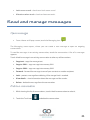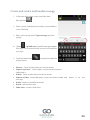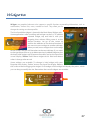
1
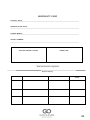
ANDROID 4.4 OWNER’S MANUAL ONLY FOR BROADCOM CPU SMARTPHONES User manual Version 1.0 for Android 4.4.2 1 About this user manual This user manual is specially designed to help our users enhance their product experience Please read this manual thoroughly to ensure safe and proper use of Goclever devices Images and screenshots may differ in appearance from the actual product Goclever reserves the right to revise this user manual or withdraw it at any time without prior notice. The Android Applications which are provided with your device have been developed by Android’s users or third party companies, not by Goclever. They are provided at no additional charge, unless otherwise indicated Goclever takes no responsibility for the performance of third party applications. Use the provided device only with original Goclever accessories. Goclever takes no responsibility for any damages caused by using third party accessories (chargers, cables, batteries etc.). Use the provided Goclever accessories only with the original Goclever device. Goclever takes no responsibility for any damages caused the misuse of Goclever accessories (chargers, cables, batteries etc.). 2 Contents Home screens..…………..…………....4 Main menu….………….………………..5 Basics…………………….……………...6 Lock and unlock the screen………..9 The notification menu..…………...10 Quick settings……………………….11 Enter text…………………………….12 Status icons…………………………15 Make a phone call…...………………17 Answer or divert calls.……………18 The call log...…………………………..19 Options during a call……………….20 Call settings………………..………..20 Read and manage messages…....21 Send or respond to a message...22 Change Messaging settings…….25 Widgets…...……………………………27 Contacts……………………...……….28 Speed dial…………..…………...……..30 Bluetooth..…….……….….…………..…...36 Mail………………………………...................37 Dialing……………………….……….....…….38 Messages…...……………..….……….……40 Access point names (APN)……….…...41 Internet browser……….……...……….…41 Camera……………………..………..............42 Photo gallery………………….………...….46 Calendar………………………….……..…....46 Clock……………………………….…………..47 Calculator…………….………….…………..48 Music...…………………………….……..……48 Radio FM.……………………………...……...49 Settings………………………………..……..50 Optimizing battery performance……..55 Safety Guide……………………..………….55 Frequently asked questions……………56 Safety warnings and Notices………….57 Warranty Card………………………………61 Emergency calls…………………..….31 Using a Memory Card as a USB Disc……………………………………….31 WiFi………………………………….……33 Data Connection…………….……....34 Con GPS basics…………………………….35 3 Home Screens Home screens –Your home screen is the starting point for accessing all of phone’s features. The home screen has multiple panels to view them swipe right or left. Status bar – Many useful information and notifications will be displayed here e.g. calendar reminders, Gmail notifications, download status. Applications and widgets–New applications installed on the device will automatically add shortcuts on the home screen. You can move them or remove them by long pressing and dragging. Shortcuts, main menu button – You can add or remove applications from the shortcut bar. These icons will be visible on all home screens. The middle button is the main menu button. Change your wallpaper – tap the settings button , select wallpapers. Then select one of the following: Gallery, Live wallpapers or Wallpapers. Select and image and tap set wallpaper. Tip – while setting the wallpaper, you can resize the desired wallpaper by tapping and dragging the frame. 4 Main menu Main menu screen –Your main menu screen contains all the apps you have installed on the device. You can also browse through available widgets. To browse between multiple panels, swipe left or right with your fingertip. Touch , to return to a previous screen or touch the home button screen at any time. to return to the home Applications and widgets tab – You can select apps or widgets and browse through the ones available. Applications screen – Here you can see all the available applications. You can access any application by taping its icon. You can make a shortcut on your home screen by long pressing the specific icon and dragging. App shop – In the top right, you have application shop icon. Tap to download additional applications and widgets. 5 Basics Caution –only use your fingertips while using the device. Tap - to open an application, press an on screen button, to enter a character using the on screen keyboard or to select a menu item gently tap it with your fingertip. Tap and hold – tap and hold for a short while to access extra options available for a given item. Swipe – quickly swipe your finger vertically or horizontally to quickly scroll through documents and web pages. 6 Long press and drag – to move your application icons, long press the application icon and drag. Zoom in – spread your finger on map screen, web page or an image to zoom in. Zoom out – pinch fingers together on a map screen, web page or an image to zoom out. 7 Motion gesture – You can rotate your phone in order to have a better view. For many screens you can automatically change your screen orientation by tilting the device sideways. While writing you can tilt the device in order to use a bigger keyboard. Tip – in order to stop automatic screen rotation, you can turn it off in the notification panel. 8 Lock and unlock the screen Automatic lock screen – When your phone is not in use, lock your phone to prevent unwanted operation and save battery life. To lock the screen, press the power button. To unlock the screen, press the power button and slide the lock icon to the side. When your phone is locked, nothing happens if you touch the screen. While your screen is locked you may still: Receive: calls, text messages, emails and other notifications. Play music and listen to the radio. Adjust the volume of the device Tip – You can use the earphone to conveniently answer a call or listen to music. Screen lock pattern – To protect any unwanted use of your device set a: screen lock pattern, PIN or password. You will be asked to unlock your phone every time it’s powered on or it has been idle for some time. To change the screen lock: Screen lock types: Finger swipe – swipe finger to unlock device. Pattern – Draw a pattern with your finger connecting four dots or more. Draw the pattern again to verify it. PIN - Enter at least four numbers, and then enter them again to verify. Password – Enter at least four characters, and then enter them again to verify. 9 Recently used apps Press and hold to easily access recently used apps, slide your finger up and down to review the complete list. The notification menu Notifications – To make sure you don’t miss any information many applications provide alerts and notifications. An alert may appear briefly at the top left of your screen and fade away if you don’t respond to them, or in the middle of the screen as a clearly visible icons remaining there until the user reacts. Dismiss specific notifications in the drop down notifications menu – slide your finger down to drop down the notifications menu and slide to the right on the notification you wish to dismiss. Dismiss all notifications. – in order to quickly dismiss all notification, press this button . 10 Quick settings Quick settings – quick settings allow you to conveniently and swiftly change major device functions like: WIFI, GPS, Data connection and others. Accessing quick settings – to access quick settings slide down the notification panel with your fingertip and press the quick menu icon. Quick settings – By simply tapping a desired icon you can check and change the status of any of the following: 1. Brightness - Adjust the brightness level of your screen. 2. Settings – Go to settings menu. 3. WIFI - Activates or deactivates the Wi-Fi feature. 4. Data usage- shows information about data usage by applications. 5. Data connection - Activates or deactivates data connection. Please remember that depending on your operator and the type of agreement you signed, this feature may not be free of charge. 6. Autorotation – Turns on or off your devices auto rotation. 7. Battery- shows actual battery level. After touch shows information screen about battery usage by applications and functions. 8. Airplane mode - turns on or off your devices wireless radios. 9. Bluetooth –Activates or deactivates the Bluetooth feature. 10. GPS – Activates or deactivates the GPS feature. 11 11. Audio profiles – switch between : general, outdoor, silent and meeting audio profiles 12. Alarm- set alarm time. Returning to the notification panel from quick settings – you can easily return to the notification panel from the quick settings menu by pressing this icon. Enter text How to enter text – use the onscreen keyboard to enter any text, such as phone numbers, text messages or web addresses. Depending on the application and language you are using, the keyboard may correct misspellings or predict what you’re typing. Tip – tilting the device sideways while typing using the onscreen keyboard will automatically stretch it sideways providing bigger keys and allowing easier typing. 12 Typing – as you type, each letter appears above your finger. The letter isn’t entered until you choose the desired word or press space. Uppercase letters – Tap the shift key toggle on and off uppercase letters. Numbers and punctuation– Tap Commonly used characters shortcut – Tap and hold the dot icon and to quickly input of the following characters, as shown on the picture to the right. for one uppercase letter. Tap and press to type numbers and punctuation. Smileys shortcut – Hold enter and swift to the smiley icon and to quickly input a smiley. 13 Entering text by voice– you can enter text by. Touch on the keyboard, and then speak into the microphone. The device displays what you say. If the device does not recognize of words correctly, tap the highlighted text and select a different word or phrase. More languages – To change the language or add a language for speech recognition, touch the currently selected language, as in the image on the right. Copy and paste text – Tap and hold on the text you have typed to bring up the copy and paste menu. Select the whole text– Tap Cut text– Tap Copy text - tap to copy the marked part of the text. Paste text –Tap to copy the marked part of the text. to select the whole text. to cut the marked part of the text. Tip - when using the voice input must be connected to the Internet. 14 Status icons Status icons – the icons appear at the top of the screen and display important information about the device. Call in progress Missed call New SMS or MMS WIFI connected GPRS network connected EDGE network connected HSPA + network connected Roaming, outside of the normal service area. Bluetooth is activated Flight mode activated Silent mode activated Vibration mode activated 15 Connected to a PC Alarm set Battery power level Headset detected Microphone headset detected 16 Make a phone call You can make calls from the Phone app, the People app, or other widgets that display contact information. Wherever you see a phone number, you can usually touch it to dial. To open the Phone app, touch the Phone icon on a Home or All Apps screen. There are three sections in the Phone app: Call log. The call log displays incoming, outgoing, and missed calls. Dialer. Let’s you dial manually. To make a call; type the number, then touch the Phone icon below the keypad. If you type a wrong number, touch the Backspace icon to erase digits one by one. To end a call in progress, touch the End Call icon at the bottom of the screen. Menu. Touch the Menu icon to access your contacts or Call Settings. Tip – you can search your contacts using the Search bar at the top of the screen 17 Answer or divert calls When you receive a phone call, the Incoming Call screen opens and displays the phone number. If the caller is an existing contact in your Peoples app, additional information may be displayed. When a call arrives, touch the white phone icon and slide over to one of the following icons: Answer call Start talking to the caller. Send to voicemail Direct the caller to leave a voicemail message. Send a message Opens a list of quick text responses. Touch one to send it to the caller immediately Silence an incoming phone call To silence the ringing sound, before answering the call, press the Volume down button on the side of your phone. Call log All incoming calls are recorded in the Phone app’s receive a notification. . call log tab. If you miss a call, you will 18 The call log The call log is a list of all the calls you’ve placed, received, or missed. It provides a convenient way to redial a number, return a call, or add a number to your Contacts. Within the Phone app, the call log is in the lower left corner of the screen. Tap a number for more information about the call, or touch the Phone icon beside it, to call the number back. Arrow icons beside a call indicate the type of call: Missed incoming, Received incoming, Outgoing. Missed incoming call Received incoming call Outgoing call While viewing details of a call: Touch the number to call it. Touch to send a text message. Touch to view contact details. Touch to make a video call. Tip – to clear the call log from your device, touch Menu>Clear call log. 19 Options during a call During a call, you can touch the following icons near the bottom of the screen. Shows the keypad. Turns the speakerphone on or off. If a Bluetooth headset is connected, this functions as a three-way switch among the built-in earpiece, the speakerphone, and the headset. The icon changes to indicate the current output. Touch & hold to see a three-way menu. Mute your microphone. Suspends call. Add caller. Call settings To change Call settings, open Settings Sound Volume – set volume level (applications, calls or multimedia) Ringtone: Sound SIM1/SIM2 Ringtone select preferred ringtone Other call settings: Vibrate and ringtones – check for device vibrations during incoming calls. Default notification sound – change the default notification sound Dial pad touch tones - check for dial pad touch tones. Select number tones – check for select number tones. 20 Lock screen sound - check to on lock screen sound Vibrations when touch– check to vibrate on touch. Read and manage messages Open messages From a Home or All apps screen, touch the Messaging icon The Messaging screen opens, where you can create a new message or open an ongoing conversation. To read the messages in an existing conversation, touch the conversation. A list of its messages appears. Touch & hold a message in an existing conversation to take any of these actions. Copy text - copy the message text. Copy to SIM1 – copy message into memory SIM1 Copy to SIM2 – copy message into memory SIM2 Forward - forward the message to one of your contacts or another recipient. Lock - protects message from deleting, if the storage limit is reached. View details - view information about the message and the sender. Delete - delete the message from the conversation. Delete a conversation 1. While viewing the list of conversations, touch & hold a conversation to select it. 2. Touch the Trash icon to delete the conversation. 21 To delete all conversations, go to the main Messaging screen and touch: Menu Delete all threads Search for Messages 1. Touch the Search icon . The Search Messaging field appears at the top of the screen. 2. Use the onscreen keyboard to type your search terms. Send or respond to a message You can send text (SMS) messages of up to 160 characters to another mobile phone. If you keep typing after the limit, your message will be delivered as a series of messages (if your network provider supports this feature). Tip – Multimedia (MMS) messages can contain text and a picture, a recorded voice, an audio file, or a video. Send a text message 1. In the main Messaging screen, touch the New Message icon . 2. Enter a name or a mobile phone number in the “To” field or click in Contacts icon . As you type, matching contacts appear. You can touch a suggested recipient or continue entering the desired phone number. 3. When you’re ready, touch Type message and start typing. 22 To enter a smiley icon (emoticon) while you’re typing, do one of the following: Touch and hold “enter” key on the keyboard. Touch the Smiley icon next to the typing space. Choose the emoticon from list. You can choose from many available emoticons, which are divided into thematic groups. To switch between groups, select a picture group: Drafts - When you type a message and press as a draft, and you can return to it later. the message you have been typing will be stored 4. Touch the SIM card button which you want to send a message. 23 Create and send a multimedia message 1. In the main Messaging screen, touch the New Message icon . 2. Enter a name, mobile phone number, or email address in the “To” field. 3. When you’re ready, touch Type message and start typing. 4. Touch Add topic, to add a message subject. (Message will be automatically convert to multimedia message). 5. Touch the attach Icon of your choice. , to attach the media file Pictures - Touch a picture that you want to attach. Capture a picture - Camera opens so you can take a picture and attach it. Videos - Touch a video that you want to attach. Capture a video - Camcorder opens so you can record a video and message. Audio- Choose a sound file to attach. Vcard – add vcard to send. Slide show – create a slide show. attach it to the 24 Tip – use the buttons in the Compose Message screen to preview or remove the media attachment. Touch the SIM card button which you want to send a message. Respond to messages you received - Messages you receive are displayed in the messaging screen. Otherwise, you receive a new message notification and a new message icon appears on your screen. Touch the new message notification to open the Messaging screen and reply to the message. If Auto-retrieve is unchecked in your Messaging MMS settings, you must touch Download to view the message. If the message contains a media file, touch Play to view, watch or listen. Change Messaging settings SMS on- touch to change default SMS application. Memory settings Delete old messages –Check to delete older messages in a conversation when limits are reached. Uncheck to keep all messages. Text message limit – Touch to set the number of text messages to save per conversation. When the limit is reached, older text messages are deleted if Delete old messages is checked. Multimedia message limit – Touch to set the number of multimedia messages to save per conversation. When the limit is reached, older multimedia messages are deleted if Delete old messages is checked. 25 Text message (SMS) settings Delivery report – check to receive a delivery report for each text message you send. For a specific SIM card. Template Messages- select to edit the message templates. Multimedia message (MMS) settings Delivery report – check to receive a delivery report for each text message you send. For a specific SIM card. Auto- retrieve- receive messages automatically. Roaming auto-retrieve – automatically retrieve messages while roaming. SIM1 Notification settings Notifications – check, to receive notifications from SIM1. Ringtone- select message ringtone for SIM1. Vibrations - check, to turn the vibration notification of a new message. SIM2 Notification settings Notifications – check, to receive notifications from SIM1. Ringtone- select message ringtone for SIM1. Vibrations - check, to turn the vibration notification of a new message. 26 Widgets Widgets are graphical elements that support a specific function or providing information, such as notifications, contact lists, news, weather or local. They allow you to change the settings or choose profiles. The list of available widgets is located in the Main Menu Widgets tab. Some applications after installing add widgets to the list. To add the selected widget, tap and hold it with your fingertip, then without lifting move it to the desired location. Let go of the screen to confirm the addition to the desired location. If you want to move widget to another desktop, when you add, move widget closer to the edge of the screen, and you will be taken to the next desktop. If you want to change the position or try to delete previously added widget on the desktop, hold widget until it become movable, and on the top of the screen display “Delete” field. Move widget to this field and release when it change color on red. Some widgets are resizable. To change it, hold widget with your fingertip until display „Delete” text on the top of the display. Release the screen without dragging the widget. On the edges of the widget will display the points, which you can drag to modify the size. Remember that not all widgets are resizable. 27 Contacts Contacts - Contacts are stored in one of two available phonebooks: Google Account Phonebook (located on your phone, which synchronizes with your Google Account) or device phonebook (located on your phone). When you add a new contact will be saved only in the selected book. View contacts – on the home screen, or in the main menu tap Search for contacts – tap the search icon and enter the firs letters of the contact name in the search bard (the device shows search results immediately). Select the desired contact. Call a contact - find the desired call in the phonebook and tap the number area for call. Favorites – you can add contacts stored on your phonebook to favorites. Find the desired contact and tap to your favorites. Tap , to add the contact to view favorites. Add a new contact 1. 2. 3. 4. 5. 6. On the home screen tap Enter a number Touch Add a new contact Tap create new contact Select the desired storage and add the desired details Tap done to finish saving. Tip – For contacts on the device phonebook, you can add detailed information, add a profile picture etc. Contact groups – you group your contacts into specific groups. For different groups you can use different identifications and send messages to groups. 28 Add contacts to a group: Add contacts to a group –in the phonebook tap add a contact to a group. Enter your group’s name tap , o view contact groups, tap , to add contacts. Import export contacts - View contact list by tapping the phone book button Tap , to . Import/export, select the contacts storage, choose the desired contacts and tap OK. Delete contacts - With “All” icons checked, and the delete button clicked, all the contact people data, including cell phone and SIM card of contact will be erased. One or more contacts can be checked separately, then click the delete, delete all selected contacts. 29 Speed dial Speed dial – Use speed dial to dial a phone number with a single tap. For example if you assign a contact number to the 5 key, you can tap and hold the 5 key to dial the contact. Tip – the number 1 key is usually reserved for your voicemail. Press and hold this key to call voicemail and retrieve your voicemail messages. Assign a contact to speed dial 1. On the home screen tap the dial pad. , to display 2. Tap , and press speed dial and then choose a numeric key. 3. Tap the desired contacts from your phone book. 30 Emergency calls Emergency calls – In some regions, you can make emergency calls even if you don’t have a SIM card installed. If you are not in the vicinity of a base station you will not be able to make an emergency call. Tip – in most European countries the emergency number is 112. Using a Memory Card as a USB Disc If you want to send music, pictures or other files to your phone you can do it via a USB cable. Set your phone as a USB Mass Storage 1. Connect the phone to the computer with a USB cable. A notification screen will appear in the notification panel. 2. In the notification panel, tap 3. Tap Turn on USB storage 31 Cell phone connections media equipment (MTP) – lets you transfer media files on Windows or using Android File Transfer on Mac. 1. In the Settings menu, switch off the developer USB debugging options. 2. Use a USB cable to establish a connection to the computer 3. In the notification panel, choose the "Media equipment (MTP)" connection mode. It can be used with a PC to act as an USB storage device. The phone connection camera (PTP) – let’s you transfer photos using camera software and transfer any files on computers that don’t support MTP. 1. Use the USB cable to establish a connection with the computer. You don't have to turn off USB debugging. Images can be viewed only from the Camera menu option. 2. After the connection has been established, captured images can be viewed directly on the PC. Installer CD- Lets you install file-transfer tools 32 WiFi Wi-Fi provides a wireless network access within a range of up to 100 m. If you use a cell phone to connect to a Wi-Fi network, you should connect to a wireless access point or a so called “hot spot”. Tip – the availability of the WIFI signal and it’s range depends on it’s intrinsic intensity, local infrastructure and other objects in the vicinity of the signal. Opening the Wi-Fi menu and connecting to a wireless network Press Turn on WiFi. Select Wi-Fi to open the Wi-Fi menu. The phone will automatically search for available wireless networks. Press the Wi-Fi settings option. A list of Wi-Fi networks will display, showing names and security settings of a specific network. (an open network, WEP or WPA/WPA2 with password). When the phone is connected to the wireless network, the status box will show this WIFI icon and the approximate signal strength (the number of lit bars). If you enable the notification option in the Wi-Fi settings, The status box will display this icon when an open available wireless network has been found. , Touching the name of the network the device was connect to, will display the name of Wi-Fi network, status, speed, signal-strength, security information and IP address. Connecting to other Wi-Fi networks 1. From the wireless connections screen, touch Wi-Fi settings. The available Wi-Fi networks will be displayed in the Wi-Fi network list. 2. Touch to select other Wi-Fi networks, it enables you to connect to the selected network. 33 Data Connection To access the internet without a Wi-Fi connection. You can activate data connection. The service costs depend on the contract you signed with your operator. To activate data connection open the quick settings menu and touch data connection. Symbols that appear next to the data connection icon are as follows: H+ - HSPA+ 3G = 3G E = EDGE (Enhanced Data rates for GSM Evolution) G = GPRS (General Packet Radio Service) The above symbolize data transfer speeds. They have been listed from the fastest to the slowest. The speed of the data transfer depends on a couple of factors. Including your operator. 34 GPS basics GPS receiver basics Like a cell phone, a GPS receiver relies on radio waves. But instead of using towers on the ground it communicate with satellites that orbit the Earth. There are currently 27 GPS satellites in orbit – 24 are in active use and 3 act as a backup in case another satellites fails. In order to determine your location, a GPS receiver has to determine: The locations of at least three satellites above you. Where you are in relation to those satellites. The receiver then uses trilateration to determine your exact location. Basically, it draws a sphere around each of three satellites it can locate. These three spheres intersect in two points – one is in space, and one is on the ground. The point on the ground at which the three spheres intersect is your location. Warning: A GPS receiver has to have a clear line of sight to the satellite to operate, so dense tree cover and buildings can keep it from getting a fix on your location. Use the GPS based services outdoors for best results. GPS positioning can take up to 5 minutes. Turn on GPS touching the GPS icon so that it lights up white, like on the picture. 35 Bluetooth Turn on Bluetooth or set the phone as available for detection 1. Press 2. Turn on Bluetooth. After start, status box will show this icon devices” to start scanning for all devices within range. . Touch “Scan for 3. To change name or visibility time touch Menu Important: maximum detection time is 2 minutes. Pairing and connecting a Bluetooth device 1. Press 2. Turn on Bluetooth by pressing on, touch Bluetooth and then your phone will scan for Bluetooth devices within range, and show all found devices in the list under the icon. Tip – if the list does not show your equipment, re-scan for devices and make sure that the desired devices are available for detection 3. Tap the device name you wish to pair to establish a connection. 4. Check connection numbers and accept. Notice: Generally, Bluetooth devices need a password to be paired, they often use “0000” as the default password. Closing an established Bluetooth connection 1. Press 2. In the list of Bluetooth equipment, touch near the paring. connected device and touch Cancel 36 Mail Create an email account Select Settings You can activate or edit existing e-mail accounts as well as set up a new e-mail account. 1. Select Gmail. Tap in one of the main panels. Google account creation interface is displayed Then touch Next step Create account Enter name, last name and then the desired email account. Google servers determine whether the name can be used, if so, a new window is displayed prompting to enter a password, then it measures the passwords security, if it doesn’t meet security requirements you have to re-enter the password. A new Gmail account should have been successfully registered, containing an automatically created test message. Tip – if you already have a gmail account you can add your existing gmail profile to the device. Creating and sending emails In order to create mail messages, select Mail (or Gmail) > Create email. Enter the address (recipient), subject and message body. Press MENU to ‘Attach files’, ‘Add Cc/Bcc’, send or discard the message. Tip – many features depend on having a Gmail account, for example the Google play store. 37 Dialing When the icon depicting signal strength is visible, it is possible to make and receive calls. The signal bar in the top right corner shows the strength of the network signal (the maximum is 4 signal bars). Select SIM card to make a call To select the SIM card to make a call, you must slide down the notification bar, and then select the desired tab. To assign a SIM card to making a call or sending SMS you should go to: Next select preferred cards. Start dialing To start dialing select: or on Home screen touch Dialing. 38 Dialing Use the keyboard to enter the desired phone number and then click the dial key, after that you should choose one of the SIM cards or an internet call. Telephone calls in the call log All calls in call log can be selected by touching of screen. Touch call on the list to show details. on the right side Proximity sensor The proximity sensor will automatically adjust switching the backlight, depending to the distance between phone and human body. During the call, placing the phone close to the ear will cause the backlight to turn off automatically, which saves battery and prevents inadvertent touching. Two-way call/multiparty call (conference call) This function needs a SIM card supporting the multiparty call feature. 1. A call is already active . 2. Click “Add callers”, make another call, after both parties are connected one can view the status of the call. 3. Select “combine call”– you can combine two calls into one. 4. After multiparty call has been made and connection established, you can separate the calls or hang up one of them using “the small arrow of conference call”. Video call When you use the video call feather, ensure to have a 3G SIM card installed. From the dialing screen, enter numbers , then press the symbol thus the video call is being made. The second way to use video calls: open the menu Applications Contacts, press one contact from the listed contacts, then press and hold the phone number and select ”Video call”. 39 Messages Send SMS to certain phone number 1. Press 2. Touch "New message". 3. On the "New message" screen: a) Touch "To” field ,add recipient. b) Enter the text in the "Enter your message" c) To send the message, click: Send MMS to certain phone number When creating message, it is created as an SMS by default, it will be turned to MMS when following operations are done. You can send a MMS by clicking “Send” after editing. 1. When you create SMS touch 2. Choice attach,, then the message will be turned to a MMS automatically. 3. You can replace or remove added attachments. After finishing edition, select SIM card to send message. Tip: If you want send MMS with many pages, you should select Slide show in the attach list. interface. Send messages to multiple numbers Touch , to add contacts form phonebook. Select proper contacts and tap Ready. 40 Access point names (APN) Add a new access point - Access Point Names (APNs) connect your phone to data networks for services such as mobile web browsing. Tip – before you add another data connection, have the access point name and settings from your mobile operator ready (including username and password if necessary). To set the APN: Then select the SIM card for which you want to set the APN. Enter the APNs settings or activate APN from the list. Internet browser To start the Web browser, select: 1. On the Internet Browser screen, tap the www address field and enter an URL address. 2. Use the keypad to enter the URL. The suggested web sites will appear on the screen. You can touch it directly to go to the page or continue to enter URL. URL – here you can type in a specific website address by tapping or check the active websites address. 41 Web page body – here you will find the actual website content, you can click on active areas of the website to visit links, download content, play music, games and many others. Tip – remember to check if you have an active wifi connection or if data connection is turned on, before accessing the web. Website images - Tab an hold on an image on a website to: save it, view it, set it as your wallpaper or share the link with your friends . Links - Tab an hold on an link on a website to: open it, open it in a new tab, save the link, copy the links URL address, save the link as a bookmark or to select a the text. Internet browser options – press the settings button web browser options. a to access the Home page - load home page. Refresh - refreshing actually opened site . Forward - moves you to next site. Save to bookmarks – adds the active website to your bookmarks, you can edit the labeling options. Share page - share the web page via: Bluetooth, sms, email or others. Find on a page – allows you to search the web page contents for specific words and characters. Request desktop site – toggle on to try to access the pc version of websites. Save for offline reading – saves the content so that you can review it offline. Settings - access web browser specific settings. Exit – closing web browser. 42 Tip – you can change your homepage by accessing the web browser settings, tapping General>Set homepage. Tip – you can clear your browsing history by accessing the web browser settings, tapping Privacy & Security>Clear history>OK Camera Open the camera app – in the Main Menu, select Camera. Take pictures 1. Aim your screen at the object. 2. Tap the “shutter” button on the screen. (blue circle). Photos will be saved in the camera’s gallery folder named using the time when they were taken. You can view the photos by slide screen to the left. In lower right corner you can change options like: toggle camera flash on\off white balance camera set exposition set 43 To change the functions of the camera to video recorder, select it by pressing the lower left corner of the screen During a recording –the recording timer will be displayed here. Tip – in both picture and video modes, you can zoom in, by double tapping the screen or performing the zoom in gesture. General options: Exposure – set the desired exposure levels. Scene mode – set camera mode – ex.: normal, night, sunset, party, portrait, landscape. White balance – choose the pictures white balance: Auto, Incandescent, Daylight, Fluorescent, Cloudy, Twilight, Shade. Flash- change flash set. Camera change- change front/ back camera. Photo option: GPS location info – toggle on or off. Picture size – adjust the desired picture size. Picture quality – select the desired picture quality. Self-timer – set the self-timer. Burst shot – take multiple shots at once. AntiBanding – toggle the anti-flicker option on or off. Restore defaults. 44 Video options Time Lapse- enable to set time interval. Video quality – select the desired video quality. GPS location info – toggle on or off. Restore defaults. Landscape mode To make landscape photo, select proper mode in camera application and Set the device horizontally and start capturing picture. The device will automatically process the image and save it in the gallery. 45 Photo gallery Photo gallery – In the photo gallery, you can browse your available images in various folders. View images - From the picture screen, tap a photo album to view images. Tap the thumbnail to view the picture in full screen mode. You can choose to display small or large thumbnails. Hold down the screen towards the left side to view the next photo or towards right to view the previous one. You can select one or more photos or albums to remove or send. To do this, hold down the selected album, when you select it, you can add another by touching. If you want to deselect photos or albums you can do individually or all at once by pressing Calendar To start calendar select: You can synchronize your calendar with Google Account and set which sheared calendars are visible. You can choose type of view the main window of the calendar: day, week or month. 46 New activities 1. Press New activities. 2. Enter the name of activity in the activity box. Notice: Special occasions such as birthdays set the all-day option to Yes. If the activity takes place at a certain time period, select the start time and end time. 3. Enter the event location, description, guests, repeat, reminder time. 4. Click Finish to return to calendar. You can edit calendar entries, change the color displayed in the overview or edit the event. Synchronization You can synchronize your calendars from different accounts. To add a new calendar select: 1. next touch settings. 2. Add an account with calendar to synchronization. 3. Go to visible calendars. 4. Select calendars to synchronization. Clock To start clock application:: Alarm You can set an alarm with repeat options, activate or deactivate alarms. When the alarm time is reached, device will generate sound or vibrations. 47 Clock You can set time for different time zones. Timer You can set the time for the timer countdown. Stopwatch Stopwatch witch time counting between laps. Calculator This function can turn your phone into a calculator which enables simple calculations to be performed. Touch the number keys to make the numbers appear in the blank box. From the interface of the calculator, press the MENU button or hold down the screen to the left, then the main panel appears. Music The device can play digital audio files stored in the memory card. Music Media Your music files are classified according to the following four categories:Artists, albums, songs and play lists. Tap any one of these categories; you can view the list inside the selected category. Select any artist to open a list of all the albums and tracks. Choose a song to start playing. 48 Interface Buttons Menu: Party shuffle- shuffle songs Shuffle all- shuffle all songs Radio FM You may listen to FM radio using your phone. FM radio requires a wired headset to act as an antenna. After you have successfully plugged in your earphones and the radio application is running, you can manually switch to speakers. Touch Automatic scan, to perform automatic scanning of FM channels Turn of Radio FM Touch FM Recording - the current program on the radio will be recorded. Tap Speaker, to mute FM radio. Favorite list. Stereo / Mono 49 Menu o o o o : Add to favorite - touch to add actual frequency to favorite list. Scan- touch to scan. Set frequency. Speaker- select to play through the speaker (headset must be constantly connected, because it serves as an antenna). Listening to FM radio in the background - tap the return to key or the home key while radio music is playing. It allows you to continue listen to your radio program moving the application to the background. Settings Some default device settings may be provided, so you may not be able to change Wi-Fi Tap , to enable. The display changes to . While Wi-Fi is enabled the devices searches for available networks automatically,networks without password protection can be accessed directly, others need to have the password entered first. Tip – When you turn flight mode on it disables WIFI automatically Bluetooth Tap , to enable Bluetooth. The display changes to Bluetooth, to search visible devices and connect to it. . Turn on Allows you to display information about the inserted SIM cards, and change the settings of default SIM card. You can also turn on data roaming for the selected card. 50 Data usage In the Data usage panel you can set up a mobile data traffic limit, if the limit is exceeded, the mobile data services will be disabled automatically. More Here you can toggle the Airplane mode, set up Tethering & portable hotspot, set APNs, turn on intelligent Dual SIM or data connection. Airplane mode – check to completely disable the device's network. The default SMS application - select the default application. Tethering and portable hotspot- allows to change options of portable hotspot. Mobile networks- allows to change options of mobile network . o Network mode - allows to change the network mode (2G/3G). o Access Points- allows to change the access points for selected SIM card. o Network operators- allows to choose network operator. Always Dual SIM – receive calls from both SIM cards, even during calls. Here you can change the phones existing audio profiles, or add new audio profiles. You can change: Volumes, voice call ringtones for selected SIM, vibrations, change Default notification sounds and change other sound options. Display Brightness – adjust the brightness levels, lower brightness levels prolong battery life. Wallpaper - choose a new wallpaper. Buttons backlight- to switch on or turn off the backlight buttons . Sleep - set the automatic lock screen timer. Quick sleep times prolong battery life. Screensaver- allow to set screensaver mode. Font size - set the preferred font size. Wireless display- select wireless display to connect. 51 Storage Allows you to choose the preferred location to install new applications. Allows you to view the memory usage of your phone and memory card. Allows you to unmount or erase the memory card. Allows you to select the default memory. Battery Here you can check the battery charge and usage history. It also allows you to check what consume battery power and how long the device is running on battery. Applications Here you can check which applications have been downloaded and which one’s are running and where have they been installed (on your device or an SD card). When location service is on you can change the location mode: o High accuracy – location determined by GPS, WiFi and mobile network. o Battery save- Lokalizacja określana przez WiFi i sieci komórkowe o Only device- location determined only by GPS. You can see latest location requests or location services. Security Screen lock – set up a screen lock. On widgets- check to on widgets. Owner information- message displayed on a lock screen. Encrypt phone - you can encrypt your accounts, settings downloaded apps and their data, media or another files. Set SIM1 Lock – set the SIM1 card lock. Set SIM2 Lock – set the SIM2 card lock. Make passwords visible - toggle on and off. Device administrators- view or deactivate device administrators. Unknown sources – Permit the installation of applications from unknown sources. Verify apps – Disallow or warn before installation of apps that may cause harm. 52 Memory mode(credential storage)- shows memory mode. Trusted credentials – display trusted CA certificates. Install from SD card- install certificates from SD card. Clear credentials- remove all certificates. Language & Input Language - select the preferred displayed language from a list of the ones available. Spell checker – toggle spell checker on and off. Personal dictionary - Add or delete words to/from a custom dictionary. Default (keyboard)- choose input method. Text-to-speech output – Text-to-speech output settings. Pointer speed – set pointer speed. Backup & reset Backup my data- will send a backup of application data, WLAN password and other Settings to Google's servers. Backup account – backing up to debug-only private cache. Automatic restore- when reinstalling an app, restore backed up settings and data. Factory data reset – erases all data on phone. Tip – In case of software issues try restoring the devices factory settings. Data & Time Automatic date and time - Use date and time provided by your network or by GPS. Automatic time zone- check to use network- provided time zone. Set date Set time Select time zone Use 24-hour format – check to use 24-hour format. Choose Date Format 53 Accessibility Talkback- helps blind and low-vision users by describes what their touch. Subtitles- toggle on or off. Zoom gestures - Enable or disable the screen zoom functions. Large text- check to display large text on screen. Power button ends call Auto-rotate screen - toggle on or off. Speak passwords Accessibility shortcut- when this feature is turned on, you can quickly enable accessibility features. Text-to-speech – set text-to-speech options. Touch & hold delay- set time of delay. Allows to remotely print. Scheduled power on & off Allows you to set the schedule power on specific days. Developer options These options are intended for advanced users. Here you can toggle USB debugging on or off About phone You can check various information about your device including the Android version and the Goclever software Build number. 54 Optimizing battery performance Always make sure that your phone is appropriately set to meet your actual usage. Profile settings impact the phone’s battery performance. Silent mode consumes the least amount of power. If you’re not using WIFI, GPS, Bluetooth or other apps, make sure to turn them off for maximum battery life. You can lower the displays backlight intensity levels to preserve battery life. Avoid using your phone near magnetic objects or on metal surfaces, which will impact the network connection and consequently drain power from your battery. Safety Guide When you contact a telecommunications or a sales agent, they need the IMEI number of your device (remove battery to expose the number placed on the label on the back of your device). Please copy this number and keep it in a safe place for future use. In order to avoid the misuse of your mobile phone take the following preventative measures: Set the PIN number of your mobile phone’s SIM card and change this number immediately if it becomes known to a third party. Please keep the phone out of sight when leaving it in a vehicle. It’s better to carry the phone with you, or lock it in the trunk. 55 Frequently asked questions The touch screen responds slowly or improperly Remove any protective covers from the touch screen Please make sure that your hands are clean and dry when handling a device with a touch screen Ensure that you have the latest software version installed The display shows SIM failure Double check if the Sim card has been mounted correctly, if the problem persists your SIM card may be damaged. Contact your operator The device freezes or suffers errors If your devices sufferes frequent freezes and errors, you may need to reset the device. If your device is frozen and unresponsive, press and hold the Power button for 7-10 seconds and the device will reboot. If the problem persists perform a factory data reset. Tap Settings>Back up & reset> Factory data reset> Reset device> Erase evrything Your battery overheats Double check if You are using the original Goclever charger intended to be used with the specific device in question You encounter problems while connecting the device to a comptuer Make sure that the USB cable you are using is compatible with your device Make sure that you have all the required drivers installed and updated on your computer If you are a Windows XP user, make sure that you have Windows XP Service Pack 3 or higher installed on your computer 56 Others cannot hear you speaking during a call Make sure that you are not covering the built in microphone Make sure that the microphone is close to your mouth Cannot find other bluetooth devices Make sure that the Bluetooth feature is activated on your device Make sure that the Bluetooth feature is active on the device you wish to connect to and that it’s visible to other devices Make sure that both devices are close enough to each other (10 m) Safety Warnings and Notices Before using your device read the following information carefully. General information Only the original battery and the original charger supplied by our company can be used with this device. Using other products might result in battery leakage, overheating, explosion or fire. To avoid your device malfunctioning or catching fire, please do not violently, jolt, throw or otherwise damage your device. Please do not place the battery, device or charger in a microwave oven or high-pressure equipment. Otherwise it could lead to unexpected accidents such as circuit damage. Please do not use your phone near flammable or explosive gases. Please do not subject your phone to high temperatures, high humidity or dust. Keep your phone out of the reach of small children. When using your device Handle your device with care. Phisical impact may cause the LCD screen to leak and malfunction. There is a risk of blindness if the liquid crystal substance gets into your eyes. If 57 this occurs rinse eyes immediately with clear water (under no circumstances rub your eyes) and immediately go to a hospital for treatment. Do not disassemble or modify your mobile phone in any way. You forfeit your warranty and you risk damaging your device. Please do not use needles, pen tips or other sharp objects on the keypad as this may damage the mobile phone or cause it to malfunction. In the event of antenna malfunction, do not use your phone as it could be harmful to the human body. Avoid letting the phone come into close contact with magnetic objects such as magnetic cards. The radio waves emited by the device may erase information stored on floppy disks, pay cards and credit cards. Avoid having the mobile phone come into contact with water or other liquids. If liquids enter the phone, this could cause a short circuit, battery leakage or other types of malfunction. Notices when using the battery The battery has a limited service life. The charge gets shorter with time and charging time increases. If the battery is weak even after charging, this indicates that the battery service life is over and you have to use a new battery. Do not dispose of old batteries together with domestic garbage. Please dispose of old batteries as indicated by European regulations. Please do not throw batteries into a fire, as this will cause the battery to explode. Similiary do store batteries in high temperature places or near open flame. When installing the battery, do not use unnecessary force or pressure, as this will cause the battery to leak, overheat, crack and catch fire. Please do not use wires, needles or other metal objects to short-circuit the battery. Also, do not put the battery near necklaces or other metal objects as this will cause the battery to leak, overheat, crack and catch fire. Please do not solder the contact points of the battery, as this will cause the battery to leak, overheat, crack and catch fire. 58 If the liquid from inside the batterie goes into your eyes, there is a risk of blindness. If this occurs do not rub your eyes, but immediately rinse them with clear water and go to the hospital for treatment. Please do not disassemble or modify the battery, as this will cause the battery to leak, overheat, crack and catch fire. If the battery overheats, changes color or becomes distorted during use, charging or storage, please stop using it and replace it with a new battery at once. If the liquid from the battery comes in contact with skin it may cause burns. Immediately use clear water to rinse and seek medical help if necessary. If the battery leaks or gives off a strange odor, please remove the battery from the vicinity of open flame to avoid a fire or explosion. Please do not let the battery become wet as this will cause the battery to overheat, smoke and corrode. Please do not continuously charge the battery for more than 24 hours. Notices when using your charger During charging, the phone must be placed in a well-ventilated environment of +5°C ~ -40°C. Always use the charger supplied by your phone manufacturer. Using an unauthorized charger might cause danger and invalidate the authorization and warranty clauses for your device. The standby time and call duration provided by the manufacturer are based on an ideal operating environment. In practice, the battery’s operating time varies depending on network conditions and usage methods. Make sure the battery has been installed before charging. It is best not to remove the battery while charging. Once fully charged, disconnect the charger from your phone and the power supply. Please use AC 220~230 volts. The use of any other voltage will cause battery leakage, fire and cause damage to the mobile phone and charger. It is forbidden to short circuit the charger, as this will cause electrical shock and damage the charger. Please do not use the charger if the power cord is damaged, as this will cause fire or electrical shock. 59 Please immediately clean any dust gathered on the electrical outlet. If the charger comes in contact with water or other liquid the power must immediately be switched off to avoid an electrical shortcircut, fire or other damages. Please do not disassemble or modify the charger, it may cause the charger to malfunction and catch fire. Please do not use the charger in the bathroom or other excessively moist areas, as this may cause electrical chock, fire or damage to the charger. Please do not touch the charger, power cord or power socket with wet hands, as this will cause electrical shock. Do not modify or place heavy objects on the power cord, as this will cause electrical shock or fire. When unplugging the charger, do not pull on the cord, but rather hold on to the main body of the charger. Cleaning and maintenance The device, battery and charger are not water resistant. Please do not use them in the bathroom or other excessively moist areas and likewise avoid allowing them to get wet in the rain. Use a soft, dry cloth to clean the mobile phone, battery and charger. Please do not use alcohol, thinner, benzene or other solvents to wipe the mobile phone. A dirty outlet will cause poor electrical contact, lose of power and even inability to recharge. Please clean it regularly. Service and Repair For repair use the authorized service and qualified staff. Any attempt to repair the device yourself, or by using an unauthorized service center will void the devices warranty. 60 WARRANTY CARD DATE OF SALE: ................................................................................................................................................................... MANUFACTURE DATE: ................................................................................................................................................................... DEVICE MODEL: ………………………………………………………………………………………………………….…………… SERIAL NUMBER: ………………………………………………………………………………………………………….…………… DEALER’S NAME /STAMP SIGNATURE ......................................................... Date and customer’s signature Repairs history Data Confirmed defect Made repairs Service sign and stamp 61