1
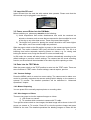
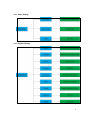
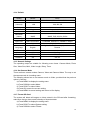
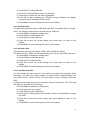
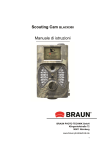
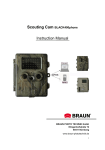
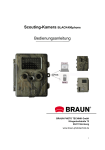
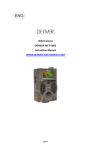
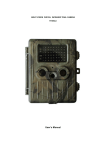
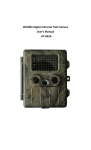
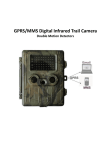
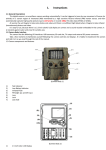
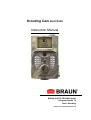
Scouting Cam BLACK300
Instruction Manual
BRAUN PHOTO TECHNIK GmbH
Klingenhofstraße 72
90411 Nürnberg
www.braun-phototechnik.de
1
Inhalt
1. Caution ............................................................................................................... 3
2. Instructions ........................................................................................................ 4
2.1 Camera Body Interface ................................................................................. 4
2.2 Camera components and features ................................................................ 4
2.3 Remote Control............................................................................................. 5
2.3.1 Navigating .............................................................................................. 5
2.3.2 Laster Pointer......................................................................................... 5
2.4 Shooting Information Display ........................................................................ 5
2.5 Supported Format ......................................................................................... 6
3. Easy Operation .................................................................................................. 6
3.1 Power Supply................................................................................................ 6
3.2 Insert the SD-card ......................................................................................... 7
3.3 Power on and Enter into the ON Mode.......................................................... 7
3.4 Enter into the TEST Mode ............................................................................. 7
3.4.1 Custom Settings..................................................................................... 7
3.4.2 Manual Capturing ................................................................................... 7
3.4.3 View Images or Videos........................................................................... 7
3.5 Power Off ...................................................................................................... 8
4. Advanced Operations ........................................................................................ 8
4.1 Settings Menu ............................................................................................... 8
4.1.1 Photo Setting ......................................................................................... 8
4.1.2 Video Setting.......................................................................................... 9
4.1.3 System Setting ....................................................................................... 9
4.1.4 Default ................................................................................................. 10
4.1.5 General Settings .................................................................................. 10
4.1.6 Set Camera Mode ................................................................................ 10
4.1.7 Format SD-Card ................................................................................... 10
4.1.8 Set Photo Size ...................................................................................... 11
4.1.9 Set Video Size ...................................................................................... 11
4.1.10 Set Date and Time ................................................................................ 11
4.1.11 Set Multi ............................................................................................... 12
4.1.12 Set ISO ................................................................................................ 12
4.1.13 Set Video Length.................................................................................. 12
4.1.14 Set Video Sound .................................................................................. 12
4.1.15 Set Delay ............................................................................................. 12
4.1.16 Set Timer ............................................................................................. 13
4.1.17 Enter Password .................................................................................... 13
4.2 Playback ..................................................................................................... 13
4.2.1 Viewing Photo or Video ........................................................................ 13
4.2.2 Delete Photo or Video .......................................................................... 14
4.3 Laser Pointer .............................................................................................. 14
4.4 File Numbering ........................................................................................... 14
2
4.5 Firmware Upgrade ...................................................................................... 14
Appendix: Technical Specifications.................................................................... 15
1. Caution
1) Do not drop, knock or shake the camera.
2) The working voltage of the camera is 6.0V. The camera is supplied by eight
AA batteries.
3) Remove batteries from camera if camera is not be used for some time.
4) Only use a power supply (not supplied) with the rated input voltage (6V, min.
500mA) specified on the rating plate, as otherwise danger of fire and
electrocution.
5) Please unlock the write-protect before inserting the SD-card.
6) Please insert the SD-card when the power switch is at OFF position before
testing the camera.
7) Please do not insert or take out the SD-card when the power switch is at ON
position.
8) It is recommended to format the SD-card by the camera when used at the first
time.
9) The camera will be in USB mode when connected to an USB port of a
computer. In this case, the SD-card functions as a removable disk.
10) Please ensure sufficient power when having firmware upgrade, otherwise the
upgrade process could be interrupted incorrectly. If any fault occurs after
improper upgrading process, the camera may stop function properly.
11) Damage to the electronics, housing and display caused by external
influences, such as heavy jerks, electric shocks, having fallen or others aren’t
covered by the warranty.
12) Don’t dismantle or repair the camera. If repair is required, ask an expert or
technical service centre.
13) Keep the camera out of reach of children.
Attention!
Legal and privacy protection
Please inform yourself carefully about the legal regulations in your
country concerning to data protection, personal identification,
copyright, duty of notification and privacy laws before using this device.
The Braun Photo Technik GmbH assumes no liability for violations
against the Federal Data Protection Act and other legal regulations!
Privacy of individuals must be preserved. Prepare your camera only at places
where this is guaranteed.
Recordings with people have to be deleted, if there is no agreement for
publishing.
The area of recording has to be displayed clearly to all public entry points.
3
2. Instructions
Thank you for purchasing BRAUN Scouting Cam BLACK300. This camera is a
surveillance camera working automatically. It can be triggered at once by any
movement of human (or animals) in a certain region of interested (ROI) monitored by
a high sensitive Passive Infrared (PIR) motion sensor, and then automatically
captures high quality pictures (up to 12MP) or records 1080p HD video clips (WVGA
or QVGA).
At sunrise the unit begins to take color photos and video until there is insufficient light
(dusk) when it begins to take infrared (monochrome) photos and video.
It is easy to use, there is a 2.0 inch colorful LCD display on camera. It is resistant
against water and snow for outside uses.
2.1 Camera Body Interface
The camera has the following I/O interfaces: USB connector, SD-card slot, TV output
and external DC power connector.
2.2 Camera components and features
1) Bottom Cover
2) SD-Card Slot: Memory card must be inserted to store photos or videos.
3) Mini USB connection (USB 2.0): For connecting the camera to a computer to
download photos and videos.
4) TV output (TV Out): The camera can be connected to the AV input of your TV
using the supplied AV cable in order to show the monitor image. (External power
supply can be connected via the DC IN socket (6V, min. 500 mA, not supplied))
5) PIR (Passive Infrared Sensor)
6) Infrared LED Flash
4
7) Lens
8) 2 inch color LCD Display
9) Sound recorder
10) Lock
11) Power switch (ON, TEST, OFF)
12) Battery Depot
2.3 Remote Control
The remote control is an input device of the camera and is primarily used for
customer settings and password input. This is an infrared type wireless remote
control. The maximum remote distance is 9 meters.
2.3.1 Navigating
Press UP or DOWN to select or highlight the menu item, while press LEFT or RIGHT
to select the option of each item and press OK to make selection.
Select Item(UP)
Display Menu
Selection
(OK)
Exit(MENU)
Select Option
(Left)
Select Option
(RIGHT)
Select Item(DOWN)
2.3.2 Laster Pointer
Press the punctuation “*” for laser pointer.
2.4 Shooting Information Display
When the camera is turned on (the power switch is slid to TEST position), the
shooting information will be displayed in the monitor.
5
3.Image Size
2.Camera Mode
4.Battery Level
1.SD Card
5.Date (M:D:Y)
6.Time (H:M:S)
7.Available Picture space
2.5 Supported Format
Item
Format
Photo
JPG
Video
AVI
File Format
FAT32
You don’t need to concern about the file system format of the camera unless you
have problems with reading the SD-card by your other equipment. If this happened,
please format the SD-card in the camera or in a computer at first and then reinsert
the card into your camera to make a try.
3. Easy Operation
3.1 Power Supply
To supply power for the camera, eight AA size batteries are needed.
Open the bottom cover. Confirm that the power switch is at the OFF (Right) position,
pull out the battery depot. Load the fully charged batteries into the depot according
the polarities sign shown below. Push back the battery compartment to the battery
chamber. The following batteries with 1.5V output can be used:
1. High-density and high-performance alkaline batteries (Recommended)
2. Rechargeable alkaline batteries
3. Rechargeable NiMH batteries
- Risk of explosion in case of incorrect changing of batteries or use of
wrong type of batteries.
- Never expose batteries to excessive heat, such as direct sunlight, fire,
etc., as otherwise danger of fire and explosion.
When in Test Mode, camera will be automatically shut down to save power if without
any operation within 3 minutes; it could be waked up by any movement detection.
When in low-battery state, camera will be also automatically shut down. Please
change the batteries in time.
6
3.2 Insert the SD-card
Insert SD-card into the card slot with marked side upwards. Please note that the
SD-card can only be plugged in one direction.
3.3 Power on and Enter into the ON Mode
Before switching on, please pay attention to the following:
1) Avoid temperature and motion disturbances that could be construed as
animals or humans such as trees that are exposed to direct sunlight for much
of the day or any other heat source. These may cause false triggers
2) The height from ground for placing the camera should be one meter higher
than object, one to two meters height are preferred.
Slide the power switch to the ON position to power on the camera and enter into the
ON mode. The motion indication LED (red) will blink for about 15s. The 15s is a
buffering time before automatic capturing photos or videos, e.g. for closing and
locking the bottom cover, fixing the camera on a tree and walk away.
In ON mode, the camera will take pictures or videos automatically according to the
default settings or previous custom settings. The camera has the sound recording
function, so the sound will be embedded in the video clip while capturing a video.
3.4 Enter into the TEST Mode
Slide the power switch to the TEST position to enter into the TEST mode. There are
some functions in TEST mode: Custom settings, manual capture, preview.
3.4.1 Custom Settings
Press the MENU switch to enter into menu setting. The camera can be taken over
control to manually customize the camera settings which display on the camera or
external TV monitor. The detailed operations will be described in “Advanced
Operations” chapter.
3.4.2 Manual Capturing
You can press OK to manually capture photos or recording video.
3.4.3 View Images or Videos
There are two ways to view the captured images or videos:
1) LCD screen on camera
2) TV monitors which connects to camera with TV cable
Turn right the select switch to view images, the latest image will be shown in the LCD
screen on camera or TV monitor. Press UP to view the previous image and press
DOWN for the next. The detailed operations like deleting images or videos will be
7
described in “Advanced Operations” chapter.
3.5 Power Off
Slide the power switch to OFF position to power off the camera. Please note that
even in the OFF mode, the camera still consumes certain power at µA level.
4. Advanced Operations
From the basic operations of the camera in previous chapter, we know that the
camera has three basic operation modes (Power switch):
1) OFF mode: Power switch is at OFF position (Right).
2) ON mode: Power switch is at ON position (Left).
3) TEST mode: Power switch is at TEST position (Middle).
In the above three modes, the OFF mode is the specified safe mode when replacing
the SD-card or batteries and transporting the camera.
The settings can only be customized in TEST mode and the remote control is
needed.
4.1 Settings Menu
To view the camera settings menu, press MENU in the TEST mode (called settings
menu in this chapter).The settings menu will be shown on the LCD on camera or the
external TV monitor.
4.1.1 Photo Setting
8
4.1.2 Video Setting
4.1.3 System Setting
9
4.1.4 Default
Setting
Default
Items
Mode
Camera
Camera, Video, Camera&Video
Resolution
(Camera)
12M
12M, 8M, 5M
Delay
1 Seconds
1-30 Seconds, 1-30 Minute
Multi
Single
Single, 3, 6, 9 Pictures
ISO
400
100, 200, 400
Resolution
(Video)
1080P
1080P, 720P, WVGA, QVGA
Video Length
10s
10s, 30s, 60s, 90s
Date/Time
Same as last time
YY/MM/DD, MM/DD/YY, DD/MM/YY Adjust
Distance
High
High, Normal, Low
Language
English
English, French, Germany, Spanish and
Russian
Timer
0 0 0 to 23 59 59
Adjust
Format
Internal Memory
Internal Memory, SD Card
TV Mode
NTSC
NTSC, PAL
Password
Off
Off, On
4.1.5 General Settings
The operating steps are suitable for following menu items: Camera Mode, Photo
Size, Video Size, Multi, Video Length, Delay, Timer.
4.1.6 Set Camera Mode
There are three camera modes: Camera, Video and Camera+Video. The way to set
the camera mode is via setting menu.
The following shows how to set camera mode to Video, provided that the previous
option is Camera:
a) Press MENU to display the setting menu.
b) Press DOWN to select Mode.
c) Press RIGHT to select Video.
d) Press OK to save the current setting.
e) Press MENU to cancel setting and return to info display.
4.1.7 Format SD-Card
The system will delete all images or videos stored in the SD-card after formatting,
make sure that you have made a backup of important data.
a) Press MENU to display the setting menu.
b) Press RIGHT to select System setting.
c) Press DOWN to select Format.
10
d)
e)
f)
g)
Press RIGHT to select SD Card.
Press OK to choose Enter to enter into submenu.
Press down to select OK. OK will be highlighted.
Press OK to start formatting the SD-card. During formatting, the display
screen will show a message “Please Wait”.
h) Press MENU to cancel setting and return to info display.
4.1.8 Set Photo Size
This parameter has three values: 12MP, 8MP and 5MP. The default value is 5 mega
pixels. The following shows how to set pixel size as 12M Pixel:
a) Press MENU to display the setting menu.
b) Press DOWN to select Resolution
c) Press Right to select 12M Pixel
d) Press OK to save the current setting, then press menu to return to info
display.
e) Press MENU to cancel setting and return to info display.
4.1.9 Set Video Size
This parameter also has four values: 1080P, 720P, WVGA and QVGA.
The default value is 1080P, the following shows how to set it to be WVGA video size:
a) Press MENU to display the setting menu.
b) Press DOWN to select Resolution.
c) Press RIGHT to select WVGA
d) Press OK to save the current setting, then press menu to return to info
display.
e) Press MENU to cancel setting and return to info display.
4.1.10 Set Date and Time
You can change the date and time of the device by setting this parameter when
necessary, e.g., after every battery change. The date format is day/month/year, the
time format is hour: minute: second. The valid value for year is between 2010 and
2050.
Provided that the date and time are needed to be set to November 15th, 2011 and
half past ten, the steps are as following:
a) Press MENU to display the setting menu.
b) Press right enter into “system”
c) Press DOWN to select Date/Time.
d) Press Right to Display Date/Time Interface, Press UP and DOWN to change
the Value.
e) Press OK to save the current setting, then press MENU to return to info
display.
f) Press MENU to cancel setting and return to info display.
11
4.1.11 Set Multi
This parameter affects the number of pictures taken for each triggering in the camera
mode. It has four values: “1 Photo”, “3 Photos” “6 Photos” and “9 photos”. Its default
value is “1 Photo”. The following shows how to set photo burst to 3 Photos, provided
that the previous option is 1 Photo:
a) Press MENU to display the setting menu.
b) Press DOWN to select Multi.
c) Press RIGHT to select 3 pictures.
d) Press OK to save the current setting, then press MENU to return to info
display.
e) Press MENU to cancel setting and return to info display
4.1.12 Set ISO
This menu could only help you get a better photo at night, there are 3 values:
100,200,400.
a) Press MENU to display the setting menu.
b) Press DOWN to select ISO400.
c) Press OK to save the current setting, then press MENU to return to info
display.
d) Press MENU to cancel setting and exit.
4.1.13 Set Video Length
The following shows how to set video length to 30 Seconds, provided that the
previous value is 10 Seconds:
a) Press MENU to display the setting menu.
b) Press DOWN to select Video Length
c) Press OK to save the current setting, then press MENU to return to info
display.
d) Press MENU to cancel setting and exit.
4.1.14 Set Video Sound
The following shows how to turn off the sound of the video:
a) Press MENU to display the setting menu.
b) Press DOWN to select Voice.
c) Press RIGHT to display the VOICE setting Interface.
4.1.15 Set Delay
This parameter means that how long the PIR (Passive Infrared motion sensor) will be
disabled after each triggering in ON mode. During this time the PIR of the device will
not react to the motion of human (or animals). The minimum interval is 5 seconds, it
means the PIR works all the time and media is taken almost continuously. The
maximum interval is 30 minutes, it means the PIR will be disabled for 30 minutes after
each triggering. The default value is 5 seconds.
The following shows how to set PIR Triggering Interval Time as 1 minute provided
12
that previous option is 5 seconds.
a) Press MENU to display the setting menu.
b) Press DOWN to select Delay.
c) Press RIGHT to enter in to the interval setting.
d) Press DOWN to select 1 minute.
e) Press OK to save the current setting, then press MENU to return to info
display.
f) Press MENU to cancel setting and return to info display.
4.1.16 Set Timer
This parameter defines a certain time lapse in a day when the Camera can be
triggered. In the rest of the time the device is shut off. The effective value of the hour
ranges from 0 to 23 while the minute ranges from 0 to 59.
Provided that the camera should work from eight a.m. to five p.m., the steps are as
follows:
a) Press MENU to display the setting menu.
b) Press DOWN to select Timer.
c) Press RIGHT to select item, press UP or DOWN to change the value until the
start time changes to 8 and the stop time changes to 17.
d) Press OK to save the current setting, then press MENU to return to info
display.
e) Press MENU to return to previous menu.
4.1.17 Enter Password
If the password setting is selected as On, after switching on the camera, the LCD
screen on camera will prompt to enter password. The default password is off. It can
be changed where the steps are as following:
a) Press MENU to display the setting menu.
b) Press DOWN to select Password.
c) Press Up to select On, then press Right to select 4 numbers as password
d) Press OK to save the current setting, then press MENU to return to info
display.
e) The LCD screen will prompt to enter password next time you switch on the
camera.
f) Press MENU to cancel setting and return to previous menu.
4.2 Playback
In playback mode, images or videos can be viewed, deleted. The images and videos
can be viewed on: LCD screen on camera and TV monitor which connect to camera
with TV cable. For simplicity, operations with PC won’t be introduced here.
4.2.1 Viewing Photo or Video
a) Switch to TEST mode and enter into info display.
b) Press right the select switch to view the latest picture (or video) in LCD screen
13
on camera, TV monitor or Image viewer with TV-in connector.
c) Press Left to start playing the video when viewing
d) Press Left again to stop playing the video.
e) Press UP to view the previous picture (or video) and DOWN for the next.
f) Press OK to return to info display.
When viewing images, the total number of all images in the SD-card and the index of
the displaying image will be shown respectively.
4.2.2 Delete Photo or Video
The operations are as following:
a) Press Right to display Photos and Videos.
b) Press Menu to select Delete.
c) Press right to select delete current or delete all.
d) Press OK, Cancel and OK are prompted.
e) Press OK to delete the image or video.
f) Press cancel to cancel, then press MENU and OK to return to info display
Please note that after deleting a picture or a video file, the deleted files can’t be
restored! Furthermore, in order to delete all the images and video clips in the
SD-card, it is suggested to format the SD-card
4.3 Laser Pointer
The laser pointer can be turned on and is especially useful when it is somewhat dark
as an additional function for pointing to an object or a certain region of interested
(ROI).
Press﹡ to turn on the laser light in TEST mode and use the tilt adjuster on the back
of camera to adjust the angle of capturing direction.
WARNING: Please note that the laser could be harmful to the eyes if pointed at
other person!
4.4 File Numbering
Images and videos are separately saved in the pre-named folder (104MEDIA). File
numbering continues by adding one to the last number for each new image or video.
The saving name is like PTDC0001.JPB or PTDC0001.AVI. Through the suffix you
can distinguish whether the file is an image(with suffix.jpg)or a video(with suffix.avi).
4.5 Firmware Upgrade
This camera is equipped with an automatic upgrade function for you. Upgrading is
needed only when an improved firmware is available. The operations are as
following:
1. Unzip the update file
2. Copy the FW18NA.bin to SD card.
3. Insert the SD card into the camera.
4. Power on the camera(Test Mode).
5. The camera will read it and update itself automatically. When updating the
14
camera, its screen is black.
6. The screen will light on after being finished
7. Plug out the SD card, then insert it into pc, delete the FW18NA.bin in the SD
card.(If you don't do this, the camera will enter update mode when power on
again).
8. Insert the SD card into the camera for its working.
Appendix: Technical Specifications
Image sensor
5 Mega Pixel Color CMOS (12 MP interpolated)
Memory
SD Card ( up to 32GB)
Lens
F=3.1; FOV=60
Size
145mm x 80mm x 55 mm
IR Filter
Full Automatic IR Filter
TFT Display
2.0’’ Color-TFT LCD
PIR sensor: Triggering sensitivity
High/Normal/Low
PIR sensor: angle of detection
60 °
IR LEDs
Black 36 LEDs
Max Night Vision/Lighting Distance
65ft/20 meters
Trigger Time
1.1 seconds
Triggering Interval :
1 sec ~ 30 min (default 1 sec)
Selectable Image Resolution:
12MP/8MP/5MP
Multiple Photo
1/3/6/9 pictures
Video Resolution
1080P/720P/VGA
File Format
JPEG/AVI
Date and Time Imprint
Yes
Exposure:
Auto
Password Security
4 digital numbers
Periodic shot
1 sec ~24 h
Stand-by current
0.2 mA
Stand-by time
6 Months
Interface
TV out (NTSC/PAL); USB; SD Card Holder; 6V
DC External
Fix Method
Belt, on tripod
Operation Temperature
-30 ~+70°C
Power Supply
8 × AA batteries
Water proof
IP54
Security authentication
FCC, CE, RoHS
Included: Digital Camera, Wireless controller, USB Cable, TV cable, CD Manual
15