1
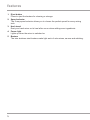
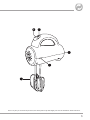
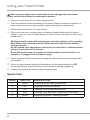
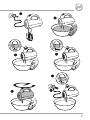
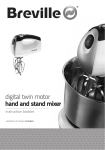
selection of recipes included
product safety
READ CAREFULLY AND KEEP FOR FUTURE REFERENCE
This product can be used by children aged 8 years and above,
and persons who require supervision, provided:
• they are familiar with the hazards associated with the
product, and,
• they receive instruction by a competent person on how to
safely use the product.
Children must not play with the product. Cleaning and user
maintenance must not be done by children unless they are
aged 8 or older and are supervised.
Always disconnect the appliance from the mains supply socket
if it is left unattended and before assembling, disassembling or
cleaning.
If the supply cord is damaged, it must be replaced by the
manufacturer, its service agent or similarly qualified persons in
order to avoid a hazard.
2
product safety
!! Never use this appliance for anything other than its intended use. This appliance is
for household use only. Do not use this appliance outdoors.
!! Always ensure that hands are dry before handling the plug or switching on the
appliance.
!! Always use the appliance on a stable, secure, dry and level surface.
!! This appliance must not be placed on or near any potentially hot surfaces (such as a
gas or electric hob).
!! Never immerse any part of the appliance or power cord and plug in water or any
other liquid.
!! Never let the power cord hang over the edge of a work top, touch hot surfaces or
become knotted, trapped or pinched.
!! Do not use the appliance if it has been dropped or if there are any visible signs of
damage.
!! Never use any accessory or attachment not recommended by the manufacturer.
!! Remove attachments from the appliance before washing or cleaning them.
!! Keep fingers, hair and clothing away from the moving parts of the appliance when it
is in use.
!! Do not attempt to eject, fit or remove attachments until the appliance has come to a
complete stop.
3
features
1. Eject button
Press to eject the beaters for cleaning or storage.
2. Speed selector
The 5-way speed selector allows you to choose the perfect speed for every mixing
task.
3. Heel stand
Rest your hand mixer on its heel after use or when adding more ingredients.
4. Power light
Lights up when the mixer is switched on
5.Beaters
The twin stainless steel beaters make light work of cake mixes, sauces and whisking.
4
Due to our policy of continuous improvement, the actual product may differ slightly from the one illustrated in these instructions.
5
using your hand mixer
Before first use
Make sure your hand mixer is switched off and unplugged from the mains
supply socket before cleaning. Never immerse the body of the hand mixer, cord or
plug in water or any other liquid.
•
Before using your hand mixer for the first time, wash the stainless steel beaters in
warm, soapy water. Rinse and dry thoroughly. Do not use harsh abrasives, chemicals
or oven cleaners.
•
Using a damp cloth or sponge, wipe the exterior of your hand mixer body.
Fitting the beaters
Make sure your hand mixer is switched off and unplugged from the mains
supply socket before fitting or removing the beaters.
1. Ensure that your hand mixer is unplugged from the supply socket and the speed
selector is set to OFF.
2. Insert one beater into a slot. Push it firmly until it locks into place.
3. Insert the other beater into the remaining slot. Push it firmly until it locks into place.
4. Your hand mixer is now assembled and ready to use.
6
7
using your hand mixer
Make sure your hand mixer is switched off and unplugged from the mains
supply socket before fitting or removing the beaters.
1. Plug your hand mixer into the mains supply socket.
2. Place the beaters into the ingredients to be mixed. Always support the container or
bowl in which you are mixing ingredients whilst operating your hand mixer.
3. Set the speed selector to 1 to start mixing.
4. With your hand mixer running, select the desired speed setting using the speed
selector. If you are not sure which setting to select, check your recipe or refer to the
speed chart.
Always avoid contact with moving parts while the appliance is in operation.
Keep hands, hair, clothing as well as other utensils away from the beaters
during operation.
Do not operate your hand mixer continuously for more than 3 minutes without
giving it a rest period of 10 minutes.
Never attempt to remove or replace the beaters whilst your food mixer is in
operation, or plugged in to the mains supply.
5. When mixing, guide the hand mixer through the centre and around the sides of the
mixing bowl.
6. When you have finished mixing the ingredients, set the speed selector to OFF.
Scrape the beaters around the bowl to remove any remaining ingredients.
7. Unplug your hand mixer from the mains supply socket.
Speed chart
8
SPEED
FUNCTION
SUGGESTED USE
1
Blend
2
Mix
Preparing muffins and pastries
3
Stir
Preparing cake and pudding mixtures
4
Beat
Creaming sugar and butter, preparing cookie dough
5
Whisk
Combining liquids, folding ingredients
Whipping egg whites, mashing potatoes
9
care, cleaning and storage
Always unplug your hand mixer from the mains supply socket before cleaning
it.
Never immerse the hand mixer body, mains lead or plug in water or any other
liquid.
Never use harsh abrasive cleaners or cleaning materials.
To make cleaning easier, clean your hand mixer and the beaters as soon as you have
finished using them.
1. Set the speed selector to OFF.
2. Unplug your hand mixer from the mains supply socket.
3. Eject the beaters from your hand mixer by pressing the eject button. The beaters
are heavy and care should be taken not to let them fall onto fragile surfaces or items
when they are being ejected.
4. Wash the beaters in warm soapy water. Alternatively, wash them in a dishwasher.
5. Rinse and dry the beaters before storing or using them again.
6. Using a dampened cloth, wipe the body of your hand mixer.
Storage
Store your hand mixer in its packing or in a clean, dry place, out of the reach of children,
ensuring that all the parts are dismantled.
10
11
recipes
Simple Pancakes - Serves 4
•
•
•
•
•
120g of plain flour
2 eggs
200ml milk
70ml of water
Pinch of salt
1. Sift the flour into a mixing bowl then make a well in the middle of it with a spoon.
2. Break the eggs into the well and mix the ingredients with your hand mixer set to a
medium speed.
3. Add the salt and gradually pour in the water and the milk continuously beating until
the batter is smooth.
4. Heat some butter in a frying pan and when it is hot, add two ladlefuls of the batter to
the pan. Swirl it around until the base of the pan is coated. Cook for approximately 1
minute and then carefully flip it over.
5. Cook it on the other side for another minute and then slide the pancake out of the
pan onto a plate.
6. Repeat the process until all the batter is used up. Keep the pancakes warm until you
are ready to eat them.
7. Serve sprinkled with lemon and sugar.
Toffee Sauce Variation: Heat 50g of butter, 70g of golden syrup. 70g of soft brown sugar
and 1 teaspoon of vanilla extract to make a toffee sauce. When it is simmering, remove it
from the heat and stir in 60ml of double cream. Serve this poured over the pancakes.
12
Vanilla Cupcakes with Raspberry Frosting - Makes approx 15
Cakes
• 225g of butter, softened
• 225g of caster sugar
• 4 eggs
• 1 teaspoon of vanilla extract
• 1 tablespoon of milk
• 225g of self raising flour, sifted.
Raspberry Frosting
• 100g of softened butter
• 50g of cream cheese
• 300g of icing sugar, sifted
• 80g of raspberries
• Raspberries for decoration
1. Pre-heat the oven to 180°C (gas mark 4).
2. In a mixing bowl cream the butter and caster sugar together using your hand mixer
on a slow speed. Gradually increase the speed and add the eggs, vanilla and milk.
3. Sift in the self raising flour and mix until creamy.
4. Lay the cupcake cases out on a cake tray and spoon the mixture into cakes. Bake in
the oven for 12-14 minutes until they are golden and springy to the touch. Remove
from the oven and allow them to cool on a wire cake rack.
5. To make the frosting, start by rubbing the raspberries through a sieve. This will
remove the seeds and make a lovely raspberry puree. Set aside.
6. In a clean bowl, begin to cream the butter using your hand mixer on a low speed.
Then add the cream cheese while continuing to mix on a low speed.
7. Gradually add the icing sugar and raspberry puree until the mixture is smooth and
creamy.
8. When the cakes have cooled, pipe or spoon on the frosting and finish with a
raspberry on top.
13
recipes
Meringues topped with Strawberries and Cream - Serves 4
•
•
•
•
3 egg whites
175g of caster sugar
100g of strawberries, hulled and chopped
190ml of double cream
1. First, make the meringues. When making meringues it is important that the bowl and
beaters are completely dry and free from grease or oil.
2. Pre-heat the oven to 150°C (gas mark 2). Cover a baking tray in baking parchment or
greaseproof paper.
3. Place the egg whites into a medium bowl and begin mixing at a low speed until the
eggs begin to froth. Then, raise the speed on your hand mixer to a faster setting.
4. Continue mixing until the egg whites form stiff peaks. This will take a couple of
minutes.
5. Once peaks are able to stand up, begin adding the sugar gradually while continuing
to whisk on a medium speed. The mixture should look glossy. Spoon the mixture onto
the baking tray in small blobs about 2cm apart.
6. Place the meringues in the oven and reduce the heat to 140°C (gas mark 1). Leave
to cook for approximately 1½ hours until they have a brown tinge to them. Turn the
oven off and leave them to cool in the oven.
7. The meringues can be stored in an airtight container until they are needed.
8. Using your hand mixer, whip the double cream on a medium speed setting until it is
thick. Top the meringues with the cream and sprinkle with strawberries.
Lemon Meringue Ice Cream - Serves 4
•
•
•
•
•
One batch of meringues (see previous recipe)
400ml of double cream
200ml of Greek yogurt
200g of lemon curd
1 lemon zest and juice
1. Using your hand mixer, whip the double cream on a medium to high setting until it is
thick. Then fold in the Greek yogurt, lemon curd, lemon zest and juice.
2. Crumble the meringues in to the mixture and gently fold the meringue pieces in.
Transfer it to a wide container with a lid.
3. Place it in the freezer and if you wish, stir every couple of hours. This will create a
smoother ice-cream. It should be frozen over 6-8 hours. Alternatively you can leave it
to freeze overnight.
14
Baked Chocolate Orange Cheesecake - Serves 6-8
For the base
• 240g Orange chocolate biscuits (or chocolate digestives with a teaspoon of orange
zest)
• 100g of melted butter
For the filling
• 200g of golden caster sugar
• 3½ tablespoons of orange juice
• 2 tablespoons of orange zest
• 4 tablespoons of corn-flour
• 600g of soft cheese (a mixture of light and full fat if you prefer)
• 3 medium eggs
• 300ml of double cream, whipped
• 100g of dark chocolate (70% cocoa), melted
1. In a food processor crush the biscuits then transfer the mixture to a bowl. Drizzle the
melted butter over the biscuits and stir to combine. Line a round cake tin with baking
parchment and then press the biscuits into the bottom. Place this in the fridge to
harden.
2. Pre-heat the oven to 180°C (gas mark 4).
3. With your hand mixer on a medium speed, begin to beat the double cream in a large
mixing bowl. Increase the speed until it is thick. Stir in the cream cheese.
4. In a separate bowl mix together the sugar, orange juice, zest, vanilla and cornflour.
Pour this into the cream and cheese and beat on a low speed until it is fully
combined.
5. Melt the chocolate in the microwave and allow it to cool slightly. Remove about a
quarter of the mixture and mix it well with the melted chocolate. You should now have
one bowl with light, creamy mixture and one bowl with the chocolate mixture.
6. Add the white mixture to the cake tin on top of the biscuit base. Then dollop the
chocolate mixture on top, and gently stir using a skewer to create a marbled effect.
7. Place it in the pre-heated oven and cook for approximately 50 minutes until it is
golden on top but slightly wobbly in the centre. If it looks like it is going to brown,
cover it with tin-foil.
8. Remove from the oven and allow to cool. Serve in wedges sprinkled with grated
chocolate.
15
recipes
Tempura King Prawns with Lemon Mayonnaise - Serves 4
For the Prawns
• 24 Large raw king prawns, heads and shells removed.
• 50g of corn-flour
• 200g of plain flour
• 1 large egg yolk
• 350ml of iced sparkling water (iced still water can also be used)
• Vegetable Oil, enough for deep frying
Lemon Mayonnaise
• 1 egg yolk
• 250ml, approximately of groundnut oil or light olive oil
• ½ teaspoon of salt
• ½ lemon, juiced
1. Prepare the mayonnaise first. The best oil to use is groundnut oil as it is flavourless,
however a light olive oil will work just as well. The egg yolk enables the lemon juice
to remain mixed with the oil.
2. In a small mixing bowl add the egg yolk and beat together using your hand mixer on
a low speed setting.
3. Slowly begin to pour in the oil, gradually beating until it is mixed in. As you add the oil,
continue mixing and the mixture will start to thicken.
4. Once it has reached a thick, creamy consistency, stir in the salt and the lemon juice.
5. This can then be stored in the fridge whilst you make the rest of the dish.
6. For the tempura batter, add the corn-flour, plain four, egg yolk and water in a bowl
and using your hand mixer on a medium speed, mix together to form a batter.
You may wish to add a little more or less water to get the batter to the desired
consistency—when correct it should coat your finger.
7. Heat the oil until it is hot in a large pan. Coat each prawn with the batter and place
them carefully into the hot oil using a slotted spoon.
8. Fry for approximately 3-4 minutes until they are golden and then remove and drain.
You may need to do the prawns in batches so that they do not stick together.
9. Serve sprinkled with salt and the lemon mayonnaise.
Variations
Aioli: Replace the lemon juice with 2 cloves of crushed garlic
Dill and Lemon: This is perfect for fish. Use the above recipe for lemon mayonnaise
adding 3 sprigs of chopped dill.
16
Easy Goats Cheese Soufflé - Serves 4
Cheese soufflé makes a lovely light lunch or supper dish. Once you have perfected the
basic soufflé, try adding some different combinations of your favourite ingredients.
•
•
•
•
•
•
•
•
50g butter, plus extra for greasing
25g white breadcrumbs
50g plain flour
1 tsp mustard powder
300ml semi skimmed milk
4 eggs
100g crumbled goat’s cheese
Salt and freshly ground black pepper
1. Heat the oven to 200°C/fan 180°C/gas 6 and place a baking sheet on the middle
shelf. Generously butter a 15cm soufflé dish then sprinkle in the breadcrumbs. Rotate
the dish to ensure the butter is evenly coated. Tip out any excess breadcrumbs.
2. In a pan, melt the butter over a low heat; stir in the flour and mustard. Cook while
stirring for 1 minute. Remove from the heat and gradually stir in the milk mixing
thoroughly in small quantities at a time before adding more. Return to the heat and
stir the mixture continuously until it becomes very thick. Transfer the mixture to a
bowl and allow to it cool.
3. Separate the eggs placing the whites into a clean bowl and stirring the yolks into the
sauce. Stir in the goats cheese and season well.
4. Begin whisking the egg whites on a medium speed until soft peaks form—do not over
whisk the whites.
5. Using a metal spoon, gently fold the whipped egg whites into the cheese sauce
mixture using a figure of eight motion. Make sure the egg whites are fully
incorporated into the mixture.
6. Place the mixture into your prepared dish and smooth over the surface. Shake the
dish gently to ensure the mixture is level.
7. Bake in a hot oven for 25-30 minutes until golden and risen.
8. Serve immediately. Delicious with cripsy baked jacket potatoes and fresh garden
peas.
17
recipes
Spring Onion, Pancetta and Cheddar Muffins - Makes 12
These muffins are really versatile; try swapping the spring onions for red onion, pancetta
for bacon and the cheddar for goats or blue cheese. Because pancetta is quite salty we
have not included any added salt in this recipe
•
•
•
•
•
•
•
•
•
•
•
100g pancetta slices
8 spring onions, finely sliced.
250g self-raising flour
2 tsp baking powder
½ tsp bicarbonate of soda
2 eggs
80g unsalted butter, melted and cooled
200ml buttermilk
1 tbsp finely chopped chives (optional)
150g strong cheddar, grated
Freshly ground black pepper to taste
1. Heat the oven to 200°C/400°F/gas mark 6 and line a muffin tin with 12 paper muffin
cases.
2. Heat a frying pan over medium heat and dry fry the pancetta until it’s golden and
crispy (be careful because pancetta slices cook really quickly). Remove the pancetta
from the pan with a slotted spoon and drain on kitchen paper. Allow it to cool then
crumble it.
3. In the same fat used to cook the pancetta, sauté the spring onion until just softened,
(about five minutes), then set aside to cool.
4. Place the flour, baking powder, bicarbonate of soda and pepper into a clean mixing
bowl.
5. In a jug, whisk together the eggs, butter and buttermilk on a medium speed for 30
seconds.
6. Pour the egg mixture into the flour mixture and gently fold them together using a
spatula (the mixture should not be smooth so do not over mix).
7. Fold in the pancetta, onions and two thirds of the cheese.
8. Spoon or scoop the mixture into the muffin tin, sprinkle on the rest of the cheese and
bake for about 18 minutes until the tops are golden and a toothpick inserted into the
centre of a muffin comes out clean.
18
connection to the mains supply
This appliance is fitted with either a moulded or rewirable BS1363, 13 amp plug. The fuse
should be rated at 3 amps and be ASTA approved to BS1362.
If the fuse in a moulded plug needs to be changed, the fuse cover must be refitted. The
appliance must not be used without the fuse cover fitted.
If the plug is unsuitable, it should be dismantled and removed from the supply cord
and an appropriate plug fitted as detailed below. If you remove the plug it must not be
connected to a 13 amp socket and the plug must be disposed of immediately.
The wires of the mains lead are coloured in accordance with the following code:
BLUE – NEUTRAL
BROWN – LIVE
The wire which is coloured Blue, must be connected to the terminal which is marked with
the letter N or coloured Black.
The wire which is coloured Brown, must be connected to the terminal which is marked
with the letter L or coloured Red.
If any other plug is used, a 3 amp fuse must be fitted either in the plug or adaptor or at the
distribution board.
CAUTION: DO NOT CONNECT EITHER WIRE TO THE EARTH TERMINAL IN THE
PLUG WHICH IS MARKED E OR WITH THE EARTH SYMBOL ( ) OR COLOURED
GREEN OR GREEN AND YELLOW.
This symbol indicates that this unit is a Class II appliance and therefore an earth
connection is not required.
Plug should be BS1363/A approved
Fit a 3 Amp Fuse
3 Amp Fuse
BLUE
(Neutral)
BROWN
(Live)
Ensure that the outer sheath of the cable
is firmly held by the clamp
19
after sales service
These appliances are built to the very highest of standards. There are no user serviceable
parts. Follow these steps if the unit fails to operate:
1. Check the instructions have been followed correctly.
2. Check that the fuse has not blown.
3. Check that the mains supply is functional.
If the appliance will still not operate, return the appliance to the place it was purchased for
a replacement. To return the appliance to the Customer Service Department, follow the
steps below:
1. Pack it carefully (preferably in the original carton). Ensure the unit is clean.
2. Enclose your name and address and quote the model number on all correspondence.
3. Give the reason why you are returning it.
4. If within the guarantee period, state when and where it was purchased and include
proof of purchase (e.g. till receipt).
5. Send it to our Customer Service Department at the address below:
Customer Service Department
Jarden Consumer Solutions (Europe) Limited
Middleton Road
Royton
Oldham
OL2 5LN, UK.
Telephone: 0161 621 6900 Fax: 0161 626 0391
e-mail: [email protected]
20
guarantee
This product is guaranteed for a period of 1 year from the date of purchase against
mechanical and electrical defects.
This guarantee is only valid if the appliance is used solely for domestic purposes in
accordance with the instructions provided, that it is not connected to an unsuitable
electricity supply, dismantled or interfered with in any way or damaged through misuse.
Under this guarantee we undertake to repair or replace free of charge any parts found to
be defective.
Nothing in this guarantee or the instructions relating to the product excludes, restricts or
otherwise affects your statutory rights.
In line with our policy of continuous development, we reserve the right to change this
product, packaging and documentation without notice.
WEEE
Waste electrical products should not be disposed of with household waste. Please recycle
where facilities exist. E-mail us at [email protected] for further recycling and WEEE
information.
21
VFP068_VFP069_VFP070_Iss_1
01/13
P.N. 165538
93557-0