Transcript
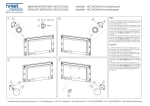
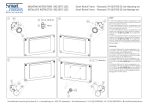
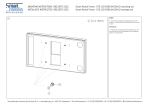
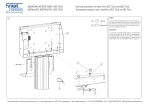
MOUNTING INSTRUCTIONS 082.5070-1301
INSTALLATIE INSTRUCTIES 082.5070-1301 1
A1
a
a
M4x10 (8x)
b
M6 (2x)
Smart Rental Frame - Barco MVD-5521 55 inch Mounting set
Smart Rental Frame - Barco MVD-5521 55 inch Montage set
a
2
1. Fasten the alignment aid (A1) as displayed, to the
screen, with two bolts (a). Then fasten the star knob
(b) to the alignment aid (A1).
2. Fasten the alignment aid (A2) as displayed, to the
screen, with two bolts (a). Then fasten the star knob
(b) to the alignment aid (A1).
3. Fasten the alignment aid (A2) as displayed, to the
screen, with two bolts (a). Then fasten the stainless
steel disc (B1) as tight as possible, to the alignment
aid (A1).
4. Fasten the alignment aid (A1) as displayed, to the
screen, with two bolts (a). Then fasten the stainless
steel disc (B1) as tight as possible, to the alignment
aid (A1). Finally fasten the adapter plate (C1) with
bolts (c) in the specified mounting holes of the flat
screen.
A2
b
b
English
Nederlands
3
4
c
M6x20 (4x)
a
A2
A1
1. Monteer uitlijnhulp (A1) zoals weergegeven, op
het scherm, met twee boutjes (a). Draai vervolgens
de ster knop (b) op de uitlijnhulp (A1).
2. Monteer uitlijnhulp (A2) zoals weergegeven, op
het scherm, met twee boutjes (a). Draai vervolgens
de ster knop (b) op de uitlijnhulp (A1).
3. Monteer uitlijnhulp (A2) zoals weergegeven, op
het scherm, met twee boutjes (a). Draai vervolgens
RVS schijf (B1) zo vast mogelijk aan, op de uitlijnhulp
(A1).
4. Monteer uitlijnhulp (A1) zoals weergegeven, op
het scherm, met twee boutjes (a). Draai vervolgens
RVS schijf (B1) zo vast mogelijk aan, op de uitlijnhulp
(A1). Schroef tot slot de meegeleverde verloopplaat (C1) met boutjes (c) in de aangegeven
bevestigingsgaten van het scherm.
a
B1
B1
C1
c
SmartMetals Mounting Solutions B.V. • Handelsweg 4 • 4231 EZ Meerkerk • The Netherlands • T +31(0)183352942 • F +31(0)183352909 • E [email protected]