1
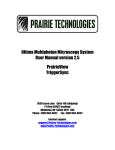
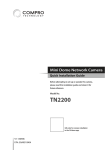
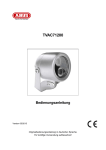
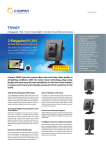
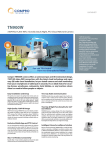
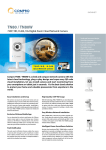
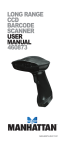
Dome Network Camera
Installation Guide
Before attempting to set up or operate this camera,
please read this quick installation guide and retain it
for future reference.
Model No.
TN3230
QR-code for camera installation
in the C4Home app.
V1-140620
P/N: 3GA0310961
Copyright
© 2014 Compro Technology, Inc. All rights reserved.
Trademark
Compro, and the Compro logo are trademarks of Compro Technology, Inc. C4Home
and C4Home logo are registered trademarks of AVSecur Technology, Inc. Microsoft,
Windows Vista, Windows and the Windows logo are trademarks of the Microsoft group
of companies. SD, SDHC and microSDHC Logos are trademarks of SD-3C, LLC. Apple,
Apple Logo, Mac, Mac OS, iPad, iPhone are trademarks of Apple Inc., registered in the
U.S. and other countries. Android is a registered trademark of Google, Inc. Other names
and marks are trademarks of their respective owners.
Restriction
No part of this document may be copied or reproduced in any form or by any means
without the prior written consent of Compro Technology, Inc.
Disclaimer
Compro Technology makes no warranties with respect to this documentation and
disclaims any implied warranties of merchantability, quality, or fitness for any particular purpose. The information in this document is subject to change without notice.
COMPRO reserves the right to make revisions to this publication without obligation to
notify any person or entity of any such changes.
Compro Technology Inc.
www.comprosecurity.com
Tel. +886 2 2918 0169, Fax +886 2 2915 2389
4F, No.12, Alley 6, Lane 45, Pao Shin Road, Hsintien District, New Taipei City 231, Taiwan
Support e-mail: [email protected]
Contents
Compro TN3230 - Installation Guide
Important Notices. . . . . . . . . . . . . . . . . . . . . . . . . . . . . . . . . . . . . . . . 2
Regulatory Notice . . . . . . . . . . . . . . . . . . . . . . . . . . . . . . . . . . . . . . . . 2
Safety Rules . . . . . . . . . . . . . . . . . . . . . . . . . . . . . . . . . . . . . . . . . . . 2
Product Overview. . . . . . . . . . . . . . . . . . . . . . . . . . . . . . . . . . . . . . . . 3
Package contents. . . . . . . . . . . . . . . . . . . . . . . . . . . . . . . . . . . . . . . . 3
Hardware Overview. . . . . . . . . . . . . . . . . . . . . . . . . . . . . . . . . . . . . . . 4
Power Connector Pinout . . . . . . . . . . . . . . . . . . . . . . . . . . . . . . . . . . . 5
Digital I/O Connector Block . . . . . . . . . . . . . . . . . . . . . . . . . . . . . . . . . . 6
Installation . . . . . . . . . . . . . . . . . . . . . . . . . . . . . . . . . . . . . . . . . . . . 7
Mounting on a Dropped Ceiling . . . . . . . . . . . . . . . . . . . . . . . . . . . . . . 7
Connect the Cables . . . . . . . . . . . . . . . . . . . . . . . . . . . . . . . . . . . . . . . 8
Install C4Home App and Add Camera. . . . . . . . . . . . . . . . . . . . . . . . . . .10
Adjust the Image. . . . . . . . . . . . . . . . . . . . . . . . . . . . . . . . . . . . . . . .11
Change SD Memory Card. . . . . . . . . . . . . . . . . . . . . . . . . . . . . . . . . . .13
Operation . . . . . . . . . . . . . . . . . . . . . . . . . . . . . . . . . . . . . . . . . . . . 14
Instant Monitoring. . . . . . . . . . . . . . . . . . . . . . . . . . . . . . . . . . . . . . .14
Technical Specifications . . . . . . . . . . . . . . . . . . . . . . . . . . . . . . . . . . . 17
TN3230 Technical Specifications. . . . . . . . . . . . . . . . . . . . . . . . . . . . . . 17
Technical Support Information. . . . . . . . . . . . . . . . . . . . . . . . . . . . . . . 19
Contact Compro Technical Support. . . . . . . . . . . . . . . . . . . . . . . . . . . . 19
Contents
1
Compro TN3230 - Installation Guide
Important Notices
Regulatory Notice
This device complies with Part 15 of the FCC Rules. Operation is subject to the following
two conditions: (1) This device may not cause harmful interference, and (2) This device
must accept any interference received, including interference that may cause undesired
operation.
FCC Interference Statement
This equipment has been tested and found to comply with the limits for a Class B digital
device, pursuant to Part 15 of the FCC Rules. These limits are designed to provide reasonable protection against harmful interference in a residential installation.
This equipment generates, uses and can radiate radio frequency energy and, if not installed and used in accordance with the instructions, may cause harmful interference to
radio communications. However, there is no guarantee that interference will not occur
in a particular installation. If this equipment does cause harmful interference to radio or
television reception, which can be determined by turning the equipment off and on, the
user is encouraged to try to correct the interference by one of the following measures:
• Reorient or relocate the receiving antenna.
• Increase the separation between the equipment and receiver.
• Connect the equipment into an outlet on a circuit different from that to which the receiver is connected.
• Consult the dealer or an experienced radio/TV technician for help.
To assure continued compliance, any changes or modifications not expressly approved
by the party responsible for compliance could void the user's authority to operate this
equipment.
Safety Rules
• The camera ought to be installed by a qualified technician.
• Place the camera on a level surface whenever possible.
• Do not drop the camera body to the ground; it may cause the damage to main parts.
• Please do not disassemble or remodel the product; it may cause damage or fire.
• Do not shake, move or disturb the camera when it is in operation, as such actions may
result in the malfunction of the device.
• Power off the camera as soon as it is found smoking or smelt unusual.
• Please do not place the camera around the heat sources, such as television or microwave oven.
2
Important Notices
The following is a list of items included in the package. Please check the package contents on your hand. If anything is missing, please don’t hesitate to contact your local
distributor.
Qty
Item
Description
1
Network camera
Compro TN3230 dome network camera
3
Hex cap screw
For use with the hexagon nuts to mount the
camera on a rack rail
3
Spring washer
For use with the included hex head screws and
the Phillips-head screws
3
Plain washer
For use with the hex head screws
3
Hexagon nut
For use with the hex cap screw to mount the
camera on a rack rail
1
3-pin power terminal For connecting power
block
1
10-pin I/O terminal block
For connecting I/O devices
1
User's guide
Providing instructions on installation
1
Drill template
For aiding in dropped ceiling mount
Product Overview
3
Compro TN3230 - Installation Guide
Product Overview
Package contents
Compro TN3230 - Installation Guide
Hardware Overview
Camera Layout
No.
4
Name
Description
1
IR LEDs
Provides additional lighting in low light conditions
2
Ambient light sensor
Feeds information on environmental lighting
condition to the camera
3
Lens
Vari-focal, f 3~9 mm, F1.2~2.1, auto iris, megapixel, IRcorrected
4
Lens hood
For eliminating unnecessary light; direction adjustable
5
All-in- one ter minal Intergrating power, IO, Ethernet, and audio in/out
cable
cable, plus a reset control
6
Reset button
Press and hold the reset button for about 8 seconds to
reset the camera back to factory defaults
7
Ethernet port
For connection to a PoE or Non-PoE network switch/
router
8
Tilt adjustment screw
For holding the tilting position of the camera
9
Pan adjustment screw
For holding the panning position of the camera
Product Overview
Name
Compro TN3230 - Installation Guide
No.
Description
10
Rotation adjustment Loosen the screw to rotate the lens
screw
11
Tilt adjustment screw
12
Screw holes (on the For installing the wall mount bracket (resvered)
bottom) for wall mount
bracket
13
Power connector
A 3-pin power connector
14
I/O connector
For connection with various I/O devices
(In x2, relay out x2)
15
MIC in (pink)
For connecting to an external microphone
16
Audio out (green)
For connecting to an external speaker
17
Zoom lever
Move the zoom lever between Wide and Tele to adjust
the angle of view
18
LED status indicator
Indicating system status
19
Focus adjustment ring
Turn the focus adjustment ring to adjust the focus
For holding the tilting position of the camera
Power Connector Pinout
The following table indicates the pinout of the camera’s terminal power connector.
3 2 1
Pin
Function
1
+ 12V DC
2
COM
3
24V AC
Product Overview
5
Compro TN3230 - Installation Guide
Digital I/O Connector Block
The digital inputs are normally used with security sensors, e.g. passive infrared sensors
(PIR), smoke detectors, etc. They work by detecting a change in the state of open and
closed circuit. The output ports are normally used to trigger external audio or visual indicators, e.g. sirens or strobe lights, etc.
Pin
Function
1
Digital Input Port 1 (IN +)
2
Digital Input Port 1 (IN –)
3
Digital Input Port 2 (IN +)
4
Digital Input Port 2 (IN –)
5
Digital Output Port 1 (NO)
Specifications
Note
M a x . 5 V D C , Floating, TTL
60mA
1 2 3 4 5 6 7 8 9 10
9
Max. 2 4 V D C Yo u c a n o n l y
, 1 A; or Max. u s e e i t h e r
Digital Output Port 1 (COM)
the Normally
125V AC, 1A
Open (NO) or
Digital Output Port 1(NC )
the Normally
Digital Output Port 2 (NO)
Closed (NC) at
any given time
Digital Output Port 2 (COM)
10
Digital Output Port 2 (NC )
6
7
8
Pinouts
Schematic Connection Diagram
The following output scenario is where the siren will only sound when the input has
been triggered. Should you wish to use the other way around in which the output device keeps staying on until the input has been triggered, please use NC.
TN3230
6
Product Overview
TN3230
Before you mount the camera on a dropped ceiling, you must first ensure that the ceiling is robust enough to hold the weight of the camera. Then refer to the following steps.
1. Use the supplied drill template to drill three mounting holes on the ceiling. Then
drill a hole for the camera’s protective cap.
2. Secure the camera to the ceiling using the supplied hex cap screws and hexagon
nuts. Make sure you use a spring washer and a plain washer in between the nut
and the ceiling (with the spring washer below the nut).
1/4" Screw
1/4" Nut
1/4" Spring Washer
1/4" Plain Washer
Ceiling or plate
3. Ensure the screws are securely tightened. Then, if you need to run the cable
through the ceiling, drill a cable hole on the ceiling and then thread the camera’s
terminal cable through the cable hole.
Installation
7
Compro TN3230 - Installation Guide
Installation
Mounting on a Dropped Ceiling
Compro TN3230 - Installation Guide
Connect the Cables
Connect Camera Using PoE
This camera supports PoE (Power-over-Ethernet), which allows electrical power and IP
data to be both delivered on a single Ethernet cable. The following instructions explain
how to connect your network camera using PoE.
PoE Switch
(802.3af class3 Type B)
Wireless
Router/Hub
Internet
1. Ethernet cable from wireless router/hub to PoE switch/router: Connect the PoE
switch/router with the wireless router/hub that has been connected to your
Cable/ADSL modem for internet connecting.
2. Ethernet port of the camera: Use the RJ-45 Ethernet cable (not supplied in the
package) to connect
the Ethernet port of the network camera to the PoE port of
Internet
your PoE switch/router.
3. Make sure your smartphone is able to go to internet via your wireless router.
Wireless
Using a Non-PoE
Switch
Router/Hub
Midspan
(PoE Injector)
If you are using the camera with a non PoE capable network switch/router, please prepare a PoE injector (midspan, optional) first in order to power the camera. Then connect
your camera in the following way:
1. Ethernet port on PoE injector: Use a RJ-45 Ethernet cable (not supplied in the
package) to connect the RJ-45 connector on PoE injector marked “IN”. Then connect the wireless router/hub.
2. Ethernet port on camera: Attach a RJ-45 Ethernet cable (not supplied in the package) from the “OUT” RJ-45 connector on PoE injector to the Ethernet port of the
network camera.
3. Make sure your smartphone is able to go to internet via your wireless router.
8
Installation
Compro TN3230 - Installation Guide
Internet
Wireless
Router/Hub
Midspan
(PoE Injector)
Using Ethernet Cable and Power Adapter
The figure below shows the basic cabling of your IP camera.
Internet
Wireless
Router/Hub
2
1.
Connect an Ethernet cable (not supplied in the package) between IP camera with
your wireless switch/router.
2.
Connect the power adapter/power cable (optional accessary, not supplied in the
package) to the IP camera and plug to the power outlet
3.
Make sure your smartphone is able to access the internet via your wireless
switch/router.
Installation
9
Compro TN3230 - Installation Guide
Install C4Home App and Add Camera
Make sure your smartphone is able to go to internet via your wireless router. Then
download the C4Home app from Apple store or Google Play and install to your smartphone. Start C4Home app and register your personal C4Home account.
(You can scan the QR-code below on your smartphone to add C4home app.)
Login to the C4Home account and click “+” to add new camera, we provide 3 ways to
add your camera:
•
Scan the QR code on the camera (or the first page of this installation guide), it will
automatically add your camera to the list.
•
•
Direct input the camera ID (10 digitals under the QR code) and password (default:
admin) to add your camera.
Click “iWizard” button on add camera page to search the available network camera
from your local network and setup.
Now you can watch live video of your network camera from your smartphone or tablet.
Note:
If you don’t have wireless connection in your local network, please refer to the user’s manual on the installation CD to install the network camera via PC.
10
Installation
Follow the instructions below to adjust the camera's varifocal lens.
Adjust Zoom and Focus
1. To adjust the zoom and focus, first remove the protection sheet from the top
cover, and then loosen the fixing screw on the top cover to remove the top cover.
in below figure) and move the lever to
2. Loosen the zoom lock lever (labeled
adjust the angle of view. Then tighten the zoom lock lever.
3. Loosen the lock screw on the focus ring and then turn the focus ring (labeled
) clockwise or counterclockwise to adjust the focus. After obtaining a satisfying
result, tighten the lock screw and re-install the top cover.
Adjust Pan/Tilt/Rotation
60°
To adjust the camera's panning or tilting position, or to rotate
the lens60°
(for horizon alignment), please remove the top cover first and then follow the steps below.
180°
180°
1. Loosen the pan adjustment screw (labeled
in below figure) and then rotate
the lens holder (labeled
in below figure) to adjust the camera's panning position. The pan adjustment range is between +180 degrees to -180 degrees.
2. Tighten the pan adjustment screw and then, if necessary, go on to adjust the tilting position.
Installation
11
Compro TN3230 - Installation Guide
Adjust the Image
Compro TN3230 - Installation Guide
60°
180°
60°
180°
3. Loosen the tilt adjustment screw (labeled
in below figure) on both sides and
then tilt the lens holder (labeled
in below figure) to adjust the camera's tilting
position. The tilt adjustment range is between +60 degrees to -60 degrees.
4. Tighten the tilt adjustment screws and then, if desired, go on to adjust the rotation of the camera image.
60°
60°
180°
\
180°
60°
180°
in below figure). Then grab
5. Loosen the rotation adjustment screw (labeled
the lens holder by the holder boss (labeled
in below figure) on both sides and
rotate the lens holder clockwise or counterclockwise to adjust the horizon in the
live image. The rotation adjustment range is between +180 degrees to -180 degrees. Tighten the rotation adjustment screw when completed.
6. Rotate the lens hood inside the top cover so the opening in the lens hood is
aligned with the camera's new position.
12
Installation
60°
Change SD Memory Card
The camera comes with a 4GB microSD card pre-installed inside the housing. The SD
memory card is user-upgradeable. And if you like to replace it, refer to the steps below
that explain the procedure.
1. Loosen the fixing screws on the top cover and remove the top cover.
2. Locate the microSD card slot below the camera's LED status indicator. Unplug
the digital IO cable and audio cables from the camera, and then push the preinstalled SD card gently to release it.
3. Pull the SD card out and insert a new one into the slot, and re-connect the digital
IO cable and audio cables. Finally, re-install the top cover to complete the upgrade.
microSD/SDHC
card slot
Installation
13
Compro TN3230 - Installation Guide
7. Having obtained the optimal result, re-install the top cover to complete the operation.
Compro TN3230 - Installation Guide
Operation
Instant Monitoring
From C4Home iPhone/Android App
When you enable and register the C4Home service, you can use the C4Home app on
your iPhone, Android phone or tablet to manage and watch live video of Compro cloud
network cameras.
The C4Home app is a safe and easy way to monitor your home, office and your valuable
possessions from anywhere in the world. No router setup required, only needs to start
your C4Home app and login with your account, you can watch live video of your network camera and manage multiple cameras from your smartphone or tablet on hand.
C4Home Login Page
Start the C4Home app from your smartphone, you can login here with your own Account ID and Password. If you forgot your password, please click the “Forgot your password” button, the system will send the password to your register email account.
Icon
Name
Description
Create
account
Here you can create the new account, please input the new account ID, password and email account for account registration.
Setup
Here you can input your account ID, password
and server address (default server: www.c4home.
com) for enable/disable auto-login. And you can
choose the display language here.
Camera Page
After login the C4Home app, you will see the camera page, here shows the camera list,
you can click to watch the live video or you can click the buttons below for more fea-
14
Operation
Icon
Name
Compro TN3230 - Installation Guide
tures.
Description
Edit
Click here to remove the installed network camera
from list.
Add Camera
Click here to add camera to the list.
Camera
Setup
Here you can setup more details for each camera:
• Camera Settings: Setup the camera name
and password
• Stream Settings: Seup the Codec, Resolution, Frame rate for video streaming and
Enable/Disable audio and Codec for audio
streaming.
• Notification Settings: Enable/Disable motion detection and select the sensitivity level
for motion detection.
• Sharing Settings: Enable/Disable the camera
sharing to others. You can add your friends'
account ID to share the live video watching.
• Firmware Update: Firmware update direct
from your smartphone.
• Private Mode: Enable/Disable private mode
to protect your privacy.
Camera
Page
List all the available camera here and you can click
to watch the live video.
Event
Page
List all the happened events by time, includes the
camera online/offline and motion detection. You
can click the listed event to watch:
• Liveview: Watch the live video of network
camera.
• Snapshot Playback/Download: Playback
and download the snapshots. When the event
trigger, the camera will take 3 snapshots for
record and you can know what’s happened.
Operation
15
Compro TN3230 - Installation Guide
Icon
Name
Description
Setup
Page
Click here for basic settings of C4Home app:
• Language: Select the display language for
C4Home app.
• Stream Buffer Size: Setup the stream buffer
size for low, median or high.
• Auto Login: Enable/Disable auto login for
C4Home app.
• Push Notification: Enable/Disable the push
notification for your device. If you enable it,
it will send you the push notification when
event triggered.
• Logout: Logout the C4Home app.
About
Camera
Here will shows the version number of C4Home
app and copyright information.
Note:
For complete C4Home app introduction, please refer to
the C4Home user’s manual on the installation CD.
16
Operation
CAMERA
VIDEO
AUDIO
NETWORK
Sensor
1/3" Progressive scan CMOS 2-megapixel sensor
Lens
HD Vari-focal, f 3~9 mm, F1.2~2.1, auto iris, IRcorrected
Zoom
3X optical (manual adjust), 10x digital (total 30x)
Angle of View
31.7° ~ 93°
Camera Angle
Adjustment
360° Pan (-180°~180°), 120° Tilt (30°~150°),
360° Rotation
Min Illumination
• IR Mode: 0 lux with built-in IR LEDs on (18 LEDs
in total; effective distance up to 20m)
• Color Mode: 1.0 lux
Shutter Time
1/5 ~ 1/16000 Sec.
Video Format
M-JPEG, MPEG-4, H.264
Resolutions
160x120, 320 x 240, 640 x 480, 1280 x 720, 1280 x
1024, 1600 x 1200
Frame Rate
• WebVUer up to 15 FPS at 1600 x 1200 (UXGA)
• C4Home App up to 30 FPS at 640 x 480
Video Streaming
Dual video streams
Image Settings
• Adjustable image size and quality
• AGC, AWB, AES
• Configurable brightness, saturation and
sharpness
Audio
Communication
Two-way audio support
Compression
Format
G.711 PCM 64Kbit/sec, AAC
Audio Input /
Output
3.5 mm phone jack, mic-in x 1, line-out x 1
Security
User ID / Password protection
Protocols
3GPP, ARP, DDNS, DHCP, DNS, FTP, HTTP, ICMP/
IPv4, IGP, NTP, PPPoE, QoS, RSP, RTSP, SMTP, SSL,
TCP/IP, UDP, UPnP
Ethernet
10/100 Base-T, autosensing, RJ-45
Technical Specifications
Compro TN3230 - Installation Guide
Technical Specifications
TN3230 Technical Specifications
17
Compro TN3230 - Installation Guide
C4Home App
Free mobile applications for iPhone and Android
• Motion/Audio detection and push notification
• Private mode and audio alarm
• Mobile digital zoom control
• Over-the-air firmware update
• Dropbox cloud storage for event snapshot
• SD card playback for event recording
• Share video to others
• Watch 4 channels at once (Android/PC only)
MJPEG Mode
Viewing of camera image via phone browsers
3GPP Mode
Viewing of camera image via 3G phones (3GPP
Streaming)
Video Surveillance
ComproView 32-channel video management
software included
Local Storage
microSD/SDHC card slot (4GB card pre-installed)
All-in-one
Terminal
Cable
3-pin power connector, RJ-45 Ethernet port, reset
button, audio out (green), mic in (pink), 10-pin I/
O connector (In x2, relay out x2)
Operating
Condition
• Temperature: -10 °C ~ 50 °C (14 °F to 122 °F)
• Humidity: 20~80% RH non-condensing
Weather
Resistance
IP66
Power Supply
• Power-over-Ethernet, IEEE 802.3af class 3 Type B
• DC 12V/2A (Power adapter optional)
System
Requirements
• Computer with 2.8GHz Dual-Core processor and
2GB memory or above
• Supported Operating Systems: Windows XP SP3,
Vista SP1, Windows 7, Windows 8, Mac OS 10.6 or
above (Live view in M-JPEG mode)
• PoE switch/router or PoE injector (IEEE 802.3af
class 3 Type B ) for PoE connection
Dimensions
Ø 160 x 135 mm
Weight (Net)
1140 g (2.52 lb.)
Optional
Accessories
• Compro PF-100, PF-200 PoE Injector
• Power Adapter (DC 12V / 2A)
MOBILE
MONITOR
GENERAL
* Specifications are subject to change without prior notice.
18
Technical Specifications
If you need any technical support, fill out the online form (http://comprousa.com/en/
form.htm) or directly email to [email protected].
Compro Technology, Inc.
www.comprousa.com
Tel. +886 2 2918 0169, Fax +886 2 2915 2389
4F, No.12, Alley 6, Lane 45, Pao Shin Road,
Hsintien District, New Taipei City 231, Taiwan
Technical Specifications
19
Compro TN3230 - Installation Guide
Technical Support Information
Contact Compro Technical Support
20
Technical Specifications
Compro TN3230 - Installation Guide
w w w.comprousa.com
Compro Technology Head Office
4F, No.12, Alley 6, Lane 45, Pao Shin Road, Hsintien District, New Taipei City 231, Taiwan
Tel. +886 2 29180169 Fax. +886 2 29152389