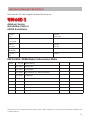
1
KAFFEEAUTOMAT MÜHLE Bedienungsanleitung Instructions for use - Notice d´utilisation Gebruiksaanwijzing - Istruzioni per l’uso Instrucciones de uso - Návod k obsluze Instrukcja obsługi Modell 28736 Impressum: Bedienungsanleitung Modell 28736 Stand: Okt 2013_2 /nr Copyright © Mannheimer Straße 4 68766 Hockenheim Telefon +49 (0) 62 05/94 18-0 Telefax +49 (0) 62 05/94 18-12 [email protected] Internetwww.unold.de INHALTSVERZEICHNIS Bedienungsanleitung Modell 28736 Technische Daten................................... 8 Symbolerklärung..................................... 8 Für Ihre Sicherheit.................................. 8 Vor dem Zubereiten des ersten Kaffees..... 10 Kaffeebohnen......................................... 10 Einstellen der Uhrzeit............................. 11 Einstellen der Kaffeestärke...................... 11 Einstellen des Mahlgrades....................... 11 Kaffee zubereiten................................... 11 Kaffee zubereiten mit Zeitvorwahl............ 13 Reinigen und Pflegen.............................. 14 Entkalken.............................................. 14 Garantiebestimmungen........................... 15 Entsorgung / Umweltschutz..................... 15 Informationen für den Fachhandel............ 15 Service-Adressen.................................... 16 Bestellformular Ersatzteile....................... 17 Gebruiksaanwijzing model 28736 Technische gegevens .............................. 31 Verklaring van de symbolen...................... 31 Voor uw veiligheid................................... 31 Voor het eerste gebruik............................ 32 Koffiebonen........................................... 33 Tijd instellen.......................................... 33 Koffiesterkte instellen............................. 33 Maalgraad instellen................................. 33 Koffie zetten ......................................... 34 Koffie zetten met een timer..................... 35 Reiniging en onderhoud.......................... 35 Ontkalken.............................................. 36 Garantievoorwaarden............................... 36 Verwijderen van afval/ Milieubescherming................................. 36 Service.................................................. 16 Instructions for use Model 28736 Technical data........................................ 18 Explanation of symbols............................ 18 For your safety........................................ 18 Prior to preparing coffee for the first time. 20 Coffee beans.......................................... 20 Setting the time..................................... 20 Setting the coffee strength...................... 21 Adjusting the degree of grinding............... 21 Brewing coffee ...................................... 21 Brewing coffee with the time preselect..... 23 Cleaning and care................................... 23 Descaling............................................... 24 Guarantee Conditions.............................. 24 Waste Disposal/Environmental Protection.. 24 Service.................................................. 16 Istruzioni per l’uso modello 28736 Dati tecnici ........................................... 37 Significato dei simboli............................ 37 Per la vostra sicurezza............................. 37 Prima di preparare il primo caffè.............. 38 Caffè in chicchi...................................... 39 Impostazione dell‘ora.............................. 39 Regolazione dell‘intensità del caffè.......... 39 Regolazione del grado di macinatura........ 39 Preparazione del caffè ............................ 40 Preparazione del caffè con temporizzazione...................................... 41 Pulizia e cura......................................... 41 Decalcificazione..................................... 42 Norme die garanzia................................. 42 Smaltimento / Tutela dell’ambiente.......... 42 Service.................................................. 16 Notice d’utilisation modèle 28736 Caractéristiques techniques..................... 25 Explication des symboles......................... 25 Pour votre sécurité.................................. 25 Avant la préparation du premier café........ 27 Grains de café........................................ 27 Réglage de l’heure.................................. 27 Réglage de l’intensité du café.................. 27 Réglage de la mouture............................ 28 Préparation du café ............................... 28 Nettoyage et entretien............................. 29 Détartrage.............................................. 29 Conditions de Garantie............................ 30 Traitement des déchets/Protection de l’environnement...................................... 30 Service.................................................. 16 Instrucciones de uso modelo 28736 Datos técnicos ....................................... 44 Explicación de los símbolos..................... 44 Para su seguridad................................... 44 Antes de preparar el primer café.............. 46 Granos de café....................................... 46 Ajustar la hora........................................ 46 Ajustar el grado de concentración del café................................................. 46 Ajuste del grado de molido...................... 47 Preparar café ........................................ 47 Preparar café con preselección de tiempo.............................................. 48 Limpieza y cuidado................................. 49 Descalcificación..................................... 49 Condiciones de Garantia.......................... 50 INHALTSVERZEICHNIS Disposición/Protección del medio ambiente............................................... 50 Service.................................................. 16 Návod k obsluze model 28736 Technické údaje .................................... 51 Vysvětlení symbolů.................................. 51 Pro vaši bezpečnost................................ 51 Před přípravou první kávy........................ 52 Kávová zrna........................................... 53 Nastavení času....................................... 53 Nastavení síly kávy.................................. 53 Nastavení stupně umletí.......................... 53 Příprava kávy ......................................... 53 Příprava kávy s předvolbou času............... 54 Čištění a péče........................................ 55 Odstranění vodního kamene .................... 55 Záruční podmínky................................... 56 Likvidace / Ochrana životného prostředí ... 56 Service.................................................. 16 Instrukcja obsługi Model 28736 Dane techniczne..................................... 57 Objaśnienie symboli................................ 57 Dla bezpieczeństwa użytkownika.............. 57 Przed przygotowaniem pierwszej kawy....... 58 Kawa ziarnista........................................ 59 Ustawienie czasu.................................... 59 Ustawienie mocy kawy............................ 59 Ustawienie stopnia mielenia.................... 59 Przygotowanie kawy ............................... 60 Przygotowanie kawy z programatorem zegarowym....................... 61 Czyszczenie i konserwacja....................... 61 Odkamienianie ...................................... 61 Warunki gwarancji.................................. 62 Utylizacja / ochrona środowiska................ 62 Service.................................................. 16 EINZELTEILE 1 3 10 4 2 5 6 7 9 1 6 D GB F NL I E CZ PL Dauerfilter Permanent filter Filtre permanent Permanent filter Filtro permanente Filtro permanente Trvalý filtr Filtr stały 8 2 D GB F NL I E CZ PL Filterhalter Filter holder Porte-filtre Filterhouder Portafiltro Soporte del filtro Držák filtru Obsada filtru 3 D Aromadeckel für Bohnenbehälter GB Aroma protection lid for bean container Couvercle à arômes pour le réservoir à grains Aromadeksel voor bonenreservoir Coperchio salvaroma del contenitore chicchi Tapa para conservación del aroma en el contenedor de café en granos Kryt chránící aroma na zásobník kávových zrn Pokrywa pojemnika na kawę ziarnistą zachowująca aromat F NL I E CZ PL 4 5 6 D GB F NL I E CZ PL Bohnenbehälter Bean container Réservoir à grains Bonenreservoir Contenitore chicchi Contenedor de café en granos Zásobník kávových zrn Pojemnik na kawę ziarnistą D GB F NL I E Deckel Wassertank Water tank lid Couvercle du réservoir d'eau Deksel watertank Coperchio del serbatoio dell'acqua Tapa del depósito de agua CZ PL Kryt zásobníku vody Pokrywa zbiornika wody D GB Öffnen-Taste für Schwenkarm Open button for swivel arm F Touche d'ouverture pour le bras pivotant Openen-knop voor zwenkarm NL I E CZ PL Tasto di apertura del braccio rotante Tecla de abrir para brazo giratorio Tlačítko otevření pro otočné rameno Przycisk otwierania ramienia odchylnego 7 D GB F NL I E CZ PL Schwenkarm mit FilterhalterAufnahme Swivel arm with filter holder receptacle Bras pivotant avec logement du porte-filtre Zwenkarm met filterhouder-opname Braccio rotante con alloggiamento portafiltro Brazo giratorio con alojamiento del soporte del filtro Otočné rameno s úchytem držáku filtru Ramię odchylne z zamocowaniem obsady filtru 8 D GB F NL I E CZ PL Warmhalteplatte Warming plate Plaque de maintien au chaud Warmhoudplaat Piastra di tenuta in caldo Placa calentadora Ohřívací deska Płyta grzejna utrzymująca ciepło 9 D GB F NL I E CZ PL Glaskanne mit Deckel Glass pot with lid Verseur en verre avec couvercle Glazen kan met deksel Bricco in vetro con coperchio Jarra de cristal con tapa Skleněná konvice s krytem Dzbanek szklany z pokrywą 10 D GB F NL I E CZ PL Knopf für den Mahlgrad Knob for grinding setting Réglage degré de finesse Knop Maalfijnheid Regolatore grado di macinatura Ajustador grado de moltura Tlačítko množství mleté Regulatory stopnia mielenia 7 BEDIENUNGSANLEITUNG MODELL 28736 TECHNISCHE DATEN Leistung: 900–1050 Watt, 50 Hz, 220–240 V~ Kanne: Glaskanne mit Deckel und Skala Volumen: 1,5 Liter, max. 12 Tassen Filtergröße: Dauerfilter bzw. Papierfilter 1 x 4 Maße (L/B/H): Ca. 20,8 x 31,3 x 42,2 cm Gewicht: Ca. 4,9 kg Kabellänge: Ca. 90 cm, fest montiert Ausstattung: Edelstahlgehäuse, LC-Display, Bohnenbehälter mit Aromaschutzdeckel, Tropfstopp, integriertes Mahlwerk, integrierter Wassertank, Zeitvorwahl, Zeitanzeige, Tassenund Kaffeestärke-Wahl, Kontrollleuchten Zubehör: Dauerfilter, Bedienungsanleitung Änderungen und Irrtümer in Ausstattungsmerkmalen, Technik, Farben und Design vorbehalten SYMBOLERKLÄRUNG Dieses Symbol kennzeichnet eventuelle Gefahren, die Verletzungen nach sich ziehen können oder zu Schäden am Gerät führen. Dieses Symbol weist Sie auf eine eventuelle Verbrennungsgefahr hin. Gehen Sie hier immer besonders achtsam vor. FÜR IHRE SICHERHEIT 1. Bitte lesen Sie die folgenden Anweisungen und bewahren Sie diese auf. 2. Das Gerät kann von Kindern ab 8 Jahren und von Personen mit verringerten physischen, sensorischen oder mentalen Fähigkeiten oder Mangel an Erfahrung und/ oder Wissen benutzt werden, wenn sie beaufsichtigt werden oder bezüglich des sicheren Gebrauchs des Gerätes unterwiesen wurden und die daraus resultierenden Gefahren verstanden haben. Das Gerät ist kein Spielzeug. Das Säu8 3. 4. 5. 6. bern und die Wartung des Geräts dürfen von Kindern nur unter Aufsicht durchgeführt werden. Kinder sollten beaufsichtigt werden, um sicher zu stellen, dass sie nicht mit dem Gerät spielen. Das Gerät an einem für Kinder unzugänglichen Ort aufbewahren. Das Gerät nur an Wechselstrom mit Spannung gemäß Typenschild anschließen. Dieses Gerät darf nicht mit einer externen Zeitschaltuhr oder einem Fernbedienungssystem betrieben werden. 7. Tauchen Sie das Gerät oder die Zuleitung aus Gründen der elektrischen Sicherheit keinesfalls in Wasser oder andere Flüssigkeiten ein. 8. Reinigen Sie das Gerät aus Gründen der elektrischen Sicherheit nicht in der Spülmaschine. 9. Schalter und Kabel dürfen nicht mit Wasser oder anderen Flüssigkeiten in Kontakt kommen. Falls dies doch einmal geschieht, müssen vor erneuter Benutzung alle Teile vollkommen trocken sein. 10. Das Gerät bzw. die Zuleitung niemals mit nassen Händen berühren. 11. Das Gerät ist ausschließlich für den Haushaltsgebrauch oder ähnliche Verwendungszwecke bestimmt, z. B. Teeküchen in Geschäften, Büros oder sonstigen Arbeitsstätten, landwirtschaftlichen Betrieben, zur Verwendung durch Gäste in Hotels, Motels oder sonstigen Beherbergungsbetrieben, in Privatpensionen oder Ferienhäusern. 12. Stellen Sie das Gerät aus Sicherheitsgründen niemals auf heiße Oberflächen, ein Metalltablett oder auf einen nassen Untergrund. 13. Das Gerät oder die Zuleitung dürfen nicht in der Nähe von Flammen betrieben werden. 14. Benutzen Sie den Kaffeeautomat stets auf einer freien, ebenen und hitzebeständigen Oberfläche. 15. Das Gerät darf nur zur Zubereitung von Kaffee verwendet werden, auf keinen Fall zum Erhitzen/ Warmhalten von Milch oder anderen Flüssigkeiten. 16. Achten Sie darauf, dass die Zuleitung nicht über den Rand der Arbeitsfläche hängt, da dies zu Unfällen führen kann, wenn z. B. Kleinkinder daran ziehen. 17. Die Zuleitung muss so verlegt sein, dass ein Ziehen oder darüber Stolpern verhindert wird. 18. Wickeln Sie die Zuleitung nicht um das Gerät und vermeiden Sie Knicke in der Zuleitung, um Schä- den an der Zuleitung zu vermeiden. 19. Verwenden Sie den Kaffeeautomat nur in Innenräumen. 20. Achten Sie darauf, dass sich nur Kaffeebohnen im Bohnenbehälter befinden. Fremdkörper können das Mahlwerk zerstören. 21. Decken Sie das Gerät während des Betriebs niemals ab, um eine Überhitzung des Gerätes zu vermeiden. 22. Verwenden Sie zum Aufbrühen von Kaffee frisches, klares Wasser und füllen Sie den Wasserbehälter mindestens bis zur untersten Markierung (2 Tassen) und höchstens bis zur MAX-Markierung. 23. Schalten Sie das Gerät erst ein, nachdem Sie Wasser in den Wassertank gefüllt haben. 24. Bei mehrmaligem Gebrauch lassen Sie das Gerät bitte zwischendurch für mindestens 5 Minuten abkühlen. 25. Verwenden Sie die Kaffeekanne nie in der Mikrowelle, da die Kanne hierfür nicht geeignet ist. 26. Verschieben Sie das Gerät nicht, solange es in Betrieb ist, um Verletzungen zu vermeiden. 27. Stellen Sie sicher, dass allen Benutzern, insbesondere Kindern, die Gefahr durch austretenden Dampf und heiße Wasserspritzer bekannt ist – Verbrennungsgefahr! 28. Das Gerät darf nicht mit Zubehör anderer Hersteller oder Marken benutzt werden, um Schäden zu vermeiden. 29. Nach Gebrauch sowie vor dem Reinigen den Netzstecker aus der Steckdose ziehen. Das Gerät niemals unbeaufsichtigt lassen, wenn der Netzstecker eingesteckt ist. 30. Prüfen Sie regelmäßig das Gerät, den Stecker und die Zuleitung auf Verschleiß oder Beschädigungen. Bei Beschädigung des Anschlusskabels oder anderer Teile senden Sie das Gerät oder die Zuleitung bitte zur Überprüfung und Reparatur an unseren Kundendienst. Unsachgemäße Reparaturen kön9 nen zu erheblichen Gefahren für VORSICHT: den Benutzer führen und haben Das Gerät wird während des den Ausschluss der Garantie zur Betriebs sehr heiß! Folge. 31. Wenn die Anschlussleitung dieses Gerätes beschädigt wird, muss sie Öffnen Sie auf keinen Fall durch den Hersteller oder seinen das Gehäuse des Gerätes. Kundendienst oder eine ähnlich Es besteht die Gefahr eines qualifizierte Person ersetzt werStromschlages. den, um Gefährdungen zu vermeiden. Der Hersteller übernimmt keine Haftung bei fehlerhafter Montage, bei unsachgemäßer oder fehlerhafter Verwendung oder nach Durchführung von Reparaturen durch nicht autorisierte Dritte. VOR DEM ZUBEREITEN DES ERSTEN KAFFEES Führen Sie vor dem ersten Kaffeekochen bitte ein bis zwei Brühvorgänge ohne Kaffeemehl durch, um eventuelle Herstellungsrückstände zu entfernen. Auch wenn das Gerät längere Zeit nicht benutzt wurde, empfehlen wir einen Brühvorgang ohne Kaffeemehl. 1. Entfernen Sie alle Verpackungs- 7. Achtung: Alle Bedieneingaben über die Tasten werden nur gespeimaterialien und Transportsichechert, solange das Display blau rungen. beleuchtet ist. Sobald die Dis2. Reinigen Sie die Glaskanne (9), playbeleuchtung erlischt, müssen den Dauerfilter (1) und den FilSie zunächst eine beliebige Taste terhalter (2), wie im Kapitel „Reidrücken, bevor weitere Tasteneinnigen und Pflegen“, beschrieben. gaben möglich sind. 3. Das Äußere des Gerätes wischen 8. Drücken Sie einmal auf die Taste Sie mit einem feuchten Tuch ab. „MÜHLE AUS“, dann „EIN/AUS“ 4. Füllen Sie den Wassertank (5) bis und lassen Sie das Wasser durchzur MAX-Markierung/12 Tassen mit laufen, bis das Gerät durch einen Leitungswasser. Achten Sie darmehrmaligen Signalton anzeigt, auf, dass sich keine Bohnen im dass der Vorgang beendet ist. Bohnenbehälter (4) befinden. 5. Schließen Sie den Deckel der 9. Schütten Sie dieses Wasser bitte weg. Glaskanne und stellen Sie diese 10. Reinigen Sie die Glaskanne. auf die Warmhalteplatte (8). 6. Stecken Sie den Stecker in eine 11. Schalten Sie das Gerät an der Taste „EIN/AUS“ aus. Steckdose (220–240 V~, 50 Hz). KAFFEEBOHNEN 1. Mit dem Kaffeeautomat Mühle kann Kaffee aus frisch gemahlenen Kaffeebohnen, oder mit handelsüblichem Filterkaffeepulver zubereitet werden. 2. Wenn Sie Kaffeebohnen verwenden möchten, achten Sie beim Einkauf darauf, dass die Bohnen für Kaffeemühlen geeignet sein müssen. Verwenden Sie bitte 10 keine Bohnen für Kaffeevollautomaten, da diese durch die andere Röstung zu einem nicht zufriedenstellenden Geschmack des Kaffees führen. 3. Es gibt im Handel diverse Hersteller von Kaffeebohnen, die für Kaffeemühlen geeignet sind (bitte Hinweise auf der Verpackung beachten). EINSTELLEN DER UHRZEIT 1. Sobald der Kaffeeautomat an das Stromnetz angeschlossen ist, zeigt das Display 12:00 an. 2. Drücken sie nun die Tasten „STD“ und „MIN“ so oft, bis die aktuelle Uhrzeit erreicht ist. 3. Sie sehen die aktuelle Uhrzeit und können nun mit dem Kaffeezubereiten beginnen. 4. Die Uhrzeit wird bei einem Stromverlust, der länger als ca. 30 Sekunden anhält, nicht gespeichert, d. h. Sie müssen die Uhrzeit, sobald das Gerät einmal vom Stromnetz getrennt war, neu einstellen. EINSTELLEN DER KAFFEESTÄRKE 1. Mit der Taste „STÄRKE“ können Sie die gewünschte Kaffeestärke auswählen. Drücken Sie die Taste „STÄRKE“ so oft, bis die gewünschte Anzahl von Kaffeebohnen im Display erscheint. 2. Sie können zwischen folgenden Stärke-Graden wählen: Fein – Anzeige im Display: eine Kaffeebohne (Standardeinstellung) Mittel – Anzeige im Display: zwei Kaffeebohnen Stark – Anzeige im Display: drei Kaffeebohnen 3. Hinweis: Sobald das Gerät längere Zeit vom Strom getrennt ist, müssen Sie den Stärkegrad erneut einstellen. EINSTELLEN DES MAHLGRADES 1. Wenn Sie Kaffee aus frisch gemahlenen Bohnen zubereiten, können Sie mit diesem Drehschalter den Mahlgrad der Bohnen zwischen Fein-Mittel-Grob einstellen. 2. Achten Sie darauf, dass die Taste „MÜHLE AUS“ nicht aktiviert ist. 3. Bereiten Sie das Gerät wie im Kapitel „Kaffee zubereiten“ beschrieben, vor und schalten Sie das Gerät ein. 4. Sobald das Gerät anfängt, die Bohnen zu mahlen, können Sie am Mahlgrad-Schalter (10) die gewünschte Stufe auswählen. 5. Achtung: Bitte verändern Sie den Mahlgrad nicht, wenn das Gerät gerade keine Bohnen mahlt. KAFFEE ZUBEREITEN Hinweis: Alle Bedieneingaben über die Tasten werden nur gespeichert, solange das Display blau beleuchtet ist. Sobald die Displaybeleuchtung erlischt, müssen Sie zunächst eine beliebige Taste drücken, bevor weitere Tasteneingaben möglich sind. Verwenden Sie bitte keine Bohnen für Kaffeevollautomaten, da diese durch die andere Röstung zu einem nicht zufriedenstellenden Geschmack des Kaffees führen. 1. Stecken Sie den Stecker in eine die Glaskanne benutzen, auf der Steckdose (220–240 V~, 50 Hz). ebenfalls Markierungen für die 2. Füllen Sie die gewünschte Menge jeweilige Tassenmenge angegeben frisches, klares Wasser in den sind. Es muss Wasser für mindesWassertank. Sie können hierfür tens zwei Tassen (270 ml) einge11 füllt werden, die maximale Menge beträgt 12 Tassen (1.525 ml). Achten Sie darauf, den Wassertank nicht zu überfüllen, da das zu viel eingefüllte Wasser sonst an der Rückseite des Gerätes herausfließt. 3. Die eingefüllte Wassermenge ist immer etwas höher als die tatsächliche Kaffeemenge, da das Kaffeemehl etwas von dem Wasser absorbiert. 4. Öffnen Sie den Schwenkarm des Kaffeeautomaten, indem Sie auf den Knopf „ÖFFNEN“ an der rechten Seite des Gerätes drücken. 5. Setzen Sie den Dauerfilter in den Filterkorb ein. Sie können alternativ dazu auch einen Papierfilter der Größe 4 benutzen. 6. Wenn Sie den Dauerfilter nutzen, können sich kleine Mengen Kaffeesatz in der Glaskanne ansammeln. Dies ist technisch bedingt und kein Mangel am Gerät. 7. Schließen Sie den Schwenkarm mit leichtem Druck. 8. Stellen Sie die Glaskanne mit geschlossenem Deckel auf die Warmhalteplatte. 9. Entfernen Sie den Deckel des Bohnenbehälters. Füllen Sie die Kaffeebohnen in den Bohnenbehälter. 10. Achten Sie darauf, dass der Bohnenbehälter immer mindestens halb voll sein muss. Die maximale Füllmenge beträgt ca. 200 g. 11. Überfüllen Sie den Bohnenbehälter nicht, da sonst das Mahlwerk beschädigt werden kann. 12. Schließen Sie den Bohnenbehälter mit dem Deckel. Beachten Sie bitte, dass das Gerät nicht erkennt, wenn keine Bohnen im Behälter sind. 13. Wählen Sie die gewünschte Tassenmenge aus, indem Sie die Taste „2-12 TASSEN“ so oft drücken, bis die gewünschte Tassenmenge aufleuchtet. Sie können zwischen 2, 4, 6, 8, 10 und 12 Tassen wählen. Achten Sie bitte unbedingt darauf, exakt die Tassenmenge zu wählen, für die auch Wasser eingefüllt wurde. Wenn Sie 12 Wasser für zwei Tassen einfüllen, müssen Sie zwei Tassen auswählen, wenn Sie Wasser für vier Tassen einfüllen, wählen Sie vier Tassen usw. Nur so kann der optimale Kaffeegeschmack gewährleistet werden. Der Kaffeeautomat mahlt die exakte Menge Kaffeepulver zur jeweils eingestellten Tassenanzahl. 14. Nun können Sie mit der Taste „STÄRKE“ die gewünschte Kaffeestärke auswählen. 15. Über den silbernen Knopf an der Geräteoberseite ist der Mahlgrad einstellbar. Bitte beachten Sie, dass eine Einstellung des Mahlgrades nur möglich ist, während das Gerät Bohnen mahlt. Am besten lassen Sie das Gerät einmal Kaffee zubereiten ohne Zeitvorwahl und wählen dabei den gewünschten Mahlgrad aus. Sobald das Gerät anfängt, die Bohnen zu mahlen, können Sie am Mahlgrad-Schalter die gewünschte Stufe auswählen. Bitte verändern Sie den Mahlgrad nicht, wenn das Gerät gerade keine Bohnen mahlt, um Schäden am Mahlwerk zu vermeiden. Wir empfehlen eine mittlere Mahlgradeinstellung. 16. Auf Wunsch können Sie auch Kaffee aus Kaffeemehl zubereiten. Drücken Sie hierfür auf die Taste „MÜHLE AUS“. Die Hintergrundbeleuchtung der Taste leuchtet blau auf, solange die Taste aktiv ist. Sobald Sie den Brühvorgang beenden, wird die Taste „MÜHLE AUS“ automatisch deaktiviert. Nun füllen Sie die gewünschte Menge Kaffeepulver in den Dauerfilter, je nach Geschmack pro Tasse 5-7 g (ca. 1 Messlöffel) mittelfein gemahlener Kaffee. Zu fein gemahlener Kaffee kann die Poren des Filters verstopfen und zum Überlaufen führen. 17. Drücken Sie auf die Taste „EIN/ AUS“, das Gerät beginnt mit der Kaffeezubereitung. 18. Im Display wird während des Brühvorgangs „BRÜHEN“ angezeigt. 19. Sie können die Kanne jederzeit während des Brühvorgangs entnehmen. Der Tropfstopp verhindert, dass Restkaffee aus dem Filter tropft. Setzen Sie die Kanne innerhalb von 30 Sekunden wieder unter den Filter, damit der Filter nicht überläuft. 20. Wenn das Gerät mit der Kaffeezubereitung fertig ist, wird dies durch einen Signalton angezeigt. 21. Die Warmhalteplatte bleibt solange eingeschaltet, wie auch der Kaffeeautomat eingeschaltet ist, um den verbliebenen Kaffee in der Kanne warm zu halten. Nach zwei Stunden schaltet sich das Gerät automatisch ab. Wenn Sie die Warmhaltefunktion nicht wünschen, schalten Sie das Gerät mit der „EIN/AUS“-Taste aus. 22. Lassen Sie nach dem vollständigen Ausschenken des Kaffees die leere Kaffeekanne nicht auf der heißen Warmhalteplatte stehen. 23. Entnehmen Sie den Dauerfilter und entsorgen Sie den Kaffeesatz. KAFFEE ZUBEREITEN MIT ZEITVORWAHL 1. Das Gerät wird wie im Kapitel „Kaffee zubereiten“ vorbereitet. 2. Achten Sie dabei darauf, die Stärke und die Tassenzahl gemäß Ihren Wünschen einzustellen. 3. Entscheiden Sie, ob Sie Kaffee aus Kaffeepulver oder Kaffeebohnen zubereiten möchten und drücken Sie ggf. die Taste „MÜHLE AUS“. 4. Bitte beachten Sie, dass eine Einstellung des Mahlgrades nur möglich ist, während das Gerät Bohnen mahlt. Am besten lassen Sie das Gerät einmal Kaffee zubereiten ohne Zeitvorwahl und wählen dabei den gewünschten Mahlgrad aus. Sobald das Gerät anfängt, die Bohnen zu mahlen, können Sie am Mahlgrad-Schalter die gewünschte Stufe auswählen. Bitte verändern Sie den Mahlgrad nicht, wenn das Gerät gerade keine Bohnen mahlt, um Schäden am Mahlwerk zu vermeiden. 5. Prüfen Sie, ob die Uhrzeit im Display mit der tatsächlichen Uhrzeit übereinstimmt. Wenn nicht, stellen Sie die aktuelle Uhrzeit wie im Kapitel „Uhrzeit einstellen“ beschrieben, ein. 6. Drücken Sie die Taste „PROGRAMM“ solange, bis die Uhrzeitanzeige im Display blinkt. 7. Nun können Sie über die Tasten „STD“ und „MIN“ die gewünschte Uhrzeit einstellen, zu der die Kaf- feezubereitung starten soll. Drücken Sie die jeweilige Taste so oft, bis die gewünschte Uhrzeit erscheint. 8. Drücken Sie danach erneut einmal auf die Taste „PROGRAMM“. Diese leuchtet nun blau, im Display erscheint „AUTO“ als Hinweis darauf, dass die Zeitvorwahl eingeschaltet wurde. 9. Zur gewählten Zeit startet das Gerät mit der Kaffeezubereitung, im Display erscheint „BRÜHEN“. 10. Sie können die Kanne jederzeit während des Brühvorgangs entnehmen. Der Tropfstopp verhindert, dass Restkaffee aus dem Filter tropft. Setzen Sie die Kanne innerhalb von 30 Sekunden wieder unter den Filter, damit der Filter nicht überläuft. 11. Wenn das Gerät mit der Kaffeezubereitung fertig ist, wird dies durch einen Signalton angezeigt. Warmhalteplatte bleibt 12. Die solange eingeschaltet, wie auch der Kaffeeautomat eingeschaltet ist, um den verbliebenen Kaffee in der Kanne warm zu halten. Nach zwei Stunden schaltet sich das Gerät automatisch ab. Wenn Sie die Warmhaltefunktion nicht wünschen, schalten Sie das Gerzät mit der „EIN/AUS“-Taste aus. 13. Lassen Sie nach dem vollständigen Ausschenken des Kaffees die 13 leere Kaffeekanne nicht auf der heißen Warmhalteplatte stehen. 14. Entnehmen Sie den Dauerfilter und entsorgen Sie den Kaffeesatz. REINIGEN UND PFLEGEN Vor dem Reinigen stets das Gerät ausschalten und den Stecker aus der Steckdose ziehen. Lassen Sie das Gerät abkühlen, bevor Sie es reinigen. 1. Das Gerät und die Zuleitung dürfen nicht in Wasser oder eine andere Flüssigkeit eingetaucht oder in der Spülmaschine gereinigt werden. 2. Öffnen Sie den Schwenkarm des Gerätes und entnehmen Sie den Dauerfilter. Entsorgen Sie den Kaffeesatz. 3. Oberhalb des Filters kann sich Kondenswasser bilden. Wischen Sie nach dem Kaffeekochen die Unterseite des Deckels mit einem trockenen Tuch ab. 4. Wischen Sie das Gehäuse und die Warmhalteplatte mit einem feuchten Tuch und etwas Spülmittel ab. Verwenden Sie keine scharfen Scheuermittel, Stahlwolle, metallischen Gegenstände, Desinfektionsmittel oder heiße Reinigungsmittel, da diese zu Beschädigungen führen können. 5. Die Glaskanne, deren Deckel, Filterhalter und Filter können Sie mit Wasser, dem Sie etwas Spülmittel zugegeben haben, reinigen. 6. Das Gerät muss vollkommen trocken sein, bevor Sie es wieder benutzen dürfen. ENTKALKEN 1. Regelmäßiges Entkalken erhält die Leistungsfähigkeit Ihres Kaffeeautomaten, erhöht dessen Lebensdauer und senkt den Energieverbrauch. 2. Verwenden Sie hierzu einen handelsüblichen Entkalker entsprechend der Anweisung auf der Verpackung. 3. Füllen Sie den Wassertank bis zur MAX-Markierung mit der Entkalkerlösung. 4. Alternativ können Sie auch Zitronensäure verwenden. Geben Sie 25 bis 50 g Zitronensäure auf einen Liter Wasser. 5. Stellen Sie die Kaffeekanne auf die Warmhalteplatte. 14 6. Drücken Sie nun die „EIN/AUS“ -Taste und lassen Sie ca. ein Drittel der Wassermenge durchlaufen. 7. Schalten Sie das Gerät durch Drücken der Taste „EIN/AUS“ aus und lassen Sie die Entkalkerlösung ca. 15 bis 30 Minuten einwirken. Bei starker Verkalkung können Sie die Lösung auch über Nacht einwirken lassen. 8. Drücken Sie danach erneut „EIN/ AUS“ und lassen Sie die restliche Entkalkerlösung durchlaufen. 9. Gießen Sie die Entkalkerlösung weg und lassen Sie mindestens zweimal klares Wasser durchlaufen. GARANTIEBESTIMMUNGEN Wir gewähren auf unsere Geräte eine Garantie von 24 Monaten, bei gewerblichem Gebrauch 12 Monate, ab dem Kaufdatum für Schäden, die bei bestimmungsgemäßem Gebrauch nachweislich auf Werksfehler zurückzuführen sind. Innerhalb der Garantiezeit beheben wir Material- und Herstellungsfehler nach unserem Ermessen durch Reparatur oder Umtausch. Unsere Garantieleistungen gelten ausschließlich für in Deutschland und Österreich verkaufte Geräte. Bei anderen Ländern wenden Sie sich bitte an den zuständigen Importeur. Geräte, für die eine Mängelbeseitigung beansprucht wird, senden Sie bitte zusammen mit einer Kopie des maschinell erstellten Kaufbelegs, aus dem das Kaufdatum ersichtlich sein muss, sowie einer Fehlerbeschreibung gut verpackt und freigemacht an unseren Kundendienst. Im Garantiefall werden dem Kunden in Deutschland und Österreich entstandene Versandkosten zurückerstattet. Von der Garantie ausgeschlossen sind Schäden durch Verschleiß, unsachgemäße Handhabung und Nichteinhaltung der Wartungs- und Pflegeanweisungen. Der Garantieanspruch erlischt, wenn Reparaturen oder Eingriffe am Gerät von dritter Stelle vorgenommen werden. Eventuelle Ansprüche des Endverbrauchers gegenüber dem Verkäufer oder Händler werden durch diese Garantie nicht eingeschränkt. ENTSORGUNG / UMWELTSCHUTZ Unsere Geräte werden auf hohem Qualitätsniveau für eine lange Nutzungsdauer hergestellt. Regelmäßige Wartung und fachgerechte Reparaturen durch unseren Kundendienst können die Nutzungsdauer des Gerätes verlängern. Wenn ein Gerät defekt und nicht mehr zu reparieren ist, beachten Sie bitte: Dieses Produkt darf nicht zusammen mit dem normalen Hausmüll entsorgt werden. Sie müssen dieses Produkt an einer ausgewiesenen Sammelstelle zum Recycling von elektrischen oder elektronischen Geräten abliefern. Durch das separate Sammeln und Recyceln von Abfallprodukten helfen Sie mit, die natürlichen Ressourcen zu schonen und stellen sicher, dass das Produkt in gesundheits- und umweltverträglicher Weise entsorgt wird. INFORMATIONEN FÜR DEN FACHHANDEL Hiermit erklärt die UNOLD AG, dass sich der Kaffeeautomat Mühle 28736 in Übereinstimmung mit den grundlegenden Anforderungen der europäischen Richtlinie für elektromagnetische Verträglichkeit (2004/108/EC) und der Niederspannungsrichtlinie (2006/95/EC) befindet. Hiermit bestätigt die UNOLD AG, dass sowohl das Produkt als auch die eingesetzten Rohstofffe den Vorschriften des LFBG 2005, § 30+31 in der jeweils aktuellen Fassung entspricht. Die gesetzlichen Grenzwerte werden eingehalten. Die Übereinstimmung mit den Regularien bezieht sich auf den Tag der Erstellung dieser Erklärung. Hockenheim, 18.1.2013 UNOLD AG, Mannheimer Straße 4, 68766 Hockenheim Diese Anleitung kann im Internet unter www.unold.de als pdf-Datei heruntergeladen werden. 15 SERVICE-ADRESSEN DEUTSCHLAND Mannheimer Straße 4 68766 Hockenheim Kundendienst Telefon +49 (0) 62 05/94 18-27 Telefax +49 (0) 62 05/94 18-22 [email protected] Internetwww.unold.de Sie möchten innerhalb der Garantiezeit ein Gerät zur Reparatur einsenden? Auf unserer Internetseite www.unold.de/ruecksendung können Sie sich einen Rücksendeschein ausdrucken, um damit das Paket kostenlos bei der Post abzugeben (nur für Einsendungen aus Deutschland und Österreich). ÖSTERREICHSCHWEIZ Reparaturabwicklung, Ersatzteile: ESC Electronic Service Center GmbH Molitorgasse 15 A-1110 Wien Telefon +43 (0) 1/9 71 70 59 Telefax +43 (0) 1/9 71 70 59 [email protected] MENAGROS SA Route der Servion CH - 1083 Mezières Telefon +41 (0) 21 9 03 01-15 Telefax +41 (0) 21 9 03 01-11 [email protected] Internetwww.menagros.ch POLENTSCHECHIEN „Quadra-net“ Sp. z o.o. Skadowa 5 61-888 Poznan Skadowa 5 Internetwww.quadra-net.pl 16 befree.cz s.r.o. Škroupova 150 537 01 Chrudim Telefon +42 0 46 46 01 881 [email protected] BESTELLFORMULAR ERSATZTEILE Bitte senden Sie das ausgefüllte Bestellformular an: Abteilung Service Mannheimer Straße 4 68766 Hockenheim Anrede / Title Telefon Phone No. Vorname / First name Name / Surname Telefax Fax No. Straße/Nr. / Street/No. PLZ/Ort / City E-Mail BESTELLUNG / ORDER Modell Kaffeeautomat Mühle Stück Art.-Nr. Bezeichnung 2873665 Dauerfilter 2873663 Filterhalter 2873658 Aromadeckel für Bohnenbehälter 2873640 Glaskanne 2873650 Deckel für Glaskanne Aktuelle Preise und Informationen erhalten Sie auf unserer Internetseite unter www.unold.de oder telefonisch bei unserem Service. 17 INSTRUCTIONS FOR USE MODEL 28736 TECHNICAL DATA Power: 900–1050 watt, 50 Hz, 220–240 V~ Pot: Glass pot with lid and scale Volume: 1.5 litres, max. 12 cups Filter size: Permanent filter or paper filter 1 x 4 Dimensions Approx. 20.8 x 31.3 x 42.2 cm (L/W/H) Weight: Approx. 4.9 kg Power cord length: Approx. 90 cm, permanently attached Features: Stainless steel housing, LC display, bean container with aroma protection lid, drip stop, integrated grinder, integrated water tank, time preselection, time display, cup and coffee strength selection, indicator lights Accessories: Permanent filter, operating instructions Equipment features, technology, colours and design are subject to change without notice. Errors and omissions excepted EXPLANATION OF SYMBOLS This symbol denotes a possible hazard which could cause injury or damage to the appliance. This symbol indicates a potential burning hazard. Please be especially careful at all times here. FOR YOUR SAFETY 1. Please read the following instructions and keep them on hand for later reference. 2. This appliance can be used by children aged from 8 years and above and persons with reduced physical, sensory or mental capabilities or lack of experience and knowledge if they have been given supervision or instruction concerning use of the appliance in a safe way and understand the hazards involved. Children shall not play with the appliance. Cleaning and user maintenance shall not be 18 3. 4. 5. 6. made by children without supervision.” Children should be supervised to ensure that they do not play with the appliance. Keep the appliance out of the reach of children. Connect appliance only to an AC power supply with voltage corresponding to the voltage on the rating plate. Do not operate this appliance with an external timer or remote control system. 7. For reasons of electrical safety, never immerse the appliance or the power cord in water or other liquids. 8. For reasons of electrical safety, do not clean the appliance in the dishwasher. 9. The switch and power cord should never come into contact with water or other liquids. If this ever happens, all parts must be completely dry before operating the appliance again. 10. Never touch the appliance or power cord with wet hands. 11. The appliance is intended for household use only, or for similar areas of use, such as, kitchenettes in businesses, offices or other workplaces, agricultural enterprises, for use by guests in hotels, motels or other lodgings, in private guest houses or holiday homes. 12. For safety reasons, never place the appliance on hot surfaces, a metal tray or a wet surface. 13. Do not place the appliance or power cord near open flames during operation. 14. Always use the coffeemaker on a level, uncluttered and heat-resistant surface. 15. The appliance may be used only for brewing coffee, never, under any circumstances, for heating milk or other liquids or keeping them warm. 16. Ensure that the power cord does not hang over the edge of the counter top or table, since this can cause accidents, for example if small children pull on the cord. 17. Route the power cord so that there is no possibility of the cord being pulled or tripped over. 18. Do not wrap the power cord around the appliance and avoid kinking of the power cord to prevent damage. 19. Only use the coffeemaker indoors. 20. Ensure that only coffee beans are in the bean container. Foreign objects can destroy the grinder. 21. When in use, never cover the coffeemaker, since this could cause the appliance to overheat. 22. To brew coffee, use fresh, clean water and fill the water tank to at least the lowest mark (2 cups) or at most to the MAX mark. 23. Do not switch on the appliance until after you have filled the water tank with water. 24. In case of repeated use, allow the appliance to cool off at least 5 minutes before next use. 25. Never use the coffee pot in the microwave; it is not suitable for such use. 26. Do not move the appliance as long as it is in operation, to prevent injuries. 27. Ensure that all users, especially children, are aware of the danger of injury from escaping steam and hot splashing water – danger of burns! 28. To avoid damage, do not use the appliance with accessories of other manufacturers or brands. 29. Unplug the mains plug from the electrical outlet after use and before cleaning. Never leave the appliance unattended when the mains plug is plugged in. 30. Check the appliance, the plug and the power cord regularly for wear or damage. In the event of damage to the power cord or other parts, please send the appliance or the power cord to our customer service organisation for inspection and repair. Unauthorised repairs can result in serious hazards for the user and void the warranty. 31. If the power cord of this appliance is damaged, it must be replaced by the manufacturer or by the manufacturer’s customer service organisation, or by a person with similar qualifications, to prevent hazards. CAUTION: The appliance becomes very hot during operation! Never open the housing of the appliance. This can result in electric shock. 19 The manufacturer will not be liable in the event of incorrect assembly, improper or incorrect use or if repairs are carried out by unauthorized third parties. PRIOR TO PREPARING COFFEE FOR THE FIRST TIME Before brewing coffee for the first time, please run one or two brewing cycles with water only, to remove any residue from the manufacturing process. We also recommend running one brewing cycle without coffee if the appliance has not been in use for an extended period. long as the display is illuminated 1. Remove all packaging materials blue. As soon as the display light and transport safeguards. goes out, you must first press a 2. Clean the glass pot (9), the perbutton before additional button manent filter (1) and the filter entries are possible. holder (2), as described in the 8. Press the button „MÜHLE AUS“ chapter, “Cleaning and Care”. („MILL OFF“), then „EIN/AUS“ 3. Wipe off the exterior of the appli(“ON/OFF”) and let the water run ance with a damp cloth. through until the appliance indi4. Fill the water tank (5) to the MAX cates through a signal tone repeamarking/12 cups with tap water. ted multiple times, that the proEnsure that there are no beans in cess is concluded. the bean container (4). 5. Close the lid of the glass pot and 9. Please discard this water. place it on the warming plate (8). 10. Clean the glass pot. 6. Plug the power cord into an elec- 11. Switch off the appliance via the „EIN/AUS“ (“ON/OFF”) button. trical outlet (220–240 V~, 50 Hz) 7. Caution: All operating entries via the buttons will only be saved as COFFEE BEANS 1. With the Coffeemaker Mühle, coffee can be prepared from fresh ground beans, or with off-theshelf coffee powder. 2. If you want to use coffee beans, when purchasing them, ensure that the beans are suitable for coffee mills. Do not use beans for fully-automatic coffee makers; these beans do not produce a satisfactory flavour of the coffee due to the different roasting process. SETTING THE TIME 1. As soon as the coffeemaker is connected to the power supply the display shows 12:00. 2. Now press the „STD“ (“HOUR”) and “MIN” buttons until the current time is set. 3. You will see the current time and can start brewing coffee. 20 4. In case of a power outage lasting longer than about 30 seconds the time is not saved, which means you must reset the time whenever the appliance has been unplugged. SETTING THE COFFEE STRENGTH 1. Use the „STÄRKE“ (“STRENGTH”) button to select the desired coffee strength. Press the „Stärke“ (“STRENGTH”) button until the desired number of coffee beans is shown in the display. 2. You can choose from the following degrees of strength: Fine - shown in the display: One coffee bean (standard setting) Medium - shown in the display: Two coffee beans Strong - shown in the display: Three coffee beans 3. Note: If the appliance is disconnected from the mains supply for a longer period of time, you must reset the degree of strength. ADJUSTING THE DEGREE OF GRINDING 1. If you are preparing coffee from freshly ground beans, you can adjust the degree of grinding between Fine-Medium-Coarse, with this rotary selection switch. 2. Ensure that the button „MÜHLE AUS“ (“MILL OFF”) is not activated. 3. Prepare the appliance as described in the chapter “Preparing coffee” and switch on the appliance. 4. As soon as the appliance starts to grind the beans, you can set the degree of grinding switch (10) to the desired level. 5. Caution: Do not change the degree of grinding if the appliance is not grinding beans at the moment. BREWING COFFEE Note: All operating entries via the buttons will only be saved as long as the display is illuminated blue. As soon as the display light goes out, you must first press a button before additional button entries are possible. Do not use beans for fully-automatic coffee makers; these beans do not produce a satisfactory flavour of the coffee due to the different roasting process. There are various manufacturers of coffee beans on the market with products that are suitable for coffee mills (comply with the instructions on the packaging). 1. Plug the power cord into an electrical outlet. 2. Fill the desired quantity of fresh, clean water into the water tank. You can use the glass pot for this; marks specifying the number of cups are also on the glass pot. Water for at least two cups (270 ml) must be filled in, the maximum quantity is 12 cups (1,525 ml). Ensure that you do not overfill the water tank, otherwise the excess water will flow out at the rear of the appliance. 3. The filled in quantity of water is always slightly higher than the actual quantity of coffee, because the ground coffee absorbs a little water. 4. Open the swivel arm of the coffeemaker by pressing the „ÖFFNEN (“OPEN”) button on the right side of the appliance. 5. Insert the permanent filter into the filter basket. Alternatively you can also use a size 4 paper filter. 6. If you use the permanent filter, small amounts of coffee grounds 21 can accumulate in the glass pot. This is due to the technology and is not a defect of the appliance. 7. Close the swivel arm with light pressure. 8. Place the glass pot with the lid closed on the warming plate. 9. Remove the lid of the bean container. Fill the coffee beans into the bean container. 10. Note that the bean container must always be at least half full. The fill quantity is 200 g. 11. Do not overfill the bean container, this can damage the grinder. 12. Close the bean container with the lid. Note that the appliance does not detect that there are no beans in the container. 13. Select the desired number of cups by pressing the button „2-12 Tassen“ (“2-12 cups”) until the desired number of cups is illuminated. You can select 2, 4, 6, 8, 10 and 12 cups. Ensure that you have selected the precise number of cups for which you have also filled water into the appliance. If you fill in water for two cups, you must select two cups, if you fill in water for four cups, you must select four cups, etc. This is the only way to ensure optimal coffee flavour. The coffeemaker grinds the precise amount of coffee powder for the number of cups that has been set. 14. Now you can select the desired strength of the coffee with the „STÄRKE“ (“STRENGTH”) button. 15. If desired you can also brew coffee from coffee powder. For this, press the button „MÜHLE AUS“ (“MILL OFF”). The background lighting of the button will be illuminated blue, as long as the button is active. As soon as you 22 conclude the brewing process, the button „MÜHLE AUS“. (“MILL OFF”) will be automatically deactivated. 16. Now fill the desired amount of coffee powder into the permanent filter, to taste, per cup, 5-7 g (approx. 1 measuring spoon) coffee powder ground medium fine. Coffee that is ground too fine can clog the pores in the filter, which can cause the coffeemaker to overflow. 17. Press the „EIN/AUS“, (“ON/ OFF”) button and the appliance will start to brew coffee. 18. During the brewing process the word, “Brewing”, will be shown in the display. 19. You can remove the pot at any time during the brewing process. The drip stop prevents residual coffee from dripping out of the filter. Put the pot back under the filter within 30 seconds, so that the filter does not overflow. 20. When the appliance is finished brewing coffee, this is indicated by a signal tone. 21. The warming plate remains switched on as long as the coffeemaker is switched on, in order to keep the coffee remaining in the pot warm. After two hours the appliance automatically switches off. If you do not want the warming function, switch off the appliance with the „EIN/AUS“, (“ON/OFF”) button. 22. After pouring out all of the coffee and emptying the pot completely, do not place the empty coffee pot on the hot warming plate. 23. Remove the permanent filter and dispose of the coffee grounds. BREWING COFFEE WITH THE TIME PRESELECT 1. The appliance is prepared as described in the chapter, “Brewing coffee”. In this regard, ensure that you set the coffee strength and the number of cups as desired. Decide whether you want to brew coffee from coffee powder or coffee beans and if necessary press the „MÜHLE AUS“. (“MILL OFF”) button. Please note that it is only possible to adjust the degree of grinding while the appliance is grinding the beans. Ideally have the appliance brew coffee without a a time preselect, and in this process, select the desired degree of grinding. As soon as the appliance starts to grind the beans, you can set the degree of grinding switch to the desired level. To prevent damage to the grinder, do not change the degree of grinding if the appliance is not grinding beans at the moment. 2. Check whether the time in the display agrees with the actual time. If it does not, set the actual time as described in the chapter “Setting the time”. 3. Press the “PROGRAM” button until the time shown in display flashes. 4. Now use the buttons „STD“ (“HOUR”) und „MIN“ (“MIN”) to set the desired time at which the coffeemaker should start to brew coffee. Press the respective button until the desired time is shown in the display. 5. Then press the “PROGRAMM” button again. This button will now be illuminated blue in the display “AUTO” to indicate that the time preselect has been switched on. 6. At the selected time the appliance starts to brew coffee, the word “BREWING” is now shown on the display. 7. You can remove the pot at any time during the brewing process. The drip stop prevents residual coffee from dripping out of the filter. Put the pot back under the filter within 30 seconds, so that the filter does not overflow. 8. When the appliance is finished brewing coffee, this is indicated by a signal tone. 9. The warming plate remains switched on as long as the coffeemaker is switched on, in order to keep the coffee remaining in the pot warm. After two hours the appliance automatically switches off. If you do not want the warming function, switch off the appliance with the „EIN/AUS“ (“ON/OFF”) button. 10. After pouring out all of the coffee and emptying the pot completely, do not place the empty coffee pot on the hot warming plate. 11. Remove the permanent filter and dispose of the coffee grounds. CLEANING AND CARE Before cleaning, always turn off the appliance and unplug it from the electrical outlet. Allow the appliance to cool before cleaning it. 1. The appliance and the supply cable may not be immersed in water or any other liquid or cleaned in the dishwasher. 2. Open the swivel arm of the appliance and remove the permanent filter. Dispose of the coffee grounds. 3. Condensation can collect above the filter. After brewing coffee, 23 wipe off the bottom of the lid with a dry cloth. 4. Wipe off the housing and the warming plate with a damp cloth and a little dishwashing detergent. Do not use any abrasive scouring agents, steel wool, metallic objects, disinfectants or hot cleaning agents, since they can damage the appliance. 5. Clean the glass pot, its lid, the filter holder and filter in water with a little dishwashing detergent added. 6. The appliance must be completely dry before you use it again. DESCALING 1. Regular descaling maintains the efficiency of your coffee machine, increases its service life and reduces the energy consumption. 2. Use commercial descaling products following the corresponding instructions for use. 3. Fill the water tank with descaling solution up to the MAX mark. 4. Alternatively, you may use citric acid. Add 25 to 50 g of citric acid to one litre of water. 5. Put the coffee jug on the temperature maintenance plate. 6. Push the button „EIN/AUS“ and the approximately one third of the water run through. 7. Switch the appliance off pushing the button „EIN/AUS“ again and leave the descaling solution to act approx. 15 to 30 minutes. With resistant calcinations you may leave the solution to act over night. 8. Push the button „EIN/AUS“ again and let the rest of the descaling solution run through. 9. Pour the descaling solution away and operate the appliance at least twice with clear water. GUARANTEE CONDITIONS We grant a 24 months guarantee, and in case of commercial use a 12 months guarantee, starting from the date of purchase for any damage demonstrably due to manufacturing defects and when the appliance has been used according to its intended use. Within the warranty period we will remedy defective materials or workmanship through repair or replacement, at our option. Our warranty terms apply only to appliances sold in Germany and Austria. For other countries, please contact the responsible importer. In the event of a claim for remedy of defects, please send the appliance to our after sales service, properly packaged and postage paid, together with a copy of the automatically generated sales receipt, which must show the date of purchase, and a description of the defect. If the defect is covered by the warranty, the customer will be reimbursed for the shipping costs only in Germany and Austria. The warranty does not cover damage from normal wear, improper handling and failure to comply with the maintenance and care instructions. The warranty is void if repairs or modifications are made to the appliance by third parties. Any claims of the end consumer vis-à-vis the retailer are not limited by this warranty. WASTE DISPOSAL / ENVIRONMENTAL PROTECTION Our appliances are produced on a high quality level for a long lifetime. Regular maintenance and expert repairs by our after-sales service can extend the useful life of the appliance. If an appliance is defective and repair is not possible we ask you to follow the following instructions for disposal. Do not dispose this appliance together with your standard household waste. Please bring this product to an approved collection point for recycling of electric and electronic products. By separate collection and disposal of waste products you help to protect natural resources and ensure, that the product is disposed in an adequate way to protect health and environment. The instruction booklet is also available for download: www.unold.de 24 NOTICE D’UTILISATION MODÈLE 28736 CARACTÉRISTIQUES TECHNIQUES Puissance : 900–1050 Watt, 50 Hz, 220–240 V~ Verseuse : Verseuse en verre avec couvercle et graduation Capacité : 1,5 litres, max. 12 tasses Grandeur du filtre : Filtre permanent ou filtre papier 1 x 4 Dimensions (L/l/h) : Env. 20,8 x 31,3 x 42,2 cm Poids : Env. 4,9 kg Longueur du câble : Env. 90 cm, montage fixe Équipement : Boîtier en inox, écran LC, réservoir à grains avec couvercle de protection des arômes, anti-goutte, moulin intégré, réservoir d‘eau intégré, minuterie, affichage de l‘heure, choix des tasses et de l‘intensité du café, voyants de contrôle Accessoires : Filtre permanent, notice d‘utilisation Modifications et erreurs des caractéristiques de l‘équipement, de la technique, des couleurs et du design réservées EXPLICATION DES SYMBOLES Ce symbole indique les dangers susceptibles de provoquer des blessures ou des endommagements de l’appareil. Ce symbole indique le risque d’être brûlé. Soyez prudent en utilisant l’appareil. POUR VOTRE SÉCURITÉ 1. Veuillez lire les instructions suivantes et les conserver. 2. Lappareil peut être utilisé par des enfants en dessous de 8 ans et des personnes aux capacités physiques, sensorielles ou mentales réduites ou manquant d‘expérience et/ ou de connaissances s‘ils sont surveillés ou instruits au niveau de l‘utilisation sûre de l‘appareil et ont compris les dangers qui en résultent. L‘appareil n‘est pas un jouet. Le nettoyage et l‘entretien de l‘appareil peuvent être réalisés par des enfants uniquement sous surveillance. 3. Les enfants doivent être surveillés. Ils ne doivent pas jouer avec l’appareil. 4. Ranger l’appareil dans un endroit inaccessible aux enfants. 5. Raccorder exclusivement l’appareil au courant alternatif à la tension se conformant au panneau signalétique. 6. Cet appareil ne doit pas être utilisé avec une minuterie externe ni avec un système de télécommande. 7. Ne plongez en aucun cas l’appareil ou le câble d‘alimentation dans de l’eau ou un autre liquide, pour des raisons de sécurité électrique. 8. Ne nettoyez pas l’appareil dans le lavevaisselle, pour des raisons de sécurité électrique. 9. L’interrupteur et le câble ne doivent pas entrer en contact avec de l’eau ou d’autres liquides. Si cela devait se produire, toutes 25 les pièces devront être totalement sèches avant toute nouvelle utilisation. 10.Ne jamais toucher l’appareil ou son cordon d’alimentation si vous avez les mains mouillées. 11.L‘appareil est exclusivement destiné à un usage domestique ou à des fins similaires telles que dans une kitchenette de magasin, de bureaux ou de tout autre lieu de travail, ou sur une exploitation agricole, Pour les clients dans les hôtels, motels ou autres établissements d’hébergement, dans les gîtes et chambres d’hôtes privés ou locations de vacances privées. 12.Pour des raisons de sécurité, l’appareil ne doit jamais être placé sur des surfaces chaudes, une tablette métallique ou un support humide. 13.L’appareil ou le cordon d‘alimentation ne doivent pas être utilisés à proximité de flammes. 14.Utilisez toujours la cafetière électrique sur une surface dégagée, plane et résistante à la chaleur. 15.L’appareil doit exclusivement être utilisé pour préparer du café ; il ne doit en aucun cas être utilisé pour faire chauffer ou maintenir au chaud du lait ou d’autres liquides. 16.Veillez à ce que le cordon d‘alimentation ne pende pas sur un rebord de la surface de travail car cela peut provoquer des accidents, par exemple avec les tout jeunes enfants. 17.Le cordon d‘alimentation doit être placé de telle sorte que personne ne puisse tirer dessus ni trébucher dessus. 18.N‘enroulez pas le cordon d‘alimentation autour de l‘appareil et évitez de le plier pour ne pas l‘abîmer. 19.Utilisez exclusivement la cafetière électrique en intérieur. 20.Veillez à ce qu‘il n‘y ait que des grains de café dans le réservoir à grains. Les corps étrangers peuvent détruire le moulin. 21.Ne couvrez jamais l’appareil durant le fonctionnement afin d’éviter une surchauffe. 22.Utilisez pour préparer le café de l‘eau fraîche et claire et remplissez le réservoir d‘eau au moins jusqu‘au repère inférieur (2 tasses) et au plus jusqu‘au repère MAX. 23.Allumez l’appareil seulement une fois que vous avez rempli le réservoir d’eau. 24.En cas d’utilisations répétées, laissez l’appareil refroidir au moins 5 minutes entre deux utilisations. 25.Ne placez jamais la verseuse à café dans le micro-ondes car elle n’est pas prévue pour cela. 26.Ne poussez pas l‘appareil pendant qu‘il fonctionne pour éviter toute blessure. 27.Assurez-vous que tous les utilisateurs, notamment les enfants, ont connaissance des risques que comporte la vapeur formée et les éclaboussures d’eau chaude : risque de brûlures ! 28.L‘appareil ne doit pas être utilisé avec des accessoires d‘un autre fabricant ou d‘une autre marque pour ne pas risquer de l‘abîmer. 29.Après utilisation et avant le nettoyage, débrancher la prise du secteur. Ne jamais laisser l‘appareil sans surveillance lorsque la prise de secteur est branchée. 30.Vérifiez régulièrement que l‘appareil, la prise mâle et le cordon d‘alimentation ne sont pas usés ni abîmés. En cas de détérioration du cordon d’alimentation ou d’autres pièces, veuillez envoyer votre appareil ou le cordon pour contrôle et réparation à notre service clientèle. Toute mauvaise réparation peut exposer l’utilisateur à des dangers considérables et entraîner l’annulation de la garantie. 31.Si le cordon de raccordement de cet appareil est endommagé, il doit être remplacé par le fabricant, son service clientèle ou une personne de qualifications similaires, afin d‘éviter tout danger. Prudence : L’appareil est très chaud pendant son fonctionnement ! N’ouvrez en aucun cas la coque de l’appareil. Risque d‘électrocution. Le fabricant ne pourra nullement être tenu responsable en cas de mauvais montage, d’utilisation incorrecte ou erronée ou de réparations effectuées par des tiers non agréés. 26 AVANT LA PRÉPARATION DU PREMIER CAFÉ Avant la première préparation de café, effectuez une ou deux fois la procédure de préparation sans mettre de café afin d’éliminer d’éventuels résidus de fabrication. De même, lorsque l’appareil n’est pas utilisé durant une longue période, nous recommandons de faire fonctionner une fois l’appareil sans café. 1. Retirez tous les matériaux d‘emballage et les sécurités de transport. 2. Nettoyez le verseur en verre (9), le filtre permanent (1) et le porte-filtre (2) selon la description du chapitre « Nettoyage et entretien ». 3. Essuyez l‘extérieur de l‘appareil avec un chiffon humide. 4. Remplissez le réservoir d’eau (5) avec de l‘eau du robinet jusqu’au repère MAX. Veillez à ce qu‘il n‘y ait pas des grains de café dans le réservoir à grains. 5. Fermez le couvercle de la verseuse en verre et posez-le sur la plaque de maintien au chaud (8). 6. Branchez la prise mâle sur une prise de courant (220–240 V~, 50 Hz) 7. Attention : Toutes les saisies de commande avec les touches ne sont enregistrées que si l‘écran est bleu. Dès que l‘écran s‘éteint, vous devez d‘abord appuyez sur une touche au choix avant de pouvoir continuer la saisie avec les touches. 8. Appuyez une fois sur la touche « MÜHLE AUS », ensuite « EIN/AUS » et laissez l‘eau s‘écouler jusqu‘à ce que l‘appareil indique par un signal sonore répétitif que la procédure est terminée. 9. Veuillez vider cette eau. 10.Nettoyez la verseuse en verre. 11.Éteignez l‘appareil avec la touche « EIN/ AUS ». GRAINS DE CAFÉ 1. Avec la cafetière électrique Mühle, le café peut être préparé avec des grains de café fraîchement moulus ou avec de café en poudre usuel pour café-filtre. 2. Si vous désirez utiliser les grains de café, veillez à l'achat à ce que les grains soient adaptés au moulin à café. N'utiliser pas de grains pour machine à café automatique car en raison d'un autre type de torréfaction, ils ne donnent pas un goût de café satisfaisant. RÉGLAGE DE L’HEURE 1. Appuyez maintenant de façon répétée sur les touches « STD » et « MIN » jusqu’à ce que l’heure actuelle soit atteinte. 2. Vous voyez l‘heure actuelle et vous pouvez maintenant commencer la préparation du café. 3. En cas de panne de courant qui dure plus de 30 secondes environ, l’heure n’est pas sauvegardée ; cela signifie que, une fois le courant rétabli, vous devez à nouveau régler l’heure. RÉGLAGE DE L’INTENSITÉ DU CAFÉ 1. Avec le touche « STÄRKE », vous pouvez choisir l‘intensité du café souhaitée. Appuyez sur la touche « Stärke » de manière répétée jusqu‘à ce que le nombre de grains désiré s‘affiche à l‘écran. 2. Vous pouvez choisir entre les degrés d‘intensité suivants : Fin — Affichage à l‘écran : un grain de café (réglage standard) Moyen — Affichage à l‘écran : deux grains de café Fort — Affichage à l‘écran : trois grains de café 3. Note : Dès que l‘appareil est coupé du courant pour une période prolongée, vous devez régler une nouvelle fois l‘intensité du café. 27 RÉGLAGE DE LA MOUTURE 1. Si vous préparez le café avec des grains fraîchement moulus, vous pouvez régler avec cet interrupteur rotatif le degré de mouture des grands entre fin-moyen-grossier. 2. Veillez à ce que la touche « MÜHLE AUS » ne soit pas activée. 3. Préparez l‘appareil selon la description du chapitre « Préparation du café » et allumez l‘appareil. 4. Dès que l‘appareil commence à moudre les grains, vous pouvez choisir le degré désiré avec l‘interrupteur de mouture (10). 5. Attention : Ne modifiez pas le degré de mouture quand l‘appareil n‘est pas en train de moudre. PRÉPARATION DU CAFÉ Note : Toutes les saisies de commande avec les touches ne sont enregistrées que si l'écran est bleu. Dès que l'écran s'éteint, vous devez d'abord appuyez sur une touche au choix avant de pouvoir continuer la saisie avec les touches. N'utiliser pas de grains pour machine à café automatique car en raison d'un autre type de torréfaction, ils ne donnent pas un goût de café satisfaisant. Il y a dans le commerce de nombreux producteurs de grains de café adaptés aux moulins à café (veuillez observer les instructions sur l'emballage). 1. Branchez la prise mâle sur une prise de courant. 2. Remplissez la quantité requise d‘eau fraîche et claire dans le réservoir à eau. Pour cela, vous pouvez utiliser la verseuse en verre sur laquelle il y a également des repères pour la quantité de tasses. Il faut verser de l‘eau pour au moins deux tasses (270ml), la quantité maximale s‘élève à 12 tasses (1.525ml). Veillez à ne pas trop remplir le réservoir d‘eau car l‘eau excédante s‘écoule au dos de l‘appareil. 3. La quantité d‘eau remplie est toujours un peu plus élevée que la quantité réelle de café car la poudre de café absorbe de l‘eau. 4. Ouvrez le bras pivotant de la cafetière en appuyant sur le bouton « ÖFFNEN » situé sur le côté droit de l‘appareil. 5. Placez le filtre permanent dans la cage à filtre. Vous pouvez aussi utiliser un filtre en papier de la grandeur 4. 6. Si vous utilisez le filtre permanent, de petites quantités de marc de café peuvent s‘accumuler dans la verseuse en verre. Ceci est dû à la technique et n‘est pas un défaut de l‘appareil. 7. Fermez le bras pivotant avec une légère pression. 8. Placez la verseuse en verre avec le couvercle fermé sur la plaque de maintien au chaud. 9. Retirer le couvercle du réservoir à grains. Versez les grains de café dans le réservoir à grains. 28 10.Veillez à ce que le réservoir à gains soit toujours plein au moins à moitié. La quantité maximale de remplissage est de 200 g. 11.Ne remplissez pas trop le réservoir à grains car sinon le mécanisme de broyage pourrait s‘endommager. 12.Fermez le réservoir à grains avec son couvercle. Notez que l‘appareil ne remarque pas le manque de grains dans le réservoir. 13.Choisissez la quantité de tasses souhaitée en appuyant sur la touche « 2-12 Tassen » autant de fois que nécessaire jusqu‘à ce que la quantité de tasses désirée s‘allume. Vous pouvez choisir entre 2, 4, 6, 8, 10 et 12 tasses. Veillez absolument à ce que la quantité de tasses choisie correspondante à la quantité d‘eau remplie. Si vous remplissez de l‘eau pour deux tasses, vous devez sélectionner deux tasses si vous avez rempli de l‘eau pour quatre tasses, choisissez quatre tasses etc. C‘est seulement de cette manière que le goût optimal du café est assuré. La cafetière moud la quantité exacte de poudre pour le nombre de tasse sélectionné. 14.Maintenant avec la touche « STÄRKE », vous pouvez choisir l‘intensité du café souhaitée. 15.Vous pouvez aussi préparer du café avec de la poudre de café. Pour cela, appuyez sur la touche « MÜHLE AUS ». Le rétro-éclairage de la touche est bleu tant que la touche est active. Dès que la procédure de préparation est terminée, la touche « MÜHLE AUS » est automatiquement désactivée. 16.Maintenant remplissez la quantité de poudre de café désirée dans le filtre permanent, selon le goût par tasse 5-7 g. (env. 1 cuillère de mesure) de café moulu moyenfin. Si le café est moulu trop finement, les pores du filtre peuvent s’obstruer et donc provoquer un débordement. 17. Appuyez sur la touche « EIN/AUS », l‘appareil commence la préparation du café. 18.A l‘écran s‘affiche « Brühen » pendant la préparation. 19.Vous pouvez retirer la verseuse à tout moment pendant la préparation. L‘antigoutte empêche que le café restant goutte du filtre. Replacez la verseuse dans les 30 secondes à nouveau sous le filtre afin qu‘il ne déborde pas. 20.Quand l‘appareil a terminé la préparation du café, un signal sonore retentit. 21.La plaque de maintien au chaud reste allumée tout comme la cafetière pour garder le café préparé au chaud. Au bout de deux heures maximum, l‘appareil s‘éteint automatiquement. Si vous ne désirez pas la fonction de maintien au chaud, éteignez l‘appareil avec la touche « EIN/AUS ». 22.Après avoir vider la verseuse, ne la remettez pas sur la plaque chaude. 23.Retirez le filtre permanent et jetez le café usagé. NETTOYAGE ET ENTRETIEN Avant de procéder au nettoyage, il faut toujours éteindre l‘appareil et débrancher la prise de secteur. Laissez refroidir l’appareil avant de le nettoyer. 1. L’appareil et le câble ne doivent pas être immergés dans l’eau ou un autre liquide, ni être nettoyés au lave-vaisselle. 2. Ouvrez le bras pivotant de l’appareil et retirez le filtre permanent. Jetez le café usagé. 3. De la condensation d’eau peut se former audessus du filtre. Une fois le café préparé, essuyez la partie inférieure du couvercle avec un chiffon sec. 4. Essuyez le boîtier et la plaque de maintien au chaud avec un torchon humide et un peu de produit de nettoyage. N‘utilisez pas de produits abrasifs, ni de laine d‘acier, ni d‘objets métalliques, ni de produits désinfectants, ni de produits nettoyants chauds pour éviter d‘abîmer l‘appareil. 5. Vous pouvez nettoyer la verseuse en verre, son couvercle, le porte-filtre et le filtre avec de l’eau additionnée de produit nettoyant. 6. L‘appareil doit être complètement sec avant de pouvoir être réutilisé. DÉTARTRAGE 1. Un détartrage régulier conserve les performances de votre machine à café, augmente sa longévité et diminue la consommation électrique. 2. Utilisez à cet effet un détartrant du commerce, en suivant les instructions figurant sur l’emballage. 3. Remplissez le réservoir avec la solution de détartrant jusqu’au repère MAX. 4. Vous pouvez aussi utiliser à la place de l’acide citrique. Mélangez 25 à 50 g d’acide citrique avec un litre d’eau. 5. Placez la verseuse sur la plaque chauffante. 6. Appuyez maintenant sur la touche EIN/AUS et laissez passer environ un tiers de la quantité d’eau. 7. Éteignez l’appareil en appuyant fois sur la touche « EIN/AUS » et laissez la solution de détartrant agir pendant environ 15 à 30 minutes. En cas d’entartrage important, vous pouvez laisser la solution agir pendant toute une nuit. 8. Appuyez à nouveau sur la touche « Ein/Aus » et laissez passer le reste de la solution de détartrant. 9. Éliminez la solution de détartrant et faites passer au moins deux fois de l’eau claire. 29 CONDITIONS DE GARANTIE En cas d’utilisation conforme et lors de dégâts manifestement dus à des défauts de fabrication, nos appareils sont garantis 24 mois, lors d’utilisation professionnelles 12 mois, à dater de l’achat. Notre garantie n’est valide que pour les appareils vendus en Allemagne et en Autriche. Dans tout autre pays veuillez contacter l’importateur. Veuillez envoyer à notre adresse les appareils, pour lesquels vous réclamez une suppression de défauts, avec le bon d’achat montrant la date d’achat, port payé et proprement emballé. Les coûts de transport seront remboursés en cas de garantie en Allemagne et en Autriche. Les défauts causés par usure, utilisation incorrecte ou non-respect des instructions de maintenance sont exclus. Notre obligation de garantie cesse, si de réparations ou des interventions sont accomplies par des tiers. Cette garantie n’affecte pas les droits du consommateur contre le commerçant. TRAITEMENT DES DÉCHETS / PROTECTION DE L’ENVIRONNEMENT Nos appareils sont produits selon un standard élevé de qualité pour une longue durée d’utilisation. Un entretien régulier et des réparations compétentes par notre service après-vente prolongent cette durée d’utilisation. Si néanmoins l’appareil est endommagé et ne peut plus être réparé, veuillez suivre les instructions suivantes. Ne jamais disposer ce produit avec les dégâts de ménage. Apportez ce produit à une station de collection pour récupération de produits électriques et électroniques. Par la collection séparée vous aidez à protéger les ressources naturelles et prenez soin, que le produit est démonté sans risque pour la santé et l’environnement. 30 GEBRUIKSAANWIJZING MODEL 28736 TECHNISCHE GEGEVENS Vermogen: 900–1050 Watt, 50 Hz, 220–240 V~ Kan: Glazen kan met deksel en meetschaal Volume: 1,5 liter, max. 12 kopjes Filtergrootte: Permanent filter resp. papieren filter 1 x 4 Afmetingen (l/b/h): Ca. 20,8 x 31,3 x 42,2 cm Gewicht: Ca. 4,9 kg Kabellengte: Ca. 90 cm vast gemonteerd Uitvoering: RVS behuizing, LC-display, bonenreservoir met aromadeksel, druppelstop, geïntegreerde molen, geïntegreerde watertank, timer, tijdweergave, keuzeknop voor kopjes en koffiesterkte, controlelampjes Toebehoren: Permanent filter, bedieningshandleiding Wijzigingen en vergissingen in de uitrustingskenmerken, techniek, kleuren en design voorbehouden VERKLARING VAN DE SYMBOLEN Dit symbool wijst op eventuele gevaren die letsel tot gevolg kunnen hebben of tot schade aan het apparaat leiden. Dit symbool wijst op een eventueel verbrandingsgevaar. Ga hier altijd zeer voorzichtig te werk. VOOR UW VEILIGHEID 1. Lees de volgende aanwijzingen a.u.b. door en bewaar ze goed. 2. Het apparaat kan door kinderen van 8 jaar en ouder gebruikt worden en door personen met beperkte fysieke, sensorische of mentale vaardigheden of met gebrek aan ervaring en/ of kennis, mits zij onder toezicht staan of instructies over het gebruik van dit apparaat hebben gekregen en de hieruit resulterende gevaren begrepen hebben. Het apparaat is geen speelgoed. Het apparaat mag uitsluitend door kinderen gereinigd en onderhouden worden, indien deze onder toezicht staan. 3. Kinderen moeten onder toezicht staan, om ervoor te zorgen dat ze niet met het apparaat spelen. 4. Bewaar het apparaat op een plaats die ontoegankelijk is voor kinderen. 5. Sluit het apparaat uitsluitend aan op wisselstroom met spanning overeenkomstig het typeplaatje. 6. Dit apparaat mag niet met een externe tijdklok of met een afstandsbediening bediend worden. 7. Dompel het apparaat of de aansluitkabel om veiligheidsredenen nooit in water of andere vloeistoffen. 8. Omwille van de elektrische veiligheid mag het apparaat nooit in de vaatwasser gereinigd worden. 9. De schakelaar en de kabel mogen niet in contact komen met water of andere vloeistoffen. Als dit toch eens gebeurt, moeten alle delen volkomen droog zijn, voordat het apparaat weer gebruikt wordt. 10.Raak het apparaat of de aansluitkabel nooit met natte handen aan. 11.Het apparaat is uitsluitend bestemd voor huishoudelijk gebruik of voor soortgelijke doeleinden, bijv.: kitchenettes in winkels, kantoren of op andere werkplaatsen, 31 landbouwbedrijven, voor gebruik door gasten van hotels, motels of andere overnachtingsbedrijven, in particuliere pensions of vakantiehuisjes. 12.Zet het apparaat om veiligheidsredenen nooit neer op hete oppervlakken, een metalen dienblad of op een natte ondergrond. 13.Het apparaat en de kabel mogen niet in de buurt van open vuur gebruikt worden. 14.Gebruik het koffiezetapparaat steeds op een vrij, effen en hittebestendig oppervlak. 15.Het apparaat mag uitsluitend worden gebruikt om koffie te zetten; in geen geval mag het worden gebruikt om melk of andere vloeistoffen warm te maken of warm te houden. 16.Let op dat de aansluitkabel niet over de rand van het werkvlak heen hangt, omdat dit anders ongevallen kan veroorzaken, als bijv. kleine kinderen aan de kabel trekken. 17.De aansluitkabel moet zodanig gelegd worden, dat niemand eraan kan trekken of erover kan struikelen. 18.Rol de kabel niet om het apparaat heen en let op dat de aansluitkabel geen knik vertoont, om schade aan de kabel te vermijden. 19.Gebruik het koffiezetapparaat uitsluitend binnenshuis. 20.Let op dat zich uitsluitend koffiebonen in het bonenreservoir bevinden. Vreemde voorwerpen kunnen de molen onherstelbaar beschadigen. 21.Dek het apparaat tijdens het gebruik nooit af, om oververhitting van het apparaat te vermijden. 22.Gebruik voor het bereiden van koffie uitsluitend vers, helder water en vul de watertank minstens tot aan de onderste markering (2 kopjes) en hoogstens tot de MAX-markering. 23.Schakel het apparaat pas in, nadat u de watertank met water gevuld hebt. 24.Als u het apparaat meerdere malen achter elkaar gebruikt, laat het dan tussendoor minstens 5 minuten afkoelen. 25.Gebruik de koffiekan nooit in de magnetron, omdat de kan hiervoor niet geschikt is. 26.Om verwondingen te voorkomen, mag u het apparaat niet verschuiven, zolang het in werking is. 27.Zorg ervoor dat alle gebruikers, vooral kinderen, bekend zijn met het gevaar dat van uittredende stoom of hete waterspetters uitgaat – verbrandingsgevaar! 28.Om schade te vermijden, mag het apparaat niet met toebehoren van andere fabrikanten of andere merken worden gebruikt. 29.Trek de netstekker uit het stopcontact nadat u het apparaat heeft gebruikt en voordat u het gaat reinigen. Laat het apparaat nooit zonder toezicht achter, als de netstekker in het stopcontact steekt. 30.Controleer het apparaat, de stekker en de aansluitkabel regelmatig op slijtage of beschadiging. Als de aansluitkabel of andere delen beschadigd zijn, stuur het apparaat of de aansluitkabel dan a.u.b. ter controle en reparatie naar onze klantenservice. Ondeskundige reparaties kunnen ernstige gevaren voor de gebruiker veroorzaken en hebben uitsluiting van de garantie tot gevolg. 31.Als de aansluitkabel van dit apparaat beschadigd wordt, moet deze door de fabrikant, de klantenservice of door een gekwalificeerde persoon vervangen worden, om gevaar te vermijden. LET OP: Het apparaat wordt tijdens de werking heel heet! Open de behuizing van het apparaat in geen geval. Er bestaat gevaar voor een elektrische schok. De fabrikant is niet aansprakelijk, indien het apparaat verkeerd gemonteerd, ondeskundig of foutief gebruikt of door niet geautoriseerde derden gerepareerd werd. VOOR HET EERSTE GEBRUIK Voordat u met dit apparaat voor de eerste keer koffie zet, laat het a.u.b. eerst een tot twee keer zonder koffiepoeder doorlopen, om eventuele fabricageresten te verwijderen. Ook als u het apparaat lang niet gebruikt hebt, is het raadzaam om het een keer zonder koffiepoeder te laten doorlopen. 1. Verwijder alle verpakkingsmaterialen en transportbeveiligingen. 2. Reinig de glazen kan (9), de permanente filter (1) en de filterhouder (2), zoals in 32 het hoofdstuk „Reiniging en onderhoud“, beschreven. 3. Veeg de buitenkant van het apparaat af met een vochtige doek. 4. Vul de watertank (5) tot aan de MAX-markering/12 kopjes met kraanwater. Let op dat zich geen koffiebonen in het bonenreservoir bevinden. 5. Sluit het deksel van de glazen kan en zet de kan op de warmhoudplaat (8). 6. Steek de stekker in een stopcontact. 7. Attentie: Alle bedieningscommando‘s die u via de bedieningsknoppen geeft, worden uitsluitend opgeslagen, zolang het display blauw verlicht is. Zodra de verlichting van het display uit is, moet u eerst op een wil- lekeurige knop drukken, voordat u verdere commando‘s m.b.v. de knoppen kunt geven. 8. Druk één keer op de knop „MÜHLE AUS“ („MOLEN UIT“), daarna op de knop „EIN/ AUS“ („AAN/UIT“) en laat het water lopen, totdat het apparaat door een herhaaldelijke signaaltoon aangeeft dat het proces beëindigd is. 9. Gooi dit water a.u.b. weg. 10.Reinig de glazen kan. 11.Schakel het apparaat uit m.b.v. de knop „EIN/AUS“ („AAN/UIT“). KOFFIEBONEN 1. Met het koffiezetapparaat Mühle kan koffie worden gemaakt met vers gemalen koffiebonen of met normaal in de winkel verkrijgbaar koffiepoeder. 2. Als u koffiebonen wilt gebruiken, let er dan bij het boodschappen doen op dat de bonen geschikt zijn voor een koffiemolen. Gebruik a.u.b. geen bonen voor een volautomatische koffiemachine, omdat deze bonen anders geroosterd zijn en de smaak van de koffie daardoor niet bevredigend is. TIJD INSTELLEN 1. Zodra het koffiezetapparaat op het stroomnet aangesloten is, geeft het display 12:00 uur weer. 2. Druk nu zo vaak op de knoppen „STD“(„UUR“) en „MIN“ („MINUUT“), tot de actuele tijd ingesteld is. 3. U ziet de actuele tijd en kunt nu met het bereiden van de koffie beginnen. 4. Als het apparaat langer dan ca. 30 seconden geen stroom krijgt, wordt de tijd niet opgeslagen; dit betekent dat u de tijd opnieuw moet instellen, nadat het apparaat van het stroomnet gescheiden werd. KOFFIESTERKTE INSTELLEN 1. Met de knop „STÄRKE“(„STERKTE“) kunt u de gewenste koffiesterkte selecteren. Druk zo vaak op de knop „Stärke“ („STERKTE“), tot het gewenste aantal koffiebonen in het display verschijnt. 2. U kunt de volgende koffiesterktes kiezen: Fijn – Weergave in het display: een koffieboon (standaard instelling) Middel – Weergave in het display: twee koffiebonen Fijn – Weergave in het display: drie koffiebonen 3. Aanwijzing: Zodra het apparaat lang van het stroomnet was, moet u de sterkte opnieuw instellen. MAALGRAAD INSTELLEN 1. Als u koffie van vers gemalen koffiebonen wilt maken, kunt u de maalgraad van de bonen met deze draaischakelaar op FijnMiddel-Grof instellen. 2. Let op dat de knop „MÜHLE AUS“ („MOLEN UIT“) niet geactiveerd is. 3. Bereid het apparaat voor zoals in het hoofdstuk „Koffie zetten“ beschreven is en schakel het apparaat in. 4. Zodra het apparaat de bonen begint te malen, kunt u de gewenste maalgraad selecteren m.b.v. de draaischakelaar (10). 5. Attentie: wijzig de maalgraad a.u.b. niet, als het apparaat net geen bonen maalt. 33 KOFFIE ZETTEN Aanwijzing: Alle bedieningscommando's die u via de bedieningsknoppen geeft, worden uitsluitend opgeslagen, zolang het display blauw verlicht is. Zodra de verlichting van het display uit is, moet u eerst op een willekeurige knop drukken, voordat u verdere commando's m.b.v. de knoppen kunt geven. Gebruik a.u.b. geen bonen voor een volautomatische koffiemachine, omdat deze bonen anders geroosterd zijn en de smaak van de koffie daardoor niet bevredigend is. Er zijn in de handel verschillende soorten koffiebonen verkrijgbaar, die geschikt zijn voor koffiemolens (de aanwijzingen op de verpakking raadplegen a.u.b.). 1. Steek de stekker in een stopcontact. 2. Doe de gewenste hoeveelheid vers, helder water in de watertank. Hiervoor kunt u gebruik maken van de glazen kan, waarop markeringen voor het afzonderlijke aantal kopjes aangegeven zijn. De kan moet met water voor minstens twee kopjes (270 ml) gevuld worden, de maximale hoeveelheid water bedraagt 12 kopjes (1.525 ml). Let op dat u de watertank niet te vol maakt, omdat het overtollige water anders aan de achterkant van het apparaat naar buiten stroomt. 3. De hoeveelheid water in de kan is steeds iets hoger dan de daadwerkelijke hoeveelheid koffie, omdat het koffiepoeder een beetje water absorbeert. 4. Open de zwenkarm van het koffiezetapparaat, door op de knop „ÖFFNEN“ („OPENEN“) te drukken, die zich aan de rechterkant van het apparaat bevindt. 5. Plaats de permanente filter in de filterkorf. Als alternatief kunt u een papieren filter grootte 4 gebruiken. 6. Als u de permanente filter gebruikt, kunnen zich kleine hoeveelheden koffiedrab in de glazen kan ophopen. Dit is afhankelijk van de techniek en is geen defect aan het apparaat. 7. Sluit de zwenkarm met lichte druk. 8. Zet de glazen kan met gesloten deksel op de warmhoudplaat. 9. Verwijder het deksel van het bonenreservoir. Doe de koffiebonen in het bonenreservoir. 10.Denk eraan dat het bonenreservoir steeds minstens halfvol moet zijn. De maximale vulhoeveelheid bedraagt 200 g. 11.Maak het bonenreservoir niet te vol, omdat de molen anders beschadigd kan raken. 12.Sluit het bonenreservoir met het deksel. Houd er alstublieft rekening mee dat het apparaat het niet registreert, als zich geen bonen in het reservoir bevinden. 13.Selecteer het gewenste aantal kopjes, door zo vaak op de knop „2-12 Tassen“ („2-12 kopjes“) te drukken, tot het gewenste aan34 tal verschijnt. U kunt tussen 2, 4, 6, 8, 10 en 12 kopjes kiezen. Let er a.u.b. absoluut op dat u exact het aantal kopjes selecteert, waarvoor u ook water in de kan hebt gedaan. Als u water voor twee kopjes in de kan hebt gedaan, moet u ook twee kopjes selecteren; als u water voor vier kopjes in de kan doet, moet u ook vier kopjes selecteren enz. Alleen op die manier is de optimale smaak van de koffie gegarandeerd. Het koffiezetapparaat maalt de exacte hoeveelheid voor het betreffende aantal kopjes dat u ingesteld hebt. 14.Nu kunt met de knop „STÄRKE“(„STERKTE“) de gewenste koffiesterkte selecteren. 15.Als u het wenst, kunt u ook koffie van koffiepoeder bereiden. Druk hiervoor op de knop „MÜHLE AUS“ („MOLEN UIT“). Zolang deze knop actief is, is de achtergrondverlichting van de knop blauw. Zodra het koffiezetten beëindigt, wordt de knop „MÜHLE AUS“ („MOLEN UIT“) automatisch gedeactiveerd. 16.Nu doet u de gewenste hoeveelheid koffiepoeder in de permanente filter, naar smaak 5-7 g (ca. 1 meetlepel) middelfijn gemalen koffie per kopje. Te fijn gemalen koffie kan de poriën van de filter verstoppen en dit kan ertoe leiden dat de filter overloopt. 17.Druk op de knop „EIN/AUS“ („AAN/UIT“) en vervolgens begint het apparaat met koffiezetten. 18.In het display wordt tijdens het proces „Brühen“ („Koffiezetten“) weergegeven. 19.Tijdens het koffiezetten kunt u de kan steeds uit het apparaat halen. De druppelstop voorkomt dat er koffie uit de filter druppelt. Zet de kan binnen 30 seconden weer onder de filter, zodat de filter niet overloopt. 20.Als het apparaat klaar is met koffiezetten, wordt dit aangegeven door een signaaltoon. 21.De warmhoudplaat blijft net zo lang ingeschakeld, als ook het koffiezetapparaat ingeschakeld is, om de resterende koffie in de kan warm te houden. Het apparaat schakelt zich na twee uur automatisch uit. Als u de warmhoudfunctie niet wilt, schakelt u het apparaat uit m.b.v. de knop „EIN/AUS“ („AAN/UIT“). 22.Laat de lege koffiekan niet op de hete warmhoudplaat staan, nadat u de koffie hebt uitgeschonken. 23.Neem de permanente filter uit het apparaat en gooi de koffiedrab bij het afval. KOFFIE ZETTEN MET EEN TIMER 1. Het apparaat wordt voorbereid zoals in het hoofdstuk „Koffie zetten“ beschreven. Denk er hierbij a.u.b. aan dat u de koffiesterkte en het aantal kopjes volgens uw wensen instelt. Eerst beslist u of u koffie van koffiepoeder of van koffiebonen wilt bereiden en dan drukt u evt. op de knop „MÜHLE AUS“ („MOLEN UIT“). Denk er a.u.b. aan dat de maalgraad alleen ingesteld kan worden, terwijl het apparaat bonen maalt. Het beste laat u het apparaat eerst een keer koffie zetten zonder de timer te gebruiken en selecteert hierbij de gewenste maalgraad. Zodra het apparaat de bonen begint te malen, kunt u de gewenste maalgraad selecteren m.b.v. de draaischakelaar. Om beschadiging van de molen te voorkomen, mag u de maalgraad niet wijzigen, als het apparaat net geen bonen maalt. 2. Controleer of de tijd in het display overeenkomt met de daadwerkelijke tijd. Als dit niet het geval is, stelt u de actuele tijd in zoals in het hoofdstuk „Tijd instellen“ beschreven. 3. Druk zo lang op de knop „PROGRAMM“ („PROGRAMMA“) tot de tijd in het display knippert. 4. Nu kunt u m.b.v. de knoppen „STD“ („UUR“) en „MIN“ („MINUUT“) de gewenste tijd instellen, waarop het koffiezetten moet beginnen. Druk zo vaak op de betreffende toetsen, tot de gewenste tijd verschijnt. 5. Druk daarna opnieuw op de knop „PROGRAMM“ („PROGRAMMA“). Deze knop is nu blauw verlicht, in het display verschijnt „AUTO“ als aanwijzing dat de timer ingeschakeld werd. 6. Op de ingestelde tijd begint het apparaat dan met koffiezetten en in het display verschijnt „BRÜHEN“ („KOFFIEZETTEN“). 7. Tijdens het koffiezetten kunt u de kan steeds uit het apparaat halen. De druppelstop voorkomt dat er koffie uit de filter druppelt. Zet de kan binnen 30 seconden weer onder de filter, zodat de filter niet overloopt. 8. Als het apparaat klaar is met koffiezetten, wordt dit aangegeven door een signaaltoon. 9. De warmhoudplaat blijft net zo lang ingeschakeld, als ook het koffiezetapparaat ingeschakeld is, om de resterende koffie in de kan warm te houden. Het apparaat schakelt zich na twee uur automatisch uit. Als u de warmhoudfunctie niet wilt, schakelt u het apparaat uit m.b.v. de knop „EIN/AUS“ („AAN/UIT“). 10.Laat de lege koffiekan niet op de hete warmhoudplaat staan, nadat u de koffie hebt uitgeschonken. 11.Neem de permanente filter uit het apparaat en gooi de koffiedrab bij het afval. REINIGING EN ONDERHOUD Voordat u het apparaat gaat reinigen, schakelt u het uit en trekt u de stekker uit het stopcontact. Laat het apparaat afkoelen, voordat u het reinigt. 1. Het apparaat en de aansluitkabel mogen niet in water of een andere vloeistof gedompeld of in de vaatwasser gereinigd worden. 2. Open de zwenkarm van het apparaat en verwijder de permanente filter. Gooi de koffiedrab bij het afval. 3. Boven de filter kan zich condenswater vormen. Veeg de onderkant van het deksel na het koffiezetten af met een droge doek. 4. Veeg de behuizing en de warmhoudplaat af met een vochtige doek en een beetje afwasmiddel. Gebruik geen scherpe schuurmiddelen, staalwol, metalen voorwerpen, desinfecterende middelen of hete schoon35 maakmiddelen, omdat deze het apparaat kunnen beschadigen. 5. De glazen kan, het deksel daarvan, de filterhouder en filter kunt u reinigen met water, waaraan u een beetje afwasmiddel hebt toegevoegd. 6. Het apparaat moet volkomen droog zijn, voordat u het weer mag gebruiken. ONTKALKEN 1. Regelmatig ontkalken bewaart het functievermogen van uw koffiezetapparaat, verlengt zijn levensduur en verlaagt het energieverbruik. 2. Gebruik voor het ontkalken een in de handel gebruikelijke ontkalker volgens de instructies op de verpakking. 3. Vul het waterreservoir tot aan de MAX-markering met de ontkalkingsoplossing. 4. Alternatief kunt u ook citroenzuur gebruiken. Geef 25 à 50 g citroenzuur op 1 liter water. 5. Plaats de kan op de warmhoudplaat. 6. Druk nu op de knop “EIN/AUS” en laat ca. een derde van het water door het apparaat lopen. 7. Schakel het apparaat uit door keer op de toets “EIN/AUS” te drukken en laat de ontkalkingsoplossing ca. 15 à 30 minuten inwerken. Bij sterke verkalking kunt u de oplossing ook tijdens de nacht laten inwerken. 8. Druk dan weer op de knop “EIN/AUS” en laat de overige ontkalkingsoplossing doorlopen. 9. Giet de ontkalkingsoplossing weg en laat minstens twee keer schoon water door het apparaat lopen. GARANTIEVOORWAARDEN Wij geven op onze apparaten een garantietermijn van 24 maanden (12 maanden bij commerciële gebruik), gerekend vanaf de dag van aanschaf. Deze garantie geldt voor schade, die bij correct gebruik aantoonbaar is veroorzaakt door een fout in de productie. Binnen de garantietermijn verhelpen wij materiaal- en productiefouten door herstelling of vervanging naar onze keuze. Onze garantie is slechts geldig voor in Duitsland en Oostenrijk verkopte apparaten. In andere landen a.u.b. de importeur aanspreken. Apparaaten, waarvoor garantie in aanspraak wordt genomen, moeten ons samen met een kopie van de machineel gegenereerde kassabon waaruit de koopdatum duidelijk wordt, alsmede een beschrijving van de fout goed verpakt aan onze klantenservice worden toegezonden, porto betaald. Als er sprake van garantie is, worden de verzendingskosten in Duitsland en Oostenrijk aan de klant vergoed. De garantie dekt geen schade veroorzaakt door slijtage, onbehoorlijk gebruik/foutieve handelingen en niet-naleving van de onderhouds- en reinigingsaanwijzingen. Het recht op garantie vervalt, wanneer reparaties of manipulaties aan het apparaat door derden worden doorgevoerd. Eventuele rechten van de eindgebruiker t.o.v. de verkoper of distributeur worden door deze garantie niet aangetast. VERWIJDEREN VAN AFVAL / MILIEUBESCHERMING Onze apparaten zijn geproduceerd met een hoge qualiteit voor een lange gebruik. Regelmatige onderhoud en vakkundig reparaties door onze klantenservice verlengt de gebruiksduur. Wanneer het apparat defekt is en kan niet meer gerepareerd worden, let op de volgende instructies. Dit product mag niet samen met het normale huishoudelijke afval worden afgevoerd. U dient dit product bij een voor het recycleren van elektrische of elektronische apparaten aangewezen verzamelplaats in te leveren. Door het separaat inzamelen en recycleren van afvalproducten helpt u mee bij het zuinig omgaan met de natuurlijke hulpbronnen en zorgt u ervoor dat het product op een gezondheids- en milieuvriendelijke manier afgevoerd wordt. 36 ISTRUZIONI PER L’USO MODELLO 28736 DATI TECNICI Potenza: 900–1050 Watt, 50 Hz, 220–240 V~ Bricco: Bricco in vetro con coperchio e graduazione Volume: 1,5 litri, max. 12 tazze Misura filtro: Filtro permanente o filtro in carta 1 x 4 Misure: Circa 20,8 x 31,3 x 42,2 cm (lunghezza/larghezza/altezza) Peso: Circa 4,9 kg Lunghezza cavo: Circa 90 cm, montato in maniera fissa Dotazioni: Scocca in acciaio inox, display LC, contenitore chicchi con coperchio salvaroma, dispositivo antigoccia, macinacaffè integrato, serbatoio dell‘acqua integrato, temporizzazione, display ora, selezione tazze e intensità caffè, spie di controllo Accessori: Filtro permanente, istruzioni per l‘uso Con riserva di modifiche ed errori relativi a caratteristiche delle dotazioni, tecnica, colore e design SIGNIFICATO DEI SIMBOLI Questo simbolo segnala possibili pericoli in grado di provocare lesioni a persone o danni all‘apparecchio. Questo simbolo indica un possibile pericolo di ustioni. In presenza di questo simbolo agire sempre con la massima cautela. PER LA VOSTRA SICUREZZA 1. Si raccomanda di leggere e conservare le presenti istruzioni. 2. L‘apparecchio può essere utilizzato da bambini a partire dagli 8 anni di età e da persone che presentano ridotte capacità fisiche, sensoriali o mentali o che difettano della necessaria esperienza e/o conoscenze solo se adeguatamente sorvegliati o addestrati sull‘uso in sicurezza dell‘apparecchio e se a conoscenza dei rischi correlati. L‘apparecchio non è un giocattolo. La pulizia e la manutenzione dell‘apparecchio possono essere effettuate da bambini soltanto sotto sorveglianza. 3. I bambini devono essere sorvegliati per accertarsi che non giochino con l’apparecchio. 4. Conservare l‘apparecchio fuori dalla portata dei bambini. 5. Collegare l’apparecchio solo a corrente alternata con una tensione pari a quella indicata sulla targhetta. 6. Questo apparecchio non deve essere comandato tramite un temporizzatore esterno o un sistema di telecomando. 7. Per motivi di sicurezza elettrica non immergere mai apparecchio o cavo in acqua o altri fluidi. 8. Per motivi di sicurezza elettrica non lavare l’apparecchio in lavastoviglie. 9. Tasto e cavo non devono venire a contatto con acqua o altri fluidi. Se ciò dovesse succedere, prima di un nuovo utilizzo è necessario che tutte le parti siano completamente asciutte. 10.Non toccare mai né l‘apparecchio né il cavo di alimentazione con le mani bagnate. 37 11.L’apparecchio è progettato esclusivamente 24.Per l‘uso ripetuto, di tanto in tanto lasciar per l’uso domestico o impieghi similari, ad raffreddare l‘apparecchio per almeno 5 es. minuti. in aree cucina di negozi, uffici o altri 25.Non usare mai il bricco del caffè nel forno luoghi di lavoro, a microonde, in quanto non è adatto per aziende agrituristiche, questo uso. per l‘uso da parte degli ospiti di hotel, 26.Per evitare di ferirsi non spostare motel o altre strutture ricettive, l’apparecchio finché è in funzione. in pensioni private o case di vacanza. 27.Accertarsi che i pericoli da vapore fuorius12.Per motivi di sicurezza non mettere mai cente o da spruzzi d‘acqua calda siano noti l‘apparecchio su superfici calde, vassoi a tutti gli utenti, in particolare ai bambini – metallici o basi umide. pericolo di ustioni! 13.L‘apparecchio e il cavo di alimentazione 28.Per evitare danni, non usare l’apparecchio non devono essere impiegati nei pressi di con accessori di altri marchi o produttori. fiamme. 29.Dopo l’utilizzo, nonché prima della puli14.Utilizzare sempre la macchina da caffè su zia, staccare la spina dalla presa elettrica. una superficie piana sgombra e resistente al Non lasciare mai l’apparecchio incustodito calore. quando la spina è inserita. 15.L‘apparecchio può essere usato soltanto per 30.Controllare regolarmente l’apparecchio, la preparare caffè, comunque mai per scaldare/ spina e il cavo di alimentazione per vedere tenere in caldo latte o altri liquidi. che non presentino tracce di usura o danni. 16.Assicurarsi che il cavo di alimentazione non In caso di danni al cavo di collegamento o penda dal piano di lavoro, in quanto ciò potad altre parti, inviare l’apparecchio e il cavo rebbe causare infortuni, ad es. se un bamdi alimentazione al nostro servizio clienti per bino piccolo dovesse strattonarlo. il controllo o la riparazione. Riparazioni non 17.Il cavo di alimentazione deve essere posato idonee possono infatti causare notevoli periin modo che non possa essere strattonato o coli per l‘utente e comportano il decadere che non ci si possa inciampare sopra. della garanzia. 18.Per evitare di danneggiare il cavo di aliment31.Se il cavo di collegamento di questo appaazione, non piegarlo e non avvolgerlo attorno recchio è danneggiato deve essere sostituito all‘apparecchio. dal produttore, dal servizio clienti o da una 19.Usare la macchina da caffè solo in interni. persona analogamente qualificata, al fine di 20.Fare attenzione che nel contenitore chicchi evitare pericolosità. vi sia solo caffè in chicchi. Corpi estranei ATTENZIONE: possono distruggere il macinacaffè. Durante il funzionamento l‘apparecchio 21.Non coprire mai l’apparecchio durante il diventa molto caldo! funzionamento, in modo da evitare surriscaldamenti dello stesso. Non aprire mai la scocca 22.Per preparare il caffè usare acqua fresca dell‘apparecchio. Pericolo di scossa pulita e riempire il serbatoio dell‘acqua elettrica. almeno fino alla marcatura inferiore (2 tazze) e massimo fino a quella MAX. 23.Accendere l‘apparecchio soltanto dopo aver versato l‘acqua nell‘apposito serbatoio. Il fabbricante non si assume alcuna responsabilità per montaggi errati, utilizzi errati o inadeguati o per riparazioni eseguite da terzi non autorizzati. PRIMA DI PREPARARE IL PRIMO CAFFÈ Prima di preparare il primo caffè effettuare uno o due cicli di preparazione senza caffè in polvere, in modo da eliminare eventuali residui di fabbricazione. Raccomandiamo di eseguire un ciclo di preparazione senza caffè in polvere anche se l'apparecchio non è stato usato da tanto 1. Rimuovere tutti i materiali di imballo e le protezioni da trasporto. 2. Pulire il bricco in vetro (9), il filtro permanente (1) e il portafiltro (2) come illustrato nel capitolo „Pulizia e cura“. 38 3. Strofinare l‘esterno dell‘apparecchio con un panno umido. 4. Riempire il serbatoio dell‘acqua (5) con acqua di rubinetto fino alla marcatura MAX/12 tazze. Fare attenzione che nel contenitore chicchi vi siano solo chicchi. 5. Chiudere il coperchio del bricco in vetro e mettere quest‘ultimo sulla piastra di tenuta in caldo (8). 6. Inserire la spina in una presa elettrica. 7. Attenzione: Tutte le immissioni effettuate dagli utenti tramite i tasti vengono memorizzate soltanto finché il display è illuminato in blu. Non appena l‘illuminazione del display si spegne, è necessario premere un tasto qualunque prima che siano possibili altre immissioni tramite i tasti. 8. Premere una volta il tasto „MÜHLE AUS“ (MACINACAFFE‘ DISATTIVATO), poi quello „EIN/AUS“ (ON/OFF) e lasciar scorrere l‘acqua finché l‘apparecchio avverte mediante un segnale acustico multiplo che il processo è terminato. 9. Si raccomanda di buttare via quest‘acqua. 10.Pulire il bricco in vetro. 11.Spegnere l‘apparecchio tramite il tasto „EIN/AUS“ (ON/OFF). CAFFÈ IN CHICCHI 1. Con la macchina da caffè Mühle è possibile preparare il caffè con chicchi macinati freschi oppure con del normale caffè in polvere. 2. Se si desidera usare il caffè in chicchi, al momento dell‘acquisto occorre sincerarsi che i chicchi siano adatti per macinacaffè. Non usare chicchi per macchine da caffè interamente automatiche in quanto, a causa della diversa tostatura, determinano un sapore del caffè insoddisfacente. IMPOSTAZIONE DELL‘ORA 1. Non appena la macchina da caffè è collegata alla rete elettrica il display indica 12:00. 2. Quindi premere i tasti „STD“ (ORA) e „MIN“ finché viene indicata l‘ora attuale. 3. E‘ visualizzata l‘ora attuale ed è possibile iniziare a preparare il caffè. 4. In caso di interruzione dell‘alimentazione elettrica superiore a 30 secondi la memorizzazione dell‘ora va perduta. Ciò significa che se l‘apparecchio è stato staccato dalla rete elettrica, è necessario reimpostare l‘ora. REGOLAZIONE DELL‘INTENSITÀ DEL CAFFÈ 1. Con il tasto „STÄRKE“ (INTENSITA‘) è possibile selezionare l‘intensità del caffè desiderata. Premere il tasto „Stärke“ (intensità) finché sul display compare il numero di chicchi di caffè desiderati. 2. E‘ possibile scegliere tra i seguenti gradi di intensità: Fine – indicazione del display: un chicco di caffè (impostazione standard) Medio – indicazione del display: due chicchi di caffè Forte – indicazione del display: tre chicchi di caffè 3. Avvertenza: Il grado di intensità deve essere reimpostato se l‘apparecchio è staccato dalla corrente per qualche tempo. REGOLAZIONE DEL GRADO DI MACINATURA 1. Quando si prepara il caffè da chicchi macinati freschi, con questo selettore è possibile impostare il grado di macinatura dei chicchi su Fine-Medio-Grosso. 2. Fare attenzione che il tasto „MÜHLE AUS“ (MACINACAFFE' DISATTIVATO) non sia attivato. 3. Preparare l'apparecchio come illustrato nel capitolo „Preparazione del caffè“ e accendere l'apparecchio. 4. Non appena l'apparecchio inizia a macinare i chicchi, con il selettore del grado di macinatura (10) è possibile selezionare il livello desiderato. 5. Attenzione: Non modificare il grado di macinatura quando l'apparecchio sta macinando i chicchi. 39 PREPARAZIONE DEL CAFFÈ Avvertenza: Tutte le immissioni effettuate dagli utenti tramite i tasti vengono memorizzate soltanto finché il display è illuminato in blu. Non appena l'illuminazione del display si spegne, è necessario premere un tasto qualunque prima che siano possibili altre immissioni tramite i tasti. Non usare chicchi per macchine da caffè interamente automatiche in quanto, a causa della diversa tostatura, determinano un sapore del caffè insoddisfacente. In commercio si trovano caffè in chicchi di diversi produttori adatti per macinacaffè (si raccomanda di osservare le avvertenze sulla confezione). 1. Inserire la spina in una presa elettrica. finché si illumina il numero di tazze deside2. Versare nel serbatoio dell‘acqua soltanto rate. E‘ possibile scegliere tra 2, 4, 6, 8, 10 la quantità desiderata di acqua fresca e e 12 tazze. Prestare assolutamente attenzipulita. Per versare l‘acqua è possibile usare one a scegliere il numero di tazze per cui è il bricco in vetro su cui sono riportate delle stata versata l‘acqua. Se si versa acqua per marcature corrispondenti al numero di due tazze si devono selezionare due tazze, tazze. Il serbatoio deve essere riempito con se si versa acqua per quattro tazze si devono una quantità d‘acqua sufficiente per almeno selezionare quattro tazze ecc. Solo in questo due tazze (270 ml), la quantità massima è modo è possibile garantire il sapore ottimale di 12 tazze (1.525 ml). Fare attenzione a del caffè. La macchina da caffè macina la non riempire eccessivamente il serbatoio in quantità di polvere di caffè esatta corrisponquanto altrimenti l‘acqua in eccesso fuodente al numero di tazze. riesce dal retro dell‘apparecchio. 14.A questo punto con il tasto „STÄRKE“ (INTEN3. La quantità d‘acqua versata è sempre legSITA‘) è possibile selezionare l‘intensità del germente superiore alla quantità di caffè caffè desiderata. effettiva, in quanto il caffè in polvere 15.Se lo si desidera è possibile preparare il assorbe un po‘ dell‘acqua. caffè anche con caffè in polvere. Per far 4. Aprire il braccio rotante della macchina ciò premere il tasto „MÜHLE AUS“ (MACIda caffè premendo il pulsante „ÖFFNACAFFE‘ DISATTIVATO). Finché il tasto è NEN“ (APERTURA) presente sulla destra attivo la retroilluminazione è illuminata in dell‘apparecchio. colore blu. Non appena il processo di prepa5. Inserire il filtro permanente nel cestello razione è terminato il tasto „MÜHLE AUS“ filtro. Alternativamente è possibile usare (MACINACAFFE‘ DISATTIVATO) è disattianche un filtro in carta misura 4. vato in automatico. 6. Se si usa il filtro permanente, piccole quan16.A questo punto versare nel filtro permatità di fondi possono raccogliersi nel bricco nente la quantità di caffè in polvere desiin vetro. Questo fenomeno è determinato derata, a seconda dei gusti 5-7 g (circa 1 da cause tecniche e non indica un difetto misurino a cucchiaio) per ogni tazza di caffè dell‘apparecchio. macinato medio. Il caffè macinato troppo 7. Chiudere il braccio rotante esercitando una fine può ostruire i pori del filtro e causare leggera pressione. tracimazioni. 8. Mettere il bricco in vetro con il coperchio 17.Premendo il tasto „EIN/AUS“ (ON/OFF), chiuso sulla piastra di tenuta in caldo. l‘apparecchio inizia a preparare il caffè. 9. Rimuovere il coperchio del contenitore chic18.Durante il processo di preparazione il dischi. Versare i chicchi di caffè nel conteniplay visualizza „Brühen“. tore chicchi. 19.E‘ possibile rimuovere il bricco in qualun10.Prestare attenzione che il contenitore chicque momento durante il processo di prepachi sia sempre almeno mezzo pieno. La razione. Il dispositivo antigoccia impedisce quantità di riempimento massima è di circa al caffè residuo di gocciolare dal filtro. 200 g. Rimettere il bricco sotto al filtro entro 30 11.Non riempire eccessivamente il contenitore secondi, di modo che il filtro non tracimi. chicchi, in quanto altrimenti il macinacaffè 20.Quando l‘apparecchio ha finito di preparare può venir danneggiato. il caffè, ciò è indicato da un segnale acu12.Chiudere il contenitore chicchi con il coperchio. stico. Si tenga presente che l‘apparecchio non è in 21.La piastra di tenuta in caldo rimane attivata grado di riconoscere quando non vi sono finché è accesa anche la macchina da caffè, chicchi nel contenitore. in modo da tenere in caldo il caffè rimasto 13.Scegliere il numero di tazze desiderate prenel bricco. Dopo due ore, l‘apparecchio si mendo il tasto „2-12 Tassen“ (2-12 tazze) spegne automaticamente. Se non si desi40 dera la funzione tenuta in caldo, spegnere l‘apparecchio con il tasto „EIN/AUS“ (ON/ OFF). 22.Dopo la mescita di tutto il caffè non lasciare il bricco vuoto sulla piastra di tenuta in caldo calda. 23.Rimuovere il filtro permanente e smaltire i fondi del caffè. PREPARAZIONE DEL CAFFÈ CON TEMPORIZZAZIONE 1. Preparare l‘apparecchio come illustrato nel capitolo „Preparazione del caffè“. Prestare attenzione a impostare l‘intensità e il numero di tazze in base alle proprie preferenze. Decidere se si vuole preparare il caffè con polvere o chicchi ed eventualmente premere il tasto „MÜHLE AUS“ (MACINACAFFE‘ DISATTIVATO). Si tenga presente che è possibile impostare il grado di macinatura soltanto finché l‘apparecchio macina i chicchi. L‘ideale è lasciare che l‘apparecchio prepari il caffè una volta senza temporizzazione e nel frattempo selezionare il grado di macinatura desiderato. Non appena l‘apparecchio inizia a macinare i chicchi, tramite il selettore del grado di macinatura, è possibile selezionare il livello desiderato. Non modificare il grado di macinatura quando l‘apparecchio sta macinando i chicchi in modo da non arrecare danni al meccanismo del macinacaffè. 2. Controllare che l‘ora indicata sul display corrisponda a quella effettiva. Altrimenti impostare l‘ora attuale come illustrato nel capitolo „Impostazione dell‘ora“. 3. Premere il tasto „PROGRAMM“ (PROGRAMMA) finché l‘ora lampeggia sul display. 4. A questo punto tramite i tasti „STD“ (ORA) e „MIN“ (MIN) è possibile iniziare a impostare l‘ora alla quale deve iniziare la preparazione del caffè. Premere il relativo tasto finché è visualizzata l‘ora desiderata. 5. Quindi premere nuovamente il tasto „PROGRAMM“ (PROGRAMMA). Così facendo questo si illumina in blu, sul display compare „AUTO“ quale indicazione che la temporizzazione è stata attivata. 6. All‘ora selezionata l‘apparecchio inizia a preparare il caffè, il display visualizza „BRÜHEN“ (PREPARAZIONE). 7. E‘ possibile rimuovere il bricco in qualunque momento durante il processo di preparazione. Il dispositivo antigoccia impedisce al caffè residuo di gocciolare dal filtro. Rimettere il bricco sotto al filtro entro 30 secondi, di modo che il filtro non tracimi. 8. Quando l‘apparecchio ha finito di preparare il caffè, ciò è indicato da un segnale acustico. 9. La piastra di tenuta in caldo rimane attivata finché è accesa anche la macchina da caffè, in modo da tenere in caldo il caffè rimasto nel bricco. Dopo due ore, l‘apparecchio si spegne automaticamente. Se non si desidera la funzione tenuta in caldo, spegnere l‘apparecchio con il tasto „EIN/AUS“ (ON/ OFF). 10.Dopo la mescita di tutto il caffè non lasciare il bricco vuoto sulla piastra di tenuta in caldo calda. 11.Rimuovere il filtro permanente e smaltire i fondi del caffè. PULIZIA E CURA Prima di procedere alla pulizia spegnere sempre l’apparecchio e staccare la spina dalla presa elettrica. Lasciar raffreddare prima di pulirlo. l‘apparecchio 1. L’apparecchio e il cavo di alimentazione non devono essere immersi in acqua o altri liquidi e non devono essere lavati in lavastoviglie. 2. Aprire il braccio rotante dell‘apparecchio e rimuovere il filtro permanente. Smaltire i fondi del caffè. 3. Sopra al filtro può formarsi della condensa. Dopo la preparazione del caffè strofinare la parte inferiore del coperchio con un panno asciutto. 4. Pulire la scocca e la piastra di tenuta in caldo con un panno umido e un po‘ di detersivo. Non usare prodotti abrasivi, lana d’acciaio, oggetti metallici, disinfettanti o 41 detergenti caldi, in quanto possono causare danni. 5. Il bricco in vetro, il relativo coperchio, i portafiltro e il filtro possono essere puliti con acqua con l‘aggiunta di un po‘ di detersivo. 6. L‘apparecchio deve essere completamente asciutto prima di poterlo riutilizzare. DECALCIFICAZIONE 1. Decalcificando regolarmente l‘apparecchio è possibile aumentare le prestazioni e la durata di vita della caffettiera automatica, nonché ridurre i consumi energetici. 2. Utilizzare un comune decalcificante e procedere seguendo le istruzioni riportate sulla confezione. 3. Riempire il serbatoio di soluzione decalcificante fino al raggiungimento del livello MAX. 4. In alternativa è possibile utilizzare anche acido citrico. Versare 25-50 g di acido citrico in un litro d‘acqua. 5. Mettere la brocca sulla piastra termica. 6. Premere il pulsante „EIN/AUS“ e fare scorrere circa un terzo dell’acqua. 7. Spegnere la caffettiera premendo il pulsante „EIN/AUS“ e lasciare agire la soluzione decalcificante per circa 15-30 minuti. In caso di forte calcificazione lasciar agire la soluzione per tutta la notte. 8. Premere nuovamente “EIN/AUS” e lasciare scorrere la soluzione decalcificante. 9. Gettare la soluzione decalcificante e lasciar scorrere acqua fresca per almeno due volte. NORME DIE GARANZIA I nostri prodotti sono garantiti per 24 mesi, 12 mesi in caso di uso professionale, dalla data di acquisto per i guasti manifestatisi durante un utilizzo conforme alle disposizioni e attribuibili in modo dimostrabile a difetti di fabbricazione. Nel periodo di garanzia porremo rimedio ai difetti materiali e di produzione secondo la nostra valutazione, procedendo alla riparazione o alla sostituzione dell’apparecchio. Le nostre prestazioni di garanzia valgono esclusivamente per gli apparecchi venduti in Germania e Austria. In tutti gli altri casi rivolgersi all‘importatore. Gli apparecchi per i quali si richiede la riparazione di guasti ci devono essere inviati con spedizione affrancata e debitamente imballati, unitamente a una copia del documento di acquisto redatto a macchina dal quale risulti la data di vendita, nonché la descrizione del guasto. In caso di garanzia al cliente verranno rimborsati i costi di spedizione sostenuti in Germania e Austria. Sono esclusi dalla garanzia i guasti dovuti all’usura, all’uso inappropriato o al mancato rispetto delle regole di manutenzione. Il diritto di garanzia decade qualora siano state effettuate riparazioni o interventi da parte di terzi. Eventuali diritti del consumatore finale verso il venditore o negoziante non vengono limitati dalla presente garanzia. SMALTIMENTO / TUTELA DELL’AMBIENTE I nostri apparecchi vengono prodotti rispettando un elevato standard qualitativo per una lunga durata di utilizzo. Una corretta manutenzione e riparazioni adeguate a cura dal nostro servizio clienti possono prolungare la durata di utilizzo del prodotto. Se un apparecchio è difettoso e non più riparabile, per il suo smaltimento si presti attenzione ai punti che seguono. Questo prodotto non deve essere smaltito unitamente ai comuni rifiuti domestici. Consegnare il prodotto a un centro di raccolta per il riciclaggio dei rifiuti elettrici o elettronici. Con la raccolta differenziata dei rifiuti e dei prodotti riciclabili è possibile contribuire alla tutela delle risorse naturali e far smaltire il prodotto nel rispetto dell’ambiente e della salute. 42 43 INSTRUCCIONES DE USO MODELO 28736 DATOS TÉCNICOS Potencia: 900–1050 vatios, 50 Hz, 220–240 V~ Jarra: Jarra de cristal con tapa y escala Volumen: 1,5 litros, máx. 12 tazas Tamaño del filtro: Filtro permanente o filtro de papel 1 x 4 Dimensiones: Aprox. 20,8 x 31,3 x 42,2 cm (L/An/Al) Peso: Aprox. 4,9 kg Longitud del cable: Aprox. 90 cm, montaje fijo Equipamiento: Carcasa de acero inoxidable, pantalla LC, contenedor de café en grano con tapa para conservación del aroma, dispositivo antigoteo, molinillo integrado, depósito de agua integrado, preselección de hora, indicación de hora, selección de tazas y del grado de concentración del café, pilotos de control Accesorios: Filtro permanente, instrucciones de uso RReservado el derecho de modificaciones y errores en características de equipamiento, técnica, colores y diseño EXPLICACIÓN DE LOS SÍMBOLOS Este símbolo advierte de posibles riesgos que pueden traer consigo lesiones personales o daños al aparato. Este símbolo hace referencia a un eventual riesgo de quemaduras. Proceda siempre con especial cuidado. PARA SU SEGURIDAD 1. Lea y conserve las siguientes instrucciones. 2. Este aparato puede ser manejado por niños a partir de 8 años y por personas con capacidad física, sensorial o mental reducida o carentes de experiencia y/o conocimientos siempre que estén supervisados o hayan sido correspondientemente instruidos en el manejo seguro de dicho aparato y comprendan los peligros que conlleva. Este aparato no es ningún juguete. Los niños solo pueden llevar a cabo la limpieza y el mantenimiento del mismo si están supervisados por un adulto. 3. Se debe vigilar a los niños para asegurarse de que no jueguen con el aparato. 4. Guarde el aparato fuera del alcance de los niños. 44 5. Conecte el aparato solo a corriente alterna con una tensión de acuerdo a la placa de características. 6. Este aparato no debe utilizarse con un reloj programador externo ni con un sistema de mando a distancia. 7. Por razones de la seguridad eléctrica, no sumerja el aparato o el cable de alimentación de ninguna manera en agua o en otros líquidos. 8. Por razones de la seguridad eléctrica, no limpie el aparato en el lavavajillas. 9. El interruptor y el cable no deben entrar en contacto con agua u otros líquidos. Si a pesar de ello, esto ocurriese alguna vez, todas las piezas deberán estar completamente secas antes de un nuevo uso. 10.No toque nunca el aparato o el cable de alimentación con las manos húmedas. 11.El aparato está destinado exclusivamente para el uso doméstico o fines de uso similares, por ejemplo, cocinas tipo office en comercios, oficinas u otros lugares de trabajo, empresas agrícolas, para el uso por clientes en hoteles, moteles u otros establecimientos de alojamiento colectivo, en pensiones privadas o casas vacacionales. 12.Por razones de seguridad jamás coloque el aparato sobre superficies calientes, sobre una bandeja metálica o sobre una base mojada. 13.El aparato o el cable de alimentación no deben utilizarse cerca de llamas. 14.Use siempre la máquina de café sobre una superficie libre, plana y resistente al calor. 15.El aparato solo debe utilizarse para la preparación de café y de ninguna manera para calentar/mantener caliente leche u otros líquidos. 16.Preste atención a que el cable de alimentación no cuelgue sobre el borde de la superficie de trabajo, dado que ello puede conducir a accidentes, si p. ej. niños pequeños tiran de él. 17.El cable de alimentación debe estar colocado de forma que no se pueda tirar de él ni tropezar con él. 18.No enrolle el cable alrededor del aparato y evite que se doble el cable de alimentación para evitar daños en el cable. 19.Utilice la máquina de café solo en interiores. 20.Preste atención a que solo haya granos de café en el contenedor de café en granos. Los cuerpos extraños pueden averiar el molinillo. 21.Nunca tape el aparato durante el funcionamiento para evitar un sobrecalentamiento del mismo. 22.Para la preparación de café, utilice agua clara y fresca y llene el depósito de agua como mínimo hasta la marca inferior (2 tazas) y como máximo hasta la marca MAX. 23.Conecte el aparato solo tras haber llenado el depósito de agua. 24.Si desea utilizar el aparato varias veces seguidas, déjelo enfriar entre uso y uso como mínimo durante 5 minutos. 25.Nunca utilice la jarra de café en el microondas, dado que no es apta para ello. 26.Para evitar lesiones, no desplace el aparato mientras esté en funcionamiento. 27.Asegúrese de que todos los usuarios, especialmente los niños, conozcan el peligro por la salida de vapor o salpicaduras de agua caliente. ¡Peligro de quemaduras! 28.Para evitar daños, no use el equipo con accesorios de otros fabricantes o marcas. 29.Después del uso así como antes de la limpieza, desenchufe el aparato. No deje nunca el aparato sin supervisión cuando esté enchufado. 30.Controle periódicamente si el equipo, el enchufe y el cable de alimentación presentan desgaste o daños. En caso de daños en el cable de alimentación o en otras piezas, por favor envíe el aparato o el cable de alimentación para su verificación y reparación a nuestro servicio de atención al cliente. Las reparaciones inadecuadas pueden ocasionar considerables peligros para el usuario y tienen como consecuencia la exclusión de la garantía. 31.En caso de que la línea de alimentación del aparato esté dañada, se deberá cambiar por el fabricante, su Servicio Postventa u otra persona igualmente cualificada para evitar peligros. PRECAUCIÓN: el aparato se calienta mucho durante el funcionamiento. De ninguna manera abra la carcasa del aparato. Existe peligro de una descarga eléctrica. El fabricante no es responsable en caso de montaje erróneo, uso inapropiado o equivocado o después de haber sido efectuadas reparaciones por terceros no autorizados. 45 ANTES DE PREPARAR EL PRIMER CAFÉ Antes de la primera preparación de café, realice uno o dos procesos de preparación sin echar café molido, para retirar posibles residuos de fabricación. Aunque no haya utilizado el aparato durante un tiempo prolongado, recomendamos realizar un proceso de preparación sin café molido. 1. Retire todos los materiales de embalaje y los seguros de transporte. 2. Limpie la jarra de cristal (9), el filtro permanente (1) y el soporte del filtro (2) como se detalla en el capítulo „Limpieza y cuidado“. 3. Puede limpiar el exterior del aparato con un paño húmedo. 4. Llene el depósito de agua (5) hasta el marcado MAX/12 tazas con agua del grifo. Preste atención a que no hayan granos de café en el recipiente de granos. 5. Cierre la tapa de la jarra de cristal y póngala sobre la placa calentadora (8). 6. Inserte el enchufe en una toma de corriente. 7. Atención: Las órdenes introducidas a través de las teclas solo se guardarán mientras la pantalla permanezca iluminada en azul. Cuando la iluminación de la pantalla se apague deberá pulsar cualquier tecla antes de poder introducir nuevas órdenes a través de las mismas. 8. Pulse una vez la tecla „MÜHLE AUS“ (apagar molinillo), después „EIN/AUS“ (conectar/desconectar) y deje pasar el agua hasta que el aparato indique mediante un tono de señal repetitivo que el proceso ya ha terminado. 9. Tire este agua. 10.Limpie la jarra de cristal. 11.Desconecte el aparato con la tecla „EIN/ AUS“ (conectar/desconectar). GRANOS DE CAFÉ 1. Con la máquina de café Mühle podrá preparar café a partir de granos recién molidos o café de filtro utilizando café molido de uso comercial. 2. Si desea utilizar granos de café, preste atención durante la compra a que los granos sean aptos para molinillos de café. No utilice granos para máquinas de café espresso automáticas, dado que por su diferente tostado pueden tener un sabor no satisfactorio. AJUSTAR LA HORA 1. En cuanto la máquina de café esté conectada a la red eléctrica, la pantalla indicará 12:00. 2. Ahora, pulse las teclas „STD“ (horas) y „MIN“ (minutos) las veces que sean necesarias hasta que se indique la hora actual. 3. Cuando se muestre la hora actual podrá comenzar con la preparación del café. 4. En caso de una interrupción de corriente de más de unos 30 segundos la hora no se guardará, por lo que deberá volver a ajustarla en cuanto haya desconectado el aparato de la red eléctrica. AJUSTAR EL GRADO DE CONCENTRACIÓN DEL CAFÉ 1. Con la tecla „STÄRKE“ (grado de concentración) puede seleccionar el grado de concentración del café deseado. Pulse la tecla „Stärke“ (grado de concentración) las veces que sean necesarias hasta que se indique la cantidad de granos de café deseada en la pantalla. 2. Puede seleccionar entre los siguientes grados de concentración: 46 Suave – indicación en la pantalla: un grano de café (ajuste estándar) Medio – indicación en la pantalla: dos granos de café Fuerte – indicación en la pantalla: tres granos de café 3. Indicación: Si el aparato permanece desconectado de la corriente durante un tiempo prolongado deberá volver a ajustar el grado de concentración. AJUSTE DEL GRADO DE MOLIDO 1. Si va a preparar café de granos recién molidos, con este interruptor giratorio podrá ajustar el grado de molido de los granos entre fino, medio y grueso. 2. Asegúrese de que la tecla „MÜHLE AUS“ (molinillo apagado) no esté activada. 3. Prepare el aparato tal y como se detalla en el capítulo „Preparar café“ y conéctelo. 4. En cuanto el aparato empiece a moler los granos podrá seleccionar el nivel deseado en el interruptor de grados de molido (10). 5. Atención: No modifique el grado de molido si el aparato no está moliendo los granos. PREPARAR CAFÉ Indicación: Las órdenes introducidas a través de las teclas solo se guardarán mientras la pantalla permanezca iluminada en azul. Cuando la iluminación de la pantalla se apague deberá pulsar cualquier tecla antes de poder introducir nuevas órdenes a través de las mismas. No utilice granos para máquinas de café espresso automáticas, dado que por su diferente tostado pueden tener un sabor no satisfactorio. En los comercios encontrará varios fabricantes de granos de café aptos para molinillos de café (observe las indicaciones del embalaje). 1. Inserte el enchufe en una toma de corriente. 2. Vierta la cantidad de agua fresca y clara deseada en el depósito de agua. Para ello puede utilizar la jarra de cristal, que también cuenta con las marcas para la cantidad de tazas correspondiente. Debe verterse como mínimo agua para dos tazas (270 ml). La cantidad máxima es de 12 tazas (1.525 ml). Preste atención a que el depósito de agua no se llene demasiado, dado que el exceso de agua saldría por el lado posterior del aparato. 3. La cantidad de agua vertida es siempre algo superior a la cantidad real de café, dado que el café en polvo absorbe un poco de agua. 4. Abra el brazo giratorio de la máquina de café pulsando el botón „ÖFFNEN“ (abrir), en el lado derecho del aparato. 5. Inserte el filtro permanente en la cesta del filtro. Alternativamente, también puede utilizar un filtro de papel de tamaño 4. 6. Si utiliza el filtro permanente, pueden acumularse pequeñas cantidades de posos de café en la jarra de cristal. Esto es así por razones técnicas y no por un defecto en el aparato. 7. Cierre el brazo giratorio presionando ligeramente. 8. Coloque la jarra de cristal con la tapa cerrada sobre la placa calentadora. 9. Retire la tapa del contenedor de café en granos. Eche los granos de café en el contenedor. 10.Preste atención a que el contenedor de café en granos esté siempre, como mínimo, lleno hasta la mitad. La cantidad máxima de llenado es de aprox. 200 g. 11.No llene el contenedor de café en granos excesivamente o podría deteriorarse el molinillo. 12.Cierre el contenedor de café en granos con la tapa. Tenga en cuenta que el aparato no detecta si no hay granos en el contenedor. 13.Seleccione la cantidad de tazas deseada pulsando la tecla „2-12 Tassen“ (2-12 tazas) las veces que sean necesarias hasta que se ilumine la cantidad de tazas deseada. Puede seleccionar entre 2, 4, 6, 8, 10 y 12 tazas. Es imprescindible asegurarse de seleccionar la cantidad de tazas exacta para las que se ha añadido agua. Si añade agua para dos tazas, debe seleccionar dos tazas; si añade agua para cuatro tazas, debe seleccionar cuatro tazas, etc. Solo así puede garantizarse un óptimo sabor del café. La máquina de café muele la cantidad exacta de café en polvo para la cantidad de tazas ajustada correspondientemente. 14.Ahora puede seleccionar con la tecla „STÄRKE“ (grado de concentración) el grado de concentración del café deseado. 15.Si lo desea, puede también preparar café a partir de café molido industrial. Para ello, pulse la tecla „MÜHLE AUS“ (apagar molinillo). La tecla se iluminará en azul mientras permanezca activa. En cuanto termine el proceso de preparación la tecla „MÜHLE AUS“ (apagar molinillo) se desactivará automáticamente. 47 16.Eche ahora la cantidad deseada de café molido en el filtro permanente, aprox. 5-7 g por cada taza (aprox. 1 cuchara dosificadora) según su gusto de café molido semifino. Un café molido demasiado fino puede obturar los poros del filtro, por lo que podría desbordarse. 17.Pulse la tecla „EIN/AUS“ (conectar/desconectar). El aparato comienza con la preparación del café. 18.En la pantalla se indica „Brühen“ (preparación) durante el proceso de preparación. 19.Puede retirar la jarra en cualquier momento durante el proceso de preparación. El dispositivo antigoteo evita que el café restante gotee fuera del filtro. Vuelva a colocar la jarra bajo el filtro en un tiempo máximo de 30 segundos para que éste no se desborde. 20.Cuando el aparato haya terminado con la preparación del café emitirá un tono de señal. 21.La placa calentadora permanecerá conectada el tiempo que también esté conectada la máquina de café para mantener caliente el café que quede en la jarra. Tras dos horas, el aparato se desconecta automáticamente. Si no desea utilizar la función de mantener el calor, desconecte el aparato con la tecla „EIN/AUS“ (conectar/ desconectar). 22.No deje la jarra de café vacía sobre la placa calentadora caliente tras haber echado todo el café. 23.Retire el filtro permanente y elimine el poso de café. PREPARAR CAFÉ CON PRESELECCIÓN DE TIEMPO 1. El aparato se prepara como en el capítulo „Preparar café“. Asegúrese de ajustar el grado de concentración y la cantidad de tazas según sus deseos. Decida si desea preparar café a partir de café molido o de granos de café y pulse, en su caso, la tecla „MÜHLE AUS“ (apagar molinillo). Observe que solo puede ajustarse el grado de molido, mientras el aparato esté moliendo los granos. Resulta conveniente dejar que el aparato prepare café una vez sin preselección de tiempo seleccionando a la vez el grado de molido deseado. En cuanto el aparato empiece a moler los granos podrá seleccionar el nivel deseado en el interruptor de grados de molido. No modifique el grado de molido si el aparato no está moliendo los granos, para evitar que se deteriore el molinillo. 2. Compruebe si la hora de la pantalla coincide con la hora real. De no ser así, ajuste la hora actual como se describe en el capítulo „Ajustar la hora“. 3. Pulse la tecla „PROGRAMM“ (programa) hasta que parpadee la indicación de hora en la pantalla. 4. Ahora puede ajustar la hora a la que deberá iniciarse la preparación del café mediante las teclas „STD“ (horas) y „MIN“ (minutos). Pulse la tecla correspondiente hasta que aparezca la hora deseada. 48 5. Después, pulse de nuevo una vez la tecla „PROGRAMM“ (programa). Esta se iluminará en azul y en la pantalla aparecerá „AUTO“ como indicación de que se ha conectado la preselección de tiempo 6. A la hora seleccionada, el aparato empezará con la preparación del café y en la pantalla aparecerá „BRÜHEN“ (preparación). 7. Puede retirar la jarra en cualquier momento durante el proceso de preparación. El dispositivo antigoteo evita que el café restante gotee fuera del filtro. Vuelva a colocar la jarra bajo el filtro en un tiempo máximo de 30 segundos para que éste no se desborde. 8. Cuando el aparato haya terminado con la preparación del café emitirá un tono de señal. 9. La placa calentadora permanecerá conectada el tiempo que también esté conectada la máquina de café para mantener caliente el café que quede en la jarra. Tras dos horas, el aparato se desconecta automáticamente. Si no desea utilizar la función de mantener el calor, desconecte el aparato con la tecla „EIN/AUS“ (conectar/ desconectar). 10.No deje la jarra de café vacía sobre la placa calentadora caliente, tras haber echado todo el café. 11.Retire el filtro permanente y elimine los posos del café. LIMPIEZA Y CUIDADO Antes de proceder con su limpieza, desconecte siempre el aparato y retire el enchufe de la toma de corriente. Deje enfriar el aparato antes de limpiarlo. 1. El aparato y el cable de alimentación no deben sumergirse en agua ni en otro líquido así como tampoco lavarse en el lavavajillas. 2. Abra el brazo giratorio del aparato y retire el filtro permanente. Elimine los posos del café. 3. Por encima del filtro puede formarse agua condensada. Tras la preparación del café, limpie la parte inferior de la tapa con un paño seco. 4. Limpie la carcasa y la placa calentadora con un paño húmedo y un poco de detergente lavavajillas. No utilice productos de limpieza agresivos, lana de acero, objetos metálicos, desinfectantes ni productos de limpieza calientes, ya que pueden producir daños. 5. La jarra de cristal, su tapa, el soporte del filtro y el filtro pueden limpiarse con agua añadiendo un poco de detergente lavavajillas. 6. El aparato deberá estar completamente seco antes de poder utilizarlo de nuevo. DESCALCIFICACIÓN 1. Descalcificar regularmente su cafetera mantendrá el rendimiento de la misma, aumentará su duración de vida y reduce el consumo de energía. 2. Utilice para ello un descalcificador comercial, siguiendo las instrucciones del fabricante. 3. Llene el depósito de agua con la solución descalcificadora hasta la marca MAX/10 tazas. 4. Alternativamente podrá utilizar ácido cítrico. Mezcle unos 25 a 50 g de ácido cítrico con un litro de agua. 5. Coloque la jarra de café en la placa calefactora. 6. Pulse la tecla „EIN/AUS“ y deje que pase una tercera parte del líquido. 7. Desconecte el equipo pulsando la tecla „EIN/AUS“ y deje actuar la solución descalcificadora durante unos 15 a 30 minutos. Si las calcificaciones son resistentes, podrá dejar actuar la solución durante la noche. 8. Vuelva a pulsar la tecla „EIN/AUS“ y deje pasar el resto de la solución descalcificadora. 9. Deseche la solución descalcificadore y haga funcionar el equipo un mínimo de dos veces con agua. 49 CONDICIONES DE GARANTIA La garantía para nuestros equipos es de 24 meses, y de 12 meses en el caso de uso comercial, a partir de la fecha de compra, cubriendo los daños que con un uso acorde a lo prescrito pueden atribuirse fehacientemente a defectos de fabricación. Dentro del período de garantía, solucionamos errores de material y de fabricación a consideración nuestra mediante reparación o cambio. Nuestros servicios de garantía son válidos únicamente para los aparatos que han sido vendidos en Alemania y Austria. Para todos los demás casos diríjase por favor al importador correspondiente. Aquellos aparatos que se presentan para eliminar errores, por favor enviarlos junto a una copia del comprobante de compra extendido a máquina, del cual debe desprenderse la fecha de compra, así como una breve descripción de las deficiencias, apropiadamente embalado y con los sellos correspondientes a nuestro servicio al cliente. En caso de garantía, los gastos de envío serán restituidos al cliente solamente en Alemania y Austria. Aquellos daños causados por desgaste están excluidos de la garantía, así como manipulación incorrecta, e incumplimiento de las condiciones de mantenimiento y cuidado. El derecho a garantía expira si las reparaciones o mantenimiento son realizadas por terceros. Todo reclamo del consumidor final ante el vendedor, comerciante no se ve afectado por esta garantía. DISPOSICIÓN/PROTECCIÓN DEL MEDIO AMBIENTE Nuestros aparatos se fabrican con un alto nivel de calidad por un largo período de uso. El mantenimiento regular y las reparaciones de tipo técnico a través de nuestro servicio al cliente pueden prolongar la duración del aparato. Cuando un aparato está defectuoso y ya no puede repararse, por favor considere en la disposición final los siguientes puntos: Este producto no puede ser eliminado junto a la basura domiciliaria. Usted debe entregar este producto a un lugar oficial para el reciclaje de aparatos eléctricos o electrónicos. Mediante la clasificación por separado y el reciclaje de productos residuales, Usted contribuye a proteger los recursos naturales y asegura que el producto sea eliminado de forma salubre y acorde con el medio ambiente. 50 NÁVOD K OBSLUZE MODEL 28736 TECHNICKÉ ÚDAJE Výkon: 900–1050 W, 50 Hz, 220–240 V~ Konvice: Skleněná konvice s krytem a stupnicí Objem: 1,5 litru, max. 12 šálků Velikost filtru: Stálý popř. papírový filtr 1 x 4 Rozměry : Cca 20,8 x 31,3 x 42,2 cm (D/Š/V) Hmotnost: Cca 4,9 kg Délka kabelu: Cca 90 cm, pevně namontovaný Vybavení: Nerezové těleso, LCD displej, zásobník kávových zrn s krytem chránícím aroma, systém proti kapání, integrovaný mlýnek, integrovaný zásobník vody, předvolba času, zobrazení času, volba počtu šálků a síly kávy, kontrolky Příslušenství: Stálý filtr, návod k obsluze Je vyhrazeno právo na omyly a změny vybavení, techniky, barev a designu VYSVĚTLENÍ SYMBOLŮ Tento symbol označuje případná ohrožení, která mohou způsobit poranění nebo poškození přístroje. Tento symbol poukazuje na eventuální nebezpečí popálení. Postupujte tu vždy zvláště opatrně. PRO VAŠI BEZPEČNOST 1. Následující pokyny si přečtěte a uložte. 2. Přístroj může být používán dětmi od 8 let a osobami se sníženými fyzickými, smyslovými nebo duševními schopnostmi nebo s nedostatkem zkušeností a/nebo nedostatkem znalostí, pokud jsou pod dohledem nebo pokud byly poučeny o bezpečném používání přístroje a porozuměly z něj vyplývajícím rizikům. Přístroj není hračka. Čištění a údržbu přístroje smí provádět děti pouze pod dohledem. 3. Je nutné dohlížet na děti, aby bylo zajištěno, že si s přístrojem nehrají. 4. Uchovávejte přístroj na místě nepřístupném dětem. 5. Přístroj připojujte pouze na střídavý proud s napětím podle typového štítku. 6. Tento přístroj nesmí být používán s externími časovými spínacími hodinami nebo se systémem pro dálkové ovládání. 7. Z důvodu elektrické bezpečnosti v žádném případě přístroj nebo jeho přívod neponořujte do vody nebo do jiné kapaliny. 8. Z důvodu elektrické bezpečnosti nečistěte přístroj v myčce. 9. Spínač a kabel se nesmí dostat do kontaktu s vodou nebo jinými tekutinami. Pokud by k tomu přesto došlo, musí být před novým použitím všechny díly zcela suché. 10.Nikdy se přístroje popř. jeho přívodu nedotýkejte mokrýma rukama. 11.Přístroj je určen výhradně pro domácí použití nebo podobné účely, např. pro kuchyňky v obchodech, kancelářích nebo podobných pracovištích, v zemědělských provozech, pro použití hosty v hotelu, motelu nebo jiných ubytovacích zařízeních, v soukromých penziónech nebo rekreačních objektech. 51 12.Z bezpečnostních důvodů přístroj nikdy nestavte na horké povrchy, kovový podnos nebo mokrý podklad. 13.Přístroj ani přívodní kabel nesmí být používány v blízkosti plamenů. 14.Kávovar vždy používejte na volném, rovném a tepelně odolném podkladu. 15.Přístroj smí být používán pouze k přípravě kávy, v žádném případě k ohřívání/udržování teploty mléka nebo jiných tekutin. 16.Dbejte na to, aby přívodní kabel nevisel přes okraj pracovní plochy, protože to může vést k nehodám, např. za něj mohou zatáhnout malé děti. 17.Přívod musí být položen tak, aby bylo vyloučeno zatažení za něj nebo zakopnutí. 18.Nenavíjejte přívodní vedení kolem přístroje a nepřipusťte lámání přívodu, abyste zabránili jeho poškození. 19.Používejte kávovar pouze ve vnitřních prostorech. 20.Dbejte na to, aby se v zásobníku kávových zrn nacházela pouze kávová zrna. Cizí tělesa by mohla mlýnek zničit. 21.Nikdy přístroj během provozu nezakrývejte, abyste předešli jeho přehřátí. 22.K přípravě kávy používejte čerstvou, čistou vodu a naplňte zásobník vody minimálně k nejspodnější značce (2 šálky) a maximálně ke značce MAX. 23.Zapněte přístroj až po naplnění zásobníku vodou. 24.Při opakovaném použití nechte přístroj mezitím vychladnout minimálně 5 minut. 25.Nikdy konvici na kávu nepoužívejte v mikrovlnné troubě, protože konvice k tomu není vhodná. 26.Dokud je přístroj v provozu, neposunujte jej, abyste předešli zraněním. 27.Zajistěte, aby všem uživatelům, zvláště dětem, bylo známo nebezpečí v důsledku unikající páry a vystříknutí horké vody – nebezpečí popálení! 28.Přístroj nesmí být používán s příslušenstvím jiných výrobců nebo značek, aby se předešlo poškození. 29.Po použití i před čištěním vyndejte síťovou zástrčku ze zásuvky. Nikdy nenechávejte přístroj bez dozoru, když je připojen do sítě. 30.Pravidelně kontrolujte přístroj, zástrčku a přívodní kabel, zda nejsou opotřebeny nebo poškozeny. Při poškození přívodního kabelu nebo jiných dílů pošlete přístroj nebo přívod na kontrolu a opravu do našeho servisu. Neodborné opravy mohou vést k značnému nebezpečí pro uživatele a mají za následek ztrátu záruky. 31.Je-li přívodní vedení tohoto přístroje poškozeno, musí být vyměněno výrobcem, jeho servisem nebo podobně kvalifikovanou osobou, aby se předešlo ohrožení. POZOR: Přístroj je během provozu velmi horký! V žádném případě těleso přístroje neotevírejte. Je nebezpečí úderu elektrickým proudem. Výrobce nepřebírá žádné ručení při chybné montáži, neodborném nebo chybném použití nebo po provedení opravy neautorizovanými třetími osobami. PŘED PŘÍPRAVOU PRVNÍ KÁVY Před prvním vařením kávy nechte vodu jednou až dvakrát uvést do varu bez kávy, aby se odstranily případné zbytky z výroby. Také když přístroj nebyl delší dobu používán, doporučujeme jedno vaření bez kávy. 1. Odstraňte všechny části balení a transportní 7. Pozor: Všechna zadání pomocí tlačítek pojistky. budou uložena jen tehdy, dokud displej svítí 2. Vyčistěte skleněnou konvici (9), stálý filtr modře. Jakmile osvětlení displeje zhasne, (1) a držák filtru (2) tak, jak je popsáno v musíte nejprve stisknout libovolné tlačítko, kapitole „Čištění a péče“. než je možné další zadávání tlačítky. 3. Vnější stranu přístroje otřete vlhkou utěrkou. 8. Stiskněte jednou tlačítko „MÜHLE AUS“ 4. Zásobník vody naplňte vodou z vodovodu až (mlýnek vyp), potom „EIN/AUS“ (zap/vyp) ke značce MAX/12 šálků. Dbejte na to, aby a nechte vodu protéci, dokud přístroj opase v zásobníku kávových zrn nenacházela kovaným signálním tónem neindikuje, že žádná kávová zrna. postup je ukončen. 5. Uzavřete kryt skleněné konvice a postavte ji 9. Tuto vodu vylijte. na ohřívací desku. 10.Vyčistěte skleněnou konvici. 6. Zapojte zástrčku do zásuvky (50 Hz, 220– 11.Vypněte přístroj spínačem „EIN/AUS“ (zap/ 240 V~). vyp). 52 KÁVOVÁ ZRNA 1. Kávovarem Mühle je možné připravovat kávu z čerstvě umletých kávových zrn nebo z běžné mleté kávy. 2. Když chcete použít kávová zrna, dbejte při nákupu na to, že tato zrna musí být vhodná pro mlýnky na kávu. Nepoužívejte zrna pro plně automatické kávovary, protože tato v důsledku jiného pražení neposkytují uspokojivou chuť kávy. NASTAVENÍ ČASU 1. Jakmile se kávovar připojí do sítě, ukazuje displej 12:00. 2. Stiskněte nyní tlačítka „STD“ (hodiny) a „MIN“ tolikrát, až je nastaven aktuální čas. 3. Nyní vidíte aktuální čas a můžete začít s přípravou kávy. 4. Nastavený čas nebude při výpadku sítě delším než 30 vteřin již uložen, tzn. musíte přístroj, jakmile byl jednou odpojen od sítě, nastavit znovu. NASTAVENÍ SÍLY KÁVY 1. Tlačítkem „STÄRKE“ (síla) můžete zvolit požadovanou sílu kávy. Stiskněte tlačítko „STÄRKE“ (síla) tolikrát, dokud se na displeji neobjeví požadovaný počet kávových zrn. 2. Můžete volit mezi následujícími stupni síly: Jemná – zobrazení na displeji: jedno kávové zrno (standardní nastavení) Střední – zobrazení na displeji: dvě kávová zrna Silná – zobrazení na displeji: tři kávová zrna 3. Upozornění: Jakmile byl přístroj delší dobu odpojen od proudu, musíte stupeň síly nastavit znovu. NASTAVENÍ STUPNĚ UMLETÍ 1. Když kávu připravujete z čerstvě umletých zrn, můžete tímto otočným spínačem nastavit stupeň umletí na jemný-střední-hrubý. 2. Dbejte na to, aby tlačítko „MÜHLE AUS“ (mlýnek vyp) nebylo aktivováno. 3. Připravte přístroj tak, jak je popsáno v kapitole „Příprava kávy“, a zapněte jej. 4. Jakmile přístroj začne zrna mlít, můžete spínačem (10) stupně umletí nastavit požadovaný stupeň. 5. Pozor: Neměňte stupeň umletí, když přístroj zrovna nemele zrna. PŘÍPRAVA KÁVY Upozornění: Všechna zadání pomocí tlačítek budou uložena jen tehdy, dokud displej svítí modře. Jakmile osvětlení displeje zhasne, musíte nejprve stisknout libovolné tlačítko, než je možné další zadávání tlačítky. Nepoužívejte zrna pro plně automatické kávovary, protože tato v důsledku jiného pražení neposkytují uspokojivou chuť kávy. V obchodě jsou k dostání kávová zrna různých výrobců, která jsou vhodná pro mlýnky na kávu (dbejte pokynů na balení). 1. Zapojte zástrčku do zásuvky. 2. Naplňte požadované množství čerstvé, čisté vody do zásobníku. Můžete k tomu použít skleněnou konvici, na níž jsou rovněž uvedeny značky pro daný počet šálků. Musí být naplněna voda na minimálně dva šálky (270 ml), maximální množství činí 12 šálků (1525 ml). Dbejte na to, aby zásobník vody nebyl přeplněn, protože jinak by nadměrně 53 naplněná voda vytékala na zadní straně přístroje. 3. Naplněné množství vody je vždy o něco větší než skutečné množství kávy, protože mletá káva trochu vody absorbuje. 4. Otevřete otočné rameno kávovaru tím, že stisknete tlačítko „ÖFFNEN“ (otevřít) na pravé straně přístroje. 5. Do koše filtru vložte stálý filtr. Alternativně můžete použít také papírový filtr velikosti 4. 6. Když používáte stálý filtr, může se ve skleněné konvici usadit malé množství kávové sedliny. To je podmíněno technicky a nejedná se o nedostatek přístroje. 7. Zavřete otočné rameno mírným přitlačením. 8. Postavte skleněnou konvici se zavřeným krytem na ohřívací desku. 9. Sundejte kryt ze zásobníku kávových zrn. Naplňte zásobník kávovými zrny. 10.Dbejte na to, že zásobník kávových zrn musí být vždy alespoň do poloviny plný. Maximální množství náplně činí cca 200 g. 11.Nepřeplňujte zásobník kávových zrn, protože jinak může dojít k poškození mlýnku. 12.Zavřete zásobník kávových zrn krytem. Dbejte na to, že přístroj nepozná, když v zásobníku nejsou žádná zrna. 13.Zvolte požadované množství šálků tím, že tlačítko „TASSEN“ (šálky) stisknete tolikrát, dokud displej neukazuje požadovaný počet šálků. Můžete volit mezi 2, 4, 6, 8, 10 a 12 šálky. Bezpodmínečně dbejte na to, abyste zvolili přesně takové množství šálků, pro které byla naplněna voda. Když naplníte vodu na dva šálky, musíte zvolit dva šálky, když naplníte vodu na čtyři šálky, zvolte čtyři šálky atd. Pouze tak může být zaručena optimální chuť kávy. Kávovar mele přesné množství kávy pro právě nastavený počet šálků. 14.Nyní můžete tlačítkem „STÄRKE“ (síla) zvolit požadovanou sílu kávy. 15.Na přání můžete kávu připravit také z mleté kávy. K tomu stiskněte tlačítko „MÜHLE AUS“ (mlýnek vyp). Tlačítko je aktivní, dokud je modře podsvětleno. Jakmile je příprava ukončena, tlačítko „MÜHLE AUS“ (mlýnek vyp) se automaticky deaktivuje. 16.Nyní stálý filtr naplňte požadovaným množstvím středně jemně mleté kávy, podle chuti 5-7 g (cca 1 odměřovací lžička) na šálek. Příliš jemně umletá káva může ucpat póry filtru a způsobit přetečení. 17.Stiskněte tlačítko „EIN/AUS“ (zap/vyp), přístroj začne s přípravou kávy. 18.Na displeji se během přípravy zobrazuje „BRÜHEN“ (vaření). 19.Konvici můžete vyjmout kdykoli během přípravy. Systém proti kapání zabrání, aby zbylá káva kapala z filtru. Konvici opět vložte pod filtr během 30 vteřin, aby filtr nepřetekl. 20.Když je přístroj s přípravou kávy hotov, je to indikováno signálním tónem. 21.Ohřívací deska zůstane zapnuta tak dlouho, dokud je zapnut také kávovar, aby káva v konvici zůstala horká. Po dvou hodinách se přístroj automaticky vypne. Pokud si funkci udržování teploty nepřejete, vypněte přístroj tlačítkem „EIN/AUS“ (zap/vyp). 22.Po úplném nalití kávy do šálků nenechávejte prázdnou konvici stát na horké ohřívací desce. 23.Vyjměte stálý filtr a odstraňte kávovou sedlinu. PŘÍPRAVA KÁVY S PŘEDVOLBOU ČASU 1. Přístroj se připraví podle popisu v kapitole „Příprava kávy“. Dávejte přitom pozor na to, aby síla kávy a počet šálků byl nastaven podle Vašeho přání. Rozhodněte se, zda budete připravovat kávu z mleté kávy nebo kávových zrn a případně stiskněte tlačítko „MÜHLE AUS“ (mlýnek vyp). Dbejte na to, že nastavení stupně umletí je možné pouze tehdy, když přístroj kávová zrna mele. Ideálně připravte kávu jednou bez předvolby času a zvolte přitom požadovaný stupeň umletí. Jakmile přístroj začne zrna mlít, můžete spínačem stupně umletí nastavit požadovaný 54 2. 3. 4. 5. stupeň. Neměňte stupeň umletí, když přístroj zrovna nemele zrna, abyste předešli poškození mlýnku. Zkontrolujte, zda čas na displeji souhlasí se skutečným časem. Pokud ne, nastavte aktuální čas tak, jak je popsáno v kapitole „Nastavení času“. Stiskněte tlačítko „PROGRAMM“ tolikrát, až údaj času na displeji bliká. Nyní můžete tlačítky „STD“ (hodiny) a „MIN“ nastavit požadovaný čas, kdy má příprava kávy začít. Stiskněte dané tlačítko tolikrát, dokud se neobjeví požadovaný čas. Potom znovu jednou stiskněte tlačítko „PROGRAMM“. To nyní svítí modře, na dis- pleji se objeví „AUTO“ jako upozornění, že byla zapnuta předvolba času. 6. Ve zvoleném čase přístroj zahájí přípravu kávy, na displeji se zobrazí „BRÜHEN“ (vaření). 7. Konvici můžete vyjmout kdykoli během přípravy. Systém proti kapání zabrání, aby zbylá káva kapala z filtru. Konvici opět vložte pod filtr během 30 vteřin, aby filtr nepřetekl. 8. Když je přístroj s přípravou kávy hotov, je to indikováno signálním tónem. 9. Ohřívací deska zůstane zapnuta tak dlouho, dokud je zapnut také kávovar, aby káva v konvici zůstala horká. Po dvou hodinách se přístroj automaticky vypne. Pokud si funkci udržování teploty nepřejete, vypněte přístroj tlačítkem „EIN/AUS“ (zap/vyp). 10.Po úplném nalití kávy do šálků nenechávejte prázdnou konvici stát na horké ohřívací desce. 11.Vyjměte stálý filtr a odstraňte kávovou sedlinu. ČIŠTĚNÍ A PÉČE Před čištěním přístroj vždy vypněte a vyndejte zástrčku ze zásuvky. Před čištěním přístroje jej nechte vychladnout. 1. Přístroj a přívodní kabel nesmí být ponořovány do vody nebo jiné tekutiny ani čištěny v myčce. 2. Otevřete otočné rameno přístroje a vyjměte stálý filtr. Odstraňte kávovou sedlinu. 3. Nad filtrem se může tvořit kondenzovaná voda. Po přípravě kávy otřete spodní stranu krytu suchou utěrkou. 4. Otřete těleso přístroje a ohřívací desku vlhkou utěrkou s trochou saponátu. Nepoužívejte abrazivní čisticí prostředky, drátěnku, kovové předměty, dezinfekční prostředky ani horké čisticí prostředky, protože mohou způsobit poškození. 5. Skleněnou konvici, její kryt, držák filtru a filtr můžete vyčistit vodou, do které přidáte trochu saponátu. 6. Před opětným použitím přístroje musí být zcela suchý. ODSTRANĚNÍ VODNÍHO KAMENE 1. Pravidelné odstraňování vodního kamene udržuje výkonnost vašeho automatu na kávu a prodlouží jeho životnost a sníží spotřebu energie. 2. Za tímto účelem použijte běžně dostupný odstraňovač vodního kamene dle pokynů na jeho obalu. 3. Nádržku na vodu naplňte až po značku MAX roztokem na odstranění vodního kamene. 4. Alternativně můžete také použít kyselinu citrónovou. Dejte 25 až 50 g kyseliny citrónové na jeden litr vody. 5. Konvici postavte na plotýnku. 6. Stiskněte tlačítko „EIN/AUS“ a nechte projít cca jednu třetinu množství vody. 7. Dvojitým stisknutím tlačítka „EIN/AUS“ přístroj vypněte a nechte roztok proti vodnímu kameni cca 15 až 30 minut působit. V případě silného nánosu vodního kamene můžete roztok nechat působit přes noc. 8. Poté znova stiskněte „EIN/AUS“a nechte přístrojem projít zbytek roztoku. 9. Roztok proti vodnímu kameni vylijte a nechte minimálně dvakrát projít čistou vodu. 55 ZÁRUČNÍ PODMÍNKY Na naše přístroje poskytujeme záruku v trvání 24 měsíců (u průmyslového využití 12 měsíců) od data koupě výrobku, záruka se vztahuje na poškození, která prokazatelne vznikla při správném použití v důsledku výrobních vad. Po dobu záruky budeme odstraňovat materiální i výrobní vady opravou nebo výměnou podle našeho uvážení. Poskytnutí záruky výhradně platí pro zařízení prodány v Německu i Rakousku. V jiných zemích se obrat’te prosím na kompetentní dovozce. Přístroje, na které bylo uplatňováno odstranění vad, zašlete prosím s mechanicky vyhotovenou kopií nákupního dokladu, ze kterého musí být bezpodmínečně patrný datum nákupu i s popisem vad, přístroj musí být bezpečně zabalen a nafrankován na náš záruční servis. V připadě opravněné záruky jsou kupujícím vraceny poštovní poplatky. Tato záruka se nevztahuje na poškození způsobená opotřebením, nesprávným zacházením a nedodržováním návodů k údržbě a obsluze. Záruční doba zaniká, když opravy nebo manipulace s přístrojem byly provedeny třetí osobou. Eventuální nároky zákazníka vůči prodejci/obchodníku nejsou touhle zárukou omezeny. LIKVIDACE / OCHRANA ŽIVOTNÉHO PROSTŘEDÍ Naše vyrobené přístroje mají vysoce kvalitní standard pro zajišt’ění jejich dlouhé životnosti. Pravidelné údržby i opravy odborně provedeny naším prodejním servisem mohou mít vliv na prodloužení provozní životnosti přístroje. Když je přístroj vadný a už ho nelze opravit, neopomeňte prosím: Toto zařízení nepatří do běžného domovního odpadku, ale musí být předáno do autorizované sběrny pro recyklování elektrických nebo elektronických zařízení. Separátní sběr a recyklování odpadních produktů umožňuje šetření přírodních zdrojů a zajišt’uje, aby byly odpady likvidovány způsobem, který je pro zdraví a kologii přijatelný. 56 INSTRUKCJA OBSŁUGI MODEL 28736 DANE TECHNICZNE Moc: 900–1050 W, 50 Hz, 220–240 V~ Dzbanek: Szklany dzbanek z pokrywą i podziałką Pojemność: 1,5 litra, maks. 12 filiżanek Wielkość filtru: Filtr stały lub papierowy 1 x 4 Wymiary: Ok. 20,8 x 31,3 x 42,2 cm (dł./szer./wys.) Ciężar: Ok. 4,9 kg Długość przewodu: Ok. 90 cm, zamontowany na stałe Wyposażenie: Obudowa ze stali nierdzewnej, wyświetlacz LCD, pojemnik na kawę ziarnistą z pokrywą zachowującą aromat, zawór zapobiegający kapaniu, wbudowany młynek, wbudowany zbiornik wody, programator zegarowy, wyświetlacz czasu, wybór ilości filiżanek i mocy kawy, lampki kontrolne Akcesoria: Filtr stały, instrukcja obsługi Zmiany i błędy w opisie wyposażenia, technice, kolorach i konstrukcji są zastrzeżone OBJAŚNIENIE SYMBOLI Symbol ten oznacza ewentualne niebezpieczeństwa, które mogą prowadzić do obrażeń lub uszkodzenia urządzenia. Symbol ten wskazuje na ewentualne niebezpieczeństwo poparzenia. Zawsze postępować tutaj ze szczególną ostrożnością. DLA BEZPIECZEŃSTWA UŻYTKOWNIKA 1. Prosimy przeczytać poniższe instrukcje i zachować je. 2. Urządzenie może być używane przez dzieci w wieku powyżej 8 lat lub osoby o ograniczonej sprawności fizycznej, sensorycznej czy umysłowej lub nie posiadające doświadczenia i/lub wiedzy, jeśli są one nadzorowane lub zostały przeszkolone w zakresie bezpiecznego użytkowania urządzenia i zrozumiały wynikające z tego niebezpieczeństwa. Urządzenie nie jest zabawką. Dzieci mogą czyścić i konserwować urządzenie tylko pod nadzorem. 3. Dzieci powinny być pod nadzorem, aby upewnić się, że nie bawią się urządzeniem. 4. Urządzenie przechowywać w miejscu niedostępnym dla dzieci. 5. Urządzenie podłączać wyłącznie do prądu zmiennego o napięciu podanym na tabliczce znamionowej. 6. Urządzenie nie może pracować z zewnętrznym programatorem zegarowym lub systemem sterowania zdalnego (pilotem). 7. Ze względu na bezpieczeństwo elektryczne w żadnym wypadku nie zanurzać urządzenia lub przewodu w wodzie lub w innych płynach. 8. Ze względu na bezpieczeństwo elektryczne nie myć urządzenia w zmywarce. 9. Wyłącznik i przewód nie może stykać się z wodą ani z innymi cieczami. Jeśli to nastąpiło, przed ponownym użyciem wszystkie części należy całkowicie wysuszyć. 10.Urządzenia ani przewodu nigdy nie dotykać mokrymi dłońmi. 57 11.Urządzenie przeznaczone jest wyłącznie do użycia w gospodarstwie domowym lub w podobnych zastosowaniach, np. aneksach kuchennych w sklepach, biurach lub innych zakładach, zakładach rolnych, do użycia przez gości w hotelach, motelach lub innych noclegowniach, w prywatnych pensjonatach lub domach letniskowych. 12.Ze względów bezpieczeństwa nigdy nie stawiać urządzenia na gorących powierzchniach, blacie metalowym lub na wilgotnym podłożu. 13.Urządzenie ani przewód nie mogą znajdować się w pobliżu płomieni. 14.Ekspresu do kawy używać zawsze na powierzchni wolnej, równej i odpornej na temperaturę. 15.Urządzenie wolno używać wyłącznie do przygotowania kawy, w żadnym wypadku nie używać do podgrzewania/utrzymywania ciepła mleka lub innych płynów. 16.Zwrócić uwagę na to, aby przewód nie zwisał na brzegu powierzchni roboczej, gdyż może to prowadzić do wypadków, gdy np. pociągną go dzieci. 17.Przewód zasilający musi być tak ułożony, aby zapobiec pociągnięciu lub potknięciu się o niego. 18.Nie owijać przewodu wokół urządzenia i nie zaginać go, aby uniknąć uszkodzenia przewodu. 19.Ekspresu do kawy używać wyłącznie wewnątrz pomieszczeń. 20.Zwrócić uwagę na to, aby w pojemniku na kawę znajdowała się tylko kawa ziarnista. Obce ciała mogą zniszczyć młynek. 21.Nigdy nie przykrywać urządzenia podczas pracy, aby uniknąć przegrzania urządzenia. 22.Do zaparzania kawy używać świeżej, czystej wody i napełnić zbiornik na wodę przynajmniej do dolnej skrajnej kreski (2 filiżanki) i maksymalnie do kreski MAX. 23.Urządzenie włączyć dopiero po nalaniu wody do zbiornika. 24.Przy wielokrotnym użyciu w międzyczasie chłodzić urządzenie przynajmniej przez 5 minut. 25.Dzbanka nie używać w mikrofalówce, gdyż dzbanek nie nadaje się do tego. 26.Nie przesuwać urządzenia podczas pracy, aby uniknąć obrażeń. 27.Zagwarantować, aby wszyscy użytkownicy, szczególnie dzieci, znali niebezpieczeństwo powodowane przez wypływającą parę i rozpryski gorącej wody - niebezpieczeństwo oparzeń! 28.Urządzenia nie wolno używać z akcesoriami innych producentów lub marek, aby uniknąć szkód. 29.Po użyciu i przed czyszczeniem wyjąć wtyczkę z gniazdka. Urządzenia nigdy nie pozostawiać bez nadzoru, gdy wtyczka włożona jest do gniazdka sieciowego. 30.Regularnie sprawdzać urządzenie, wtyczkę i przewód, czy nie ma śladów zużycia lub uszkodzenia. Przy uszkodzeniu przewodu lub innych części prosimy odesłać urządzenie lub przewód do sprawdzenia i naprawy do naszego serwisu. Niewłaściwe naprawy mogą powodować znaczne niebezpieczeństwo dla użytkownika i unieważnienie gwarancji. 31.Gdy przewód przyłączeniowy urządzenia jest uszkodzony, musi go wymienić producent, serwis producenta lub odpowiednio wykwalifikowana osoba, aby uniknąć niebezpieczeństw. OSTROŻNIE: Urządzenie podczas pracy jest bardzo gorące! W żadnym wypadku nie otwierać obudowy urządzenia. Istnieje niebezpieczeństwo porażenia prądem. Producent nie przyjmuje żadnej odpowiedzialności za błędny montaż, niewłaściwe lub błędne używanie lub po wykonaniu napraw przez nieupoważnione osoby trzecie PRZED PRZYGOTOWANIEM PIERWSZEJ KAWY Przed przygotowaniem pierwszej kawy prosimy wykonać jedną lub dwie operacje zaparzania bez mielonej kawy, aby usunąć ewentualne pozostałości produkcyjne. Także wtedy, gdy urządzenie nie jest używane przez dłuższy czas, zalecamy wykonać zaparzanie bez kawy. 1. Usunąć całkowicie materiał opakowania i zabezpieczenia transportowe. 2. Wymyć szklany dzbanek (9), filtr (1) i obsadę filtru (2), jak opisano w rozdziale „Czyszczenie i pielęgnacja“. 58 3. Przetrzeć urządzenie z zewnątrz wilgotną ścierką. 4. Napełnić zbiornik wody do kreski MAX/12 filiżanek wodą z kranu. Zwrócić uwagę na to, aby w pojemniku na kawę nie było żadnych ziaren kawy. 5. Zamknąć pokrywę dzbanka i postawić go na płycie utrzymującej ciepło. 6. Włożyć wtyczkę do gniazdka (50 Hz, 220– 240 V~) 7. Uwaga: Wszystkie wprowadzone przyciskami dane zapamiętane są tak długo, jak wyświetlacz oświetlony jest na niebiesko. Gdy zgaśnie oświetlenie wyświetlacza, najpierw trzeba nacisnąć dowolny przycisk zanim możliwe będzie dalsze wprowadzanie przyciskami. 8. Nacisnąć raz przycisk „MÜHLE AUS“ (WYŁĄCZENIE MŁYNKA), następnie „EIN/ AUS“ (WŁĄCZNIK/WYŁĄCZNIK) i odczekać na przepływ wody, aż urządzenie zasygnalizuje wielokrotnym sygnałem dźwiękowym, że przebieg jest zakończony. 9. Wylać wodę. 10.Wymyć dzbanek. 11.Wyłączyć urządzenie przyciskiem „EIN/ AUS“ (WŁĄCZNIK/WYŁĄCZNIK). KAWA ZIARNISTA 1. Przy pomocy ekspresu do kawy można przygotować kawę ze świeżo zmielonych ziaren lub użyć dostępnej w handlu kawy mielonej. 2. Gdy chce się używać kawy ziarnistej, zwrócić uwagę na to, aby ziarna nadawały się do młynka do kawy. Nie używać kawy ziarnistej przeznaczonej do pełnych automatów do kawy, gdyż na skutek innego palenia kawy powstaje niezadowalający smak kawy. USTAWIENIE CZASU 1. Gdy ekspres do kawy podłączony jest do sieci elektrycznej, na wyświetlaczu ukazuje się 12:00. 2. Naciskać teraz przyciski „STD“ (GODZINA) i „MIN“ (MINUTA) tak długo, aż wyświetli się aktualny czas. 3. Gdy wyświetla się aktualny czas można rozpocząć przygotowanie kawy. 4. W razie zaniku zasilania prądowego dłuższego niż 30 sekund czas nie będzie zapamiętany, tzn. gdy urządzenie było odłączone od sieci należy ponownie ustawić czas. USTAWIENIE MOCY KAWY 1. Przyciskiem „STÄRKE“ (MOC) można wybrać pożądaną moc kawy. Naciskać przycisk „Stärke“ (MOC) tak długo, aż na wyświetlaczu ukaże się pożądana liczba ziaren kawy. 2. Można wybrać spośród następujących stopni mocy: Słaba – wyświetla się: jedno ziarno kawy (ustawienie standardowe) Średnia – wyświetlają się: dwa ziarna kawy Mocna – wyświetlają się: trzy ziarna kawy 3. Wskazówka: Gdy urządzenie dłuższy czas odłączone było od prądu, ponownie trzeba ustawić moc kawy. USTAWIENIE STOPNIA MIELENIA 1. Gdy przygotowuje się kawę ze świeżo zmielonych ziaren, tym pokrętłem można ustawić stopień zmielenia ziaren: drobno, średnio lub grubo zmielone. 2. Zwrócić uwagę, czy przycisk „MÜHLE AUS“ (wyłączenie młynka) NIE JEST AKTYWNY. 3. Przygotować urządzenie jak opisano w rozdziale „Przygotowanie kawy“ i włączyć urządzenie. 4. Gdy urządzenie rozpocznie mielenie ziaren, przełącznikiem stopnia mielenia można wybrać pożądany stopień zmielenia. 5. Uwaga: Prosimy nie zmieniać stopnia mielenia, gdy urządzenie nie mieli ziaren kawy. 59 PRZYGOTOWANIE KAWY Wskazówka: Wszystkie wprowadzone przyciskami dane zapamiętane są tak długo, jak wyświetlacz oświetlony jest na niebiesko. Gdy zgaśnie oświetlenie wyświetlacza, najpierw trzeba nacisnąć dowolny przycisk zanim możliwe będzie dalsze wprowadzanie przyciskami. Nie używać kawy ziarnistej przeznaczonej do pełnych automatów do kawy, gdyż na skutek innego palenia kawy powstaje niezadowalający smak kawy. W handlu dostępna jest kawa ziarnista różnych producentów nadająca się do młynków do kawy (przestrzegać wskazówek na opakowaniu). 1. Włożyć wtyczkę do gniazdka. 2. Wlać odpowiednią ilość świeżej, czystej wody do zbiornika. Można do tego celu użyć też szklanego dzbanka, na którym są również oznaczenia ilości filiżanek. Należy wlać wodę przynajmniej na dwie filiżanki (270 ml), maksymalna ilość wynosi 12 filiżanek (1.525 ml). Uważać, aby nie przelać zbiornika, gdyż nadmiar wody wypłynie z tyłu urządzenia. 3. Wlana ilość wody jest zawsze trochę większa od rzeczywistej ilości kawy, gdyż zmielona kawa absorbuje część wody. 4. Otworzyć ramię odchylne ekspresu do kawy przez naciśnięcie przycisku „ÖFFNEN“ (OTWARCIE) z prawej strony urządzenia. 5. Włożyć filtr stały do kosza. Alternatywnie można używać filtru papierowego wielkości 4. 6. Gdy używa się filtru stałego, w dzbanku mogą zbierać się niewielkie ilości fusów po kawie. Jest to uwarunkowane technicznie i nie stanowi wady urządzenia. 7. Zamknąć ramię odchylne lekko je naciskając. 8. Postawić dzbanek z zamkniętą pokrywą na płycie utrzymującej ciepło. 9. Zdjąć pokrywę z pojemnika na kawę ziarnistą. Wsypać ziarna kawy do pojemnika. 10.Zwrócić uwagę na to, aby pojemnik na kawę ziarnistą był wypełniony przynajmniej do połowy. Maksymalnie można wsypać około 200 g. 11.Nie przepełniać pojemnika, gdyż można uszkodzić młynek. 12.Zamknąć pojemnik pokrywą. Zauważmy, że urządzenie nie rozpozna, że w pojemniku nie będzie ziaren kawy. 13.Wybrać wymaganą ilość filiżanek, przy czym przycisk „2-12 Tassen“ (2-12 filiżanek) naciskać, aż zaświeci się wymagana ilość filiżanek. Można wybrać 2, 4, 6, 8, 10 i 12 filiżanek. Bezwzględnie przestrzegać zasady, aby wybierać dokładnie taką ilość filiżanek, dla której wlano wodę. Gdy naleje się wody na 2 filiżanki, trzeba wybrać 2 60 filiżanki, gdy naleje się wody na 4 filiżanki, wybrać 4 filiżanki itd. Tylko wtedy można zapewnić optymalny smak kawy. Ekspres mieli dokładną ilość kawy dla wybranej ilości filiżanek. 14.Teraz przyciskiem „STÄRKE“ (MOC) można wybrać pożądaną moc kawy. 15.Na życzenie można również przygotować kawę z mielonej kawy. W tym celu nacisnąć przycisk „MÜHLE AUS“ (WYŁĄCZENIE MŁYNKA). Oświetlenie przycisku świeci się na niebiesko, gdy przycisk jest aktywny. Gdy proces parzenia zakończy się, przycisk „MÜHLE AUS“ (WYŁĄCZENIE MŁYNKA) zostanie automatycznie dezaktywowany. 16.Teraz wsypać pożądaną ilość zmielonej kawy do filtru stałego, do smaku 5-7 g (ok. 1 łyżeczki z miarką) średnio zmielonej kawy. Jeśli kawa jest zbyt drobno zmielona, pory filtru mogą zapchać się i spowodować przelanie. 17.Nacisnąć przycisk „EIN/AUS“ (WŁĄCZNIK/ WYŁĄCZNIK), urządzenie rozpocznie przygotowanie kawy. 18.Podczas parzenia na wyświetlaczu ukazuje się napis „Brühen“ (parzenie). 19.Dzbanek można w każdej chwili zdjąć podczas parzenia. Zawór zapobiega kapaniu resztek kawy z filtru. W ciągu 30 sekund ponownie włożyć dzbanek pod filtr, aby nie nastąpiło przelanie filtru. 20.Gdy kawa jest już gotowa, rozlega się sygnał dźwiękowy. 21.Płyta utrzymująca ciepło pozostaje tak długo włączona, jak długo włączony jest ekspres., aby pozostała kawa w dzbanku była nadal ciepła. Po dwóch godzinach urządzenie wyłączy się automatycznie. Gdy nie jest potrzebna funkcja utrzymywania ciepła, wyłączyć urządzenie przyciskiem „EIN/ AUS“ (WŁĄCZNIK/WYŁĄCZNIK). 22.Po całkowitym rozlaniu kawy nie stawiać pustego dzbanka na gorącą płytę. 23.Wyjąć filtr i usunąć fusy. PRZYGOTOWANIE KAWY Z PROGRAMATOREM ZEGAROWYM 1. Urządzenie przygotować jak opisano w rozdziale „Przygotowanie kawy“. Ustawić moc kawy i liczbę filiżanek według życzenia. Zdecydować się, czy chce się użyć kawy ziarnistej czy mielonej i w razie potrzeby nacisnąć przycisk „MÜHLE AUS“ (WYŁĄCZENIE MŁYNKA). Zwrócić uwagę na to, że ustawienie stopnia mielenia możliwe jest tylko wtedy, gdy urządzenie mieli ziarna. Najlepiej przygotować raz kawę bez programatora i wybrać odpowiedni stopień mielenia. Gdy urządzenie rozpocznie mielenie ziaren, przełącznikiem stopnia mielenia można wybrać pożądany stopień mielenia. Prosimy nie zmieniać stopnia mielenia, gdy urządzenie nie mieli ziaren kawy, aby uniknąć uszkodzenia młynka. 2. Sprawdzić, czy wyświetlacz pokazuje rzeczywisty czas. Jeśli nie pokazuje aktualnego czasu, ustawić czas zgodnie z opisem podanym w rozdziale „Ustawienie czasu“. 3. Naciskać przycisk „PROGRAMM“ (PROGRAM) tak długo, aż wskazanie czasu na wyświetlaczu zacznie migać. 4. Teraz przyciskami „STD“ (GODZINA) i „MIN“ (MINUTA) ustawić pożądany czas rozpoczęcia przygotowania kawy. Naciskać dany przycisk, aż wyświetli się pożądany czas. 5. Następnie ponownie nacisnąć przycisk „PROGRAMM“ (PROGRAM). Zaświeci się on teraz na niebiesko, na wyświetlaczu ukaże się „AUTO“, co oznacza, że programator został włączony. 6. Gdy o wybranym czasie urządzenie rozpocznie przygotowanie kawy, na wyświetlaczu ukaże się „BRÜHEN“ (PARZENIE). 7. Dzbanek można w każdej chwili zdjąć podczas parzenia. Zawór zapobiega kapaniu resztek kawy z filtru. W ciągu 30 sekund ponownie włożyć dzbanek pod filtr, aby nie nastąpiło przelanie filtru. 8. Gdy kawa jest już gotowa, rozlega się sygnał dźwiękowy. 9. Płyta utrzymująca ciepło pozostaje tak długo włączona, jak długo włączony jest ekspres., aby pozostała kawa w dzbanku była nadal ciepła. Po dwóch godzinach urządzenie wyłączy się automatycznie. Gdy nie jest potrzebna funkcja utrzymywania ciepła, wyłączyć urządzenie przyciskiem „EIN/ AUS“ (WŁĄCZNIK/WYŁĄCZNIK). 10.Po całkowitym rozlaniu kawy nie stawiać pustego dzbanka na gorącą płytę. 11.Wyjąć filtr i usunąć fusy. CZYSZCZENIE I KONSERWACJA Przed czyszczeniem urządzenie zawsze wyłączyć i wyjąć wtyczkę z gniazdka. Przed czyszczeniem urządzenie. ochłodzić 1. Urządzenie i przewód nie mogą być zanurzone w wodzie lub w innym płynie ani wkładane do zmywarki do naczyń. 2. Otworzyć ramię uchylne urządzenia i wyjąć filtr stały. Usunąć fusy z kawy. 3. Nad filtrem mogą gromadzić się skropliny. Po gotowaniu kawy wytrzeć spód pokrywy suchą ścierką. 4. Obudowę i płytę grzejną utrzymującą ciepło wytrzeć wilgotną ścierką ze środkiem do zmywania naczyń. Nie używać ostrych środków szorujących, wełny stalowej, przedmiotów metalowych, środków dezynfekujących lub gorących środków czyszczących, ponieważ mogą spowodować uszkodzenia. 5. Szklany dzbanek, jego pokrywę, obsadę filtru i filtr można myć wodą z niewielkim dodatkiem środka do mycia naczyń. 6. Urządzenie musi być całkowicie suche zanim można je będzie ponownie użyć. ODKAMIENIANIE 1. Regularne pozbywanie się kamienia utrzymuje wydajność ekspresu do kawy oraz przedłuża jego żywotność. 2. Jeżeli urządzenie wyłączy się przed upływem czasu podgrzewania lub w trakcie parzenia kawy, pozostanie woda w zbiorniku. 61 3. 4. 5. 6. 7. Z urządzenia należy natychmiast usunąć kamień. Proszę użyć dostępnego w handlu odkamieniacza zgodnie z instrukcją na opakowaniu. Napełnić zbiornik do oznaczenia MAX roztworem odkamieniacza. Alternatywnie można użyć kwasku cytrynowego w ilości 25-50g kwasku cytrynowego na jeden litr wody. Postawić dzbanek do kawy na płycie grzewczej. Nacisnąć teraz przycisk EIN/AUS i odczekać, aż przeleje się ok. jednej trzeciej ilości wody. 8. Wyłączyć urządzenie i zostawić roztwór odkamieniacza w urządzeniu na ok. 15-30 minut. Przy mocnym zakamienieniu można pozostawić roztwór na noc. 9. Następnie ponownie nacisnąć EIN/AUS ( przycisk EIN/AUS) i odczekać, aż przeleje się reszta roztworu odkamieniacza. 10.Wylać roztwór odkamieniacza i przeprowadzić dwu- lub trzykrotne parzenie czystą wodą bez dodawania kawy. WARUNKI GWARANCJI Udzielamy na nasze produkty 24 miesięcznej gwarancji od daty zakupu (warunkiem jest zachowanie faktury zakupu lub paragonu) na szkody, które przy użytkowaniu zgodnym z przeznaczeniem wskazują na wadę fabryczną. W czasie trwania gwarancji usuniemy wady materiałowe bądź fabryczne zgodnie z naszym osądem poprzez naprawę lub wymianę. Gwarancja udzielana jest na produkty sprzedawane na terenie Niemiec i Austrii. W innych krajach proszę zwrócić się do właściwego Importera. Urządzenia, w których wymagane jest usunięcie wady, proszę przesłać razem z kopią faktury zakupu, na której musi być widoczna data zakupu, z załączonym opisem wady, w oryginalnym pudełku, dobrze zapakowane i na własny koszt na adres serwisu. Gwarancja nie obejmuje szkód wynikających ze zużycia, użytkowania niezgodnie z przeznaczeniem i nieprzestrzegania wskazówek dotyczących konserwacji i pielęgnacji. Roszczenie gwarancji wygasa, jeżeli naprawa bądź otwarcie przedmiotu będą przeprowadzone przez stronę trzecią. Ewentualne roszczenia użytkownika końcowego wobec sprzedawcy/dealera nie są ograniczone tą gwarancją. UTYLIZACJA / OCHRONA ŚRODOWISKA Nasze urządzenia wyprodukowane zostały na wysokim poziomie do długiego użytkowania. Regularna konserwacja i fachowe naprawy poprzez nasz serwis mogą wydłużyć pracę urządzenia. W razie kiedy urządzenie jest uszkodzone i nie nadaje się do naprawy, proszę przestrzegać zaleceń: Ten produkt nie może być zutylizowany razem z normalnymi odpadami domowymi. Muszą Państwo dostarczyć ten produkt do zbiorczego punktu recyklingowego dla urządzeń elektrycznych i elektronicznych. Poprzez oddzielne zbieranie i recykling odpadów pomagają Państwo chronić naturalne zasoby i sprawiają, że ten produkt będzie zutylizowany w sposób bezpieczny dla zdrowia i środowiska naturalnego. 62 63 Aus dem Hause