1
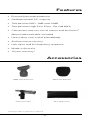
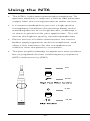
NT6 Instruction Manual www.rodemic.com (EMC, LVD) Introduction We at RØDE would like to thank you and congratulate you on investing in the RØDE NT6 Compact Condenser Microphone with Detachable Capsule. The RØDE NT6 is specifically designed for difficult mounting applications. Although clearly relevant to instrument miking, the NT6 is extremely well suited to any situation where a small and unobtrusive, yet powerful microphone system is required. The 1/2” (externally biased) gold sputtered capsule is designed to attach to a custom made, multi-position swivel mount allowing it to be independently positioned with ease. The capsule is connected to the remote pre-amplifier (body) by a custom 3m (10’) Kevlar ® fibre reinforced cable. The surface-mount pre-amplifier circuit also incorporates a two position variable PAD with 0 dB and -10 dB attenuation, and a two position variable highpass filter that enables you to step from a flat response to 80Hz high pass filter; both conveniently located away from the capsule, providing additional control without the need to move the capsule once in position. The NT6 is intended for film, television, broadcast, live performance, theatre, surround and environmental recording applications, or wherever your imagination takes you. Please take the time to visit www.rodemic.com and register your microphone for a full ten year warranty. While there you can view studio tips and techniques, as well as browse the comprehensive range of accessories for RØDE microphones. Peter Freedman Microphones Sydney, Australia -2- Specifications Acoustic Principle: Pressure gradient Directional Pattern: Cardioid (see graph) Frequency Range: 40Hz-20kHz, selectable HPF @ 80Hz/12dB/octave (see graph) Output Impedence: 200 Sensitivity: -37 dB re 1 Volt/Pascal (16 mV @ 94 dB SPL) +/- 2 dB @ 1kHz Equivalent Noise: 19 dB SPL (A - weighted per IEC651) Maximum Output: +6dBu (@ 1kHz, 1% THD into 1K load) Dynamic Range: 119 dB (per IEC651, IEC268-15) Maximum SPL: 135dB SPL (@ 1kHz, 1% THD into 1K load) (145dB with maximum PAD) Signal/Noise: 75 dB SPL (A - weighted per IEC651) Power Requirement: P48 (48V), P24 (24V) phantom supply Output Connection: 3 pin XLR, balanced output between pin 2(+), pin (-) & pin 1 (ground) Net Weight: 386gm -3- Specifications Dimensions 88.5 mm (2 4/8”) Ø 20 mm (13/16”) 188.4 mm (7 3/8”) Ø 20 mm (13/16”) 64 mm (2 1/2”) Ø 13 mm Ø 18 mm 1/4” x 20 tpi 18 mm 12 mm 3/8” x 16 tpi 5/8” x 27 tpi Frequency Response Polar Response -4- Features • Externally biased condenser • Gold sputtered 1/2” capsule • Two position PAD - 0dB and -10dB • Two position High-Pass Filter - flat and 80Hz • Convenient two-axis swivel mount and 3m Kevlar ® fibre reinforced cable included • Heavy-duty satin-nickel plated body • Surface mount circuitry • Low noise and full frequency response • Made in Australia • 10 year warranty* Accessories RM5 stand mount WS5 windshield Swivel mount ZP1 zip pouch *Online product registration required. -5- Mounting the NT6 • The NT6 is supplied with a selection of fittings and adaptors designed to ease positioning and mounting. The NT6 head attaches to a 2-axis swivel-mount that allows it to independently move and lock in position. • To further increase the versatility of the NT6, it comes supplied with 2 threaded adaptors, a 1/4” to 5/8” and a 1/4” to 3/8” that enable the capsule assembly to be securely attached to a wide variety of mic stands, tripods and boompoles. • The larger Adaptor is the 1/4” to 5/8”. When screwed into the base of the swivel mount it enable the capsule assembly to be attached to a standard 5/8” thread found on microphone stands. • The smaller 1/4” to 3/8” adaptor, when screwed to the base of the swivel mount enables the head assembly to be attached to a standard tripod or boompole. -6- Mounting the NT6 • With the capsule securely in position, you are ready to connect and position the pre-amplifier (body) as required. Like the head, the pre-amplifier is designed to be positioned and/or mounted in several ways. • The NT6 comes complete with an RM5 Stand Mount. When connected to a mic stand the RM5 securely holds the pre-amplifier in position. This allows the head assembly to be directly suspended from or positioned independently to that of the pre-amplifier. • As long as the pre-amplifier is suitably protected from the elements it can be positioned as required. • As with any recording set-up it is best to explore the options you have available and use the product within these constraints. -7- Connecting the miniature cable • With the head and pre-amplifier in position and the XLR cable connected to the back of the pre-amplifier, it is time to connect the mini-XLR connectors. • With the pre-amplifier assembly in one hand and the mini-XLR in the other, align the key on the connector to the groove on the back of the preamplifier. Gently insert the connector ensuring you align the two elements correctly, without applying excessive force during insertion. • The same method is to be used when attaching the min-XLR to the back of the head assembly. • The miniature connection cable is more than capable of withstanding the rigours of professional use, however it is important to understand and where possible consider the following points: -8- Connecting the miniature cable – The miniature connection cable is Kevlar ® fibre reinforced and designed to withstand considerable tensile and compressive forces, however inside this sheath are three copper wires. – Always ensure the connectors are correctly aligned groove-to-key when connecting the miniature connector’s and do not use excessive force when inserting and withdrawing. Cable runs of no greater than 10 m (30’) are recommended to maintain signal integrity. -9- Using the NT6 • The NT6 is a phantom powered microphone. To operate correctly it requires a 24V or 48V phantom supply from the mixing console or other source. • It is recommended that you use a high-quality microphone lead from the preamp body to the recording device or mixing console, and keep it as short as practical for your application. This will ensure the highest quality sound reproduction. • Please ensure all cable connections are secure before applying power to the microphone, and allow a few moments for the microphone to stabilise after the power is turned on. • The pre-amplifier (body) incorporates two switches for varying both the low end frequency response (HPF) and sensitivity (PAD). Flat 80Hz 0 dB -10 dB - 10 - Using the NT6 • The PAD settings provide a 10 dB reduction in sensitivity or commonly referred to as attenuation, and a two-position variable High-Pass Filter that enables you to step from a flat response to 80 Hz high pass filter; both conveniently located away from the head, providing additional control without the need to move the head once in position. • Use the High-Pass Filter when you wish to remove low frequency noise that is not part of your intended sound source. Remember however the tonal characteristics will be affected by this, so it is important that you listen to the sound with and without the HPF in circuit before deciding if it is appropriate for the source. • A small screwdriver or pen can be used to alter the switch positions as required. Storage • After use the NT6 head should be wiped with a dry, soft cloth, and both head and body placed in the protective case. • Be sure to place the moisture-absorbent crystals (supplied) at the head of the microphone, so as to absorb any moisture present. • Eventually this pack of crystals will need to be dried. This is indicated by the crystals turning pink in colour. • They can easily be re-used by placing them in an oven at 100 - 150 degrees celsius for approximately ten minutes. The crystals will operate effectively again once they have turned blue. - 11 - Warranty All RØDE microphones are warranted for one year from date of purchase. You can extend that to a full ten years if you register online at www.rodemic.com. The warranty covers parts and labour that may be required to repair the microphone during the warranty period. The warranty excludes defects caused by normal wear and tear, modification, shipping damage, or failure to use the microphone as per the instruction guide. If you experience any problem, or have any questions regarding your RØDE microphone, first contact the dealer who sold it to you. If the microphone requires a factory authorised service, return will be organised by that dealer. We have an extensive distributor/dealer network, but if you have difficulty getting the advice or assistance you require, do not hesitate to contact us directly. For information and technical support questions please visit www.rodemic.com/support. - 12 -