1
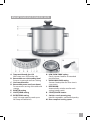
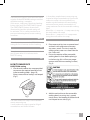
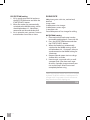
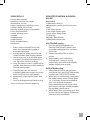
M U LT I C H E F
Instruction Booklet
M U LT I C H E F
RC 4010
M U LT I C H E F
CONTENTS
2
Congratulations
3
Catler recommends safety first
7
Know your Multi Chef RC 4010
8
Operating your Multi Chef RC 4010
8
How to make risotto
9
How to make rice
11
How to slow cook
13
14
Rice cooking tables
Rice variations
15
Steaming foods
19
Care and cleaning
20
Troubleshooting
21
Recipes
CONTENTS
1
Congratulations
on the purchase of your new Multi Chef RC 4010.
2
CONGRATULATIONS
CATLER RECOMMENDS SAFETY FIRST
At Catler we are very safety conscious. We design and manufacture consumer products with
the safety of you, our valued customer, foremost in mind. In addition we ask that you exercise
a degree of care when using any electrical appliance and adhere to the following precautions.
IMPORTANT SAFEGUARDS
READ ALL INSTRUCTIONS BEFORE USE AND SAVE FOR FUTURE REFERENCE
• Remove and safely discard any packaging • Do not use chemicals, steel wool, metal
material and promotional labels before
scouring pad or abrasive cleaners to
using the appliance for the first time.
clean the outside of the multi cooker
• To eliminate a choking hazard for young
housing or cooking bowl as these can
children, remove and safely discard the
damaged the housing or the coating of
protective cover fitted to the power plug
the cooking bowl.
of this multi cooker.
• Keep the multi cooker clean. Follow the
• Do not place the multi cooker near
cleaning instructions provided in this
the edge of a bench or table during
book.
operation. Ensure that the surface is
• Never plug in or switch on the multi
level, clean and free of water and other
cooker without having the removable
substances.
cooking bowl placed inside the multi
• Position the lid so that the steam vent is
cooker housing.
directed away from you. Lift and remove
• Do not place food or liquid in the multi
the lid carefully to avoid scalding from
cooker housing. Only the removable
escaping steam.
cooking bowl is designed to contain food
• Always ensure the multi cooker is
or liquid.
properly assembled before use. Follow
• Never operate the multi cooker without
the instructions provided in this book.
food and liquid in the removable cooking
• Always operate the multi cooker on
bowl.
a stable and heat resistant surface.
• Do not touch hot surfaces, use oven
• Use the removable cooking bowl
mitts to remove the lid and or removable
supplied with the multi cooker. Do not
cooking bowl. Lift and remove the lid
use any other bowl inside the multi
carefully and away from yourself to avoid
cooker housing.
scalding from escaping steam.
• Do not use a damaged or dented
• Do not allow water from the lid to drip
removable cooking bowl. If damaged or
into the multi cooker housing, only into
dented, replace bowl before using.
the removable cooking bowl.
• Do not operate the multi cooker on a sink • Do not leave the multi cooker
drain board.
unattended when in use.
• Do not place anything on top of the lid
• Extreme caution must be used when
when assembled, when in use and when
the multi cooker contains hot food and
stored.
liquids. Do not move the appliance
• Do not touch hot surfaces. Use the handle
during cooking.
for lifting and carrying the multi cooker.
CATLER RECOMMENDS SAFETY FIRST
3
•
•
•
•
•
•
The temperature of accessible surfaces
will be high when the multi cooker is
operating and for some time after use
Do not place anything, other than the
lid, on top of the multi cooker when
assembled, when in use and when stored.
Always insert the connector end of the
power cord into the appliance inlet
before inserting power plug into the
power outlet and switching on appliance.
Ensure the appliance inlet is completely
dry before inserting the connector end of
the power cord.
To prevent scratching the non-stick
surface of the removable cooking bowl,
always use wooded or plastic utensils.
Always position steam vent on lid away
from yourself to avoid scalding from
escaping steam.
Ensure the removable cooking bowl is
correctly positioned in the multi cooker
base before you commence cooking.
•
•
•
•
The appliance connector must be
removed before the multi cooker is
cleaned and that the appliance inlet must
be dried before the multi cooker is used
again.
To prevent damage to the multi cooker
do not use alkaline cleaning agents
when cleaning, use a soft cloth and mild
detergent.
Always have the glass lid placed
correctly into position on the appliance
throughout operation of the appliance
unless states in the recipe to have it
removed.
The glass lid has been specially treated to
make it stronger, more durable and safer
than ordinary glass, however it is not
unbreakable. If struck extremely hard, it
may break or weaken, and could at a later
time shatter into many small pieces
without apparent cause.
DO NOT USE THIS APPLIANCE WITH PROGRAMMER, TIMER OR ANY
OTHER APPLIANCE THAT IS ENABLE TO SWITCH ON THE APPLIANCE
AUTOMATICALLY.
USE ONLY THE ACCESSORIES SUPPLIED OR INTENDED TO BE USED
WITH THIS APPLIANCE.
4
CATLER RECOMMENDS SAFETY FIRST
IMPORTANT SAFEGUARDS FOR ALL
ELECTRICAL APPLIANCES
• Fully unwind the power cord before use.
• Connect only to 230V or 240V power
outlet.
• Do not let the power cord hang over
the edge of a bench or table, touch hot
surfaces or become knotted.
• To protect against electric shock, do not
immerse the power cord, power plug or
appliance in water or any other liquid or
allow moisture to come in contact with
the part, unless it is recommended in the
cleaning instructions.
• The appliance is not intended for use
by persons (including children) with
reduced physical, sensory or mental
capabilities, or lack of experience and
knowledge, unless they have been given
supervision or instruction concerning use
of the appliance by a person responsible
for their safety.
• Children should be supervised to ensure
that they do not play with the appliance.
• It is recommended to regularly inspect
the appliance. To avoid a hazard, do not
use the appliance if power cord, power
plug or appliance becomes damaged
in any way. Return the entire appliance
to the nearest authorized Catler service
centre for examination and/or repair.
• Any maintenance other than cleaning
should be performed at an authorised
Catler Service Centre.
•
•
•
•
•
•
This appliance is for household use only.
Do not use this appliance for anything
other than its intended use. Do not use
in moving vehicles or boats. Do not use
outdoors. Misuse may cause injury.
The installation of a residual current
device (safety switch) is recommended
to provide additional safety protection
when using electrical appliances. It is
advisable that a safety switch with a rated
residual operating current not exceeding
30mA be installed in the electrical
circuit supplying the appliance. See your
electrician for professional advice.
Always turn the appliance to the OFF
position, switch off at the power outlet
and unplug at the power outlet when the
appliance is not in use.
Before cleaning, always turn the
appliance to the OFF position, switch off
at the power outlet, unplug at the power
outlet and remove the power cord, if
detachable, from the appliance and allow
all parts to cool.
Do not place this appliance on or near
a heat source, such as hot plate, oven or
heaters.
Position the appliance at a minimum
distance of 20cm away from walls,
curtains and other heat or steam
sensitive materials and provide adequate
space above and on all sides for air
circulation.
FULLY UNWIND THE CORD BEFORE USE.
DO NOT OPERATE THE APPLIANCE ON AN INCLINED SURFACE.
DO NOT MOVE THE APPLIANCE WHILE IT IS SWITCHED ON.
THE POWER PLUG WHEN PLUGGED MUST REMAIN ACCESSIBLE FOR EASY
REMOVING.
ENSURE THE APPLIANCE IS FULLY COOLED BEFORE CLEANING AND STORING.
SAVE THESE INSTRUCTIONS
CATLER RECOMMENDS SAFETY FIRST
5
BEFORE STARTING TO COOK, CLEAN THE BOTTOM OF THE INNER POT
AND THE SURFACE OF THE HEATING PLATE.
TO ENSURE THE POT IS SITTING FLAT ON THE HEATING PLATE, TURN THE
POT CLOCKWISE AND ANTI CLOCKWISE INSIDE THE RICE COOKER.
THE POT MUST BE PROPERLY POSITIONED INSIDE THE RICE COOKER OR
THE UNIT WILL NOT WORK AND MAY BECOME DAMAGED.
WARNING
FOR HOUSEHOLD USE ONLY.
DO NOT IMMERSE IN WATER.
FULLY UNWIND THE CORD BEFORE USE.
SAFE THESE INSTRUCTIONS.
6
CATLER RECOMMENDS SAFETY FIRST
KNOW YOUR MULTI CHEF RC 4010
A. Tempered domed glass lid
With steam vent. Dishwasher safe.
B. Removable non-stick cooking bowl
Prevents risotto and rice from sticking.
C. Cool-touch handles
D. Removable power cord (not shown)
For convenient serving at the table and
storage.
E. RISOTTO setting
F. SAUTÉ|SEAR setting
G. RICE|STEAM setting
Large 10 scoop capacity cooks up to
20 scoops of cooked rice.
H. LOW SLOW COOK setting
Gently simmers food for an extended
period of time.
I. HIGH SLOW COOK setting
Simmers food quicker for when time is
a constraint.
J. KEEP WARM
Automatically switches on after each
setting (except sauté).
K. START|CANCEL button
L. Stainless steel steaming tray
Ideal for vegetables, seafood and poultry.
M. Rice scoop and serving spoon
KNOW YOUR MULTI CHEF RC 4010
7
OPERATING YOUR MULTI CHEF RC 4010
BEFORE FIRST USE
Before first use, remove all packaging material and promotional labels and wash the non-stick
removable cooking bowl, stainless steel steaming tray and glass lid in hot soapy water, rinse
and dry thoroughly.
HOW TO MAKE RISOTTO
SAUTÉ|SEAR setting
1. Ensure exterior of the removable cooking
bowl is clean before placing it in the
housing (this will ensure proper contact
with the inner cooking surface).
2. Plug power cord into a 230V or 240V
power outlet. The START|CANCEL button
and RISOTTO button surround will
illuminate in white.
3. Press the SAUTÉ|SEAR button, the button
surround will illuminate in white.
Press the START|CANCEL button to
activate the setting, the button surround
will illuminate red.
4. Cover with lid and allow to pre-heat
for approximately 2-3 minutes (do not
preheat for longer than 5 minutes).
5. Add oil/butter and allow to heat/melt for
approximately 1 minute.
6. If using chicken or seafood in the recipe,
sear in small batches, cover with lid and
stir occasionally until food is cooked.
Remove from cooking bowl.
7. Add extra oil/butter to cooking bowl if
necessary or if recipe states. Allow to heat
for approximately 1 minute.
8. Add ingredients such as onions and
garlic. Sauté, cover with lid if necessary
and stir occasionally for about 4 to
5 minutes or until cooked to desired
brownness.
9. Stir in Arborio or carnaroli rice and
mix well. Sauté for approximately 2-3
minutes, stirring occasionally.
10. Pour in wine (if using) and cook
uncovered until rice has absorbed all
liquid and alcohol has evaporated,
stirring frequently.
8
OPERATING YOUR MULTI CHEF RC 4010
11. Press the START|CANCEL button to stop
the SAUTÉ|SEAR setting.
12. Refer to step 1 in the RISOTTO setting
section below.
RISOTTO Setting
1. Follow steps 1-11 in the SAUTÉ|SEAR
setting section above.
2. Add stock or water and stir well. Cover
with lid and press the RISOTTO button,
then press the START|CANCEL button to
activate the setting. The START|CANCEL
button surround will illuminate red and
cooking will commence.
3. Allow to cook until the ready beeps
sound and the multi cooker automatically
switches to the KEEP WARM setting. This
will take approximately 20-30 minutes
depending on the recipe.
4. Remove lid and stir well using the serving
spoon provided. At this stage remaining
ingredients can be added i.e., butter,
parmesan cheese, herbs, salt and pepper.
5. The multi cooker will remain on the
KEEP WARM setting for 30 minutes
before switching OFF. However, risotto
is best served as soon as possible after
completion of cooking.
There may be occasions when the multi cooker
switches to the KEEP WARM setting or switches
off before cooking is complete.
If this occurs, simply press the desired cooking
button, then press the START|CANCEL button.
The START|CANCEL button surround will
illuminate red and the selected setting will
be activated. This is a safety mechanism to
prevent overheating due to certain cooking
conditions.
(1 Australian standard metric measuring cup
is equal to 200g of uncooked rice) If your multi
cooker rice scoop is lost or misplaced, use
another cup but maintain the same cooking
ratios and ensure you do not exceed the 10
scoop maximum line in the removable cooking
bowl:
White Rice = 1 scoop rice + 1 scoop water (using
the multi cooker rice scoop)
Brown Rice = 1 scoop rice + 1½ scoops water
(using the multi cooker rice scoop)
NOTE
Allow the risotto to rest in the KEEP WARM
setting for 5 or 10 minutes to finish cooking.
TIP
For optimum risotto results, we recommend
you stir once after 15-20 minutes in the
RISOTTO setting.
TIP
HOW TO MAKE RICE
NOTE
2. Place measured rice into a separate bowl
and wash with cold water to remove
any excess starch. The rice is ready for
cooking when water runs clear from the
rice. Drain well.
3. Ensure the exterior of the removable
cooking bowl is clean before placing it
in the housing (this will ensure proper
contact with the inner cooking surface)
(Fig 2).
RICE|STEAM setting
1. Use the multi cooker rice scoop provided
to measure the required quantity of rice
(refer to cooking tables - page 18).
Always measure level scoops, not heaped
(Fig 1).
Fig. 2
Fig. 1
The multi cooker rice scoop is not a standard
metric measuring cup.
1 multi cooker rice scoop is equal to 150g of
uncooked rice and 180ml of water.
4. Add the washed rice to the removable
cooking bowl, ensuring rice is spread
evenly across the bottom of the bowl and
not heaped to one side (Fig 3).
OPERATING YOUR MULTI CHEF RC 4010
9
To stop the KEEP WARM setting, unplug the
power cord.
NOTE
Fig. 3
5. Add water using the following ratios:
White Rice = 1 scoop rice: 1 scoop water
Brown Rice = 1 scoop rice: 1½ scoops water
6. Place the glass lid into position.
7. Plug power cord into 230V or 240V power
outlet. The START|CANCEL button and
RISOTTO button surround will illuminate
in white.
8. Press the RICE|STEAM button, then press
the START|CANCEL button to activate
the setting. The START|CANCEL button
surround will illuminate red and cooking
will commence.
9. When cooking is complete, the ready
beeps will sound and the multi cooker
will automatically switch to the KEEP
WARM setting.
10. Open the lid and turn the rice over with
the serving spoon provided. Replace the
lid and allow the rice to stand for 10-15
minutes before serving. This allows any
excess moisture to be absorbed, resulting
in a fluffier rice texture.
IMPORTANT
• Always place liquid into the removable
cooking bowl before pressing the
START|CANCEL button.
• Do not interfere with the automatic
selector control during operation.
• To prevent scratching the non-stick
surface of the removable cooking
bowl, always use wooden or plastic
utensils.
• Ensure the removable cooking bowl is
correctly positioned in the appliance
base before you commence cooking.
•
•
•
•
After using the RICE setting the appliance will
automatically switch to the KEEP WARM setting
for up to 5 hours.
•
NOTE
•
Do not remove the glass lid until ready to serve
(except for when turning over rice after cooking
is complete or as suggested in the recipes).
NOTE
•
Before removing the non-stick cooking
bowl from housing, always ensure
the power cord is unplugged. Always
ensure appliance is switched off at
the power outlet and power cord is
unplugged.
Always use heat protective gloves or
oven mitts when removing the lid and
the non-stick cooking bowl from the
appliance.
Always position steam vent on lid
away from yourself to avoid scalding
from escaping steam.
Always lift and remove the lid
carefully, angling it away from yourself
to avoid scalding from escaping steam.
To ensure continued protection
against risk of electric shock, connect
to properly grounded outlets only.
Cook only in removable non-stick
cooking bowl.
Do not use a damaged or dented
removable cooking bowl.
If damaged or dented, replace bowl
before using.
WARNING
10
OPERATING YOUR MULTI CHEF RC 4010
HOW TO SLOW COOK
SEAR setting
Searing in the multi cooker may take a little
extra time and whilst not strictly necessary,
the rewards are evident in the end result.
The cooking bowl keeps the heat stable and
uniform allowing the meat to brown and
form an even crust. Plus searing seals in the
moisture, intensifies the flavour and provides
more tender results.
1. Ensure exterior of the removable cooking
bowl is clean before placing it in the
housing (this will ensure proper contact
with the inner cooking surface).
2. Plug power cord into a 230V or 240V
power outlet. The START|CANCEL button
and RISOTTO button surround will
illuminate in white.
3. Press the SAUTÉ|SEAR button, the button
surround will illuminate white.
Press the START|CANCEL button to
activate the setting, the button surround
will illuminate red.
4. Cover with lid and allow to pre-heat
for approximately 2-3 minutes (do not
preheat for longer than 5 minutes).
5. Add oil/butter and allow to heat/melt for
approximately 1 minute with the lid on.
6. Always sear meat and poultry in small
batches. Cover with lid and cook,
stirring occasionally until food is evenly
browned. Remove from cooking bowl.
When finished searing, proceed to the
Slow Cook Settings section below.
Slow Cook Settings
The multi cooker has two slow cook settings:
Low and High. Use the recommended
guidelines below to determine cooking time
and heat settings and use recipes in this
instruction book. Dishes can be prepared
well in advance and cooking time regulated
so that food is ready to serve at a convenient
time.
A general rule of thumb for most slow
cooked meat and vegetable recipes is:
Setting Cooking Time
LOW: 6-7 hours
HIGH: 3-4 hours
Your favourite traditional recipes can also
be easily adapted to this slow cooker.
Simply halve the amount of liquid and
increase the cooking time.
These cooking times are approximates only
and times can vary depending on ingredients,
quantities in recipes and whether the cooking
bowl and its ingredients are hot from searing.
NOTE
As a guide meats such as chicken or small
pieces of meat will have best results when
cooked on high for 3-4 hours.
Larger pieces of meat such as lamb shanks
will have best results when cooked on low for
6-7 hours.
Cooking Times (with Searing)
When the SAUTÉ|SEAR setting is used
prior to slow cooking, cooking times will
be shortened slightly. Check for doneness
intermittently during cooking.
Low or High Slow Cook Settings
1. Add all ingredients into the cooking bowl,
ensuring denser foods are spread evenly
across the bottom of the bowl and not
heaped to one side and the liquid level is
between MIN and MAX markings on the
bowl.
2. Place the glass lid into position.
3. Press the LOW SLOW COOK OR HIGH
SLOW COOK button, then press the
START|CANCEL button to activate the
setting. The START|CANCEL button
surround will illuminate red and cooking
will commence.
OPERATING YOUR MULTI CHEF RC 4010
11
4. Allow to cook until the ready beeps
sound. The unit then automatically
switches to KEEP WARM setting.
5. The multi cooker will remain on the
KEEP WARM setting for 5 hours before
switching OFF.
The Catler Multi Chef is designed specifically
for flavour layering. A technique professional
chefs use to enhance and deepen the
taste of meals by using the same pan for
browning onions, searing meats and creating
casseroles, curries, soups and bolognaise.
For this reason, we have now developed
a SLOW COOK with a SAUTÉ|SEAR setting to
caramelise vegetables and sear meats before
commencing the slow cooker function.
Following is a guide to help simplify the
process of slow cooking, allowing you to
obtain optimum results from your multi
cooker. We have also included helpful hints
for successful slow cooking. For recipes, go to
recipe section in this instruction book.
Preparing meat and poultry
Select the freshest cuts when purchasing
meat. Trim the meat or poultry of any visible
excess fat. If possible, purchase chicken
portions without the skin. Otherwise, the
slow cooking process will result in extra
liquid being formed from the fat as it melts.
For casserole type recipes, cut the meat
into cubes, approximately 4cm to 5cm.
Slow cooking allows less tender cuts of
meat to be used. The bones can be left in
meat or poultry. This imparts a good flavour
and helps to keep the meat tender during
cooking.
12
OPERATING YOUR MULTI CHEF RC 4010
Suitable meat cuts for slow cooking
Beef chuck, skirt, round steak, boneless shin
(gravy) beef, bone-in-shin (osso bucco), tri
tip.
Lamb shanks, drumsticks (frenched shanks),
neck chops, boned out forequarter or
shoulder.
Veal diced leg, shoulder/forequarter chops
and steaks, neck chops, knuckle (osso bucco).
Pork leg steaks, diced belly, diced shoulder,
boneless loin chops.
Chicken pieces bone in (thigh cutlets/
drumsticks).
Chicken thigh fillets.
Preparing vegetables
Vegetables should be cut into even-sized
pieces to ensure more even cooking. Frozen
vegetables must be thawed before adding to
other foods cooking in the multi cooker.
RICE COOKING TABLES
The rice scoop provided with your multi cooker is used in the following tables.
The multi cooker rice scoop is not a standard metric measuring cup.
1 multi cooker rice scoop is equal to 150g of uncooked rice and 180ml of water.
(1 Australian standard metric measuring cup is equal to 200g of uncooked rice) If your multi cooker
rice scoop is lost or misplaced, use another cup but maintain the same cooking ratios and ensure
you do not exceed the 10 scoop maximum line in the removable cooking bowl:
White Rice = 1 scoop rice + 1 scoop water (using the multi cooker rice scoop)
Brown Rice = 1 scoop rice + 1½ scoops water (using the multi cooker rice scoop)
NOTE
White Rice
Uncooked white rice
(multi cooker rice
scoops)
2
4
6
8
10
Cold tap water
(multi cooker rice
scoops)
2
4
6
8
10
Cooked rice – approx.
(Multi cooker rice
scoops)
5
9
15
16
27
Cooking time –
approx.
(Minutes)
10-12
12-15
15-20
20-25
25-30
Cold tap water
(multi cooker rice
scoops)
3
6
9
Cooked rice – approx.
(Multi cooker rice
scoops)
5
10
15
Cooking time –
approx.
(Minutes)
25-30
30-40
40-45
Brown Rice
Uncooked white rice
(multi cooker rice
scoops)
2
4
6
Due to the additional water needed to cook brown rice, some starchy water bubbles may rise to the
lid while cooking.
NOTE
OPERATING YOUR
MULTI
CHEF RC
4010
RICE
COOKING
TABLES
13
RICE VARIATIONS
Savory rice
Prepare rice in the multi cooker as specified,
substituting all the water with the same
quantity of chicken, beef, fish, or vegetable
stock.
Sweet rice
Prepare rice in the multi cooker as specified
substituting half the water with apple juice,
orange juice or pineapple juice. Cooking rice
with milk or cream is not recommended as
it will burn onto the bottom of removable
cooking bowl.
Saffron rice
Add ¼ teaspoon of saffron powder
or 2 saffron threads to every 2 cups of water.
Use the white rice cooking tables. Mix well.
Arborio rice
Arborio rice is short round-grained pearly
rice often used for Italian risotto cooking.
Use the brown rice cooking tables.
Jasmine rice
Jasmine rice is fragrant long grain rice.
Use the white rice cooking tables.
Basmati rice
Basmati rice is an aromatic long grain rice.
Use the white rice cooking tables.
Wild rice
It is not recommended to cook wild rice
alone in the multi cooker as it requires
a substantial amount of water. It is possible
to cook wild rice as a blend with white or
brown rice.
14
OPERATING
YOUR
MULTI CHEF RC 4010
RICE
COOKING
TABLES
•
•
Add a little extra water for fluffier rice and
a little less water for firmer rice.
Some rice varieties may require more
water for cooking, such as wild rice blends,
Arborio rice or short grain rice. Follow the
directions on the packet or use the brown
rice cooking table.
TIP
Quinoa
Quinoa is an ancient South American grain
that is high in protein with fluffy, creamy and
slightly crunchy texture. Use the brown rice
cooking tables.
Sushi
Sushi rice is short grained rice used in
Japanese cooking. Use the brown rice
cooking tables.
STEAMING
Steamed foods retain most of their
nutritional value when cooked in the multi
cooker. Foods may be steamed by placing
food in the stainless steel steaming tray over
stock or water and covering with the glass
lid. Keep the glass lid on while steaming
food unless the recipe or chart specifically
states to remove the lid. By removing the lid
unnecessarily steam is lost and the cooking
time will be extended.
1. Measure 3 rice scoops or more of water
or stock and pour into the removable
cooking bowl. Use up to a maximum of 6
rice scoop cups of water.
2. Place food to be steamed directly into the
stainless steel steaming tray and insert
into the removable cooking bowl.
(Refer to the Steaming Charts on pages
20-22 for approximate cooking times).
3. Place removable cooking bowl with the
steaming tray into housing and cover
with the glass lid.
4. Plug power cord into a 230V or 240V
power outlet. The START|CANCEL button
and RISOTTO button surround will
illuminate in white.
5. Press the RICE|STEAM setting then press
the START|CANCEL button to activate
the setting. The START|CANCEL button
surround will illuminate red and cooking
will commence.
6. When steaming is complete, the ready
beeps will sound and the multi cooker
will automatically switch to the KEEP
WARM setting.
7. If no further steaming is required, press
the START|CANCEL button to cease
operation and turn the multi cooker off at
the power outlet and then unplug power
cord. Allow to cool before cleaning.
Keep the glass lid on while steaming food
unless the recipe or chart specifically states
to remove the lid. (By removing the lid
unnecessarily, steam is lost and the cooking
time will be extended.)
NOTE
Do not let the removable cooking bowl boil dry
during steaming.
NOTE
Hot liquid can be added during the steaming
process.
NOTE
Hints and tips for steaming vegetables
• Smaller pieces will steam faster than larger pieces.
• Try to keep vegetables to a standard size to ensure even cooking.
• Fresh or frozen vegetables may be steamed.
• If steaming frozen vegetables, do not thaw.
• The size and shape of vegetables, as well as personal taste, may call for adjustments to the
cooking time. If softer vegetables are required, allow extra cooking time.
• Do not allow water or stock to reach the stainless steel tray. The steaming will not be
effective.
Always lift and remove the lid carefully, angling it away from yourself to avoid scalding from
escaping steam.
WARNING
OPERATING YOUR MULTI CHEF
RC 4010
STEAMING
15
16
VEGETABLES
PREPARATION & TIPS
QUANTITY
COOKING TIME
Artichoke
Asparagus
Beans
Beets
Bell Peppers
Broccoli
Brussel Sprouts
Cabbage
Carrots
Celery
Chickpeas
Corn
Mushrooms
Onions
Snow peas
Peas
remove hard outer leaves & stalk
trim, leave as spears
top and tail, leave whole
trim, do not break skin
cut into strips
cut into florets
cut a cross in the base
large pieces
cut into strips
slice into strips
soak for 12 hours
whole corn cobs
whole, unwashed
peeled, leave whole
topped and tailed
fresh, peeled frozen
Potatoes
Potatoes
Sweet Potato
Pumpkin
Spinach (English)
Squash (baby)
Turnips
Zucchini
all purpose, whole
new, whole
cut into pieces
cut into pieces
leaves and stems cleaned
topped and tailed
peeled, sliced & cut to 50g pieces
sliced
2 medium
2 bunches
250g
300g
3 medium
250g
375g
500g
3 medium
3 stalks
1 cup dried
2 small cobs
300g
6 medium
250g
250g
250g
4(150-180g each)
6 (125g each)
300g
300g
½ bunch
350g
350g
350g
30-35
12-14
13-15
12-13
14-16
8-10
17-19
10-12
14-16
5-6
40-45
20-22
8-10
20-25
4-5
8-10
4-5
35-40
25-30
20-25
20-25
5
8
15-17
6
OPERATING YOUR MULTI CHEF RC 4010
STEAMING
Hints and tips for steaming fish and seafood
• Season fish with fresh herbs, onions, lemon etc. before cooking.
• Ensure fish fillets are in a single layer and do not overlap.
• Fish is cooked when it flakes easily with a fork and is opaque in color.
TYPE
SUGGESTIONS AND TIPS
Fish
– fillets
– whole
– cutlets
Lobster – tails
Mussels – in shell
Clams
Prawns
- in shell
Scallops
Steam until opaque and easy to flake. A cutlet is
cooked when the centre bone is able to be easily
removed
Remove underside of shell
Steam until just opened
Steam until just opened
Steam until pink
Steam until opaque
COOKING TIME
(MINUTES)
8-10
15-20
12-14
18-20
12-14
8-10
8-10
4-6
Hints and tips for steaming poultry
• Select similar sized pieces of poultry for even cooking.
• For even cooking results arrange poultry in a single layer.
• Remove visible fat and skin.
• To obtain a browned appearance, sear the chicken before steaming.
• Check poultry is cooked by piercing the thickest part. The poultry is cooked when the
juices run clear.
TYPE
SUGGESTIONS AND TIPS
Breast fillet
Drumstick
Thigh fillet
Place skin side up
Place thickest part to outside of the steaming tray
Place thickest part to outside of the steaming tray
COOKING TIME
(MINUTES)
20-25
30-35
18-20
OPERATING YOUR MULTI CHEF
RC 4010
STEAMING
17
Hints and tips for steaming dumplings
• Fresh or frozen dumplings and savoury buns can be steamed.
• Place small pieces of baking paper, or cabbage or lettuce leaves, under the dumplings to
avoid sticking to the steaming tray.
TYPE
SUGGESTIONS AND TIPS
BBQ pork or chicken buns
Dumplings – frozen
Dumplings – fresh
Cook from frozen
Separate before cooking
COOKING TIME
(MINUTES)
10-12
8-10
5-6
KEEP WARM setting
The multi cooker will automatically switch to the KEEP WARM setting once the RICE, RISOTTO
and SLOW COOK settings have finished cooking. It will keep KEEP WARM for up to 5 hours on
the RICE and SLOW COOK settings and up to 30 minutes on the RISOTTO setting.
18
OPERATING YOUR MULTI CHEF RC 4010
STEAMING
CARE & CLEANING
Unplug the power cord from the power
outlet.
Allow all parts to cool before removing
the removable cooking bowl. Wash the
removable cooking bowl, stainless steel
steaming tray and glass lid in hot, soapy
water, rinse and dry thoroughly.
It is not recommend that any parts of your
multi cooker are washed in a dishwasher
as harsh detergents and hot water
temperatures may stain or distort the
removable cooking bowl and accessories.
Do not use abrasive cleaners, steel wool, or
metal scouring pads as these can damage
the non-stick surface.
The housing can be wiped over with a damp
cloth and then dried thoroughly.
To prevent damage to appliance do not use
alkaline cleaning agents when cleaning, use
a soft cloth and a mild detergent.
The appliance connector must be removed
before the multi cooker is cleaned and
that the appliance inlet must be dried
before the multi cooker is used again.
To prevent damage to the multi cooker
do not use alkaline cleaning agents
when cleaning, use a soft cloth and mild
detergent.
Do not use chemicals, steel wool, metal
scouring pad or abrasive cleaners to clean
the outside of the multi cooker housing
or cooking bowl as these can damaged
the housing or the coating of the cooking
bowl.
Do not immerse housing or power cord in
water or any other liquid as this may cause
electrocution.
WARNING
If rice has cooked onto the bottom of the
removable cooking bowl, fill the bowl with
hot, soapy water and leave to stand for
approximately 10 minutes before cleaning.
NOTE
CARE & CLEANING
19
TROUBLESHOOTING
PROBLEM
The multi cooker suddenly
switches off.
The multi cooker has switched
to KEEP WARM setting before
cooking is complete.
20
CARE & CLEANING
TROUBLESHOOTING
WHAT TO DO
• Ensure power plug is connected properly to the
appliance and to power outlet.
• The appliance has been stressed or has overheated
due to cooking conditions. Push the desired
cooking button and then the START|CANCEL button
to reset and continue cooking.
Allow a few minutes for appliance to reheat and
continue cooking.
• Press the START|CANCEL button to reset. Then,
select the desired cooking method to continue
cooking.
Recipes
RECIPES
CREAMY TOMATO AND LENTIL
SOUP
Serves 4-6
1 tablespoon olive oil
1 large red onion, sliced
2 cloves garlic, crushed
1 small red chilli, seeds removed and finely
chopped
2 tablespoons tomato paste
3 cups tomato passatta
4 cups chicken stock
2 teaspoons brown sugar
¾ cup red lentils
1 cup Greek yoghurt
Salt and freshly ground pepper
2 tablespoons chopped coriander
1. Press the SAUTÉ|SEAR button and
then the START|CANCEL button. Heat
removable cooking bowl for 3 minutes
with the lid on.
2. Remove lid, add oil and heat for 1 minute
further.
3. Add onion, garlic and chilli, cover with lid,
cook for 3-4 minutes, stirring occasionally
or until onion has softened.
4. Add tomato paste and cook for a further
minute. Stir in passatta, stock, sugar and
lentils. Cover with lid.
5. Press the SLOW COOK HIGH BUTTON and
cook for 3-4 hours or SLOW COOK LOW
BUTTON and cook for 6-7 hours.
6. Stir through yoghurt and season with salt
and pepper to taste.
Serve sprinkled with chopped coriander.
22
RECIPES
CHICKEN CACCIATORE
Serves 4-6
1 tablespoon olive oil
2kg chicken pieces (skin removed)
1 medium onion, sliced
2 cloves garlic, crushed
1 cup tomato passatta
½ cup pitted Kalamata olives
¼ cup white wine
½ cup chicken stock
200g button mushrooms, halved
2 teaspoons chopped fresh rosemary
2 teaspoons sugar
Salt and freshly ground black pepper
¼ cup chopped fresh basil
1. Press the SAUTÉ|SEAR button and
then the START|CANCEL button. Heat
removable cooking bowl for 3 minutes
with the lid on.
2. Add oil and heat for 1 minute.
3. Add chicken in batches, and cook until
lightly browned; remove and set aside.
Drain off any excess oil and reheat
removable cooking bowl for another 1
minute.
4. Add onion and garlic and cook for 3-4
minutes, stirring occasionally, or until
softened.
5. Stir in tomato passatta, olives, wine,
stock, mushrooms, rosemary and sugar.
6. Return chicken to removable cooking
bowl and submerge in sauce and
vegetables. Cover with lid.
7. Press the SLOW COOK HIGH BUTTON and
cook for 3-4 hours.
8. Season to taste and stir through chopped
basil.
CHICKEN WITH ROSEMARY,
LEMON AND GARLIC
Serves 4-6
1 tablespoon olive oil
2kg chicken pieces, skin removed
1 onion, chopped
3 cloves garlic, sliced
1 teaspoon grated lemon rind
1 teaspoon cracked black pepper
1 tablespoon fresh chopped rosemary
½ cup white wine
½ cup chicken stock
2 tablespoons lemon juice
Salt and freshly ground black pepper
1. Press the SAUTÉ|SEAR button and
then the START|CANCEL button. Heat
removable cooking bowl for 3 minutes
with the lid on.
2. Add oil and heat for 1 minute.
3. Add chicken in batches, and cook until
lightly browned. Remove and set aside.
4. Add onion, garlic, lemon rind, pepper
and rosemary. Cover and cook, stirring
occasionally until softened.
5. Stir in wine and simmer for 2-3
minutes to cook off alcohol. Add stock,
lemon juice and return chicken to the
removable cooking bowl and submerge
in the sauce.
6. Cover with lid. Press the SLOW COOK
HIGH BUTTON and cook for 3-4 hours.
7. Season to taste and serve hot
accompanied with oven-roasted
potatoes, pumpkin and steamed green
beans.
LAMB SHANK RAGU
Serves 4
2 tablespoons olive oil
¼ cup plain flour
6 small lamb shanks, frenched
1 onion, chopped
2 cloves garlic, crushed
1 carrot, diced
1 large stick celery, diced
bbb cup tomato paste
½ cup red wine
400g can diced tomatoes
½ cup chicken or beef stock
1 bay leaf
Salt and freshly ground black pepper
1. Press the SAUTÉ|SEAR button and
then the START|CANCEL button. Heat
removable cooking bowl for 3 minutes
with the lid on.
2. Add oil and heat for 1 minute.
3. Coat lamb shanks in flour, shaking of
excess and cook until lightly browned;
remove and set aside.
4. Add onion, garlic, carrot and celery
and cook for 3-4 minutes, stirring
occasionally, or until softened.
5. Stir in tomato paste and cook for
a further 1 minute.
6. Add wine and bring to the boil; simmer
for 1-2 minutes, scraping up any of the
sediment in the base of the bowl.
7. Return shanks to removable cooking
bowl and pour over tomatoes, stock and
bay leaf; mix well to coat.
8. Cover with lid. Press the or SLOW COOK
LOW BUTTON and cook for 6-7 hours.
9. Season with salt and pepper and serve
immediately with mashed potato
RECIPES
23
FRAGRANT LAMB CURRY
EASY OSSO BUCCO
Serves 4-6
2 tablespoons vegetable oil
1.5kg lamb leg, diced into 5cm cubes
1 large onion, sliced
2 cloves garlic, crushed
2cm knob ginger, finely chopped
1 tablespoon ground coriander
1 tablespoon ground cumin
1 tablespoon curry paste
1 teaspoons ground turmeric
½ teaspoon ground cloves
5 cardamom pods
1 cinnamon stick
1 cup water or chicken stock
½ cup plain yoghurt
bbb cup chopped coriander to serve
Salt and freshly ground black pepper
Serves 4
6 × 4cm thick Osso Bucco (Veal shanks)
2 tablespoons plain flour
2 tablespoons olive oil
⅓ cup white wine
400g can diced tomatoes
2 teaspoons caster sugar
Salt and freshly ground black pepper
Gremolata
4 cloves garlic, finely chopped
Finely grated rind of 1 lemon
½ cup chopped fresh parsley
1. Press the SAUTÉ|SEAR button and
then the START|CANCEL button. Heat
removable cooking bowl for 3 minutes
with the lid on.
2. Add half the oil and heat for 1 minute.
3. Add lamb in small batches and cook until
lightly browned; remove and set aside.
4. Add remaining oil and onion and garlic
and cook for 3-4 minutes, stirring
occasionally, or until softened.
5. Stir in spices and cook for 1 minute.
6. Return lamb to removable cooking bowl
and add stock; mix well.
7. Cover with lid. Press the SLOW COOK
HIGH BUTTON and cook for 3-4 hours or
SLOW COOK LOW BUTTON and cook for
5-6 hours.
8. Stir through yoghurt and coriander.
Season to taste with salt and pepper.
Serve with steam rice.
To achieve even cooking, stir curry half way
through cooking time.
NOTE
24
RECIPES
1. Press the SAUTÉ|SEAR button and
then the START|CANCEL button. Heat
removable cooking bowl for 3 minutes
with the lid on.
2. Add oil and heat for 1 minute.
3. Coat osso bucco in flour, shaking off
excess and cook in small batches until
lightly browned. Remove and set aside.
4. Add wine and bring to the boil; simmer
for 1-2 minutes, scraping up any of the
sediment in the base of the bowl.
5. Return osso bucco to removable cooking
bowl and add tomato, sugar, salt and
pepper.
6. Cover with lid. Press the SLOW COOK
LOW BUTTON and cook for 6-7 hours.
Serve sprinkled with gremolata
TEX-MEX BEEF AND BEANS
BOLOGNESE SAUCE
Serves 4-6
1½ cups dried red kidney beans, soaked
overnight in cold water
2 tablespoons oil
1.3kg chuck steak cut into 5cm cubes
2 large onions, sliced
3 cloves garlic, chopped
1 tablespoon ground cumin
2 teaspoons chilli powder
2 teaspoons dried oregano flakes
400g can diced tomatoes
½ cup beef stock
1 green capsicum cut into large pieces
Salt and freshly ground black pepper
Sour cream, guacamole, grated cheddar
cheese to serve
Serves 4
2 tablespoons olive oil
1 large onion, chopped
2 cloves garlic, crushed
1kg beef or pork mince
⅓ cup tomato paste
½ cup red wine
1 large carrot, grated
400g can diced tomatoes
1 teaspoon dried oregano
1 bay leaf
½ cup beef stock or water
Salt and freshly ground black pepper
¼ cup chopped fresh basil
1. Drain beans and rinse well; drain again
and set aside.
2. Press the SAUTÉ|SEAR button and
then the START|CANCEL button. Heat
removable cooking bowl for 3 minutes
with the lid on.
3. Add a little of the oil and heat for 1
minute.
4. Add meat in batches and cook for 2-3
minutes or until just browned. Remove
and repeat with remaining meat and oil.
5. Add remaining oil and fry onion and
garlic until softened but not browned.
6. Stir in spices, tomatoes, stock, capsicum,
and return beef to removable cooking
bowl.
7. Cover with lid. Press the SLOW COOK
HIGH BUTTON and cook for 3-4 hours or
SLOW COOK LOW BUTTON and cook for
5-6 hours.
8. Shred beef with fork and return to dish.
Season to taste with salt and pepper.
1. Press the SAUTÉ|SEAR button and
then the START|CANCEL button. Heat
removable cooking bowl for 3 minutes
with the lid on.
2. Add oil and heat for 1 minute.
3. Add onion, garlic and cook for 3-4
minutes, stirring occasionally, or until
softened.
4. Add mince in batches, making sure to
break up the lumps while the meat is
cooking.
5. Stir in tomato paste and cook for
a further 1 minute. Add wine and bring to
the boil; simmer for 1-2 minutes to cook
off the alcohol.
6. Stir in carrot, tomato, oregano, bay leaf
and stock.
7. Cover with lid. Press the SLOW COOK
HIGH BUTTON and cook for 3-4 hours.
8. Season to taste with salt and pepper and
stir through basil just before serving.
Serve with a dollop of sour cream, guacamole
and grated cheese.
RECIPES
25
SPICY MIXED DHAL
RISOTTO MILANESE
Serves 4-6
1 tablespoon oil
1 tablespoon black mustard seeds
1 large red onion, sliced
4 cloves garlic, crushed
4cm piece ginger, grated
1 tablespoon ground coriander
2 teaspoons ground turmeric
2 small red chillies, chopped
½ cup yellow split peas
½ cup red lentils
½ cup brown lentils
3 cups vegetable stock
3 tomatoes, chopped
Sea salt to taste
Juice of half a lemon
2 tablespoons chopped coriander
Plain thick yoghurt to serve
Serves 4-6
1 tablespoon olive oil
40g butter
1 onion, finely chopped
2 cloves garlic, crushed
350g Aborio or Canaroli rice
1 cup white wine
4 cups hot chicken stock
Salt and freshly ground black pepper
½ cup grated parmesan cheese
1. Press the SAUTÉ|SEAR button and
then the START|CANCEL button. Heat
removable cooking bowl for 3 minutes
with the lid on.
2. Add oil and heat for 1 minute.
3. Add mustard seeds and cook until they
start to pop. Add onion, garlic and
ginger and cook 5-6 minutes, stirring
occasionally, until onion is light golden.
4. Stir in spices, chilli, lentils, stock and
tomatoes. Cover with lid. Press the SLOW
COOK HIGH BUTTON and cook for 3-4
hours or SLOW COOK LOW BUTTON and
cook for 4-6 hours.
5. Season with salt and stir through lemon
juice and chopped coriander.
Serve with yoghurt.
26
RECIPES
SAUTÉ|SEAR setting
1. Press the SAUTÉ|SEAR button and
then the START|CANCEL button. Heat
removable cooking bowl for 3 minutes
with the lid on.
2. Remove lid, add oil and half of the butter,
heat for 1 minute or until melted.
3. Add onion and garlic, cover with lid, cook
for 3 - 4 minutes, stirring occasionally,
until onion has softened.
4. Add rice, mix well, cover with lid, cook for
2 - 3 minutes or until rice is glossy.
5. Stir in wine, cover and simmer for 2-3
minutes or until wine has been absorbed.
RISOTTO Setting
1. Stir in chicken stock, mixing well. Cover
with lid and press the RISOTTO button
and then the START|CANCEL button.
2. When it has automatically switched to
the WARM setting, which will take about
20 - 30 minutes, remove lid and stir
through remaining butter and half the
parmesan.
Serve immediately topped with parmesan
RISOTTO AL A FUNGHI
Serves 4-6
2 tablespoons oil
30g butter
6 to 8 eschallots, finely chopped
400g assorted mushrooms, sliced
350g Arborio or Carnaroli rice
½ cup dry white wine
6 cups vegetable or chicken stock
½ cup grated pecorino or parmesan cheese
1 tablespoon chopped fresh sage
Salt and freshly ground pepper
SAUTÉ|SEAR setting
1. Press the SAUTÉ|SEAR button and
then the START|CANCEL button. Heat
removable cooking bowl for 3 minutes.
2. Remove lid, add oil and butter, heat 1
minute or until butter has melted.
3. Add chopped eschallots, cover with lid
and cook, stirring occasionally for 3- 4
minutes or until eschallots have softened.
4. Add mushrooms, cover with lid and cook
for 3 minutes or until mushrooms have
softened slightly.
5. Add rice, mix well, cover with lid and cook
for 2 - 3 minutes, stirring occasionally.
6. Stir in wine, and cook uncovered for 2-3
minutes or until all the wine is absorbed.
RISOTTO Setting
1. Stir in stock, cover with lid and press
the RISOTTO button and then the
START|CANCEL button.
2. When it switches to the WARM setting,
which will take about 20 - 30 minutes,
remove the lid and stir through grated
pecorino cheese and chopped sage
Season to taste with salt and pepper
Serve immediately.
A variety of mushrooms can be used for this
recipe i.e.; Swiss Brown, Portobello, shiitake,
field, oyster etc.
NOTE
CHICKEN RISOTTO WITH PESTO &
ROCKET
Serves 4-6
30g butter
300g chicken breast fillet, thinly sliced
1 tablespoon oil
1 large onion, finely chopped
3 cloves garlic, finely chopped
350g Arborio or Carnaroli rice
5 cups chicken stock
bbb cup pesto
¼ cup grated parmesan cheese
50g baby rocket leaves
Extra bbb cup grated parmesan cheese
SAUTÉ|SEAR setting
1. Press the SAUTÉ|SEAR button and
then the START|CANCEL button. Heat
removable cooking bowl for 3 minutes
with the lid on.
2. Remove lid, add half of the butter, heat
for 1 minute or until melted.
3. Add half the chicken, cover with the lid
and cook for 3 - 4 minutes.
4. Remove lid, stir and cook for a further
3 - 4 minutes or until chicken is lightly
browned and cooked through. Remove
from removable cooking bowl and keep
warm. Repeat with remaining chicken,
remove and set aside.
5. Heat remaining butter and oil until butter
is melted. Add onion and garlic, cover
with lid, cook for 3 - 4 minutes, stirring
occasionally, until onion has softened.
6. Add rice, mix well, cover with lid, cook for
2 - 3 minutes or until rice is glossy.
RECIPES
27
RISOTTO Setting
1. Stir in chicken stock, mixing well. Cover
with lid and press the RISOTTO button
and then the START|CANCEL button.
2. When it has automatically switched
to the WARM setting, which will take
about 20 - 30 minutes, remove lid and
stir through cooked chicken, pesto,
parmesan cheese and rocket.
Serve immediately with extra freshly grated
parmesan
PRAWN AND ASPARAGUS
RISOTTO
Serves 4-6
40g butter
400g medium green prawns, peeled and
deveined
1 tablespoon oil
1 onion, finely chopped
1 small bulb of fennel, halved and thinly sliced
350g Arborio or carnaroli rice
½ cup dry white wine
5½ cups chicken or light fish stock
½ teaspoon ground white pepper
1 bunch asparagus, trimmed and thinly sliced
diagonally
2 tablespoon fresh lemon juice
Finely grated rind of 1 lemon
Sea salt to taste
SAUTÉ|SEAR setting
1. Press the SAUTÉ|SEAR button and
then the START|CANCEL button. Heat
removable cooking bowl for 3 minutes
with the lid on.
2. Remove lid, add 10g of the butter, heat
for 1 minute or until melted.
3. Add prawns, cover with the lid and cook for
4 - 5 minutes or until prawns are cooked.
Remove and set aside to keep warm.
4. Add oil and 20g of the butter to
removable cooking bowl. Heat 1 minute
or until butter has melted.
28
RECIPES
5. Add onion and sliced fennel; cover with
lid, and cook for 6 -7 minutes, stirring
occasionally, until fennel is tender.
6. Add rice, stir well, cover with the lid; cook
for 3 minutes, stirring occasionally.
7. Remove lid, stir in wine and cook
uncovered for 2 -3 minutes, stirring
occasionally until all wine is absorbed.
RISOTTO Setting
1. Stir in chicken stock and pepper,
mixing well. Cover with lid and press
the RISOTTO button and then the
START|CANCEL button.
2. When it has automatically switched
to the WARM setting, which will take
about 20-30 minutes, remove lid and stir
through asparagus slices and remaining
10g of butter. Cover with lid and leave on
WARM setting for 5 minutes.
3. Stir through lemon juice, lemon rind and
season with salt.
Serve immediately with prawns
THYME, BARRAMUNDI AND PEA
RISOTTO
Serves 4-6
20g butter
1 tablespoon oil
2 leeks, washed and thinly sliced
2 cloves garlic, finely chopped
300g Arborio or carnaroli rice
1 cup dry white wine
4 cups chicken or fish stock
400g fresh barramundi fillets cut into 3cm
cubes
250g fresh peas or frozen peas, thawed
1 teaspoon finely grated lemon rind
1 tablespoon fresh lemon juice
2 tablespoons chopped fresh parsley
Salt and ground white pepper
Lemon wedges to serve
SAUTÉ|SEAR setting
1. Press the SAUTÉ|SEAR button and
then the START|CANCEL button. Heat
removable cooking bowl for 3 minutes
with lid on.
2. Remove lid, add butter and oil, heat for 1
minute or until butter has melted.
3. Add leeks and garlic cover with lid, cook,
stirring occasionally for 4 - 5 minutes, or
until leeks have softened.
4. Add rice, mix well, cover with lid and
cook, stirring occasionally for 2 - 3
minutes or until rice is glossy.
5. Stir in wine, cook uncovered for 2 - 3
minutes or until all the wine is absorbed.
RISOTTO Setting
1. Stir in stock, cover with lid and press
the RISOTTO button and then the
START|CANCEL button. Cook for 18 - 20
minutes, stirring occasionally or until
most of the liquid has been absorbed.
2. Remove the lid and stir through
barramundi pieces. Cover with the lid.
3. When the cooker has automatically
switched to WARM setting, which will
take about 5 -10 minutes, remove lid
and stir through peas, lemon rind, lemon
juice and chopped parsley. Season to
taste with salt and pepper.
Serve immediately with wedges of lemon
Any type of firm white boneless fish fillets can
be used in this recipe.
NOTE
TURKISH PILAF
Serves 4-6
2 tablespoons olive oil
1 red onion, finely chopped
2 cloves garlic, finely chopped
1 teaspoon cardamom pods, finely crushed
1 teaspoon ground cumin
½ teaspoon ground black pepper
1 teaspoon ground turmeric
1 bay leaf
pinch salt
450g Basmati rice, washed and well drained
4 cups chicken or vegetable stock
½ cup shelled pistachio nuts, chopped
1 cup dried apricots, chopped
¾ cup currants
¼ cup chopped coriander leaves
SAUTÉ|SEAR setting
1. Press the SAUTÉ|SEAR button and
then the START|CANCEL button. Heat
removable cooking bowl for 3 minutes
with the lid on.
2. Remove lid, add oil, heat 1 minute.
3. Add onion, garlic, spices and salt. Cover
with lid and cook, stirring occasionally for
3- 4 minutes, or until onion has softened
slightly and spices are fragrant.
4. Add washed rice, stir well, cover with
lid and cook for 2- 3 minutes, stirring
occasionally.
RECIPES
29
RICE|STEAM setting
1. Stir in stock, cover with lid and press
the RICE|STEAM button and then the
START|CANCEL button.
2. When the cooker has automatically
switched to the WARM setting, which
should take about 15 - 20 minutes,
remove lid and discard the bay leaf.
3. Stir in pistachio nuts, apricots, currants
and coriander. Serve hot or warm.
SUSHI RICE
600g short grain sushi rice, washed and
drained
4 cups water
2 tablespoons rice vinegar
2 tablespoons caster sugar
½ teaspoon salt
Extra tablespoon of rice vinegar for rolling
RICE|STEAM setting
1. Place washed rice and water into the
removable cooking bowl. Cover with lid.
2. Press the RICE|STEAM button and then
the START|CANCEL button.
3. When the cooker has automatically
switched to the WARM setting, which
will take about 10 - 15 minutes, allow to
stand covered on the WARM setting for
10 minutes
4. Remove lid and spoon rice into a large
shallow dish, set aside.
5. Heat vinegar, sugar and salt in a small
saucepan over a low heat until sugar
dissolves. Sprinkle vinegar mixture over
rice and mix well. Allow rice to cool
completely before using.
Some sushi recipes require the rice to be shaped
by hand. To do this combine 1 tablespoon rice
vinegar with ¼ cup water. Use this mixture to
keep hands wet while shaping rice.
TIP
30
RECIPES
SUSHI ROLLS
6 sheets Nori seaweed
Prepared Sushi Rice( see recipe)
Wasabi paste, to taste
Add any combination of fillings such as:
Smoked salmon, thinly sliced
Japanese pickled ginger and vegetables
Finely sliced cucumber
Sashimi salmon or tuna
Avocado
Shredded carrot
Cooked prawns
Finely shredded lettuce
Mayonnaise
1. Place a sheet of seaweed, shiny side
down on a sheet of baking paper or
a bamboo rolling mat.
2. Spread a portion of the rice over a two
third of the Nori sheet, leaving a border.
3. Spread a very thin layer of wasabi paste
in a narrow line down the centre of the
rice. Top with a selection of fillings.
4. Using the paper or mat as a guide, roll up
the Nori sheet firmly to enclose the filling.
Press to seal the edges.
5. Place the roll seam side down on
a chopping board and using a very sharp
knife, cut the roll into small portions.
6. Repeat with remaining Nori sheets and
filling.
7. Cover and refrigerate until ready to serve.
Serve as soon as possible after preparing.
ROASTED PUMPKIN & QUINOA
SALAD
Serves 4-6
3 tablespoons olive oil
400g pumpkin, peeled and cut into 1.5cm
cubes
2 rice scoops quinoa
3 rice scoops chicken stock
4 green onion, finely sliced
3-4 dried figs
50g baby spinach leaves
2 tablespoons lemon juice
SAUTÉ|SEAR setting
1. Press the SAUTÉ|SEAR button and
then the START|CANCEL button. Heat
removable cooking bowl for 3 minutes
with lid on.
2. Remove lid, add half the oil, heat 1
minute.
3. Add pumpkin, cover with the lid
and cook for 3-4 minutes, stirring
occasionally, until softened and lightly
golden. Remove and set aside
RICE|STEAM setting
1. Add quinoa and stock, mix well, cover
with the lid. Press the RICE|STEAM button
and then the START|CANCEL button.
2. When Rice has automatically switched to
the WARM setting, which will take about
10 - 15 minutes, remove lid and fluff up
with a fork and cool completely.
Place cooked quinoa into a large salad
bowl and toss through cooked pumpkin,
figs and baby spinach leaves.
3. Whisk lemon juice and remaining oil and
season with salt and pepper. Drizzle over
salad and serve immediately.
RECIPES
31
TROPICAL MANGO RICE
Serves 4 -6
275g short grain white rice, washed and
drained
1 cup mango nectar
1 cup water
450g can sliced peaches, drained, juice
reserved
2 teaspoons finely grated lime rind
270ml can coconut cream
¼ cup passionfruit pulp
1 tablespoon cinnamon sugar
1. Place washed rice, mango nectar, water
and reserved peach juice (set peach slices
aside) into the removable cooking bowl,
mixing well. Cover with lid.
2. Press the RICE|STEAM button and then
the START|CANCEL button.
3. When the cooker has automatically
switched to the WARM setting, stir
through lime rind, coconut cream and
passionfruit pulp. Cover with lid and
stand for 10 minutes on WARM setting.
Serve warm with reserved peaches and sprinkle
with cinnamon sugar
32
RECIPES
STEAMED WHOLE FISH WITH
GINGER & GREEN ONIONS
Serves 2
300-400g whole snapper or bream, cleaned
and scaled
2cm piece fresh ginger, peeled and cut into
thin strips
1 lime, sliced
1 cup coriander sprigs
3 cups water
2 tablespoons soy sauce
1 tablespoon peanut oil
3 green onions, finely sliced
1. Wash and dry the fish. Cut 2 slits at a 45°
angle through each side of the fish. Place
some of the ginger and a slices of lime
into each slit.
2. Place the coriander into the cavity of fish.
Place fish into steaming tray.
3. Pour 3 cups of water into the removable
cooking bowl. Place steaming tray into
removable cooking bowl, cover with lid.
4. Press the RICE|STEAM button and then
the START|CANCEL button.
5. Steam fish for about 15 minutes or until
flakes when tested with a fork.
6. Remove fish from steaming tray and
place onto a serving platter.
7. Combine soy sauce, oil and shallots, pour
over fish and serve immediately.
INSTRUCTIONS AND INFORMATION REGARDING THE DISPOSAL OF USED PACKAGING MATERIALS
Dispose of packaging material at a public waste disposal site.
DISPOSAL OF USED ELECTRICAL AND ELECTRONIC EQUIPMENT
The meaning of the symbol on the product, its accessory or packaging indicates
that this product shall not be treated as household waste. Please, dispose of
this product at your applicable collection point for the recycling of electrical &
electronic equipment waste. Alternatively in some states of the European Union
or other European states you may return your products to your local retailer when
buying an equivalent new product. The correct disposal of this product will help
save valuable natural resources and help in preventing the potential negative
impact on the environment and human health, which could be caused as a result of
improper liquidation of waste. Please ask your local authorities or the nearest waste
collection centre for further details. The improper disposal of this type of waste may
fall subject to national regulations for fines.
For business entities in the European Union
If you wish to dispose of an electrical or electronic device, request the necessary
information from your seller or supplier.
Disposal in other countries outside the European Union
If you wish to dispose of this product, request the necessary information about the
correct disposal method from local government departments or from your seller.
This product meets all the basic EU regulation requirements that relate to it.
Changes to the text, design and technical specifications may occur without prior notice and
we reserve the right to make these changes.
Due to continued product improvement, the products illustrated/photographed in this brochure may vary slightly from the
actual product.
W W W . C A T L E R . E U
CUSTOMER SERVICE
I N F O @ C A T L E R . E U