1
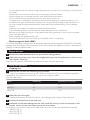
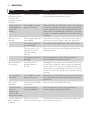
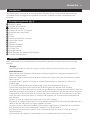
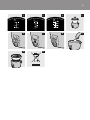
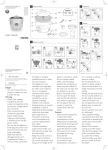
HD4718, HD4715, HD4711
A
1
B
C
D
E
F
L
M
G
N
H
I
O
J
K
P
English 6
HD4718, HD4715, HD4711
Français 11
21
26
English
Introduction
Congratulations on your purchase and welcome to Philips! To fully benefit from the support that
Philips offers, register your product at www.philips.com/welcome.
General description (Fig. 1)
A Steam vent
B Lid handle
C Glass lid
D Steam tray
E Water level indication
F Inner pot
G Body
H Keep-warm light
I Cook light
J Control lever
K Heating element
L Measuring cup
M Rice scoop
N Side handle
O Mains cord connection
P Mains cord
Important
Read this user manual carefully before you use the appliance and save it for future reference.
-
-
Danger
Never immerse the housing of the rice cooker in water, nor rinse it under the tap.
Warning
Check if the voltage indicated on the appliance corresponds to the local mains voltage before
you connect the appliance.
Only connect the appliance to an earthed wall socket. Always make sure that the plug is
inserted firmly into the wall socket.
Do not use the appliance if the plug, the mains cord or the appliance itself is damaged.
If the mains cord is damaged, it must be replaced by Philips, a service centre authorised by
Philips or similarly qualified persons in order to avoid a hazard.
This appliance is not intended for use by persons (including children) with reduced physical,
sensory or mental capabilities, or lack of experience and knowledge, unless they have been given
supervision or instruction concerning use of the appliance by a person responsible for their
safety.
Children should be supervised to ensure that they do not play with the appliance.
Keep the mains cord out of the reach of children. Do not let the mains cord hang over the edge
of the table or worktop on which the appliance stands.
Make sure the heating element, the magnetic switch and the outside of the inner pot are clean
and dry before you put the plug in the wall socket.
Do not cover the steam vent and the lid while the rice cooker is operating.
Do not plug in the appliance or operate the control lever with wet hands.
Caution
Never use any accessories or parts from other manufacturers or that Philips does
not specifically recommend. If you use such accessories or parts, your guarantee becomes
invalid.
Only use the rice scoop provided. Avoid using sharp utensils.
English
-
-
Do not expose the rice cooker to high temperatures, nor place it on a working or still hot stove
or cooker.
Always insert the inner pot before you put the plug in the wall socket.
Always unplug the rice cooker and let it cool down before you clean it.
Do not place the inner pot directly over an open fire to cook rice.
This appliance is intended for household use only. If the appliance is used improperly or for
professional or semi-professional purposes or if it is not used according to the instructions in
this user manual, the guarantee becomes invalid and Philips refuses liability for any damage
caused.
Place the rice cooker on a stable, horizontal and level surface.
The accessible surfaces may become hot when the appliance is in operation.
Beware of hot steam coming out of the steam vent during cooking or out of the rice cooker
when you open the lid.
Always unplug the appliance after use.
Do not lift and move the rice cooker by its handles while it is operating.
Electromagnetic fields (EMF)
This Philips appliance complies with all standards regarding electromagnetic fields (EMF). If handled
properly and according to the instructions in this user manual, the appliance is safe to use based on
scientific evidence available today.
Before first use
1 Remove the sheet between the inner pot and the heating element.
2 Clean the parts of the rice cooker thoroughly before you use the appliance for the first time
(see chapter ‘Cleaning’).
Make sure all parts are completely dry before you start using the appliance.
Using the appliance
Cooking rice
1 Measure the rice with the measuring cup provided.
Each cup of uncooked rice normally gives 2 bowls of cooked rice. Do not exceed the quantities
indicated on the inside of the inner pot. 1 cup of rice is approx. 180ml.
See the table below.
Menu
Volume (L)
Quantity of rice (cups)
HD4711
1.0
1-5
HD4715
1.8
2-10
HD4718
2.8
5-15
1 Wash the rice thoroughly.
Use a separate container to wash the rice to avoid damaging the surface of the inner pot.
2 Put the pre-washed rice in the inner pot.
3 Add water to the level indicated on the scale inside the inner pot that corresponds to the
number of cups of rice used. Then smooth the rice surface.
For instance, if you cook 4 cups of rice, add water up to the 4-cup level indicated on the scale.
- HD4711 (Fig. 2)
- HD4715 (Fig. 3)
- HD4718 (Fig. 4)
English
Note:The level marked inside the inner pot is just an indication.You can always adjust the water level for
different types of rice and your own preference.
4 Put the inner pot in the rice cooker. (Fig. 5)
- Make sure the inner pot is in proper contact with the heating element. To achieve this, turn the
inner pot slightly to the left and right a few times inside the rice cooker.
- Make sure that the outside of the inner pot is dry and clean. Also make sure that there is no
foreign residue on the heating element or the magnetic switch.
5 Put the lid on the rice cooker and put the plug in the wall socket.
, The keep-warm light goes on to indicate that the appliance is on. (Fig. 6)
6 Press the control lever down to start the cooking process (Fig. 7).
, The cook light goes on (Fig. 8).
If you fail to press down the control lever, the keep-warm light stays on.
, When the cooking process is finished, the cook light goes out and the keep-warm light goes
on to indicate that the rice cooker has automatically switched to the keep-warm
mode (Fig. 6).
7 Open the lid and stir the rice to loosen it (Fig. 9).
For the best results, do this just after the rice cooker has switched to the keep-warm mode. Then
close the lid firmly. Stirring the rice allows excess steam to escape. This gives fluffier rice.
8 To end the cooking process, pull up the control lever and remove the mains plug from the
wall socket. To end the keep-warm mode, remove the mains plug from the wall socket.
Steaming
1 Measure 3 cups of water with the measuring cup and pour it into the inner pot.
The amount of water varies based on to the quantity of food to be steamed.
It takes approx. 8 minutes for 3 cups of water to come to the boil.
- Make sure that the inner pot is in proper contact with the heating element. To achieve this, turn
the inner pot slightly to the left and right a few times inside the rice cooker.
- Make sure that the outside of the inner pot is dry and clean. Also make sure that there is no
foreign residue on the heating element or the magnetic switch.
2 Put the food to be steamed on a plate or in the steam tray.
To ensure even steaming, spread out the food evenly and do not pile it up.
3 Put the steam tray in the inner pot (Fig. 10).
When you cook rice and steam food at the same time, make sure you measure out an amount of
rice that leaves enough room for the steam tray. The steamed food is ready when the rice cooking
process is finished.
4 If you use a separate plate, put it in the steam tray.
5 Close the lid firmly.
6 Follow steps 6, 7 and 8 in section ‘Cooking rice’
The steaming time varies based on the quantity of food to be steamed.
When the steaming process is finished, the cook light goes out and the keep-warm light goes on to
indicate that the appliance has automatically switched to the keep-warm mode.
7 To end the cooking process, pull up the control lever and remove the mains plug from the
wall socket. To end the keep-warm mode, remove the mains plug from the wall socket.
8 Open the lid and carefully remove the steamed food from the plate or steam tray. Use a
kitchen glove or a cloth, as the plate and the steam tray are very hot.
Beware of the hot steam.
English
Keeping warm
This mode allows you to keep your rice warm for a longer period of time.
, When the cooking process is finished, the rice cooker automatically switches to the keepwarm mode. The cook light goes out and the keep-warm light goes on.
We advise you not to keep rice warm for more than 5 hours, to preserve its taste.
The keep-warm mode does not switch off automatically.
To end the keep-warm mode, remove the mains plug from the wall socket.
Cleaning
Unplug the rice cooker before you clean it.
Wait until the rice cooker has cooled down sufficiently before you clean it.
To protect the surface of the inner pot, do not:
- use the inner pot for washing dishes;
- put vinegar in the pot.
1 Take the steam tray and the inner pot out of the body of the appliance.
2 Clean the lid, inner pot, steam tray and rice scoop with a sponge or a cloth in hot water with
some washing-up liquid.
Do not use abrasive cleaning agents, scourers or metal utensils to clean the inner pot, as
they damage the surface of the inner pot.
3 Use only a damp cloth to wipe the outside and inside of the body of the rice cooker.
Never immerse the body of the rice cooker in water, nor rinse it under the tap. Wipe the heating
element with a dry cloth.
Environment
-
Do not throw away the appliance with the normal household waste at the end of its life, but
hand it in at an official collection point for recycling. By doing this, you help to preserve the
environment (Fig. 11).
Guarantee & service
If you need service or information or if you have a problem, please visit the Philips website at
www.philips.com or contact the Philips Consumer Care Centre in your country (you find its phone
number in the worldwide guarantee leaflet). If there is no Consumer Care Centre in your country,
go to your local Philips dealer.
Troubleshooting
If your rice cooker does not function properly or if the quality of the cooked food is insufficient,
consult the table below. If you are unable to solve the problem, please contact the Philips Consumer
Care Centre in your country.
Problem
Cause
Solution
The cook light
does not go on.
There is a connection
problem.
Check if the rice cooker is connected to the mains
and if the plug is inserted firmly into the wall socket.
The light is defective.
Take the appliance to your Philips dealer or a
service centre authorised by Philips.
10
English
Problem
Cause
Solution
The keep-warm
The light is defective.
light does not go
on when the
cooking process is
finished.
Take the appliance to your Philips dealer or a
service centre authorised by Philips.
Water spills out
of the appliance
during rice
cooking.
You added too much
water to the rice.
Make sure that you add water to the level indicated
on the scale inside the inner pot that corresponds
to the number of cups of rice used. Make sure the
water does not exceed the next level on the scale,
as this may cause the appliance to overflow during
cooking.
The rice is not
cooked.
Not enough water has
been added.
Add water according to the scale on the inside of
the inner pot (see chapter ‘Using the appliance’).
The cooking process
has not started.
You have failed to press down the control lever.
The inner pot is not
properly in contact
with the heating
element.
Make sure that there is no foreign residue on the
heating element.
The heating element is
damaged.
Take the appliance to your Philips dealer or a
service centre authorised by Philips.
The cooked rice
is too hard.
You did not add
enough water to
the rice.
Add slightly more water than indicated by the level on the scale inside the inner pot that corresponds
to the number of cups of rice used. Make sure the
water does not exceed the next level on the scale,
as this may cause the appliance to overflow during
cooking.
The cooked rice
is too soft.
You added too much
water to the rice.
Make sure you add water according to the scale on
the inside of the inner pot (see chapter ‘Using the
appliance’).
The rice is
scorched.
The rice has not been
rinsed well.
Rinse the rice until water runs clear.
The rice cooker
The temperature
does not
control is defective.
automatically
switch to the
keep-warm mode.
Take the appliance to your Philips dealer or a
service centre authorised by Philips.
The food has not
been steamed
properly.
Distribute the food evenly and do not steam too
much food at one time.
There is too much
food in the steam tray.
Français 11
Introduction
Félicitations pour votre achat et bienvenue dans l’univers Philips ! Pour profiter pleinement de
l’assistance Philips, enregistrez vos produits sur le site à l’adresse suivante : www.philips.com/
welcome.
Description générale (fig. 1)
A Évents à vapeur
B Poignée du couvercle
C Couvercle en verre
D Plateau de cuisson à la vapeur
E Indication de niveau d’eau
F Cuve
G Corps
H Voyant de maintien au chaud
I Voyant de cuisson
J Manette
K Élément chauffant
L Mesure graduée
M Cuillère à riz
N Poignée latérale
O Branchement du cordon d’alimentation
P Cordon d’alimentation
Important
Lisez attentivement ce mode d’emploi avant d’utiliser l’appareil et conservez-le pour un usage
ultérieur.
-
-
Danger
Ne plongez jamais le corps du cuiseur à riz dans l’eau et ne le rincez pas sous le robinet.
Avertissement
Avant de brancher l’appareil, vérifiez que la tension indiquée sur l’appareil correspond à la
tension secteur locale.
Branchez l’appareil sur une prise de terre. Assurez-vous que la fiche est correctement insérée
dans la prise.
N’utilisez jamais l’appareil si la fiche, le cordon d’alimentation ou l’appareil lui-même est
endommagé.
Si le cordon d’alimentation est endommagé, il doit être remplacé par Philips, un
Centre Service Agréé ou des techniciens qualifiés agréés afin d’éviter tout accident.
Cet appareil n’est pas destiné à être utilisé par des personnes (notamment des enfants) dont les
capacités physiques, sensorielles ou intellectuelles sont réduites, ou par des personnes manquant
d’expérience ou de connaissances, à moins que celles-ci ne soient sous surveillance ou qu’elles
aient reçu des instructions quant à l’utilisation de l’appareil par une personne responsable de
leur sécurité.
Veillez à ce que les enfants ne puissent pas jouer avec l’appareil.
Maintenez le cordon d’alimentation hors de portée des enfants. Ne le laissez pas dépasser de la
table ou du plan de travail sur lequel l’appareil est posé.
Assurez-vous que l’élément chauffant, l’interrupteur magnétique et l’extérieur de la cuve sont
bien propres et secs avant de brancher l’appareil sur la prise secteur.
Ne couvrez pas les évents à vapeur et le couvercle lorsque le cuiseur à riz est en cours de
fonctionnement.
Ne branchez pas l’appareil et ne touchez pas à la manette avec des mains humides.
12
-
-
Français
Attention
N’utilisez jamais d’accessoires, ni de pièces d’autres fabricants ou qui n’ont pas été
spécifiquement recommandés par Philips. Votre garantie ne sera pas valable en cas d’utilisation
de tels accessoires ou pièces.
Utilisez uniquement la cuillère à riz fournie. N’utilisez pas d’ustensile pointu.
N’exposez pas le cuiseur à riz à des températures élevées, ne le placez pas sur une plaque
chauffante ou une cuisinière en cours de fonctionnement ou encore chaude.
Insérez toujours la cuve avant de brancher l’appareil sur la prise secteur.
Débranchez toujours le cuiseur à riz et laissez-le refroidir avant de le nettoyer.
Ne placez jamais la cuve directement sur une flamme pour cuire du riz.
Cet appareil est destiné à un usage domestique uniquement. S’il est employé de manière
inappropriée, à des fins professionnelles ou semi-professionnelles, ou en non-conformité avec les
instructions de ce mode d’emploi, la garantie peut être caduque et Philips décline toute
responsabilité concernant les dégâts occasionnés.
Placez le cuiseur à riz sur une surface stable, horizontale et plane.
En cours de fonctionnement, les surfaces accessibles peuvent devenir très chaudes.
Faites attention à la vapeur brûlante s’échappant des évents à vapeur pendant la cuisson et à la
vapeur s’échappant du cuiseur à riz lorsque vous ouvrez le couvercle.
Débranchez toujours l’appareil après utilisation.
Ne soulevez pas et ne déplacez pas le cuiseur à riz par ses poignées lorsque celui-ci est en
cours de fonctionnement.
Champs électromagnétiques (CEM)
Cet appareil Philips est conforme à toutes les normes relatives aux champs électromagnétiques
(CEM). Il répond aux règles de sécurité établies sur la base des connaissances scientifiques actuelles
s’il est manipulé correctement et conformément aux instructions de ce mode d’emploi.
Avant la première utilisation
1 Retirez la plaque entre la cuve et l’élément chauffant.
2 Nettoyez les éléments du cuiseur à riz soigneusement avant la première utilisation (voir la
section « Nettoyage »).
Séchez bien tous les éléments avant d’utiliser l’appareil.
Utilisation de l’appareil
Cuisson du riz
1 Mesurez le riz à l’aide de la mesure graduée fournie.
Pour chaque tasse de riz non cuit vous obtenez 2 bols de riz cuit. Ne dépassez pas les quantités
indiquées à l’intérieur de la cuve. 1 tasse de riz représente environ 180 ml.
Reportez-vous au tableau ci-après.
Menu
Volume (L)
Quantité de riz (en nombre de
tasses)
HD4711
1
1 à 5
HD4715
1,8
2 à 10
HD4718
2,8
5 à 15
1 Lavez le riz à grande eau.
Utilisez un autre récipient pour laver le riz afin d’éviter d’endommager la surface de la cuve.
2 Placez le riz lavé dans la cuve.
Français 13
3 Ajoutez de l’eau jusqu’au niveau correspondant au nombre de tasses de riz utilisées. Étalez
uniformément le riz.
Par exemple, si vous cuisez 4 tasses de riz, ajoutez de l’eau jusqu’au niveau correspondant à 4 tasses.
- HD4711 (fig. 2)
- HD4715 (fig. 3)
- HD4718 (fig. 4)
Remarque : Le niveau indiqué à l’intérieur de la cuve est une simple indication ; vous pouvez adapter le
niveau d’eau selon les différentes variétés de riz et selon vos préférences.
4 Placez la cuve dans le cuiseur à riz. (fig. 5)
- Assurez-vous que la cuve est directement en contact avec l’élément chauffant. Tournez plusieurs
fois la cuve légèrement vers la gauche et la droite à l’intérieur du cuiseur à riz pour vous en
assurer.
- Assurez-vous que l’extérieur de la cuve est bien sec et propre. Veillez à ce qu’il n’y ait aucun
résidu sur l’élément chauffant ou sur l’interrupteur magnétique.
5 Placez le couvercle sur le cuiseur à riz et branchez le cordon d’alimentation sur la prise
secteur.
, Le voyant de maintien au chaud s’allume pour indiquer que l’appareil fonctionne. (fig. 6)
6 Abaissez la manette pour commencer la cuisson (fig. 7).
, Le voyant de cuisson s’allume (fig. 8).
Si vous n’abaissez pas la manette, le voyant de maintien au chaud reste allumé.
, Lorsque la cuisson est terminée, le voyant de cuisson s’éteint et le voyant de maintien au
chaud s’allume, ce qui indique que le cuiseur à riz passe automatiquement en mode de
maintien au chaud (fig. 6).
7 Ouvrez le couvercle et remuez le riz pour le décoller (fig. 9).
Pour obtenir les meilleurs résultats, attendez que le cuiseur à riz passe en mode de maintien au
chaud. Refermez correctement le couvercle. Lorsque vous remuez le riz, de la vapeur
supplémentaire s’échappe. Le riz sera ainsi plus léger.
8 Pour terminer la cuisson, tirez la manette vers le haut et débranchez le cordon
d’alimentation de la prise secteur. Pour arrêter le mode de maintien au chaud, débranchez le
cordon d’alimentation de la prise secteur.
Cuisson à la vapeur
1 Mesurez 3 tasses d’eau avec la mesure graduée et versez-les dans la cuve.
La quantité d’eau dépend de la quantité d’aliments à cuire à la vapeur.
Il faut environ 8 minutes pour obtenir 3 tasses d’eau à ébullition.
- Assurez-vous que la cuve est directement en contact avec l’élément chauffant. Tournez plusieurs
fois la cuve légèrement vers la gauche et la droite à l’intérieur du cuiseur à riz pour vous en
assurer.
- Assurez-vous que l’extérieur de la cuve est bien sec et propre. Veillez à ce qu’il n’y ait aucun
résidu sur l’élément chauffant ou sur l’interrupteur magnétique.
2 Mettez les aliments à cuire à la vapeur sur une assiette ou sur le plateau.
Pour une cuisson à la vapeur optimale, répartissez les aliments uniformément sur le plateau.
3 Placez le plateau de cuisson à la vapeur dans la cuve (fig. 10).
Lorsque vous faites cuire du riz et des aliments à la vapeur en même temps, veillez à ne pas mettre
trop de riz afin de laisser assez de place pour le plateau de cuisson à la vapeur. Les aliments sont
prêts une fois la cuisson du riz terminée.
4 Si vous utilisez une assiette, posez-la sur le plateau.
5 Fermez correctement le couvercle.
14
Français
6 Suivez les étapes 6, 7 et 8 du chapitre « Cuisson du riz ».
Le temps de cuisson dépend de la quantité d’aliments à cuire à la vapeur.
Lorsque la cuisson à la vapeur est terminée, le voyant de cuisson s’éteint et le voyant de maintien au
chaud s’allume, ce qui indique que l’appareil passe automatiquement en mode de maintien au chaud.
7 Pour terminer la cuisson, tirez la manette vers le haut et débranchez le cordon
d’alimentation de la prise secteur. Pour arrêter le mode de maintien au chaud, débranchez le
cordon d’alimentation de la prise secteur.
8 Ouvrez le couvercle et retirez avec précaution les aliments cuits à la vapeur de l’assiette ou
du plateau. Utilisez un gant de cuisine ou un torchon car l’assiette et le plateau sont très
chauds.
Faites attention à la vapeur brûlante.
Maintien au chaud
Ce mode vous permet de maintenir votre riz au chaud pendant une longue période.
, Lorsque la cuisson est terminée, le cuiseur à riz passe automatiquement en mode de
maintien au chaud. Le voyant de cuisson s’éteint et le voyant de maintien au chaud s’allume.
Il est recommandé de ne pas maintenir votre riz au chaud pendant plus de 5 heures pour en
conserver l’arôme.
Le mode de maintien au chaud ne s’arrête pas automatiquement.
Pour arrêter ce mode, débranchez le cordon d’alimentation de la prise secteur.
Nettoyage
Débranchez le cuiseur à riz avant de le nettoyer.
Attendez que le cuiseur à riz ait suffisamment refroidi avant de le nettoyer.
Pour protéger la surface de la cuve, évitez :
- d’utiliser la cuve pour laver la vaisselle ;
- de verser du vinaigre dans la cuve.
1 Retirez le plateau de cuisson à la vapeur et la cuve de l’appareil.
2 Nettoyez le couvercle, la cuve, le plateau, la cuillère à riz à l’eau savonneuse à l’aide d’une
éponge ou d’un torchon.
N’utilisez jamais de produits abrasifs, de tampons à récurer ou d’ustensiles métalliques pour
nettoyer la cuve au risque d’endommager sa surface.
3 Pour nettoyer le corps du cuiseur à riz à l’intérieur et à l’extérieur, utilisez un chiffon humide.
Ne plongez jamais le corps du cuiseur à riz dans l’eau et ne le rincez pas sous le robinet. Essuyez
l’élément chauffant avec un torchon sec.
Environnement
-
Lorsqu’il ne fonctionnera plus, ne jetez pas l’appareil avec les ordures ménagères, mais déposezle à un endroit assigné à cet effet, où il pourra être recyclé. Vous contribuerez ainsi à la
protection de l’environnement (fig. 11).
Français 15
Garantie et service
Si vous souhaitez obtenir des informations supplémentaires ou faire réparer l’appareil, ou si vous
rencontrez un problème, rendez-vous sur le site Web de Philips à l’adresse www.philips.com ou
contactez le Service Consommateurs Philips de votre pays (vous trouverez le numéro de téléphone
correspondant sur le dépliant de garantie internationale). S’il n’existe pas de
Service Consommateurs Philips dans votre pays, renseignez-vous auprès de votre revendeur Philips
local.
Dépannage
Si votre cuiseur à riz ne fonctionne pas correctement ou si vous n’êtes pas satisfait de la qualité des
aliments cuits, consultez le tableau ci-dessous. Si vous n’arrivez pas à résoudre le problème, veuillez
contacter le Service Consommateurs Philips de votre pays.
Problème
Cause
Le voyant de
Il s’agit d’un problème
cuisson ne s’allume de branchement.
pas.
Le voyant de
maintien au chaud
ne s’allume pas
lorsque la cuisson
est finie.
Solution
Vérifiez si le cuiseur à riz est branché et si la fiche a
été correctement insérée dans la prise.
Le voyant est
défectueux.
Confiez l’appareil à votre revendeur Philips ou à un
Centre Service Agréé Philips.
Le voyant est
défectueux.
Confiez l’appareil à votre revendeur Philips ou à un
Centre Service Agréé Philips.
De l’eau déborde Vous avez versé une
de l’appareil
trop grande quantité
pendant la cuisson. d’eau.
Ajoutez de l’eau jusqu’au niveau correspondant au
nombre de tasses de riz utilisées. Pour éviter que
de l’eau déborde de l’appareil lors de la cuisson,
vérifiez que le niveau d’eau ne dépasse pas le
niveau supérieur.
Le riz n’est pas
cuit.
Vous n’avez pas ajouté
suffisamment d’eau.
Ajoutez de l’eau jusqu’au niveau correspondant à
l’intérieur de la cuve (voir le chapitre « Utilisation
de l’appareil »).
La cuisson n’a pas
commencé.
Vous n’avez pas abaissé la manette.
La cuve n’est pas
directement en
contact avec l’élément
chauffant.
Assurez-vous qu’aucun résidu ne se trouve sur
l’élément chauffant.
L’élément chauffant est Confiez l’appareil à votre revendeur Philips ou à un
endommagé.
Centre Service Agréé Philips.
Le riz cuit est trop
dur.
Vous n’avez pas ajouté
suffisamment d’eau.
Ajoutez un peu plus d’eau que le niveau
correspondant au nombre de tasses de riz utilisées.
Pour éviter que de l’eau déborde de l’appareil lors
de la cuisson, vérifiez que le niveau d’eau ne
dépasse pas le niveau supérieur.
16
Français
Problème
Cause
Solution
Le riz est trop cuit. Vous avez versé une
trop grande quantité
d’eau.
Ajoutez de l’eau jusqu’au niveau correspondant à
l’intérieur de la cuve (voir le chapitre « Utilisation
de l’appareil »).
Le riz est sec.
Le riz n’a pas été rincé
correctement.
Rincez le riz jusqu’à ce que l’eau devienne claire.
Le cuiseur à riz ne
passe pas
automatiquement
en mode de
maintien au chaud.
Le thermostat est
défectueux.
Confiez l’appareil à votre revendeur Philips ou à un
Centre Service Agréé Philips.
Les aliments n’ont
pas été
correctement
cuits.
Vous avez placé trop
d’aliments dans le
plateau de cuisson à la
vapeur.
Répartissez les aliments uniformément et ne cuisez
pas une quantité trop importante.
17
18
19
20
21
22
23
24
25
26
27
28
29
30
2
3
4
5
6
7
8
9
10
11
31
4222.002.6707.2