1
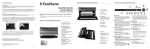
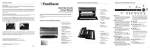
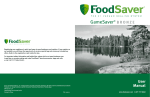
VACUUM SEALING SYSTEM
不锈钢食品真空保鲜系统
User Guide 用户手册
Model • 型号
FSFSSL3840/V3840
www.foodsaver.com.cn
www.foodsaver.com
Quick Marinating Canister
快速腌渍罐子
READ AND SAVE ALL INSTRUCTIONS
BEFORE USING THIS APPLIANCE
使用产品前先阅读此用户手册并妥善保管
Important Safeguards & Tips
Important Safeguards
For your own safety, always follow these basic
precautions when using a FoodSaver® appliance:
1. ReadtheUserManualcarefullyforoperating
instructions.Readallinstructionsinthismanual
beforeuse.
2.
Checkifthevoltageindicatedontheappliance
correspondingtothelocalmainsvoltagebefore
youconnecttheappliance.ForMainlandChina,
standardelectricaloutletis220V~50Hz.
3. D
onotuseapplianceonwetorhotsurfaces,
ornearaheatsource.
4. T oprotectagainstelectricshock,donotimmerse
anypartoftheappliance,powercordorplugin
waterorotherliquid.Unplugfromoutletwhen
notinuseandbeforecleaning.
5. T odisconnect,unplugpowercordfromelectrical
outlet.Donotdisconnectbypullingoncord.
13. W
hendefrostingfoodsinthemicrowavein
FoodSaver®Bagsmakesurenottoexceedmaximum
powerof180watts,maximumtimeof2minutes
andmaximumtemperatureof70°C(158°F).
14. Thisapplianceisnotintendedforuseby
persons(includingchildren)withreduced
physical,sensoryormentalcapabilities,orlack
ofexperienceandknowledge,unlesstheyhave
beengivensupervisionorinstructionconcerning
useoftheappliancebyapersonresponsiblefor
theirsafety.
15. Closesupervisionisnecessarywhenany
applianceisusedbyornearchildrentoensure
theydonotplaywiththeappliance.
For Household Use Only
SAVE THESE INSTRUCTIONS
6. D
onotoperatetheappliancewithadamaged
powercordorplug.Donotoperatethe
applianceifitmalfunctionsorisinanyway
damaged.
7. Useapplianceonlyforitsintendeduse.
8. C
aution:Ashortpowercordisprovidedto
reducerisksfromentanglementortripping
overalongercord.Anextensioncordmaybe
usedwhenmarkedelectricalratingisnoless
thanelectricalratingofthisappliance.Allcords
shouldnotdrapeovercounterortabletop
wherecordscanbetrippedoverorpulledon
unintentionally,especiallybychildren.
9. D
onotplaceonornearahotgasorelectric
burner,orheatedoven.Extremecautionmust
beusedwhenmovingproductscontaininghot
liquids.
10. Wait20secondsbetweensealstoallow
appliancetocool.
11. Nouserservicing.
12. FOODSINSIDEBAGCANBEDEFROSTEDBUT
NOTREHEATEDINMICROWAVEOVEN.When
reheatingfoodsinFoodSaver®Bagsmake suretoplacetheminwateratalowsimmering
temperaturebelow75°C(170°F).
1
www.foodsaver.com.cn
Welcome to FoodSaver® Vacuum Sealing System
Congratulations…
Why Vacuum Package?
You are about to enjoy the freshness
benefits of FoodSaver®, The #1 Selling
Brand of Vacuum Packaging Systems. For
years, the FoodSaver® Vacuum Packaging
System has helped millions of households
keep food fresh longer in the refrigerator,
freezer and pantry. The FoodSaver® system
is designed to remove air and extend
freshness up to five times longer than
conventional storage methods. Keep your
FoodSaver® appliance on your worktop,
and you will soon discover its convenience
and versatility.
Exposure to air causes food to lose nutrition and
flavour, and also causes freezer burn and enables
bacteria, mould and yeast to grow. The FoodSaver®
vacuum packaging system removes air and seals
in flavour and quality. With a full line of FoodSaver®
Bags, Canisters and Accessories to expand your
options, you can now enjoy the benefits of a
scientifically proven food storage method that
keeps food fresh up to five times longer.
The FoodSaver® Vacuum Packaging System Saves
Time and Money.
• Spend less money. With the FoodSaver® system,
you can buy in bulk or buy when needed and
vacuum package your food in desired portions
without wasting food.
• Save more time. Cook ahead for the week,
preparing meals and saving them in FoodSaver®
Bags.
• Marinate in minutes. Vacuum packaging opens
up the pores of food so you can get that greatmarinated flavour in minutes instead of hours.
• Make entertaining a breeze. Make your
signature dish and holiday treats in advance
so you can spend quality time with your guests.
• Enjoy seasonal or specialty foods. Keep highly
perishable or infrequently used items fresh
longer.
• Control portions for dieting. Vacuum package
sensible portions and write calories and/or
fat content on the bag.
• Protect non-food items. Keep camping and
boating supplies dry and organised for outings.
Protect polished silver from tarnishing by
minimising exposure to air.
Do not return this product
to place of purchase.
www.foodsaver.com.cn
2
Features of Your FoodSaver® Appliance
A. Controls and Indicator Lights
To indicate current setting, vacuum
progress and for added control.
B. Vacuum Progress Display
Blue lights signal progression of
vacuuming and sealing process.
All lights extinguish when the full
process is finished.
C. Seal Button
Crush Free Instant Seal feature.
Prevents crushing delicate items.
D. Appliance Door
Opens to access Built-in Roll Holder
and Cutter.
E. Vacuum Channel
Simply insert bag and the FoodSaver
appliance does the rest.
®
F. Retractable Accessory Hose/
Accessory Port
Accessory hose can be used with all
FoodSaver® Brand Accessories.
3
www.foodsaver.com.cn
Features of Your FoodSaver® Appliance
G. Built-in Roll Holder
For storage of FoodSaver®
Vacuum Sealing Rolls.
H. Roll Cutter Bar
Simplifies making
custom-sized bags.
I. Auto Bag Sensing
Simply insert open end of bag
into the vacuum channel and the
machine will sense and grasp the
bag, vacuum, seal and shut-off
automatically.
J. Release Buttons
To open appliance
for cleaning.
K. Appliance Door
Opens to access Built-in
Roll Holder and Cutter.
L. Lower Gasket (glued)
M. Extra-wide Sealing Strip with
Non-stick Coating
Provides extra secure, airtight
seal that’s two times wider.
N. Drip Tray
Catches overflow liquids
and contains Food Sensors
to detect liquid.
O. Upper Bag Detection Tray
P. Upper Gasket (glued)
Q. Rubber Seal Profile
www.foodsaver.com.cn
4
Features of Your FoodSaver® Appliance
8
Indicator
LEDs
Power Button
1
3
4
Press the power button to begin. The Power Indicator,
Speed Indicator and Food Indicator lights will become
illuminated. After Vacuum Sealing, press the Power
Button to turn the appliance Off. Note: After 12
minutes, the appliance will turn Off automatically.
5
6
During the vacuum sealing process, small amounts of
liquids, crumbs or food particles can be inadvertently
pulled into the Drip Tray (N). When excess liquid fills
the Drip Tray, the unit will turn off and the Tray Full
Indicator 2 will activate. To resume normal operation,
remove the Drip Tray, empty liquid, wash in warm
soapy water or place in top rack of dishwasher. Dry and
replace the Drip Tray in trough. (See Care and Cleaning)
3 FOR USE WITH THE FOODSAVER® “QUICK MARINATING
CANISTER” ONLY
A ten-minute predetermined sequence of vacuum pulse
to rest ratio-allowing foods to get optimum flavour
infusion in the least amount of time. See “Marinating
with your FoodSaver®” section on page 10.
When vacuum sealing delicate items, press the Speed
Setting Button 5 so that the gentle speed indicator
light is illuminated. For more control you may press
the Seal Button 8 at any time to stop the vacuum
and begin the automatic the sealing process. Note:
Appliance will default to Normal speed upon pressing
the Power On Button or when power has been
interrupted.
Seal Indicator
10
For optimal vacuuming and sealing of moist or juicy
foods, press the Adjustable Food Setting Button 6
until the Moist Indicator Light is illuminated. Choose
the dry food setting for foods without liquid.
The Moist Food Indicator light will flash when Food
Sealing Sensors automatically detect any moisture or
liquid in the Drip Tray (N). Note: Appliance will default
to Dry setting upon pressing the Power Button or when
power has been interrupted, unless liquid is detected
in the Drip Tray. (See Care and Cleaning section of this
User Manual).
7 CANCEL BUTTON
Immediately halts the current function opening the
Vacuum Channel.
8 SEAL BUTTON
Crush Free Instant Seal featureThis button has three uses:
1. Press to immediately stop the vacuum process
and begin sealing the bag. This prevents crushing
delicate items such as bread, biscuits and pastries.
4 ACCESSORY BUTTON
Press to achieve best vacuum for canisters and
accessories. Push Canister Vacuum Button 4 to
begin vacuum process. Motor will run until Vacuum
Sealing Process is complete.
7
6 ADJUSTABLE FOOD SETTINGS BUTTON
2 TRAY FULL INDICATOR LIGHT
5
9
Vacuum
Progress
Display
Adjustable Cancel
Marinate Accessory Speed
Button Settings Food Settings Button
Button
1 POWER BUTTON
5 SPEED SETTINGS BUTTON
Seal
Button
2
Tray Full
Indicator
2. Press to create a seal when making bags from
a FoodSaver® Roll.
3. Press to create a seal on most Mylar bags (such as
a potato crisp bag) to keep food sealed airtight.
9 VACUUM PROGRESS DISPLAY
Displays vacuum levels as the bag/canister is
evacuated.
10
SEAL INDICATOR LIGHT
Constant Red light indicates sealing process is
engaged. (Flashing light indicates error)
www.foodsaver.com.cn
How to Make a Bag from a
FoodSaver® Vacuum Sealing Roll
Fig. 1 Lift Roll Cutter
1. Open the appliance door and place the roll into the
Roll Storage Compartment (G). For Best results, insert
the roll with material flap down. Note: Bags can be
sealed with the appliance door either open or closed.
2. Lift up the Roll Cutter Bar (H) and place bag material
beneath the cutter bar (See Fig.1).
3. Pull out enough bag material to hold the item being
vacuum packed, plus 4 inches (10 cm). Lower the
Cutter Bar and slide the Roll Cutter (H) across the
Cutter Bar (See Fig.2).
4. Press the Seal Button 8 . The red seal light will illuminate.
Fig. 2 Slide Cutter
5. Using two hands, insert the open end of the bag into
the Vacuum Channel (E) until the clamp motor starts.
Bag must be centred between arrows.
6. When the red seal light 10 turns off, sealing is complete. You may remove the bag from the Vacuum
Channel (E).
7. You now have one sealed end.
8. Now you are ready to vacuum seal with your new bag
(See below).
How to Vacuum Seal
with FoodSaver® Vacuum Sealing Bags
Fig. 3 Insert Bag
1. Begin with a FoodSaver® Vacuum Sealing System Bag
(or create a bag as described in the “How to Make a
Bag from a Roll” section above).
2. Place item(s) in bag, allowing at least 8 cm (3 inches)
of space between bag contents and top of bag.
3. Using two hands, insert open end of bag curl side
down into Vacuum Channel (E) until clamp motor
starts (See Fig.3). The vacuum progress lights will
illuminate.
4. Continue to hold bag until vacuum pump starts. You
may now release bag. Note: To prevent crushing
delicate items, you may press Seal Button 8 at any
time to begin automatic sealing process.
5. When red Seal Light 10 turns off, remove bag.
Refrigerate or freeze if needed. (See the safety tips
section) Note: Wait at least 20 seconds between seals
to allow appliance to properly cool.
www.foodsaver.com.cn
6
Guidelines
for Vacuum Packaging
Vacuum Packaging and Food Safety
Thevacuumpackagingprocessextendsthelifeof
foodsbyremovingmostoftheairfromthesealed
container,therebyreducingoxidation,which
affectsnutritionalvalue,flavourandoverallquality.
Removingaircanalsoinhibitthegrowthofmicroorganisms,whichcancauseproblemsundercertain
conditions:
Mould –Easilyidentifiedbyitsfuzzycharacteristic.
Mouldcannotgrowinalowoxygenenvironment,
thereforevacuumpackagingcanslowthegrowth
ofmould.
Yeast–Resultsinfermentation,whichcanbe
identifiedbysmellandtaste.Yeastneedswater,
sugarandamoderatetemperaturetogrow.Itcan
alsosurvivewithorwithoutair.Slowingthegrowthof
yeastrequiresrefrigeration,whilefreezingstops
itcompletely.
Bacteria–Resultsinanunpleasantodour,
discolourationand/orsoftorslimytexture.Under
therightconditions,anaerobicbacteriasuchas
ClostridiumBotulinum(theorganismthatcauses
Botulism)cangrowwithoutairandsometimescannot
bedetectedbysmellortaste.Although
itisextremelyrare,itcanbeverydangerous.
Topreservefoodssafely,itiscriticalthatyoumaintain
lowtemperatures.Youcansignificantlyreducethe
growthofmicroorganismsattemperaturesof4°C
(40°F)orbelow.Freezingat-17°C(0°F)doesnot
killmicroorganisms,butstopsthemfromgrowing.
Forlong-termstorage,alwaysfreezeperishable
foodsthathavebeenvacuumpackaged,andkeep
refrigeratedafterthawing.
Itisimportanttonotethatvacuumpackagingis
NOTasubstituteforcanninganditcannotreverse
thedeteriorationoffoods.Itcanonlyslowdownthe
changesinquality.Itisdifficulttopredicthowlong
foodswillretaintheirtop-qualityflavour,appearance
ortexturebecauseitdependsontheageand
conditionofthefoodonthedayitwasvacuumed
packaged.
IMPORTANT: Vacuum packaging is NOT a substitute
for refrigeration or freezing.Anyperishablefoods
thatrequirerefrigerationmuststillberefrigerated
orfrozenaftervacuumpackaging.
Food Preparation and Reheating Tips
Thawing and Reheating Vacuum Packaged Foods
FOODSINSIDEBAGCANBEDEFROSTEDBUTNOT
REHEATEDINMICROWAVEOVEN.
7
Defrosting-Alwaysthawfoodsineitherarefrigerator
ormicrowave—donotthawperishablefoodsatroom
temperature.Makesuretocutthecornerofthebag
beforeplacingitinmicrowave.Itisrecommendedthat
youplacebagonamicrowave-safedishtoavoidliquids
fromspillingout.Makesurenottoexceedmaximum
powerof180watts,maximumtimeof2minutesand
maximumtemperatureof70°C(158°F).
Reheating-Toreheatfoodsinamicrowaveoven,remove
itfrombagandplaceitonamicrowave-safedish.
YoucanalsoreheatfoodsinFoodSaver®Bagsbyplacingthem
inwateratalowsimmeringtemperaturebelow75°C(170°F).
Preparation Guidelines for Meat and Fish:
Forbestresults,pre-freezemeatandfishfor1-2hours
beforevacuumpackaginginaFoodSaver®Bag.This
helpsretainthejuiceandshape,andguaranteesa
betterseal.
Ifitisnotpossibletopre-freeze,placeafoldedpaper
towelbetweenmeatorfishandthetopofthebag,
butbelowthesealarea.Leaveapapertowelinthe
bagtoabsorbexcessmoistureandjuicesduringthe
vacuumpackagingprocess.
Note:Beefmayappeardarkeraftervacuum
packagingduetotheremovalofoxygen.Thisisnot
anindicationofspoilage.
Preparation Guidelines for Hard Cheeses:
Tokeepcheesefresh,vacuumpackageitaftereach
use.MakeyourFoodSaver®Bagextralong,allowing
2.5cm(1-inch)ofbagmaterialforeachtimeyouplan
toopenandresealinadditiontothe8cm(3-inch)
roomyounormallyleavebetweenthecontentsand
theseal.Simplycutthesealededgeandremove
cheese.Whenyouarereadytorepackagethecheese,
justdropitinthebagandreseal.
IMPORTANT: Due to the risk of anaerobic bacteria,
Soft cheeses should never be vacuum packaged.
Preparation Guidelines for Vegetables:
Vegetablesneedtobeblanchedbeforevacuum
packaging.Thisprocessstopstheenzymeactionthat
couldleadtolossofflavour,colourandtexture.
Toblanchvegetables,placetheminboilingwater
orinthemicrowaveuntiltheyarecooked,butstill
crisp.Blanchingtimesrangefrom1to2minutes
forleafygreensandpeas;3to4minutesforsugar
snappeas,slicedcourgettesorbroccoli;5minutes
forcarrots;and7to11minutesforcornonthecob.
Afterblanching,immersevegetablesincoldwaterto
stopthecookingprocess.Finally,dryvegetablesona
towelbeforevacuumpackaging.
www.foodsaver.com.cn
Guidelines
for Vacuum Packaging
Note:Allvegetables(includingbroccoli,brussels
sprouts,cabbage,cauliflower,kale,turnips)naturally
emitgasesduringstorage.Therefore,afterblanching,
theymustbeonlystoredinthefreezer.
Whenfreezingvegetables,itisbesttopre-freeze
themfor1-2hoursoruntilsolidlyfrozen.Tofreeze
vegetablesinindividualservings,firstplaceon
abakingsheetandspreadthemoutsotheyare
nottouching.Thispreventsthemfromfreezing
togetherinablock.Oncetheyarefrozen,remove
frombakingsheetandvacuumpackagevegetables
inaFoodSaver®Bag.Aftertheyhavebeenvacuum
packaged,returnthemtothefreezer.
IMPORTANT: Due to the risk of anaerobic bacteria,
fresh mushrooms, onions, & garlic should never
be vacuum packaged.
Preparation Guidelines for Leafy Vegetables:
Forbestresults,useacanistertostoreleafy
vegetables.Firstwashthevegetables,andthendry
withatowelorsaladspinner.Aftertheyaredried,
puttheminaFoodSaver®CanisterorContainerand
vacuumpackage.Storeintherefrigerator.
Preparation Guidelines for Fruit:
Whenfreezingsoftfruitorberries,itisbesttoprefreezethemfor1-2hoursoruntilsolidlyfrozen.To
freezefruitinindividualservings,firstplaceona
bakingsheetandspreadthemoutsotheyarenot
touching.Thispreventsthemfromfreezingtogether
inablock.Oncetheyarefrozen,removefrombaking
sheetandvacuumpackagefruitinaFoodSaver®Bag.
Aftertheyhavebeenvacuumpackaged,returnthem
tothefreezer.
Youcanvacuumpackageportionsforbaking,or
inyourfavouritecombinationsforeasyfruitsalad
allyearround.Ifstoringintherefrigerator,we
recommendusingaFoodSaver®CanisterorContainer.
Preparation Guidelines for Baked Goods:
Tovacuumpackagesoftorairybakedgoods,we
recommendusingaFoodSaver®CanisterorContainer
sotheywillholdtheirshape.Ifusingabag,pre-freeze
for1-2hoursoruntilsolidlyfrozen.Tosavetime,
makecookiedough,pieshells,wholepies,ormixdry
ingredientsinadvanceandvacuumpackageforlater
use.
Preparation Guidelines for Coffee and Powdery
Foods:
Topreventfoodparticlesfrombeingdrawnintothe
vacuumpump,placeacoffeefilterorpapertowel
atthetopofthebagorcanisterbeforevacuum
packaging.Youcanalsoplacethefoodinitsoriginal
baginsideaFoodSaver®Bag.
Preparation Guidelines for Liquids:
Beforeyouvacuumpackageliquidssuchassoup
stock,pre-freezeinacasseroledish,loaftinorice
cubetrayuntilsolid.Removefrozenliquidfromthe
panandvacuumpackageinaFoodSaver®Bag.You
canstackthese“frozenbricks”inyourfreezer.
Tovacuumpackagenon-carbonatedbottledliquids,
youcanuseaFoodSaver®BottleStopperwiththe
originalcontainer.Remembertoleaveatleast2.5cm
(1inch)ofroombetweenthecontentsandthebottom
oftheBottleStopper.Youcanre-sealbottlesafter
eachuse.
Preparation Guidelines for Make-ahead Meals,
Leftovers and Sandwiches:
Efficientlystoreyourmake-aheadmeals,leftoversand
sandwichesinthestackable,lightweightFoodSaver®
containers.Theyaremicrowaveable,toprack
dishwashersafeandcomewithacustomadaptor.
Thelightweightcontainerswillbereadytogotothe
officeorschoolwhenyouare!Pleasecheckthebase
ofthecontainerstoconfirmiftheyaremicrowavesafe
beforeuse.
Preparation Guidelines for Snack Foods:
Yoursnackfoodswillmaintaintheirfreshness
longerwhenyouvacuumpackagethem.Forbest
results,useaFoodSaver®CanisterorContainerfor
crushableitemslikebiscuits.
Vacuum Packaging Non-Food Items
TheFoodSaver®vacuumpackagingsystemalso
protectsnon-fooditemsfromoxidation,corrosion
andmoisture.Simplyfollowthedirectionstovacuum
packageitemsusingFoodSaver®Bags,Canisters,
ContainersandAccessories.
Tovacuumpackagesilver,wrapforktinesinsoft
cushioningmaterial,suchasapapertowel,toavoid
puncturingthebag.YourFoodSaver®Bagsareideal
foroutdoorexcursions.Forcampingandhiking,keep
yourmatches,mapsandfooddryandcompact.To
havefreshwaterfordrinking,simplyfillaFoodSaver®
Bagwithice,sealitandwhenneeded,lettheice
packmelt.Ifyouaregoingsailingorboating,vacuum
packageyourfood,filmandadrychangeofclothes.
Justremembertobringscissorsoraknifetoopenthe
bag.Tokeepemergencykitssafeanddry,vacuum
packageflares,batteries,torches,matches,candles
andothernecessities.Youremergencyitemswillstay
dryandorganisedinyourhome,carorboat.
www.foodsaver.com.cn
8
Tips for Successful Vacuum Sealing
General Tips
Tips for Successful Vacuum Sealing
1. Vacuum sealing is NOT a substitute for the heat process
of canning. Perishables still need to be refrigerated or
frozen.
2. For best results, use FoodSaver® brand Bags, Canisters,
Containers and Accessories.
3. During the vacuum sealing process, small amounts of
liquids, crumbs or food particles can be pulled inadvertently into the Drip Tray (N), clogging the pump and
damaging your appliance.
To prevent this, follow these tips:
a. For moist and juicy foods: Freeze first and avoid
overfilling bags. You can also place a folded paper
towel inside top of bag, and below the seal area,
before vacuum sealing.
b. For soups, sauces and liquids: Freeze first and avoid
overfilling bags. Or, use a canister or container in
refrigerator.
c. For powdery or fine-grained foods: Avoid overfilling
bags or use a canister or container. You can also place
a coffee filter or paper towel inside before vacuum
packaging.
d. Empty the Drip Tray (N) after each use.
4. To avoid overfilling, always leave at least 8 cm (3 inches)
of bag material between the bag contents and the top
the of bag. Then leave at least one additional inch
(2.5 cm) of bag material for each time you plan to reuse
the bag.
5. Do not create your own side seams for a FoodSaver®
brand Bag. Our bags are manufactured with a special
side seam, which is sealed all the way to the outer edge.
6. To prevent wrinkles in a seal when vacuum sealing bulky
items, gently stretch bag flat while inserting into the
vacuum channel and hold until the pump begins.
7. If you are unsure whether your bag was sealed properly,
simply reseal the bag.
Tips on Removing Air from a Bag
Avoid wrinkles when inserting the bag into the
Vacuum Channel (E).
Wrinkles in the seal may cause a leakage and allow air
to return into the bag. To eliminate any wrinkles while
inserting the bag into the vacuum channel (E), hold the
bag with two hands gently stretching the bag flat until
the vacuum pump begins. If you find wrinkles after sealing the bag, simply cut the bag open and vacuum seal
again.
9
8. When you are vacuum sealing items with sharp edges
(dry spaghetti, silverware, etc.), protect the bag from
punctures by wrapping item in soft cushioning material,
such as a paper towel. You may want to use a canister or
container instead of a bag.
9. When using accessories, remember to leave 2.5 cm
(1-inch) of space at top of canister or container.
10. Pre-freeze fruits and blanch vegetables before vacuum
sealing for best results. Refer to the Guidelines in the
Vacuum Packaging section for more information.
11. If the appliance does not function, or the Seal button
8 flashes to signal an error:
a. Check the power cord to see if it is firmly plugged
into an electrical outlet.
b. Examine the power cord for any damages.
c. See if the electrical outlet is working by plugging in
another appliance.
d. Check to be certain that the Upper Bag Detection
Tray (O) is properly inserted.
e. Make sure the bag is placed correctly inside the
Vacuum Channel (E). (See How to Vacuum Seal with
FoodSaver® Vacuum Sealing Bags)
f. Check to ensure the Release Buttons ( J) are properly
latched.
g. Check the Foam Gasket (L) around the Drip Tray
to make sure it is free from food material and is
properly inserted into the gasket channel.
h. Check the Upper Gasket (P) around the Upper Bag
Detection Tray (O) to be sure it is free from food
material.
i. If overheated, allow the appliance to cool for 20
minutes.
j. For more usage tips visit our website at
www.foodsavereurope.com.
If motor runs for more than 30 seconds without
stopping, consider the following:
If you are vacuum sealing with a bag, make sure the
bag is properly sealed (See “How to Make a Bag From
a Roll”). Check the foam gasket around the Drip Tray to
make sure it is free from food material and is properly
inserted into the gasket channel.
If vacuum sealing with an accessory, check the
Accessory Hose connections to ensure a tight fit.
www.foodsaver.com.cn
Tips for Successful Vacuum Sealing (continued)
Tips on Sealing a Bag
When making a bag from a roll:
Press the Seal Button 8 before placing the bag material
into the Vacuum Channel (E). Once the bag is inserted the
Seal process will begin immediately.
Note: If you forget to press the Seal Button 8 before
inserting the bag into the Vacuum Channel (E), the vacuum
pump will turn on. This is not a problem, simply press the
Seal Button to prevent the pump from running
continuously,and the sealing process will begin.
How to Prevent moisture or liquid from being pulled into
the Drip Tray (N) or getting trapped in the seal:
Either pre-freeze moist food such as raw meat for 1-2
hours before vacuum sealing, or place a folded paper towel
between food and the end of the bag to absorb excess
liquid. Be sure to leave at least 8 cm (3 inches) between the
paper towel and the end of the bag so that the bag seals
properly with the paper towel inside and not positioned in
the seal area.
Make sure appliance has time to cool down.
Wait at least 20 seconds between seals. Under very
heavy usage, the appliance will stop operating to prevent
overheating. If it does, wait 20 minutes to allow the
appliance to cool down.
Tips on Vacuum Sealing with Accessories
®
How to prepare FoodSaver Accessories for
Vacuum packaging
Accessories include FoodSavor Vacuum Packaging
Canisters, Containers and Bottle Stoppers.
1. Always leave at least 2.5 cm (1 inch) of space between
the contents and the rim.
2. Wipe rim of canister, container or bottle to ensure it is
clean and dry.
3. Place lid on canister or container, or place stopper in
bottle.
4. For accessories with a large knob on lid, turn knob
to Vacuum. Vacuum package using the instructions
below. When the vacuum process is complete, turn the
knob to Closed before removing the Accessory Hose.
5. For Accessories without a large knob on the lid,
vacuum package using instructions above.
The marinating function can only be used with the FoodSaver® “Quick
Marinating Canister”. This feature will not work with bags or rolls
Your FoodSaver® Vacuum Sealing System has a special
Quick Marinate Cycle which will last about ten minutes.
The vacuum motor will “hold” the vacuum for several
minutes then release the vacuum allowing the food to
“rest” for 30 seconds. This process will then repeat
two more times. This “Pulsing” action of “vacuuming
and resting” will allow for quicker marinating.
The FoodSaver® Quick Marinating Canister is the perfect
FoodSaver® Accessory for marinating foods. Foods will
marinate in minutes when vacuum sealed because the
vacuum process opens the pores of the food and absorbs
the marinade more quickly.
Important Note: Use the FoodSaver® Quick Marinating
Canister with clear lid and large white knob. During
the Quick Marinate Cycle, make sure the knob on the
accessory lid is set to OPEN. Do not set the knob to
Vacuum. The Vacuum position on the knob will allow
the Quick Marinating Canister to be used for extending
vacuum storage.
1. Prepare enough of your favourite marinade to fully
cover food inside a marinating canister. Always leave
at least 2.5 cm (1-inch) of space between the contents
and the top of the rim.
2. Make sure the rubber gasket underneath the lids as
well as the rim of the marinating canister is free from
food materials.
3. Make sure the Accessory Hose is securely inserted into
the port on the FoodSaver® Quick Marinator lid.
4. Make sure the knob on the accessory lid is set to
OPEN.
5. Make sure lid is firmly attached to marinator base.
6. Press the Marinate button on the control panel.
7. Your FoodSaver® Vacuum Sealing System will now
begin the Quick Marinate Cycle. The Marinate Indicator
Light will flash to indicate the marinating process has
begun.
8. During the initial vacuum cycle the Marinate Mode
Indicator will illuminate. While Marinating, the Vacuum
Progress Display will blink during the Vacuum Hold or
Rest Cycle.
9. After completing the marinating cycle you may now
cook or refrigerate your marinated food.
www.foodsaver.com.cn
10
Storage Guide
Meat, Cheese, Vegetables, Fruits
Where
to Store
Recommended
FoodSaver®
Bag/Accessory
Storage Life
with FoodSaver®
Normal
Storage Life
Beef,Pork,Lamb
Freezer
FoodSaver®Bag
2-3years
6months
GroundMeat
Freezer
FoodSaver Bag
1year
4months
Poultry
Freezer
FoodSaver Bag
2-3years
6months
Fish
Freezer
FoodSaver Bag
2years
6months
Foods
Meat
®
®
®
Hard Cheeses (Donotvacuumpackagesoftcheese)
Cheddar,Swiss
Refrigerator
FoodSaver®Bag,
Canister
4-8months
1-2weeks
Parmesan
Refrigerator
FoodSaver®Bag,
Canister
4-8months
1-2weeks
Vegetables (Donotvacuumpackagefreshmushrooms,onions&garlic)
Asparagus
Freezer
FoodSaver®Bag
2-3years
8months
Broccoli,Cauliflower
Freezer
FoodSaver Bag
2-3years
8months
Cabbage,Brussels
Sprouts
Freezer
FoodSaver Bag
2-3years
8months
Corn(coborkernel)
Freezer
FoodSaver®Bag
2-3years
8months
GreenBeans
Freezer
FoodSaver Bag
2-3years
8months
Refrigerator
FoodSaver Canister
2weeks
3-6days
Freezer
FoodSaver Bag
2-3years
8months
Apricots,Plums
Freezer
FoodSaver®Bag
1-3years
6-12months
Peaches,Nectarines
Freezer
FoodSaver Bag
1-3years
6-12months
Raspberries,
Blackberries
Refrigerator
FoodSaver®Canister
1week
1-3days
Strawberries
Refrigerator
FoodSaver®Canister
1week
1-3days
Blueberries
Refrigerator
FoodSaver®Canister
2weeks
3-6days
Cranberries
Refrigerator
FoodSaver Canister
2weeks
3-6days
Lettuce,Spinach
Mangetout,Sugar
snapPeas
®
®
®
®
®
Fruits
®
Softer Berries
Harder Berries
11
®
www.foodsaver.com.cn
Baked Goods, Coffee, Snacks and Liquids
Where
to Store
Recommended
FoodSaver®
Bag/Accessory
Storage
life with
FoodSaver®
Normal
Storage Life
Freezer
FoodSaver®Bag
1-3years
6-12months
Almonds,
Peanuts
Pantry
FoodSaver®Bag,Canister
2years
6months
Sunflower
Seeds
Pantry
FoodSaver®Bag,Canister
2years
6months
CoffeeBeans
Freezer
FoodSaver®Bag
2-3years
6months
CoffeeBeans
Pantry
FoodSaver Bag,Canister
1year
3months
GroundCoffee
Freezer
FoodSaver Bag
2years
6months
GroundCoffee
Pantry
FoodSaver®Bag,Canister
5-6months
1month
Freezer
FoodSaver®Bag
1-2years
3-6months
Pantry
FoodSaver®BottleStopper
1-11⁄2years
5-6months
Beans,Grains
Pantry
FoodSaver®Bag,Canister
1-2years
6months
Pasta,Rice
Pantry
FoodSaver Bag,Canister
1-2years
6months
DryMilk
Pantry
FoodSaver®Bag,Canister
1-2years
6months
DriedCoconut
Pantry
FoodSaver®Bag,Canister
1-2years
6months
Flour
Pantry
FoodSaver®Bag,Canister
1-2years
6months
Sugar,Brown
Sugar
Pantry
FoodSaver Bag,Canister
1-2years
6months
Crisps
Pantry
FoodSaver®Canister
3-6weeks
1-2weeks
Biscuits,Crackers
Pantry
FoodSaver®Canister
3-6weeks
1-2weeks
Foods
Baked Goods
Bagels,Bread,
Pastries
Nuts
Coffee
®
®
Prepared Liquids
Sauces,Soups,
Stews
Bottled Liquids
Oils
Dry Foods
®
Powdery Foods
®
Snack Foods
www.foodsaver.com.cn
12
Care and Cleaning
To Clean Appliance:
1. Press the on/off button and unplug before cleaning.
2. Do not immerse in liquid.
3. Open the appliance door (D), while holding the
appliance with two hands, press the two Release
Buttons (J) with your thumbs, rotate the appliance
away from you, and allow the appliance to rest on the
counter.
4. Check the Lower Gasket (L) around the Drip Tray (N)
and the Upper Gasket (P) which surrounds the Upper
Bag Detection Tray (O) to make sure they are free from
food materials and that the lower Foam Gasket is
properly inserted into gasket channel.
Fig. 7 Remove For Cleaning
5. Avoid using abrasive products or materials to clean any
appliance components. These cleaners can scratch the
surface and damage the black foam rubber pads.
6. Use a mild dishwashing soap and a warm, damp
cloth to wipe away food residue inside or around
components.
7. Dry thoroughly before reusing.
Fig. 8 Firmly Snap in Place
Antibacterial Drip Tray & Upper Bag Detection Tray
Empty the Drip Tray after each use (See Fig. 7). Wash in
warm soapy water or place in top rack of dishwasher.
The Food Sensors in the Drip Tray (N) will not function
correctly if liquid is allowed to remain in the Drip Tray.
This appliance has a Tray Full indicator 2 . When excess
liquid fills the Drip Tray, the unit will turn off and the
Tray Full Indicator light will activate. To resume normal
operation, open the Appliance Door (D), press the two
release buttons (J), rotate the appliance away from you,
and allow the appliance to rest on the counter. Remove
the the Drip Tray, empty liquid, clean the Drip Tray and
replace in housing. When replacing drip tray, set the
right end of the drip tray into place, then firmly snap
the left side down (See Fig. 8). The appliance can be
used without the Drip Tray, however the Adjustable Food
Sensor setting 6 will not function without the Drip Tray.
Clean the Upper Bag Detection Tray after each use. The
Upper Bag Detection Tray (O) is removable for cleaning,
remove by lifting the tabs on each end. Do not pull on
the Upper Bag Detection Flags to remove the Upper Bag
Detection Tray. Clean the Upper Bag Detection Tray by
washing in warm soapy water or placing in top rack of
dishwasher. The upper Bag Detection Tray MUST be
inserted to use the appliance. Without the Upper Bag
Detection Tray, your FoodSaver® Appliance will not detect
the bag when inserted in the Vacuum Channel (E). After
cleaning, hold the appliance with two hands and rotate
upright until the latches lock.
13
FoodSaver® Accessories
1. Wash all FoodSaver® accessories in warm water, using
a mild dishwashing soap. Do not immerse lids in
water.
2. Dry thoroughly before reusing.
3. FoodSaver® Canister bases (but not lids) are top rack
dishwasher safe. Canister lids should be wiped down
with a damp cloth.
4. FoodSaver® Canisters and FoodSaver® Lunch &
Leftover and Sandwich & Snack Containers should not
be used in the freezer.
5. Some FoodSaver® containers are microwave and
dishwasher safe (top rack only). Please check the base
of the containers to confirm if they are microwave safe
before use.
www.foodsaver.com.cn
Troubleshooting
Nothing happens when I try to vacuum package:
1. Check power cord to see if it is firmly plugged into
electrical outlet.
2. Examine power cord for damage.
3. Check electrical outlet by plugging in another
appliance.
4. If your appliance has latches, make sure the lid is
closed and the latch is in the locked position.
5. If your appliance has a mode switch, make sure it is
set to the correct mode.
6. Make sure bag is placed correctly down inside the
Vacuum Channel.
7. Wait 20 minutes to allow appliance to cool off, and
then try using it again.
Note: The appliance will shut off automatically if it
becomes too hot.
3. If you are using a custom-sized FoodSaver® Bag, check
the bag’s seal. A wrinkle in the bag along the seal may
cause leakage and allow air to re-enter. Just cut the
bag and reseal.
4. Do not attempt to make your own side seams for a
FoodSaver® Bag. The bags are manufactured with
special side seams, which are sealed all the way to the
outer edge. Making your own side seams may cause
leakage and allow air to re-enter.
5. Make sure the Accessory Hose is not inserted into the
Accessory Port.
6. Check the gasket around the Drip Tray and the upper
gasket under the lid to make sure it is free from food
materials and is properly inserted into the gasket
channel.
To keep your appliance from overheating:
Wait at least 20 seconds for the appliance to cool down
before you begin vacuum packaging another item. Keep
the lid open before vacuum packaging.
Air is still in the bag:
1. Make sure the open end of bag is resting entirely
inside the Vacuum Channel. If the edge of bag is
beyond the Vacuum Channel, the bag will not seal
properly.
2. Examine the bag for leaks. To see if your bag has a
leak, seal the bag with air, submerge it into water and
apply pressure. Bubbles indicate a leak. Use a new
bag if bubbles appear.
www.foodsaver.com.cn
14
The Complete FoodSaver® System
Get the most out of your FoodSaver® appliance
with easy-to-use FoodSaver® Bags, Canisters and
Accessories.
FoodSaver® Bags and Rolls
The design of FoodSaver® Bags and Rolls features
special channels that enable the efficient and complete
removal of air. The multi-ply construction makes
them an especially effective barrier to oxygen and
moisture, preventing freezer burn. FoodSaver® Bags and
Rolls come in a variety of sizes.
IMPORTANT: To avoid possible illness, do not reuse
bags after storing raw meats, raw fish or greasy foods.
Do not reuse bags that have been microwaved or
simmered.
FoodSaver® Bottle Stopper
Use FoodSaver® Bottle Stoppers to vacuum package
wine, non-carbonated liquids and oils. This will extend
the life of the liquid and preserve the flavour. Avoid
using the Bottle Stopper on plastic bottles.
Note: Do not vacuum package carbonated or sparkling
beverages as gas removal will cause them to go flat.
How to Purchase FoodSaver® Bags, Rolls and Accessories
FoodSaver® products and accessories are available
through the consumer service number, see back page of
manual for details.
FoodSaver® Vacuum Packaging Canisters
FoodSaver® Canisters are simple to use and ideal for
vacuum packaging delicate items such as muffins and
other baked goods, liquids and dry goods.
The canisters come in a variety of styles and sizes and
can be used on the countertop, in the refrigerator or in
the pantry.
The Quick Marinator is an excellent way to marinate
foods in minutes instead of hours. Any FoodSaver®
Canister can be used for marinating, but we recommend
the square or rectangular shapes because less marinade
is needed. Canisters should not be used in the freezer.
The stackable, lightweight containers are a convenient
option to store make-ahead meals, leftovers and snacks.
Note: Allow hot foods to cool to room temperature
before vacuum packaging. Otherwise contents may
bubble up out of canister.
15
www.foodsaver.com.cn
For product and consumer services questions contact:
FoodSaver Consumer Service
Mainland China: 4008-622-268
www.foodsaver.com.cn
© 2013 Sunbeam Products, Inc. doing business as Jarden Consumer Solutions.
All rights reserved. Distributed by Dongguan Huixun Electrical Products Co. Ltd.,
No. 30-32, Hu Jing Road, Hong Ye Industrial Estate, Tangxia Town, Dongguan,
Guangdong Province, PRC. 1-Year Limited Warranty - please see separate insert
for details. Sunbeam Products, Inc. and Dongguan Huixun Electrical Products Co.
Ltd. are subsidiaries of Jarden Corporation (NYSE: JAH).
版权所有。一年有限保修:详情请参阅另附保修卡。
有关产品及客户服务问题, 请联络:
FoodSaver客户服务
国内专线: 4008-622-268
www.foodsaver.com.cn
Printed in China
中国印刷
P.N. 9100060002336 Rev. A
FSFSSL3840-073_13ECM2
GCDS-FSV30418-JC