1
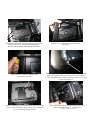
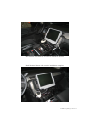
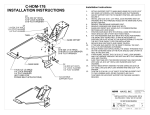
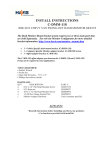
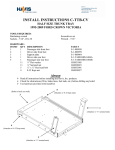
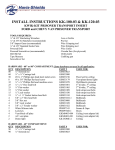
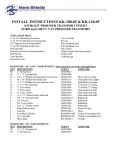
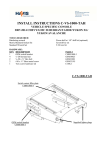
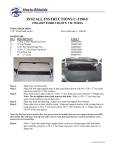
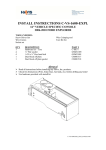
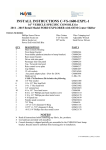
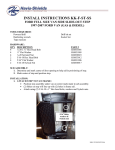
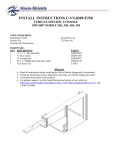
INSTALL INSTRUCTIONS
C-DMM-114
2007-2014 TAHOE SWING-OUT DASH MONITOR MOUNT
The Dash Monitor Mount bracket system requires two or three main parts that
are Sold Separately. See web site Monitor Configurator for more detailed
bracket information. http://www.havis.com/monitor_mounts.htm
•
•
•
1 - Vehicle Specific dash mount bracket. (C-DMM-114)
1 - Computer Specific Monitor adaptor bracket. (C-MM-200 series)
1 - Offset adaptor bracket. (C-MM-301)
The C-MM-301 offset adaptor goes between the C-DMM-114 and C-MM-2XX.
It may not be required in some applications.
TOOLS REQUIRED:
• Ratchet Wrench
• Socket Set
• Open End Wrenches - 7/16”, 1/2”
• Phillips Screwdriver (short)
HARDWARE:
QTY:
DESCRIPTION:
2
1/4” x 3/4 Hex Bolt
2
1/4” Flat Washer
2
1/4” Nylon retaining washer
6
1/4-20 Hex Flange Serrated Nut
4
10/32 x 1/2 Flat Head Machine Screw
4
Rubber Bumpers (stick on)
1
Monitor Adapter Hardware
PART #:
GSM33001
GSM31005
GSM31322
GSM30023
GSM33072
GSM19802
Varies (monitor specific)
ALWAYS!
• Read all instructions before installing any Havis, Inc products.
• Use hardware provided with install kit
Note: The swing door utilizes a gas spring to assist in opening the door and to eliminate the
possibility of it slamming shut. If additional damping is desired because of heavier equipment, an
optional stronger gas spring is available under Part Number CM86662-30 (sold separately)
Installer must change out gas spring as needed.
C-DMM-114
Assembly for Tahoe
C-MM-301
Offset Adaptor
C-MM-201
Monitor Mount Adaptor
(VESA bracket shown)
C-DMM-114_INST_4-10 rev 9-13
Installation:
OEM Dash
Prior to installation.
Carefully remove center OEM trim bezel.
This has eight (8) snap in clips.
Remove 4 screws that hold radio head.
Screws to be reused (7 mm socket)
Remove radio and unplug wires.
#1
#3
#2
Disassemble
1. Side support brackets
2. Cover / Trim Bezel
3. Gas Shock (one end only)
Attach #1 Side support brackets onto original radio
mount holes with OEM screws.
One bracket
on each side.
C-DMM-114_INST_4-10
rev 9-13
Replace OEM Trim Bezel
Side support shown with OEM
bezel back in place.
Insert main bracket assembly into dash
cavity.
Attach main bracket to the side support
brackets with 10/32 x ½” screws provided.
Insert two (2) ¼” x ¾” hex bolts and ¼” washers into OEM existing
holes from the forward side and hold bolts in place with nylon
retaining washers.
** This should be done prior to inserting cavity bracket**
With Cavity bracket in place, attach ¼” serrated nuts onto bolts.
Tighten hardware.
Main cavity bracket assembly installed
C-DMM-114_INST_4-10 rev 9-13
Attach wires into radio and insert into cavity bracket
Radio will fit over four (4) mounting studs.
Secure radio to studs with existing 8/32 nuts.
Reattach cover / trim bezel with screws
previously removed.
Attach C-MM-200 series bracket to the back of monitor.
Note: Some computers require wiring to be connected
prior to attaching adaptor bracket.
Replace cover / trim bezel and reattach gas
shock stud.
Rubber Bumpers are provided to push against the top OEM
trim bezel and the back side of the metal cavity bracket.
**This is needed because the top OEM clip holes are covered
by the new bracket**
Place monitor mount into desired position of swivel
bracket and attach with ¼” serrated nuts.
C-DMM-114_INST_4-10 rev 9-13
Run monitor wire harness on exterior of dash as desired.
Dash Monitor Mount with console installation complete.
C-DMM-114_INST_4-10 rev 9-13