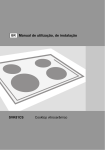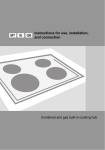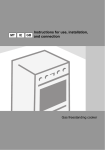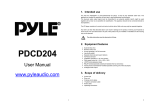
1
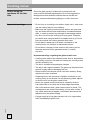
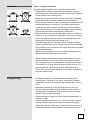
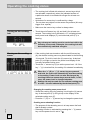
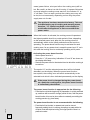
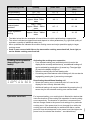
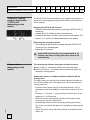
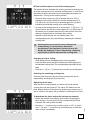
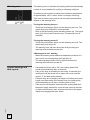
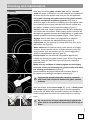
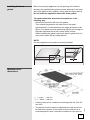
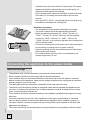
MT
IE
GB
Instructions for use, installation,
and connection
Glass-ceramic built-in coking hob
Glass-ceramic built-in cooking hob
Dear customer!
Glass-ceramic hob is intended for use in households.
Our products are packed in environment-friendly materials which
can be recycled, disposed of, or destroyed without imposing any
burden on the environment.
Instructions for use
Instructions for use are intended for the user. They describe the
appliance and its operation. The instructions apply to various
types of appliances and may therefore include description of
functions that may not be available on your appliance.
Instructions for
connection
The appliance must be connected in compliance with the
instructions attached to it, as well as in compliance with relevant
regulations and standards. The connection may only be
performed by a qualified person.
Rating plate
The rating plate indicating the basic information on the appliance
is attached to the lower side of the hob.
Fire risk protection
When the cooking hob is built-in, a kitchen furniture element that
is higher than the hob can stand next to in on one side, provided
the kitchen element on the other side of the hob is not higher
than the hob level.
233033
Important - Read before using the appliance .............. 3
Appliance description .................................................... 5
Cooking zones ................................................................ 6
Operating the cooking zones ........................................ 8
Cleaning and maintenance .......................................... 15
Installation..................................................................... 16
Connecting the appliance to the power mains .......... 18
Technical characteristics ............................................. 20
2
Important - Read before using the appliance
Safety percautions
• This appliance can be used by children aged from 8 years and
above and persons with reduced physical, sensory or metal
capabilities or lack of experience and knowledge if they have
been given supervision or instruction concerning use of the
appliance in a safe way and understand the hazards involved.
Children shall not play with the appliance. Cleaning and user
maintenance shall not be made by children without supervision.
• WARNING: The appliance and its accessible parts become hot
during use. Care should be taken to avoid touching heating
elements. Children less than 8 years of age shall be kept away
unless continuously supervised.
• WARNING: Danger of fire: do not store items on the cooking
surfaces.
• WARNING: Unattended cooking on a hob with fat or oil can be
dangerous and may result in fire. Never try to extinguish a fire
with water, but switch off the appliance and then cover flame
with a lid or a damp cloth.
• After use, switch off the hob element by its control and not rely
on the pan detector.
• WARNING: If the surface is cracked, switch off the appliance to
avoid the possibility of electric shock.
• Do not use steam cleaners or high-pressure cleaners to clean
the cooking hob, as this may result in an electric shock.
• The appliance is not intended to be controlled by external timers
or special control systems.
• The appliance may only be connected to the power mains by an authorized service
technician or expert.
• Tampering with the appliance or non-professional repair thereof may result in risk of
severe injury or damage to the product. Any repairs may only be carried out by an
authorized service technician or expert.
• The appliance is intended solely for cooking. Do not use it for any other purpose, e.g. for
room heating. Do not place empty cookware on the cooking zones.
• If another electrical appliance is connected to a AC power socket near the appliance,
make sure the power cord does not come into contact with hot cooking zones.
3
233033
Warnings
• Do not store temperature-sensitive items underneath the appliance, such as cleaners or
detergents, spray cans etc.
• Using the glass ceramic hob as a storage area may result in scratches or other damage
to it. Never heat food in aluminium foil or in plastic containers on the cooking hob. Such
foil or containers may melt which can result in a fire or damage to the cooking hob.
The symbol on the product or on its packaging indicates that this product may not be
treated as household waste. Instead it shall be handed over to the applicable
collection point for the recycling of electrical and electronic equipment. By ensuring
this product is disposed of correctly, you will help prevent potential negative
consequences for the environment and human health, which could otherwise be caused by
inappropriate waste handling of thisproduct. For more detailed information about recycling
of this product, please contact your local city office, your household waste disposal service
or the shop where you purchased the product.
233033
4
Appliance description
1. Cooking zone rear left
2. Cooking zone front left
3. Cooking hob control unit
4. Cooking zone front right
5. Cooking zone rear right
6. Warming zone
Cooking hob control
elements
(depending on the model)
G Increase value / setting sensor
H Cooking zone selection sensor
I Decrease value / setting sensor
J Cooking zone expansion on/off sensor
K Switch-off timer indication light
L Time display
M Warming zone on/off sensor
N Warming zone activation sensor
N1 “Warming zone active” signal lamp
N2 “Warming zone hot” signal lamp
233033
Control sensor keys:
A Coking hob on/off sensor
B Child lock sensor
B1 Child lock signal light
C Stop & Go sensor (temporary cooking
progress suspension sensor key)
C1 Stop & Go signal light
D Alarm or timer setting sensor
E Cooking zone expansion indicator light
F Power level / residual heat displays
F1 Active function decimal point
5
Cooking zones
Before using the
appliance for the first
time
Clean the glass-ceramic surface with a damp cloth and
some manual dishwashing detergent. Do not use aggressive
detergents such as abrasive cleaners that can scratch the
surface, abrasive dishwashing sponges, or stain removers.
Important warnings
• Do not turn on a cooking zone without a pan over it, and never
use the cooking hob for room heating!
• Make sure the cooking zones and pan bottom are clean and
dry, and that sufficient heat transmission is enabled between
them, in order to prevent any damage to the heating surface.
• Any fat or oil left on the cooking ones may ignite. Therefore,
be careful when using fat and oil to prepare food (e.g. French
fries) and control the cooking process at all times.
• Do not place a damp pan or a steam-covered lid on the
cooking zones, as moisture is detrimental to them.
• Do not leave a hot pan to cool down on the cooking zones,
because moisture will be generated under it, causing
corrosion.
Important warnings regarding the glass ceramic hob
• Cooking zone reaches the selected power level or temperature
very quickly; however, the area surrounding the cooking zones
remains relatively cool.
• The hob is resistant to temperature changes.
• The hob is also impact-resistant. The pans may be placed onto
the hob roughly without damaging the hob.
• Glass ceramic hobs should not be used as a worktop. Sharp
objects can cause scratches.
• Preparing food in thin aluminum of plastic containers on hot
cooking zones is not allowed. Do not place any plastic objects
or aluminum foil on the glass ceramic hob.
• Never use a glass-ceramic hob that is cracked or broken.
If an object falls on the hob with a sharp edge downwards,
this could cause the hob / glass ceramic panel to break. The
consequences are visible immediately, or only after a while. If
any visible crack should appear, immediately disconnect the
appliance from the power supply.
• If sugar is spilt on a hot glass ceramic hob, or a sugar-laden
food, immediately wipe the hob.
233033
6
Cookware
Tips on using the cookware
Use high-quality cookware with a flat and stable bottom.
• Transmission of heat is best when the pan bottom and the
cooking zone are of the same diameter, and the pan is placed
on the middle of the cooking zone.
• When using a tempered glass (Pyrex) or porcelain cookware,
please follow the cookware manufacturer’s instructions.
• When using a pressure cooker, do not leave it unattended until
the desired pressure is reached. The cooking zone should
initially be set to the maximum power level; as the pressure
rises, use the sensors to decrease the power level according
to the pressure cooker manufacturer’s instructions.
• Make sure there is always enough water, either in a pressure
cooker or in any other piece of cookware, as using an empty
pan on the cooking hob will result in overheating which will
damage both the pan and the cooking zone.
• Tempered glass (Pyrex) cookware with a specially brushed
bottom is suitable for use on cooking hobs if it fits the diameter
of the cooking zone. Cookware with larger diameter may break
due to thermal stress.
• When using any special or unconventional cookware, follow
the cookware manufacturer’s instructions.
• When a highly reflective pan (bright metal surface) or a pan
with a thick bottom is used for cooking on a glass-ceramic
hob, cooking time can be extended by several minutes (up to
10 minutes). If you wish to boil a larger quantity of food, it is
recommended to use a container with a flat dark bottom.
• Do not use clay cookware, because it may leave scratches on
the glass-ceramic hob.
• Pan bottom diameters should match the diameter of the
cooking zone. If the pan is too small, some heat is wasted;
furthermore, using a too small pan can damage the cooking
zone.
• Whenever possible given the cooking process, use a lid.
• The pan should be appropriately sized given the quantity of
food prepared. Preparing a small quantity of food in a large
pan will cause a waste of energy.
• Dishes that take a long time to cook should be prepared in a
pressure cooker.
• Various vegetables, potatoes, etc., can be cooked in a small
quantity of water; however, the lid should be closed tightly.
When the water is brought to boil, reduce the power level to a
setting that maintains a temperature just above boiling point.
233033
Energy saving
7
Operating the cooking zones
• The cooking hob is fitted with electronic sensor keys which
are activated, respectively, when the indicated surface of
a particular sensor is touched with a finger for at least one
second.
• Activation of a sensor key is confirmed by a beep.
• Do not place any objects on the sensor key surface (this may
trigger error reports).
• Make sure the sensor key surface is always clean.
Turning on the cooking
hob
• Touch the on/off sensor key (A) and hold it for at least one
second. The cooking hob is activated; a “0” is displayed next
to all power level displays (F), and a decimal point (F1) is
flashing.
Any subsequent setting must be carried out within the
following 10 seconds; otherwise, the cooking hob will
be automatically switched off again.
Turning on the cooking
zones
• If the cooking hob was turned on with the on/off sensor key
(A), the desired cooking zone may be activated in the following
10 seconds. To do this, touch the (H) sensor key. A decimal
point (F1) will light up next to the power level display of the
currently selected cooking zone.
• Touch the “+” sensor key (G) to set the power level 1-9. If the
key “–” (I) is touched first, the setting 9 is selected immediately.
When the “+” (G) or “–” (I) sensor key are pressed
and held, the levels will automatically start decreasing
or increasing. Power level can also be changed by
touching these two sensor keys several times; in this
case, the power level is changed stepwise.
Settings can only be made for one selected cooking zone
at a time – the one indicated by the decimal point (F1).
Changing the cooking zone power level
• Select the cooking zone by pressing / touching the (H) sensor
key. A decimal point (F1) will light up on the display of the
selected cooking zone (F).
• Press the “+” (G) or “–” (I) sensor key to change the power level.
233033
Cooking zone reheating function
• The purpose of the reheating zone is to keep warm the food
that is already cooked.
• Reheating function is activated by pressing the “–” (I) sensor
key until the power level is set to 1 .
8
Turning off the cooking
zones
• Select the cooking zone by pressing the relevant sensor key
(H). The decimal point (F1) next to the display for the selected
cooking zone will light up.
• Press the “–” (I) sensor key to set the power level to “0”.
• Quick power off: the power level can be instantly set to “0”
by pressing the “+” (G) sensor key and “–” (I) sensor key
simultaneously.
Turning off the cooking
hob
• The cooking hob may be turned off at any time by pressing the
on/off sensor key (A).
• All indicators go off, except for the remaining, or residual, heat
indicators which are lit on the displays for those cooking zones
that are still hot.
• If the cooking zone is turned off before the end of the cooking
process, the residual heat is used, which saves some power.
Activating the child lock
By activating the child lock, the operation and use of the cooking
zones is prevented. This way, children will not be able to activate
the cooking hob.
Activating the child lock
• Activate the child lock by holding the (B) sensor key for
approximately three seconds; the (B1) signal light will light up.
• Child lock can be activated when the cooking zone is
operating.
• Child lock prevents activation of any sensor key, except for the
main switch (A) and the child lock sensor key (B).
Residual heat indicators
As soon as a hot coking zone is switched off, or when the entire
cooking hob is turned off, the following is displayed on the
display of each hot cooking zone:
- “H” if the cooking zone is still hot;
- “h” if the cooking zone is cooling down and is warm to touch.
The duration of this display is calculated given the power level
and depends on how long the cooking zone has been activated.
When the “H” or “h” sign goes off, the cooking zone may in some
9
233033
Deactivating the child lock
• Child lock can be deactivated, or disengaged, by holding the
(B) sensor key for three seconds. A beep will sound when the
lock is disengaged and the signal light above the sensor key
will go off.
cases (power failure, a hot pan left on the cooking zone) still be
hot. Be careful, as there is a risk of burning. If a power failure has
occurred when the cooking zones were hot, the indicator “H” or
“h” will flash. This is to warn you that the cooking zone may still
be hot, but not necessarily, depending on how long the power
supply was out of order.
The appliance has been tested at the factory. This test
includes heating up all cooking and warming zones;
therefore, “H” symbol may flash on the display for
a while after the appliance is first connected to the
power mains.
Power boost function
When this function is activated, the cooking zone will operate at
the highest possible level for a certain period of time, depending
on the selected power level; after this, the cooking zone will
automatically switch to the initially selected level and continue
operating. The power boost function may be activated for each
cooking zone, for any power level, except for power level “9”, as in
this case the cooking zone is constantly operating at full power.
Activating the power boost function
• Set the power level to 9.
• Press the “+” (G) sensor key. Indications “A” and “9” are shown on
the display alternately.
• Reduce the power level to the desired level at which the cooking is
to continue.
The symbol “A” and the selected power level will be indicated
alternately on the display. When the power boost function
has expired, the cooking zone will switch automatically to the
selected level which is then indicated permanently on the display.
If the power level is changed during the power boost
on a particular cooking zone, the power boost function
is immediately deactivated.
The power boost function is appropriate for the following:
• Food that is cold at the beginning of preparation is quickly warmed
up, and then left to cook for a longer period of time; with the power
boost function, this can be done without constantly controlling the
cooking process (e.g. beef stew).
233033
The power boost function is not recommended for the following:
• Food that is fried, broiled, or stewed and must be turned
frequently, adding liquid, or stirring; dumplings or pasta with a lot
of liquid; food that requires boiling for longer period of time in a
pressure-cooker.
10
Dish/cooking mode
quantity
power level
cooking duration
(min)
Soup/reheating
0,5 – 1 lit
A7 - 8
4-7
milk/reheating
0,2 – 0,4 lit
A1 - 2
4-7
rice/simmering
125 – 250 g
approx. 300ml - 600ml
water
A2 - 3
20 - 25
cooked jacket
potatoes
750g – 1,5 kg
approx. 600ml – 900ml
water
A5 - 6
25 - 38
fresh vegetables/
boiling
0,5 – 1 kg
approx. 400ml – 600ml
water
A4 - 5
18 - 25
• The table below lists the examples of some dishes for which rapid heating is appropriate.
• The values indicated are approximate and depend on other parameters (e.g. type and quality of
cookware, quantity of additional water, etc.).
• Minor quantities are indicated for smaller cooking zones and major quantities apply to larger
cooking zones.
• Cook in pots covered with lids on the two smaller cooking zones back left, front right, or
on the double cooking zone front left.
Cooking zone expansion
(depending on the
model)
Activating the cooking zone expansion
• For a selected cooking one (a decimal point is lit next to the
display for the currently selected zone), an additional heating coil
can be activated by pressing the (J) sensor key. The signal light
(E) next to the display will light up.
• Select the cooking zone for both heating coils.
• If a cooking zone also features a third heating coil, this can also be
engaged by pressing the (J) sensor key once again.
Operation time limit
For improved safety, your cooking hob is fitted with a device that
limits the duration of the cooking hob operation for each cooking
zone respectively. The duration of operation is measured from
the last change made to the power level settings for a particular
cooking zone. If the power level is not changed for a while, the
cooking zone will automatically be switched off after a certain
period of time which depends on the power level (the higher the
power level, the shorter the duration – see table below).
11
233033
Deactivating the additional heating coil
• Select the cooking zone (a decimal point is lit next to the
display for the currently selected zone).
• Additional heating coil may be deactivated by pressing the (J)
sensor key for the selected cooking zone several times.
Power level
u
1
2
3
4
5
6
7
8
9
Maximum operation time in hours
6
6
6
5
5
4
1,5
1,5
1,5
1,5
Temporary cooking
progress suspension
- STOP & GO
(depending on the
model)
The STOP & GO function enables you to temporarily suspend, or
pause the cooking progress (urgent other tasks), while keeping
all the settings.
Engaging the STOP & GO function
• Cooing is temporarily suspended by touching the STOP & GO (C)
sensor key.
• A signal light (C1) will light up above the sensor key.
• All settings are frozen, and the cooking zones do not operate. The
letters S, t, O, and P are indicated alternately on the display.
Resuming the cooking progress
• The cooking hob will continue to operate when the STOP & GO
(C) sensor key is pressed again.
• Signal light (C1) goes off.
If the STOP & GO function is not deactivated in 10
minutes, the entire cooking hob will be witched off
automatically.
Program timer
(depending on the
model)
The cooking hob features two types of timer functions:
A alarm function – countdown without the switch-off option
B switch-off function – countdown with the switch-off option for
respective cooking zones.
233033
A Warning function- countdown without switching off the
cooking zone
The timer warns you that the time set has elapsed, but does not
turn off the cooking zone. The alarm timer can be set when the
cooking hob is on.
• Press the timer sensor key (D) to activate the timer. “00” is
displayed on the timer display (L) and the decimal point (F1) is
lit.
• Press the “+” (G) and “–” (I) sensor keys to set the time in the
range from 1 to 99 minutes.
• After the set time has elapsed, an alarm will sound, but the
cooking zone will not be turned off.
• Acknowledge and turn off the alarm by pressing any sensor
key; if this is not done, the alarm will stop after a certain period
of time.
• Alarm will remain active also after the hob is switched off with
button (A).
12
B Timer with the option to turn off the cooking zone
The switch-off timer facilitates the cooking process by allowing you
to set the cooking time for a particular cooking zone. In order to set
the switch-off timer, the power level must already have been set
(see section “Turning on the cooking zones”).
• Press the timer sensor key (D) to activate the timer. “00” is
displayed on the timer display (L) and the decimal point (F1)
is lit. When the (D) sensor key is pressed again, the (K) point
indicating the selected cooking zone, starts flashing.
• As long as the decimal point is lit, sensor keys “+” (G) and “–” (I)
can be used to set the time in the range from 1 to 99 minutes. IF
the sensor key is pressed and held, the rate at which the timer
setting is changing will be increased after a while.
• When the value was set, the countdown starts. The
corresponding point (K) is still flashing, indicating the selected
cooking field.
Cooking time can be set for each cooking zone
independently. If several timers have been
programmed, the time that is closest to zero will
always be displayed. This is indicated by a flashing
signal light (L) which indicates the cooking field.
Changing the timer setting
• Timer setting can be changed any time during operation.
• Press the timer sensor key (D) to display the remaining time for
the selected cooking field. The corresponding signal light (K) will
flash.
• Press the “+” (G) or “–” (I) sensor key to set the new cooking time.
Checking the remaining cooking time
If several timers are set, the remaining cooking time can be
displayed by touching the (D) sensor key.
To deactivate the timer before the set time has elapsed:
• Select the desired timer display (see section Changing the
timer setting) – the set time and the corresponding dot that
indicates the cooking field will flash.
• Press the “–” (I) sensor key to set the value to “00”, or press
the “+” (G) and “–” (I) sensor key simultaneously, to reset the
value to zero immediately.
13
233033
Switching off the timer
After the set time has elapsed, an alarm will sound and the
cooking zone will be turned off. The value “00” flashes on the
timer display. Switch off the alarm by pressing any sensor key; if
this is not done, the alarm will go off after a certain period of time.
Warming zone
The warming zone is intended for keeping warm the food already
cooked. It is not intended for cooking or reheating cold food.
The warming zone warms up slowly and reaches a temperature
of approximately 100°C; hence, there is a danger of burning.
Take care to prevent injury and do not store any heat-sensitive
objects on the warming zone.
Turning the warming zone on
- Touch the on/off sensor (M) to turn the warming zone on. The
signal lamp (N1) will flash for a few seconds.
- Now, touch the warming zone activation sensor (N). The signal
lamp (N1) will now be lit continuously. The warming zone is
activated.
Turning the warming zone off
- Touch the on/off sensor (M) to turn the warming zone off. The
signal lamp (N1) will go off.
- The warming zone can also be turned off by touching the
warming zone activation sensor (N).
“Warming zone hot” warning
- When the warming zone reaches a temperature at which it is
hot to touch, the warning lamp (N2) will light up.
- The warning lamp remains lit for a while even after the
warming zone has been turned off.
Special warnings and
fault reports
233033
14
• If all power levels are set to “00”, the cooking hob will be
turned off automatically after 10 seconds.
• If any of the keys is activated for more than 10 seconds, the
cooking hob will be turned off, an alarm will sound, and the
symbol “F” will flash on the display.
• If several keys are covered by an object or if boiled-over liquid
is spilt over the surface of the sensor keys, the cooking hob
will automatically go off after a certain period of time.
• If the keys do not respond, disconnect the cooking field from
the power supply network for a few minutes (remove the fuse
or trip the main switch); then, reconnect the hob to the power
mains and reengage the main switch.
Cleaning and maintenance
Cleaning
Figure 1
Figure 2
Figure 3
After each use of the glass-ceramic hob, wait for it to cool
down and clean it; otherwise, even the smallest food residue will
be burnt onto the hot surface next time you use the appliance.
For regular cleaning and maintenance of the glass-ceramic
surface, use special conditioning agents which form a
protective layer on the surface, shielding it from dirt. Before each
use, wipe any dust or other particles from the hob surface and
pan bottom as these could scratch the surface (Figure 1).
Careful: steel wool, abrasive sponges, and abrasive detergents
can scratch the hob surface. Glass ceramic surface can also be
damaged by aggressive sprays and inappropriate or insufficiently
shaken (mixed) liquid cleaning agents (Figure 1 and Figure 2).
Signage may be worn when using aggressive or abrasive
cleaners or cookware with damaged bottom (figure 2).
Light stains can be removed by a damp soft cloth; then, wipe
the surface dry (Figure 3).
Water stains can be removed using a mild solution of vinegar;
however, do not use this solution to clean the frame (only with
some models, as it may become dull. Do not use aggressive
sprays or decalcification agents (Figure 3).
Heavier stains can be removed using special agents and
utensils for cleaning the glass-ceramic hobs. When using these
products, follow the instructions provided by their respective
manufacturers.
Make sure any residues of cleaning agents are thoroughly
removed, as they could damage the glass-ceramic hob when
the cooking zones heat up (Figure 3).
Remove stubborn and burnt residues with a scraper (figure 4).
Be careful when handling the scraper to prevent injury.
Only use the scraper when dirt cannot be removed
with a wet cloth or special cleaners for glass ceramic
surfaces.
Do not press the scraper perpendicularly against the
glass and do not scratch the hob surface with its tip or
blade.
233033
Figure 4
Hold the scraper at the correct angle (45° to 60°). Gently press
the scraper against the glass and slide it over the signage to
remove the dirt. Make sure the plastic handle of the scraper (in
some models) does not come into contact with a hot cooking
zone.
15
Figure 5
Sugar and sugar-laden food may permanently damage the glassceramic surface (Figure 5); therefore, they should be removed
from the glass-ceramic surface as soon as possible, although
the cooking zone may still be hot (Figure 4). Any change in the
color of the glass-ceramic surface does not affect its operation
or the stability of the surface. Such discolorations are mostly
a result of burnt food residues or use of cookware made of
materials such as aluminum or copper; these stains are difficult
to remove.
Warning: All damage described above predominantly relates to
the aesthetics, i.e. appearance of the appliance and do not affect
its functionality directly. Such errors cannot be the subject of a
warranty claim.
Installation
Important warnings
• Installation of the appliance into a kitchen worktop and its connection to the power mains may
only be performed by an adequately qualified technician.
• Veneer or other finish of the piece of kitchen furniture into which the hob is to be built in should
be treated with heat resistant glue (100°C); otherwise, the worktop finish may be discolored or
deformed.
• Cooking hob is dimensioned to be built into the worktop over a piece of kitchen furniture, with a
width of 600 mm or more.
• After installation, the front two fastening elements should be freely accessible from below.
• Hanging, or wall-mounted kitchen elements should be installed high enough not to interfere with
the work process.
• The distance between the cooking hob and the kitchen hood should be no less than indicated in
the instructions for kitchen hood installation. The minimum distance is 650 mm.
• The distance between the appliance edge and the adjacent tall kitchen furniture element should
amount to no less than 40 mm.
• Use of massive wood decoration plates or boards on the worktops behind the cooking hob is
permitted, if the minimum distance remains the same as indicated in the installation drawings.
• Minimum distance between the built-in cooking hob and the rear wall is indicated on the
installation drawing.
233033
16
Installing the foam
gasket
Before inserting the appliance into the opening in the kitchen
worktop, the supplied foam gasket must be attached to the lower
side of the glass ceramic (glass) cooking hob (see figure above).
Do not install the appliance without the foam gasket!
The gasket should be attached to the appliance in the
following way:
- Remove the protective film from the gasket.
- Then, attach the gasket to the lower side of the glass,
approximately 2-3 millimetres from the edge (as shown in the
figure). The gasket must be attached along the entire length of
the glass edge and should not overlap at the corners.
- When installing the gasket, make sure that the glass does not
come into contact with any sharp objects.
NOTE!
On some appliances the gasket is already installed!
Worktop cutout
dimensions
• Cooking hobs can be installed into worktops that are 30 to 50
mm thick.
• The kitchen furniture element underneath the hob should not
be fitted with a drawer. If the kitchen furniture element as a
horizontal partition wall, it should be installed no less than 60
17
233033
*(…) – SVK7… - 750 mm
**(...) – SVK8... - 850 mm
millimeters from the lower surface of the worktop. The space
between the partition wall and the hob must be empty; no
objects should be placed into that gap.
• On the furniture back wall there should be a cutout with width
of at least 175 mm along the entire width of the furniture
element.
• Only type EVP4..,EVP2.., ovens fitted with a cooling fan may
be installed underneath this cooking hob.
Installation procedure
• The worktop should be installed completely horizontally.
• The cutoff surfaces should be appropriately protected.
• Attach the fastening elements (4x - SVK6…600 mm; 6x
- SVK7…750 mm; 6x - SVK8…850 mm) with the supplied
screws (4x - SVK6…600 mm; 6x - SVK7…750 mm; 6x
- SVK8…850 mm) to the left and right wall of the cooking hob
and the worktop cutoff.
• Connect the cooking hob to the power mains (see instructions
for connecting a cooking hob on a power network).
• Insert the cooking hob into he cutoff and press it heavily from
above against the worktop.
• For screwing down the fixing clip it is not allowed to use
screws longer than 6,5 mm.
Connecting the appliance to the power mains
Important warnings
•
•
•
•
•
•
•
•
•
The appliance may only be connected by an authorized skilled technician.
Electric system protection should comply with all relevant regulations.
The connection clips can be accessed when the connection clip covers are opened / removed.
Before connecting the appliance, make sure the voltage indicated on the rating plate is consistent
with the voltage in your home circuit.
The rating plate with basic information is attached on the lower side of the hob.
The electric circuit should also include an omnipolar switch that will separate the appliance from
the mains, if required, with at least 3 mm of distance between contacts. Suitable devices include
fuses, current protection switches, etc.
The connection should be selected according to the installation possibilities with regard to current
and fuses.
Given the protection from the risk of fire, appliances of this type may be installed in a worktop
next to a piece of kitchen furniture that is taller than the appliance (when installed); however, in
this case, a kitchen furniture not higher than the cooking hob must be installed on the other side,
adjacent to the appliance.
The current conducting and isolated parts must be protected from any possibility of direct contact.
233033
18
ATTENTION!
• Before any manipulation with the appliance (other than its regular use), disconnect it from the
power mains. The appliance should be connected according to the relevant scheme (diagram),
subject to the network voltage. Connect the earth (PE) wire to the clip indicated with the earth
/ground symbol.
• The mains cord must be fed through the fastening clip / strain release device which protects it
from being pulled out accidentally.
• After connecting the appliance, turn on all cookers for approximately three minutes to check their
operation.
‘’ The appliances are suitable for photovoltaic electrical power
under the condition that electrical voltage will be 220VAC 240VAC with semi tonic frequency 50Ηz in order the appliance
to operate properly (alternative a generator can be used with
the same technical characteristic).’’
• Incorrect connection may destroy parts of the appliance,
making the warranty void.
• Before connecting the appliance, make sure the voltage
indicated on the rating plate is consistent with the voltage
in your home network. Connection voltage (230 V through
N) should be checked by a qualified technician using a
corresponding measuring device!
• Connection cable on the back of the appliance should be led in
such way that it does not touch the appliance back wall, as this
part will get very hot during operation.
NOTE:
Connection bridges are already installed on their respective
places on the clip. Screws of the connection terminals are open,
which means they do not have to be unfastened or unscrewed
any further. When fastening the screws, you may hear a slight
‘click’, which means that the screws should be fastened /
screwed in completely.
The following can be used for connection:
• Type H05 RR-F 4×1.5 rubber connection cables with a greenyellow protective wire,
• Type H05 VV-F 4x1,5 PCV insulated connection cables with
yellow-green protective wire, or other equivalent or superior
grade cables.
19
233033
Connection diagram
Technical characteristics
Rating plate
A
B
C
D
E
F
G
Serial number
Code
Model
Type
Trademark
Technical information
Compliance indications / symbols
WE RESERVE THE RIGHT TO MAKE ANY CHANGES
THAT DO NOT AFFECT THE FUNCTIONALITY OF THE
APPLIANCE.
Instructions for use of the appliance can also be found on our
website at www.gorenje.com / < http://www.gorenje.com />
SVK67,73CS
en (03-14)