1
EN
SurfTab® xiron 7.0 3G
OPERATING INSTRUCTIONS
Contents
1) About the SurfTab xiron 7.0 3G ………………………………………… 4
2) Safety information………………………………………………………… 5
Operational safety…………………………………………………………… 5
Repair……………………………………………………………………… 6
Intended operating conditions……………………………………………… 7
Power supply………………………………………………………………… 7
Care and maintenance……………………………………………………… 7
Notes on devices with a suction cup……………………………………… 8
Information on the memory capacities indicated…………………………… 8
3) Technical specifications…………………………………………………… 9
4) Scope of delivery………………………………………………………… 9
5) Controls and connections………………………………………………… 11
6) Charging the SurfTab……………………………………………………… 11
7) Switching on the SurfTab………………………………………………… 11
8) Elements on the home screen…………………………………………… 12
9) Using the touch screen…………………………………………………… 13
Scrolling…………………………………………………………………… 13
Selecting an element……………………………………………………… 14
Enlarging and reducing the view…………………………………………… 15
Using the display keyboard………………………………………………… 15
10) Personalising the home screen…………………………………………… 16
Adding apps to the home screen…………………………………………… 16
Adding widgets to the home screen………………………………………… 16
Removing apps and widgets from the home screen……………………… 16
Changing the screen background…………………………………………… 17
11)Setting up a screen lock…………………………………………………… 17
12) Using the multiple user function………………………………………… 18
13) Connecting to the Internet via WiFi……………………………………… 18
14) Connecting to the Internet via 3G………………………………………… 19
Inserting the SIM card……………………………………………………… 19
EN 2
Defining settings for 3G mode……………………………………………… 20
Removing the SIM card……………………………………………………… 22
15) Setting up/removing an email account………………………………… 22
Setting up an email account………………………………………………… 22
Removing an email account………………………………………………… 22
16) Installing/uninstalling apps……………………………………………… 23
Downloading and installing apps…………………………………………… 23
Uninstalling apps…………………………………………………………… 23
17) Using navigation…………………………………………………………… 24
Mounting the car cradle…………………………………………………… 24
Navigating with the SurfTab………………………………………………… 25
18) Using the camera………………………………………………………… 26
Taking a photo……………………………………………………………… 26
Recording a video…………………………………………………………… 27
Zooming…………………………………………………………………… 27
19) Connecting other devices………………………………………………… 28
Connecting the SurfTab to a computer……………………………………… 28
Connecting a USB device…………………………………………………… 28
Connecting another device via Bluetooth®………………………………… 28
20) Activating standby mode………………………………………………… 29
21) Reset and recovery mode………………………………………………… 29
Resetting the SurfTab (Reset)……………………………………………… 29
Putting the SurfTab into recovery mode/loading the factory settings……… 30
22) Switching off the SurfTab………………………………………………… 30
23) Notes on copyright and trademarks……………………………………… 31
Open Source Software……………………………………………………… 31
24) Notes on disposal………………………………………………………… 32
Disposal……………………………………………………………………… 32
Recycling…………………………………………………………………… 32
25)Notes on liability and warranty…………………………………………… 32
3 EN
We hope you enjoy your TrekStor SurfTab xiron 7.0 3G. Please read the following
passages carefully to familiarise yourself with the functions of this product and
how to operate it.
IMPORTANT!
Follow the safety information in Section 2.
IMPORTANT!
Please keep these instructions in a safe place for future reference. Should
the device change hands, pass these instructions on to the new owner.
Up-to-date product information is available on the TrekStor website:
www.trekstor.de
Visit www.trekstor-onlineshop.de for additional products and accessories.
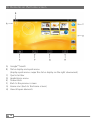
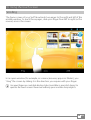
1) About the SurfTab xiron 7.0 3G
The TrekStor SurfTab xiron 7.0 3G is a tablet PC with 7" multi-touch display
for surfing the Internet, using apps and playing music, videos and games.
The built-in 3G module makes it possible to surf the Internet while on the go,
even without a WiFi connection. The integrated GPS module means that the
SurfTab can also be used as a navigation device.
Only ever use the device for its intended purpose. The manufacturer is not
liable for damages resulting from improper use. Furthermore, the manufacturer
shall not be responsible for damages or loss of data and any subsequent
damage caused.
EN 4
2) Safety information
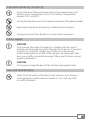
These instructions use the following warning symbols and key words:
a
r
r
i
DANGER
Indicates possible danger to life and/or danger of severe, irreversible injuries.
CAUTION
Follow instructions to avoid injuries and material damage.
WARNING
Follow instructions to avoid material damage.
NOTE
Further information about the use of the device.
Operational safety
r
CAUTION
Those who, as a result of their physical, sensory or mental capabilities,
or lack of experience or knowledge, are not in a position to use the product
safely must not be allowed in the vicinity of the product without supervision
or instruction by a person responsible for their safety. Supervise children
around the product.
DANGER
Keep packaging materials out of reach of children (e.g., plastic sheets).
There is a danger of suffocation.
a
DANGER
Some accessories can pose a choking hazard for babies and young children.
Keep these accessories out of reach of babies and young children.
a
DANGER
Never open the casing of the device or the charger: This may cause an electrical shock, short circuit or fire!
a
DANGER
Do not insert any object into the ports or openings of the device or charger: This may cause an electrical shock, short circuit or fire!
a
DANGER
Do not cover the device or charger during operation or while charging. This may cause the device/charger to overheat and potentially catch fire!
a
5 EN
CAUTION
This device can generate high sound volumes. Never listen at high volumes
for long periods. Doing so can result in immediate or gradual hearing
damage. Remember: Permanent hearing damage may only emerge
later in life. You may become used to listening to high volumes over time,
making them appear normal to you. However, your hearing may have
already been damaged. The higher you set the volume, the more quickly
your hearing can be damaged.
u
DANGER
Your safety is very important to us! Safety always has first priority
in road transport. Protect yourself and other road users by operating
the device only if the traffic situation allows it and you do not endanger
or hinder anyone. Adjust the volume of the device for your safety so that
you can continue to react to all the sounds around you. Local legislation
in force applies.
a
r
o
p
WARNING
Do not exert excessive pressure on the display, as it may break.
Avoid using USB cables over 3 m in length.
Exposing the device to electrostatic discharge can interrupt the data
transfer between the device and the computer or impair the functions
of the device. Should this happen, disconnect the device from the USB
port and reconnect it or rebuild the WiFi connection from scratch.
Repair
r
r
EN 6
WARNING
No parts inside the device require maintenance or cleaning.
WARNING
Should the device become wet, turn it off immediately. Ensure the device
is checked for operational safety before using it again.
Intended operating conditions
j
m
e
h
Protect the device from extremely high or low temperatures and
fluctuations in temperature. Use it at an ambient temperature
between 10º C and 40º C.
Do not place the device near a heat source and protect it from direct sunlight.
Never expose the device to humidity, condensation or moisture.
Ensure you use and store the device in a dust-free environment.
Power supply
r
CAUTION
Only ever use the original charger or a charger with the correct voltage and amperage to prevent damage to the device. If you have to resort to a universal charger, pay attention to the polarity of the charging device as well as the voltage and amperage. Your device may suffer irreparable damage if these specifications are not properly adhered to.
r
CAUTION
Do not use or charge the device if the battery is damaged or leaks.
Care and maintenance
g
Never clean the surface of the device with solvents, paint thinners,
cleaning agents or other chemical products. Use a soft, dry cloth
or a soft paintbrush.
7 EN
Notes on devices with a suction cup
r
WARNING
When attaching the device using the suction cup, ensure that the surface
of the suction cup and the surface to which the device is to be attached
are smooth, clean and free of grease. Always use the release tab provided
to detach the suction cup: Never pull the product directly.
Information on the memory capacities indicated
q
EN 8
The storage capacity indicated on the packaging and in the technical
specifications refers to the total storage capacity of your device.
The storage capacity of the device indicated by your operating system
may differ from the stated storage capacity, as a portion of the total
storage is also used by the operating system and system applications.
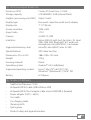
3) Technical specifications
Processor (CPU)
Cortex A7 Quad Core, 1.2 GHz
Storage capacity
512 MB RAM / 4 GB (internal Flash)
Graphics processing unit (GPU) Video Core IV
Display type
Five-point capacitive multi-touch display
Display size 7" (17.78 cm)
Screen resolution 1024 x 600
Aspect ratio
17:10
Camera 2.0 MP / 0.3 MP
Interfaces Micro-USB 2.0 (with host function), 3G (dual
SIM), GSM, WiFi, Bluetooth® 4.0, audio out,
microphone, microSD/SDHC- card reader
Supported memory cards
microSD, microSDHC (max. 32 GB)
Special features
GPS, Vibra function
Dimensions (W x H x D) 188 x 108 x 10.5 mm
Weight 270 g
Housing material
Plastic
Operating system Android™ 4.2.2 (Jelly Bean)
Supported operating systems
Linux®, Mac OS® (ab OS X 10.6), Windows® (Windows 8, 7, Vista®, XP)
Battery Li-Polymer
4) Scope of delivery
•
•
•
•
•
•
•
•
•
TrekStor SurfTab xiron 7.0 3G
Hi-Speed USB 2.0 cable (USB-A/Micro-USB)
Hi-Speed USB 2.0 host adapter cable (micro USB/USB-A (female))
Power adapter (100 V – 240 V)
Car cradle
Car charging cable
Cleaning cloth
Quick guide
Product safety and legal information
9 EN
M.No.: ST70404-1
L
EN 10
C
D
E
2
Designed in Germany | Made in China
TrekStor GmbH, Kastanienallee 8-10
64653 Lorsch, Germany
B
USB
OPEN
K
RESET
SurfTab xiron 7.0 3G
A
F
1
G
H
I
J
M
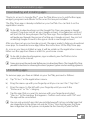
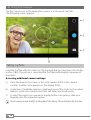
5) Controls and connections
A) Front camera
B) Audio out socket
C) microSD/microSDHC- card slot
D) Rear camera
E) Micro-USB socket
F) Opening slit for the cover
G) Dual SIM slot
H) Volume control +
I) Volume control J) On/off switch
K)Reset
L) Fixing point for car cradle
M)Loudspeaker
6) Charging the SurfTab
Please fully charge your SurfTab before you use it for the first time. Connect your
SurfTab to a plug socket using the USB cable and power adapter. After about
3.5 hours SurfTab is fully charged. Charging via a PC generally take longer than
charging via a plug socket.
i The maximum battery life is reached after approximately ten charging cycles.
7) Switching on the SurfTab
After you have charged your SurfTab, you can switch it on. Press the on/off
switch for three to five seconds to start the device. As soon as the device is
switched on, the lock screen appears. Place your finger on the lock symbol on
the screen and drag the lock symbol to the right to the open lock. Your SurfTab
will now display the home screen.
i If you are using your new SurfTab for the first time, a configuration assistant
will appear to help you configure the first important settings on your SurfTab.
The settings that you specify here (for example, language or WiFi) can be altered
again later on the applications menu under "Settings".
i If you have inserted a SIM card, you must enter the corresponding PIN number
to unlock the screen.
11 EN
8) Elements on the home screen
A) Google™ Search
B) Status display and quick menu
(display quick menu: swipe the status display on the right downwards)
C) Quick start bar
D) Applications menu
E)Screenshots
F) Back to the previous screen
G) Home icon (back to the home screen)
H) View all open elements
EN 12
9) Using the touch screen
Scrolling
The home screen of your SurfTab extends two pages to the right and left of the
middle window. To reach these pages, slide your finger from left to right (or the
reverse) across the screen.
In an open window (for example, in a menu, browser, app or in folders), you
"drag" the screen by sliding it in the direction you require with your finger.
i Use your fingers or a suitable display stylus (available in specialist shops) to
operate the touch screen. Never use ordinary pens or other sharp objects.
13 EN
Selecting an element
To open an element or select an option, briefly touch the icon you require with
your finger.
i If you want to close a recently used element (app, widget, menu), tap the display
of all open elements. Place your finger on the element that you want to close and
drag the element down to close it.
EN 14
Enlarging and reducing the view
To enlarge the display, move two fingertips apart on the screen or tap the display
twice in quick succession. Conversely, move two fingertips towards each other
on the screen or tap twice again in quick succession to reduce the display once more.
Using the display keyboard
If you tap a text field in order to enter text (for example, a Web address),
the display keyboard appears. Enter the text in the usual way via the keyboard.
Use the "?123" and "=\<" buttons to enter numbers and special symbols. To enter
an alternative letter (for example, a letter with an accent or German umlaut),
press and hold a particular letter to view the available alternatives.
i You can specify further display keyboard settings under "Settings"
+ "Language & Input" + "keyboard & input methods".10) Personalising the
home screen
15 EN
10) Personalising the home screen
You can set up the home screen (as well as the four additional pages) according
to your wishes by adding or removing app shortcuts and widgets and altering
the background.
Adding apps to the home screen
a) Tap the applications menu in the quick start bar on the home screen.
A screen opens showing the apps that are currently available.
b) Keep pressing the app that you have selected until the home screen appears.
c) Now drag the selected icon to an empty position of your choice within
the blue frame. To place the icon on the next page of the home screen,
drag the icon to the page edge.
i You can move an icon placed on your home screen at any time. Hold your finger
on the icon that you want to move until a thin, blue frame appears on the screen.
You can now move the selected icon to any empty position within the blue frame
(or to the next page of your display).
Adding widgets to the home screen
In addition to apps, you can also add widgets to your home screen.
a) Tap "Widgets" on the top left of the applications menu.
b) Keep pressing the widget that you have selected until the home screen appears.
c) Now drag the selected widget to an empty position of your choice within
the blue frame. To place the widget on the next page of the home screen,
drag the icon to the page edge.
Removing apps and widgets from the home screen
a) To remove an app or widget from the home screen, tap and hold the
respective icon. "Remove" or "X" appears at the edge of the screen.
b) Keep the icon pressed and drag it to "Remove" or "X".
i This action deletes the link to the home screen but does not delete the app itself.
To find out how you can completely remove an app from your SurfTab,
see Section 16.
EN 16
Changing the screen background
a) Touch an empty area of the screen background until a window with the
message "Choose wallpaper from" appears.
b) Now tap the relevant icon to choose which source you would like to select
the background motif from.
c) Tap the desired picture in the selected folder and confirm your choice with
"Set wallpaper".
i If you choose a background from the gallery, you also have the option to select
a particular area of the chosen picture as your background motif. Move the
selection window onto the picture and tap "OK" on the top right side as soon as
you have chosen the desired area of the picture.
11) Setting up a screen lock
To make the data on your SurfTab more secure,
we recommend that you set up a screen lock. Please proceed as follows:
a) Select "Settings" from the applications menu or the quick menu.
b) Drag the menu up until you can see the "Security" menu item. Tap "Security".
c) Tap "Screen lock".
d) Now tap the type of screen lock that you require in order to set it up.
i Now, every time you unlock the screen, you will be prompted for the form of
identification that you have set up.
i If you forget your password, you can reset it using recovery mode (see Section 21).
17 EN
12) Using the multiple user function
The SurfTab allows you to set up as many as eight user accounts. To set up a new
user account, please proceed as follows:
a) Select "Settings".
b) Tap "Users" under "Device".
c) Then tap "Add User" at the bottom of the screen.
d) Confirm with "OK". The "Set up user now?" window appears.
d) Confirm with "Set up now". The lock screen appears.
f ) As soon as you have unlocked the screen, a configuration assistant will start.
This assistant will guide you through the process of setting up a new
user account.
i You arrive at the individual user accounts by tapping the relevant icon at the
bottom of the lock screen and then unlocking the screen.
i You can also delete the user accounts you have created under "Settings" + "User"
by tapping the recycle bin symbol to the right of the user account you want to
delete. Confirm your decision by tapping "Delete" in the following window.
13) Connecting to the Internet via WiFi
You can connect your SurfTab to the Internet via WiFi. If you would like to
establish a connection to a new wireless network, proceed as follows:
a) Select "Settings" from the applications menu or the quick menu. This is where
you will find the "Wi-Fi" item.
b) Slide the on/off switch from "OFF" to "ON".
c) Tap "Wi-Fi". All available wireless networks will be displayed in the following
window.
d) Tap the network that you would like to connect to.
An input window appears. Enter the network key ("Password") for the wireless
network you have selected and tap "Connect".
e) Your SurfTab will connect to the Internet via the wireless network you have
selected. You can now surf the Internet using a browser app.
i Once you have established a connection to a WiFi network, your SurfTab will
automatically connect to it as soon as it is within reach. It is not necessary to
re-enter the network key.
i To save power, it is advisable to turn off the WiFi function when it is not in use.
EN 18
14) Connecting to the Internet via 3G
The 3G function on your SurfTab means that you are independent of available
WiFi networks. You connect to the network via your mobile communications
provider.
Inserting the SIM card
Only insert the SIM card when the device is completely switched off. The card
will not be recognised if the device is in standby mode.
i It is advisable to use mini SIM cards and forego micro SIM cards with adapters.
a) Remove the cover on the rear side of your SurfTab by reaching into the slit
intended for this purpose and carefully pulling the cover upwards.
i Use your fingernail or a similarly thin lever to reach into the opening.
Do not use any pointed or sharp-edged instruments.
b) Insert the SIM card from your data service provider into one of the available
SIM slots. The golden contacts on the SIM card should face the rear side of
the device and the slanted corner should be in the top left.
i The illustration on the dual SIM slot provides further assistance in inserting the
SIM card.
a Do not insert any microSD/SDHC- memory cards into the dual SIM slot! If a
memory card does become stuck in the dual SIM slot, have it removed by a
trained professional.
c) Replace the cover.
i The device cover contains the antenna for WiFi, GPS and Bluetooth.
Pay particular attention here to the correct seating of the device cover after
re-attaching to avoid disturbances and problems in reception.
i When you switch on your SurfTab again after inserting the SIM card, you have
to enter the corresponding PIN number, if available.
19 EN
Defining settings for 3G mode
There are various options for adjusting 3G mode to suit your requirements.
These can be found under "Settings".
SIM card management
i The following setting options vary depending on whether you have inserted
one or two SIM cards.
Tap "SIM-card management". This opens a menu with the following setting options:
SIM Card Info
Drag the slider to the right of your data service provider to "ON" in order to
activate the data service.
i If you have inserted two SIM cards, you can activate or deactivate one or both
of the data service providers here.
i You can call up the data from your SIM card by tapping the data service provider.
Data connection
You can deactivate the data connection by tapping "Data connection".
i If you have inserted two SIM cards, you can select the desired data service
provider here.
Data roaming
You can active data roaming under this option. Tap "Data roaming" and then tap
the box to the right of your data service provider if you would like to use data
roaming. A blue check mark will appear.
a If you allow roaming, high roaming charges can be incurred!
Confirm the corresponding message with "OK".
i If you have inserted two SIM cards, you can select the desired data service
provider for roaming here. Of course, you can also activate the roaming option
for both SIM cards.
Data usage
Here you can limit your data usage.
i You can define all of the following settings for each card individually. To do this,
switch between "Mobile" and "Mobile 2" by tapping the relevant option.
EN 20
Mobile data
Drag the slider to the right of "Mobile data" to "ON", in order to activate the data
service, or to "OFF", in order to deactivate it.
Set mobile data limit
Tap the box to the right of "Set mobile data limit" if you would like to limit your data
usage. Confirm the message for "Limiting data usage" by tapping "OK". A blue check
mark will appear.
Data usage cycle
If you tap the date field to the right of "Data usage cycle", the "Change cycle …"
option will open. Tap it to select the date interval for the usage cycle to be
displayed. Confirm by tapping "Set".
Graphic
If you have placed the check mark under "Set mobile data limit", you can set both
the data usage limit and a warning for when you reach a certain data volume
on an activated SIM card.
In order to do this, hold the tip of your finger on the respective right-hand end
point of the visible limiting line and drag the limiting line to the data volume
you desire.
More …
Here you will find additional adjustment options.
Mobile networks
Tap "Mobile networks" + "3G network" in order to set your preferred data
connection rate.
You can choose between the following options:
3G prefer
Uses both 2G and 3G for data connection,
preference is given to 3G, if available
3G only
Only uses 3G for data connection
2G
Only uses 2G for data connection
Select your desired method of connection by tapping the relevant option.
i The "3G prefer" option is the optimum standard setting.
i If you have inserted two SIM cards, select the desired method of connection for
one of the cards. The second card will then automatically be allocated GSM (2G).
21 EN
Removing the SIM card
a) Remove the cover on the rear side of your SurfTab by reaching into the slit
intended for this purpose and carefully pulling the cover upwards.
i Use your fingernail or a similarly thin lever to reach into the opening.
Do not use any pointed or sharp-edged instruments.
b) Press lightly on the visible end of the SIM card with your thumb and gently
slide the SIM card out.
i Round-headed tweezers can be useful for pulling out the SIM card.
Do not use any pointed or sharp-edged instruments.
c) Replace the cover.
15) Setting up/removing an email account
Setting up an email account
a) Tap the email icon in the quick start bar or in the applications menu.
b) Enter a valid email address in the upper input field and the associated
password in the lower input field.
c) Tap "Next" to confirm your entries.
d) You can specify further account settings in the next steps. Confirm the
specified settings with "Next".
i As soon as you have set up the account according to your wishes, the email app
is ready for use.
Removing an email account
a) Select "Email" in the quick start bar or in the applications menu.
b) Tap the three vertically stacked dots at the bottom of the screen and then
tap "Settings".
c) Now tap the account that you wish to remove.
d) Drag the menu rto the lower screen and tap "Remove account".
e) Confirm your selection with "OK" and the account will be deleted.
EN 22
16) Installing/uninstalling apps
Downloading and installing apps
Thanks to access to Google Play™, your SurfTab allows you to add further apps,
widgets, programs and eBooks to the ones that are pre-installed.
The Play Store app is already installed on your SurfTab. You can find it on the
applications menu.
i To be able to download apps via the Google Play Store, you require a Google
account. If you have not yet set up a Google account, a configuration assistant
will start the first time you open the Play Store app. The configuration assistant
will guide you through the process of setting up a Google account. You can link
an existing Google account to the app or create a new Google account.
After you have set up your Google account, the app is ready to help you download
new apps. To download a new app, follow the instructions of the Play Store app.
As soon as you have installed an app, it will be visible on the applications menu.
Either run the app from there or add it to your home screen.
i To be able to download programs, apps or eBooks, your SurfTab has to be
connected to the Internet.
i Some apps must be purchased before you can download them. The Google Play Store
provides instructions on choosing the correct payment system and on making payments.
Uninstalling apps
To remove apps you have installed on your SurfTab, proceed as follows:
a) Tap "Settings" in the applications menu.
b) Drag the menu up with your fingertip until you can see "Apps". Tap "Apps".
c) Drag the menu to the left with your fingertip until you reach the
"Downloaded" or "All" category.
d) Tap the app that you want to remove with your fingertip and select
"Uninstall" in the window that appears. Confirm once more with "OK" and
the app will be uninstalled.
i You can only uninstall apps that you installed yourself. Factory-installed apps that
are integrated into the system can only be "Disable". Deactivating apps that have
been integrated into the system can impede the functionality of your SurfTab.
23 EN
17) Using navigation
The SurfTab is delivered with a built-in GPS module as well as a car cradle and a
car charging cable. This makes it perfect for navigation purposes.
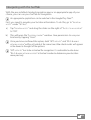
Mounting the car cradle
a
c
b
d
a) Connect the two parts of the car cradle.
i Make sure the tab on the suction cup is facing upwards.
i Place the mounting plate on the designated hooks and push it to the left
until the hooks slot in.
b) Now place your SurfTab onto the mounting plate and slide it to the left as
far as it will go. Gently push it so it sticks to the recessed grip above. Make
sure that all three fixing points of the retaining plate have slotted into the
recesses on the SurfTab.
c) Attach the car cradle to your car’s windscreen by moving the lever towards
the suction cup mount.
EN 24
Navigating with the SurfTab
With the pre-installed standard navigation app or an appropriate app of your
choice, you can use your SurfTab for navigation.
i An appropriate application can be selected in the Google Play Store™.
First, you need to provide your location information. To do this, go to "Location
access" under "Settings".
a) Tap "Location access" and drag the slider on the right of "Access to my location"
to "ON".
b) This will open the "Location consent" window. Give permission to use your
location by tapping "Agree".
i Once you have confirmed this option, both "GPS satellites" and "Wi-Fi & mobile
network location" will be activated at the same time. Blue check marks will appear
in the boxes to the right of the options.
i"GPS satellites" has to be activated for navigation. It is advisable to also leave
"Wi-Fi & mobile network location" activated in order to determine your location
more precisely.
25 EN
18) Using the camera
Tap the camera icon in the applications menu or in the quick start bar.
The following screen appears:
Taking a photo
Hold the SurfTab with the camera in the required direction and press the shutter
button (18 B). The picture is saved and the SurfTab briefly displays a preview of
the photo.
Accessing additional camera settings
a) Tap a free area on the screen or the circle symbol (18 A) in the camera
controls. A white circle appears on the display (18 D).
b) A selection of available options is displayed around the circle (such as white
balance, continuous advance function, self timer, and much more).
c) To select the option you require or display further sub-options, slide your
fingertip onto the respective option.
i To exit camera mode, briefly tap the edge of the display. This will display the task bar.
EN 26
Editing photos
a) Briefly tap the lower edge of the display to show the task bar. Now tap the
home icon to exit camera mode.
b) Open the gallery by tapping the gallery symbol in the applications menu or
in the quick start bar.
c) In the gallery, tap the photo that you would like to edit.
The following symbol appears on the bottom left of the screen:
d) Tap this symbol. Various editing options (regarding exposure, framing,
cropping and colour settings) are now displayed beneath the photo.
e) Tap the desired option and save your change by tapping "Save" in the top left.
i The SurfTab now saves a new picture. The original picture is not overwritten.
Recording a video
a) Tap the photo camera symbol (18 C) at the edge of the screen and then tap
the video camera symbol.
b) A red dot now appears in the camera controls.
c) Tap the red dot to start recording the video. To stop recording, tap the red
dot again.
i Additional camera settings (such as white balance, time lapse, colour mode and
much more) are also available in video mode (though not while recording). To
access these, proceed as described under "Accessing additional camera settings".
Zooming
You can zoom in on or out of your subject both in photo and in video mode.
Move two fingers apart on the screen to zoom in and move two fingers towards
each other again to zoom out.
i To exit the camera mode, briefly tap the edge of the display to show the task bar.
27 EN
19) Connecting other devices
Connecting the SurfTab to a computer
a) Connect the SurfTab to your computer with the micro USB cable
provided.
b) A short moment later, the memory of the SurfTab will be shown as a connected
device in your computer’s file explorer. From there, you can load, copy,
delete or move files in the usual way.
Connecting a USB device
External USB devices such as USB-Sticks can be connected directly via the micro
USB socket of the SurfTab or using the micro USB host adapter cable.
i To be able to move files between your SurfTab and an external storage device,
you need an app that functions as a file browser (such as "ES File Explorer" or
"FileBrowser").
a) Connect the external USB storage device to the SurfTab and wait
approximately 20 seconds.
c) You can now load, copy, delete or move files as usual using your file explorer app.
i The power supply of the SurfTab may not be sufficient to ensure that all the
functions of the connected USB device work properly. For this reason, make sure
that you supply additional power to external USB devices via a charging cable.
Connecting another device via Bluetooth®
a) Select "Settings" + "Bluetooth" in the applications menu.
b) Slide the on/off switch for Bluetooth from "OFF" to "ON".
c) Activate the Bluetooth function on the device you want to connect and
make the device visible to other Bluetooth devices, if necessary. To do so,
refer to the instructions in the operating manual of the device.
d) Tap "Bluetooth", and in the next window tap "SEARCH FOR DEVICES" (located
at the bottom of the screen). A list of all available Bluetooth devices in the
vicinity will appear.
e) Now tap the device you want to connect and confirm by tapping "Pair".
f ) You may also have to confirm pairing on the device you want to connect.
EN 28
20) Activating standby mode
If you do not want to use your SurfTab for a while, press the on/off switch briefly
to put the SurfTab into standby mode and save power. To exit standby mode,
briefly press the on/off switch again.
Once you have reactivated the SurfTab, it will initially display the lock screen.
Place your finger on the lock symbol and drag it to the right to the open lock.
Your SurfTab will now display the home screen.
iIf you previously set up a screen lock, you must now identify yourself using the
method that you chose in order to unlock the SurfTab.
i Standby mode is activated automatically when the SurfTab is not used for
a certain time. You can specify the period of time after which the SurfTab
automatically goes into standby mode under "Settings" + "Display" + "Sleep".
21) Reset and recovery mode
Resetting the SurfTab (Reset)
If your SurfTab "freezes" and no longer responds, you can force a shutdown by
holding the on/off switch for approximately 20 seconds. Then you can switch the
SurfTab on again as usual.
Alternatively, you can press a pointed, but not sharp, object (such as a bent
paper clip) into the reset hole next to the on/off switch for a short while. The
SurfTab will automatically switch itself on again after the reset.
i Never use needles or other sharp objects as this may damage your device!
29 EN
Putting the SurfTab into recovery mode/loading the factory settings
The "recovery mode" allows you to reset the device to its factory settings, delete
forgotten passwords or delete the memory of the SurfTab, for instance.
a As system-related settings can be specified in recovery mode, you should only use
this mode if you have the necessary technical knowledge.
a) Please switch off your SurfTab.
b) Press the "Volume -" button and keep it pressed.
c) Please also press the on/off switch and keep it pressed.
d) As soon as the TrekStor logo appears, release the on/off switch.
e) A little while later, the recovery mode menu is displayed. You can now
release the "Volume -" button.
f ) Use the volume control buttons to navigate through the menu, and use the
on/off switch to select an option.
i To restore the SurfTab to its factory state, select the "wipe data/factors reset" option.
Confirm your selection by pressing the on/off switch. Complete the command in
the following menu by selecting "Yes -- delete all user data" and confirm in the same
way.
WARNING: All the files that you have stored (photos, text files, bookmarks and so
on) and the settings that you have specified (background, passwords and so on)
will be deleted.
g) To exit recovery mode, use the volume button to select the "reboot system
now" option and confirm by pressing the on/off switch. Your SurfTab will
now exit recovery mode and will restart.
22) Switching off the SurfTab
a) Press the on/off switch for approximately two to four seconds to switch off
the device.
b) Tap "Power off".
c) The following message will appear: "Power off/Your tablet will shut down.".
Tap "OK" to confirm and switch off the SurfTab.
EN 30
23) Notes on copyright and trademarks
Copyright law prohibits the copying of the content of these operating
instructions (illustrations, reference documents etc.), in whole or in part,
without the permission of the copyright holder.
Android and Google Play are trademarks of Google Inc. Use of these trademarks
is subject to Google Permissions.
The Bluetooth word mark and logos are registered trademarks owned by
Bluetooth SIG, Inc. and any use of such marks by TrekStor GmbH is under license.
Other trademarks and trade names are those of their respective owners.
Mac OS and OS X are trademarks of Apple Inc., registered in the U.S. and
other countries.
Microsoft, Windows and Windows Vista are either registered trademarks or
trademarks of Microsoft Corporation in the United States and/or other countries.
Linux is the registered trademark of Linus Torvalds in the U.S. and other countries.
TrekStor and SurfTab are registered trademarks of TrekStor Ltd. in the European
Community and other countries.
Copyright © 2014 TrekStor GmbH. All rights reserved. Some product or company
names mentioned elsewhere may be brand names or trade names of the
respective proprietor.
Open Source Software
This product contains software which might in whole or in part be free software
under license of Free Software Foundation (FSF). This is subject to terms and
conditions of GNU General Public License (GPL) as well as Lesser General Public
License (LGPL).
For further information visit: http://www.gnu.org/licenses/gpl
For additional informations concerning Source Code please consult:
www.trekstor.de/opensource/
Disclaimer of liability
Since this is concerning free software Contributor does not give any guarantee
about free software as far as permitted by law.
Please be aware that this disclaimer is not concerning regular use of hardware
and regular warranty of this device itself. g
31 EN
24) Notes on disposal
Disposal
This symbol indicates that this product and/or the battery used contain
components that are harmful to the environment and/or human health
if not disposed of correctly. As the owner of a used electrical or electronic
device, you may not dispose of this device together with unsorted
domestic waste.
v
Remove the battery from the device before disposing of your old device.
Contact your city or municipal authority for information on how to
correctly dispose of the device and its battery.
a
Recycling
t
s
Your device and its sales packaging consist of valuable raw materials,
which must be recycled in the interest of environmental protection.
Contact your city or municipal authority for information on the correct
method of disposal.
25) Notes on liability and warranty
The manufacturer shall reserve the right to constantly further develop the product.
These changes may be made without any direct reference to them in the
operating instructions. As a result, the information contained in the operating
instructions does not need to reflect the current technical design.
The statutory warranty period for consumer products is 24 months. There is no
warranty beyond this.
Unauthorised modifications to the device (particularly installing external
firmware not approved by the manufacturer or modifications to the device
hardware) may result in a loss of all warranty claims.
EN 32
E C D E C L A R AT I O N O F C O N F O R M I T Y
As manufacturer and importer respectively:
TrekStor GmbH
Kastanienallee 8 - 10
D-64653 Lorsch, Germany
■ ■ ■ ■ ■ ■ ■ ■ ■ ■ ■ ■ ■ ■ ■ ■ ■ ■ ■ ■ ■ ■ ■ ■ ■ ■ ■ ■ ■ ■ ■ ■ ■ ■ ■ ■ ■ ■ ■ ■ ■ ■ ■ ■ ■ ■ ■ ■ ■ ■ ■ ■ ■ ■ ■ ■ ■ ■ ■ ■ ■ ■ ■ ■ ■ ■ ■ ■ ■ ■ ■ ■ ■ ■ ■ ■ ■ ■ ■ ■ ■ ■ ■ ■ ■ ■ ■ ■ ■ ■ ■ ■ ■ ■ ■ ■ ■ ■ ■ ■ ■ ■ ■ ■ ■ ■ ■ ■ ■ ■ ■ ■ ■ ■ ■ ■ ■ ■ ■ ■ ■ ■ ■ ■ ■ ■ ■ ■ ■ ■ ■ ■ ■ ■ ■ ■ ■ ■ ■ ■ ■ ■ ■ ■ ■ ■ ■ ■ ■ ■ ■ ■ ■ ■ ■ ■ ■ ■ ■ ■ ■ ■ ■ ■ ■ ■ ■ ■ ■ ■ ■ ■ ■ ■ ■ ■
herewith declares that the products
Product:
SurfTab xiron 7.0 3G (ST70404-1)
■ ■ ■ ■ ■ ■ ■ ■ ■ ■ ■ ■ ■ ■ ■ ■ ■ ■ ■ ■ ■ ■ ■ ■ ■ ■ ■ ■ ■ ■ ■ ■ ■ ■ ■ ■ ■ ■ ■ ■ ■ ■ ■ ■ ■ ■ ■ ■ ■ ■ ■ ■ ■ ■ ■ ■ ■ ■ ■ ■ ■ ■ ■ ■ ■ ■ ■ ■ ■ ■ ■ ■ ■ ■ ■ ■ ■ ■ ■ ■ ■ ■ ■ ■ ■ ■ ■ ■ ■ ■ ■ ■ ■ ■ ■ ■ ■ ■ ■ ■ ■ ■ ■ ■ ■ ■ ■ ■ ■ ■ ■ ■ ■ ■ ■ ■ ■ ■ ■ ■ ■ ■ ■ ■ ■ ■ ■ ■ ■ ■ ■ ■ ■ ■ ■ ■ ■ ■ ■ ■ ■ ■ ■ ■ ■ ■ ■ ■ ■ ■ ■ ■ ■ ■ ■ ■ ■ ■ ■ ■ ■ ■ ■ ■ ■ ■ ■ ■ ■ ■ ■ ■ ■ ■ ■ ■
Type:
Mobile Internet Device
■ ■ ■ ■ ■ ■ ■ ■ ■ ■ ■ ■ ■ ■ ■ ■ ■ ■ ■ ■ ■ ■ ■ ■ ■ ■ ■ ■ ■ ■ ■ ■ ■ ■ ■ ■ ■ ■ ■ ■ ■ ■ ■ ■ ■ ■ ■ ■ ■ ■ ■ ■ ■ ■ ■ ■ ■ ■ ■ ■ ■ ■ ■ ■ ■ ■ ■ ■ ■ ■ ■ ■ ■ ■ ■ ■ ■ ■ ■ ■ ■ ■ ■ ■ ■ ■ ■ ■ ■ ■ ■ ■ ■ ■ ■ ■ ■ ■ ■ ■ ■ ■ ■ ■ ■ ■ ■ ■ ■ ■ ■ ■ ■ ■ ■ ■ ■ ■ ■ ■ ■ ■ ■ ■ ■ ■ ■ ■ ■ ■ ■ ■ ■ ■ ■ ■ ■ ■ ■ ■ ■ ■ ■ ■ ■ ■ ■ ■ ■ ■ ■ ■ ■ ■ ■ ■ ■ ■ ■ ■ ■ ■ ■ ■ ■ ■ ■ ■ ■ ■ ■ ■ ■ ■ ■ ■
comply with the following directive(s):
99/5/EC
Radio Equipment and Telecommunications Terminal Equipment
2004/108/EC EMC Directive: Electromagnetic Compatibility
2006/95/EC
Low Voltage Directive
■
■
■
■ ■ ■ ■ ■ ■ ■ ■ ■ ■ ■ ■ ■ ■ ■ ■ ■ ■ ■ ■ ■ ■ ■ ■ ■ ■ ■ ■ ■ ■ ■ ■ ■ ■ ■ ■ ■ ■ ■ ■ ■ ■ ■ ■ ■ ■ ■ ■ ■ ■ ■ ■ ■ ■ ■ ■ ■ ■ ■ ■ ■ ■ ■ ■ ■ ■ ■ ■ ■ ■ ■ ■ ■ ■ ■ ■ ■ ■ ■ ■ ■ ■ ■ ■ ■ ■ ■ ■ ■ ■ ■ ■ ■ ■ ■ ■ ■ ■ ■ ■ ■ ■ ■ ■ ■ ■ ■ ■ ■ ■ ■ ■ ■ ■ ■ ■ ■ ■ ■ ■ ■ ■ ■ ■ ■ ■ ■ ■ ■ ■ ■ ■ ■ ■ ■ ■ ■ ■ ■ ■ ■ ■ ■ ■ ■ ■ ■ ■ ■ ■ ■ ■ ■ ■ ■ ■ ■ ■ ■ ■ ■ ■ ■ ■ ■ ■ ■ ■ ■ ■ ■ ■ ■ ■ ■ ■
The following norms were consulted to assess conformity:
■
■
■
■
EN 300 328 V1.8.1
Electromagnetic compatibility and Radio spectrum Matters (ERM); Data transmission equipment
operating in the 2,4 GHz ISM band and using wide band modulation techniques
EN 301 489-1 V1.9.2 EMC and ERM
EMC standard for radio equipment and services; Part 1: Common technical requirements
EN 301 489-17 V2.2.1
Electromagnetic compatibility and Radio spectrum Matters (ERM); ElectroMagnetic Compatibility (EMC)
standard for radio equipment; Part 17: Specific conditions for 2,4 GHz wideband transmission systems.
EN 60950-1:2006/A2:2013
Information technology equipment – Safety – Part 1: General requirements
■ ■ ■ ■ ■ ■ ■ ■ ■ ■ ■ ■ ■ ■ ■ ■ ■ ■ ■ ■ ■ ■ ■ ■ ■ ■ ■ ■ ■ ■ ■ ■ ■ ■ ■ ■ ■ ■ ■ ■ ■ ■ ■ ■ ■ ■ ■ ■ ■ ■ ■ ■ ■ ■ ■ ■ ■ ■ ■ ■ ■ ■ ■ ■ ■ ■ ■ ■ ■ ■ ■ ■ ■ ■ ■ ■ ■ ■ ■ ■ ■ ■ ■ ■ ■ ■ ■ ■ ■ ■ ■ ■ ■ ■ ■ ■ ■ ■ ■ ■ ■ ■ ■ ■ ■ ■ ■ ■ ■ ■ ■ ■ ■ ■ ■ ■ ■ ■ ■ ■ ■ ■ ■ ■ ■ ■ ■ ■ ■ ■ ■ ■ ■ ■ ■ ■ ■ ■ ■ ■ ■ ■ ■ ■ ■ ■ ■ ■ ■ ■ ■ ■ ■ ■ ■ ■ ■ ■ ■ ■ ■ ■ ■ ■ ■ ■ ■ ■ ■ ■ ■ ■ ■ ■ ■ ■
The CE symbol confirms that this product conforms with the above mentioned norms and regulations.
■ ■ ■ ■ ■ ■ ■ ■ ■ ■ ■ ■ ■ ■ ■ ■ ■ ■ ■ ■ ■ ■ ■ ■ ■ ■ ■ ■ ■ ■ ■ ■ ■ ■ ■ ■ ■ ■ ■ ■ ■ ■ ■ ■ ■ ■ ■ ■ ■ ■ ■ ■ ■ ■ ■ ■ ■ ■ ■ ■ ■ ■ ■ ■ ■ ■ ■ ■ ■ ■ ■ ■ ■ ■ ■ ■ ■ ■ ■ ■ ■ ■ ■ ■ ■ ■ ■ ■ ■ ■ ■ ■ ■ ■ ■ ■ ■ ■ ■ ■ ■ ■ ■ ■ ■ ■ ■ ■ ■ ■ ■ ■ ■ ■ ■ ■ ■ ■ ■ ■ ■ ■ ■ ■ ■ ■ ■ ■ ■ ■ ■ ■ ■ ■ ■ ■ ■ ■ ■ ■ ■ ■ ■ ■ ■ ■ ■ ■ ■ ■ ■ ■ ■ ■ ■ ■ ■ ■ ■ ■ ■ ■ ■ ■ ■ ■ ■ ■ ■ ■ ■ ■ ■ ■ ■ ■
The manufacturer also declares the conformity of the product according to the following directives:
■
2001/95/EC
General Product Safety
■
2011/65/EU
RoHS: Hazardous substances in electrical and electronic equipment
■
2006/1907/EC REACh: Regulation concerning the Registration, Evaluation, Authorisation
■
2009/125/EC
and Restriction of Chemicals
Lorsch,
Ecodesign requirements for energy-using products
28.01.2014
Thorsten Koroscha, LPM
Supportinformationen
Sollten Sie Fragen zu Ihrem TrekStor Produkt haben, gehen Sie bitte wie folgt vor:
• Überprüfen Sie anhand der Produkteigenschaften und der Funktionen Ihres Gerätes
(auf der Verpackung ersichtlich), ob Sie die richtigen Einstellungen vorgenommen haben.
• Lesen Sie aufmerksam die gesamte Bedienungsanleitung.
• Informieren Sie sich auf unserer Website www.trekstor.de über aktuelle Informationen zu
Ihrem Produkt (z. B. neu verfügbare Firmware-Updates).
Wenn Sie weitergehende Fragen zu Ihrem Produkt haben, beachten Sie bitte die folgenden
TrekStor Supportoptionen:
FAQ
Der FAQ-Bereich unserer Website bietet Ihnen vielfältige Problemlösungshinweise. Hier erhalten Sie Antworten zu den am häufigsten gestellten Fragen zu
unseren Produkten.
E-Mail
Füllen Sie das Supportformular auf unserer Website aus oder senden Sie
eine E-Mail an [email protected]. Telefonsupport Von Deutschland aus wählen Sie bitte 01805-TREKSTOR*, 01805-87357867*. Die Nummer der Supporthotline für andere Länder finden Sie auf unserer Website unter "SERVICE".
* 14 Cent/Min. aus dem deutschen Festnetz der DTAG, max. 42 Cent/Min. aus Mobilfunknetzen.
Support information
If you have any questions regarding your TrekStor product, please proceed as follows:
• Check the features as well as the functions of your device (apparent on the packaging),
in order to use the correct settings.
• Read the manual carefully.
• Inform yourself on our website www.trekstor.de/en about the up-to-date information concerning
your product (e. g. available most recent firmware releases).
In the case you have further questions regarding your product, please note the following
TrekStor support options:
FAQ
The FAQ area of our website offers you a wide range of problem solving hints.
Here you can obtain answers to the most frequently asked questions
concerning our products.
E-Mail
Please fill in the support form on our website or send an E-Mail to
[email protected]. You can find mailing addresses for other
countries when you click "SERVICE" at the menu bar on our website.
Phone support Please find the number of the support hotline for your country on our
website under "SERVICE" as well. TrekStor GmbH
Kastanienallee 8-10
D-64653 Lorsch, Germany
www.trekstor.de
BA-STX703G-V1-10-EN-140513