1
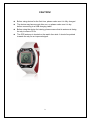
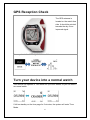
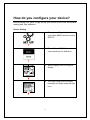
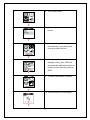
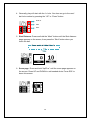
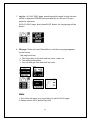
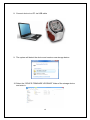
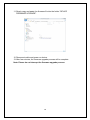
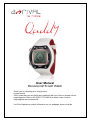
User Manual Personal GPS Golf Watch Thank you for choosing an a-rival product. A good choice. Just in case that you are facing any problems with your Device, please call our support/service hotline +49 (0)511 / 270 496 90 or send us an e-mail to [email protected] You'll find Updates or actual information on our webpage: www.a-rival.de CAUTION! Before using device for the first time, please make sure it is fully charged The device may become wet after use, so please make sure it is dry before connecting to a USB charging cable Before using the device for training, please ensure that its antenna is facing the sky to ensure 3D fix The GPS antenna is located on the watch face side. It should be pointed towards the sky for an improved signal. 2 Symbol Explanation Symbol Explanation GPS status indicator: Solid with 1 bar: 3D fix with poor signal Solid with 2 bar: 3D fix with good signal Solid with 3 bar: 3D fix with strong signal Battery status Pars Shot number Hole number B,C,F The distance from location to Green Back, Center and Front Screen Pages Explanation There are five pages in the pages Menu: Time Page: This page is for Time of day. Score Page: This page shows the history of the scorecard Play Golf Page: This page is for execute Play Golf. Setup Page: This page is for device setup and status check 3 1 3 2 4 Button Definition Button Description 1. Power/Light/ESC Press 2 seconds to turn on/off device. When device is on, quickly pressing this button will turn on/off the backlight Press and hold this button for 10 seconds to activate hardware reset if the system is halted. In Menu pages, press ESC button briefly to exit the current page and go back to the previous page 2. OK/Mark/Shot Selection entry In PLAY GOLF, press for 2 seconds to trigger shot distance page 3. Up/Plus Scrolling UP: Press UP to scrolling up and highlight an item in Main Menu page. Hole change: In Golf green page, press 1s to next hole 4 4. Down/Minus Scrolling DOWN: Press DOWN to scrolling down and highlight an item in Main Menu page. Hole change: In Golf green page, Press 1s to last hole. OB page/daylight information: Press 2s for switching to OB page. 5 GPS Reception Check The GPS antenna is located on the watch face side. It should be pointed towards the sky for an improved signal. You may check the GPS signal status as follows: Turn your device into a normal watch Your device can operate in Time Mode for up to four weeks, so you can wear it as normal watch. If left on standby on the time page for 3 minutes, the system will enter Time Mode. 6 How do you configure your device? Before playing your game, simply set up your device for the most comfortable reading and easy operation. Device Setting 1. Please press Page button 2s to enter Main MENU and then select SETUP. 2. Press UP and DOWN button to select each item for definition. 3. Select Display icon to configure display. 4. You may configure the contrast, backlight and night mode with this icon. 7 5. Go to select UNIT. 6. You may setup Meter or Yard to check. 7. In order to record the most accurate time, you can set the time zone with this icon. 8. Configure your time zone and daylight saving. Your GPS will automatically calibrate the time to keep the most accuracy time via GPS. 9. To setup the beeper condition. 10. You can turn on or off beeper. 8 11. You can configure the language with this icon. Select your favourite language. How to Start Playing Golf 1. Select “Play” and press “OK” key to enter. To make sure your device shows 3D fixed and then press OK to go to Courses Selection page. 2. On the Courses Selection page, if you are unsure of the current Course’s name, you can use “AUTO” search to find this out. If you know the Course name, just use “MANUAL” to select the course in the map list. In some countries are a left- and a right green available. Select the preferred one in the settings. Otherwise you can ignore this setting. 3. Press key to start to play. 9 4. Generally, play will start with the 1st hole. You also can go to the next/ last hole number by pressing the “UP” or “Down” button. Hole no. Pars Shot 5. Shot Distance: Press and hold the “Mark” button until the Shot distance page appears on the screen, then press the “Shot” button when you reach the ball. Press and hold “Mark” for 2s 6. Score page: Press and hold “Up/Plus” until the score page appears on the screen. Press UP and DOWN to add needed shots. Press ESC to leave this screen. 10 7. Lay Up : In PLAY GOLF page, sometimes golfer needs to refer the best hit ball to approach GREEN, here provides lay up 100 and 150 yard points for reference. IN PLAY GOLF page, short press SHOT button, the Layup page will be shown. 8. OB page: Press and hold “Down/Minus” until the score page appears on the screen. This page will show a. The object item in this hole such as a tree, water, etc. b. The daylight information c. You can end golf from here with any hole. Note 1. The device will save your score after you exit the PLAY page. 2. Please ensure 3D fix before Play Golf. 11 How to check Score 1. Select SCORE menu and press OK. 2. The device can usually save 10 items on score cards, and will be rolling over write if records over 10 items. Update the Course data The enclosed CD are stored all Course data because the internal memory on the golf watch is limited. Following areas with more than 33.000 courses are preinstalled: EUROPE, AMERICA, NEW ZEALAND, and AUSTRALIA. More than 4.000 courses for ASIA are provided on CD. 1. Please switch device’s power off 12 2. Connect device to a PC via USB cable 3. The system will detect the device and create a new storage device. 4. Select the “Course” folder of the storage device and enter in. 13 5. Simply copy and paste the course files into the folder “Course”. Not all courses do fit to the internal memory. We recommend that you copy just the needed one. ACourseDB = ASIA ECourseDB = EUROPE UCourseDB = America, New Zealand, Australia 6. Disconnect cable and power on device. How to Upgrade Firmware The following procedure is only for firmware upgrade use. 7. Please switch device’s power off 14 8. Connect device to a PC via USB cable 9. The system will detect the device and create a new storage device. 10. Select the “DEVICE FIRMWARE UPGRADE” folder of the storage device and enter in. 15 11. Simply copy and paste the firmware file into the folder “DEVICE FIRMWARE UPGRADE”. 12. Disconnect cable and power on device. 13. After few minutes, the firmware upgrade process will be complete. Note: Please do not interrupt the firmware upgrade process. 16 Guarantee Please keep the proof of purchase for this device for the entire duration of the guarantee period, as it must be produced in the event of any claim. You (as the end user) receive a 36-month guarantee from the date of sale. The article has been manufactured using the most modern production methods and subjected to strict quality controls. Please contact only the manufacturer (not the dealer where you purchased it) in the event of any defects during the guarantee period. Hotline: +49 (0)511 - 123 83 506 or: [email protected] The guarantee does not cover damage caused by improper use or external influence (water, falling, sunlight, breakage or impact). User information/Contact If your device has a defect or you have problems with it, please contact our Service and Support Centre. If you need to send your device to us, please attend to the following points: 1. Use only the original packaging 2. Add a detailed error description 3. Add your full name and address and a copy of your purchase receipt 4. Stamp and send the package to us (sufficient postage) Address of our Service Center: First Service Center, Kleine Düwelstr 21, DE-30171 Hannover/Germany Declaration of Conformity Hereby Baros GmbH, declares, that the device Golf Watch/GW01 is in compliance with the essential requirements and other relevant regulations of Directive 1999/5/EC. The Declaration of Conformity can be found at: www.a-rival.de 17 18