1
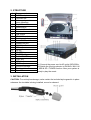
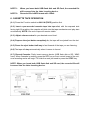
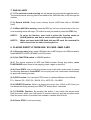
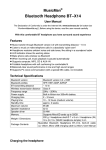
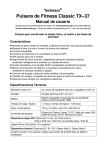
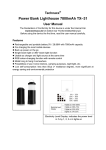
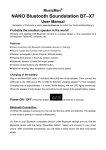
Technaxx®
Digital Converter for LP and Cassette
with built-in Stereo Radio TX–22
User Manual
Declaration of Conformity is under: www.technaxx.de/ (in bottom bar “Konformitätserklärung”)
Before using the device the first time, read the user manual carefully.
Before usage
Choose the installation location of your unit carefully. Avoid placing it in direct
sunlight or close to a source of heat. Also avoid locations subject to vibrations and
excessive dust, heat, cold or moisture.
Do not install the unit in a inclined position, It is designed to be operated in a
horizontal position only.
If the unit is brought directly from a cold to a warm location, moisture may
condense inside the player, and cause damage it. When you first install the unit, or
when you move it from a cold to a warm location, wait for 30 minutes before operating
the unit.
The ventilation holes should not be covered. Make sure there is enough space
above and beside the amplifier/receiver. Do not place a CD player or other equipment
on top of the device.
Do not open the cabinet. This might cause a damage to circuitry or electrical shock.
When removing the power plug, never yank the cord. If you are not going to use
the player for long time, be sure do disconnect the player from the AC power source.
To prevent fire or shock hazard, disconnect your unit from the AC power source
when cleaning. Use caution when cleaning and wiping the plastic parts. Do not
attempt to clean the unit with the chemical solvents as this might damage the finish.
1. FEATURES
Directly recording of LPs, cassettes, radio or from AUX–IN on USB flash drive or
SD card (up to 32GB)
No PC required
Plays MP3 music from USB flash drive or SD / MMC card
Analog AM / FM / FM stereo radio
Record player with 3-speeds: 33 1/3, 45, 78 RPM
AUX–IN jack and headphone jack
Built-in full range stereo speakers
Built-in cassette player
Nice shape and easy handling
2. STRUCTURE
1
2
3
4
5
6
7
8
9
10
11
12
13
14
15
16
17
18
19
20
21
22
23
24
25
Transparent dust cover
45 RPM adapter
Tone arm set
Full range dynamic
stereo speakers
Play / Pause lift lever
Speed switch
Power / VOL knob
Tuner knob
USB socket
SD / MMC socket
Function switch
Tuner BAND switch
Headphone jack
AUX–IN jack
REC key
EQ key
DELETE key
FOLDER+ key
PLAY / PAUSE key
STOP key
PREV key
NEXT key
Diamond cartridge
The big platter
Tape slot
(1) Connect the power cord to AC outlet 230V/50Hz.
(2) Switch the function selector to PHONO / AUX–IN
/ USB & SD / TUNER function. Now your system is
ready to play the music.
3. INSTALLATION
CAUTION: To avoid stylus damage, make certain the included stylus guard is in place
whenever the turntable is being installed, moved or cleaned.
4. FM / AM OPERATION
(4.1.) Set FUNCTION switch to TUNER mode, then choose needed band (AM, FM
and FM stereo) by BAND switch.
(4.2.) Search stations: Rotate the TUNER knob to choose request station, or press
PREV/NEXT keys to choose idea stations. User can also press one of the two keys a
little longer around 1.5s then the model will search automatically and it would stop at a
clearest station.
(4.3.) Record Radio: Firstly insert memory device (USB flash disk or SD /MMC card).
When Radio is working, press the REC key on front control board of the unit, now
recording works will begin. To finish the work just need to press the STOP key.
NOTE: When you insert both USB flash disk and SD Card, the recorded file will
be saved into the latter inserting device.
5. PHONO OPERATION
(5.1.) Press the Function switch to PHONO position. Then
put a record on the Platter lightly.
In certain circumstances, 45 RPM adapter is needed.
(5.2.) Select the speed of record: 33 1/3, 45, 78 RPM according to vinyl to played.
(5.3.) Remove the stylus guard and push the lift lever upward to raise the tone
arm from the arm park, and then move the cartridge holder over the record gently, now
the platter will run automatically (default set of Auto/Manual stop switch at ON
position ). Then put down the lever, the tone arm would drop and touch record surface
gently. Now users can enjoy their favorite sons.
(5.4.) Select the auto/manual stop control: The turntable will stop automatically
while the song on the record finished when the switch at ON position. The other side it
will always play when it is at OFF position, this may helps to play some long recorded
vinyl which can not be played to the end by normal way.
(5.5.) Rotate the volume control knob to get desired sound level.
(5.6.) Push the arm lift lever up to raise the arm, now platter will still running but
play will pause. To continue the play, user just need to put down the lever.
(5.7.) Record Vinyl: Firstly insert memory device (USB flash disk or SD/MMC card).
When turntable is working, press the REC key on front control board of the unit, now
recording works will begin. To finish the work just need to press the STOP key.
NOTE 1:
NOTE 2:
When you insert both USB flash disk and SD Card, the recorded file
will be saved into the latter inserting device.
Recorded file in MP3 format with 128bit.
6. CASSETTE TAPE OPERATION
(6.1.) Press the Function switch to AUX–IN (TAPE) position first.
(6.2.) Insert a pre-recorded cassette tape into tape slot, with the exposed side
facing right. By pushing, the cassette will slide into the tape mechanism and play start
automatically. NOTE: one end of tape will remain visible.
(6.3.) Adjust volume control to your desired sound level.
(6.4.) Depress the eject button completely in, the tape will be ejected from the slot.
(6.5.) Press the eject button half way to fast forward of the tape you are listening.
(6.6) The tape will stop automatically when it comes to its end.
(6.7.) Record Cassette: Firstly insert memory device (USB flash disk or SD / MMC
card). When Cassette is working, press the REC key on front control board of the unit,
now recording works will begin. To finish the work just need to press the STOP key.
NOTE: When you insert both USB flash disk and SD card, the recorded file will
be saved into the latter inserting device.
7. AUX–IN JACK
(7.1.) The external sound sourcing can be played and recorded through the device.
The external sound sourcing can be recorded to the USB flash disk or SD through the
sockets.
(7.2.) Record AUX-IN: Firstly insert memory device (USB flash disk or SD/MMC
card).
(7.3.) When AUX-IN is working, press the REC key on front control board of the unit,
now recording works will begin. To finish the work just need to press the STOP key.
NOTE 1:
NOTE 2:
To enjoy the function, user need to select the function switch to
AUX-IN position, and Aux In source will be prior to tape play.
When you insert both USB flash disk and SD card, the recorded file
will be saved into the latter inserting device.
8. PLAYING DIRECTLY FROM USB / SD CARD / MMC CARD
(8.1.) Be sure power is on, insert USB flash disk or MP3 player into USB port and/or
insert MEMORY CARD (SD/MMC) into SD socket.
(8.2.) Set FUNCTION switch to USB/SD position.
(8.3.) The device supports for MP3 and WMA formats. During play status, press
PLAY/PAUSE button once to halt playing, press it again to continue.
(8.4.) Press PREV once to play the preview song, hold down continuously to speed
up selecting backward. Press NEXT once to play next one, holds down continuously
to speed up selecting forward.
(8.5.) EQ Function: You can press "EQ" button to choose different sound effects.
E1 = Normal, E2 = POP, E3 = ROCK, E4 = JAZZ, E5 = CLASSIC.
(8.6.) DELETE Function: When it is playing the music from U-Disk or SD Card, you
can delete the file by pressing the "DELETE" button about 2 seconds.
(8.7.) FOLDER+ Function: By pressing this button, it can switch the stored music
files (the music which you have stored in memory devices) and the recorded music
files (the music which is recorded from turnable, cassette and AUX-IN).
(8.8.) Press STOP to end up the play.
9. PHONES OUTPUT / EARPHONE JACK
(9.1.) The device can be connected to amplifier or speakers by 3.5mm HEADPHONE
jack.
(9.2.) Private listen of earphone also can be realized through this jack.
10. HOW TO REPLACE THE NEEDLE
(10.1.) Removing the needle from the cartridge: Place a screwdriver at the tip of
the needle heads hell and push downwards in the direction shown in sketch “A”.
Remove the needle head shell by pulling it forwards and pushing downwards.
(10.2.) Inserting the needle: Hold the tip of the needle head shell and insert it by
pressing in the direction illustrated by “B”. Push the needle head shell upwards in the
direction illustrated by “C” until the needle locks into the tip position.
Guide Pins (inside)
11. TIPS FOR BETTER PERFORMANCE
(11.1.) When opening or closing the turntable cover, handle it gently, moving it either
at the center or equally from both sides.
(11.2.) Do not touch the stylus tip with your fingers; avoid bumping the stylus on the
turntable mat or a record’s edge.
(11.3.) Clean the stylus tip frequently, using a soft brush with a back-to-front motion
only. If you use a stylus cleaning fluid, use it very sparingly. Wipe the dust cover and
turntable housing gently with a soft cloth. Use only a small amount of mild detergent
solution to clean the turntable and dust cover. Never apply harsh chemicals or
solvents to any part of the turntable system.
(11.4.) Prior to moving the turntable, always unplug it from the AC outlet and fasten
the tone arm on the tone arm rest with the vinyl twist-tie.
TECHNICAL SPECIFICATIONS
USB / SD / MMC slot for encoding & decoding
Built-in 45 RPM adapter
Belt-drive and semi-automatic play tone arm
Ceramic stereo cartridge with jewel stylus
LCD screen with backlight
Removable semi transparent plastic dust cover
3.5mm Jack
Input power: 100-240V / AC
Weight / Dimensions: 2,38KG / (L) 31,5 x (W) 29 x (H) 11cm
Package Contents: Digital converter for LP and cassette with built-in stereo radio
TX–22, Fixed radio antenna, User Manual
Hints for Environment Protection: Packages materials are raw materials and can be recycled. Do not disposal old
devices into the domestic waste. Cleaning: Protect the device from contamination and pollution. Only clean the device
with soft cloth or drapery, avoid using rough or coarse-grained materials. Do NOT use solvents or other aggressive
cleaner. Wipe the device after cleaning accurately.
Inverkehrbringer: Technaxx Deutschland GmbH &
Co.KG, Kruppstr. 105, 60388 Frankfurt am Main,
Deutschland (Germany), [0049] – (0)69 / 9047552 – 0