1
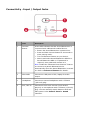
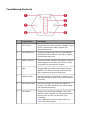
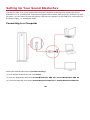
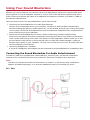
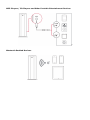
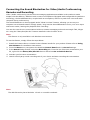
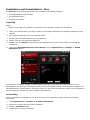
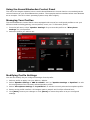
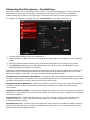
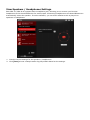
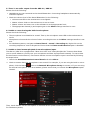
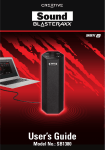
User’s Guide
Model No.: SB1390 (SBX 10) / SB1360 (SBX 20)
Getting Started
Thank you for choosing Creative Sound BlasterAxx, the next generation Sound Blaster® that
incorporates the powerful SB-Axx1 sound and voice processor. It is equipped with speaker and
microphone functions for both listening and conferencing capabilities. The SBX 10 / SBX 20 (SB1390 /
SB1360) model design provides portability and low power consumption without compromising your
audio pleasure.
The SBX 10 / SBX 20 comprises both right and left drivers within a single tower structure. This system is
equipped with the following features:
l
Portable form makes it ideal for laptop usage
l
High quality audio
l
Seamless support for various operating systems including Windows® 8, Windows 7, Windows
Vista® and Mac® OS.
l
Power efficient and environmentally friendly with its low power amplifier technology
l
Specialized software for different speaker enhancements and configurations
l
SBX Pro Studio audio enhancements
l
l
Built-in stereo microphones with CrystalVoice technology
Built-in Bluetooth® Transceiver
Package Checklist
Your Sound BlasterAxx SBX 10 / SBX 20 package comes with the following components
l
The Sound BlasterAxx SBX 10 / SBX 20 tower
l
MicroUSB cable
System Requirements
l
l
Intel Core™2 Duo processor 2.2 GHz, AMD Athlon 64x2 Dual Core or equivalent processor
Microsoft® Windows 8 64-bit, Windows 8 32-bit, OR
Microsoft Windows 7 64-bit, Windows 7 32-bit, OR
Microsoft Windows Vista 64-bit, Windows Vista 32-bit, OR
Macintosh OS 10.5 and above
l
Powered USB 2.0 port
Registering Your Product
Registering your product ensures you receive the most appropriate service and product support
available. You can register your product during installation or at www.creative.com/register. Please
note that your warranty rights are not dependent on registration.
More Help
For the latest news and products for the Sound Blaster, please visit www.soundblaster.com. The site
also includes information on making purchases, technical help and the latest software updates.
Using Creative Software AutoUpdate
Locating, downloading and installing updates for your Creative products is now simpler and faster with
the web-based Creative Software AutoUpdate system.
When you connect to Creative Software AutoUpdate via the Internet, the website will analyze your
computer system to determine your operating system, language and which Creative products are
connected to your system.
When this analysis is completed, you will then be given a list of only the most relevant software updates
for your connected products. The files can then be retrieved and installed.
To learn more about the Creative Software AutoUpdate, please visit www.soundblaster.com/support.
Note:
First-time users of Creative Software AutoUpdate may be prompted to authorize the download of a
browser component required for system analysis. Check to ensure that this content is signed by
Creative Labs, Inc., then click the Yes button.
Please ensure that all your Creative products are connected and installed on the same computer
running Creative Software AutoUpdate.
Understanding Your Sound BlasterAxx
The SBX 10 / SBX 20 is equipped with a variety of input and output jacks to enable connection to various
devices. A touchscreen interface located at the top of the Sound BlasterAxx gives you basic control over
the system's functions. This chapter looks at these features in detail.
The Sound BlasterAxx Tower
1
Jack
Description
LED Button
A white LED indicates that the Sound BlasterAxx is
on. The Sound BlasterAxx is automatically powered
on when a valid power source is connected to it.
Power sources include:
l PC / Laptop via the microUSB cable
l Power socket connected to the USB Power
Adapter (available separately)
l USB battery pack (not included)
A blue LED indicates that the Sound BlasterAxx is
connected with a Bluetooth enabled device.
2
Base
The SBX 20 comes with a base packed separately
in the box.
l Attach the base onto the bottom of the Sound
BlasterAxx and tighten it gently by screwing it
clockwise.
l To detach the base, screw it counterclockwise
and remove it from the Sound BlasterAxx.
Note: Only available for the SBX 20 model.
Connectivity - Input / Output Jacks
1
Jack
Description
Connect
Button
A blue LED indicates that the Sound BlasterAxx is
connected with a Bluetooth enabled device.
l Ensure the Sound BlasterAxx is powered on.
l Press and hold Connect button for 4 seconds to
enter pairing mode.
l Turn on Bluetooth feature on your device.
l Search and select Sound BlasterAxx SBX 20 or
Sound BlasterAxx SBX 10. If password is
required, enter 0000 and connect to it.
Note: Enable the "Bluetooth Auto Connect" feature
to connect to a paired Bluetooth device
automatically when the Sound BlasterAxx is turned
on. Refer to Advanced Feature for details.
2
MicroUSB
Connects to USB ports of PC / laptop for audio
output.
3
Headphone
Connects to stereo headphones with a 3.50mm
(1/8-inch) plug.
4
Aux / Mic In
Connects to line-level sources (such as MP3
players) or microphones with a 3.50mm (1/8-inch)
plug. You can manually switch between AUX and
MIC inputs via the Control Panel > Sound
interface.
TouchScreen Controls
Toggle/Slider
Description
1
Voice Focus
Toggles the Voice Focus function ON/OFF. Voice
Focus is ON when the LED is lighted and
dimmed otherwise.
2
Noise Reduction
Toggles the Noise Reduction function ON/OFF.
Noise Reduction is ON when the LED is lighted
and dimmed otherwise.
3
Master Volume
9 segment slider indicates the speaker volume.
Slide upwards to increase the volume or slide
downwards to decrease the volume.
4
SBX
Toggles SBX Pro Studio audio enhancements
ON/OFF. The SBX Pro Studio is ON when the
LED is lighted and dimmed otherwise.
5
Speaker Mute
Indicates whether the speaker is muted. A red
LED indicates mute while a white LED indicates
otherwise.
6
Microphone Mute
Indicates whether the inbuilt microphone is
muted. A red LED indicates mute while a white
LED indicates otherwise.
7
Call Button
Toggles the Call function ON/OFF. Call is ON
when the LED is lighted and dimmed otherwise.
Press to pick up call or to activate voice
command.
Note: LED blink for phone ringing when it is
connected via Bluetooth.
Setting Up Your Sound BlasterAxx
The SBX 10 / SBX 20 is a new system with low power amplifier technology that enables the Sound
BlasterAxx to run on USB power while delivering performance which was previously possible only with
AC power. You can either connect the SBX 10 / SBX 20 to a computer via the USB or by connecting it to
the power supply, i.e. standalone mode.
Connecting to a Computer
Setting the default audio device (for Mac OS only)
(i) Go to System Preferences and click Sound.
(ii) Click the Output tab, then select Sound BlasterAxx SBX 10 or Sound BlasterAxx SBX 20.
(iii) Click the Input tab, then select Sound BlasterAxx SBX 10 or Sound BlasterAxx SBX 20.
OR
Connecting to a Power Supply
Note:
USB Power Adapter available separately.
Using Your Sound BlasterAxx
Whether you wish to listen to your favorite tracks from MP3 players, experience realistic audio while
playing games on your PC and game consoles or receive clear voice and audio outputs during video /
audio conferencing without the hassle of an additional microphone or headset, your SBX 10 / SBX 20
provides the ideal solution.
Various scenarios where the Sound BlasterAxx can be used include:
l
l
l
Connecting the Sound BlasterAxx For Audio Entertainment
Connect your Sound BlasterAxx to your computer via USB or to other portable entertainment
devices including MP3 players, mobile phones etc. via the AUX IN jack and enjoy clear audio quality.
You may also connect the Sound BlasterAxx to various Bluetooth enabled devices via Bluetooth for
group conferencing or music playback.
Connecting the Sound BlasterAxx for Video / Audio Conferencing, Karaoke and Recording
The built-in microphone along with CrystalVoice technology provides a truly hands-free solution to
video / audio conferencing via the web. The "What You Hear" application further allows you to mix
the microphone input and the currently playing track or video with instant playback, creating a
Karaoke-type system on your computer. You may even record your Voice over IP (VoIP) calls and
internet telephony conversations.
Connecting Headphones / Headsets
If required, headphones and headsets can be connected to the Sound BlasterAxx's headphone jack.
Connecting the Sound BlasterAxx For Audio Entertainment
The SBX 10 / SBX 20 is equipped with a MicroUSB jack, an Aux In jack, and a build-in Bluetooth
transceiver for connection to a wide array of devices. This section illustrates the connection.
Note:
The SBX 10 / SBX 20 must either be connected to a computer, a wall socket using a USB Power
Adapter (available separately) or an external USB battery pack (not included) for power.
PC / Mac
MP3 Players / CD Players and Other Portable Entertainment Devices
y
Bluetooth Enabled Devices
Connecting the Sound BlasterAxx for Video/Audio Conferencing,
Karaoke and Recording
Video / Audio conferencing via the various messaging applications available in the market is made
simpler with the SBX 10 / SBX 20's built-in stereo microphones. Equipped with configurable CrystalVoice
technology, the Sound BlasterAxx, coupled with its microphone, delivers crystal clear voice and audio
reception during conferencing.
The Sound BlasterAxx is also equipped with a "What You Hear" feature, allowing you to turn your
computer into a Karaoke station. Simply speak / sing into the Sound BlasterAxx to mix your voice input
with music tracks, hearing the playback while recording.
You can also record voice conversations held over instant messaging tools such as Google Talk, Skype
etc. using the "Wave/Aux/Mic Mix" feature installed via the Creative driver.
Note: This feature is only available in the Windows environment.
To use this feature, simply follow the steps below:
1. Install the Creative Driver included in the software bundle for your product. Please refer to Using
the Software for installation instructions.
2. From the Start menu, navigate to the Windows Control Panel and view Sound settings.
3. In the Sound dialog window, select the Recording tab. From the list of devices connected to your
PC, right-click the Wave/Aux/Mic Mix device and select Set as Default Device.
4. Activate your IM voice conversation.
5. Launch a third-party sound recording tool of your choice and start recording the conversation.
Note:
The SBX 20 can be placed behind a 13-inch or a smaller notebook.
Connecting Headphones / Headsets
Headphones and headsets can be connected to the Sound BlasterAxx via the Headphone jack. Please
note that the Sound BlasterAxx's speaker will be automatically muted when a headphone is connected.
Using the Software
A specialized software for the Sound BlasterAxx is developed to provide additional enhancements to the
audio and voice inputs and outputs of the product. The software bundle supports a range of operating
systems including:
l
Windows 8, Windows 7, Windows Vista
l
Mac
To take full advantage of your Sound BlasterAxx, we recommend downloading and installing this
software into your computer.
Note:
Some applications are available only for certain operating systems. To learn more about each
application, please consult its respective Online Help.
Depending on your model and software version, the color theme of the user interface may differ.
Installation and Uninstallation - Windows
For Windows OS, the following applications are included in the software bundle:
l
Sound BlasterAxx Control Panel
l
Creative Software AutoUpdate
l
Creative System Information
l
Product Registration
l
Creative ALchemy
l
Host OpenAL
l
Creative Driver
You can also download the following bonus applications from www.creative.com/support:
l
Creative WaveStudio
l
Creative Media Toolbox
Installing
Note:
Please ensure that your product is connected to the computer running the installation.
1. Using a standard web browser, visit www.creative.com/support and locate the software package for
the Windows operating system.
2. Download this package into your local hard disk.
3. Locate and launch the software package.
4. Follow the on-screen instructions to complete the installation.
5. When prompted, restart your computer.
6. Launch the application by clicking Start > Programs or All Programs > Creative > Sound
BlasterAxx > Sound BlasterAxx Control Panel
This software includes a number of configurations that help you control the basic functions of your
Sound BlasterAxx plus several software enhancement configurations that can be made to heighten your
Sound BlasterAxx's performance. The menu column on the left of the interface allows you to navigate to
the configuration interface for each of these enhancements.
Uninstalling
In the event that an uninstallation is required (such as for upgrades), please follow the following
procedure.
1. Click Start > Control Panel > Uninstall a program
2. Select the Sound BlasterAxx entry.
3. Click the Uninstall button.
If the User Account Control dialog box appears, click the Continue button.
4. Click the Yes button.
5. When prompted, restart your computer.
Installation and Uninstallation - Mac
For Mac OS, the following applications are included in the software bundle:
l
Sound BlasterAxx Control Panel
l
Product Registration
l
Creative Uninstaller
Installing
Note:
Please ensure that your product is connected to the computer running the installation.
1. Using your web browser, visit www.creative.com/support and locate the software package for the
Mac OS.
2. Download this package into your local hard disk.
3. Double-click the downloaded file to uncompress it.
4. Double-click the uncompressed DMG file.
5. Double-click the Install icon and follow the subsequent on-screen instructions to complete the
installation.
6. Launch the Sound BlasterAxx Control Panel from the Applications > Creative > Sound
BlasterAxx folder.
This software includes a number of configurations that help you control the basic functions of your
Sound BlasterAxx plus several software enhancement configurations that can be made to heighten your
Sound BlasterAxx's performance. The menu column on the left of the interface allows you to navigate to
the configuration interface for each of these enhancements.
Uninstalling
In the event that an uninstallation is required (such as for upgrades), please follow the following
procedure.
1. Click Applications > Creative > Creative Uninstaller
2. Select the Creative product to be uninstalled.
3. Click the Uninstall button.
4. Follow the on-screen instructions.
Using the Sound BlasterAxx Control Panel
The rest of this chapter explains how to use the Sound BlasterAxx Control Panel to view and adjust the
various features of your Sound BlasterAxx product. The examples and screenshots below uses Windows
as an example. The UI for other operating systems may differ slightly.
Managing Your Profiles
The Sound BlasterAxx Control Panel comes equipped with a set of pre-configured profiles to suit your
different needs including gaming, movies/videos, music, etc. To activate a profile,
1. From the left menu, select "Speaker Settings" for pre-set audio profiles or "Microphone
Settings" for voice profiles.
2. Select the profile you wish to use.
Modifying Profile Settings
You can also modify the pre-configured settings of each profile.
1. Select a profile to apply it to your SBX 10 / SBX 20.
2. Select "Speaker Settings > SBX Pro Studio" and / or "Speaker Settings > Equalizer" to edit
the configuration of the currently selected speaker profile.
3. Select "Microphone Settings > CrystalVoice" to edit the currently selected microphone profile.
4. Return to the profile interface. All changes made in steps 2 and 3 will be reflected here.
5. Click [Save] to save your changes or click [Reset] to return the profile to its pre-configured
settings.
Adjusting Speaker Volume Via Software
A master volume slider is available at the bottom left corner of the
interface. Drag the slider to adjust the master volume. You can also
mute / unmute the speaker by clicking the speaker icon to the left of
the slider.
Mixer Settings
A mixer is also available via the software, allowing you to adjust the volume levels of individual outputs
and channels including the microphone, speakers, etc. Simply click the "Mixer" option on the menu and
adjust the volumes using the sliders.
Enhancing the Audio - SBX Pro Studio
SBX Pro Studio enhances the audio output of your Sound BlasterAxx using software optimizations. To
configure SBX Pro Studio, click the "SBX Pro Studio" menu option on the left.
Follow the steps below to toggle on SBX Pro Studio and adjust the level of enhancements.
1. Click the power button to toggle ON SBX Pro Studio.
2. Select the type(s) of enhancements to apply and drag the sliders to adjust the level for each
enhancement.
3. Click the play button to test the audio output, if necessary.
Note:
You can also toggle SBX Pro Studio ON via the physical touchscreen of the Sound BlasterAxx.
Enhancement adjustments can only be made via the software.
SBX Pro Studio includes a number of enhancements for movies and gaming, elevating your movie and
gaming experience to the next level. These include:
l
l
l
l
l
SBX Surround - provides immersion control to enhance the natural sense of audio depth and
spaciousness by creating virtual surround sound channels. Stereo content or multichannel content
will sound as if its coming from all sides while voices remain centered in front and original balance
and timbre is preserved.
SBX Crystalizer - restores the natural dynamic range that is lost when music files (iTunes and
MP3) gets compressed. This makes the music sound as good as the artist originally intended, and
adds an enhanced level of realism for movies and games.
SBX Bass - fills in the missing low frequency tones and gives the extra impact for a better
entertainment experience. Consumers no longer have to tolerate a lack of bass in speakers as the
SBX Pro Studio Bass technology dramatically improves the sound experience even in the absence of
a subwoofer.
SBX Smart Volume - addresses the problem of abrupt volume level changes during playback and
between songs by continously measuring volume automatically, applying gain and attenuation
intelligently to compensate for any changes.
SBX Dialog Plus - enhances the voices in movies for clearer dialog, allowing the listener to hear
the dialog over the rest of the soundtrack and over ambient noise in the listening environment.
Enhancing the Microphone - CrystalVoice
The SBX 10 / SBX 20 is equipped with built-in stereo microphones, allowing you to easily carry out
video/audio conferencing using popular VoIP applications such as Ventrilo® etc. CrystalVoice
enhancements help to further this experience by enhancing the clarity of such communications.
To configure CrystalVoice settings, Click the "CrystalVoice" menu option on the left.
1. Click the power button to turn on CrystalVoice.
2. Select the SBX 10 / SBX 20 as your recording device, adjusting the microphone volume using the
slider.
3. Select the desired enhancements to turn on and adjust the settings according to your needs.
4. Click [Test] and speak into your Sound BlasterAxx to hear your voice recorded based on the
configured settings. Readjust if necessary.
CrystalVoice enhancements helps you hear and be heard clearly by all participants of the conference,
doing away with noisy background distortions and unclear communication that disrupts your online
gaming and chatting experience. The various enhancements available include:
CrystalVoice Acoustic Echo Cancellation - eliminates echoes and enables the speaker to listen to
the other parties clearly. Echoes are a common problem present in voice communication systems that
disrupts conversations by making it difficult to hear the other party.
CrystalVoice Noise Reduction - enables the speaker to be heard clearly over background noise by
constantly monitoring the environment and eliminating unwanted noise that interferes with the
conversation.
CrystalVoice Smart Volume - automatically adjusts the loudness of a voice to maintain a consistent
volume level. This makes it convenient for the speaker to converse normally, regardless of his distance
from the microphone.
CrystalVoice FX™ - enables the alteration of voice with a variety of effects which can be used to
enhance the tone of a voice, create interesting accents or even allow someone to sound like a
completely different person.
CrystalVoice Focus - creates a zone and suppresses noise outside it to enable the speaker within to
be heard with amazing clarity. Multiple microphones are used to focus, enhance the speaker’s voice,
and eliminate sounds outside the zone.
View Speakers / Headphones Settings
Each SBX 10 / SBX 20 is equipped with a headphone jack, allowing you to connect your favorite
headphones to the Sound BlasterAxx for audio output. Connecting headphones to the Sound BlasterAxx
automatically mutes the speaker. From the software, you can check whether audio is played via
speakers or headphones.
1. View the current settings for the speakers / headphones.
2. Click [Test] to hear a sample audio clip played back based on the settings.
Understanding Other Advanced Features
The software also provides other advanced features including:
l
Equalizer Settings
l
Optimize USB Power for better speaker performance
l
Bluetooth Auto Connect
Equalizer Settings
Equalizers allows you to filter various audio frequency, thus controlling the tone of your audio output.
The Sound BlasterAxx Control Panel comes equipped with a range of preset equalizer settings, helping
you to select different audio tones easily. You can also manually modify or add equalizer presets.
To view the Equalizer Settings interface, select "Equalizer" from the menu. To apply and adjust an
equalizer preset,
1. Check the EQ checkbox to enable the use of the equalizer.
2. From the drop down menu, select the preset to use.
3. Adjust the vertical slider bars to achieve your desired level.
4. Click [Save] to save the changes to the preset if necessary.
You can also delete any user created equalizer presets by selecting the preset from the drop down menu
and clicking [Delete].
Note:
All default equalizer presets cannot be deleted.
Optimize USB Power for better speaker performance
The Optimize USB Power feature is used to increase the performance of your speaker on Sound
BlasterAxx. Please note that the Sound BlasterAxx will consume more power when this feature is
enabled.
To enable the Optimize USB Power feature, select the Optimize USB power for better speaker
performance checkbox.
Note:
This feature is only available on SBX 20.
Bluetooth Auto Connect
The Bluetooth Auto Connect feature allows a paired Bluetooth device to be connected to the Sound
BlasterAxx automatically. When the feature is enabled, the Sound BlasterAxx detects and reconnects to
the previously paired Bluetooth device when it is turned on.
To enable Bluetooth Auto Connect, select the Bluetooth Auto Connect checkbox.
Using the Bluetooth® Wireless Feature
You can stream music from your Bluetooth enabled devices to your SBX 10 / SBX 20.
Enjoy audio from your Bluetooth enabled devices
Enjoy your favorite music from your Bluetooth devices; simply follow these steps to connect them.
Action
LED Status
Status
Connect the Sound
BlasterAxx SBX 10 / SBX 20
to a computer or a power
supply
SBX 10 / SBX 20 LED button
and Touchpad are lit
SBX 10 / SBX 20 is powered
ON once plugged in
Press and hold CONNECT
button for 4 seconds
SBX 10 / SBX 20
Bluetooth LED blinks
rapidly and changes from
white to blue
Pairing mode. Ready to be
paired with new device
Turn ON the Bluetooth
feature on your device.
Search and select "Sound
BlasterAxx SBX 10" or
"Sound BlasterAxx SBX
20". If password is
required, enter 0000 and
connect to it
SBX 10 / SBX 20
Bluetooth LED lit
Ready to stream music
Note:
The SBX 10 / SBX 20 will exit from pairing mode if no device is paired within 1 minute.
To disconnect and remove all Bluetooth pairings, press and hold the CONNECT button for 10 seconds.
Reconnect your Sound BlasterAxx to the PC by setting it as the default audio device:
For Windows,
i. Go to Control Panel and click Sound.
ii. Click the Playback tab, select Sound BlasterAxx SBX 10 or Sound BlasterAxx SBX 20, then
click the Set Default button.
iii. Click the Recording tab, select Sound BlasterAxx SBX 10 or Sound BlasterAxx SBX 20, then
click the Set Default button.
For Mac,
i. Go to System Preferences and click Sound.
ii. Click the Output tab, then select Sound BlasterAxx SBX 10 or Sound BlasterAxx SBX 20.
iii. Click the Input tab, then select Sound BlasterAxx SBX 10 or Sound BlasterAxx SBX 20.
General Specifications
Capacitive Touchscreen User Interface
l
Master Volume Slider with LED Backlit
l
Voice Focus On / Off button with LED Backlit
l
Noise Reduction On / Off button with LED Backlit
l
SBX Pro Studio Master On / Off button with LED Backlit
l
Speaker Mute button with LED Backlit
l
Mic Mute with button LED Backlit
l
“Call” button with LED Backlit
l
White LED for Power indication. Blue LED for Bluetooth indication.
l
Bluetooth Connect button
Inputs
l
USB 2.0, Bluetooth Wireless
l
One 3.50 mm (1/8-inch) stereo jack for Aux In or Microphone In
l
Built-in Microphone: High quality dual microphone array
Outputs
l
Amplified speaker
l
One 3.50 mm (1/8-inch) stereo jack for Headphones Playback
Physical Specifications
l
l
Dimensions (L x W x H) :
l
SBX 10: 90.6 x 80.3 x 295.7 mm
l
SBX 20: 109.8 x 97 x 400.2 mm
Weight:
l
SBX 10: Approx. 0.8 kg
l
SBX 20: Approx. 1.9 kg
Technical Specifications
Bluetooth Version: Bluetooth 2.1 + EDR (Enhanced Data Rate)
Bluetooth Profiles:
l
A2DP (Wireless Stereo Bluetooth)
l
AVRCP (Bluetooth Remote Control)
l
HFP (Hands-Free Profile)
Audio Codec: AAC, SBC
Operating Frequency: 2402 - 2480 MHz
Operating Range: Up to 10 meters / 33 feet
(Measured in open space. Walls and structures may affect range of device.)
Device Operating Temperature range: 0°C to 45°C
USB Power Adapter (available separately): DC 5V, 1A
Troubleshooting and Support
This chapter provides solutions to issues that may be encountered during the installation or usage of
your Sound BlasterAxx.
1. The Sound BlasterAxx SBX 10 / SBX 20 does not power on.
The Sound BlasterAxx is designed to be powered on by connecting to a PC / laptop via USB or through a
physical power socket using a USB Power Adapter.
If you are connected via USB, please ensure that the connected computer has recognized your Sound
BlasterAxx correctly. If not, please follow the steps below in order until the issue is corrected.
i. Tighten the USB connection at both ends of the cable.
ii. The USB cable may be faulty. Replace the cable with a working USB cable.
iii. Your computer's USB port may be disabled, or faulty or requires a driver update. Check your
computer's hardware device manager to determine the working status of your USB port. Enable
your USB port and / or update its driver.
If the problem persists, connect the Sound BlasterAxx to a different USB port.
If you are connected via a USB Power Adapter, please check that all cables are tightly connected and
the power socket is turned on.
2. I am having difficulty in linking up the Bluetooth device with SBX 10 / SBX 20.
Ensure that your Bluetooth enabled device supports A2DP profile.
Please also try the following steps:
l
l
Make sure that Bluetooth is enabled (turned on) on your device.
On some devices, ensure that the Sound BlasterAxx SBX 10 / SBX 20 is selected as the default
headset / wireless stereo audio playback device.
l
Make sure that there are no other wireless devices within a 10 meter radius when pairing.
l
Position them within 1 meter or closer to each other if you experience pairing difficulties.
l
Check if you have input the correct passcode / pin number (0000) on your Bluetooth device.
l
Ensure that both, your Bluetooth device and SBX 10 / SBX 20 are not connected to any other
devices.
l
Pair the devices again.
l
Should the problem persist, reset the SBX 10 / SBX 20 to factory default.
3. Bluetooth link is established and paired between the devices but there’s no music.
Ensure that the device’s volume is not set to minimum or muted. With some built-in Bluetooth enabled
computers or 3rd party USB Bluetooth dongles, you may be required to manually specify / set-up the
audio output as the Sound BlasterAxx SBX 10 / SBX 20 (under sound and audio devices section) on your
computer’s operating system.
Note:
Audio transmitted from your Sound BlasterAxx may be slightly delayed; this is due to the
characteristics of Bluetooth technology.
4. No sound from headphones.
Please check the following:
l
l
Headphones are securely connected to the headphone jack.
Headphones it recognized as the output device in the Speakers / Headphones interface on the
Control Panel.
5. There is no audio output from the SBX 10 / SBX 20.
Please check the following:
l
l
Headphones are not connected to the Sound BlasterAxx. Connecting headphones automatically
mutes the speaker.
Check the volume level of the Sound BlasterAxx for the following:
l
Volume mute LED on the touchscreen is not lighted.
l
Master volume slider on the touchscreen is not at 0 bars.
l
Master volume and mute icon on the software is at the appropriate level.
l
The appropriate channel(s) and output types on the Mixer settings interface is not 0.
6. Unable to record using the built-in microphone.
Please check the following:
l
l
l
The microphone is not disabled or muted. That is, the microphone mute LED on the touchscreen is
not lit.
Microphone volume and the volume of other recording devices on the Mixer settings interface is not
at 0.
For Windows systems, navigate to Control Panel > Sound > Recording tab. Right-click on the
recording endpoint to view its Properties. Ensure that the Listen to this device option is disabled.
7. Unable to hear instant playback from microphone input.
The SBX 10 / SBX 20 is equipped with "What Your Hear" and "Wave/Aux/Mic Mix" features that allows
you to record whatever you say into your microphone and hear it played back instantly. To ensure that
the this feature works however, first ensure that the correct microphone input is unmuted by following
the steps below.
i. Launch the Sound BlasterAxx Control Panel and select Mixer.
ii. Check to ensure that your microphone is not muted. For example, if you are using the built-in microphone, click the button
next to the Internal Microphone Array to unmute it. If you are using
an external microphone, such as a headset, please ensure that you unmute the Microphone option
instead.
Then, check that the correct microphone is selected as the system sound input device.
For Windows systems,
i. Navigate to Control Panel > Sound > Recording tab.
ii. In Recording tab, ensure that the correct microphone is selected. For example, if you are using the
built-in microphone, the Internal Microphone Array should be selected. If you are using an external microphone, the Microphone should be selected instead.
For Mac systems,
i. Go to System Preferences and click Sound.
ii. Click the Input tab and ensure that the correct microphone is selected as the input device.
Additional Support
If you encounter any other issues or have any other enquiries about your SBX 10 / SBX 20 or any other
Creative products, please visit our comprehensive knowledge base at support.creative.com or
www.soundblaster.com for additional information.
Regulatory Information
The following sections contains notices for various countries.
Caution:
This product is intended for use with FCC/CE certified computer equipment. Please check the
equipment operating/installation manual and/or the equipment manufacturer to verify/confirm if
your equipment is suitable prior to the installation or use of the product.
Notice for the USA
Federal Communication Commission (FCC) Interference Statement
FCC PART 15: This equipment has been tested and found to comply with the limits for a Class B digital
device, pursuant to Part 15 of the FCC Rules. These limits are designed to provide reasonable protection
against harmful interference in a residential installation. This equipment generates, uses and can
radiate radio frequency energy and, if not installed and used in accordance with the instructions, may
cause harmful interference to radio communications. However, there is no guarantee that interference
will not occur in a particular installation. If this equipment does cause harmful interference to radio or
television reception, which can be determined by turning the equipment off and on, the user is
encouraged to try to correct the interference by one or more of the following measures:
l
Reorient or relocate the receiving antenna.
l
Increase the separation between the equipment and receiver.
l
l
Connect the equipment into an outlet on a circuit different from that to which the receiver is
connected.
Consult the dealer or an experienced radio/TV technician for help.
This device complies with part 15 of the FCC Rules. Operation is subject to the following two conditions:
1. This device may not cause harmful interference, and
2. This device must accept any interference received, including interference that may cause undesired
operation.
Caution:
To comply with the limits of the Class B digital device, pursuant to Part 15 of the FCC Rules, this
device must be installed with computer equipment certified to comply with Class B limits.
All cables used to connect to the computer and peripherals must be shielded and grounded. Operation
with non-certified computers or non-shielded cables may result in interference to radio or television
reception.
MODIFICATION: Any changes or modifications not expressly approved by the grantee of this device
could void the user’s authority to operate the device.
Federal Communication Commission (FCC) Radiation Exposure Statement
This equipment complies with FCC radiation exposure limits set forth for an uncontrolled environment.
This equipment should be installed and operated with minimum distance 20cm between the radiator &
your body. This transmitter must not be co-located or operating in conjunction with any other antenna
or transmitter.
California Proposition 65 Statement
Warning:
Handling this product may expose you to chemicals known to the State of California to cause cancer and
birth defects or other reproductive harm. Wash hands after handling.
EXPLANATORY NOTE: California Safe Drinking Water and Toxic Enforcement Act of 1986 (Proposition
65) requires special product labeling for products containing certain chemicals known to the State of
California to cause cancer, birth defects or other reproductive harm. Creative has chosen to provide a
warning based on its knowledge about the presence of one or more listed chemicals without attempting
to evaluate the lvel of exposure. With Creative’s products, the exposure may be below the Proposition
65 level of concern, or could even be zero. However, out of an abundance of caution, Creative has
elected to place the Proposition 65 warning on its products.
Notice for Canada
This Class B digital apparatus complies with Canadian ICES-003 and RSS-210.
Cet appareil numérique de classe B est conforme aux normes canadiennes NMB-003 et CNR-210.
This device complies with Industry Canada licence-exempt RSS standard.
Operation is subject to the following two conditions:
1. This device may not cause harmful interference, and
2. this device must accept any interference received, including interference that may cause
undesirable operation.
Cet appareil est conforme avec Industrie Canada RSS standard exempts de licence.
Son fonctionnement est soumis aux deux conditions suivantes :
1. Le matériel ne peut étre source D’interférences et
2. Doit accepter toutes les interférences reques, Y compris celles pouvant provoquer un
fonctionnement indésirable.
CANADIAN CLASS B STATEMENT: This digital device does not exceed the Class B limits for radio
noise emissions from digital apparatus as set out in the interference-causing equipment standard
entitled "Digital Apparatus," ICES-003 of the Department of Communications.
Cet appareil numerique respecte les limites de bruits radioelectriques applicables aux appareils
numeriques de Classe B prescrites dans la norme sur le materiel brouilleur: "Appareils Numeriques,"
NMB-003 edictee par le ministre des Communications.
MODIFICATION: Any changes or modifications not expressly approved by the grantee of this device
could void the user's authority to operate the device.
Toute modification non approuvée explicitement par le fournisseur de licence de l'appareil peut
entraîner l'annulation du droit de l'utilisateur à utiliser l'appareil.
Notice for Australia / New Zealand
Complies with the requirements of the ACMA Radiocommunications (Electromagnetic
Compatibility) Standard 2008.
Ukraine RoHS Statement
Обладнання відповідає вимогам Технічного регламенту щодо обмеження використання деяких
небезпечних речовин в електричному та електронному обладнанні, затвердженого постановою
Кабінету Міністрів України від 3 грудня 2008 № 1057
European Compliance
This product conforms to the following:
RoHS Directive 2011/65/EU.
EMC Directive 2004/108/EC.
Mains operated products for the European market comply with Low Voltage Directive 2006/95/EC and
Commission Regulation(s) Implementing Directive 2009/125/EC.
Communication / RF wireless products for the European market comply with R&TTE Directive
1999/5/EC.
Caution:
To comply with the Europe CE requirement, this device must be installed with CE certified computer
equipment which meet with Class B lmits.
All cables used to connect this device must be shielded, grounded and no longer than 3m in length.
Operation with non-certified computers or incorrect cables may result in interference to other
devices or undesired effects to the product.
MODIFICATION: Any changes or modifications not expressly approved by Creative Technology Limited
or one of its affliated companies could void the user's warranty and guarantee rights.
Vietnam RoHS Statement
This product is in compliance with Circular 30/2011/TTBCT of the Ministry of Trade of the Socialist
Republic of Vietnam (“Circular”), it does not contain the following substances in concentration greater
than the Maximum Limit value as specified in the Circular.
Substance
Maximum Limit (ppm) 1, 2
l
lead
1000
l
mercury
1000
l
cadmium
100
l
hexavalent chromium
1000
l
polybrominated biphenyls (PBB)
1000
l
polybrominated diphenyl ethers (PBDE)
1000
1 Maximum Limit does not apply to applications exempted from the Circular.
2 Maximum Limit refers to concentration by weight in homogeneous materials.
Notice for Korea
B급 기 기
(가 정 용 방 송 통 신 기 자 재 )
이 기 기 는 가 정 용 (B급 ) 전 자 파 적 합 기 기 로 서 주 로 가 정 에 서 사 용 하 는 것 을 목 적 으 로 하 며
,모 든 지 역 에 서 사 용 할 수 있 습 니 다 .
Notice for Singapore
Safety Information
Refer to the following information to use your product safely, and to reduce the chance of electric shock,
short-circuiting, damage, fire, hearing impairment or other hazards. Improper handling may void the
warranty for your product. For more information, read the warranty available with your product.
l
Do not dismantle or attempt to repair your product.
Refer all servicing to authorized repair agents.
l
Do not expose your product to temperatures outside the range of 0°C to 45°C (32°F to 113°F).
l
Do not pierce, crush or set fire to your product.
l
Keep your product away from strong magnetic objects.
l
Do not subject your product to excessive force or impact.
l
Do not expose your product to water or moisture.
If your product is moisture-resistant, take care not to immerse your product in water or expose it to
rain.
Bluetooth Product
l
l
l
The short wave radio frequency signals of a Bluetooth device may impair the operation of other
electronic and medical devices.
Switch off the device where it is prohibited. Do not use the device in medical facilities, aircraft,
refueling points, close to automatic doors, automatic fire alarms or other automatically controlled
devices.
Keep this device at least 20 cm from pacemakers and other medical devices. Radio waves may
impair the operation of pacemakers and other medical devices.
License and Copyright
Information in this document is subject to change without notice and does not represent a commitment
on the part of Creative Technology Ltd. No part of this manual may be reproduced or transmitted in any
form or by any means, electronic or mechanical, including photocopying and recording, for any purpose
without the written permission of Creative Technology Ltd.
Copyright © 2012 Creative Technology Ltd. All rights reserved. Creative, the Creative logo, Sound
BlasterAxx, the Sound BlasterAxx logo, SBX Pro Studio, the SBX Pro Studio logo, Recon3D and
CrystalVoice are trademarks or registered trademarks of Creative Technology Ltd. in the United States
and/or other countries. The Bluetooth® word mark and logos are registered trademarks owned by
Bluetooth SIG, Inc. and any use of such marks by Creative Technology Ltd is under license. Other
trademarks and trade names are those of their respective owners. All specifications are subject to
change without prior notice. Use of this product is subject to a limited hardware warranty. Actual
contents may differ slightly from those pictured. The software included in this packaging may not be
used separately from the hardware. Before using the software, you must agree to be bound by the
terms and conditions of the end user license agreement.
Version 1.0
May 2012