1
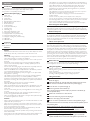
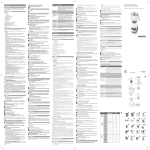
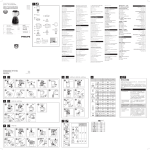
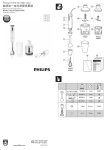
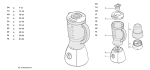
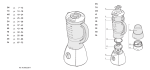
Register your product and get support at www.philips.com/welcome 2 3 4 5 6 7 8 9 10 11 12 13 14 15 16 17 18 19 20 21 HR2118, HR2117, HR2116, HR2115 1 22 cups 6 5 4 3 2 4222.005.0409.1 1500 ml 1250 1000 750 500 1 250 0.5 150 English Introduction Congratulations on your purchase and welcome to Philips! To fully benefit from the support that Philips offers, register your product at www.philips.com/welcome. General description (Fig. 1) 1 Motor unit 2 Control panel A OFF button B Speed buttons C PULSE/QUICK CLEAN button 3 Blender blade unit 4 Plastic blender jar 5 Level indication 6 Lid of plastic blender jar 7 Opening in lid 8 Measuring cup 9 Filter (HR2118/HR2117 only) 10 Chopper lid (HR2118 only) 11 Chopper blade unit (HR2118 only) 12 Chopper bowl (HR2118 only) 13 Chopper coupling unit (HR2118 only) 14 Mill beaker 15 Mill blade unit Important Read this user manual carefully before you use the appliance and save it for future reference. General Danger -- Never immerse the motor unit in water or any other liquid, nor rinse it under the tap. Use only a moist cloth to clean the motor unit. Warning -- Check if the voltage indicated on the appliance corresponds to the local mains voltage before you connect the appliance. -- Do not use the appliance if the plug, the mains cord or other parts are damaged. -- If the mains cord is damaged, you must have it replaced by Philips, a service centre authorised by Philips or similarly qualified persons in order to avoid a hazard. -- Do not touch the cutting edges of the blade units, especially when the appliance is plugged in. The cutting edges are very sharp. -- Make sure the blade unit is securely fastened to the blender jar before you assemble the blender jar onto the motor unit. -- Never reach into the blender jar with your fingers or an object while the appliance is operating. -- This appliance is not intended for use by persons (including children) with reduced physical, sensory or mental capabilities, or lack of experience and knowledge, unless they have been given supervision or instruction concerning use of the appliance by a person responsible for their safety. -- Keep the appliance and its cord out of reach of children. -- Never let the appliance operate unattended. -- Make sure the blade unit is securely fastened to the blender jar or mill beaker before you assemble the blender jar or mill beaker onto the motor unit. -- Do not use the mill to grind very hard ingredients such as nutmeg and ice cubes. -- If one of the blade units gets stuck, unplug the appliance before you remove the ingredients that block the blades. -- Never use the blender jar, mill beaker or chopper bowl (HR2118 only) to switch the appliance on and off. ------ Caution Always unplug the appliance before you assemble, disassemble or make adjustments to any of the parts. Never use any accessories or parts from other manufacturers or that Philips does not specifically recommend. If you use such accessories or parts, your guarantee becomes invalid. Do not exceed the maximum indication on the blender jar, the mill beaker and the chopper bowl (HR2118 only). Do not exceed the maximum quantities and processing times indicated in the relevant table. If food sticks to the wall of the blender jar, switch off the appliance and unplug it. Then use a spatula to remove the food from the wall. ----------- The appliance can only be switched on if the blender jar, the mill beaker or the chopper bowl (HR2118 only) is assembled on the motor unit correctly. Never fill the blender jar with ingredients hotter than 80°C/175°C. Always process cloves, star anise and aniseed together with other ingredients. If processed separately, these ingredients may attack the plastic materials of the mill. The mill beaker may become discoloured when you use it to process ingredients such as cloves, anise and cinnamon. The mill is not suitable for chopping raw meat. Use the blender or chopper instead. Do not use the dry mill to process liquids such as fruit juice. Do not use the chopper to mix liquids. Use the blender for this purpose. Soak dried ingredients, such as soy beans, before you put them in the filter. Cut fruit into smaller pieces before you put it in the filter. Never overload the filter. Do not fill the filter beyond its metal part. Electromagnetic fields (EMF) This Philips appliance complies with all standards regarding electromagnetic fields (EMF). If handled properly and according to the instructions in this user manual, the appliance is safe to use based on scientific evidence available today. Built-in safety lock This feature ensures that you can only switch on the appliance if the blender jar and lid, the mill beaker or the chopper bowl and lid (HR2118 only) are assembled on the motor unit properly. If the blender jar and lid, the mill beaker or the chopper bowl and lid are correctly assembled, the built-in safety lock will be unlocked. Motor circuit protector The appliance is equipped with a motor circuit protector that switches off the motor if the motor jams (which might occur during heavy processing jobs or if the appliance is not used according to the instructions in the user manual). If this happens, DO NOT press the reset button in the bottom of the appliance immediately after the circuit protector has switched off the appliance. First switch off and unplug the appliance and let it cool down to room temperature. Then make sure that the quantity of ingredients you are processing does not exceed the quantity mentioned in the user manual and make sure that nothing is blocking the blade unit. After this, press the reset button in the bottom of the appliance and continue processing. Do not touch the blade unit when you press the reset button. Before first use Thoroughly clean the parts that come into contact with food before you use the appliance for the first time (see chapter ‘Cleaning’). Using the appliance The blender is intended for: -- Blending fluids, e.g. dairy products, sauces, fruit juices, soups, mixed drinks and shakes. -- Mixing soft ingredients, e.g. pancake batter or mayonnaise. -- Pureeing cooked ingredients, e.g. for making baby food. Using the blender 1Screw the bottom of the blender jar clockwise onto the blender blade unit (Fig. 2). 2Mount the blender jar with the blade unit attached onto the motor unit and turn it clockwise until it locks into position (Fig. 3). 3Press the lever to open the lid (Fig. 4). 4Put the ingredients in the blender jar. Note: Let hot ingredients cool down before you put them in the blender jar (max. temperature 80°C). 5Release the control lever to close the lid. 6Insert the measuring cup into the lid (Fig. 5). 7Put the mains plug in the wall socket. 8Press one of the speed buttons to switch on the appliance (Fig. 6). Note: See the table in this user manual for the recommended quantities, speeds and processing times. Never reach into the jar with your fingers or an object (except the spatula provided) while the blender is operating. Do not let the appliance operate for more than 3 minutes at a time. If you have not finished processing after 3 minutes, switch off the appliance for one minute before you let it operate again. 9If you want to process ingredients very briefly, press the PULSE/ QUICK CLEAN button several times. The appliance operates at the highest speed. When you release the PULSE/QUICK CLEAN button, the appliance stops operating (Fig. 7). Never press the PULSE/QUICK CLEAN button longer than a few seconds at a time. 10Always press the OFF button to switch off the appliance before you open the lid. -- ------ -- Tips To prevent spillage, do not put more than 1.5 litres of liquid in the blender jar, especially when you want to process at a high speed. Do not put more than 1 litre in the blender jar when you want to process hot liquids or ingredients that tend to foam. You can use the opening in the lid to add ingredients while the appliance is operating (Fig. 8). Do not process dry ingredients for more than 1 minute. Do not prepare recipes that contain large quantities of oil or fat. Cut solid ingredients into smaller pieces before you put them in the blender jar. Do not process a large quantity of solid ingredients at the same time. Process these ingredients in a series of small batches instead. If you are not satisfied with the result when you blend solid ingredients, switch of the blender and press the PULSE/QUICK CLEAN button a few times to let the blender operate briefly. You can also remove some of the contents of the jar and process smaller amounts. To crush ice cubes, put max. 5 cubes at a time in the jar and press the PULSE/QUICK CLEAN button a few times. Keep the lid closed during processing. Using the filter (HR2118/HR2117 only) You can use the filter to obtain extra finely blended sauces, fresh fruit juices or cocktails. All pips and skins are caught in the filter. Never fill the filter beyond its metal part. Do not use the filter to process hot ingredients. 1Open the lid. 2Put the filter in the blender jar. Make sure the filter fits properly onto the bottom of the jar. The grooves of the filter and the ribs inside the blender jar help you put the filter in the right position (Fig. 9). 3Close the lid. 4Put the ingredients in the filter through the opening in the lid. Cut fruits into smaller pieces and soak dried pulses, such as soy beans, before you process them in the filter. 5Add water or another liquid. 6Put the measuring cup in the lid, press speed button 5 (highest speed) and let the appliance operate for max. 40 seconds. 7Press the OFF button to switch off the appliance. 8Pour out the drink through the spout of the blender jar. Make sure the lid is closed and the measuring cup is in the lid. This prevents pulp and skins from ending up in your drink. 9For optimal results, put the jar with the remaining ingredients back onto the appliance with the lid closed. Then let the appliance operate for a few more seconds. 10Pour out the rest of the drink. Tips -- Particularly when you process large quantities, we advise you not to put all the ingredients in the filter at the same time. Start to process a small quantity, let the appliance operate for a moment, switch it off and then add another small quantity. -- To get the best result when you make fruit juices and cocktails, add approx. 300ml water to 150g fruit. You can also use other liquids, e.g. to make cocktails. Using the mill The mill is intended for chopping ingredients such as peppercorns, sesame seeds, rice, wheat, coconut flesh, nuts (shelled), coffee beans, dried soy beans, dried peas, cheese, breadcrumbs, etc. 1Put the ingredients in the mill beaker (Fig. 10). 2Screw the mill blade unit clockwise onto the mill beaker (Fig. 11). Note: See the table in this user manual for the recommended quantities and processing times. 3Turn the assembled mill upside down and screw it clockwise onto the motor unit (Fig. 12). 4Switch on the appliance. Tip:We advise you to use the PULSE/QUICK CLEAN button or speed 5. Never let the mill operate for more than 30 seconds without interruption. 5When you have finished processing, press the OFF button. 6To remove the mill from the motor unit, turn the mill anticlockwise. Using the chopper (HR2118 only) The chopper is intended for chopping ingredients such as onions, meat, herbs, fruit, chocolate, firm cheese, baby food and nuts. Be careful when you place or remove the blade unit, the cutting edges are very sharp. 1Insert the coupling unit into the bottom of the chopper bowl (1). Turn the coupling unit anticlockwise to fix it (2) (Fig. 13). 2Place the chopper bowl on motor unit (1) and turn it clockwise to fix it (2) (Fig. 14). 3Place the blade unit in the chopper bowl (Fig. 15). 4Put the ingredients in the chopper bowl (Fig. 16). See the table below for recommended quantities. Do not exceed the maximum quantities indicated in the table Tip: Precut large pieces of food into pieces of 1-2cm. 5Put the lid on the chopper bowl and turn it clockwise to fix it (Fig. 17). Note: Make sure the lid is fixed properly before you switch on the appliance. 6Switch on the appliance. Note: If the appliance shakes because the food is not distributed evenly, put your hands on the chopper lid. Note:The chopper does its work in a few seconds. Never let it operate longer than a few seconds. 7When you have finished chopping, switch off the appliance and unplug it. 8Turn the chopper anticlockwise and remove it from the motor unit (Fig. 18). Always remove the chopper from the motor unit before you empty the chopper bowl. 9Turn the coupling unit clockwise and remove it from the bottom of the chopper bowl (Fig. 19). 10Remove the lid and the blade unit from the chopper bowl. 11Empty the chopper bowl. Cleaning Never use scouring pads, abrasive cleaning agents or aggressive liquids such as petrol or acetone to clean the appliance. Tips: -- Cleaning the appliance and its parts is easiest immediately after use. -- If necessary, you can clean the mesh of the filter (HR2118/HR2117 only) with a very soft brush. -- Always disassemble all removable parts before you clean them. 1Make sure the appliance is unplugged. 2Clean the motor unit and the chopper coupling unit with a moist cloth. Never immerse the motor unit and the chopper coupling unit in water or any other liquid. Do not clean the motor unit and the chopper coupling unit in the dishwasher. 3Clean all the removable parts (except the chopper coupling unit) in hot water, if necessary with some washing-up liquid, or in the dishwasher. Quick-cleaning the blender jar 1Fill the blender halfway with warm water and add a few drops of washing-up liquid. 2Press the PULSE/QUICK CLEAN button a few times. 3Detach the blender jar, empty it and rinse it under the tap. Storage -- To store the mains cord, wind it round the reel in the bottom of the appliance (Fig. 20). Ordering accessories To purchase accessories for this appliance, please visit our online shop at www.shop.philips.com/service. If the online shop is not available in your country, go to your Philips dealer or a Philips service centre. If you have any difficulties obtaining accessories for your appliance, please contact the Philips Consumer Care Centre in your country. You find its contact details in the worldwide guarantee leaflet. Environment -- Do not throw away the appliance with the normal household waste at the end of its life, but hand it in at an official collection point for recycling. By doing this, you help to preserve the environment. (Fig. 21) Guarantee and service If you need service or information or if you have a problem, please visit the Philips website at www.philips.com/support or contact the Philips Consumer Care Centre in your country. You find its phone number in the worldwide guarantee leaflet. If there is no Consumer Care Centre in your country, go to your local Philips dealer. Recipe Soy milk Ingredients: -- 90g dried soy beans -- 600ml water 1Soak the soy beans for 4 hours before you process them. 2Place the filter (HR2118/HR2117 only) in the blender jar. 3Pour the soaked soy beans and the water in the filter (HR2118/ HR2117 only). Blend for 24 seconds at the highest speed. Do not process more than 1 batch without interruption. Let the appliance cool down to room temperature before you continue processing. 4Bring the soy milk to boil in a pan, then add sugar and leave to simmer. Troubleshooting This chapter summarises the most common problems you could encounter with the appliance. If you are unable to solve the problem with the information below, visit www.philips.com/support for a list of frequently asked questions or contact the Consumer Care Centre in your country. Problem Solution The appliance does not work This appliance is equipped with a safety system. The appliance does not work if the blender jar, the mill beaker or the chopper bowl has not been assembled properly onto the motor unit or has not been assembled at all. Check whether the blender jar, the mill beaker or the chopper bowl is assembled properly (see chapter ‘Using the appliance’ ). Press the OFF button first to make sure the appliance is switched off. I do not know what I can do with the PULSE/ QUICK CLEAN button. When you press the PULSE/QUICK CLEAN button, the appliance operates at its highest speed until you release the button. Use the PULSE/QUICK CLEAN button when you want to have more control over the processing jobs. You can also use this button to quickclean the blender jar (see chapter ‘Cleaning’). The motor produces an unpleasant smell during processing. It is normal for a new appliance to give off an unpleasant smell or emit some smoke the first few times you use it. This phenomenon stops after you have used the appliance a few times. If the appliance has been switched on too long, it may also give off an unpleasant smell or emit some smoke. In this case, switch off the appliance and let it cool down for 60 minutes. The appliance stopped operating because the blade unit is blocked. Press the OFF button and use a spatula to dislodge the ingredients that block the blender blade unit, the mill blade unit or the chopper blade unit. We also advise you to process a smaller quantity. The fruit juice or soy milk contains a lot of pulp or skins. To prevent pulp and skins from ending up in your drink, make sure that the filter (HR2118/HR2117 only) is placed in the jar properly. Also make sure that the lid is closed and that the measuring cup is inserted in the lid. The blender jar leaks. Switch off the appliance and pour out the ingredients. Check if the blade unit is assembled correctly. Table (Fig. 22) -- This table shows the recommended speeds, quantities and processing times. Bahasa Melayu Pengenalan Tahniah atas pembelian anda, dan selamat datang ke Philips! Untuk mendapat manfaat sepenuhnya daripada sokongan yang ditawarkan oleh Philips, daftarkan produk anda di www.philips.com/welcome. Perihalan umum (Gamb. 1) 1 Unit motor 2 Panel kawalan A Butang MATI B Butang kelajuan C Butang DENYUT/BERSIH PANTAS 3 Unit pisau pengisar 4 Balang pengisar plastik 5 Penunjuk paras 6 Tudung balang pengisar plastik 7 Lubang pada tudung 8 Cawan penyukat 9 Penapis (HR2118/HR2117 sahaja) 10 Tudung pencincang (HR2118 sahaja) 11 Unit pisau pencincang (HR2118 sahaja) 12 Mangkuk pencincang (HR2118 sahaja) 13 Unit gandingan pencincang (HR2118 sahaja) 14 Bikar pengisar 15 Unit pisau pengisar Penting Baca manual pengguna ini dengan teliti sebelum anda menggunakan perkakas dan simpan ia untuk rujukan masa depan. Am Bahaya -- Jangan sekali-kali tenggelamkan unit motor ke dalam air atau apa-apa cecair lain, mahupun membilasnya di bawah air paip. Hanya gunakan kain lembap untuk membersihkan unit motor. Amaran -- Periksa sama ada voltan yang ditunjukkan pada perkakas sepadan dengan voltan sesalur kuasa setempat sebelum anda menyambungkan perkakas. -- Jangan gunakan perkakas jika plag, kord sesalur kuasa atau bahagian lain telah rosak. -- Jika kord sesalur kuasa rosak, ia mesti diganti oleh Philips, pusat servis yang dibenarkan oleh Philips ataupun pihak lain seumpamanya yang layak bagi mengelakkan bahaya. -- Jangan sentuh mata pemotong unit bilah, terutama apabila plag perkakas dipasang. Mata pemotong sangat tajam. -- Pastikan mata pisau dipasang dengan kejap pada balang pengisar sebelum anda memasang balang pengisar pada unit motor. -- Jangan sekali-kali masukkan jari anda atau objek lain ke dalam balang pengisar semasa perkakas sedang berjalan. -- Perkakas ini tidak dimaksudkan untuk digunakan oleh orang (termasuk kanak-kanak) yang kurang upaya dari segi fizikal, deria atau mental, atau kurang berpengalaman dan pengetahuan, kecuali mereka telah diberi pengawasan atau arahan berkenaan penggunaan perkakas ini oleh orang yang bertanggungjawab atas keselamatan mereka. -- Jauhkan perkakas dan kordnya dari capaian kanak-kanak. -- Jangan sekali-kali biarkan perkakas beroperasi tanpa diawasi. -- Pastikan unit mata pisau dipasang dengan kukuh pada balang pengisar atau bikar pengisar sebelum anda memasang balang pengisar atau bikar pengisar pada unit motor. -- Jangan menggunakan pengisar untuk mengisar bahan-bahan yang sangat keras seperti buah pala dan ketulan ais. -- Jika salah satu unit pisau tersekat, cabut plag perkakas sebelum anda mengeluarkan bahan-bahan yang menyekat pisau. -- Jangan guna balang pengisar, bikar pengisar atau mangkuk pencincang (HR2118 sahaja) untuk menghidupkan dan mematikan perkakas. Awas -- Sentiasa cabut plag perkakas sebelum anda memasang, membuka atau membuat pelarasan terhadap mana-mana bahagian. -- Jangan sekali-kali menggunakan sebarang aksesori atau bahagian daripada pengilang lain atau yang tidak disyorkan secara khusus oleh Philips. Jika anda menggunakan aksesori atau bahagian sedemikian, jaminan anda menjadi tidak sah. -- Jangan melebihi penunjuk maksimum pada balang pengisar, bikar pengisar dan mangkuk pencincang (HR2118 sahaja). -- Jangan melebihi kuantiti maksimum dan masa pemprosesan yang dinyatakan dalam jadual yang relevan. -- Jika makanan melekat pada dinding balang pengisar, matikan perkakas dan cabut plagnya. Kemudian gunakan spatula untuk mengeluarkan makanan tersebut dari dinding. -- Perkakas hanya boleh dihidupkan jika balang pengisar, bikar pengisar atau mangkuk pencincang (HR2118 sahaja) dipasangkan pada unit motor dengan betul. -- Jangan sekali-kali mengisi balang pengisar dengan bahan yang lebih panas daripada 80ºC/ 175°C. -- Anda hendaklah memproses bunga cengkih, bunga lawang dan jintan manis bersama-sama dengan bahan-bahan lain setiap kali. Jika diproses berasingan, bahan-bahan ini mungkin akan merosakkan bahan-bahan plastik pengisar. -- Bikar pengisar kering mungkin berubah warna apabila anda menggunakannya untuk memproses bahan-bahan seperti bunga cengkih, jintan manis dan kayu manis. -- Pengisar kering tidak sesuai digunakan untuk mencincang daging mentah. Gunakan pengisar atau pencincang untuk tujuan ini. -- Jangan gunakan pengisar kering untuk memproses cecair seperti jus buah-buahan. -- Jangan gunakan pencincang untuk mencampurkan cecair. Gunakan pengisar untuk tujuan ini. -- Rendam bahan kering, seperti kacang soya, sebelum memasukkannya ke dalam penapis. -- Potong buah menjadi kepingan lebih kecil sebelum memasukkannya ke dalam penapis. -- Jangan sekali-kali menyaratkan penapis. Jangan isi penapis melebihi bahagian logamnya. Medan elektromagnet (EMF) Perkakas Philips ini mematuhi semua standard berkenaan medan elektromagnet (EMF). Jika perkakas ini dikendalikan dengan betul dan mengikut arahan dalam manual pengguna ini, ia selamat untuk digunakan berdasarkan bukti saintifik yang terdapat pada hari ini. Kunci keselamatan binaan dalam Ciri ini memastikan anda hanya boleh menghidupkan perkakas jika balang pengisar dan tudungnya, bikar pengisar atau mangkuk pencincang dan tudungnya (HR2118 sahaja) dipasangkan pada unit motor dengan betul. Jika balang pengisar dan tudungnya, bikar pengisar atau mangkuk pencincang dan tudungnya dipasangkan dengan betul, kunci keselamatan terbina dalam akan terbuka. Pelindung litar motor Perkakas dilengkapi pelindung litar motor yang matikan motor jika motornya tersekat (yang mungkin berlaku semasa tugas pemprosesan yang berat atau jika perkakas tidak digunakan mengikut arahan di dalam manual pengguna). Jika ini berlaku, JANGAN tekan butang set semula di bahagian bawah perkakas sebaik sahaja selepas pelindung litar telah mematikan perkakas. Matikan dahulu dan tanggalkan plag perkakas dan biarkan ia menyejuk pada suhu bilik. Kemudian pastikan jika kuantiti ramuan yang anda proses tidak melebihi kuantiti yang disebut dalam manual pengguna dan pastikan tidak ada apa-apa yang menyekat unit pisaunya. Selepas ini, tekan butang set semula di bahagian bawah perkakas dan teruskan memproses. Jangan sentuh unit pisau semasa anda menekan butang set semula. Sebelum penggunaan pertama Bersihkan dengan menyeluruh semua bahagian yang bersentuhan dengan makanan sebelum anda menggunakan perkakas buat kali pertama (lihat bab ‘Membersihkan’). Menggunakan perkakas Pengisar dimaksudkan untuk: -- Mengisar cecair, cth. hasil tenusu, sos, jus buah, sup, minuman bancuhan dan minuman kocak. -- Mencampur bahan-bahan lembut, contohnya adunan lempeng atau mayones. -- Memurikan bahan yang telah dimasak, contohnya, untuk menyediakan makanan bayi. Menggunakan pengisar 1Skru bahagian bawah balang pengisar mengikut arah jam pada unit pisau pengisar (Gamb. 2). 5Lepaskan tuil kawalan untuk menutup penutup. 6Masukkan cawan penyukat ke dalam penutup (Gamb. 5). 7Masukkan plag utama ke dalam soket. 8Tekan salah satu butang kelajuan untuk menghidupkan perkakas (Gamb. 6). Nota: Lihat jadual dalam manual pengguna ini untuk kuantiti, kelajuan dan masa pemprosesan yang disyorkan. Jangan sekali-kali masukkan jari anda atau objek lain (kecuali spatula yang dibekalkan) ke dalam balang semasa perkakas sedang berjalan. Jangan biarkan perkakas berjalan berterusan lebih daripada 3 minit sekali gus. Jika anda belum selesai memproses selepas 3 minit, matikan perkakas selama satu minit sebelum anda menjalankannya semula. 9Jika anda ingin memproses ramuan untuk seketika, tekan butang DENYUT/BERSIH PANTAS beberapa kali. Perkakas akan berjalan pada kelajuan tertinggi. Apabila anda melepaskan butang DENYUT/BERSIH PANTAS, perkakas akan berhenti berjalan (Gamb. 7). Jangan sekali-kali menekan butang DENYUT/BERSIH PANTAS lebih lama daripada beberapa saat pada satu-satu masa. 10Tekan butang MATI untuk mematikan perkakas setiap kali sebelum anda membuka penutup. Petua -- Untuk mengelakkan tumpahan, jangan masukkan lebih daripada 1.5 liter cecair ke dalam balang pengisar, lebih-lebih lagi apabila anda hendak memproses pada kelajuan tinggi. Jangan masukkan lebih daripada 1liter ke dalam balang pengisar apabila anda hendak memproses cecair panas atau bahan yang mudah berbuih. -- Anda boleh menggunakan bukaan pada penutup untuk menambah bahan semasa perkakas sedang berjalan (Gamb. 8). -- Jangan proses bahan kering lebih daripada 1 minit. -- Jangan sediakan makanan yang resipinya mengandungi banyak minyak atau lemak. -- Potongkan bahan pepejal kepada bahagian-bahagian kecil sebelum memasukkannya ke dalam balang pengisar. Jangan proses kuantiti bahan pepejal yang banyak sekali gus. Sebaliknya, proses bahan ini dalam beberapa kelompok kecil. -- Jika anda tidak berpuas hati dengan hasil kisaran bahan pepejal, matikan pengisar dan tekan butang DENYUT/BERSIH PANTAS beberapa kali untuk mambiarkan pengisar berjalan buat seketika. Anda juga boleh keluarkan sebahagian isi dari balang dan proses bilangan yang lebih sikit. -- Untuk menghancurkan ketulan ais, letakkan maksimum 5 kiub pada satu masa di dalam balang dan tekan butang DENYUT/BERSIH PANTAS beberapa kali. Biarkan tudung tertutup semasa memproses. Menggunakan penapis (HR2118/HR2117 sahaja) Anda boleh menggunakan penapis untuk menghasilkan sos, jus buah segar atau koktel yang lebih halus kisarannya. Semua biji dan kulit buah akan tersangkut pada penapis. Jangan isikan penapis melebihi bahagian logamnya. Jangan gunakan penapis untuk memproses bahan yang panas. 1Bukakan tudung. 2Letakkan penapis dalam balang pengisar. Pastikan penapis dimuatkan dengan betul pada bahagian bawah balang. Alur penapis dan rusuk dalam balang pengisar membantu anda meletakkan penapis pada tempat yang betul (Gamb. 9). 3Tutup tudung. 4Letakkan ramuan dalam penapis menerusi bukaan pada penutup. Potong buah-buahan menjadi kecil dan rendam bahan kering seperti kacang soya, sebelum anda memprosesnya dalam penapis. 5Tambah air atau cecair lain. 6Letakkan cawan penyukat di dalam penutup, tekan butang kelajuan 5 (kelajuan tertinggi) dan biarkan perkakas berjalan selama maksimum 40 saat. 7Tekan butang MATI untuk mematikan perkakas. 2Lekapkan balang pengisar dengan unit pisau yang terpasang pada unit 8Tuangkan keluar minuman melalui muncung balang pengisar. Pastikan 3Tekan tuil untuk membuka penutup (Gamb. 4). 9Untuk mendapat hasil yang optimum, letakkan balang dengan bahan yang motor dan putarkannya mengikut arah jam sehingga ia terkunci pada tempatnya (Gamb. 3). 4Letak bahan-bahan dalam balang pengisar. Nota: Biarkan bahan yang panas menjadi sejuk sebelum anda memasukkannya ke dalam balang pengisar (suhu maks. 80°C). tudung tertutup dan cawan penyukat di dalam penutup. Ini menghindari pulpa dan kulit daripada termasuk ke dalam minuman anda. selebihnya kembali di atas perkakas dengan keadaan ditutup dengan penutup. Kemudian biarkan perkakas berjalan selama beberapa saat lagi. 10Tuangkan keluar minuman selebihnya. Petua -- Terutamanya apabila anda memproses kuantiti yang banyak, kami nasihatkan agar anda tidak meletakkan semua bahan di dalam penapis pada masa yang sama. Mulakan dengan memproses kuantiti yang kecil, biarkan perkakas berjalan untuk seketika, matikannya lalu tambahkan sedikit lagi. -- Untuk mendapatkan hasil yang terbaik apabila anda membuat jus dan koktel buah-buahan, tambah anggaran 300ml air kepada 150g buahbuahan. Anda juga boleh menggunakan cecair lain, contohnya untuk membuat koktel. Menggunakan pengisar kering Bikar dimaksudkan untuk mencincang bahan- seperti lada biji, bijan, beras, gandum, isi kelapa, kacang (berkulit) biji kopi, biji soya kering, kacang pea kering, keju, serbuk roti, dll. 1Masukkan bahan kering ke dalam balang pengisar kering (Gamb. 10). 2Ketatkan unit pisau pengisar mengikut arah jam pada balang pengisar (Gamb. 11). Nota: Lihat jadual dalam manual pengguna ini untuk kuantiti, kelajuan dan masa pemprosesan yang disyorkan. 3Terbalikkan pengisar yang telah dipasang dan ketatkannya pengikut arah jam pada unit motor (Gamb. 12). 4Hidupkan suis perkakas. Petua: Kami mengesyorkan anda untuk menggunakan butang DENYUT/ BERSIH PANTAS atau kelajuan 5. Jangan biarkan pengisar kering berjalan lebih daripada 30 saat tanpa gangguan. 5Apabila anda telah selesai memproses, tekan butang MATI. 6Untuk mengeluarkan pengisar dari unit motor, putarkan pengisar melawan arah jam. Menggunakan pencincang (HR2118 sahaja) Pencincang adalah dimaksudkan untuk mencincang bahan seperti bawang, daging, herba, buah-buahan, coklat, keju pejal, makanan bayi dan kacang. Berhati-hati apabila anda meletakkan atau mengalihkan unit pisau, kerana mata pemotong sangat tajam. 1Masukkan unit gandingan ke dalam bahagian bawah mangkuk pencincang (1). Putar unit gandingan melawan arah jam untuk menetapkannya (2) (Gamb. 13). 2Letakkan mangkuk pencincang pada unit motor (1) dan putarkannya mengikut arah jam untuk menetapkannya (2) (Gamb. 14). 3Letakkan unit pisau ke dalam mangkuk pencincang (Gamb. 15). 4Masukkan bahan-bahan ke dalam mangkuk pencincang (Gamb. 16). Lihat jadual di bawah untuk kuantiti yang disyorkan. Jangan melebihi kuantiti maksimum yang ditunjukkan dalam jadual Petua: Potong terlebih dahulu ketulan makanan ke dalam bahagian sebesar 1-2sm. 5Letakkan tudung pada mangkuk pencincang dan putarkannya mengikut arah jam untuk menetapkannya (Gamb. 17). Nota: Pastikan penutup diletakkan dengan betul sebelum anda menghidupkan perkakas. 6Hidupkan suis perkakas. Nota: Jika perkakas bergoncang disebabkan makanan tidak teragih dengan sekata, letakkan tangan anda di atas penutup pencincang. Pembersihan Jangan sekali-kali menggunakan pad penyental, agen pembersih yang melelas atau cecair yang agresif seperti petrol atau aseton untuk membersihkan perkakas. Petua: -- Perkakas dan bahagian-bahagiannya amat mudah dibersihkan sebaik saja ia selesai digunakan. -- Jika perlu, anda boleh bersihkan jaringan penapis (HR2118/HR2117 sahaja) dengan berus yang sangat lembut. -- Buka semua bahagian yang boleh ditanggalkan setiap kali sebelum anda membersihkannya. 1Pastikan palam perkakas ditanggalkan. 2Bersihkan unit motor dan unit gandingan pencincang dengan kain lembap. Jangan sekali-kali merendam unit motor dan unit gandingan pencincang di dalam air atau sebarang cecair lain. Jangan bersihkan unit motor dan unit gandingan pencincang di dalam mesin basuh pinggan. 3Bersihkan semua bahagian yang boleh ditanggalkan (kecuali unit gandingan pencincang) di dalam air panas, jika perlu dengan sedikit cecair pencuci, atau di dalam mesin basuh pinggan. Membersihkan balang pengisar dengan cepat 1Isi pengisar separuh penuh dengan air suam dan tambah beberapa titik cecair pencuci pinggan mangkuk. 2Tekan butang DENYUT/BERSIH PANTAS beberapa kali. 3Tanggalkan balang pengisar, kosongkannya dan bilas di bawah air paip. Penyimpanan -- Untuk menyimpan kord sesalur utama, gulung di sekeliling gelendong pada bahagian bawah perkakas (Gamb. 20). Memesan aksesori Untuk membeli aksesori perkakas ini, sila lawati kedai dalam talian kami di www.shop.philips.com/service. Sekiranya kedai dalam talian tidak terdapat di negara anda, lawatilah pembekal Philips anda atau pusat servis Philips. Sekiranya anda menghadapi kesukaran mendapatkan aksesori bagi perkakas anda, sila hubungi Pusat Layanan Pelanggan Philips di negara anda. Anda boleh menemui butirannya dalam risalah jaminan sedunia. Alam sekitar -- Jangan buang perkakas dengan sampah rumah yang biasa pada akhir hayatnya, sebaliknya serahkannya ke pusat pungutan rasmi untuk dikitar semula. Dengan berbuat begini, anda membantu memelihara alam sekitar. (Gamb. 21) Jaminan dan perkhidmatan Jika anda memerlukan perkhidmatan atau jika anda menghadapi masalah, sila layari laman web Philips di www.philips.com/support atau hubungi Pusat Layanan Pelanggan Philips di negara anda. Anda boleh mendapatkan nombor telefonnya dalam risalah jaminan sedunia. Jika Pusat Layanan Pelanggan tidak terdapat di negara anda, hubungi wakil penjual Philips setempat anda. Resipi Susu soya Ramuan: -- 90g kacang soya kering -- 600ml air 1Rendam kacang soya selama 4 jam sebelum memprosesnya. 2Letakkan penapis (HR2118/HR2117 sahaja) dalam balang pengisar. Nota: Pencincang menjalankan kerjanya dalam beberapa saat. Jangan biarkan ia berjalan lebih lama daripada beberapa saat. 3Tuangkan kacang soya yang telah direndam dan air ke dalam penapis 7Selepas selesai mencincang, matikan perkakas dan cabut plagnya. Jangan memproses lebih daripada 1 kelompok tanpa henti seketika. Biarkan perkakas menjadi sejuk hinggap ke suhu bilik sebelum anda meneruskan pemprosesan. 8Putar pencincang melawan arah jam dan keluarkannya daripada unit motor (Gamb. 18). Tanggalkan pencincang daripada unit motor sebelum anda mengosongkan mangkuk pencincang. 9Putar unit gandingan mengikut arah jam dan keluarkannya dari bahagian bawah mangkuk pencincang (Gamb. 19). 10Keluarkan tudung dan unit pisau dari mangkuk pencincang. 11Kosongkan mangkuk pencincang. (HR2118/HR2117 sahaja). Kisar selama 24 saat pada kelajuan tertinggi. 4Didihkan susu kacang soya dalam periuk, kemudian tambah gula dan biarkan ia mereneh. Mencarisilapan Bab ini meringkaskan masalah paling lazim yang mungkin anda hadapi dengan perkakas ini. Jika anda tidak dapat menyelesaikan masalah dengan maklumat di bawah, lawati www.philips.com/support untuk mendapatkan senarai soalan lazim atau hubungi Pusat Layanan Pelanggan di negara anda. Masalah Penyelesaian Perkakas tidak berjalan Perkakas ini dilengkapkan dengan sistem keselamatan. Perkakas ini tidak berjalan jika balang pengisar, bikar pengisar atau mangkuk pencincang tidak dipasang dengan betul pada unit motor atau belum dipasang. Pastikan balang pengisar, bikar pengisar atau mangkuk pengisar dipasang dengan betul (lihat bab ‘Menggunakan perkakas’ ) Tekan butang MATI dahulu untuk memastikan perkakas telah dimatikan. Saya tidak tahu apa yang boleh saya lakukan dengan butang ‘DENYUT/ BERSIH PANTAS’. Motor mengeluarkan bau yang tidak menyenangkan semasa pemprosesan. Perkakas berhenti berjalan kerana unit pisau tersumbat. Apabila anda menekan butang DENYUT/BERSIH PANTAS, perkakas berjalan pada kelajuan tertingginya sehingga anda melepaskan butang. Gunakan butang DENYUT/BERSIH PANTAS apabila anda mahukan lebih kawalan ke atas kerja-kerja pemprosesan. Anda juga boleh menggunakan butang ini untuk membersihkan pantas balang pengisar (lihat bab ‘Pembersihan’). Biasanya perkakas baru mengeluarkan bau yang kurang menyenangkan atau sedikit asap pada beberapa kali pertama ia digunakan. Kejadian ini akan berhenti selepas anda menggunakan perkakas beberapa kali. Jika perkakas telah dihidupkan terlalu lama, ia juga akan mengeluarkan bau yang kurang menyenangkan atau sedikit asap. Jika ini berlaku, matikan perkakas dan biarkan ia menyejuk selama 60 minit. Tekan butang MATI dan gunakan spatula untuk mengeluarkan bahan yang menyekat unit pisau pengisar atau unit pisau pencincang. Kami juga menasihatkan anda agar memproses dalam jumlah yang sedikit. Jus buah atau susu kacang soya mengandungi banyak pulpa atau kulit. Untuk mengelakkan pulpa dan kulit buah daripada termasuk ke dalam minuman anda, pastikan penapis (HR2118/HR2117 sahaja) diletakkan dengan betul di dalam balang. Juga pastikan bahawa penutup telah ditutup dan cawan penyukat dimasukkan ke dalam penutup. Balang pengisar bocor. Matikan perkakas dan tuang keluar bahan-bahan. Periksa sama ada unit pisau dipasang dengan betul. Jadual (Gamb. 22) -- Jadual ini menunjukkan kelajuan,kuantiti dan masa memproses yang disyorkan. ภาษาไทย ขอมูลเบื้องตน ขอแสดงความยินดีที่คุณสั่งซื้อและยินดีตอนรับสผลิตภัณฑของ Philips! เพื่อใหคุณไดรับประโยชนอยางเต็มที่จากบริการที่ Philips มอบให โปรดลงทะเบียนผลิตภัณฑของคุณที่ www.philips.com/welcome สวนประกอบ (รูปที่ 1) 1แทนมอเตอร 2ปุ่มควบคุม A ปุ่ม OFF C ปุ่ม PULSE/QUICK CLEAN Bปุ่มความเร็ว 3ชุดใบมีดของเครื่องป่น 4โถป่นพลาสติก 5ขีดแสดงระดับ 6ฝาปดโถป่นพลาสติก 7ชองเติมบนฝาปด 8ถวยตวง 9 แผนกรอง (รน HR2118/HR2117 เทานั้น) 11 ชุดใบมีดโถบดสับ (รน HR2118 เทานั้น) 10 12 13 ฝาโถบดสับ (รน HR2118 เทานั้น) โถบดสับ (รน HR2118 เทานั้น) ชุดอุปกรณเชื่อมตอโถบดสับ (รน HR2118 เทานั้น) 14โถบด 15ชุดใบมีดของโถบด ขอสำ�คัญ ควรอานคมืออยางละเอียดกอนใชงานและเก็บไวเพื่อใชอางอิงในครั้งตอไป ทั่วไป -- -------- --- อันตราย ไมควรนำ�แทนมอเตอรจมลงนหรือของเหลวใดๆ และไมควรนำ�ไปลางใตก็อกนที่เปดนไหลผาน ควรใชผาชุบนบิดพอ หมาดเช็ดทำ�ความสะอาดเทานั้น คำ�เตือน กอนใชงาน โปรดตรวจสอบแรงดันไฟฟาที่ระบุบนผลิตภัณฑ วาตรงกับแรงดันไฟฟาที่ใชภายในบานหรือไม หามใชงาน หากปลั๊กไฟ สายไฟ หรือชิ้นสวนอื่นๆ ชำ�รุดเสียหาย หากสายไฟชำ�รุด ควรนำ�ไปเปลี่ยนที่บริษัทฟลิปส หรือศูนยบริการที่ไดรับอนุญาตจากฟลิปส หรือบุคคลที่ผานการอบรม จากฟลิปสดำ�เนินการเปลี่ยนให เพื่อหลีกเลี่ยงอันตรายที่อาจเกิดขึ้นได หามสัมผัส ขอบคมของชุดใบมีด โดยเฉพาะเมื่อเครื่องเสียบปลั๊กไฟอย เพราะใบมีดคมมาก ตรวจดูใหแนใจวา ไดติดตั้งชุดใบมีดเขากับโถป่นอยางแนนหนาดีแลว กอนประกอบโถป่นเขากับแทนมอเตอร หามใชนิ้วหรือวัตถุใดๆ แหยเขาไปในโถป่น ขณะที่เครื่องกำ�ลังทำ�งาน ไมควรใหบุคคล (รวมทั้งเด็กเล็ก) ที่มีสภาพรางกายไมสมบูรณ ประสาทสัมผัสไมสมบูรณหรือสภาพจิตใจไมปกติ หรือขาด ประสบการณและความรความเขาใจ นำ�เครื่องนี้ไปใชงาน เวนแตจะอยในการควบคุมดูแลหรือไดรับคำ�แนะนำ�ในการ ใชงานโดยผที่รับผิดชอบในดานความปลอดภัย เก็บเครื่องและสายไฟใหพนมือเด็ก หามปลอยใหเครื่องทำ�งานโดยไมมีการควบคุมดูแลเปนอันขาด -- ตรวจดูใหแนใจวา ไดติดตั้งชุดใบมีดเขากับโถป่นหรือโถบดอยางแนนหนาดีแลวกอนประกอบโถป่นหรือโถบดเขากับ -- หามใชโถบดบดสวนผสมที่แข็งมาก เชน จันทนเทศ และนแข็งกอน ---------- --------- แทนมอเตอร หากหนึ่งในชุดใบมีดเกิดติดขัด ใหถอดปลั๊กเครื่องออกกอนแลวจึงเขี่ยสวนผสมที่อุดตันใบมีดออก หามใชโถป่น โถบด หรือโถบดสับ (รน HR2118 เทานั้น) ในการเปดและปดเครื่อง ขอควรระวัง ถอดปลั๊กไฟออกทุกครั้ง กอนประกอบเครื่อง, ถอดอุปกรณ หรือปรับเปลี่ยนชิ้นสวนอื่นๆ หามใชอุปกรณเสริม หรือชิ้นสวนที่ผลิตโดยผผลิตรายอื่น หรือบริษัทที่ฟลิปสไมไดแนะนำ� การรับประกันจะเปนโมฆะ ทันที หากคุณใชอุปกรณเสริม หรือชิ้นสวนดังกลาว หามใสสวนผสมเกินขีดแสดงระดับสูงสุดบนโถป่น โถบด และโถบดสับ (รน HR2118 เทานั้น) หามป่นสวนผสมในปริมาณที่มากกวาปริมาณสูงสุดที่กำ�หนดและใชเวลาเกินกวาที่ระบุไวในตาราง หากมีเศษอาหารติดอยดานในโถป่น ใหปดสวิตชเครื่อง และถอดปลั๊กออก แลวใชพายกวาดเศษอาหารออก เครื่องจะเปดสวิตชเมื่อมีการประกอบโถป่น โถบด หรือโถบดสับ (รน HR2118 เทานั้น) เขากับแทนมอเตอรอยางถูกตอง แลวเทานั้น หามใสสวนผสมที่มีอุณหภูมิสูงกวา 80°C/175°C ลงในโถป่น ควรป่นสวนผสมจำ�พวกกานพลู ยี่หรา เมล็ดพืช พรอมกับสวนผสมอื่น หากป่นแยก สวนผสมเหลานี้อาจทำ�ใหวัสดุที่เปนพ ลาสติกของโถบดชำ�รุดเสียหาย โถบดอาจเปลี่ยนสีได หากใชป่นสวนผสมบางอยาง เชน กานพลู, ยี่หราและอบเชย ไมควรใชโถบดป่นเนื้อดิบ ควรใชโถป่นหรือโถบดสับแทน หามใชงานโถบดแหงบดสวนผสมที่เปนของเหลว เชน นผลไม หามใชที่บดสับในการผสมของเหลว ใหใชเครื่องป่นแทน ควรแชสวนผสมแหง เชน ถั่วเหลือง ลงในนกอนใสลงในแผนกรอง หั่นผลไมเปนชิ้นเล็กๆ กอนเทใสแผนกรอง ไมควรใสสวนผสมลงในแผนกรองครั้งละมากๆ โดยหามใสสวนผสมสูงเกินกวาสวนที่เปนโลหะ Electromagnetic fields (EMF) ผลิตภัณฑของ Philips ไดมาตรฐานดานคลื่นแมเหล็กไฟฟา (EMF) หากมีการใชงานอยางเหมาะสมและสอดคลองกับคำ�แนะนำ� ในคมือนี้ คุณสามารถใชผลิตภัณฑไดอยางปลอดภัยตามขอพิสูจนทางวิทยาศาสตรในปจจุบัน ระบบล็อคนิรภัยซึ่งติดตั้งในเครื่อง คุณสมบัตินี้ทำ�ใหคุณสามารถเปดสวิตชเครื่องไดเฉพาะเมื่อประกอบโถป่นและฝา โถบดหรือโถบดสับและฝา (รน HR2118 เทา นั้น) เขากับแทนมอเตอรเขาที่ดีแลวเทานั้น หากประกอบโถป่นและฝา โถบดหรือโถบดสับและฝาอยางถูกตอง เครื่องจะปลด ระบบล็อคนิรภัยเอง ระบบปองกันวงจรมอเตอร เครื่องรนนี้มีระบบปองกันวงจรมอเตอรซึ่งจะตัดการทำ�งานทันทีหากมอเตอรติดขัด (ซึ่งอาจเกิดขึ้นเมื่อใชงานอยางหนัก หรือหาก 8 เทเครื่องดื่มผานปากพวยของโถป่น ตรวจสอบใหแนใจวาปดฝาแลว และถวยตวงอยในฝา ทั้งนี้เปนการปอง กันไมใหกากและเปลือกไหลลงไปในเครื่องดื่มของคุณ 9 เพื่อใหไดสวนผสมที่ละเอียด ใหใสโถป่นที่ยังมีสวนผสมเหลืออยกลับเขาไปที่เครื่องโดยปดฝาไว จา กนั้นป่นตอไปอีกประมาณ 2-3 วินาที 10เทเครื่องดื่มที่เหลือทั้งหมดออกมา ไมไดใชงานเครื่องตามคำ�แนะนำ�ในคมือ) ในกรณีนี้ หามกดปุ่มรีเซ็ตดานลางตัวเครื่องทันทีที่ระบบปองกันวงจรปดเครื่อง ควร -- ปริมาณที่ระบุในคมือและตรวจดูใหแนใจวาไมมีสิ่งใดอุดตันชุดใบมีด หลังจากนั้นใหกดปุ่มรีเซ็ตดานลางเครื่องแลวใชงานตอได -- ปดสวิตชแลวถอดปลั๊กออกกอน จากนั้นปลอยใหเครื่องเย็นลงจนเทากับอุณหภูมิหอง ตรวจดูวาสวนผสมที่คุณป่นมีปริมาณไมเกิน หามสัมผัสชุดใบมีดเมื่อคุณกดปุ่มรีเซ็ต การใชงาน เครื่องป่นใชงานเพื่อ : -- -- -- ผสมของเหลวตางๆ ใหเขากัน เชน นม, ซอส, นผลไม, ซุป, เครื่องดื่มผสมหรือเชค คลุกเคลาสวนผสมที่ออนนมใหเขากัน เชน แปงทำ�แพนเคก หรือมายองเนส บดเคลาสวนผสมที่ปรุงสุกแลว เชน อาหารสำ�หรับทารก การใชงานเครื่องป่น 1 ขันสกรูที่อยดานลางโถป่นในทิศทางตามเข็มนาฬิกา บนชุดใบมีดเครื่องป่น (รูปที่ 2) 2 ติดตั้งโถป่นที่ประกอบชุดใบมีดแลว เขากับแทนมอเตอร แลวหมุนตามเข็มนาฬิกาจนกระทั่งล็อคเขาที่ (รูป ที่ 3) 3 กดแปนควบคุมจนกระทั่งฝาปดเปดขึ้น (รูปที่ 4) 4ใสสวนผสมลงในโถป่น หมายเหตุ: ควรปลอยใหสวนผสมที่มีความรอนใหเย็นลงกอนที่จะใสลงในโถป่น (อุณหภูมิสูงสุด 80°C) 5ปลอยแปนควบคุมเพื่อปดฝา 6 ประกอบถวยตวงเขากับฝาปด (รูปที่ 5) 7เสียบปลั๊กไฟเขากับเตารับบนผนัง 8 กดปุ่มความเร็วปุ่มใดปุ่มหนึ่งเพื่อเปดสวิตชเครื่อง (รูปที่ 6) หมายเหตุ: โปรดดูตารางในคมือผใชนี้เพื่อดูปริมาณ ความเร็วและเวลาการป่นที่แนะนำ� หามแหยนิ้วหรือวัตถุลงในโถป่น (ยกเวนแตวาจะมีไมพายใหใช) ในขณะที่เครื่องกำ�ลังทำ�งาน หามป่นสวนผสมติดตอกันนานเกิน 3 นาทีในแตและครั้งที่ใชงาน หากหลังจาก 3 นาทีแลว ยังป่นไมเสร็จ ใหปด เครื่องประมาณ 1 นาที กอนที่จะเริ่มป่นอีกครั้ง 9 หากตองการป่นสวนผสมเปนระยะเวลาสั้นๆ ใหกดปุ่ม PULSE/QUICK CLEAN หลายๆ ครั้ง เครื่องจะป่นที่ ความเร็วสูงสุด เมื่อคุณปลอยปุ่ม PULSE/QUICK CLEAN เครื่องจะหยุดป่น (รูปที่ 7) โดยเฉพาะอยางยิ่งเมื่อคุณป่นสวนผสมในปริมาณมาก เราขอแนะนำ�วา ไมควรใสสวนผสมทั้งหมดลงในแผนกรองพรอมๆ กัน ควรเริ่มตนป่นในปริมาณนอย ปลอยใหเครื่องทำ�งานสักคร ปดสวิตช แลวเติมสวนผสมเพิ่มอีกเล็กนอย เพื่อใหไดนผลไมและค็อกเทลที่ดีที่สุด ใหเติมนประมาณ 300 มล. กับผลไม 150 กรัม คุณยังสามารถใชของเหลวประ เภทอื่นๆ ได เชน ทำ�ค็อกเทล การใชโถบด กอนใชงานครั้งแรก ควรทำ�ความสะอาดอุปกรณทุกชิ้นที่สัมผัสกับอาหาร กอนใชงานเครื่องเปนครั้งแรก (ดูไดจากบท ‘การทำ�ความสะอาด’) ขอแนะนำ�เพิ่มเติม โถบดใชสำ�หรับการบดสับสวนผสม เชน เม็ดพริกไทย, เมล็ดงา, ขาว, ขาวสาลี, เนื้อมะพราว, ถั่ว (มีเปลือก), เมล็ดกาแฟ, ถั่วเหลือง แหง, เมล็ดถั่วลันเตาแหง, เนย, ขนมปงชิ้นเล็ก ๆ และอื่นๆ 1 ใสสวนผสมลงในโถบด (รูปที่ 10) 2 หมุนชุดใบมีดของโถบดเขากับโถบด โดยหมุนตามเข็มนาฬิกา (รูปที่ 11) หมายเหตุ: โปรดดูตารางในคมือผใชนี้เพื่อดูปริมาณและเวลาการป่นที่แนะนำ� 3 ควโถบดที่ประกอบชุดใบมีดแลวลงบนแทนมอเตอร โดยหมุนตามเข็มนาฬิกาจนเขาที่ (รูปที่ 12) 4เปดสวิตชเครื่อง เคล็ดลับ: เราขอแนะนำ�ใหคุณใชปุ่ม PULSE/QUICK CLEAN หรือความเร็วระดับ 5 หามใชโถบดป่นนานเกินกวา 30 วินาทีติดตอกันโดยไมหยุดพัก 5 เมื่อป่นเสร็จแลว ใหกดปุ่ม OFF 6 ในการถอดโถบดออกจากแทนมอเตอร ใหหมุนโถบดในทิศทางทวนเข็มนาฬิกา การใชโถบดสับ (รน HR2118 เทานั้น) โถสับมีไวสำ�หรับสับสวนผสมเชน หอมหัวใหญ เนื้อสัตว สมุนไพร ผลไม ช็อกโกแลต ชีสเนื้อแข็ง อาหารเด็ก และถั่ว ควรระมัดระวังเมื่อคุณใสหรือถอดชุดใบมีดเนื่องจากใบมีดมีขอบที่คมมาก 1 ประกอบชุดอุปกรณสำ�หรับเชื่อมตอเขาที่ดานลางของโถสับ (1) หมุนชุดอุปกรณสำ�หรับเชื่อมตอในทิศทาง ทวนเข็มนาฬิกาจนเขาที่ (2) (รูปที่ 13) 2 วางโถบดสับลงบนแทนมอเตอร (1) แลวหมุนตามเข็มนาฬิกาจนเขาที่ (2) (รูปที่ 14) 3 ประกอบชุดใบมีดเขากับโถบดสับ (รูปที่ 15) 4 ใสสวนผสมลงในโถบดสับ (รูปที่ 16) ดูตารางดานลางสำ�หรับปริมาณที่แนะนำ� หามใสสวนผสมเกินปริมาณสูงสุดที่ระบุไวในตาราง เคล็ดลับ: ควรหั่นอาหารชิ้นใหญออกเปนชิ้นเล็กๆ ประมาณ 1-2 ซม. ไมควรกดปุ่ม PULSE/QUICK CLEAN คางเปนเวลานานเกินกวาสองสามวินาทีในแตละครั้ง 5 ปดฝาโถบดสับแลวหมุนตามเข็มนาฬิกาจนเขาที่ (รูปที่ 17) 10 ควรกดปุ่ม OFF เพื่อปดสวิตชเครื่องกอนที่จะเปดฝาเสมอ หมายเหตุ: ตรวจดูใหแนใจวาไดปดฝาเขาที่ดีแลว กอนที่จะเปดสวิตชเครื่อง --- -- -- --- -- ขอแนะนำ�เพิ่มเติม เพื่อปองกันการกระเด็น ไมควรใสสวนผสมที่เปนของเหลว ลงในโถป่นเกินกวา 1.5 ลิตร โดยเฉพาะเมื่อตองการป่นดวย ความเร็วสูง ในกรณีที่สวนผสมมีลักษณะเหลวและรอนหรือเปนฟอง ไมควรใสสวนผสมลงในโถป่นเกินกวา 1 ลิตร คุณสามารถใชชองเติมบนฝาสำ�หรับเติมสวนผสม ขณะที่เครื่องกำ�ลังทำ�งานอยได (รูปที่ 8) หามป่นสวนผสมแหงนานเกิน 1 นาที ไมควรเตรียมอาหารที่มีสวนผสมของนมันและไขมันในปริมาณสูง หั่นสวนผสมที่มีเนื้อแข็งเปนชิ้นเล็กๆ กอนใสลงในโถป่น ไมควรป่นสวนผสมที่มีเนื้อแข็งในปริมาณมากพรอมกัน ควร แบงป่นผสมทีละนอยๆ หากยังไมพอใจกับผลที่ไดเมื่อคุณป่นสวนผสมที่แข็ง ใหปดสวิตชเครื่องป่นและกดปุ่ม PULSE/QUICK CLEAN สองหรือ สามครั้งเพื่อใหเครื่องป่นทำ�งานเปนระยะเวลาสั้นๆ คุณสามารถตักสวนผสมออกบางสวน แลวป่นสวนผสมในจำ�นวนนอ ยลง หากตองการบดกอนนแข็ง ใสนแข็งลงในโถโดยใสไดสูงสุด 5 กอนตอครั้ง และกดปุ่ม PULSE/QUICK CLEAN สอง หรือสามครั้ง ปดฝาโถในระหวางการป่น 6เปดสวิตชเครื่อง หมายเหตุ: หากเครื่องสั่น เพราะสวนผสมกระจายตัวไมทั่ว ใหเอามือวางลงบนฝาปดของโถบดสับ หมายเหตุ: โถบดสับจะทำ�งานประมาณ 2-3 วินาที หามป่นนานเกินกวา 2-3 วินาที 7 เมื่อบดสับเสร็จแลว ใหปดสวิตชเครื่อง และถอดปลั๊กออก 8 หมุนโถบดสับในทิศทางทวนเข็มนาฬิกา แลวถอดออกจากแทนมอเตอร (รูปที่ 18) ถอดโถบดสับออกจากแทนมอเตอรกอนที่จะเทสวนผสมออกจากโถบดสับ 9 หมุนชุดอุปกรณสำ�หรับเชื่อมตอตามเข็มนาฬิกา แลวถอดออกจากดานลางของโถบดสับ (รูปที่ 19) 10ถอดฝาปดและชุดใบมีดออกจากโถบดสับ 11เทอาหารออกจากโถบดสับ การใชแผนกรอง (รน HR2118/HR2117 เทานั้น) คุณสามารถใชแผนกรองเพื่อทำ�นซอส นผลไมสด หรือค็อกเทลเนื้อละเอียดพิเศษ สวนเมล็ดและกากผลไมจะถูกกักไวใน แผนกรอง หามใสสวนผสมลงในแผนกรองสูงเกินกวาสวนที่เปนโลหะ หามใชแผนกรองในการป่นสวนผสมที่มีความรอน 1เปดฝา 2 ใสแผนกรองในโถป่น ตรวจดูใหแนใจวาแผนกรองล็อคเขาที่บนกนโถแลว รองของแผนกรองและสันดานใน ของโถป่นชวยใหคุณใสแผนกรองในตำ�แหนงที่ถูกตอง (รูปที่ 9) 3ปดฝา 4 ใสสวนผสมลงในแผนกรองโดยผานทางชองเปดบนฝาปด หั่นผลไมเปนชิ้นเล็กๆ และแชเมล็ดถั่วตางๆ เชน ถั่วเหลือง ลงในนกอนที่จะใสป่นลงในแผนกรอง 5เติมนหรือของเหลวอื่นๆ 6 ประกอบถวยตวงเขากับฝาปด กดปุ่มความเร็ว 5 (ความเร็วสูงสุด) แลวปลอยใหเครื่องทำ�งานไมเกิน 40 วินาที 7 กดปุ่ม OFF เพื่อปดสวิตชเครื่อง การทำ�ความสะอาด หามใชแผนใย อุปกรณที่มีความคม หรือของเหลวที่มีฤทธิ์รุนแรง เชน นมัน หรืออะซีโทนในการทำ�ความสะอาด ผลิตภัณฑนี้เปนอันขาด ---- ขอแนะนำ�เพิ่มเติม: การทำ�ความสะอาดตัวเครื่องและชิ้นสวนตางๆ จะทำ�ไดงายที่สุด หากทำ�ทันทีหลังการใชงาน หากจำ�เปน คุณสามารถทำ�ความสะอาดตาขายของแผนกรอง (รน HR2118/HR2117 เทานั้น) ดวยแปรงออนนม ควรถอดชิ้นสวนที่ถอดประกอบไดออกกอนที่จะทำ�ความสะอาดทุกครั้ง 1ควรถอดปลั๊กไฟออกกอน 2เช็ดทำ�ความสะอาดแทนมอเตอรและชุดอุปกรณสำ�หรับเชื่อมตอโถบดสับดวยผาชุบนบิดพอหมาด ไมควรจมแทนมอเตอรและชุดอุปกรณสำ�หรับเชื่อมตอโถบดสับลงในนหรือของเหลวอื่นๆ หามทำ�ความสะอาด แทนมอเตอรและชุดอุปกรณสำ�หรับเชื่อมตอโถบดสับดวยเครื่องลางจาน 3 ทำ�ความสะอาดชิ้นสวนที่สามารถถอดออกไดทั้งหมด (ยกเวนชุดอุปกรณสำ�หรับเชื่อมตอโถบดสับ) ในนรอน หากจำ�เปน ควรใชนยาลางจานเล็กนอยหรือใชเครื่องลางจาน การทำ�ความสะอาดโถป่นแบบรวดเร็ว 1 ใสนอนลงในโถป่นครึ่งหนึ่ง แลวเติมนยาทำ�ความสะอาดประมาณ 2-3 หยด 2 กดปุ่ม PULSE/QUICK CLEAN สองหรือสามครั้ง 3 ถอดโถป่น แลวเทนออก และลางดวยนกอก การจัดเก็บ -- ในการจัดเก็บสายไฟ ใหพันสายไฟรอบๆ หลอดมวนสายที่อยบริเวณดานลางของเครื่อง (รูปที่ 20) การสั่งซื้ออุปกรณเสริม หากตองการสั่งซื้ออุปกรณเสริมสำ�หรับเครื่องนี้ โปรดไปที่รานคาออนไลนของเรา www.shop.philips.com/service หาก ไมมีรานคาออนไลนในประเทศของคุณ โปรดไปที่ตัวแทนจำ�หนาย Philips หรือศูนยบริการ Philips หากคุณไมสามารถหาซื้ออุ ปกรณเสริมสำ�หรับเครื่องได โปรดติดตอศูนยบริการลูกคา Philips ในประเทศของคุณ โดยคนหารายละเอียดการติดตอไดในเอก สารแผนพับเกี่ยวกับการรับประกันทั่วโลก สิ่งแวดลอม -- หามทิ้งเครื่องรวมกับขยะในครัวเรือนทั่วไป เมื่อเครื่องหมดอายุการใชงานแลว ควรทิ้งลงในถังขยะสำ�หรับนำ�กลับ ไปใชใหมได (รีไซเคิล) เพื่อชวยรักษาสภาวะสิ่งแวดลอมที่ดี (รูปที่ 21) การรับประกันและบริการ หากคุณตองการขอรับบริการหรือตองการทราบขอมูลหรือหากคุณมีปญหา โปรดเขาชมเว็บไซตของ Philips ไดที่ www.philips.com/support หรือติดตอศูนยบริการดูแลลูกคาของ Philips ในประเทศของคุณ หมายเลขโทรศัพทของ ศูนยบริการลูกคา อยในเอกสารแผนพับเกี่ยวกับการรับประกันทั่วโลก หากในประเทศของคุณไมมีศูนยบริการลูกคา โปรดติดตอ ตัวแทนจำ�หนายผลิตภัณฑของ Philips ในประเทศ สูตรอาหาร นเตาห สวนผสม: -- -- ถั่วเหลืองแหง 90 กรัม น 600 มิลลิลิตร 1 แชถั่วเหลืองเปนเวลา 4 ชั่วโมง กอนป่น 2 ใสแผนกรอง (รน HR2118/HR2117 เทานั้น) ในโถป่น 3 ใสถั่วเหลืองที่แชนแลวและนลงในแผนกรอง (รน HR2118/HR2117 เทานั้น) ป่นผสมกันเปนเวลา 24 วินาที ดวยความเร็วสูงสุด หามป่นสวนผสมมากกวาหนึ่งครั้งติดตอกันโดยไมปดพักเครื่อง ปลอยใหเครื่องเย็นลงที่อุณหภูมิหองกอนป่นสวน ผสมอื่นๆ ตอ 4 นำ�นมถั่วเหลืองที่ไดไปตมในกระทะ และเติมนตาล แลวรอใหเดือด การแกปญหา บทนี้ไดรวบรวมปญหาทั่วไปเกี่ยวกับเครื่องซึ่งคุณอาจพบได หากยังไมสามารถแกไขปญหาตามขอมูลดานลาง โปรดดูรายการ คำ�ถามที่พบบอยที่ www.philips.com/support หรือติดตอศูนยบริการลูกคาในประเทศของคุณ ปญหา การแกปญหา เครื่องไมทำ�งาน เครื่องนี้มีการติดตั้งระบบปองกันความปลอดภัย เครื่องจะไมทำ�งาน หากโถป่น โถบดหรือโถ บดสับประกอบเขากับแทนมอเตอรไมถูกตอง หรือไมไดประกอบเขากันเลย ตรวจดูวาไดประ กอบโถป่น โถบด โถบดสับเขาที่แลวหรือไม (ดูที่บท ‘การใชงาน’ ) กอนอื่นใหกดปุ่ม OFF เพื่อตรวจดูใหแนใจวาปดสวิตชเครื่องแลว ฉันไมรวาจะใชงานปุ่ม เมื่อกดปุ่ม PULSE/QUICK CLEAN เครื่องจะทำ�งานดวยความเร็วสูงสุดจนกระทั่งคุณปลอ เพื่อทำ�อะไร คุณยังสามารถใชปุ่มนี้เพื่อทำ�ความสะอาดโถป่นแบบรวดเร็วได (ดูบท ‘การทำ�ความสะอาด’) PULSE/QUICK CLEAN มอเตอรสงกลิ่นไมพึง ประสงคในระหวางการป่น ยมือออกจากปุ่ม ใชปุ่ม PULSE/QUICK CLEAN เมื่อตองการควบคุมงานการป่นมากขึ้น ถือเปนเรื่องปกติที่เครื่องใหมจะสงกลิ่นอันไมพึงประสงคหรือปลอยควันออกมาบางในระหวา งการใชงานสองหรือสามครั้งแรก ลักษณะเชนนี้จะหายไปหลังจากที่คุณใชเครื่องสองสามครั้ง หากมีการเปดสวิตชเครื่องทิ้งไวนานเกินไป ก็อาจจะทำ�ใหเกิดกลิ่นอันไมพึงประสงคและเกิด ควันขึ้นมาได ในกรณีนี้ ใหปดสวิตชเครื่องและรอใหเครื่องเย็นเปนเวลา 60 นาที เครื่องหยุดทำ�งานเพราะชุด ใบมีดติด กดปุ่ม OFF และใชไมพายปาดสวนผสมที่ปดกั้นชุดใบมีดของเครื่องป่น ชุดใบมีดโถบดหรือ ชุดใบมีดโถสับ เราขอแนะนำ�ใหค ุณป่นสวนผสมในปริมาณที่นอยลง เหตุใดนผลไมหรือนมถั่ว เพื่อปองกันกากและเปลือกปนอยในเครื่องดื่ม ควรตรวจดูวาไดประกอบแผนกรอง (รน ปนอยมาก ถวยตวงเขากับฝาปดแลว เหลืองจึงมีกากหรือเปลือก โถป่นมีการรั่วซึม HR2118/HR2117 เทานั้น) เขากับโถป่นอยางถูกตองแลว และดูวา ไดปดฝาและประกอบ ปดสวิตชเครื่องและเทสวนผสมออก ตรวจดูวา ชุดใบมีดมีการประกอบอยางถูกตองหรือไม บนโตะ (รูปที่ 22) -- ตารางนี้แสดงความเร็ว ปริมาณ และเวลาการป่นที่แนะนำ� Tiếng Việt Giới thiệu Chúc mừng bạn đã mua được sản phẩm Philips mới và chào mừng bạn đến với Philips! Để có được lợi ích đầy đủ từ sự hỗ trợ do Philips cung cấp, hãy đăng ký sản phẩm tại www.philips.com/welcome. Mô tả chung (Hình 1) 1 Bộ phận mô-tơ 2 Panen điều khiển A Nút TẮT B Nút tốc độ C Nút XUNG/LÀM SẠCH NHANH 3 Bộ lưỡi cắt của máy xay 4 Bình máy xay bằng nhựa 5 Chỉ báo mức 6 Nắp của cối xay bằng nhựa 7 Lỗ trên nắp 8 Cốc định lượng 9 Bộ lọc (chỉ có ở kiểu HR2118/HR2117) 10 Nắp máy cắt (chỉ có ở kiểu HR2118) 11 Bộ lưỡi cắt máy cắt (chỉ có ở kiểu HR2118) 12 Tô máy cắt (chỉ có ở kiểu HR2118) 13 Bộ ghép nối máy cắt (chỉ có ở kiểu HR2118) 14 Cốc nghiền 15 Bộ lưỡi cắt máy nghiền Quan trọng Hãy đọc kỹ hướng dẫn sử dụng này trước khi sử dụng thiết bị và cất giữ để tiện tham khảo sau này. Tổng quát Nguy hiểm -- Không nhúng bộ phận mô-tơ vào trong nước hay vào bất kỳ chất lỏng nào khác, bạn cũng không được rửa nó dưới vòi nước. Chỉ dùng một miếng vải ẩm để lau bộ phận mô-tơ. Cảnh báo -- Kiểm tra xem điện áp ghi trên máy có tương ứng với điện áp nguồn nơi sử dụng trước khi bạn nối máy vào nguồn điện. -- Không nên sử dụng thiết bị nếu dây điện, phích cắm hoặc những bộ phận khác bị hỏng. -- Nếu dây điện nguồn bị hư hỏng, bạn nên thay dây điện tại trung tâm bảo hành của Philips, trung tâm bảo hành do Philips ủy quyền hoặc những nơi có khả năng và trình độ tương đương để tránh gây nguy hiểm. -- Không chạm vào các cạnh cắt của bộ lưỡi cắt, đặc biệt khi thiết bị đang được cắm điện. Các cạnh cắt rất sắc. -- Đảm bảo bộ lưỡi cắt được gắn chặt vào bình máy xay trước khi lắp bình máy xay vào bộ phận mô-tơ. -- Không cho ngón tay hoặc bất kỳ vật nào vào bình máy xay khi máy đang hoạt động. -- Thiết bị này không dành cho người dùng (bao gồm cả trẻ em) có sức khỏe kém, khả năng giác quan hoặc thần kinh suy giảm, hoặc thiếu kinh nghiệm và kiến thức, trừ khi họ được giám sát hoặc hướng dẫn sử dụng thiết bị bởi người có trách nhiệm đảm bảo an toàn cho họ. -- Giữ thiết bị và dây điện ngoài tầm với của trẻ em. -- Không để máy hoạt động khi không có sự theo dõi. -- Đảm bảo rằng bộ lưỡi cắt được lắp chặt vào bình máy xay hoặc cốc nghiền trước khi lắp bình máy xay hoặc cốc nghiền vào bộ phận mô-tơ. -- Không sử dụng máy nghiền để nghiền các nguyên liệu quá cứng như hạt đậu khấu và nước đá viên. -- Nếu một trong các bộ lưỡi cắt bị kẹt, rút phích cắm ra khỏi nguồn điện trước khi lấy nguyên liệu làm kẹt lưỡi cắt ra. -- Không sử dụng bình máy xay, cốc nghiền hoặc tô máy cắt (chỉ có ở kiểu HR2118) để tắt và bật máy. Chú ý -- Luôn luôn rút phích cắm của thiết bị khỏi nguồn điện trước khi lắp ráp, tháo rời, vệ sinh hoặc điều chỉnh bất cứ bộ phận nào. -- Không sử dụng bất kỳ phụ kiện hoặc bộ phận nào mà Philips không đặc biệt khuyên dùng. Nếu bạn sử dụng các phụ kiện hoặc bộ phận không phải của Philips, việc bảo hành sẽ bị mất hiệu lực. -- Không cho nguyên liệu vào vượt quá chỉ báo mức tối đa trên bình máy xay, cốc nghiền và tô máy cắt (chỉ có ở kiểu HR2118). -- Không sử dụng vượt quá số lượng tối đa và thời gian xử lý được chỉ định trong các bảng tương ứng. -- Nếu thực phẩm dính vào thành bình máy xay, hãy tắt máy và tháo phích cắm ra khỏi ổ điện. Sau đó sử dụng thìa để tách thực phẩm ra khỏi thành. -- Chỉ có thể bật máy nếu bình máy xay, cốc nghiền hoặc tô máy cắt (chỉ có ở kiểu HR2118) được lắp vào bộ phận mô-tơ theo đúng cách. -- Không đổ nguyên liệu nóng trên 80ºC/ 175°F vào bình máy xay. -- Luôn chế biến đinh hương, cây hồi và hạt hồi cùng với các nguyên liệu khác. Nếu chế biến riêng lẻ, các nguyên liệu này có thể làm hỏng phần nhựa của máy. -- Cối nghiền có thể bị đổi màu khi dùng để nghiền các loại nguyên liệu như đinh hương, cây hồi và cây quế. -- Máy nghiền không thích hợp để cắt thịt sống. Hãy dùng máy xay hoặc cối xay thịt. -- Không dùng máy nghiền khô để nghiền chất lỏng như nước trái cây. -- Không sử dụng ly xay thịt để trộn chất lỏng. Hãy sử dụng máy xay cho mục đích này. -- Ngâm các nguyên liệu khô, chẳng hạn như đậu nành, trong nước trước khi cho chúng vào bộ lọc. -- Cắt trái cây thành từng miếng nhỏ trước khi cho vào bộ lọc. -- Không làm bộ lọc bị quá tải. Không đổ nguyên liệu vào bộ lọc vượt quá phần kim loại của nó. Điện từ trường (EMF) Thiết bị Philips này tuân thủ tất cả các tiêu chuẩn liên quan đến điện từ trường (EMF). Nếu được sử dụng đúng và tuân thủ các hướng dẫn trong sách hướng dẫn này, theo các bằng chứng khoa học hiện nay, việc sử dụng thiết bị này là an toàn. Thiết bị khoá an toàn bên trong máy Tính năng này đảm bảo rằng bạn chỉ có thể bật máy nếu bình máy xay và nắp, cốc nghiền hoặc tô máy cắt và nắp (chỉ có ở kiểu HR2118) được lắp vào bộ phận mô-tơ theo đúng cách. Nếu bình máy xay và nắp, cốc nghiền hoặc tô máy cắt và nắp đã được lắp đúng cách, khóa an toàn tích hợp sẽ được mở. Bộ phận bảo vệ mạch điện của mô-tơ 9Nếu bạn muốn chế biến nguyên liệu rất nhanh, nhấn nút XUNG/ LÀM SẠCH NHANH vài lần. Thiết bị hoạt động ở tốc độ cao nhất. Khi bạn nhả nút XUNG/LÀM SẠCH NHANH, thiết bị ngừng hoạt động (Hình 7). Không nhấn nút XUNG/LÀM SẠCH NHANH liên tục quá vài giây. 10Luôn nhấn nút TẮT để tắt thiết bị trước khi mở nắp. Mẹo -- Để tránh nguyên liệu bị tràn ra ngoài, không cho quá 1,5 lít nguyên liệu lỏng vào bình máy xay, đặc biệt khi bạn muốn xay ở tốc độ cao. Không cho quá 1 lít nguyên liệu lỏng vào bình máy xay khi bạn muốn xay các chất lỏng còn nóng hay những nguyên liệu dễ sủi bọt. -- Bạn có thể sử dụng lỗ trên nắp để cho nguyên liệu vào trong khi máy đang chạy (Hình 8). -- Không chế biến nguyên liệu khô lâu quá 1 phút. -- Không chế biến các món ăn chứa một lượng lớn dầu ăn hoặc chất béo. -- Cắt nguyên liệu cứng thành những miếng nhỏ trước khi cho vào bình máy xay. Không xay khối lượng lớn các chất rắn cùng lúc mà chia thành nhiều mẻ nhỏ. -- Nếu bạn chưa hài lòng với kết quả khi xay nguyên liệu rắn, tắt máy xay và nhấn nút XUNG/LÀM SẠCH NHANH vài lần để máy xay chạy nhanh. Bạn cũng có thể lấy bớt nguyên liệu ra và xử lý lượng nhỏ hơn. -- Để nghiền đá viên, cho tối đa 5 viên nước đá vào bình cùng lúc và nhấn nút XUNG/LÀM SẠCH NHANH một vài lần. Giữ nắp đậy khi đang nghiền. Sử dụng bộ lọc (chỉ có ở kiểu HR2118/HR2117) Bạn có thể sử dụng bộ lọc để xay nước sốt, nước quả hay cốctai rất tinh. Tất cả vỏ hay hạt sẽ được ị bộ lọc giữ lại. Không đổ nguyên liệu vào bộ lọc vượt quá vần kim loại. Không sử dụng bộ lọc để chế biến nguyên liệu nóng. Thiết bị được trang bị mạch bảo vệ mô-tơ có thể tắt mô-tơ nếu mô-tơ bị tắc (điều này có thể xảy ra khi phải xử lý quá nhiều thức ăn hoặc không sử dụng thiết bị theo các chỉ dẫn trong tài liệu hướng dẫn sử dụng). Nếu điều này xảy ra, KHÔNG ấn nút đặt lại ở đáy thiết bị ngay sau khi mạch bảo vệ tắt thiết bị. Trước tiên tắt máy và rút phích cắm của thiết bị và để thiết bị nguội xuống nhiệt độ trong phòng. Sau đó kiểm tra xem lượng thức ăn bạn đang xử lý có vượt quá số lượng được nhắc đến trong tài liệu hướng dẫn sử dụng không hoặc có vật gì đó làm tắc bộ lưỡi cắt. Sau khi kiểm tra, ấn nút đặt lại ở đáy thiết bị và tiếp tục xay thức ăn. Không chạm vào bộ lưỡi cắt khi bạn ấn nút đặt lại. 1Mở nắp ra. Trước khi sử dụng lần đầu Rửa sạch thật kỹ các bộ phận tiếp xúc với thực phẩm trước khi sử dụng thiết bị này lần đầu tiên (xem chương ‘Làm sạch thiết bị’). 6Đặt cốc định lượng vào nắp, nhấn nút tốc độ 5 (tốc độ cao nhất) và Sử dụng thiết bị Máy xay được dùng để: -- Trộn chất lỏng, ví dụ sản phẩm sữa, nước xốt, nước trái cây, xúp, các loại đồ uống thập cẩm. -- Trộn các nguyên liệu mềm, như bột làm bánh hay sốt ma-don-ne. -- Nghiền nhừ các thức ăn chín, ví dụ để làm thức ăn cho trẻ. 8Rót đồ uống ra qua vòi bình máy xay. Đảm bảo nắp được đậy kín và Sử dụng cối xay 1Xoay đáy của bình máy xay theo chiều kim đồng hồ vào bộ lưỡi cắt của máy xay (Hình 2). 2Gắn bình máy xay cùng với bộ lưỡi cắt vào bộ phận mô-tơ và xoay theo chiều kim đồng hồ cho tới khi khớp vào vị trí (Hình 3). 3Nhấn cần để mở nắp (Hình 4). 4Bỏ nguyên liệu vào cối xay. Lưu ý: Để nguyên liệu nóng nguội xuống trước khi cho vào bình máy xay (nhiệt độ tối đa 80°C). 2Lắp bộ lọc vào bình máy xay. Đảm bảo rằng bộ lọc được lắp khít vào đáy bình. Các rãnh của bộ lọc và các răng bên trong bình máy xay giúp bạn đặt bộ lọc vào đúng vị trí (Hình 9). 3Đóng nắp. 4Cho nguyên liệu vào bộ lọc qua lỗ trên nắp. Cắt trái cây thành từng miếng nhỏ và ngâm các hạt đậu khô, như đậu nành, trước khi chế biến trong bộ lọc. 5Thêm nước hay chất lỏng khác vào. để máy chạy tối đa 40 giây. 7 Bấm nút OFF (tắt) để tắt thiết bị. cốc định lượng đã được đặt vào nắp. Làm như vậy sẽ ngăn không cho xơ và vỏ lẫn vào đồ uống của bạn. 9Để có hiệu quả tối ưu, hãy đặt lại bình cùng với phần nguyên liệu còn lại vào máy với nắp đóng. Sau đó để máy chạy vài giây. 10Rót phần đồ uống còn lại ra. Mẹo -- Đặc biệt khi chế biến một lượng lớn nguyên liệu, chúng tôi khuyên bạn không cho tất cả nguyên liệu vào bộ lọc cùng một lúc. Hãy bắt đầu xay một lượng nhỏ, để máy hoạt động trong chốc lát, tắt máy và sau đó thêm một lượng nhỏ nguyên liệu khác. -- Để có được kết quả tốt nhất khi ép nước trái cây và cốc-tai, thêm khoảng 300ml nước cho 150g trái cây. Bạn cũng có thể sử dụng dung dịch khác, ví dụ để làm cốc-tai. Sử dụng chức năng nghiền 5Nhả cần điều khiển để đóng nắp. Máy nghiền được sử dụng để cắt các loại nguyên liệu như hạt tiêu, hạt vừng, gạo, bột mì, cùi dừa, lạc (đã bóc vỏ), hạt cà phê, đậu nành khô, đậu Hà Lan khô, pho mát, vụn bánh mì, v.v. 6Lắp cốc định lượng vào nắp (Hình 5). 1Cho nguyên liệu khô vào cối xay nghiền (Hình 10). 7 Cắm phích vào nguồn điện. 2Xoay bộ phận lưỡi cắt của máy nghiền theo chiều kim đồng hồ vào 8Nhấn một trong các nút tốc độ để bật máy (Hình 6). Lưu ý:Tham khảo bảng trong hướng dẫn sử dụng này để biết số lượng và thời gian chế biến thích hợp. Không cho ngón tay hoặc một vật nào đó vào bình (trừ thìa đi kèm) khi máy xay đang hoạt động. Không để máy chạy quá 3 phút liên tục. Nếu bạn không thể hoàn tất quá trình chế biến sau 3 phút, hãy tắt máy và chờ một phút trước khi bật lại máy. cốc nghiền (Hình 11). Lưu ý:Tham khảo bảng trong hướng dẫn sử dụng này để biết số lượng và thời gian chế biến được khuyến cáo. 3Lộn ngược máy xay đã lắp và xoay theo chiều kim đồng hồ vào bộ phận mô-tơ (Hình 12). 4Bật máy. Mẹo: Chúng tôi khuyên bạn sử dụng nút XUNG/LÀM SẠCH NHANH hoặc tốc độ 5. Không để máy nghiền chạy quá 30 giây liên tục. 5Khi chế biến xong, hãy nhấn nút TẮT. 6Để tháo máy nghiền ra khỏi bộ phận mô-tơ, xoay máy nghiền ngược chiều kim đồng hồ. Sử dụng cối xay thịt (chỉ có ở kiểu HR2118) Cối xay thịt dùng để cắt nhỏ nguyên liệu như hành, thịt, rau thơm, trái cây, sô-cô-la, pho mát rắn, đồ ăn cho em bé và các loại hạt. Cẩn thận khi lắp hoặc tháo bộ lưỡi cắt, các cạnh cắt rất sắc. 1Lắp bộ nối vào đáy tô máy cắt (1). Xoay bộ nối ngược chiều kim đồng hồ để cố định bộ nối (2) (Hình 13). 2Đặt tô máy cắt vào bộ phận mô-tơ (1) và xoay tô theo chiều kim đồng hồ để cố định tô (2) (Hình 14). 3Đặt bộ lưỡi cắt vào tô máy cắt (Hình 15). 4Cho nguyên liệu vào tô trộn (Hình 16). Xem bảng dưới đây để biết khối lượng đề xuất. tâm dịch vụ của Philips. Nếu bạn gặp bất kỳ khó khăn nào trong việc đặt mua phụ kiện, vui lòng liên hệ với Trung Tâm Chăm Sóc Khách Hàng của Philips ở quốc gia của bạn. Bạn sẽ tìm thấy chi tiết liên hệ trên tờ bảo hành toàn cầu. Môi trường -- Không vứt thiết bị cùng với chất thải gia đình thông thường khi chấm dứt sử dụng thiết bị. Hãy đem thiết bị đến điểm thu gom chính thức để tái chế. Làm như vậy, bạn sẽ giúp bảo vệ môi trường. (Hình 21) Bảo hành và dịch vụ Nếu bạn cần biết dịch vụ, thông tin hay gặp trục trặc, vui lòng vào trang web của Philips tại www.philips.com/support hoặc liên hệ với Trung Tâm Chăm Sóc Khách Hàng của Philips tại quốc gia bạn. Bạn sẽ tìm thấy số điện thoại trong tờ bảo hành toàn cầu. Nếu không có Trung Tâm Chăm Sóc Khách Hàng tại quốc gia bạn, hãy liên hệ với đại lý Philips tại địa phương bạn. Công thức chế biến Sữa đậu nành Không chế biến nguyên liệu vượt quá số lượng tối đa được nêu trong bảng Nguyên liệu: -- 90g hạt đậu nành khô -- 600ml nước Mẹo: Cắt những phần đồ ăn lớn thành từng miếng nhỏ 1-2cm. 1Ngâm đậu nành trong 4 giờ trước khi chế biến. 5Đậy nắp vào cối xay thịt và xoay nắp theo chiều kim đồng hồ để cố 2Đặt bộ lọc (chỉ có ở kiểu HR2118/HR2117) vào bình máy xay. định nắp (Hình 17). Lưu ý: Đảm bảo nắp được cố định đúng cách trước khi bật máy. 6Bật máy. Lưu ý: Nếu máy bị lắc giật do đồ ăn phân bố không đều, hãy đặt tay bạn lên nắp. Lưu ý: Cối xay thịt cần vài giây để chế biến. Không để máy chạy quá vài giây. 7 Sau khi đã xay xong, tắt máy và rút phích cắm điện. 8Xoay cối xay thịt ngược chiều kim đồng hồ và tháo cối ra khỏi bộ phận mô-tơ (Hình 18). Luôn tháo cối xay thịt ra khỏi bộ phận mô-tơ trước khi lấy hết nguyên liệu ra khỏi cối xay thịt. 9Xoay bộ ghép nối theo chiều kim đồng hồ và tháo bộ ghép nối ra khỏi đáy cối xay thịt (Hình 19). 10Tháo nắp và bộ lưỡi cắt ra khỏi cối xay thịt. 3Cho đậu nành đã ngâm và nước vào bộ lọc (chỉ có ở kiểu HR2118/ HR2117). Xay trong 24 giây với tốc độ cao nhất. Không nên chế biến liên tục quá 1 đợt. Nên để máy nguội xuống nhiệt độ trong phòng trước khi chế biến tiếp. 4Đun sôi sữa đậu nành trong nồi, sau đó cho thêm đường vào và và đun nhỏ lửa. Cách khắc phục sự cố Chương này tóm tắt các sự cố thường gặp nhất với thiết bị. Nếu bạn không thể giải quyết được sự cố sau khi tham khảo thông tin dưới đây, vui lòng truy cập www.philips.com/support để xem danh sách các câu hỏi thường gặp hoặc liên hệ với Trung tâm Chăm sóc Khách hàng tại quốc gia bạn. Sự cố Giải pháp Thiết bị không hoạt động Máy được trang bị hệ thống an toàn. Máy sẽ không hoạt động nếu bình máy xay, cốc nghiền hoặc tô máy cắt chưa được lắp hoặc lắp vào bộ phận mô-tơ không đúng cách. Hãy kiểm tra xem bình máy xay, cốc nghiền hoặc tô máy cắt đã được lắp đúng cách chưa (xem chương ‘Cách sử dụng máy’). Nhấn nút TẮT trước để đảm bảo rằng máy đã tắt. Tôi không biết tôi có thể làm gì với nút XUNG/ LÀM SẠCH NHANH. Khi bạn nhấn nút XUNG/LÀM SẠCH NHANH, máy sẽ hoạt động ở tốc độ cao nhất cho đến khi bạn nhả nút. Sử dụng nút XUNG/LÀM SẠCH NHANH khi bạn muốn có khả năng điều khiển cao hơn đối với công việc chế biến. Bạn cũng có thể sử dụng nút này để làm sạch nhanh bình máy cắt (xem chương ‘Vệ sinh máy’). Mô-tơ phát ra mùi khó chịu trong khi chế biến. Việc một thiết bị mới tạo ra mùi khó chịu hoặc bốc một chút khói trong vài lần sử dụng đầu tiên là điều bình thường. Hiện tượng này sẽ hết sau khi bạn đã sử dụng máy vài lần. Máy cũng có thể tạo ra mùi khó chịu hoặc bốc khói nếu máy được sử dụng quá lâu. Trong trường hợp này, hãy tắt máy và để máy nguội xuống trong 60 phút. Máy dừng hoạt động vì bộ lưỡi cắt bị kẹt. Nhấn nút TẮT và dùng thìa để lấy nguyên liệu làm kẹt bộ lưỡi cắt của máy xay, bộ lưỡi cắt của máy nghiền hoặc bộ lưỡi cắt của cối xay thịt. Chúng tôi khuyên bạn chế biến lượng nguyên liệu ít hơn. Nước trái cây hay sữa đậu nành có xơ hoặc vỏ. Để tránh không cho xơ và vỏ lẫn vào đồ uống của bạn, đảm bảo rằng bộ lọc (chỉ có ở kiểu HR2118/ HR2117) được lắp vào bình đúng cách. Cũng cần đảm bảo rằng nắp đã đóng và cốc định lượng được lắp vào nắp. Bình máy xay bị rò rỉ. Tắt máy và đổ nguyên liệu ra. Kiểm tra xem bộ lưỡi cắt có được lắp đúng cách không. 11Đổ thức ăn ra khỏi cối xay thịt. Vệ sinh Không sử dụng miếng tẩy rửa, chất tẩy rửa có tính ăn mòn hoặc những chất lỏng mạnh như là xăng hoặc axêtôn để lau chùi thiết bị. Mẹo -- Cách tốt nhất để làm sạch thiết bị và các bộ phận là ngay sau khi sử dụng. -- Nếu cần, bạn có thể rửa sạch lưới bộ lọc (chỉ có ở kiểu HR2118/ HR2117) bằng bàn chải rất mềm. -- Luôn tháo tất cả các bộ phần có thể tháo rời trước khi làm sạch chúng. 1Bảo đảm rút điện ra khỏi máy. 2Lau sạch bộ phận mô-tơ và bộ phận ghép nối máy cắt bằng khăn ẩm. Không nhúng bộ phận mô-tơ và bộ ghép nối máy cắt vào nước hoặc bất kỳ loại chất lỏng nào khác. Không làm sạch bộ phận mô-tơ và bộ ghép nối máy cắt trong máy rửa chén. 3Rửa tất cả các bộ phận có thể tháo rời (trừ bộ ghép nối máy cắt) bằng nước nóng, cùng với một chút nước rửa chén nếu cần, hoặc bằng máy rửa chén. Rửa nhanh bình máy xay 1Đổ nước ấm vào nửa bìnhmays xay và thêm vài giọt dung dịch tẩy rửa. 2Nhấn nút XUNG/LÀM SẠCH NHANH vài lần. 3Tháo bình máy xay, đổ sạch đồ ăn ra khỏi bình và rửa bình dưới vòi nước. Lưu trữ sữa -- Để bảo quản dây điện, cuốn dây quanh cuộn dưới đáy máy (Hình 20). Đặt mua các phụ kiện Để mua các phụ kiện cho thiết bị này, vui lòng ghé thăm cửa hàng trực tuyến của chúng tôi tại www.shop.philips.com/service. Nếu không có cửa hàng trực tuyến cho quốc gia của bạn, hãy đến đại lý Philips hoặc trung Bàn (Hình 22) -- Bảng này trình bày tốc độ, số lượng và thời gian chế biến được đề xuất.