1
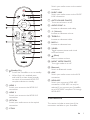
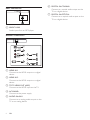
Always there to help you
Register your product and get support at
www.philips.com/welcome
Question?
Contact
Philips
User manual
HTL5120
Contents
1 Important 2
2
3
3
3
2 Your SoundBar 4
4
4
5
Safety Care for your product Care of the environment Help and support Main unit Remote control Connectors 3 Connect 7
Connect to TV 7
Connect digital devices through HDMI 7
Connect audio from TV and other
devices 8
4 Use your SoundBar 9
9
9
10
10
11
11
5 Wall mount your SoundBar 12
12
6 Product specifications 13
7 Troubleshooting 14
8 Notice 15
15
15
Adjust the volume Choose your sound MP3 player Play audio through Bluetooth Auto standby Apply factory settings Wall mount Compliance Trademarks EN
1
1Important
Read and understand all instructions before you
use your product. If damage is caused by failure
to follow instructions, the warranty does not
apply.
Safety
Risk of electric shock or fire!
• Never expose the product and accessories
to rain or water. Never place liquid
containers, such as vases, near the product.
If liquids are spilt on or into the product,
disconnect it from the power outlet
immediately. Contact Philips Consumer
Care to have the product checked before
use.
• Never place the product and accessories
near naked flames or other heat sources,
including direct sunlight.
• Never insert objects into the ventilation
slots or other openings on the product.
• Where the mains plug or an appliance
coupler is used as the disconnect device,
the disconnect device shall remain readily
operable.
• Disconnect the product from the power
outlet before lightning storms.
• When you disconnect the power cord,
always pull the plug, never the cable.
Risk of short circuit or fire!
• Before you connect the product to the
power outlet, ensure that the power
voltage matches the value printed on the
back or bottom of the product. Never
connect the product to the power outlet if
the voltage is different.
Risk of injury or damage to the SoundBar!
• For wall-mountable products, use only the
supplied wall mount bracket. Secure the
wall mount to a wall that can support the
combined weight of the product and the
wall mount. Koninklijke Philips Electronics
2
EN
N.V. bears no responsibility for improper
wall mounting that results in accident,
injury or damage.
• Never place the product or any objects
on power cords or on other electrical
equipment.
• If the product is transported in
temperatures below 5°C, unpack the
product and wait until its temperature
matches room temperature before
connecting it to the power outlet.
• Parts of this product can be made of
glass. Handle with care to avoid injury and
damage.
Risk of overheating!
• Never install this product in a confined
space. Always leave a space of at least four
inches around the product for ventilation.
Ensure curtains or other objects never
cover the ventilation slots on the product.
Risk of contamination!
• Do not mix batteries (old and new or
carbon and alkaine, etc.).
• Danger of explosion if batteries are
incorrectly replaced. Replace only with the
same or equivalent type.
• Remove batteries if they are exhausted or
if the remote control is not to be used for
a long time.
• Batteries contain chemical substances, they
should be disposed of properly.
Risk of swallowing batteries!
• The product/remote control may contain
a coin/button type battery, which can be
swallowed. Keep the battery out of reach
of children at all times! If swallowed, the
battery can cause serious injury or death.
Severe internal burns can occur within two
hours of ingestion.
• If you suspect that a battery has been
swallowed or placed inside any part of the
body, seek immediate medical attention.
• When you change the batteries, always
keep all new and used batteries out of
reach of children. Ensure that the battery
compartment is completely secure after
you replace the battery.
•
If the battery compartment cannot be
completely secured, discontinue use of the
product. Keep out of reach of children and
contact the manufacturer.
This is CLASS II apparatus with double
insulation, and no protective earth provided.
Care for your product
Use only microfiber cloth to clean the product.
Care of the environment
Your product is designed and manufactured
with high quality materials and components,
which can be recycled and reused.
When this crossed-out wheeled bin symbol is
attached to a product it means that the product
is covered by the European Directive 2002/96/
EC. Please inform yourself about the local
separate collection system for electrical and
electronic products.
Please act according to your local rules and
do not dispose of your old products with your
normal household waste.
Correct disposal of your old product helps to
prevent potential negative consequences for the
environment and human health.
Your product contains batteries covered by the
European Directive 2006/66/EC, which cannot
be disposed with normal household waste.
Please inform yourself about the local rules
on separate collection of batteries because
correct disposal helps to prevent negative
consequences for the environmental and
human health.
Help and support
Philips provides extensive online support. Visit
our website at www.philips.com/support to:
• download the complete user manual
• print the quick start guide
• watch video tutorials (available only for
selected models)
• find answers to frequently answered
questions (FAQs)
• email us a question
• chat with our support representative.
Follow the instructions on the website to select
your language, and then enter your product
model number.
Alternatively, you can contact Philips Consumer
Care in your country. Before you contact
Philips, note down the model number and
serial number of your product. You can find this
information on the back or bottom of your
product.
EN
3
2 Your SoundBar
Congratulations on your purchase, and
welcome to Philips! To fully benefit from
the support that Philips offers, register your
SoundBar at www.philips.com/welcome.
Main unit
This section includes an overview of the main
unit.
• OPTICAL: Lights up when you switch
to optical input source.
• AUX/Bluetooth: Lights up when you
switch to analog input source. Blinks
when you switch to Bluetooth mode.
• COAXIAL: Lights up when you switch
to coaxial input source.
c Volume indicator/V. SURR indicator
• When you change volume, volume
indicators light up to indicate the
volume level.
• Lights up when you select Virtual
Surround sound.
d Volume indicator/MUSIC iLINK indicator
• When you change volume, volume
indicators light up to indicate the
volume level.
• Lights up when you select MUSIC
iLINK as the input source.
Bluetooth
Remote control
a
(Standby-On/Standby indicator)
• Switch the SoundBar on or to standby.
• When the SoundBar is in standby, the
standby indicator turns red.
b Volume indicator/Source indicators
When you change volume, volume
indicators light up to indicate the volume
level.
Source indicator lights up when a source
is selected.
• HDMI ARC: Lights up when you select
HDMI ARC as the input source.
• HDMI 1: Lights up when you select
HDMI IN 1 as the input source. Blinks
for five seconds when you play Dolby
audio.
• HDMI 2: Lights up when you select
HDMI IN 2 as the input source. Blinks
for five seconds when you play DTS
audio.
4
EN
This section includes an overview of the
remote control.
Switch your audio source to the coaxial
connection.
1
2
17
3
4
16
Bluetooth
5
15
6
7
14
8
13
9
10
11
12
f MUSIC iLINK
Switch your audio source to the MUSIC
iLINK connection.
g AUTO VOLUME ON/OFF
Turn auto volume on or off.
h AUDIO SYNC +/Increase or decrease audio delay.
i +/- (Volume)
Increase or decrease volume.
j TREBLE +/Increase or decrease treble.
k BASS +/Increase or decrease bass.
l V.SURR
Toggle between stereo and virtual
surround sound.
m
(Mute)
Mute or restore volume.
n NIGHT MODE ON/OFF
Turn night mode on or off.
a
(Standby-On)
• Switch the SoundBar on or to standby.
• When EasyLink is enabled, press
and hold for at least three seconds
to switch all connected HDMI CEC
compliant devices to standby.
b HDMI 1
Switch your source to the HDMI IN 1
connection.
c HDMI 2
Switch your source to the HDMI IN 2
connection.
d OPTICAL
Switch your audio source to the optical
connection.
o Bluetooth
Switch to Bluetooth mode.
p AUX
Switch your audio source to the AUX
connection.
q HDMI ARC
Switch your source to HDMI ARC
connection. HDMI ARC can only be
selected if you connect your SoundBar
to an HDMI ARC compliant TV through
HDMI ARC.
Connectors
This section includes an overview of the
connectors available on your SoundBar.
e COAX
EN
5
f DIGITAL IN-COAXIAL
Connect to a coaxial audio output on the
TV or a digital device.
Rear connectors
g DIGITAL IN-OPTICAL
Connect to an optical audio output on the
TV or a digital device.
a MUSIC iLINK
Audio input from an MP3 player.
Bottom connectors
g
6
5
4
1
2
3
a HDMI IN 1
Connect to the HDMI output on a digital
device.
b HDMI IN 2
Connect to the HDMI output on a digital
device.
c TO TV-HDMI OUT (ARC)
Connect to the HDMI input on the TV.
d AC MAINS~
Connect to the power supply.
e AUDIO IN-AUX
Connect to an analog audio output on the
TV or an analog device.
6
EN
3Connect
This section helps you connect your SoundBar
to a TV and other devices.
For information about the basic connections of
your SoundBar and accessories, see the quick
start guide.
2
• The HDMI ARC connector on the TV
might be labeled differently. For details,
see the TV user manual.
On your TV, turn on HDMI-CEC
operations. For details, see the TV user
manual.
Note
•• If your TV is not HDMI ARC compliant, connect
Note
•• For identification and supply ratings, refer to the type
plate at the back or bottom of the product.
•• Before you make or change any connections, make sure
that all devices are disconnected from the power outlet.
Connect to TV
Connect your SoundBar to a TV. You can listen
to audio from TV programs through your
SoundBar. Use the best quality connection
available on your SoundBar and TV.
Connect to TV through HDMI (ARC)
Your SoundBar supports HDMI with Audio
Return Channel (ARC). If your TV is HDMI ARC
compliant, you can hear the TV audio through
your SoundBar by using a single HDMI cable.
TV
1
Using a High Speed HDMI cable, connect
the HDMI OUT (ARC) connector on your
SoundBar to the HDMI ARC connector
on the TV.
an audio cable to hear the TV audio through your
SoundBar. (see 'Connect audio from TV and other
devices' on page 8)
•• If your TV has a DVI connector, you can use an HDMI/
DVI adapter to connect to TV. However, some of the
features may not be available.
Connect digital devices
through HDMI
Connect a digital device such as a set-top box,
DVD/Blu-ray player, or games console to your
SoundBar through a single HDMI connection.
When you connect the devices in this way and
play a file or game, the
• video is automatically displayed on your
TV, and
• audio is automatically played on your
SoundBar.
1
2
3
Using a High Speed HDMI cable, connect
the HDMI OUT connector on your digital
device to the HDMI IN 1/2 on your
SoundBar.
Connect your SoundBar to TV through
HDMI OUT (ARC).
• If the TV is not HDMI CEC compliant,
select the correct video input on your
TV.
On the connected device, turn on HDMICEC operations. For details, see the user
manual of the device.
EN
7
Connect audio from TV and
other devices
Play audio from TV or other devices through
your Soundbar speakers.
Use the best quality connection available on
your TV, Soundbar, and other devices.
Note
•• When your Soundbar and TV are connected through
HDMI ARC, an audio connection is not required.
Option 1: Connect audio through a
digital optical cable
TV
Using an optical cable, connect the
OPTICAL connector on your SoundBar to
the OPTICAL OUT connector on the TV
or other device.
• The digital optical connector might be
labeled SPDIF or SPDIF OUT.
Option 2: Connect audio through a
digital coaxial cable
Good quality audio
8
EN
Using a coaxial cable, connect the
COAXIAL connector on your SoundBar
to the COAXIAL/DIGITAL OUT
connector on the TV or other device.
• The digital coaxial connector might be
labeled DIGITAL AUDIO OUT.
Option 3: Connect audio through
analog audio cables
Basic quality audio
1
Using an analog cable, connect the AUX
connectors on your SoundBar to the
AUDIO OUT connectors on the TV or
other device.
DVD
Best quality audio
1
1
4 Use your
SoundBar
Surround sound mode
Experience an immersive audio experience with
surround sound modes.
1
This section helps you use the SoundBar to play
audio from connected devices.
Before you start
• Make the necessary connections described
in the quick start guide and the user
manual.
• Switch the SoundBar to the correct source
for other devices.
»» When the V.SURR indicator on the
main unit turns off, two-channel stereo
sound is on, ideal for listening to music.
Equalizer
Adjust the volume
Change the high frequency (treble) and low
frequency (bass) settings of the SoundBar.
1
Press +/- (Volume) to increase or decrease
a volume level.
• To mute sound, press (Mute).
• To restore the sound, press (Mute)
again or press +/- (Volume).
Volume indicator
• When you change volume, one or multiple
Volume indicator (up to 8 indicators) on
the main unit light up to indicate a volume
level. The more indicators light up, the
higher the volume level is.
0
60
1
Press TREBLE +/- or BASS +/- to change
the treble or bass level.
Treble/bass indicator
• When you change the treble or bass
level, all the indicators on the main
unit blink one by one. If the treble or
bass level is set to the minimum, all the
indicators turn off.
Auto volume
Turn the auto volume on to keep the volume
constant when you switch to a different source.
1
Bluetooth
•
Press V.SURR repeatedly to switch
surround mode on or off.
»» When surround mode is on, the
V.SURR indicator on the main unit
lights up. Creates a surround listening
experience.
If you do not press the volume key for five
seconds, the volume indicators light off, and
the current source indicator and the sound
mode indicator light up.
Choose your sound
This section helps you choose the ideal sound
for your video or music.
Press AUTO VOLUME ON/OFF to turn
auto volume on or off.
»» When auto volume is turned on or off,
V.SURR indicator blinks once.
Synchronize picture and sound
If the audio and video are not synchronized,
delay the audio to match the video.
1
Press AUDIO SYNC +/- to synchronize
the audio with the video.
EN
9
Night mode
For quiet listening, decrease the volume of loud
sounds when audio is played. Night mode is
only available for Dolby Digital soundtracks.
1
Press NIGHT MODE ON/OFF to turn
night mode on or off.
»» When night mode is turned on or off,
V.SURR indicator blinks once.
•
1
2
Note
•• If auto volume is set to turned on, you cannot enable
the night mode.
3
The operational range between the
SoundBar and a Bluetooth device is
approximately 10 meters (30 feet).
Press Bluetooth on the remote control to
switch the SoundBar to Bluetooth mode.
»» The AUX/Bluetooth indicator blinks at
a fast rate.
On the Bluetooth device, switch on
Bluetooth, search for and select Philips
HTL5120 to start connection (see the
user manual of the Bluetooth device on
how to enable Bluetooth).
• When prompted for a password, enter
"0000".
»» During connection, the indicator blinks
at a lower rate.
Connect your MP3 player to play your audio
files or music.
Wait until you hear a beep sound from the
SoundBar.
»» When the Bluetooth connection
succeeds, and the AUX/Bluetooth
indicator lights up.
What you need
• An MP3 player.
• A 3.5mm stereo audio cable.
»» If the connection fails, the
AUX/Bluetooth indicator blinks
continually at a lower rate.
MP3 player
1
2
3
Using the 3.5mm stereo audio cable,
connect the MP3 player to the MUSIC
iLINK connector on your SoundBar.
Press MUSIC iLINK.
Press the buttons on the MP3 player to
select and play audio files or music.
Play audio through Bluetooth
Through Bluetooth, connect the SoundBar with
your Bluetooth device (such as an iPad, iPhone,
iPod touch, Android phone, or laptop), and then
you can listen to the audio files stored on the
device through your SoundBar speakers.
What you need
• A Bluetooth device which supports
Bluetooth profile A2DP, and with Bluetooth
version as 2.1 + EDR.
10
4
EN
5
Select and play audio files or music on
your Bluetooth device.
• During play, if a call is coming, music
play is paused. Play resumes when the
call ends.
To exit Bluetooth, select other source.
• When your switch back to Bluetooth
mode, Bluetooth connection remains
active.
Note
•• The music streaming may be interrupted by obstacles
between the device and SoundBar, such as wall, metallic
casing that covers the device, or other devices nearby
that operate in the same frequency.
•• If you want to connect your SoundBar with another
Bluetooth device, disable the currently connected
Bluetooth device.
•• Philips does not guarantee 100% compatibility with all
Bluetooth devices.
Auto standby
When playing media from a connected device,
the SoundBar automatically switches to standby
if:
• no source button is pressed for 30
minutes, and
• no audio/video playback is detected from a
connected device.
Apply factory settings
You can reset your SoundBar to the default
settings programmed at the factory.
1
Press TREBLE+, VOL-, and BASS+ within
three seconds.
»» When the factory settings restore is
complete, the SoundBar automatically
switches off and restarts.
EN
11
5 Wall mount
your SoundBar
Before you mount your SoundBar on the wall,
read all safety precautions. (see 'Safety' on page
2)
Wall mount
Note
•• Koninklijke Philips Electronics N.V. bears no
responsibility for improper wall mounting that results
in accident, injury or damage. If you have any query,
contact Philips Consumer Care in your country.
•• Secure the wall mount to a wall that can support the
combined weight of the product and the wall mount.
•• Before wall mount, you need not remove the four
rubber feet at the bottom of the soundbar, otherwise
the rubber feet cannot be fixed back.
Screw length/diameter
Depend on the type of wall mounting this wall
mount bracket, make sure that you use screws
of a suitable length and diameter.
3 - 3.5mm
> 25mm
For information about how to wall your
SoundBar, see the wall mount guide.
12
EN
6Product
specifications
••
••
Dimensions (WxHxD):
1010 x 81 x 154 mm
Weight: 3.9 kg
Wall mount
••
Note
•• Specifications and design are subject to change without
notice.
••
Dimensions (WxHxD):
40 x 100 x 26.5 mm
Weight: 0.1 kg/each
Remote control batteries
•
2 x AAA-R03-1.5 V
Amplifier
•
•
•
•
Total output power: 120W RMS (+/- 0.5
dB, 30% THD) / 96W RMS (+/- 0.5 dB,
10% THD)
Frequency response: 20 Hz-20 kHz /
±3 dB
Signal-to-noise ratio: > 65 dB (CCIR) /
(A-weighted)
Input sensitivity:
• AUX: 800 mV
• Music iLink: 550 mV
Audio
•
S/PDIF Digital audio input:
• Coaxial: IEC 60958-3
• Optical: TOSLINK
Bluetooth
••
••
Bluetooth profiles: A2DP
Bluetooth version: 2.1 + EDR
Main unit
••
••
••
•
•
Power supply: 110-240 V~, 50-60 Hz
Power consumption: 40 W
Standby power consumption: ≤ 0.5 W
Speaker impedance:
• Woofer: 3 ohm
• tweeter: 12 ohm
Speaker drivers: 2 x 102 mm (4") woofer
+ 2 x 25.4 mm (1") tweeter
EN
13
7Troubleshooting
Warning
•• Risk of electric shock. Never remove the casing of the
product.
To keep the warranty valid, never try to repair
the product yourself.
If you have problems using this product, check
the following points before you request service.
If you still have a problem, get support at www.
philips.com/support.
Main unit
The buttons on the SoundBar do not work.
• Disconnect the SoundBar from the power
supply for a few minutes, then reconnect.
Sound
No sound from SoundBar speakers.
• Connect the audio cable from your
SoundBar to your TV or other devices.
However, you do not need a separate
audio connection when:
• the SoundBar and TV are connected
through HDMI ARC connection, or
• a device is connected to the HDMI IN
connector on your SoundBar.
• Reset your SoundBar to its factory settings
(see 'Apply factory settings' on page 11).
• On the remote control, select the correct
audio input.
• Make sure that the SoundBar is not muted.
Distorted sound or echo.
• If you play audio from the TV through the
SoundBar, make sure that the TV is muted.
Audio and video are not synchronized.
• Press AUDIO SYNC +/- to synchronize
the audio with the video.
14
EN
Bluetooth
A device cannot connect with the SoundBar.
• The device does not support the
compatible profiles required for the
SoundBar.
• You have not enabled the Bluetooth
function of the device. See the user manual
of the device on how to enable the
function.
• The device is not correctly connected.
Connect the device correctly. (see 'Play
audio through Bluetooth' on page 10)
• The SoundBar is already connected with
another Bluetooth device. Disconnect the
connected device, then try again.
Quality of audio play from a connected
Bluetooth device is poor.
• The Bluetooth reception is poor. Move the
device closer to the SoundBar, or remove
any obstacle between the device and the
SoundBar.
The connected Bluetooth device connects and
disconnects constantly.
• The Bluetooth reception is poor. Move the
device closer to the SoundBar, or remove
any obstacle between the device and the
SoundBar.
• Turn off Wi-Fi function on the Bluetooth
device to avoid interference.
• For some Bluetooth, the Bluetooth
connection can be deactivated
automatically to save power. This does not
indicate any malfunction of the SoundBar.
8Notice
This section contains the legal and trademark
notices.
The Bluetooth® word mark and logos are
registered trademarks owned by Bluetooth
SIG, Inc. and any use of such marks by Philips is
under license.
Compliance
This product complies with the radio
interference requirements of the European
Community.
Hereby, Philips Consumer Lifestyle, declares that
this product is in compliance with the essential
requirements and other relevant provisions of
Directive 1999/5/EC.
A copy of the EC declaration of Conformity
is available in the Portable Document Format
(PDF) version of the user manual at www.
philips.com/support.
The terms HDMI and HDMI High-Definition
Multimedia Interface, and the HDMI Logo are
trademarks or registered trademarks of HDMI
Licensing LLC in the United States and other
countries.
Trademarks
Manufactured under license under U.S.
Patent Nos: 5,956,674; 5,974,380; 6,487,535
& other U.S. and worldwide patents issued
& pending. DTS, the Symbol, & DTS and the
Symbol together are registered trademarks
& DTS Digital Surround and the DTS logos
are trademarks of DTS, Inc. Product includes
software. DTS, Inc. All Rights Reserved.
Manufactured under license from Dolby
Laboratories. Dolby and the double-D symbol
are trademarks of Dolby Laboratories.
EN
15
Philips Consumer Lifestyle
HK-1236- HTL5120/12
Year 2012
........................................................
(Report No. / Numéro du Rapport)
..............................................................................................
(Year in which the CE mark is affixed / Année au cours de
laquelle le marquage CE a été apposé)
EC DECLARATION OF CONFORMITY
(DECLARATION DE CONFORMITE CE)
We / Nous, PHILIPS CONSUMER LIFESTYLE B.V.
(Name / Nom de l’entreprise)
TUSSENDIEPEN 4, 9206 AD DRACHTEN, THE NETHERLANDS
(address / adresse)
Declare under our responsibility that the electrical product(s):
(Déclarons sous notre propre responsabilité que le(s) produit(s) électrique(s):)
PHILIPS
HTL5120/12
..................................
...............................................
(brand name, nom de la marque)
(Type version or model, référence ou modèle)
SOUNDBAR SPEAKER
.................................................................
(product description, description du produit)
_
To which this declaration relates is in conformity with the following harmonized standards:
(Auquel cette déclaration se rapporte, est conforme aux normes harmonisées suivantes)
(title, number and date of issue of the standard / titre, numéro et date de parution de la norme)
EN60065:2002+A1:2006+A11:2008+A2:2010+A12:2011
EN 55013:2001+A1: 2003+A2: 2006
EN 55020:2007+A11:2011
EN61000-3-2:2006+A1:2009+A2:2009
EN61000-3-3:2008
EN62301:2005
EN62311:2008
EN 300328 V1.7.1:2006
EN 301489-1 V1.9.2: 2011
EN 301489-17 V2.1.1: 2009
_
Following the provisions of :
(Conformément aux exigences essentielles et autres dispositions pertinentes de:)
1999/5/EC(R&TTE Directive)
2006/95/EC (Low Voltage Directive)
2004/108/EC (EMC Directive)
2011/65/EU (RoHS Directive)
2009/125/EC (ErP Directive)
- EC/1275/2008
And are produced under a quality scheme at least in conformity with ISO 9001 or CENELEC
Permanent Documents
(Et sont fabriqués conformément à une qualité au moins conforme à la norme ISO 9001 ou aux Documents Permanents CENELEC)
Telefication
NB
The Notified Body ............................................... performed ...................................................................
(L’Organisme Notifié)
(Name and number/ nom et numéro)
(a effectué)
(description of intervention /
description de l’intervention)
12214133/AA/00
And issued the certificate, ....................................................................................
(et a délivré le certificat)
Remarks:
(certificate number / numéro du certificat)
(Remarques:)
Drachten, Netherlands, August 30, 2012
...........................................................
(place,date / lieu, date)
Philips Consumer Lifestyle
16
A.Speelman, CL Compliance Manager
...............................................................................................
(signature, name and function / signature, nom et fonction)
AMB 544-9056
_
Specifications are subject to change without notice
© 2013 Koninklijke Philips Electronics N.V.
All rights reserved.
HTL5120_12_UM_V3.0