1
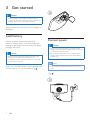
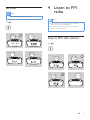
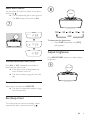
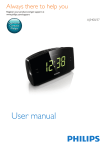
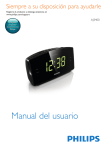
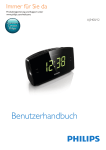
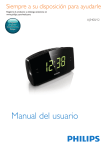
Always there to help you
Register your product and get support at
www.philips.com/welcome
Question?
Contact
Philips
User manual
AJ3400/37
Contents
1Important
3
Safety3
2 Your clock radio
4
4
3 Get started
5
5
5
6
4 Listen to FM radio
6
6
7
7
7
5 Other features
7
7
8
8
6 Product information
9
9
7Troubleshooting
9
What's in the box
Install battery
Connect power
Set time
Tune to FM radio stations
Store FM radio stations manually
Select a preset radio station
Adjust volume
Set alarm timer
Set sleep timer
Adjust brightness
Specifications
8Notice
10
Notice10
EN
2
1Important
Safety
Important Safety Instructions
a Read these instructions.
b Keep these instructions.
c Heed all warnings.
d Follow all instructions.
e Do not use this apparatus near water.
f Clean only with dry cloth.
g Do not block any ventilation openings.
Install in accordance with the
manufacturer’s instructions.
h Do not install near any heat sources such
as radiators, heat registers, stoves, or
other apparatus (including amplifiers) that
produce heat.
i Protect the power cord from being
walked on or pinched, particularly at
plugs, convenience receptacles, and the
point where they exit from the apparatus.
j Only use attachments/accessories
specified by the manufacturer.
k Use only with the cart, stand, tripod,
bracket, or table specified by the
manufacturer or sold with the apparatus.
When a cart is used, use caution when
moving the cart/apparatus combination to
avoid injury from tip-over.
l Unplug this apparatus during lightning
storms or when unused for long periods
of time.
m Refer all servicing to qualified service
personnel. Servicing is required when
the apparatus has been damaged in any
way, such as power-supply cord or plug
is damaged, liquid has been spilled or
objects have fallen into the apparatus, the
apparatus has been exposed to rain or
moisture, does not operate normally, or
has been dropped.
n Battery usage CAUTION – To prevent
battery leakage which may result in bodily
injury, property damage, or damage to the
unit:
• Install all batteries correctly, + and - as
marked on the unit.
• Do not mix batteries (old and new or
carbon and alkaline, etc.).
• Remove batteries when the unit is not
used for a long time.
• Batteries (battery pack or batteries
installed) shall not be exposed to
excessive heat such as sunshine, fire or
the like.
o Apparatus shall not be exposed to
dripping or splashing.
p Do not place any sources of danger on
the apparatus (e.g. liquid filled objects,
lighted candles).
q This product may contain lead and mercury.
Disposal of these materials may be regulated
due to environmental considerations. For
disposal or recycling information, please
contact your local authorities or the
Electronic Industries Alliance: www.eiae.org.
r Where the plug of the Direct Plug-in
Adapter is used as the disconnect device,
the disconnect device shall remain readily
operable.
s Only use power supplies listed in the user
manual.
3
EN
Warning
•• Never remove the casing of this clock radio.
•• Never place this clock radio on other electrical
equipment.
•• Keep this clock radio away from direct sunlight, naked
flames or heat.
•• To reduce the risk of fire or electric shock, do not
expose this apparatus to rain or moisture.
•• Ensure that you always have easy access to the power
cord, plug or adapter to disconnect this clock radio
from the power.
2 Your clock radio
Congratulations on your purchase, and
welcome to Philips! To fully benefit from the
support that Philips offers, register your product
at www.philips.com/welcome.
What's in the box
(Fig.
)
a
User manual
EN
4
3 Get started
b
Caution
•• Use of controls or adjustments or performance of
procedures other than herein may result in hazardous
radiation exposure or other unsafe operation.
Always follow the instructions in this chapter in
sequence.
Install battery
If there is power interruption, the clock
memory backup allows your alarm and clock
settings to be stored for up to a day. The display
backlight will be off.
Caution
•• Risk of explosion! Keep the battery away from heat,
sunshine or fire. Never discard battery in fire.
Connect power
Caution
•• Risk of product damage! Make sure that the power
voltage corresponds to the voltage printed on the back
or underside of the clock radio.
•• Risk of electric shock! When you unplug the power
adapter, always pull the plug from the socket. Never
pull the cord.
•• The battery contains chemical substances, so it should
be disposed of properly.
Insert 2 x 1.5V AAA battery (not supplied) with
correct polarity (+/-) as illustrated. (Fig. )
Note
•• The type plate is located at the bottom of the clock
radio.
(Fig.
c
5
EN
)
4 Listen to FM
radio
Set time
Note
•• You can only set time in standby mode.
(Fig.
Note
)
•• Keep the clock radio away from other electronic
devices to avoid radio interference.
d
•• For better reception, fully extend and adjust the
position of the FM antenna.
1
2
PRESET/
SET TIME
HOUR
2 sec
Tune to FM radio stations
(Fig.
)
e
3
MIN
4
PRESET/
SET TIME
1
2
RADIO
ON/OFF
TUNING
2 sec
MIN
4
3
TUNING
HOUR
2 sec
- VOLUME +
EN
6
Store FM radio stations
manually
5 Other features
You can store up to 10 FM radio stations.
1
2
3
4
5
Tune to an FM radio station.
Press and hold PRESET for two seconds.
»» The preset number begins to blink.
Press TUNING
number.
repeatedly to select a
Set alarm timer
Set alarm
Press PRESET again to confirm.
Repeat steps 1 to 4 to store other stations.
Tip
•• To remove a pre-stored station, store another station
in its place.
Select a preset radio station
In tuner mode, press PRESET repeatedly to
select a preset number.
Note
•• You can only set the alarm in standby mode.
•• When alarm sounds, volume rises gradually. You cannot
adjust the alarm volume manually.
•• Make sure that you have set the clock correctly.
Follow the illustration to set the first alarm. (Fig.
• AL1: set the first alarm.
• AL2: set the second alarm.
f
1
2
AL1
2 sec
HOUR
Adjust volume
While listening, press - VOLUME + to adjust
volume.
»» The volume level (1~15) shows in the
display.
3
4
MIN
AL1
Tip
•• The clock radio exits alarm setting mode when being
idle for 10 seconds.
7
EN
)
Select alarm source
You can select FM radio or buzzer as the alarm
source. (Fig. )
»» The corresponding alarm icon lights up.
h
SLEEP
• The AL2 setting is the same as AL1.
g
120
90
60
30
15
AL1 FM
OFF
AL1
AL1
To deactivate the sleep timer:
• Press SLEEP repeatedly until [OFF]
(off) appears.
Adjust brightness
Activate/deactivate alarm timer
Press AL1 or AL2 repeatedly to activate or
deactivate the alarm timer.
»» If the alarm timer is deactivated, the
alarm indicator turns off.
Press BRIGHTNESS repeatly to adjust display
brightness.
i
BRIGHTNESS
»» The alarm repeats ringing for the next
day.
Snooze alarm
When alarm sounds, press SNOOZE.
»» The alarm snoozes and repeats ringing
nine minutes later.
Set sleep timer
This clock radio can switch to standby mode
automatically after a preset period. (Fig. )
EN
8
6Product
information
7Troubleshooting
Warning
•• Never remove the casing of this apparatus.
Note
•• Product information is subject to change without prior
notice.
Specifications
Amplifier
Total Output Power
0.4W RMS
Tuner (FM)
Tuning range
Tuning grid
Sensitivity
- Mono, 26 dB S/N Ratio
- Stereo, 46 dB S/N Ratio
Total Harmonic Distortion
Signal to Noise Ratio
87.5-108
MHz
50 KHz
<22 dBf
<49.5 dBf
<2%
>50 dBA
General information
AC power (power
adapter)
Operation Power
Consumption
Standby Power
Consumption
Dimensions:
Main Unit (W x H
x D)
Weight: -Main Unit
9
EN
Brand name: Philips;
Model: Model: Y04FE050-0500U;
Input: 100-240 V~, 5060 Hz; 0.2 A;
Output: 5.0 V 500
mA
1.2 W
<1 W
191 x 103 x 69.5 mm
0.33 kg
To keep the warranty valid, never try to repair
the system yourself.
If you encounter problems when using this
apparatus, check the following points before
requesting service. If the problem remains
unsolved, go to the Philips web site (www.
philips.com/welcome). When you contact
Philips, ensure that the apparatus is nearby
and the model number and serial number are
available.
No power
•• Ensure that the AC power plug of the unit
is connected properly.
•• Ensure that there is power at the AC
outlet.
No sound
•• Adjust the volume.
No response from the unit
•• Disconnect and reconnect the AC power
plug, then turn on the unit again.
Poor radio reception
•• Increase the distance between the unit and
your TV or VCR.
•• Fully extend the FM antenna.
Alarm does not work
•• Set the clock/alarm correctly.
Clock/alarm setting erased
•• Power has been interrupted or the power
plug has been disconnected.
•• Reset the clock/alarm.
8Notice
Notice
Any changes or modifications made to this
device that are not expressly approved by
WOOX Innovations may void the user’s
authority to operate the equipment.
Notice for the USA
This equipment has been tested and found
to comply with the limits for a Class B digital
device, pursuant to part 15 of the FCC Rules .
These limits are designed to provide reasonable
protection against harmful interference in a
residential installation. This equipment generates,
uses, and can radiate radio frequency energy
and, if not installed and used in accordance
with the instruction manual, may cause harmful
interference to radio communications.
However, there is no guarantee that interference
will not occur in a particular installation. If this
equipment does cause harmful interference
to radio or television reception, which can be
determined by turning the equipment off and
on, the user is encouraged to try to correct the
interference by one or more of the following
measures:
• Relocate the receiving antenna.
• I n c r e a s e t h e s e p a r a t i o n b e t w e e n
equipment and receiver.
• Connect the equipment into an outlet on
a circuit different from that to which the
receiver is connected.
• Consult the dealer or an experienced
radio/TV technician for help.
Notice for Canada
This device complies with Industr y Canada
licence-exempt RSS standard(s): Operation is
subject to the following Two conditions:
• this device may not cause interference, and
• this device must accept any interference,
including interference that may cause
undesired operation of the device.
Disposal of your old product
Your product is designed and manufactured
with high quality materials and components,
which can be recycled and reused.
Never dispose of your product with other
household waste. Please inform yourself about
the local rules on the separate collection of
electrical and electronic products and batteries.
The correct disposal of these products helps
prevent potentially negative consequences on
the environment and human health.
Your product contains batteries, which
cannot be disposed of with normal
household waste. Please inform yourself
about the local rules on separate collection of
batteries. The correct disposal of batteries helps
prevent potentially negative consequences on
the environment and human health.
Please visit www.recycle .philips.com for
additional information on a recycling center in
your area.
Environmental information
All unnecessary packaging has been omitted. We
have tried to make the packaging easy to separate
into three materials: cardboard (box), polystyrene
foam (buffer) and polyethylene (bags, protective
foam sheet.)
Your system consists of materials which can
be recycled and reused if disassembled by
a specialized company. Please obser ve the
local regulations regarding the disposal of
packaging materials, exhausted batteries and old
equipment.
EN
10
The making of
unauthorized
copies of copyprotected mater ial, including computer
programs, files, broadcasts and sound recordings,
may be an infringement of copyrights and
constitute a criminal offence. This equipment
should not be used for such purposes.
Note
•• The type plate is located on the bottom of the apparatus.
11
Specifications are subject to change without notice
2014 © WOOX Innovations Limited.
All rights reserved.
This product was brought to the market by WOOX
Innovations Limited or one of its affiliates, further referred
to in this document as WOOX Innovations, and is the
manufacturer of the product. P&F is the warrantor in relation
to the product with which this booklet was packaged. Philips
and the Philips Shield Emblem are registered trademarks of
Koninklijke Philips N.V.
AJ3400_37_UM_V2.0