1
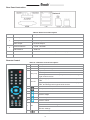
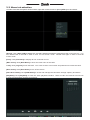
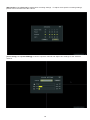
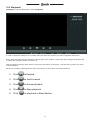
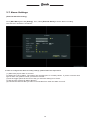
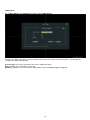
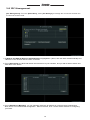
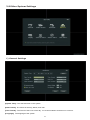
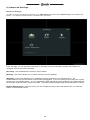
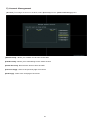
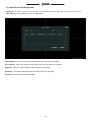
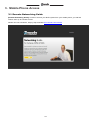
NVR User Manual
NVR User Manual
For further help, please visit www.zmodo.com
Introduction
This product series is a 4 channel embedded NVR with pentaplex functionality. This means that the product
will perform video and audio live preview, recording, playback, remote access, and backup simultaneously.
This advanced product series receives a high quality video stream that is transmitted digitally by the IP
Camera (IPC). This video signal is encoded by the NVR and enabled for recording, viewing, configuring, and
playback. This document mainly focuses on the installation and configuration of the NVR in a LAN
environment. With high performance audio & video, user-friendly graphic user interface (GUI), and
practical industrial designs, this series NVR is suitable for civil applications such as homes, stores,
internet cafes, and small businesses, in addition to mainstream security and surveillance applications.
Declaration
· The content in this manual may be different from the product version you are using. If you experience any
issue that is not mentioned in this manual, please visit our knowledgebase website, kb.zmodo.com, or
contact our technical support or product supplier.
· The software of this product will be updated as necessary. Our company reserves the right make
updates without notice.
Intended Users
This manual is primarily intended for the following users:
· System planner
· Onsite tech-support and maintenance personnel
· Administrator for system installation
· Users for business operation
Conventions
·
·
·
·
Click: Refers to left-click with your mouse
Double click: Refers to left double-click with your mouse
Right Click: Refers to right-click with your mouse
Square brackets "[ ]" indicate the window name, menu name, or data sheet, such as [Download]
for example
Catalog
1 INTRODUCTION ...................................................................................................................... 2
1.1 Brief Introduction .................................................................................................................................. 2
1.2 Main Functions and Features .............................................................................................................. 2
1.3 Installation Instructions ........................................................................................................................ 2
1.4 Installation & Wiring ............................................................................................................................. 4
2 USE INSTRUCTION................................................................................................................. 6
2.1 Login .................................................................................................................................................... 6
2.2 Menu introduction ................................................................................................................................ 7
2.3 Main Menu operation ........................................................................................................................... 9
2.4 Record .................................................................................................................................................. 9
2.5 Playback ............................................................................................................................................ 11
2.6 Backup ............................................................................................................................................... 12
2.7 Alarm Setting ...................................................................................................................................... 12
2.8 IPC Management ............................................................................................................................... 14
2.9 Other System Setting ......................................................................................................................... 16
1) General………………………………………………………………………………………………………17
2) Network………………………………………………………………………………………………………17
3) Channel Loop ................................................................................................................................... 18
4) Advanced Setting ............................................................................................................................. 19
5) Device storage management ........................................................................................................... 19
6) User Management ........................................................................................................................... 20
7) Automatic maintenance setting ........................................................................................................ 22
2.10 System Information .......................................................................................................................... 23
3 APPENDIX ............................................................................................................................... 25
3.1 SPECIFICATIONS ............................................................................................................................. 25
3.2 System Default Values ....................................................................................................................... 25
3.3 Other Important Information............................................................................................................... 27
1
1 INTRODUCTION
1.1 Brief Introduction
This product series is a 4 channel embedded NVR with pentaplex functionality. This means that the product
will perform video audio live preview, recording, playback, remote access, and backup simultaneously. This
advanced product series receives a high quality video stream that is transmitted digitally by the IP Camera
(IPC). This video signal is encoded by the NVR and enabled for recording, viewing, configuring, and playback.
1.2 Main Functions and Features
>
>
>
>
>
>
>
>
>
>
>
Support Mouse & IR Remote Control;
Support VGA-IPC Bound Connection;
Support 4-Channel VGA-IPC Stream Input and Forwarding;
Obtain Video Parameter of Front-device IP Camera;
Multiple Recording Modes;
Built-in SATA Interface, Support SATA HDD between
250GB and 2TB of storage;
Support USB Backup through USB Flash Disk
Preview & Playback, Support VGA Video Output;
Support Alarm Linked Channel Picture Enlarge, Audio Alarm, Report to the Alarm,
Email Alert and FTP Upload;
Support TCP/IP Protocol & DDNS;
Auto Maintenance, Update and Restore to Factory.
1.3 Installation Instructions
Check the Package Content
When you receive the product, please check the equipment and accessories according to the packing list in
the package box.
Front Panel Instruction
Table 0-1 Front Panel Description
Type
LED
Name
POWER
HDD
Description
Power indicator: Red light ON when the power is on
Hard Disk Drive indicator: Blinks red when the HDD is
recording or reading. Remains off otherwise.
2
Rear Panel Instruction
Table 0-2Rear Panel Description
NO.
Interface
Description
VGA Output
1: DIN-15
Alarm Input
4 Channel Input
Alarm Output
1 Channel Output
Network Interface
1 : RJ45 10/100M
USB Interface
2: USB 2.0
3
RS485
1: Send & Receive Data, half-duplex interface (+ -)
4
power
DC 12V
1
2
Remote Control
Table 0- 3 Remote Control Description
NO.
1
2
3
4
5
Name
Power
Rec
Description
Turn on/off the device
Start/Stop recording
• Input numbers in the editable box
• One key channel selection in preview mode
NO. (1-9)
• One key channel selection in playback mode, and enlarge the
single-channel screen
•Apply for group use to choose channels above 10 in preview
mode
NO.10+
•Apply for group use to choose channels above 10 in playback
mode, and enlarge the single-channel screen
NO.0
Input 0 in the editable box
6
Backspace, delete input in the editable box
7
Direction: Left
8
Direction: Right
9
Direction: Up
10
Direction: Down
11
1) Press to confirm in menu mode
2) Check or un-check configuration boxes in menus
3) Select or deselect motion detection areas in the motion
detection settings
12
OK
Switch from single screen and multi-screen in preview mode
3
13
14
15
16
MENU
ESC
BACKUP
CLEAR
17
SEQ
18
Enter the main menu of setting interface
Return or exit operations
Backup video files
Cancel alarm under alarm status
One key for channel touring according to the touring settings;
Press to pause and restart while touring
1. preview mode: pop out playback interface;
2. playback mode: shift between play and pause
19
Playback mode: Stop play
20
Playback mode: fast rewind
21
Playback mode: fast forward
1.4 Installation & Wiring
Hard Drive Installation
A Hard Disk Drive (HDD) is not installed by the manufacturer unless the item is specifically purchased with a
HDD. The user may install a SATA HDD with between 250GB and 2TB of storage after receiving the system.
We recommend Western Digital Caviar Green AV-GP hard drives or Seagate Pipeline hard drives because
they are engineered specifically for use in security camera environments.
Hard Drive Installation Procedure
1. Open the NVR top cover while the NVR is unplugged from its power source, take out the damping
washers in the screw bag, and then put the 4 damping washers into the clamping slots (four protruding
steps) in the case;
2. Connect the SATA data cable and HDD power cord to the HDD;
3. Lift up the hard drive with your hand, and turn over the case to make sure that the four holes at the bottom
of the case correspond to the hard drive mounting holes, and then fix the hard drive using four 4 M3*12
Head Screws plus plain washers;
4. Connect the SATA data cable and HDD power cord to the backplane (if not already connected);
5. Close the cover and fix the case with screws.
Note 1: Please select the video surveillance dedicated hard drive that recommended by the hard drive
manufacturer, in order to meet the requirements of long time & large amount of data read and write. Make
sure to purchase from an official reseller to ensure the quality of the hard disk. Recommended resellers
include Newegg.com, Tiger-Direct, and Best Buy.
Note 2: Please format HDD for the first use, or system will send error notification of “Hard disk error”
accompanied with an audible alarm.
Note 3: No washers are actually needed for installation. The damping washers only help with noise reduction.
Wiring Instruction
Connect to the Power Supply
You should first make sure that the AC voltage connected with the NVR power adapter matches with the
requirements. Then, connect the power adapter to power input on the NVR, the power indicator on the
front panel will turn on, indicating the power is connected correctly.
Note: Please use the power adapter included in the package to avoid any damage to the equipment.
Network Access
The device provides a standard RJ45 interface to be used with an Ethernet cable, which can easily provide
access to the LAN or WAN. During the network connection, you should provide sufficient bandwidth to
ensure the stability, smoothness, and clarity of the images transmitted over the network. It is recommended
that you have at least 1mbps upload speed from your Internet Service Provider (ISP). For remote viewing, if
the upload speed is less than 1mbps, then you may have connectivity issues trying to view multiple cameras
at the same time.
4
*Connect to the Alarm Input and Output Devices
The alarm input device should be the type of GND connected alarm or voltage input alarm, which can be set
as N/O or N/C (N/O = Normally Open and N/C = Normally Closed). These definitions refer to the type of
signaling method your alarm uses.
The requirements of voltage alarm signal input level: low level: 0-2V; high level: 5-15V.
The green angle pins are supplied for access of PTZ and alarm devices. The wiring steps are shown below:
(1) Push the orange tab in with your fingernail in order to open the spring loaded connection.
(2) With the orange tab pushed in, push in the bare wire about 1/8-1/4 inch of the way in.
(3) Let go of the orange tab and the spring loaded connection should grab onto the cable. Give the wire a light
tug to ensure that it is secure.
Connect to the Video Output Device: VGA Monitor
The NVR should be connected via the VGA port to a VGA Monitor.
Note 1: Most computer monitors have a VGA port on the back.
5
2 USE INSTRUCTION
2.1 Login
Starting Up
To turn on the device, plug power into the back of the unit and flip the switch on the back. The Power LED on
the front panel will light in red when the unit is receiving power. The preview screen will then display. The
login window will appear by either pressing [ESC] on the remote control, or by right clicking the mouse.
Select the appropriate user and the corresponding password to log in.
Note 1: Please allow the NVR up to two minutes to fully initialize
Note 2: Modify password by selecting <Tool Bar>→<System>→<System Setting>→<Password Setting>.Set
as indicated, new password will take effect instantly
Note 3: Default password for admin is 111111. Default password for User is admin. Admin password can
be restored to factory defaults by jumping the terminals on the motherboard l abeled JP1. Admin
user can modify the user’s password after login. The system supports up to 8 users, admin is the
administrator user with all permissions. The admin user name cannot be deleted or changed. The
admin user can add and delete all other users and the corresponding permissions.
Note 4: “No Hard Drive” will prompt if you start up the device without hard drive, and you can choose whether
to enable a buzzer or not when no hard disk.
6
2.2 Menu introduction
In order to access the options shown below, right-click on the mouse or press [MENU] on the remote.
[Single]: Click [View 1CH] to display the currently selected channel in full screen mode. Alternativel y, you
can double-click a channel in order to view it in full screen mode. Double-click again in order to exit full
screen mode.
[Four]: Click [View 4CH] to display all four channels at once.
[Main menu]: Click [Main Menu] to enter the main menu of the NVR.
Lock]: Click [Log Out] to lock the NVR. You must re-enter a user name and password to unlock the NVR.
[Shut down]: Click [Shut Down] to turn off the device.
[Hard drive status]: Click [HDD Status] to check and manage the hard drive storage capacity and status.
[Playback]: Click [Playback] to enter the video playback interface. Refer to 2.5 in the manual to know how
to search and playback specific time frames.
7
[Manual Rec]: Click [Record] to adjust basic recording settings. To adjust more specific recording settings,
please refer to section 2.4 of the manual.
[Color Setup]: Click [Color Setting] to choose a specific channel and adjust color settings for the selected
channel.
10
2.3 Main Menu operation
2.4 Record
[Video Recording]: Click [Setting] to go to the menu that contains many of the configuration settings on the
NVR.
10
Click [Schedule] to adjust any recording settings.
(1)
(2)
(3)
(4)
Select channel;
Select the type of recording (Schedule: scheduled recording/Alarm: alarm triggered recording);
Select the time period you want to record(note the day of the week, choose ALL for all 7 days)
Select the start and end time for recording, and the total recording time.
10
2.5 Playback
[Playback]: From the Main Menu, select [Playback].
In order to playback footage from a certain date, first select the channel you want to playback video from.
Next, select the date from the calendar in the top right of the window. Dates with video footage will appear with
a yellow date number instead of a white one.
After the date is selected, there will be a time line at the bottom of the page. Just left-click anywhere you want
to start playback.
While in the middle of playing back a video, the buttons on the screen control the following:
1. Click
to Rewind.
2. Click
to Fast Forward.
3. Click
to Pause playback
4. Click
to Stop playback
5. Click
to playback in Slow Motion
11
2.6 Backup
[Backup]: From the Main Menu, select [Backup] in the bottom right. You will be presented with a screen
like below.
In order to backup a video file, you will need to specify the type (motion, alarm, or schedule), channel, and
time for the video file.
[Time]: The time that your video was recorded
[First Page]: The first page of files given the search criteria
[Previous Page]: The previous page of files given the search
criteria
[Next Page]: The next page of files, given the search criteria
[Last Page]: The last page of files, given the search criteria
[Backup]: Click this to actually backup the file
12
2.7 Alarm Settings
[External Alarm Recording]:
Go to [Main Menu] and click [Setting]. Then, select [External Alarm] to set the alarm recording.
The sub-menu interface is as follows:
In order to configure the alarm recording settings, please follow the steps below.
(1) Select the proper Alarm In channel
(2) Select the Type of Alarm. The options are normally open or normally closed. If you do not know what
type of alarm it is, please consult your alarm’s manual.
(3) Set the trigger period for the time of day you want this setting to be active.
(4) Set the type of alarm (E-Mail or Buzzer)
(5) Choose the channels that you want to record video from when the alarm is set off.
13
[HDD Alarm]:
Go to [Main Menu], click [Settings], and then select [HDD Alarm]
In order to configure the NVR to sound an alarm when there is an issue with the hard drive, you will need to
configure the alarm settings here.
[Event Type]: The type of event that you want to trigger the alarm.
[ON]: Whether or not the alarm is on or off
[Buzzer]: Whether or not to sound an audible alarm when the [Event Type] is triggered.
14
2.8 IPC Management
[IPC Management]: From the [Main Menu], select [IPC Manage] to manage the connection between the
IP Cameras and the NVR.
1) If [Search and Add All Devices Automatically] is highlighted in yellow, then the NVR will automatically find
cameras on the network and bind them to the list.
2) From [Search IPC], the NVR will search the network for any IP Cameras, and you will be able to select and
bind them to the device.
3) From [Add Device Manually], you can manually select the IP address of a camera and it’s Media Port.
Note, this is a more advanced configuration. Most of the time, lines 1 and 2 will be sufficient in configuring
your NVR.
15
[Video Stream] To adjust the video stream settings, go to [Main Menu] and click [Settings]. From the
[Settings] menu, go to [Video Stream].
[Channel]: The channel that you are trying to change the video stream settings for.
[Main Stream]: This is used when you are connected on the LAN to the NVR.
[Sub Stream]: This is used when you are remotely connected to the NVR through the Internet
[Video Quality]: Video quality of the image you are seeing
[Frame Rate]: This is the number of pictures per second that is used to make up the video you are seeing.
The higher the frame rate is, the smoother the video will appear. A higher frame rate also uses more
bandwidth.
[Resolution]: This is the resolution that makes up the video that you are seeing. VGA=640x480,
QVGA=320x240
[Bit Rate Type]: This is the type of bit rate that the NVR uses to view video from the camera. “Constant”
uses more bandwidth and is higher quality than variable.
16
2.9 Other System Settings
1) General Settings
[System Time]: The date and time on the system.
[Date Format]: The format of the Day, Month, and Year.
[Time Format]: The format of the hours of the day. It’s recommended to leave this on 24 Hours.
[Language]: The language of the system.
17
[HDD Full]: This is what the system will automatically do when the hard drive becomes full.
[Video Standard]: The video standard of the NVR. Default for North America is NTSC
[Pack Duration]: The length of time each video file will be
[Startup Guide]: whether or not to display the startup guide when the system boots
[Sync IPC Time]: Whether or not to sync the date and time on the NVR with the cameras connected to the
system.
2) Network
[Network] In order to set the network parameters on the NVR, click [Network] from the [Settings] menu.
[DDNS]: Allows you to configure the NVR to sync with a DDNS provider
[E-Mail]: Allows you to configure the email settings on the NVR. This is the e-mail used for the alarm settings
when you check “E-Mail”
[UPnP]: Whether or not to enable UPnP and what ports the NVR uses when UPnP is enabled
[FTP]: Allows you to configure an FTP server to be linked with the NVR. This is used when the alarm settings
have “Upload” checked. The NVR will not record to the FTP server, it will only store still images on it.
[Web Port]: This is the port the web browser accesses the NVR on.
[Video Port]: This is the port that the video feed is transmitted over.
[Phone Port]: This is the port that is used when you try to hook a smart phone up to the NVR.
18
3) Display Settings
[Display Settings] In order to configure the [Display Settings] for the NVR, go to [Main Menu], then to
[Settings], and then select [Display].
[Channel]: This is the current channel you are editing the settings for.
[Channel Name]: This is the name you want the NVR to display for the selected channel.
[Channel Display]: Whether or not to display the channel name on the live feed.
[Time Display]: Whether or not to display the time on the selected channel.
[Resolution]: This is the video output resolution for the NVR.
WARNING: Do not set this too high for your monitor. You may permanently lose access to the menu
system on the NVR.
[Enable AUTO SEQ]: Whether or not to enable auto sequencing between channels.
[All]: Whether or not to include all channels in the Auto Sequence.
[View 1CH]: Whether or not to view the selected channels in full screen mode during auto sequence
[View 4CH]: Whether or not to have a 4 CH grid view during the auto sequence.
[Interval]: The length of time you want the NVR to pause on each selection in the auto sequence.
19
4) Advanced Settings
[Advanced Settings]:
In order to access the advanced settings, go to [Main Menu] and then select [Advanced] in the middle at the
bottom. You will be presented with a screen like the one below.
From this page, you can access the accounts on the NVR, restore it to defaults, upgrade the software, or
configure when to auto-reboot the NVR.
[Account]: This is addressed in section 5 of this chapter.
[Default]: This button allows you to restore the NVR to factory defaults.
[Upgrade]: This button will allow you to upgrade the NVR’s software from a USB flash drive. It is
recommended to only use this button for an incremental upgrade. If you are coming from the old menu system,
DO NOT use the upgrade button. You can upgrade the NVR software by simply plugging in the USB drive with
the firmware update and then reboot the system. The NVR will automatically begin the update when it reboots.
[System Maintenance]: From this menu, you can configure the day of the week and the time you want the
system to automatically reboot.
20
5) Account Management
[Account] To manage accounts on the NVR, select [Account] from the [Advanced Settings] menu.
[Add Account]: Allows you to add a new account to the NVR
[Edit Account]: Allows you to edit settings on the select account
[Delete Account]: Removes the account from the NVR.
[Previous Page]: Goes to the previous page of Accounts
[Next Page]: Goes to the next page of Accounts
21
6) Hard Drive Management
[HDD Info] In order to view the current status of the HDD and to format the HDD, you will need to first go to
[Main Menu], then to[ Info], and then to [HDD Info].
[Total Space]: This is the total space available on the hard drive in the NVR.
[Free Space]: This is the amount of free space left on the hard drive in the NVR.
[Status]: This is the current status of the hard drive in the NVR
[Refresh]: This button will refresh the information shown on the page.
[Format]: This button will format the HDD
20
2.10 System Information
[System Information]: To display the [System Information] page, go to [Main Menu] and then to [Info].
[HDD Info]: This page allows you to view the current status of the hard drive in the NVR and to format the HDD
if necessary.
[Log]: This page will allow you to view the log files associated with alarms that the system has set off.
Additional information can be found in the next section of this manual.
[Version]: This page shows you the following information:
Device Name
Channels
Alarm Inputs
Alarm Outputs
Hardware Version
Software Version
MAC Address
1)
Log
[Log] In order to view the log files on the NVR, go to [ Main Menu], then to [Info], and then to [Log]. You will
be presented with a screen like shown below.
21
[Type]: This is the type of log you want to search for
[Date]: This is the date you want to search for log files on
[Search]: Click this button to actually search for log files based on the [Type] and [Date].
[Prev. Page]: This button takes you to the previous page of log files
[Next Page]: This button takes you to the next page of log files
[First]: This button takes you to the first page of log files
[Last]: This button takes you to the last page of log files
22
3. Mobile Phone Access
3.1 Remote Networking Guide
[Remote Networking Guide] In order to access your NVR system from your mobile phone, you will first
need to set it up for remote access.
Please view our interactive, step-by-step tutorial at www.zmodo.com/network
23
3.2 Zviewer for Android
[Zviewer for Andoird]
Figure 1
Figure 3
Figure 2
Figure 4
Connecting to a Device:
1.From the main interface tap the settings gear in the
bottom left corner and enter the device list.(Fig1)
2.If there are no devices added you will be prompted
with “No device, please add”. Tap “Add new
device”(Fig2)
3.Enter a name for the DVR. Now enter the
corresponding IP address, mobile port number, case
sensitive username and password, and the number of
channels your DVR has. Select OK to save your
device.(Fig3/Fig4)
4.To delete or edit a device, press and hold on its name
from the device list(Fig2)
5. From the main page, tap any blank window and you
Playing Video
will see an orange highlight around the perimeter of
the window.(Fig1)
1.
Press the settings gear, and from the device list,
select a device. Upon selecting a device, its channel
list will appear, and you may select a channel which
will then be played in the previously highlighted
box.
2.
Repeat step 1 and 2 up to four times. Each box may
be connected to either the same or separate devices
from the list and be controlled independently.
20
3.2 Zviewer for iOS
[Zviewer for iOS]
Figure 1
Figure3
Figure 2
Figure 4
Device Management:
1.
2.
3.
4.
From the home screen (Fig1), press the
settings arrow in the bottom left and select
“Device Manage”(Fig2).
From the management screen( Fig3), select
the “+” icon in the upper right hand corner
to add a device.
From the “Add Device” page (Fig4), enter a
name for the DVR. Now enter the
corresponding IP address, mobile port
number, case sensitive username and
password, and the number of channels your
DVR has. Change the current channel to “2”.
Select “save” to save your device. (Note:
Greyed out values must have something
input before you will be able to save.
Connecting to a Device
1.
2.
3.
4.
From the home screen (Fig1) select 1 of the 4
windows so that an orange highlight is around the
perimeter of the box.
Press the settings arrow in the bottom left and select
“Connect to Device” (Fig2).
From this device list, you may select your device
from the list. After selecting your device, you may
choose a channel to play. This will play your camera
in the box previously selected in step 1.
Repeat steps 1 through 3 up to four times. Each box
may be connected to either the same or separate
devices from the list and be controlled
independently
4. APPENDIX
4.1 SPECIFICATIONS
Model
ZMD-NV-SBN4 -4 CH Standalone NVR
Video System
NTSC
Operation System
Linux Based
Video Output
VGA
Display Frame Rate
120fps @VGA
Display Resolution
800×600@60Hz,1024×768@60Hz,1280×1024@60Hz
Recording Frame Rate
120fps @VGA
Record Resolution
120fps @VGA
Record Mode
Manual / Time Scheduled / Alarm Triggered
Playback Mode
Normal Play /Fast Forward /Rewind /Slow Play
Network Function
Real-time Preview, Record, Playback, Download, NVR Setting,
Upgrade, Mobile & Email Function
Network Interface
RJ45, 10M/100M
Net Protocol
TCP/IP, PPPoE, DHCP,DDNS
3G Mobile
Support mobile phone based on iPhone® 4.3 up, Android™ 2.2 up
Mobile Function
4 Channel Viewer / Channel Switch
Alarm Mode
Trigger Record, Email Alert, Audio Output, Alarm output
Sensor/Alarm
4 CH Sensor Inputs / 1 CH Alarm Output
HDD Interface
1 SATA HD, Support up to 2TB
USB Interface
USB 2.0, USB Backup, Mouse
Backup
USB Flash Disk
Remote Control
IR Remote Control
Remote Access
LAN or Internet Browsing
Power Supply
DC12V, 3A
Dimension
8.66"x8.07"x1.57"
Gross Weight
5.65lbs
4.2 System Default Values
22
Items
Options in Menu
Default
LANGUAGE
Simplified
Chinese, English
English
Video Standard
PAL,NTSC,SECAM
Auto adjust
VGA Setting
800×600@60Hz
,1024×768@60
Hz,1280×1024@60 Hz
1280×1024@60Hz
Time Format
12 hours, 24 hours
24 hours
Time Setting
No menu options, click
directly into sub-menu
settings
Year-month-day
hour : minute PM
DST
OFF/ON, choose directly
into sub-menu settings
OFF
Password Setting
No menu options, click
directly into sub-menu
settings
Password: 111111
User: admin
HDD Overwrite
ON/OFF
ON
Add User
No menu options, click
directly into sub-menu
settings
Delete User
No menu options, click
directly into sub-menu
settings
Authority Management
No menu options for
current user, click directly
into sub-menu settings
Current User: admin
Schedule
No menu options, click
directly into sub-menu
settings
24 hours recording
Color Setting
brightness, contrast,
& saturation:
128\46\128\64
3/35/127
Network
Static IP, Dynamic
IP, PPPoE
Static IP
IP Address
No menu options, click
directly into settings
192.168.0.101
Subnet Mask
No menu options, click
directly into settings
255.255.255.0
Gateway
No menu options, click
directly into settings
192.168.0.1
HTTP Port
No menu options, click
directly into settings
80
System Settings
Record Settings
Network Settings
23
Media Port
No menu options, click
directly into settings
8000
PPPoE Setting
ON/OFF; No menu
options, click directly into
settings
OFF
PPPoE Address
No menu options, display
IP address when PPPoE
dial-up successfully
0.0.0.0
DNS Address
No menu options, click
directly into settings
202.96.134.133
Dynamic Domain Name
No menu options, click
directly into settings
OFF
Email Setting
No menu options, check
the settings directly
Mobile Port
No menu options, click
directly into settings
9000
UPnP Setting
Click directly into submenu settings
OFF
FTP Setting
Click directly into submenu settings
OFF
4.3 Other Important Information
Client Supported Versions:
Only Android 2.2 and iOS 4.3 and up are supported. Blackberry and Windows Mobile phones are NOT
compatible.
24
Lifetime Customer Support
Informative Knowledge Base at kb.zmodo.com
24/7 Live Support on www.zmodo.com
Mailing Address:
Champaign Office: 1401 Interstate Drive, Champaign, IL 61822
Los Angeles Office: 17870 Castleton Street, Suite 200, Industry, CA
91748