1
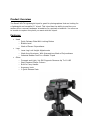
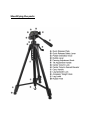
Product Overview The Ravelli APLT4 Lightweight tripod is great for photographers that are looking for a lightweight and versatile 61" tripod. This tripod has the ability to position your camera from a normal landscape orientation to a portrait orientation. You are sure to be able to capture the photo you want with this tripod. Features Head o o o Legs o o o Other o o o o o Quick Release Plate With Locking Button Bubble Level Made of Dense Polyurethane Lever Leg Lock Height Adjustments Made from Aluminum, With Intersections Made of Polyurethane Indented Rubber Feet For a Stable Tripod Compact and Light, Yet Still Supports Cameras Up To 10 LBS Gear Elevated Center Column Built In Carry Handle Accessory hook 1 Quick Release Plate Identifying the parts Using the Tripod Initial Set Up To begin using the tripod, open the carrying bag using the zipper and pull the tripod out of the protective plastic bag. Height Adjustment After you have removed the contents, start by loosening the Leg spreader knob (J), then spread the legs apart. Retighten the leg spreader lock after it reaches the bottom of the center column. Adjusting the height of the APLT4 is done by extending each leg. Unlock the leg locks to extend the legs down to the desired height and then snap close the leg locks to secure. (Note: When adjusting the height, extend the thicker leg segments first, as they are thicker and provide greater stability.) The Quick Release Plate To remove the quick release plate, First unlatch the quick release lever which will release the plate. To attach the camera to the quick release plate, hold camera securely in one hand and locate the 1/4” screw on the bottom. Secure the screw of the quick release plate onto the camera by turning it clockwise. To install the quick release plate insert the front of the plate end first, then snap in the back. The lock will snap close when the plate is seated. Always ensure the lever is fully locked before fully releasing the camera. Panning & Tilting Tilting - To control the resistance of the tilt, you can turn the handle (F) clockwise for greater resistance or counter clockwise for less resistance, to easily tilt up and down. Panning- For smooth consistent panning, tighten or loosen the panning adjustment knob (E) until the right amount of resistance is obtained. Turning the knob clockwise will tighten it and make panning slow and firmer. Turning the knob counter-clockwise to loosen it and will make panning fast and easy. (Note: Finding the right amount of panning resistance will give you smooth and optimal speed for great captures. We also recommend the use of sand bags to provide greater stability when panning.) Geared Column To elevate the center column, First loosen the center column lock knob (G) then turn the crank handle (H) clockwise to raise column to desired height. Lock the center column knob to prevent the head from retracting back down. Applying weight to increase tripod stability The tripod is designed with a special spring loaded hook located at the bottom of the center column. By attaching a weight on the hook, the stability of the tripod can be increased. The weight can be in the form of a sandbag, accessory bag, camera bag, etc. Care & Maintenance Clean tripod with a clean damp cloth. Specifications Model: APLT4 Model Tripod Max Load: Supports Up To 10 LBS Panning Angle: 360° Tilt Angle: 180°, 90° Upward or 90° Downward Dimensions: Storage Height: 24” Maximum Height: 61.5” Minimum Height: 23” Tripod: 2.14 LBS Shipping Weight: 3.5 LBS 1/4” Mass: Quick Release Plate Screw: Quick Release Plate Dimensions: 2 39/64” x 2 1/32” Height Leg Locks: 2 Height Adjustment Leg Locks per leg Feet Materials: Rubber feet Unit Materials: Tripod: 100% Carrying Case: Nylon 3 Leg Sections Leg Diameter (per segment) Center column: 1st -.76” 2nd- .64” 3rd – .54” 13.5” Caution: There is a tipping risk for the fully extended tripods. This can be due to moving the tripods while fully extended, things such as uneven surfaces or wind. To reduce the risk of tipping over, we recommend placing one tripod leg facing the same direction as the camera or the heavy part of mounted equipment to balance the weight. We also recommend purchasing sand bags or weights to set on the tripod legs to hold the tripod in place. Ravelli™ guarantees the tripod only and is not liable for damage caused to backdrops, cameras, lighting, or any other items. ***Optional ATD Tripod Dolly: To easily maneuver your tripod or stands, we recommend our universal heavy duty Ravelli ATD Tripod Dolly. The ATD dolly is an excellent choice for use with your professional background stands, light stands, and also video and camera tripods. These dollies offer smooth movement with 3" rubber wheels and metal ball bearings. The Ravelli ATD also includes a one-step lock on each wheel to securely hold your tripod in place. The dolly is easily folded and has a carrying handle built in and includes a protective bag.