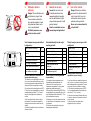
1
RÖMER KID
F
NL
GB
Mode d’emploi
Gebruiksaanwijzing
User instructions
Nous sommes heureux que notre
RÖMER KID puisse accompagner
votre enfant en toute sécurité pendant
un nouveau chapitre de sa vie.
Gefeliciteerd met de aankoop van de
RÖMER KID: de juiste keuze om uw
kind veilig door een nieuwe levensfase
te begeleiden.
We are pleased that our RÖMER KID
may accompany your child safely
through a new stage of his or her life.
Pour protéger efficacement votre
enfant, le RÖMER KID doit
impérativement être utilisé et
installé de la manière décrite dans
le présent mode d’emploi.
De RÖMER KID moet voor een
juiste bescherming van uw kind
altijd zo worden gebruikt en
gemonteerd als in deze
gebruiksaanwijzing beschreven.
Pour toute question complémentaire,
n’hésitez pas à nous contacter.
Als u nog vragen hebt over het
gebruik, neem dan contact met ons
op.
BRITAX RÖMER
Kindersicherheit GmbH
In order to protect your child
correctly, the RÖMER KID must
always be used and installed as
described in these instructions.
If you have any further questions
regarding its use, please feel free to
contact us.
BRITAX RÖMER
Kindersicherheit GmbH
BRITAX RÖMER
Kindersicherheit GmbH
Table des matières
Inhoud
Contents
1. Habilitation .....................................2
2. Utilisation dans le véhicule ..........3
3. Sécurité de votre enfant
le véhicule .....................................4
3.1 Fixation du dossier ..................6
3.2 Réglage en hauteur de
l'appui-tête ...............................7
3.3 Stabilisation du dossier ...........8
3.4 Mise en place de la ceinture
de votre enfant ........................9
3.5 Voici comment votre enfant
est bien protégé ....................12
4. Consignes d’entretien ................13
4.1 Nettoyage ..............................13
4.2 Retrait de la housse ..............14
4.3 Remise en place de la housse 15
5. Remarques relatives à
l’élimination .................................15
6. 2 ans de garantie .........................16
7. Carte de garantie / Procès-verbal
de remise .....................................18
1. Geschiktheid .................................2
2. Gebruik in de auto .........................3
3. Beveiliging van uw kind in
de auto ...........................................4
3.1 Bevestiging van de rugleuning 6
3.2 Instelling van de hoogte van
de hoofdsteun .........................7
3.3 Ruststand van de rugleuning ..8
3.4 De gordel bij uw kind omdoen .9
3.5 Zo is uw kind goed beveiligd .12
4. Onderhoudshandleiding .............13
4.1 Reiniging ...............................13
4.2 De bekleding verwijderen ......14
4.3 De bekleding bevestigen .......15
5. Afvalverwijderingsinstructies ....15
6. 2 jaar garantie ..............................16
7. Garantiekaart/
overdrachtscontrole ...................19
1. Suitability .......................................2
2. Use in the vehicle ..........................3
3. Securing your child in the vehicle 4
3.1 Attaching the backrest .............6
3.2 Adjusting the height of the
headrest ..................................7
3.3 Attaching the backrest .............8
3.4 Securing your child ..................9
3.5 Checklist to ensure that your
child is buckled up correctly ..12
4. Care instructions .........................13
4.1 Cleaning ................................13
4.2 Removing the cover ..............14
4.3 Re-fitting the cover ................15
5. Notes regarding disposal ...........15
6. 2-year warranty ............................16
7. Warranty Card / Transfer Check 20
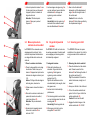
1.
Habilitation
1.
Homologation
RÖMER
Siège auto
KID
Vérification et
homologation selon
ECE* R 44/04
Groupe
Poids
ll+lll
15 à 36 kg
NL
GB
1.
Suitability
Certification
Controle en goedkeuring
conform ECE* R 44/04
RÖMER
autokinder
zitje
Groep
Lichaamsgewicht
KID
ll+lll
15 t/m 36 kg
Tested and certified
RÖMER
according to ECE* R 44/04
Child
safety seat Group
Body weight
KID
ll+lll
15 to 36 kg
*ECE = Europese norm voor
veiligheidsuitrusting
*ECE = European Standard for Safety
Equipment
• Le siège auto est conçu, contrôlé et
homologué conformément aux
exigences de la norme européenne
pour les équipements de sécurité
pour enfants (ECE R 44/04). Le
signe de contrôle E (dans un cercle)
et le numéro d’homologation se
trouvent sur l’étiquette
d’homologation (autocollant sur le
siège auto).
• Het autokinderzitje is ontworpen,
gecontroleerd en goedgekeurd
overeenkomstig de eisen in de
Europese norm voor
veiligheidsvoorzieningen voor
kinderen (ECE R 44/04). Het
keurmerk E (in een rondje) en het
goedkeuringsnummer bevinden
zich op het goedkeuringslabel
(sticker op het autokinderzitje).
• The child safety seat has been
designed, tested and certified to the
requirements of the European
Standard for Child Safety
Equipment (ECE R 44/04). The seal
of approval E (in a circle) and the
approval number are located on the
approval label (sticker on the child
safety seat).
• Le RÖMER KID a été testé et
homologué en tant que
combinaison d'une assise et d'un
dossier.
Attention ! Aucun des deux
éléments ne peut être utilisé avec
d'autres assises ou dossiers.
• De RÖMER KID is als combinatie
van zitkussen en rugleuning getest
en goedgekeurd.
Voorzichtig! De beide delen
mogen niet afzonderlijk in
combinatie met andere zitkussens
of rugleuningen worden gebruikt.
• Le siège auto perd son
homologation dès que vous réalisez
des modifications. Toute
modification doit exclusivement être
réalisée par le fabricant.
• De goedkeuring vervalt zodra er
wijzigingen in het autokinderzitje
worden aangebracht. Wijzigingen
mogen alleen door de fabrikant
worden uitgevoerd.
• RÖMER KID est exclusivement
réservé à l’installation sécuritaire de
votre enfant dans votre véhicule. Il
convient en aucun cas à un usage
domestique en tant que chaise ou
jouet.
• Het autokinderzitje RÖMER KID
mag uitsluitend ter bescherming
van uw kind in de auto worden
gebruikt. Het is niet geschikt om in
huis als stoeltje of speelgoed te
worden gebruikt
*ECE = norme européenne pour les
équipements de sécurité
F
Geschiktheid
Goedkeuring
-2-
• The RÖMER KID, as a combination
of the seat cushion and backrest,
has been checked and approved.
Caution! Do not use either of the
parts in connection with other seat
cushions or backrests.
• This approval shall be invalidated if
you make any modifications to the
child safety seat. No modifications
may be made to the child safety
seat other than by the
manufacturer.
• Use the RÖMER KID exclusively for
securing your child in your vehicle.
It is in no way suitable as a seat or
toy in the home.
NL
F
2.
Utilisation dans le
véhicule
2.
Danger ! Si vous attachez votre
enfant dans le siège à l'aide
d'une ceinture de sécurité à
deux points seulement, il peut
être gravement blessé, voire
tué, en cas d'accident.
N'utilisez jamais avec une
ceinture à deux points !
GB
Gebruik in de auto
2.
Gevaar! Als uw kind in het
kinderzitje slechts met een
tweepuntsgordel is beveiligd,
dan kan het daardoor bij een
ongeval zwaar gewond of zelfs
gedood worden.
Nooit in combinatie met een
tweepuntsgordel gebruiken!
Use in the vehicle
Danger! Should your child be
secured in the vehicle seat with
only a 2-point belt, he or she
could sustain serious injuries
possibly resulting in death.
Never use in connection with
a 2-point belt!
Voici comment vous pouvez utiliser
le siège auto :
Het autokinderzitje kan als volgt
worden gebruikt:
This is how you can use your child
safety seat:
dans le sens de la marche
oui
in de rijrichting
ja
forward facing
dans le sens contraire de la
marche
non 1)
tegen de rijrichting in
nee 1)
rearward facing
no 1)
met tweepuntsgordel
nee
with 2-point belt
no
avec ceinture à 2 points
non
met driepuntsgordel 2)
ja
with 3-point belt 2)
yes
avec ceinture à 3 points 2)
oui
op de passagiersstoel
ja 3)
on front passenger seat
yes 3)
sur le siège du passager
oui 3)
on outer rear seat
yes
oui
op de achterbank aan de
buitenkant
ja
sur les sièges arrière latéraux
yes 4)
sur le siège arrière central
(avec ceinture à 3 points)
oui 4)
on centre rear seat (with 3point belt)
op de achterbank in het midden ja 4)
(met driepuntsgordel)
(Veuillez respecter les directives en
vigueur dans votre pays)
(Houd u aan de in uw land geldende
voorschriften.)
1) L'utilisation sur un siège dirigé dos à la route
(p.ex. van, minibus) n'est autorisée que si celuici convient également au transport d'adultes. Ce
siège ne doit pas être protégé pas un airbag.
2) La ceinture doit être homologuée selon ECE
R 16 (ou une norme comparable) ce qui est par
exemple signalé par la lettre "E", "e" insérée
dans un cercle et figurant sur l’étiquette de
contrôle.
3) Avec un airbag frontal : reculer le siège le
plus possible. Le cas échéant, respectez les
consignes contenues dans le manuel de votre
véhicule.
4) Utilisation impossible lorsqu’il n'existe qu'une
ceinture à 2 points.
1) Het gebruik is alleen toegestaan op een
achterwaarts gerichte zitplaats (bijv. bus,
minibus) die ook voor het vervoer van
volwassenen is toegestaan. Er mag op deze
zitplaats geen airbag aanwezig zijn.
2) De gordel dient overeenkomstig ECE R 16 (of
een vergelijkbare norm) goedgekeurd te zijn. Dit
is bijv. herkenbaar aan de omcirkelde "E", "e" op
het controlelabel van de gordel.
3) bij airbag voorin: ver naar achteren schuiven,
evt. de instructies in het handboek van uw auto
in acht nemen.
4) Gebruik is niet mogelijk als er alleen een
tweepuntsgordel aanwezig is.
yes
(Please observe the relevant
regulations in your country.)
1) Use is permitted on a rearward-facing vehicle
seat (e.g. in a van or minibus) only if the vehicle
seat is also approved for use by adults. The seat
may not be in the area of effect of an airbag.
2) The safety belt must be approved to ECE R
16 or a comparable standard (see test label on
belt with an "E" or "e" in a circle).
3) If there is a front airbag: slide back all the way
or nearly so, observe any instructions in vehicle
owner's manual.
4) Cannot be used if the vehicle seat is
equipped with only a 2-point belt.
3.
Sécurité de votre enfant
dans le véhicule
3.
Pour protéger votre enfant
Ter bescherming van uw kind
• Les principes suivants sont à
respecter : Plus la ceinture de
sécurité est proche du corps de
votre enfant, plus celui-ci est en
sécurité.
• In principe geldt: Hoe beter de
gordel op het lichaam van uw kind
aansluit, des te groter de veiligheid.
• Ne laissez pas votre enfant dans le
siège auto dans la voiture sans
surveillance.
• Gebruik op de achterbank: Schuif
de voorstoel zo ver naar voren dat
de voeten van uw kind de
rugleuning van de voorstoel niet
raken (verwondingsgevaar).
• Laat uw kind nooit zonder toezicht
in het kinderzitje in de auto achter.
• Utilisation sur le siège arrière :
Avancez le siège avant de manière
à ce que les pieds de votre enfant
ne touchent pas le dossier de celuici (risques de blessures).
• De kunststofdelen van het
kinderzitje worden heet in de zon.
Voorzichtig! Uw kind kan zich
hieraan verbranden. Bescherm het
kinderzitje, wanneer dit tijdelijk niet
wordt gebruikt, tegen intensieve
zonnestraling.
• Les parties en matière plastique du
siège auto se réchauffent en plein
soleil.
Attention ! Votre enfant risque de
se brûler. Protégez le siège auto
des rayons du soleil lorsque vous
ne l'utilisez pas.
• Laat uw kind alleen in- en
uitstappen aan de zijde van het
trottoir.
• Ne faites monter ou descendre
votre enfant que du côté du trottoir.
• Houd tijdens lange ritten regelmatig
pauzes zodat u tegemoetkomt aan
de bewegingsdrang van uw kind.
• Lors des longs trajets, ménagez
des pauses afin que votre enfant
puisse se dégourdir les jambes.
F
NL
GB
Beveiliging van uw kind
in de auto
-4-
3.
Securing your child in
the vehicle
For the protection of your
child
• As a general rule: The more snugly
the safety harness fits over your
child's body, the safer your child will
be.
• Please do not leave your child
unattended in the child safety seat
in the vehicle.
• Installation on the rear seat: Move
the front seat forward far enough
that you child's feet cannot hit the
back rest of the front seat (to
prevent risk of injury).
• The plastic parts of the child safety
seat can heat up in the sun.
Caution! Your child may get burnt.
Protect the child seat against
intensive solar radiation when it is
not actually in use.
• Allow your child to enter and exit the
vehicle only on the side away from
traffic.
• Make stops during longer journeys
to give your child an opportunity to
run about and play.
NL
F
Pour protéger tous les
passagers
GB
Ter bescherming van alle
passagiers
For the protection of all
vehicle occupants
En cas de freinage d’urgence ou
d’accident, les objets et personnes
non attachés risquent de blesser
d’autres passagers. Veuillez donc
toujours veiller à ce que…
Bij een noodstop of een ongeval
kunnen niet vastgezette voorwerpen
of personen andere passagiers
verwonden. Zorg er daarom altijd voor
dat...
In the case of an emergency stop or
an accident unsecured persons or
objects may cause injury to other
vehicle occupants. Please always
check that...
• les dossiers des sièges de voiture
soient verrouillés (enclenchez par
exemple le banc arrière rabattable),
• de rugleuningen van de zitplaatsen
zijn vastgezet (bijv. de neerklapbare
rugleuning van de achterbank
vsatklikken);
• the backrests of the vehicle seats
are locked (i.e. that a foldable rear
seat bench latch is engaged).
• tous les objets lourds ou à bords
vifs (par exemple sur la lunette
arrière) soient bien fixés,
• toutes les personnes aient mis leur
ceinture,
• le siège auto soit toujours fixé dans
la voiture même si aucun enfant ne
l’occupe.
• alle zware of scherpe voorwerpen in
de auto (bijv. op de hoedenplank)
zijn vastgezet;
• alle personen in de auto de gordel
om hebben;
• het kinderzitje in de auto is
vastgezet, ook als er geen kind
word vervoerd.
• all heavy or sharp-edged objects in
the vehicle (e.g. on the parcel shelf)
are secured.
• all persons in the vehicle have their
seat belts fastened.
• the child safety seat is always
secured when it is in the vehicle,
even if no child is being transported.
Pour protéger votre véhicule
Ter bescherming van uw auto
To protect your vehicle
• Sur certaines housses de siège de
véhicule recouvertes d’une matière
sensible (velours, cuir, etc.),
l’utilisation de sièges auto risque de
laisser des traces. Pour éviter cela,
vous pouvez mettre en-dessous
une couverture ou une serviette,
par exemple.
• Bepaalde autostoelbekledingen van
gevoelig materiaal (bijv. velours,
leer, etc) kunnen tekenen van
slijtage gaan vertonen door gebruik
van het autokinderzitje. Dit kan
worden voorkomen door
bijvoorbeeld een deken of
handdoek onder het zitje te leggen.
• Some vehicle seat covers of
sensitive materials (e.g. velour,
leather, etc.) may develop wear
marks when child seats are used.
This can be avoided by placing a
blanket or towel under the child
seat.
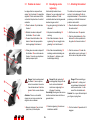
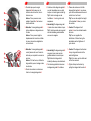
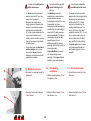
3.1 Fixation du dossier
3.1 Bevestiging van de
rugleuning
3.1 Attaching the backrest
Le siège enfant se compose d'une
assise 1 et d'un dossier 2 à appui-tête
réglable 3. Cette combinaison offre à
votre enfant la protection et le confort
souhaités.
Het kinderzitje bestaat uit een
zitkussen 1 en een rugleuning 2 met
instelbare hoofdsteun 3. Deze
combinatie biedt uw kind de gewenste
bescherming en comfort.
The child seat is composed of a seat
cushion 1 and a backrest 2 with an
adjustable headrest 3. The comination
provides your child with the desired
protection and comfort.
Þ Placez le dossier 2 à plat derrière
Þ Leg de rugleuning 2 plat achter het
Þ Place the backrest 2 evenly behind
l'assise 1.
zitkussen 1.
Þ Rabattez le cache du dispositif
Þ Klap de scharnierafdekking 18
d'articulation 18 vers le haut.
omhoog.
Þ Poussez l'axe d'articulation 4 du
Þ Schuif de scharnieras 4 van de
dossier 2 aussi loin que possible
dans le guidage 5 de l'assise 1.
rugleuning 2 zo ver mogelijk in de
geleiding 5 van het zitkussen 1.
Þ Faites glisser le cache du dispositif
Þ Schuif de scharnierafdekking 18
d'articulation 18 sous la housse de
l'assise 1, de sorte que la partie en
plastique repose à plat.
dusdanig onder de bekleding van
het zitkussen 1, dat deze op het
kunststofoppervlak ligt.
NL
GB
backrest 2 as far as possible into
the guide 5 on the seat cushion 1.
Þ Push the axis cover 18 under the
seat cushion cover in such a way 1,
that is rests on the plastic surface.
Danger ! Lors du redressement
du dossier 2, aucun objet ne
doit se trouver dans la zone de
l’axe de basculement 4 entre le
dossier 2 et le coussin d’assise
1.
Attention ! Vous ou votre enfant
risquez par ex. de vous coincer les
doigts ou de vous blesser.
Gevaar! Als de rugleuning 2
wordt opgeklapt, mag zich in de
buurt van de scharnieras 4
niets tussen rugleuning 2 en
zitkussen 1 bevinden.
Voorzichtig! Uw vingers of die van uw
kind kunnen klem komen te zitten en
gewond raken.
Danger! When swivelling up
the backrest 2, nothing must
come between the backrest 2
and the seat cushion 1 in the
area of the articulated axis 4.
Caution! You or your child could pinch
your fingers, injuring them.
Þ Basculez le dossier 2 vers le haut
Þ Draai de rugleuning 2 naar boven
Þ Turn the backrest 2 upwards until it
totdat deze vastklikt.
jusqu'à ce qu'il s'encliquète.
F
the seat cushion 1.
Þ Fold the axis cover 18 upwards.
Þ Push the articulated axis 4 of the
-6-
engages.
F
NL
GB
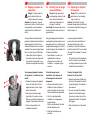
3.2 Réglage en hauteur de
l'appui-tête
3.2 Instelling van de hoogte
van de hoofdsteun
3.2 Adjusting the height of
the headrest
Danger ! Le siège enfant ne
doit jamais être utilisé non
installé, même pour l’essayer.
Attention ! Le dossier 2 risque de
basculer vers l’arrière. Placez toujours
le siège enfant sur la banquette du
véhicule avant d’y installer votre
enfant.
Gevaar! Als de rugleuning 2
wordt opgeklapt, mag zich in de
buurt van de scharnieras 4
niets tussen rugleuning 2 en
zitkussen 1 bevinden.
Voorzichtig! Uw vingers of die van uw
kind kunnen klem komen te zitten en
gewond raken.
Danger! Do not use the child
seat when it is free standing,
even to test it out.
Caution! The backrest 2 may tip
backward. Always place the child seat
on the vehicle seat before having your
child sit down in it.
Un appui-tête correctement réglé 3
garantit un déplacement optimal de la
sangle diagonale 6 et offre ainsi à
votre enfant la protection et le confort
souhaités. Vous pouvez régler l'appuitête 3 sur onze hauteurs différentes.
Een goed aangepaste hoofdsteun 3
waarborgt de optimale positie van de
diagonale gordel 6, en biedt uw kind
de gewenste beveiliging en comfort. U
kunt de hoogte van de hoofdsteun 3 in
elf standen vastklikken.
• L'appui-tête 3 doit être réglé de
façon telle qu'entre les épaules de
votre enfant et l'appui-tête 3 vous
puissiez encore glisser deux doigts.
• De hoofdsteun 3 moet zo zijn
ingesteld dat er tussen de
schouders van uw kind en de
hoofdsteun 3 nog twee vingers
ruimte is.
A properly adjusted headrest 3
ensures the optimum distribution of
the diagonal belt section 6 and
provides your child with the desired
protection and comfort. You can adjust
the height of the headrest 3 to eleven
positions.
Voici comment adapter la hauteur
de l'appui-tête 3 à la taille de votre
enfant :
U kunt de hoogte van de
hoofdsteun 3 als volgt aan de
lichaamsgrootte van uw kind
aanpassen:
Þ Saisissez la poignée de réglage 8
au dos de l'appui-tête 3 et tirez
légèrement vers le haut. L'appuitête est déverrouillé.
Þ Vous pouvez à présent régler
l'appui-tête 3 à la hauteur voulue.
Dès que vous lâchez la poignée de
réglage 8, l'appui-tête se verrouille.
Þ Placez le siège enfant sur la
banquette du véhicule.
Þ Grijp de instelhendel 8 aan de
achterkant van de hoofdsteun 3
vast en trek deze iets naar boven.
Nu is de hoofdsteun ontgrendeld.
Þ U kunt nu de ontgrendelde
hoofdsteun 3 in de gewenste
hoogte instellen.
Zodra u de instelhendel 8 loslaat,
klikt de hoofdsteun vast.
Þ Plaats het kinderzitje op de
autostoel.
• The headrest 3 must be adjusted in
such a way that you can still pass
two fingers between the your child's
shoulders and the headrest 3.
To adjust the height of the
headrest 3 to fit your child:
Þ Grasp the adjustment handle 8 by
the back of the headrest 3 and pull
it upwards slightly. The headrest is
now released.
Þ You can now adjust the released
headrest 3 to the desired height.
As soon as you have let go of the
adjustment handle 8, the headrest
will engage.
Þ Place the child seat on the vehicle
seat.
Þ Faites asseoir votre enfant et
Þ Laat uw kind in het kinderzitje
contrôlez la hauteur.
Attention ! Renouvelez cette
opération autant de fois que
nécessaire jusqu’à ce que le
réglage de l’appui-tête 3 soit
optimal.
plaatsnemen en controleer de
hoogte.
Voorzichtig! Herhaal dit proces
totdat de hoofdsteun 3 optimaal is
ingesteld.
3.3 Ruststand van de
rugleuning
3.3 Stabilisation du dossier
Le dossier 2 du siège enfant s'adapte
en continu à l'inclinaison du siège du
véhicule.
Astuce ! Le dossier 2 est maintenu en
position verticale par un petit
enclenchement. Poussez légèrement
le dossier 2 vers l‘arrière pour
débloquer l‘enclenchement.
De rugleuning 2 van het kinderzitje
past zich traploos aan de hellingshoek
van de autostoel aan.
Tip! De rugleuning 2 wordt met een
kleine grendel verticaal gehouden.
Druk de rugleuning 2 iets naar
achteren om de grendel te
ontgrendelen.
Attention ! La meilleure protection
possible n'est assurée que lorsque le
siège du véhicule est en position
droite. Le dossier 2 du siège enfant
peut être basculé vers l'arrière en
position de repos, indépendamment
du siège du véhicule.
Let op! De beste bescherming is
alleen gewaarborgd als de autostoel
rechtop staat. De rugleuning 2 van het
kinderzitje kan, onafhankelijk van de
autostoel, naar achteren in een
ruststand leunen.
Þ Pour ce faire, abattez l'équerre 9
Þ Klap daarvoor de afstandshoek 9
qui se trouve à l'arrière du
dossier 2.
F
NL
GB
aan de achterkant van de
rugleuning 2 uit.
-8-
Þ Have your child sit down in the child
seat and check the height.
Caution! Repeat this process until
the headrest 3 is at the optimal
height.
3.3 Attaching the backrest
The backrest 2 of the child seat adapts
smoothly to the slant of the vehicle
seat.
Tip! The backrest 2 is held vertically
by a small notch. Press the backrest 2
slightly to the rear to release the
notch.
Please observe: The best possible
protection can only be ensured if the
vehicle seat is in its upright position.
The backrest 2 of the child seat can be
inclined backwards into a reclining
position independent of the the vehicle
seat.
Þ To do so, fold out the displacement
angle 9 on the back of the
backrest 2.
F
Þ Inclinez à présent le dossier 2 vers
l'arrière jusqu'à ce que l'équerre 9
s'appuie à plat sur le dossier du
siège du véhicule.
Attention ! N'inclinez pas le
dossier 2 plus que le permet
l'équerre 9.
NL
Þ Laat vervolgens de rugleuning 2 zo
ver naar achteren leunen totdat de
afstandshoek 9 vlak tegen de
rugleuning van de autostoel
aankomt.
Voorzichtig! Laat de rugleuning 2
niet verder naar achteren leunen
dan de afstandshoek 9 toestaat.
GB
Þ Now incline the backrest 2
backwards until the displacement
angle 9 lies flat along the back of
the vehicle seat.
Caution! Do not incline the
backrest 2 farther than specified by
the displacement angle 9.
3.4 Mise en place de la
ceinture de votre enfant
3.4 De gordel bij uw kind
omdoen
3.4 Securing your child
Le RÖMER KID ne nécessite aucun
aménagement du véhicule. Votre
enfant est simplement attaché dans
son siège à l'aide de la ceinture du
véhicule.
De RÖMER KID hoeft niet in de auto
te worden gemonteerd. Uw kind wordt
eenvoudigweg met de autogordel in
het kinderzitje vastgezet.
The RÖMER KID does not require
installation in the vehicle. Your child is
simply secured with the vehicle seat
belt.
1. Poser la ceinture du véhicule
1. Autogordel omdoen
1. Fastening the vehicle seat belt
Þ Placez le siège enfant sur le siège
Þ Plaats het kinderzitje op de
Þ Place the child seat on the vehicle
du véhicule. Veillez à ce que le
dossier 2 s'appuie bien à plat contre
le dossier du siège du véhicule (voir
3.3).
Astuce ! Si l'appui-tête du siège du
véhicule gêne, retournez-le.
Þ Faites asseoir votre enfant dans le
siège.
Þ Déroulez la ceinture du véhicule et
passez-là, devant votre enfant,
jusqu'à son fermoir 10.
Attention ! Ne pas torsader la
sangle.
Þ Enclenchez la languette dans le
fermoir de la ceinture 10 du
véhicule. CLIC !
autostoel. Zorg ervoor dat de
rugleuning 2 vlak tegen de
rugleuning van de autostoel
aankomt (zie 3.3).
Tip! Als de hoofdsteun van de
autostoel daarbij in de weg zit, draai
dan gewoon om.
Þ Laat uw kind in het kinderzitje
plaatsnemen.
Þ Trek de autogordel los en leid deze
voor uw kind langs naar het slot van
de autogordel 10.
Voorzichtig! Draai de gordel niet.
Þ Klik de gesp in het slot van de
autogordel 10 vast. KLIK!
seat. Please be sure that the
backrest 2 lies flat along the back of
the vehicle seat (see 3.3).
Tip! If the headrest of the vehicle
seat is bothersome, simply turn it
around.
Þ Have your child sit in the child seat.
Þ Pull out the vehicle seat belt and
guide it in front of your child to the
vehicle seat buckle 10.
Caution! Do not twist the belt.
Þ Engage the buckle tongue in the
vehicle seat buckle 10. CLICK!
2. Passez la ceinture dans les
guidages rouges du siège enfant.
Þ Passez la sangle diagonale 6 et la
sangle ventrale 11 du côté du
fermoir 10, sous l'accoudoir, dans le
guidage rouge clair 12 de l'assise 1.
Attention ! Le fermoir de ceinture
du véhicule 10 ne doit pas se
trouver entre le guidage rouge 12 et
l'accoudoir .
l'autre côté de l'assise 1, également
dans le guidage rouge 12.
Attention ! La sangle ventrale 11
doit passer, des deux côtés, le plus
bas possible au-dessus de l’aine de
votre enfant.
le support de sangle rouge foncé 7
de l'appui-tête 3 jusqu'à ce qu'elle
repose complètement et sans être
torsadée dans le support de sangle
7.
Astuce ! Si le dossier 2 cache le
support de sangle 7, vous pouvez
bouger l'appui-tête 3 vers le haut.
Maintenant, la sangle diagonale 6
s'insère facilement. Replacez à
présent l'appui-tête 3 à la bonne
hauteur.
GB
Þ Leid de diagonale gordel 6 en de
Þ Insert the diagonal belt section 6
heupgordel 11 aan de kant van het
gordelslot van de auto 10 onder de
armleuning, door de lichtrode
gordelgeleider 12 van het
zitkussen 1.
Voorzichtig! Het gordelslot van de
auto 10 mag niet tussen de
lichtrode gordelgeleider 12 en de
armleuning liggen.
andere zijde van het zitkussen 1
ook door de lichtrode gordelgeleider
12.
Voorzichtig!De heupgordel 11
moet aan beide zijden zo laag
mogelijk over de liezen van uw kind
lopen.
Þ Leid de diagonale gordel 6 in de
Þ Insérez la sangle diagonale 6 dans
NL
2. Inserting the vehicle seat belt
into the red belt guides of the child
seat.
Þ Leid de heupgordel 11 aan de
Þ Passez la sangle ventrale 11 de
F
2. Autogordel in de rode
gordelgeleiders van het kinderzitje
leggen.
-10-
donkerrode gordelhouder 7 van de
hoofdsteun 3 totdat deze zich
volledig en ongedraaid in
gordelhouder 7 bevindt.
Tip! Als de rugleuning 2 de
gordelhouder 7 bedekt, kunt u de
hoofdsteun 3 naar boven verstellen.
Nu kan de diagonale gordel 6
gemakkelijk worden aangebracht.
Zet de hoofdsteun 3 vervolgens
weer terug op de juist hoogte.
and the lap belt section 11 on the
side of vehicle belt buckle 10 under
the armrest into the light red belt
guide 12 of the seat cushion 1.
Caution! The vehicle seat beat 10
may not rest between the light red
belt guide 12 and the armrest .
Þ Insert the lap belt section 11 on the
other side of the seat cushion 1 into
the light red belt guide 12 as well.
Caution!The lap belt section 11
must lie as low as possible over
your child's hips.
Þ Guide the diagonal seat belt
section 6 into the dark red belt
holder 7 of the headrest 3 until it
lies completely in the belt holder
and is not twisted 7.
Tip! If the backrest 2 conceals the
belt holder 7, you can adjust the
headrest 3 upwards. The diagonal
belt section 6 can now be easily
inserted. Now return the headrest 3
to the proper height.
F
Þ N'oubliez pas que la sangle
diagonale 6 doit passer sur la
clavicule de votre enfant, et non
dans son cou.
Astuce ! Vous pouvez encore
adapter l'appui-tête 3 en hauteur
dans le véhicule.
Þ Attention ! La sangle diagonale 6
doit se déplacer en diagonale vers
l'arrière.
Astuce ! Vous pouvez régler le
déplacement de la ceinture à l'aide
du renvoi de ceinture réglable de
votre véhicule.
Þ Attention ! La sangle diagonale 6
ne doit jamais aller vers l'avant du
véhicule pour rejoindre le renvoi de
ceinture.
Astuce ! Si c'est le cas, n'utilisez le
siège enfant que sur le siège arrière
du véhicule.
Þ Tendez la ceinture du véhicule en
tirant sur la sangle diagonale 6.
NL
Þ Controleer of de diagonale gordel 6
over het sleutelbeen van uw kind
loopt en niet vast tegen de hals ligt.
Tip! U kunt de hoogte van de
hoofdsteun 3 ook nog in de auto
aanpassen.
Þ Voorzichtig! De diagonale gordel
6 moet schuin naar achteren lopen.
Tip! U kunt de positie van de gordel
met de instelbare gordelomleider
van uw auto regelen.
GB
Þ Please also make sure that the
diagonal belt section 6 runs above
your child's collarbone and does not
rest at his or her throat.
Tip! You can also adjust the height
of the headrest 3 when you are in
the vehicle.
Þ Caution! The diagonal belt
section 6 must run slanted towards
the back.
Tip! You can regulate the
distribution of the belt using the
adjustable seat belt tightener of
your vehicle.
Þ Voorzichtig! De diagonale gordel 6
Þ Caution! The diagonal belt section
mag nooit naar voren naar de
gordelomleider in de auto lopen.
Tip! Gebruik in dat geval het
kinderzitje alleen op de achterbank.
6 may not guide forwards to the
seat belt tightener.
Tip! In this case, use the child seat
on the the rear seat.
Þ Trek de autogordel strak door aan
de diagonale gordel 6 te trekken.
Þ Tighten the lap belt section by
pulling the diagonal belt section 6.
3.5 Voici comment votre
enfant est bien protégé
3.5 Zo is uw kind goed
beveiligd
Vérifiez, pour la protection de
votre enfant, que...
• la sangle ventrale 11 passe bien
dans les guidages rouge clair 12 de
l'assise,
• la sangle diagonale 6 passe bien,
du côté du fermoir de ceinture du
véhicule 10, également dans le
guidage rouge clair 12 de l'assise,
Controleer voor de veiligheid
van uw kind of...
• de heupgordel 11 aan beide zijden
door de twee lichtrode
gordelgeleiders 12 van het
zitkussen loopt;
• de diagonale gordel 6 aan de kant
van het slot van de autogordel 10
ook door de lichtrode
gordelgeleider 12 van het zitkussen
loopt;
• la sangle diagonale 6 passe bien
dans le support de ceinture rouge
foncé 7 de l'appui-tête,
• la sangle diagonale 6 se déplace en
diagonale vers l'arrière,
• de diagonale gordel 6 door de
donkerrode gordelhouder 7 van de
hoofdsteun loopt;
• les bretelles sont bien tendues et
pas torsadées,
• de diagonale gordel 6 schuin naar
achteren loopt;
• de gordels goed strak zitten en niet
zijn verdraaid;
• le fermoir de ceinture du
véhicule 10 ne se trouve pas entre
le guidage de ceinture rouge
clair 12 et l'accoudoir de l'assise.
F
NL
GB
• het slot van de autogordel 10 zich
niet tussen de lichtrode
gordelgeleider 12 en de armleuning
van het zitkussen bevindt.
-12-
3.5 Checklist to ensure that
your child is buckled up
correctly
For the safety of your child,
please check that...
• the belt lap section 11 runs through
both sides of the light red belt
guides 12 of the seat cushion,
• the diagonal belt section 6 also runs
through the light red belt guide 12 of
the seat cushion on the side of the
vehicle seat buckle 10,
• the diagonal belt section 6 runs
through the dark red belt holder 7 of
the headrest,
• the diagonal belt section 6 runs
slanted towards the back.
• the straps are tightened and not
twisted,
• the vehicle seat buckle 10 does not
rest between the light red guide 12
and the armrest of the seat cushion.
NL
F
4.
Consignes d’entretien
Pour conserver l’efficacité de
la protection
• En cas de collision à une vitesse
supérieure à 10 km/h, il est possible
que le siège auto soit endommagé,
les dégâts n’étant pas forcément
visibles.
Remplacez impérativement ce
siège auto. Veuillez éliminer
l‘ancien siège auto selon la
réglementation (voir 5).
• Contrôlez régulièrement l’état de
toutes les pièces importantes.
Assurez-vous du bon
fonctionnement de toutes les pièces
mécaniques.
• Veillez à ce que le siège auto ne
soit pas coincé entre des objets
durs (porte du véhicule, glissière du
siège, etc.), ce qui risquerait de
l’endommager.
• Faites impérativement contrôler un
siège auto endommagé (par
exemple après une chute) par le
fabricant.
4.
GB
Onderhoudshandleiding
Voor het behoud van de
beschermende werking
4.
Care instructions
To retain the protective effect
• Bij ongevallen waarbij de
botssnelheid hoger dan 10 km/u is,
kan het autokinderzitje beschadigd
raken, hoewel de beschadigingen
niet altijd zichtbaar zijn.
Vervang in zo‘n geval het kinderzitje
altijd. Voer het zitje volgens de
geldende voorschriften af (zie 5).
• In an accident at a collision speed
above 10 km/h the child seat could
suffer damage which is not
necessarily obvious.
In such cases it is extremely
important that you replace the child
seat. Please dispose of it properly
(see 5).
• Controleer alle belangrijke
onderdelen regelmatig op
beschadiging. Zorg ervoor dat de
mechanische componenten goed
functioneren.
• Regularly check all important parts
for damage. Ensure the correct
operation of all mechanical
components.
• Zorg ervoor dat het autokinderzitje
niet tussen harde delen (portier,
stoelrail, etc) klem komt te zitten en
beschadigd raakt.
• Laat een autokinderzitje dat
beschadigd is (bijv. als dit is
gevallen) altijd door de fabrikant
controleren.
• To prevent damage or breakage,
ensure that the child seat does not
become jammed in the car door,
seat runners, etc.
• Should the child seat be damaged
(for example after dropping it) it
must be inspected by the
manufacturer.
4.1 Nettoyage
4.1 Reiniging
4.1 Cleaning
Veillez à seulement utiliser une
housse de rechange RÖMER car la
housse représente un élément
fonctionnel essentiel du système. Les
housses de rechange sont disponibles
dans les magasins spécialisés ou
dans une filiale de l’ADAC (automobile
club allemand).
Gebruik uitsluitend een originele
bekleding van RÖMER, aangezien de
bekleding van wezenlijk belang is voor
de werking van het systeem. Losse
bekleding is verkrijgbaar bij de
vakhandel en bij filialen van de ADAC
(de Duitse ANWB).
Please be sure to use only original
RÖMER replacement seat covers, as
the seat cover is important to the
proper functioning of the system.
Replacement seat covers are
available from your retailer and or at
ADAC (German Motoring Club)
branches.
Le siège auto ne doit pas être
utilisé sans housse.
Het autokinderzitje mag niet
zonder bekleding worden
gebruikt.
• La housse peut être enlevée et
lavée en machine à 30° avec une
lessive pour linge délicat.
Respectez les instructions de
lavage figurant sur l'étiquette de la
housse. Si vous lavez la housse à
des températures supérieures à
30°, le tissu risque de déteindre. Ne
pas essorer la housse et ne la
mettre en aucun cas dans le sèchelinge (le tissu risque de se décoller
du rembourrage).
• Vous pouvez laver les éléments en
matière plastique avec une eau
savonneuse. Ne pas utiliser de
détergents ou de produits corrosifs
(solvants par exemple).
4.2 Retrait de la housse
Þ Décrochez le crochet de housse 14
du dossier 2.
• De bekleding kan worden
verwijderd en in de wasmachine
worden gewassen met een
fijnwasprogramma op 30°C en een
fijnwasmiddel. Let op de
aanwijzingen op het wasetiket van
de bekleding. Als de bekleding op
meer dan 30°C wordt gewassen,
kan de bekledingsstof verkleuren.
De bekleding mag niet worden
gecentrifugeerd of in een
elektrische wasdroger worden
gedroogd (hierdoor kan de stof van
de vulling losraken).
• De kunststofdelen kunnen met
een zeepoplossing worden
gereinigd. Gebruik geen bijtende
middelen (zoals oplosmiddelen).
4.2 De bekleding
verwijderen
Þ Maak de bekledingshaken 14 van
The child seat must not be
used without the seat cover.
• The cover can be removed and
washed with a mild detergent using
the washing machine's cycle for
delicate items (30 °C). Please
observe the instructions on the
washing label of the cover. The
colours of the cover may fade if
washed at more than 30 °C. Do not
spin, and never tumble dry in an
electric clothes dryer (the fabric
may separate from the padding).
• The plastic parts can be cleaned
using soapy water. Do not use
harsh cleaning agents (such as
solvents).
4.2 Removing the cover
Þ Unhook the cover hook 14 of the
backrest 2.
de rugleuning 2 los.
Þ Décrochez les boucles élastiques
Þ Maak de rubberen lussen 13 van
13 de l'assise 1.
F
NL
GB
het zitkussen 1 los.
-14-
Þ Unhook the elastic loops 13 of the
seat cushion 1.
NL
F
Þ Défaites les boutonnières 19 de
Þ Maak de knoopgaten 19 van de
l'appui-tête 3.
Þ Maintenant vous pouvez retirer la
GB
Þ Unhook the buttonholes 19 of the
hoofdsteun 3 los.
Þ De bekleding kan nu worden
housse.
headrest 3.
Þ You can now pull the cover off.
verwijderd.
4.3 Remise en place de la
housse
Þ Procédez simplement en sens
4.3 De bekleding bevestigen
Þ Ga gewoon in omgekeerde
4.3 Re-fitting the cover
Þ Simply proceed in the reverse
order.
volgorde te werk.
inverse.
5.
Remarques relatives à
l’élimination
Veuillez respecter les directives en
vigueur dans votre pays.
Elimination de l’emballage
Conteneur pour le
carton
5.
Afvalverwijderingsinstructies
Houd u aan de in uw land geldende
voorschriften inzake
afvalverwijdering.
5.
Notes regarding
disposal
Please observe the waste disposal
regulations in your country.
Disposal of packaging
Afvoer van de verpakking
Bij het oud papier
Container for paperboard
Disposal of components
Elimination des pièces détachées
Afvoer van de afzonderlijke delen
cover
garbage, thermal utilisation
Housse
Déchets résiduels,
recyclage thermique
Bekleding
Huisvuil, thermische
verwerking
plastic
parts
container corresponding to
the label on the part
Pièces en
matière
plastique
suivant le marquage,
dans le conteneur
spécialement prévu
Kunststofdelen
metal
parts
container for metals
Pièces
métalliques
Conteneur pour métaux
Overeenkomstig de
aanduiding op het deel
in de daarvoor
bestemde container
Metalen delen
Container voor metaal
6.
2 ans de garantie
6.
2 jaar garantie
Pour ce siège auto / bicyclette /cette
poussette, nous accordons une
garantie de 2 ans pour les défauts de
fabrication ou de matériau. La garantie
débute le jour de l’achat. Pour
apporter la preuve de la garantie,
veuillez conserver pendant toute la
durée de la garantie : la carte de
garantie remplie, le procès-verbal de
remise que vous avez signé ainsi que
la facture d’achat.
Wij geven 2 jaar garantie op fabricageen materiaalfouten in deze
autokinderzitjes/fietskinderzitjes/
kinderwagens. De garantieperiode
gaat in op de datum van aankoop.
Bewaar om aanspraak op de garantie
te kunnen maken de ingevulde
garantiekaart, de door u ondertekende
overdrachtscontrole en het
aankoopbewijs gedurende de gehele
garantieperiode.
Pour toute réclamation, la carte de
garantie doit être jointe au siège pour
enfants. La prestation de garantie est
limitée aux sièges auto / bicyclette /
poussettes qui ont été traités comme il
convient et qui sont renvoyés propres
et complets.
Bij het indienen van een garantieclaim
dient het garantiebewijs met het
kinderzitje te worden meegestuurd. De
garantie is alleen van toepassing op
autokinderzitjes/fietskinderzitjes/
kinderwagens waar juist mee is
omgegaan en die in schone en goed
staat worden teruggezonden.
La garantie ne couvre pas les
défauts suivants :
• usure naturelle et dommages dus à
une sollicitation excessive
• dommages dus à une utilisation
inappropriée et non conforme
F
NL
GB
In the case of a warranty claim, the
Warranty Card must be returned
together with the product. The
warranty covers only car/bicycle child
seats / pushchairs which have been
handled properly and which have
been sent to us in a clean condition.
The Warranty does not cover:
• natural signs of wear and damage
resulting from excessive stress.
• normale tekenen van slijtage en
schade ten gevolge van overmatige
belasting
• damage resulting from
inappropriate or improper use.
• schade ten gevolge van onbedoeld
of onjuist gebruik
What is covered by the warranty?
Garantie of niet?
Stoffen: Al onze stoffen voldoen aan
hoge eisen wat betreft
kleurbestendigheid tegen UV-straling.
Alle stoffen verbleken echter als deze
aan UV-straling worden blootgesteld.
Hierbij gaat het niet om
materiaalfouten, maar om normale
slijtageverschijnselen die van garantie
zijn uitgesloten.
-16-
2-year warranty
For this car/bicycle child seat /
pushchair we provide a 2-year
warranty against manufacturing or
material defects. The warranty period
is effective from the day of purchase.
As proof we ask that you fill out the
Warranty Card and retain it for the
whole term of the warranty period,
together with the Transfer Check
signed by you and your sales receipt.
Uitgesloten van garantie zijn:
Cas de garantie ou non ?
Tissus : tous nos tissus répondent
aux exigences élevées quant à
la résistance des couleurs aux rayons
UV. Malgré tout, les tissus se
décolorent lorsqu’ils sont soumis aux
rayons UV. Dans ce cas, il ne s’agit
pas de défaut de matériel mais d’une
usure normale qui n’est pas couverte
par la garantie.
6.
Fabrics: All our materials meet very
high requirements with regard to
colour fastness when exposed to UV
radiation. Nevertheless, all fabrics
fade when exposed to UV radiation.
This is not a material defect, but rather
a normal sign of wear which is not
covered by the warranty.
Buckle: Buckle malfunction is often
due to accumulations of dirt and dust
which may stop it from working
properly. If this happens, the buckle
F
Fermoir : au cas où le fermoir
présenterait des dysfonctionnements,
ceux-ci sont souvent dus aux
encrassements qui peuvent être
enlevés par lavage. Veuillez vous
conformer aux instructions de votre
mode d’emploi.
En cas de garantie, veuillez vous
adresser immédiatement à votre
revendeur spécialisé. Il vous assistera
volontiers. Lors du traitement des
droits résultant de réclamations, les
taux d’amortissement spécifiques au
produit sont appliqués. Pour cela,
veuillez consulter nos conditions
générales de vente disponibles chez
le revendeur.
NL
Slot: Eventuele problemen met het
slot zijn meestal het gevolg van
verontreinigingen die kunnen worden
verwijderd door het slot met water te
reinigen. Houd u zich hierbij aan de
instructies in uw gebruiksaanwijzing.
Neem, als uw kinderzitje nog onder de
garantie valt, onmiddellijk contact op
met uw vakhandel. Hier wordt u met
raad en daad terzijde gestaan. Bij de
behandeling van garantieclaims
worden productspecifieke
afschrijvingsregels toegepast.
Hiervoor verwijzen wij u naar de bij de
vakhandel verkrijgbare algemene
voorwaarden.
Gebruik, onderhoud en verzorging
Utilisation, entretien et
maintenance
Le siège auto / bicyclette / la
poussette doivent être traités
conformément au mode d’emploi.
Nous signalons expressément que
seuls les accessoires et les pièces de
rechange d’origine doivent être
utilisés.
Het autokinderzitje, fietskinderzitje of
de kinderwagen moet overeenkomstig
de gebruiksaanwijzing worden
gebruikt en onderhouden. Wij wijzen
er nadrukkelijk op dat uitsluitend
originele accessoires en onderdelen
mogen worden gebruikt.
GB
can be washed out. Please refer to
your user instructions.
Please contact your retailer directly in
the event of a warranty claim. He or
she will give you the advice and
support you need. When processing
claims, product-specific depreciation
rates will be applied. Please refer to
our General Terms and Conditions
which are available from your retailer.
Use, care and maintenance
The car/bicycle child seat / pushchair
must be used in accordance with the
user instructions. We would like to
point out that it is extremely important
that only RÖMER accessories and
replacement parts are used.
F
7.
Carte de garantie / Procès-verbal de remise
Nom :
________________________________________________
Adresse :
________________________________________________
Code postal :
________________________________________________
Lieu :
________________________________________________
Procès-verbal de remise :
1. Intégralité
{ contrôlé
en ordre
2. Contrôle
fonctionnel
Téléphone (avec
préfixe) :
________________________________________________
- Mécanisme de
réglage siège
E-Mail :
________________________________________________
- Réglage des sangles
{ contrôlé
en ordre
{ contrôlé
en ordre
{ J’ai contrôlé le siège auto /
bicyclette / la poussette et vérifié
qu’ils ont été remis en bon état
et complet, et que toutes les
fonctions sont parfaitement
opérationnelles.
{ J’ai reçu des informations
suffisantes concernant le produit
et ses fonctions avant l’achat, et
j’ai pris connaissance des
instructions d’entretien et de
maintenance.
________________________________________________
Siège auto /
bicyclette /
poussette :
________________________________________________
Référence :
________________________________________________
Couleur du tissu
(dessin) :
________________________________________________
Accessoires :
________________________________________________
Date de l’achat :
________________________________________________
Acheteur
(signature) :
________________________________________________
Revendeur :
________________________________________________
3. Absence de
dommages
- Contrôle du siège
{ contrôlé
en ordre
- Contrôle des
éléments textiles
{ contrôlé
en ordre
- Contrôle des pièces
en matière plastique
{ contrôlé
en ordre
Cachet du revendeur
NL
7.
Garantiekaart/overdrachtscontrole
Overdrachtscontrole:
1. Volledigheid
{ gecontroleerd
in orde
Naam:
_______________________________________________
Adres:
_______________________________________________
Postcode:
_______________________________________________
Plaats:
_______________________________________________
2. Controle van de
werking
Telefoon (incl.
netnummer):
_______________________________________________
- Instelmechanisme zitje
{ gecontroleerd
in orde
E-mail:
_______________________________________________
- Instelling gordel
{ gecontroleerd
in orde
_______________________________________________
Autokinderzitje/
fietskinderzitje/
kinderwagen:
_______________________________________________
3. Controleren op
beschadigingen
Artikelnummer:
_______________________________________________
- Zitje controleren
{ gecontroleerd
in orde
Kleur stof (dessin):
_______________________________________________
Accessoires:
_______________________________________________
- Stoffen delen
controleren
{ gecontroleerd
in orde
- Kunststofdelen
controleren
{ gecontroleerd
in orde
Datum van
aankoop:
_______________________________________________
Klant
(handtekening):
_______________________________________________
Verkoper:
_______________________________________________
Stempel vakhandel
{ Ik heb het autokinderzitje/
het fietskinderzitje/de
kinderwagen gecontroleerd
en mijzelf ervan overtuigd
dat het zitje/de kinderwagen
compleet en volledig
functionerend aan mij is
overgedragen.
{ Ik heb voorafgaand aan de
aankoop voldoende
informatie over het product
en de werking ervan
gekregen en ben op de
hoogte gesteld van de
onderhouds- en
verzorgingsvoorschriften.
GB
7.
Warranty Card / Transfer Check
Name:
____________________________________________
Address:
____________________________________________
Post Code:
____________________________________________
City/Town:
____________________________________________
Transfer Check:
1. Completeness
{ examined
OK
2. Function test
Telephone No.
(including area code):
____________________________________________
e-mail address:
____________________________________________
- Seat adjustment
mechanism
{ examined
OK
- Harness adjustment
{ examined
OK
____________________________________________
Car/bicycle child seat /
pushchair:
____________________________________________
Article No.:
____________________________________________
Fabric colour (design):
____________________________________________
Accessories:
____________________________________________
Date of purchase:
____________________________________________
Buyer (signature):
____________________________________________
3. Intactness
- Seat
{ examined
OK
- Fabrics
{ examined
OK
- Plastic parts
{ examined
OK
Retailer's stamp
Retailer:
____________________________________________
{ I have checked the child car/
bicycle seat / pushchair and
am sure that the seat was
complete on delivery and that
all functions are sound.
{ I received adequate
information on the product
and its functions prior to
purchase and have noted the
care and maintenance
instructions.