1
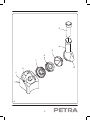
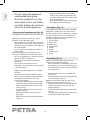
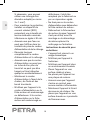
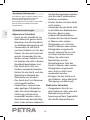
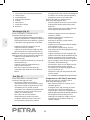
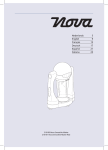
282700 Petra Ice Maker USER MANUAL English Français Deutsch Italiano Guarantee, CE & SSL 4 9 14 19 24 2 5 4 3 6 7 8 2 1 B A 3 • Do not immerse the appliance in water or other liquids. If the appliance is immersed in water or other liquids, do not remove the appliance with your hands. Immediately remove the mains plug from the wall socket. If the appliance is immersed in water or other liquids, do not use the appliance again. • Clean the appliance and the accessories. Refer to the section "Cleaning and maintenance". Congratulations! EN You have purchased a Petra product. Our aim is to provide quality products with a tasteful design and at an affordable price. We hope that you will enjoy this product for many years. Safety instructions General safety • Read the manual carefully before use. Keep the manual for future reference. • Only use the appliance and the accessories for their intended purposes. Do not use the appliance and the accessories for other purposes than described in the manual. • The appliance shall not be used by children. Keep the appliance and the mains cable out of the reach of children. • The appliance can be used by persons with reduced physical, sensory or mental capabilities or with lack of experience and knowledge if they are supervised or instructed on how to use the appliance in a safe way and understand the hazards involved. • Children shall not play with the appliance. • Do not use the appliance near bathtubs, showers, basins or other vessels containing water. Electrical safety • Before use, always check that the mains voltage is the same as the voltage on the rating plate of the appliance. • The appliance is not intended to be operated by means of an external timer or separate remote-control system. • Connect the appliance to an earthed wall socket. If necessary, use an earthed extension cable of a suitable diameter (at least 3 x 1 mm2). • For additional protection, install a residual current device (RCD) with a rated residual operating current that does not exceed 30 mA. 4 • Do not use the appliance outdoors. • Do not use the appliance in damp environments. • Place the appliance on a stable and flat surface. • Do not place the appliance on a hob. • Make sure that the appliance does not come into contact with flammable material. • Keep the appliance away from heat sources. Do not place the appliance on hot surfaces or near open flames. • Make sure that your hands are dry before touching the appliance. • Beware of sharp parts. Keep your hands away from the sharp parts. • Keep your hands away from the moving parts. • Keep long hair and loose clothing away from the moving parts. • Keep spatulas and other kitchen utensils away from the moving parts. • Do not insert foreign objects into the appliance. • Do not move the appliance while it is switched on. Safety instructions for icecream makers • The appliance is suitable for domestic use only. 5 EN • Make sure that water cannot enter the contact plugs of the mains cable and the extension cable. • Always fully unwind the mains cable and the extension cable. • Make sure that the mains cable does not hang over the edge of a worktop and cannot be caught accidentally or tripped over. • Keep the mains cable away from heat, oil and sharp edges. • Do not use the appliance if the mains cable or the mains plug is damaged or defective. If the mains cable or the mains plug is damaged or defective, it must be replaced by the manufacturer or an authorised repair agent. • Do not pull the mains cable to disconnect the mains plug from the mains. • Disconnect the mains plug from the mains when the appliance is not in use, before assembly or disassembly and before cleaning and maintenance. EN • Do not leave the appliance unattended during use. • Store the appliance in a dry place when not in use. Make sure that children do not have access to stored appliances. - Clean the blade cone (3), the feeding tube (4), the pusher (5), the gasket (6) and the bottom cover (7) in soapy water or in the dishwasher. - Rinse the accessories under running water. - Thoroughly dry the accessories. Description (fig. A) Your 282700 Petra ice-cream maker has been designed for making ice cream from frozen fruits. The appliance is not suitable for making ice cream from fresh fruits. The appliance is suitable for indoor use only. The appliance is suitable for domestic use only. 1. On/off switch 2. Motor unit 3. Blade cone 4. Feeding tube 5. Pusher 6. Gasket 7. Bottom cover 8. Spout Cleaning and maintenance (fig. A) The appliance must be cleaned after each use. Before you proceed, we need you to pay attention to the following notes: - Before cleaning or maintenance, switch off the appliance, remove the mains plug from the wall socket and wait until the appliance has cooled down. - Do not immerse the appliance in water or other liquids. Before you proceed, we would like you to focus your attention on the following notes: - Do not use aggressive or abrasive cleaning agents to clean the appliance. - Do not use sharp objects to clean the appliance. - Do not clean the appliance in the dishwasher. The accessories can be cleaned in the dishwasher. Assembly (fig. A) Before you proceed, we need you to pay attention to the following notes: - Before assembly or disassembly, switch off the appliance, remove the mains plug from the wall socket and wait until the appliance has cooled down. • Regularly check the appliance for possible damage. • Clean the outside of the appliance with a damp cloth. Thoroughly dry the outside of the appliance with a clean, dry cloth. • Clean the accessories: - Unlock the feeding tube (4) by turning it into the direction of the unlock symbol. - Remove the feeding tube (4) from the motor unit (2). - Loosen the bottom cover (7) from the feeding tube (4). - Remove the blade cone (3) from the gasket (6). - Remove the gasket (6) from the bottom cover (7). • Place the motor unit (2) on a stable and flat surface. • Place the bottom (10.8 cm) of the gasket (6) into the bottom cover (7). Note: Do not place the top (9.5 cm) of the gasket (6) into the bottom cover (7). • Place the blade cone (3) onto the gasket (6). • Tighten the bottom cover (7) onto the feeding tube (4). • Place the feeding tube (4) onto the motor unit (2). • Lock the feeding tube (4) by turning it into the direction of the lock symbol. 6 Food preparation (2 persons) Before you proceed, we need you to pay attention to the following notes: - Do not use fruits with pits, nuts or ice cubes. - Defrost all types of fruit for a few minutes before pressing the fruit using the appliance. The defrost time depends on the temperature setting of your freezer and on the room temperature. Experiment with the required time to achieve the best results. As a guideline, start with 10-15 minutes for soft fruits and increase to 15-20 minutes for hard fruits. • If you use overripe or brown-spotted bananas, peel the bananas and freeze them for 24 hours. Defrost the bananas at room temperature for 10-15 minutes. • Use different types of frozen berries: strawberries, raspberries, blackberries, blueberries or cranberries. Defrost the berries at room temperature for 10-15 minutes. • To achieve the best results, alternate between the ingredients. • Place the appliance on a stable and flat surface. • Assemble the appliance. Refer to the section "Assembly". • Remove the pusher (5) from the feeding tube (4). • Place a bowl of a suitable size under the spout (8). • To switch on the appliance, set the on/off switch (1) to the 'I' position. • Cut the frozen fruits into pieces that fit into the feeding tube (4). • Insert the pieces of frozen fruit into the feeding tube (4). Use the pusher (5) to press the pieces of frozen fruit through the feeding tube (4). • If necessary, clean the blade cone (3). • To switch off the appliance, set the on/off switch (1) to the 'O' position. • Remove the mains plug from the wall socket. • Allow the appliance to cool down completely. Storage • Put the appliance and the accessories in the original packaging. • Store the appliance with the accessories in a dry and frost-free place, out of the reach of children. U.K. Wiring instructions The wires in the mains lead are coloured in accordance with the following code: BLUE NEUTRAL BROWN LIVE As the colours of the wire in the mains lead of this appliance may not correspond with the colour markings identifying the terminals on your plug, proceed as follows: The wire which is coloured BLUE must be connected to the terminal which is marked with the letter N or coloured black. The wire which is coloured BROWN must be connected to the terminal which is marked with the letter L or coloured red. 7 EN Use (fig. A) Before you proceed, we need you to pay attention to the following notes: - Do not leave the appliance switched on continuously for more than two minutes. After two minutes, switch off the appliance and allow it to cool down for one minute before switching it on again. Allow the appliance to cool down completely after every three cycles of "two minutes on / one minute off". - Do not insert your hands into the feeding tube to press frozen fruits. Always use the pusher. Do not exert pressure on the pusher. - If the appliance starts to vibrate strongly and produce less ice cream, switch off the appliance and subsequently clean the blade cone. Before you proceed, we would like you to focus your attention on the following notes: - Only operate the appliance when a bowl of a suitable size is placed under the spout. - Regularly clean the blade cone when processing larger quantities of fruit. EN Should the fuse in the BS1363 plug require replacement, a 3Amp BS1362 fuse must be fitted. This is a double-insulated appliance and does not need an earth connection. Warning! On no account should either the live or neutral wires be connected to the earth terminal. Disclaimer Subject to change; specifications can be changed without further notice. 8 Instructions de sécurité Sécurité générale • Lisez avec soin le manuel avant utilisation. Conservez le manuel pour référence future. • Utilisez l'appareil et ses accessoires uniquement pour leurs fins prévues. N'utilisez pas l'appareil et ses accessoires pour tout autre objet que celui exposé dans le manuel. • L'appareil ne doit pas être utilisé par les enfants. Maintenez l'appareil et le cordon d'alimentation hors de portée des enfants. • Cet appareil peut être utilisé par des personnes présentant un handicap physique, sensoriel ou mental voire ne disposant pas des connaissances et de l'expérience nécessaires en cas de surveillance ou d'instructions sur l'usage de cet appareil en toute sécurité et de compréhension des risques impliqués. Sécurité électrique • Avant toute utilisation, vérifiez que la tension du secteur correspond à celle indiquée sur la plaque signalétique de l'appareil. • L'appareil n'est pas conçu pour être utilisé avec une minuterie externe ou un système de télécommande séparé. • Connectez l'appareil à une prise murale mise à la terre. 9 FR • Les enfants ne doivent pas jouer avec l'appareil. • N'utilisez pas l'appareil à proximité d'une baignoire, d'une douche, d'un lavabo ou d'autres récipients contenant de l'eau. • Ne plongez pas l'appareil dans l'eau ou autres liquides. Si l'appareil est plongé dans l'eau ou d'autres liquides, ne retirez pas l'appareil avec vos mains. Débranchez immédiatement la fiche secteur de la prise murale. Si l'appareil est plongé dans l'eau ou autre liquide, ne l'utilisez pas à nouveau. • Nettoyez l'appareil et les accessoires. Consultez la section "Nettoyage et entretien". Félicitations! Vous avez acheté un produit Petra. Nous souhaitons vous proposer des produits de qualité associant un design raffiné et des prix accessibles. Nous espérons que vous profiterez longtemps de ce produit. FR Si nécessaire, vous pouvez utiliser une rallonge d'un diamètre adapté (au moins 3 x 1 mm2). • Pour maximiser la protection, installez un dispositif de courant résiduel (RCD) présentant une intensité de service résiduelle nominale inférieure ou égale à 30 mA. • Assurez-vous que l'eau ne peut pas s'infiltrer dans les contacts de prise du cordon d'alimentation et de la rallonge. • Déroulez toujours complètement le cordon d'alimentation et la rallonge. • Assurez-vous que le cordon d'alimentation ne pend pas sur le bord d'un plan de travail et ne peut pas être happé ou faire trébucher quelqu'un accidentellement. • Maintenez le cordon d'alimentation à l'écart de la chaleur, de l'huile et des bords tranchants. • N'utilisez pas l'appareil si le cordon d'alimentation ou la fiche secteur est endommagé ou défectueux. Si le cordon d'alimentation ou la fiche secteur est endommagé ou défectueux, il doit être remplacé par le fabricant ou par un réparateur agréé. • Ne tirez pas sur le cordon d'alimentation pour débrancher la fiche secteur du secteur. • Débranchez la fiche secteur du secteur lorsque l'appareil n'est pas utilisé, avant le montage ou le démontage de même qu'avant le nettoyage ou l'entretien. Instructions de sécurité pour sorbetières • L'appareil est réservé à un usage domestique. • N'utilisez pas l'appareil à l'extérieur. • N'utilisez pas l'appareil dans un environnement humide. • Placez l'appareil sur une surface stable et plane. • Ne placez pas l'appareil sur une plaque de cuisson. • Assurez-vous que l'appareil n'entre en contact avec aucune matière inflammable. • Maintenez l'appareil à l'écart des sources de chaleur. Ne placez pas l'appareil sur une surface chaude ou à proximité de flammes nues. 10 - Ne plongez pas l'appareil dans l'eau ou autres liquides. Avant de procéder, nous souhaiterions que vous preniez connaissance des remarques suivantes : - N'utilisez pas de produits de nettoyage agressifs ou abrasifs pour nettoyer l'appareil. - Ne nettoyez pas l'appareil avec des objets coupants. - Ne nettoyez pas l'appareil dans le lavevaisselle. Les accessoires peuvent être nettoyés au lave-vaisselle. • Contrôlez régulièrement les éventuels dommages sur l'appareil. • Nettoyez l'extérieur de l'appareil avec un chiffon humide. Séchez soigneusement l'extérieur de l'appareil avec un chiffon propre et sec. • Nettoyez les accessoires : - Déverrouillez le tube d'alimentation (4) en le tournant dans le sens du symbole de déverrouillage. - Retirez le tube d'alimentation (4) de l'unité moteur (2). - Desserrez le cache inférieur (7) du tube d'alimentation (4). - Retirez le cône à lame (3) du joint (6). - Retirez le joint (6) du cache inférieur (7). - Nettoyez le cône à lame (3), le tube d'alimentation (4), le poussoir (5), le joint (6) et le cache inférieur (7) à l'eau savonneuse ou au lave-vaisselle. - Rincez les accessoires sous l’eau courante. - Séchez soigneusement les accessoires. Description (fig. A) Votre sorbetière 282700 Petra a été conçue pour la préparation de glaces à partir de fruits surgelés. L'appareil ne convient pas à la préparation de glaces à partir de fruits frais. L'appareil est réservé à un usage à l'intérieur. L'appareil est réservé à un usage domestique. 1. Interrupteur marche/arrêt 2. Unité moteur 3. Cône à lame 4. Tube d'alimentation 5. Poussoir Nettoyage et entretien (fig. A) L’appareil doit être nettoyé après chaque utilisation. Avant de procéder, vous devez faire attention aux remarques suivantes : - Avant le nettoyage ou l'entretien, arrêtez l'appareil, débranchez la fiche secteur de la prise murale et attendez que l'appareil refroidisse. 11 FR • Assurez-vous d'avoir les mains sèches avant de toucher l'appareil. • Attention aux pièces coupantes. Éloignez vos mains des parties coupantes. • Éloignez vos mains des parties mobiles. • N’approchez pas les cheveux longs et les vêtements amples des pièces mobiles. • Éloignez les spatules et autres ustensiles de cuisine des pièces mobiles. • N'insérez pas de corps étrangers dans l'appareil. • Ne déplacez pas l’appareil lorsqu’il est en marche. • Ne laissez jamais l'appareil sans surveillance pendant l'utilisation. • Rangez l'appareil dans un endroit sec lorsqu'il n'est pas utilisé. Assurez-vous que les enfants ne puissent pas accéder aux appareils rangés. Avant de procéder, nous souhaiterions que vous preniez connaissance des remarques suivantes : - Utilisez l'appareil uniquement si un bol d'une taille adaptée est placé sous la goulotte. - Nettoyez régulièrement le cône à lame pour traiter de grandes quantités de fruits. 6. Joint 7. Cache inférieur 8. Goulotte Assemblage (fig. A) FR Avant de procéder, vous devez faire attention aux remarques suivantes : - Avant le montage ou le démontage, arrêtez l'appareil, débranchez la fiche secteur de la prise murale et attendez que l'appareil refroidisse. • Placez l'appareil sur une surface stable et plane. • Assemblez l’appareil. Consultez la section "Assemblage". • Retirez le poussoir (5) du tube d'alimentation (4). • Placez un bol d'une taille adaptée sous la goulotte (8). • Pour mettre l'appareil en marche, positionnez l'interrupteur marche/arrêt (1) sur 'I'. • Découpez les fruits surgelés en morceaux adaptés au tube d'alimentation (4). • Insérez les morceaux de fruits surgelés dans le tube d'alimentation (4). Utilisez le poussoir (5) pour presser les morceaux de fruits surgelés dans le tube d'alimentation (4). • Si nécessaire, nettoyez le cône à lame (3). • Pour éteindre l'appareil, positionnez l'interrupteur marche/arrêt (1) sur 'O'. • Débranchez la fiche secteur de la prise murale. • Laissez l'appareil refroidir complètement. • Placez l'unité moteur (2) sur une surface plane et stable. • Placez le fond (10,8 cm) du joint (6) dans le cache inférieur (7). Remarque : Ne placez pas le sommet (9,5 cm) du joint (6) dans le cache inférieur (7). • Placez le cône à lame (2) sur le joint (3). • Serrez le cache inférieur (7) sur le tube d'alimentation (4). • Placez le tube d'alimentation (4) sur l'unité moteur (2). • Verrouillez le tube d'alimentation (4) en le tournant dans le sens du symbole de verrouillage. Utilisation (fig. A) Préparation des aliments (2 personnes) Avant de procéder, vous devez faire attention aux remarques suivantes : - Ne faites pas fonctionner l’appareil en continu pendant plus de deux minutes. Après deux minutes, arrêtez l'appareil et laissez-le refroidir pendant une minute avant de le remettre en marche. Laissez l'appareil refroidir complètement tous les trois cycles de "deux minutes de marche / une minute d'arrêt". - N'insérez pas vos mains dans le tube d'alimentation pour presser les fruits surgelés. Utilisez toujours le poussoir. N’exercez pas de pression sur le poussoir. - Si l'appareil commence à vibrer fortement et produit moins de glace, arrêtez-le puis nettoyez le cône à lame. Avant de procéder, vous devez faire attention aux remarques suivantes : - N'utilisez pas des fruits avec des noyaux, des noix ou des glaçons. - Décongelez tous les types de fruits quelques minutes avant de les presser avec l'appareil. Le temps de décongélation dépend du réglage de température de votre congélateur et de la température ambiante. Expérimentez avec différentes durées pour obtenir les meilleurs résultats. En règle générale, commencez par 10-15 minutes pour les fruits mous et augmentez à 15-20 minutes pour les fruits durs. • 12 Si vous utilisez des bananes très mûres ou tachetées, pelez les bananes et congelez-les 24 heures. Décongelez les bananes à température ambiante pendant 10-15 minutes. FR • Utilisez différents types de baies surgelées : fraises, framboises, mûres, myrtilles et canneberge. Décongelez les baies à température ambiante pendant 10-15 minutes. • Pour optimiser les résultats, faites alterner les ingrédients. Rangement • Rangez l'appareil et les accessoires dans l'emballage d'origine. • Rangez l'appareil avec les accessoires dans un endroit sec, hors de portée des enfants et à l'abri du gel. Clause de non responsabilité Sous réserve de modifications ; les spécifications peuvent être modifiées sans préavis. 13 des Geräts eingewiesen werden und die damit verbundenen Gefahren verstehen. • Kinder dürfen mit dem Gerät nicht spielen. • Verwenden Sie das Gerät nicht in der Nähe von Badewannen, Duschen, Bassins oder anderen Wasserbehältern. • Tauchen Sie das Gerät niemals in Wasser oder andere Flüssigkeiten ein. Falls das Gerät in Wasser oder andere Flüssigkeiten eingetaucht wurde, nehmen Sie es nicht mit Ihren Händen heraus. Ziehen Sie sofort den Netzstecker aus der Wandsteckdose. Falls das Gerät in Wasser oder andere Flüssigkeiten eingetaucht wird, darf es nicht mehr verwendet werden. • Reinigen Sie das Gerät und das Zubehör. Siehe Abschnitt "Reinigung und Wartung". Herzlichen Glückwunsch! Sie haben ein Petra Produkt erworben. Unser Ziel ist es, Qualitätsprodukte mit einem geschmackvollen Design zu einem erschwinglichen Preis anzubieten. Wir hoffen, dass Sie viele Jahre Gefallen an diesem Produkt finden. Sicherheitsanweisungen DE Allgemeine Sicherheit • Lesen Sie das Handbuch vor dem Gebrauch genau durch. Bewahren Sie das Handbuch zur künftigen Bezugnahme auf. • Verwenden Sie das Gerät und sein Zubehör nur für den Zweck, für den es konstruiert wurde. Verwenden Sie das Gerät und sein Zubehör nicht für Zwecke, die nicht in diesem Handbuch beschrieben sind. • Das Gerät darf nicht von Kindern verwendet werden. Halten Sie das Gerät und das Netzkabel außerhalb der Reichweite von Kindern. • Das Gerät darf von Personen mit eingeschränkten körperlichen, sensorischen oder geistigen Fähigkeiten oder mit einem Mangel an Erfahrung und Kenntnis verwendet werden, sofern diese Personen beaufsichtigt bzw. in den sicheren Gebrauch Elektrische Sicherheit • Vergewissern Sie sich vor dem Gebrauch stets, dass die Netzspannung mit der Spannung auf dem Typenschild des Geräts übereinstimmt. 14 Sicherheitsanweisungen für Eismaschinen • Das Gerät ist nur für den Hausgebrauch geeignet. • Verwenden Sie das Gerät nicht im Freien. • Verwenden Sie das Gerät nicht in feuchten Umgebungen. 15 DE • Halten Sie das Netzkabel von Hitzequellen, Öl und scharfen Kanten fern. • Verwenden Sie das Gerät nicht, wenn das Netzkabel oder der Netzstecker beschädigt oder defekt ist. Ist das Netzkabel oder der Netzstecker beschädigt oder defekt, muss das Teil vom Hersteller oder einem autorisierten Reparaturbetrieb ausgetauscht werden. • Ziehen Sie niemals am Netzkabel, um den Netzstecker aus der Wandsteckdose zu ziehen. • Ziehen Sie den Netzstecker aus der Wandsteckdose, wenn das Gerät nicht gebraucht wird, sowie vor der Zerlegung bzw. dem Zusammenbau und vor der Reinigung und Wartung. • Das Gerät ist nicht dafür ausgelegt, von einer externen Zeitschaltuhr oder einem Fernsteuersystem betrieben zu werden. • Schließen Sie das Gerät an eine geerdete Wandsteckdose an. Verwenden Sie nötigenfalls ein geerdetes Verlängerungskabel mit einem geeigneten Durchmesser (mindestens 3 x 1 mm2). • Lassen Sie als zusätzliche Schutzmaßnahme einen Fehlerstromschutzschalter (FI-Schutzschalter) installieren, der einen Nenn-Fehlerstrom von 30 mA nicht überschreitet. • Stellen Sie sicher, dass kein Wasser in die Steckkontakte des Netzkabels und in das Verlängerungskabel eindringen kann. • Wickeln Sie das Netzkabel und das Verlängerungskabel stets vollständig ab. • Vergewissern Sie sich, dass das Netzkabel nicht an der Kante einer Arbeitsplatte hängen bleibt und nicht versehentlich daran gezogen oder darüber gestolpert wird. DE • Stellen Sie das Gerät auf eine stabile, flache Oberfläche. • Stellen Sie das Gerät nicht auf ein Kochfeld. • Stellen Sie sicher, dass das Gerät nicht mit entzündlichem Material in Berührung kommt. • Halten Sie das Gerät von Wärmequellen fern. Stellen Sie das Gerät nicht auf heiße Oberflächen oder in die Nähe von offenen Flammen. • Stellen Sie sicher, dass Ihre Hände trocken sind, bevor Sie das Gerät berühren. • Vorsicht vor scharfen Teilen. Halten Sie Ihre Hände von den scharfen Teilen fern. • Halten Sie Ihre Hände von den sich bewegenden Teilen fern. • Halten Sie langes Haar und lose Kleidung von den sich bewegenden Teilen fern. • Halten Sie Spachtel und andere Küchenutensilien von den sich bewegenden Teilen fern. • Stecken Sie keine Fremdkörper in das Gerät. • Bewegen Sie das Gerät nicht, während es eingeschaltet ist. • Lassen Sie das Gerät während des Gebrauchs nicht unbeaufsichtigt. • Bewahren Sie das Gerät bei Nichtgebrauch an einem trockenen Ort auf. Vergewissern Sie sich, dass Kinder keinen Zugang zu den aufbewahrten Geräten haben. Reinigung und Wartung (Abb. A) Das Gerät muss nach jedem Gebrauch gereinigt werden. Bevor Sie fortfahren, beachten Sie bitte unbedingt die folgenden Hinweise: - Schalten Sie das Gerät vor der Reinigung und Wartung aus, ziehen Sie den Netzstecker aus der Wandsteckdose und warten Sie, bis das Gerät abgekühlt ist. - Tauchen Sie das Gerät niemals in Wasser oder andere Flüssigkeiten ein. Bevor Sie fortfahren, richten Sie bitte Ihre Aufmerksamkeit auf folgende Hinweise: - Verwenden Sie keine aggressiven oder scheuernden Mittel, um das Gerät zu reinigen. - Verwenden Sie keine scharfen Gegenstände, um das Gerät zu reinigen. - Reinigen Sie das Gerät nicht in der Geschirrspülmaschine. Das Zubehör kann in der Geschirrspülmaschine gereinigt werden. • Kontrollieren Sie das Gerät regelmäßig auf mögliche Schäden. • Reinigen Sie das Äußere des Geräts mit einem feuchten Lappen. Trocknen Sie das Äußere des Geräts gründlich mit einem sauberen, trockenen Tuch. • Reinigen Sie das Zubehör: - Entsichern Sie das Einfüllrohr (4), indem Sie es in Richtung des Entsicherungssymbols drehen. - Entfernen Sie das Einfüllrohr (4) von der Motoreinheit (2). - Lösen Sie die untere Abdeckung (7) vom Einfüllrohr (4). - Entfernen Sie den Messerkonus (3) von der Dichtung (6). 16 - Entfernen Sie die Dichtung (6) von der unteren Abdeckung (7). - Reinigen Sie den Messerkonus (3), das Einfüllrohr (4), den Schieber (5), die Dichtung (6) und die untere Abdeckung (7) in Seifenwasser oder in der Geschirrspülmaschine. - Spülen Sie das Zubehör unter fließendem Wasser. - Trocknen Sie das Zubehör gründlich ab. • Setzen Sie das Einfüllrohr (4) auf die Motoreinheit (2). • Sichern Sie das Einfüllrohr (4), indem Sie es in Richtung des Sicherungssymbols drehen. Bevor Sie fortfahren, beachten Sie bitte unbedingt die folgenden Hinweise: - Lassen Sie das Gerät nicht länger als zwei Minuten ununterbrochen laufen. Schalten Sie das Gerät nach zwei Minuten aus und lassen Sie es eine Minute lang abkühlen, bevor Sie es wieder einschalten. Lassen Sie das Gerät jeden "zwei-Minuten-an / eineMinute aus"-Zyklus vollständig abkühlen. - Stecken Sie nicht Ihre Hände in das Einfüllrohr, um die gefrorenen Früchte hineinzupressen. Verwenden Sie stets den Schieber. Üben Sie keinen Druck auf den Schieber aus. - Falls das Gerät beginnt, stark zu vibrieren und weniger Eis herstellt, schalten Sie es aus und reinigen Sie anschließend den Messerkonus. Bevor Sie fortfahren, richten Sie bitte Ihre Aufmerksamkeit auf folgende Hinweise: - Betreiben Sie das Gerät nur, wenn ein Behälter geeigneter Größe unter dem Ausgießer steht. - Reinigen Sie regelmäßig den Messerkonus, wenn größere Fruchtmengen verarbeitet werden. Beschreibung (Abb. A) Ihre 282700 Petra Eismaschine wurde zum Herstellen von Eis aus gefrorenen Früchten konstruiert. Das Gerät ist nicht für die Zubereitung von Eis aus frischen Früchten geeignet. Das Gerät ist nur für den Gebrauch in geschlossenen Räumen geeignet. Das Gerät ist nur für den Hausgebrauch geeignet. 1. Ein-/Aus-Schalter 2. Motoreinheit 3. Messerkonus 4. Einfüllrohr 5. Schieber 6. Dichtung 7. Untere Abdeckung 8. Ausgießer Zusammenbau (Abb. A) Bevor Sie fortfahren, beachten Sie bitte unbedingt die folgenden Hinweise: - Schalten Sie das Gerät vor dem Zusammenbau bzw. der Zerlegung aus, ziehen Sie den Netzstecker aus der Wandsteckdose und warten Sie, bis das Gerät abgekühlt ist. • Stellen Sie das Gerät auf eine stabile, flache Oberfläche. • Bauen Sie das Gerät zusammen. Siehe Abschnitt "Zusammenbau". • Entfernen Sie den Schieber (5) vom Einfüllrohr (4). • Stellen Sie einen Behälter geeigneter Größe unter den Ausgießer (8). • Um das Gerät einzuschalten, stellen Sie den Ein-/Aus-Schalter (1) auf Position 'I'. • Schneiden Sie die gefrorenen Früchte in für das Einfüllrohr (4) passende Stücke. • Geben Sie die gefrorenen Früchte in das Einfüllrohr (4). Verwenden Sie den Schieber (5), um die gefrorenen Fruchtstücke durch das Einfüllrohr (4) zu pressen. • Stellen Sie die Motoreinheit (2) auf eine stabile, flache Oberfläche. • Setzen Sie die Unterseite (10,8 cm) der Dichtung (6) in die untere Abdeckung (7) ein. Hinweis: Setzen Sie die Oberseite (9,5 cm) der Dichtung (6) nicht in die untere Abdeckung (7) ein. • Setzen Sie den Messerkonus (3) auf die Dichtung (6). • Befestigen Sie die untere Abdeckung (7) auf dem Einfüllrohr (4). 17 DE Gebrauch (Abb. A) • Reinigen Sie ggf. den Messerkonus (3). • Um das Gerät auszuschalten, stellen Sie den Ein-/Aus-Schalter (1) auf Position 'O'. • Ziehen Sie den Netzstecker aus der Wandsteckdose. • Lassen Sie das Gerät vollständig abkühlen. Zubereitung von Speise (2 Personen) DE Bevor Sie fortfahren, beachten Sie bitte unbedingt die folgenden Hinweise: - Verwenden Sie keine Früchte mit Kernen, Nüssen oder Eiswürfeln. - Tauen Sie alle Fruchtsorten zunächst ein paar Minuten lang auf, bevor Sie die Frucht mit dem Gerät pressen. Die Auftauzeit hängt von der Temperatureinstellung Ihres Gefrierschranks sowie der Raumtemperatur ab. Experimentieren Sie mit der erforderlichen Zeit, um die besten Ergebnisse zu erzielen. Beginnen Sie als Richtlinie mit 10-15 Minuten für weiche Früchte und erhöhen Sie auf 15-20 Minuten für harte Früchte. • Falls Sie überreife oder braungefleckte Bananen verwenden, schälen Sie diese und frieren Sie sie 24 Stunden lang ein. Tauen Sie die Bananen bei Raumtemperatur 10-15 Minuten lang auf. • Verwenden Sie verschiedene gefrorene Beeren: Erdbeeren, Himbeeren, Brombeeren, Heidelbeeren oder Preiselbeeren. Tauen Sie die Beeren bei Raumtemperatur 10-15 Minuten lang auf. • Um die besten Ergebnisse zu erzielen, wechseln Sie zwischen den Zutaten. Aufbewahrung • Verstauen Sie das Gerät und das Zubehör in der Originalverpackung. • Bewahren Sie das Gerät samt Zubehör an einem trockenen, frostfreien und für Kinder unerreichbaren Ort auf. Haftungsausschluss Änderungen vorbehalten; die Daten können ohne Vorankündigung geändert werden. 18 Istruzioni per la sicurezza Sicurezza generale • Leggere attentamente il manuale prima dell'uso. Conservare il manuale per future consultazioni. • Utilizzare l'apparecchio e gli accessori esclusivamente per gli scopi previsti. Non utilizzare l'apparecchio e gli accessori per scopi diversi da quelli descritti nel manuale. • L'apparecchio non deve essere utilizzato dai bambini. Tenere l'apparecchio e il cavo di alimentazione fuori dalla portata dei bambini. • L'apparecchio può essere utilizzato da persone con ridotte capacità fisiche, sensoriali o mentali o senza la necessaria pratica ed esperienza sotto supervisione o dopo aver ricevuto adeguate istruzioni sull'uso in sicurezza dell'apparecchio e aver compreso i possibili rischi. Sicurezza elettrica • Prima dell'uso, verificare sempre che la tensione di rete corrisponda alla tensione riportata sulla targhetta nominale dell'apparecchio. • L'apparecchio non è previsto per essere azionato mediante timer esterno o telecomando. • Collegare l'apparecchio a una presa a parete dotata di messa a terra. Se necessario, 19 IT • I bambini non devono giocare con l'apparecchio. • Non usare l'apparecchio in prossimità di vasche da bagno, docce, bacinelle o altri recipienti contenenti acqua. • Non immergere l'apparecchio in acqua o in altri liquidi. Se l'apparecchio viene immerso in acqua o in altri liquidi, non rimuovere l'apparecchio con le mani. Rimuovere immediatamente la spina di alimentazione dalla presa a parete. Se l'apparecchio viene immerso in acqua o altri liquidi, non riutilizzare l'apparecchio. • Pulire l'apparecchio e gli accessori. Consultare la sezione "Pulizia e manutenzione". Congratulazioni! Avete acquistato un prodotto Petra. Il nostro scopo è quello di fornire prodotti di qualità con un design gradevole, ad un prezzo interessante. Ci auguriamo che possiate usufruire di questo prodotto per molti anni a venire. IT utilizzare un cavo di prolunga dotato di conduttore di messa a terra di diametro adeguato (almeno 3 x 1 mm2). • Come ulteriore protezione, installare un interruttore differenziale (RCD) con una corrente residua di funzionamento nominale non superiore a 30 mA. • Verificare che l'acqua non penetri negli spinotti del cavo di alimentazione e del cavo di prolunga. • Srotolare sempre completamente il cavo di alimentazione e il cavo di prolunga. • Verificare che il cavo di alimentazione non rimanga impigliato nel bordo di sporgenze o ripiani e non possa costituire fonte di rischio di incidenti o cadute. • Tenere il cavo di alimentazione lontano da fonti di calore, olio e spigoli taglienti. • Non usare l'apparecchio se il cavo di alimentazione o la spina sono danneggiati o difettosi. Se il cavo di alimentazione o la spina sono danneggiati o difettosi, devono essere sostituiti dal fabbricante o da un centro di assistenza autorizzato. • Per scollegare la spina di alimentazione elettrica, non tirare mai il cavo di alimentazione. • Se l'apparecchio non viene utilizzato, prima di eseguire operazioni di montaggio o smontaggio e prima di effettuare interventi di pulizia e manutenzione, scollegare sempre la spina dalla rete di alimentazione elettrica. Istruzioni di sicurezza per gelatiere • L'apparecchio è adatto esclusivamente per uso domestico. • Non usare l'apparecchio in ambienti esterni. • Non utilizzate l'apparecchio in ambienti umidi. • Collocare l'apparecchio su una superficie uniforme e stabile. • Non collocare l'apparecchio su un piano di cottura. • Verificare che l'apparecchio non entri in contatto con materiale infiammabile. • Tenere l'apparecchio a distanza da fonti di calore. 20 Non collocare l'apparecchio su superfici calde o vicino a fiamme libere. • Prima di toccare l'apparecchio assicurarsi di avere le mani asciutte. • Porre attenzione alle parti taglienti. Tenere le mani distanti dalle parti taglienti. • Tenere le mani distanti dalle parti in movimento. • Tenere lontano capelli lunghi e indumenti larghi dalle parti in movimento. • Tenere spatole ed altri utensili da cucina distanti dalle parti in movimento. • Non inserire oggetti estranei nell'apparecchio. • Non spostare l'apparecchio quando è acceso. • Non lasciare l'apparecchio incustodito durante l'uso. • Riporre l'apparecchio in un luogo asciutto quando non viene utilizzato. Assicurarsi che i bambini non abbiano accesso agli apparecchi riposti. • Controllare l'apparecchio a intervalli regolari, verificando che non sia danneggiato. • Pulire l'esterno dell'apparecchio con un panno umido. Asciugare a fondo l'esterno dell'apparecchio con un panno pulito e asciutto. • Pulizia degli accessori: - Sbloccare il tubo di alimentazione (4) ruotandolo nella direzione del simbolo di sblocco. - Rimuovere il tubo di alimentazione (4) dall'unità del motore (2). - Allentare il coperchio inferiore (7) dal tubo di alimentazione (4). - Estrarre il cono delle lame (3) dalla guarnizione (6). - Rimuovere la guarnizione (6) dal coperchio inferiore (7). - Pulire il cono delle lame (3), il tubo di alimentazione (4), il pressino (5), la guarnizione (6) e il coperchio inferiore (7) in acqua saponosa o nella lavastoviglie. - Sciacquare gli accessori in acqua corrente. - Asciugare a fondo gli accessori. Descrizione (fig. A) La gelatiera 282700 Petra è stata progettata per preparare gelati con frutta congelata. L'apparecchio non è adatto per preparare gelati con frutta fresca. L'apparecchio è adatto esclusivamente per l'uso al coperto. L'apparecchio è adatto esclusivamente per uso domestico. Pulizia e manutenzione (fig. A) È necessario pulire l'apparecchio dopo ogni uso. Prima di procedere, è necessario porre attenzione alle seguenti note: 21 IT - Prima di qualsiasi operazione di pulizia o manutenzione, spegnere l'apparecchio, scollegare la spina di alimentazione dalla presa elettrica a parete e attendere che l'apparecchio si raffreddi. - Non immergere l'apparecchio in acqua o in altri liquidi. Prima di procedere, si prega di porre attenzione alle seguenti note: - Non utilizzare detergenti aggressivi o abrasivi per pulire l'apparecchio. - Non utilizzare oggetti affilati per pulire l'apparecchio. - Non lavare l'apparecchio in lavastoviglie. Gli accessori sono lavabili in lavastoviglie. - Se l'apparecchio inizia a vibrare notevolmente e produce una minore quantità di gelato, spengerlo e pulire il cono delle lame. Prima di procedere, si prega di porre attenzione alle seguenti note: - Attivare l'apparecchio solo con una ciotola di dimensioni adatte posizionata sotto il beccuccio. - Pulire regolarmente il cono delle lame per lavorare grandi quantità di frutta. 1. Interruttore di accensione/spegnimento 2. Unità motore 3. Cono delle lame 4. Tubo di alimentazione 5. Pressino 6. Guarnizione 7. Coperchio inferiore 8. Beccuccio Montaggio (fig. A) IT Prima di procedere, è necessario porre attenzione alle seguenti note: - Prima del montaggio o dello smontaggio, spegnere l'apparecchio, scollegare la spina di alimentazione dalla presa elettrica a parete e attendere che l'apparecchio si raffreddi. • Collocare l'apparecchio su una superficie uniforme e stabile. • Montare l'apparecchio. Consultare la sezione "Montaggio". • Rimuovere il pressino (5) dal tubo di alimentazione (4). • Collocare una ciotola di dimensioni adatte sotto il beccuccio (8). • Per accendere l'apparecchio, portare l'interruttore di accensione/spegnimento (1) sulla posizione 'I'. • Tagliare a pezzetti la frutta congelata per poterla inserire nel tubo di alimentazione (4). • Inserire i pezzetti di frutta congelata nel tubo di alimentazione (4). Usare il pressino (5) per spingere i pezzi di frutta congelata nel tubo di alimentazione (4). • Se necessario, pulire il cono delle lame (3). • Per spegnere l'apparecchio, portate l'interruttore di accensione/spegnimento (1) sulla posizione "O". • Disinserire la spina di alimentazione dalla presa a parete. • Far raffreddare completamente l'apparecchio. • Collocare l'unità del motore (2) su una superficie uniforme e stabile. • Collocare la parte inferiore (10,8 cm) della guarnizione (6) sul coperchio inferiore (7). Nota: Non collocare la parte superiore (9,5 cm) della guarnizione (6) sul coperchio inferiore (7). • Collocare il cono delle lame (3) sulla guarnizione (6). • Serrare il coperchio inferiore (7) sul tubo di alimentazione (4). • Collocare il tubo di alimentazione (4) sull'unità del motore (2). • Bloccare il tubo di alimentazione (4) ruotandolo nella direzione del simbolo di blocco. Uso (fig. A) Preparazione del cibo (2 persone) Prima di procedere, è necessario porre attenzione alle seguenti note: - Non lasciare l'apparecchio acceso costantemente per oltre due minuti. Dopo due minuti, spengere l'apparecchio e farlo raffreddare per un minuto prima di riaccenderlo. Far raffreddare completamente l'apparecchio ogni tre cicli di "due minuti acceso / un minuto spento". - Non inserire le mani nel tubo di alimentazione per premere la frutta congelata. Utilizzare sempre il pressino. Non esercitare pressione sul pressino. Prima di procedere, è necessario porre attenzione alle seguenti note: - Non utilizzare frutta con noccioli, noci o cubetti di ghiaccio. - Scongelare tutti i tipi di frutta per alcuni minuti prima di lavorarla utilizzando l'apparecchio. Il tempo di scongelamento dipende dall'impostazione della temperatura del congelatore e dalla temperatura ambiente. Per ottenere i migliori risultati fare delle prove variando il tempo di cottura richiesto. 22 Come linea guida, iniziare con 10-15 minuti per la frutta morbida e aumentare a 15-20 minuti per la frutta dura. • Per utilizzare banane troppo mature o con macchie scure, sbucciare le banane e congelarle per 24 ore. Scongelare le banane a temperatura ambiente per 10-15 minuti. • Utilizzare vari tipi di bacche congelati: fragole, lamponi, more, mirtilli, ossicocco. Scongelare i bacche a temperatura ambiente per 10-15 minuti. • Per ottenere i migliori risultati, alternare gli ingredienti. Stoccaggio IT • Collocare l'apparecchio e gli accessori nell'imballaggio originale. • Riporre l'apparecchio con i relativi accessori in un luogo asciutto, al riparo dal gelo e fuori dalla portata dei bambini. Clausola di esclusione della responsabilità Soggetto a modifica; le specifiche possono subire variazioni senza preavviso. 23 Terms and Conditions of Factory Guarantee CE regulations Service Station List April 2013 24 Guarantee card / Certificat de garantie / Garantiekarte / Certificato di garanzia Date of purchase / Date d'achat / Kaufdatum / Data di acquisto Dealer / Concessionnaire / Händler / Rivenditore Model / Type / Typ / Modello Purchaser / Acheteur / Käufer / Dati relativi all'acquirente 25 United Kingdom: Terms and conditions of guarantee 1 year on manufacturing and material faults. The guarantee is valid solely when the guarantee card has been completely filled in. The guarantee does not cover defects caused by incorrect use, unauthorized disassembly, or damage caused by a fall. The guarantee does not cover consequential damage. Please retain receipt as proof of purchase. A claim to the factory guarantee is only possible through the retailer in the country of purchase. Deutschland: Garantiebedingungen 2 Jahre auf Herstellungs- und Materialfehler. Die Garantie gilt nur mit komplett ausgefülltem Garantienachweis. Die Garantie gilt nicht für Schäden, die aufgrund falschen Gebrauchs, unbefugter Demontage und weil das Gerät heruntergefallen ist, entstanden sind. Die Garantie gilt nicht für Folgeschäden. Ein Anspruch auf Werksgarantie ist nur über den Händler in dem Land möglich, in dem das Produkt gekauft wurde. Italia: Condizioni di garanzia L’apparecchio è garantito per un periodo di 24 mesi dalla data di acquisto a copertura di difetti di materiale e/o di fabbricazione. La garanzia è valida unicamente se accompagnata da un certificato di garanzia debitamente compilato in ogni sua parte. La garanzia non si applica ai danni derivanti da utilizzo errato o non conforme del prodotto, da riparazioni eseguite da personale non autorizzato e da eventuali cadute dell’apparecchio. La garanzia non copre gli eventuali danni indiretti a persone e/o cose causati dal malfunzionamento del prodotto. Per inoltrare un reclamo in base alla garanzia del fabbricante è necessario rivolgersi esclusivamente al rivenditore nel paese di acquisto. France: Conditions de garantie 1 année sur les défaults de pièce et main d’oeuvre. La garantie est valable uniquement si de garantie est entièrement rempli. La garantie n’est pas valable si l’appareil a été incorrectement utilisé, démonté par une personne non qualifiée, ou est tombé. La garantie n’est pas valable pour les dommages consécutifs. Une réclamation dans le cadre de la garantie d‘usine est acceptable uniquement via le distributeur du pays d‘achat. 26 ENGLISH Petra declares that the supplied products are in conformity with the following European directives: WEEE Directive (2012/19/EU): “WEEE” = “Waste Electrical and Electronic Equipment” If you want to dispose of equipment with this symbol on the appliance and/or in the user manual, follow the below procedure: Make sure that the appliance is processed in a responsible manner at the end of its service life to guarantee the maximum reuse of (parts of) the appliance. Do not dispose of the appliance with unsorted waste, but hand it in at the store or take it to a recognised collection point. Contact your municipality for information about the reception and collection systems in your area. Make sure that the appliance is reused if you want to dispose of the appliance while it is still in good working order or needs only a minor repair. LVD Directive (2006/95/EC): “LVD” = “Low Voltage Directive” EMC Directive (2004/108/EC): “EMC” = “Electromagnetic Compatibility” EMF Directive (2006/95/EC): “EMF” = “Electromagnetic Fields” RoHS Directive (2011/65/EU): “RoHS” = “Restriction of Hazardous Substances” REACH Regulation (1907/2006): “REACH” = “Registration, Evaluation, Authorisation and restrictions of Chemicals” ErP Directive (2009/125/EC): “ErP” = “Ecodesign requirements for energy-related products” FRANÇAIS Petra déclare que les produits fournis sont conformes aux directives européennes suivantes : Directive DEEE (2012/19/EU) : « DEEE » = « Déchets d’équipements électriques et électroniques » Si vous souhaitez mettre au rebut un équipement comportant ce symbole (ou si ce symbole est présent dans son manuel), procédez comme suit : assurez-vous que l’appareil est traité de manière responsable à la fin de son cycle de vie afin de maximiser sa réutilisation (ou celle de ses pièces). Ne mettez pas l’appareil au rebut avec les déchets non triés. Remettez-le plutôt au magasin ou apportez-le à un point de collecte agréé. Contactez votre municipalité afin d’en savoir plus sur les système de réception et de collecte près de chez vous. Assurez-vous que l’appareil sera réutilisé si vous souhaitez le mettre au rebut bien qu’il fonctionne encore ou s’il nécessite seulement une réparation minime. Directive DBT (2006/95/CE) : « DBT » = « Directive basse tension » Directive CEM (2004/108/CE) : « CEM » = « Compatibilité électromagnétique » Directive EMF (2006/95/CE) : « EMF » = « Electromagnetic Fields » (Champs électromagnétiques) Directive RoHS (2011/65/EU) : « RoHS » = « Restriction of Hazardous Substances » (Limitation de l’utilisation des substances dangereuses) Règlement REACH (1907/2006) : « REACH » = « Registration, Evaluation, Authorisation and restrictions of Chemicals » (Obligation d‘enregistrement, évaluation et autorisation, restriction des produits chimiques) Directive ErP (2009/125/CE) : « ErP » = « Ecodesign requirements for energy-related products » (Exigences en matière d‘écoconception applicables aux produits liés à l‘énergie) 27 DEUTSCH Petra erklärt, dass die gelieferten Produkte folgenden europäischen Richtlinien entsprechen: EEAG-Richtlinie (2012/19/EU): “EEAG” = “Elektro- und Elektronik-Altgeräte” Wenn Sie Ausrüstung mit diesem Symbol auf dem Gerät und/oder im Benutzerhandbuch entsorgen möchten, halten Sie sich an die unten aufgeführte Vorgehensweise: Vergewissern Sie sich, dass das Gerät am Ende seiner Einsatzzeit auf verantwortliche Weise verarbeitet wird, um eine maximale Wiederverwertung des Geräts (und seiner Teile) sicherzustellen. Entsorgen Sie das Gerät nicht zusammen mit unsortiertem Abfall, sondern bringen Sie es zum Geschäft oder einer anerkannten Sammelstelle zurück. Wenden Sie sich an Ihre Stadtverwaltung, um Informationen über Annahmeund Sammelsysteme in Ihrem Gebiet zu erhalten. Vergewissern Sie sich, dass das Gerät wieder verwertet wird, wenn Sie es entsorgen möchten und es sich noch in einem guten Betriebszustand befindet oder nur kleinere Reparaturen erforderlich sind. NSR-Richtlinie (2006/95/EG): “NSR” = “Niederspannungsrichtlinie” EMV-Richtlinie (2004/108/EG): “EMV” = “Elektromagnetische Verträglichkeit” EMF-Richtlinie (2006/95/EG): “EMF” = “Elektromagnetische Felder” RoHS-Richtlinie (2011/65/EU): “RoHS” = “Restriction of Hazardous Substances” (Beschränkung der Verwendung bestimmter gefährlicher Stoffe) REACH-Verordnung (1907/2006): “REACH” = “Registration, Evaluation, Authorisation and restrictions of Chemicals” (Registrierung, Bewertung, Zulassung und Beschränkung von Chemikalien) ErP-Richtlinie (2009/125/EG): “ErP” = “Ecodesign requirements for energy-related products” (Anforderungen an die umweltgerechte Gestaltung von energieverbrauchsrelevanten Produkten) ITALIANO Petra dichiara che i prodotti forniti sono conformi alle seguenti direttive europee: Direttiva RAEE (2012/19/EU): “RAEE” = “Rifiuti di apparecchiature elettriche ed elettroniche” Se si desidera smaltire un’apparecchiatura con questo simbolo sull’elettrodomestico e/o nel manuale utente, attenersi alla procedura descritta di seguito. Verificare che l’elettrodomestico sia trattato in maniera responsabile al termine della vita utile, per garantire il massimo riutilizzo dell‘elettrodomestico stesso (o di componenti di esso). Non smaltire l’elettrodomestico nei rifiuti indifferenziati ma portarlo al negozio o presso un punto di raccolta autorizzato. Contattare le autorità locali per informazioni sul sistema di raccolta nella propria zona. Verificare che l’elettrodomestico venga riutilizzato se si desidera smaltirlo quando è ancora funzionante o necessita solo di una riparazione minore. Direttiva DBT (2006/95/CE): “DBT” = “Direttiva bassa tensione” Direttiva CEM (2004/108/CE): “CEM” = “Compatibilità elettromagnetica” Direttiva EMF (2006/95/CE): “EMF” = “Electromagnetic Fields” (Campi elettromagnetici) Direttiva RoHS (2011/65/EU): “RoHS” = “Restriction of Hazardous Substances” (Restrizioni per l’uso di sostanze pericolose) Normativa REACH (1907/2006): “REACH” = “Registration, Evaluation, Authorisation and restrictions of Chemicals” (Registrazione, valutazione, autorizzazione e restrizioni delle sostanze chimiche) Direttiva ErP (2009/125/CE): “ErP” = “Ecodesign requirements for energy-related products” (Specifiche per la progettazione ecocompatibile dei prodotti connessi all‘energia) 28 Service Station List: Tel: (0180) 2000 402* eMail: [email protected] *6 Cent pro Anruf aus dem Festnetz, Mobilfunk max. 42 Cent www.petra-electric.de 29 30 31 © 2013 PETRA PETRA Deutschland GmbH Eberhardstraße 73312 Geislingen/Steige Deutschland www.petra-electric.de 05/13/V4 © Petra 2013 05/13