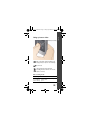
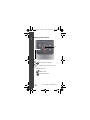
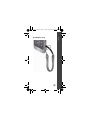
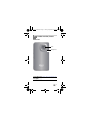
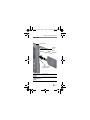
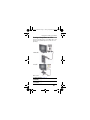
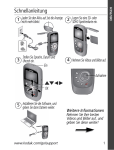
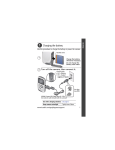
1
urg_01305.book Page 1 Friday, September 23, 2011 1:03 PM
Table of contents
Getting started with your camera 2
Opening the USB/charging door 2
Charging the non-removable battery 3
Using an accessory SD/SDHC Card 4
Turning on the camera 5
Setting the language, date/time 6
Taking a picture or video 7
Reviewing pictures/videos 8
Deleting videos/pictures 9
Transferring, sharing online, editing 10
Attaching the strap 11
Keep learning about your camera 12
Product overview, features 13
Front view 13
Back view 14
Side view 15
Doing more with your camera 16
Using the camera under water 16
Viewing videos/pictures on a TV 17
Using the settings menu 18
Trimming a video 19
Making a picture from a video 19
Zooming and panning a picture 20
Solving camera problems 21
Resetting the camera 21
Appendix 24
1
urg_01305.book Page 2 Friday, September 23, 2011 1:03 PM
ENGLISH
1Getting started with your camera
Opening the USB/charging door
The non-removable battery charges when the
computer is on and awake; disable your computer’s
hibernation, sleep, and standby modes. Charge the
battery as often as you like—you can’t over-charge
it—and always fully charge before using.
1
2
2
www.kodak.com/go/support
urg_01305.book Page 3 Friday, September 23, 2011 1:03 PM
ENGLISH
Charging the non-removable battery
Charging takes less than 4 hours.
3
When the camera is plugged in,
the USB symbol appears.
3
urg_01305.book Page 4 Friday, September 23, 2011 1:03 PM
ENGLISH
Using an accessory SD/SDHC Card
Your camera has internal memory. We recommend
purchasing an SD or SDHC Card (Class 4 or higher) to
store more pictures/videos.
CAUTION:
A card can only be inserted one way; forcing it
may cause damage. Inserting or removing a card
while the camera is on may damage the
pictures, the card, or the camera.
1 Turn off the camera.
2 Insert a card until it
clicks.
To remove a
card, press
and release it.
Accessory
IMPORTANT: When you turn on the camera, it checks to
see if a card is inserted. If so, new pictures/videos are stored
on the card. If no card is inserted, new pictures/videos are
stored in the camera’s internal memory.
If pictures/videos are detected in internal memory and a
card is inserted, the camera prompts you to move the
pictures to the card (and erase those in internal memory).
Purchase cards www.kodak.com/go/accessories
4
www.kodak.com/go/support
urg_01305.book Page 5 Friday, September 23, 2011 1:03 PM
ENGLISH
Turning on the camera
5
urg_01305.book Page 6 Friday, September 23, 2011 1:03 PM
ENGLISH
Setting the language, date/time
OK
Language
OK
to change.
to accept.
Date/Time
At the prompt, press OK.
to change current field.
for previous/next field.
OK to accept.
See the
Extended user
guide
6
www.kodak.com/go/Ze2manuals
www.kodak.com/go/support
Taking a picture or video
Start/stop recording.
Turn on the Glare Shield (if enabled in the
Settings menu) to improve LCD viewability.
Zoom in/out.
Change between picture and video
recording modes. (In Review or in a menu,
return to Liveview.)
Video recording modes
HD720p
WVGA
for viewing on a for conserving
TV or computer, memory card
and for sharing space
Still
for 1 MP pictures
7
ENGLISH
urg_01305.book Page 7 Friday, September 23, 2011 1:03 PM
urg_01305.book Page 8 Friday, September 23, 2011 1:03 PM
ENGLISH
Reviewing pictures/videos
OK
1 Review
2
Previous/next video/picture.
3 OK
Play/Pause. (Press and hold to Stop.)
While playing a video:
Adjust volume
Fast-forward/rewind
8
www.kodak.com/go/support
urg_01305.book Page 9 Friday, September 23, 2011 1:03 PM
ENGLISH
Deleting videos/pictures
OK
Delete
1 Review
2
Previous/next video/picture.
3 Delete.
4 Highlight Delete or OK, then press OK.
9
urg_01305.book Page 10 Friday, September 23, 2011 1:03 PM
ENGLISH
Transferring, sharing online, editing
1 Connect the camera to the computer USB
port. (It turns on automatically.)
2 If this is the first time you’ve connected to this
3
computer, follow the prompts to install the
KODAK Share Button App and—for
WINDOWS OS-based computers—
ARCSOFT Software.*
Follow the on-screen instructions to transfer
and share videos.
NOTE: It may be convenient to use a USB extension
cable to connect the camera to the computer.
* For MAC OS, use the APPLE ILIFE suite of software
to watch and edit videos.
Share Button App Download the right version for
doesn’t install?
your operating system:
www.kodak.com/go/camerasw
Get ArcSoft
product support
www.arcsoft.com/support
HD video system
requirements for
playback
www.kodak.com/go/HDsysreq
10
www.kodak.com/go/support
urg_01305.book Page 11 Friday, September 23, 2011 1:03 PM
ENGLISH
Attaching the strap
11
urg_01305.book Page 12 Friday, September 23, 2011 1:03 PM
ENGLISH
Keep learning about your camera
Congratulations!
You have:
• set up your camera
• taken videos and pictures
• transferred them to your computer
Keep learning!
Finish reading this book, so you can take and share
your best videos and pictures!
Go to www.kodak.com/go/Ze2support for:
• the Extended user guide
• camera firmware updates
• answers to your frequently asked questions
12
www.kodak.com/go/support
urg_01305.book Page 13 Friday, September 23, 2011 1:03 PM
2
Product overview, features
Front view
Lens
Microphone
See the Extended www.kodak.com/go/Ze2manuals
user guide
13
urg_01305.book Page 14 Friday, September 23, 2011 1:03 PM
Product overview, features
Back view
Record
mode
Settings
Review
Delete
Share
Record/OK
On bottom:
• USB Arm
• AV Out
See the
Extended user
guide
www.kodak.com/go/Ze2manuals
14
www.kodak.com/go/support
urg_01305.book Page 15 Friday, September 23, 2011 1:03 PM
Product overview, features
Side view
Power button
Camera
Reset
button
HDMI Out
Slot for accessory
SD/SDHC Card
Use the Reset
button
See page 21
See the
Extended user
guide
www.kodak.com/go/Ze2manuals
15
urg_01305.book Page 16 Friday, September 23, 2011 1:03 PM
3
Doing more with your camera
Using the camera under water
The camera does not float. Secure it to your wrist with
the strap (see a floating accessory strap at
www.kodak.com/go/accessories). To keep the camera
waterproof, tightly close and latch all doors. Do not
open doors in water or when hands are wet.
Waterproof integrity may be compromised if the camera
is dropped. For more information, see page 24.
For the best focus and color balance under water:
1 Press the Settings button , then
to
choose Underwater Correction.
2 Press OK, then
to choose Scene mode:
Water, then press OK.
3 Press the Mode button
to take
videos/pictures.
IMPORTANT: Verify that all doors are tightly closed. This
camera is waterproof to a depth of 3 metres (9.8 feet).
After using the camera in water
■ When finished using under water, go to Step 1 and
turn off Underwater Correction.
■ Wipe off water or debris. If the camera was used in
chemically treated water or saltwater, rinse it in
fresh water, then use a soft towel to dry it.
■ If water has entered the camera, remove the card.
Allow the camera to air-dry for at least 24 hours
before using.
16
www.kodak.com/go/support
urg_01305.book Page 17 Friday, September 23, 2011 1:03 PM
Doing more with your camera
Viewing videos/pictures on a TV
If you have an HD television, use an HDMI cable—and
get the richest playback experience. (Cables are sold
separately.)
HDMI Cable
AV Cable
NOTE: Set your TV’s input setting to HDMI or AV.
Set Video Output page 18
(NTSC/PAL)
Purchase
accessories
www.kodak.com/go/accessories
17
urg_01305.book Page 18 Friday, September 23, 2011 1:03 PM
Doing more with your camera
Using the settings menu
the Settings
1 Press
button.
2 Press
to choose a setting.
LCD Brightness Turn on when viewing the LCD in
& Glare Shield bright conditions.
Underwater
Mode
Use when taking videos/pictures
under water.
Effects
Normal Color, Sepia, B&W, High
Saturation, or 70s Film
Video
Resolution
HD720P, WVGA
Microphone
Gain
Adjust sensitivity of the internal
microphone.
Sounds
Turn on/off sounds.
Date/Time
Set the date/time
Share Settings Choose which sites and email
addresses are offered when you
share.
Video Output
Choose the setting (NTSC, PAL) for
your region.
Language
Choose your language.
Reset Settings Return all settings to their factory
default.
Format Card
Erase, format the card.
About
View firmware and ARCSOFT
Software versions
18
www.kodak.com/go/support
urg_01305.book Page 19 Friday, September 23, 2011 1:03 PM
Doing more with your camera
Trimming a video
Use the Trim Video feature to remove an unwanted
video start or finish.
1 Press the Review button
, then
to find a
video to trim.
Optional: Play, then pause the video at the desired
new start point.
2 Press the Settings button .
3 Press
to choose Trim Video, then press OK.
An instruction screen appears. After you read it, press
OK.
4 When prompted, press
to move the Start
marker to the new position, then press OK. Press
to move the End marker to the new position,
then press OK.
NOTE: If you need to make adjustments, press
to highlight
the Start or End marker, then press
to move it. When finished,
press OK.
5 When prompted, preview your edit or save the edit
without previewing. Save the video, or choose Save
As if you want to keep the existing video, as well.
Making a picture from a video
You can choose a single frame from a video, then make
it into a picture. (Size and quality depend on video
resolution.)
1 Press the Review button
, then
to find a
video from which you want to extract a single video
frame.
2 Play, then pause the video at the desired frame.
3 Press the Settings button .
4 Press
to choose Make Picture. Press OK.
5 Follow the prompts to save the picture.
19
urg_01305.book Page 20 Friday, September 23, 2011 1:03 PM
Doing more with your camera
Zooming and panning a picture
1 Press the Review button
.
2 Press
to choose a picture.
3 Press OK repeatedly to choose 2x, 4x, 8x, then back
to 1x.
4 Use
20
to pan the picture.
www.kodak.com/go/support
urg_01305.book Page 21 Friday, September 23, 2011 1:03 PM
4
Solving camera problems
Resetting the camera
If the camera will not turn off, use a straightened paper
clip, pen, or stylus tip to gently but firmly press the
button for about 1 second. The camera turns off. When
you turn on the camera again, you may need to reset
the Date and Time.
Camera Reset
button
Go to www.kodak.com/go/Ze2support for the Extended
user guide, firmware updates, and answers to your
questions.
Status
Solution
Low battery.
■ Charge the battery (page 3).
21
urg_01305.book Page 22 Friday, September 23, 2011 1:03 PM
Solving camera problems
Status
Solution
Card or internal ■ Transfer videos/pictures to your
memory is nearly
computer (page 10), then
full.
format (erase) the card in the
camera (page 18) or card
Corrupt or
reader.
unusable card.
■ Insert another card. For the best
experience, we strongly suggest
purchasing a Class 4 or higher
SDHC Card.
Unrecognized
file.
■ Transfer videos/pictures to your
computer (page 10).
LCD is hard to
see.
■ Turn on the LCD Glare Shield in
the Settings menu (page 18),
then enable it in Liveview
(page 7).
Camera will not ■ Ensure that the battery is
turn on.
charged (page 3).
■ Ensure the camera is clean and
dry. (If it’s wet inside, open all
doors. Remove the card. Do not
turn on the camera. Let it dry for
at least 24 hours.)
Videos are
blurry.
22
■ Ensure that the lens is clean.
■ Ensure that the subject is at
least 1 m (3.3 ft) from the lens.
www.kodak.com/go/support
urg_01305.book Page 23 Friday, September 23, 2011 1:03 PM
Solving camera problems
Status
Solution
Videos are
■ Use ARCSOFT
choppy or jumpy
MEDIAIMPRESSION for KODAK
when played on
Software for video playback
a computer.
(page 10).
■ Ensure that the computer
system requirements are met.
Go to www.arcsoft.com/support
or
www.kodak.com/go/HDsysreq.
■ For the best experience, we
strongly suggest purchasing a
Class 4 or higher SDHC Card.
Videos do not
play on a TV.
■ Verify that an HDMI or AV Cable
is properly connected directly to
the TV input (page 17).
■ Ensure that your TV settings are
correct for an HDMI or AV
connection.
■ Ensure that the Video Output is
set correctly (page 18).
Solve problems
with ARCSOFT
Software.
■ Go to
www.arcsoft.com/support. (For
other applications, go to their
support sites.)
23
urg_01305.book Page 24 Friday, September 23, 2011 1:03 PM
5
Appendix
IMPORTANT: The shock resistance and water
resistance of this product are based on Kodak test
results and do not constitute any guarantee that the
product will perform, will not be damaged, or will not
malfunction under such conditions. Though the camera
is designed to withstand the effects of impact occurring
during normal use, impact due to rough handling (such
as throwing or dropping it from excessive heights) can
cause serious damage. Even if a drop does not result in
functional problems, it can cause scratching and other
cosmetic damage to the camera.
FCC compliance and advisory
This equipment has been tested and found to comply
with the limits for a Class B digital device, pursuant to
Part 15 of the FCC Rules. These limits are designed to
provide reasonable protection against harmful
interference in a residential installation. The KODAK
High Performance USB AC Adapter K20-AM complies
with part 15 of the FCC Rules. Operation is subject to
the following two conditions: (1) This device may not
cause harmful interference, and (2) this device must
accept any interference received, including interference
that may cause undesired operation.
Eastman Kodak Company
Rochester, New York 14650
© Kodak, 2011
Kodak and PlayFull are trademarks of Eastman Kodak
Company.
4H8658_en
24
www.kodak.com/go/support