1
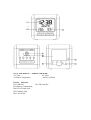
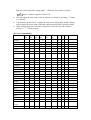
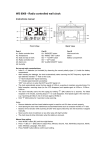
ITEM 862677
-
USB CUBE MP3 ALARM CLOCK RADIO
Main feature:
* Time Display with Date & Day of Week
* Indoor Temperature
* Daily Snooze Alarm function
* LED Back light
* MP3/Radio Function:
(a)
As MP3 player, with five types sound effects: Normal, Classic, Bass,
Live & Rock
(b) Built-in FM radio: 20 pre set radio station & auto-search radio frequency.
(c)
MP3 & Radio Playback as alarm signal
(d)
MP3 & Radio sleep function
(e)
Sound Output to headphone function
(f)
Line In function: Built in line in jack, could be connected with mp3,
laptop, MD/CD … via. audio cable, used as a mini louderspeaker.
Specifications:
* USB Interface: full speed USB 2.0
* SD Card slot- support SD card up to 4 GB (optional)
* FM Frequency: 87.5 -- 108 MHz
* Power Supply:
Clock: AAA size battery x 2
MP3 & Radio:
AAA size battery x 4
Adaptor: Ouput: DC 6.0 V,
* Loudspeaker: outer Diameter 50mm
* Dimension: w110 x h105 x d100 mm
1000mA
Part A: LCD DISPLAY --- TIME/CLCOK MODE
A1: Time.
A3:Indoor Temperature
Part B: Structure
B1: USB Jack
B3: Battery Compartment
B4: DC/AC Input Jack
B5: Earphone Jack
B6: Line In Jack
A2: Date
A4: Day of Week
B2: SD Card Slot
Set Up:
Remove battery compartment door at the back of the unit and Insert AAA battery
Or Connect the power cord to the wall outlet
When the battery been inserted properly, the LCD screen will display the time,
which you can adjust accordingly.
Note : Power Supply Selection:
MP3 player and amplifier are powered through the following 2 methods:
(1) 4 x AAA batteries
(2) 6V power supply adaptor (When connecting with the adaptor on the premise
that AAA batteries have been installed correctly, this product will switch to
the external power supply automatically)
Manual Time Setting:
Hold “SET” button for 2 seconds to enter settings.
Press “+” & “-” to change setting. Press “SET” to confirm and move to the next
setting.
The setting options are as follows: Min, Hour, 12/24 Hour, Year, Month and
Date.
Press “SET” button to confirm each setting.
If no button is pressed for 30 seconds, the display will return to previous mode.
Press “Mode” button to exit the Time Setting Mode
Daily Alarm Setting:
Press “MODE” to select Alarm Time Display
Hold “SET” for 3 seconds and Alarm Time flashes.
Press “+” & “-” buttons to change setting.
Press “MODE” to confirm each setting.
MP3 to Alarm Setup
In the MP3 mode, hold “ALARM” button for 2 seconds to set up the current MP3
track to alarm and “AL SET” will pops on the LCD.
Radio to Alarm Setup
In the Radio Operation mode, hold “ALARM” button for 2 seconds to set up the
current Radio Station to alarm and “AL SET” will pops on the LCD.
Snooze Alarm Function :
Press “ALARM” button to activate or deactivate the alarm. When it is on, the
symbol “
ALARM” appears and when it is off, the symbol “
ALARM”
disappears.
Press SNOOZE/LIGHT (B5) when alarm alerts. The alarm snoozes for 5 minutes,
then it alerts again. “
snooze” flashes on the LCD during the snooze time.
This function is only available with MP3 or BIBI alarm.
When SNOOZE, press any other buttons (except SNOOZE/ LIGHT button) to
cancel snooze function.
Thermometer:
Press “-” button to select Indoor Temperature in Celsius mode/ Fahrenheit mode.
FM Radio Operation Procedure:
LCD DISPLAY --- FM MODE
A1: Time.
A3: Pre-stored radio station
A2: Radio Frequency
A4: FM/ Volume
FM Radio Mode
: Rewind radio station. Press and hold for 2 seconds search radio station downward
automatically.
: Next radio station. Press & hold for 2 seconds, search radio station upward automatically.
Set up
In clock mode, press “RADIO” button to activate FM function.
If the figure in the middle of the LCD screen (A2) is 104.5 MHz,, the frequency of
current station is 104.5 MHz.
NOTE: The radio frequency range is 87.5 -- 108 MHz
FM Frequency Adjustment and Storage
Short press “ ” button to decrease the frequency, “ ” button to increase the
frequency.
Hold “ ” or “ ” button 2 second, the unit will start to auto select the radio
frequency, it will auto stop and broadcast that radio station when it find the strong
frequency.
Hold “SET” button to enter the FM station pre-storage function. The pre-stored
identification number (lower left corner of the LCD screen, A3) will flash, press
“ ” button to decrease the frequency, “ ” button to increase the frequency. And
then press “SET” button to confirm the setting and exit. The maximum
pre-storage station is 20. If no button is pressed for 8 seconds, the display will
return to FM radio operation mode.
Short press “SET” button to select station from the 20 pre-stored stations.
Volume Adjustment.
Press “+” or “- ” button, can turn up or down the volume. 0 stands for the lowest
volume level, and 16 stands for the highest volume level.
MP3 Function
LCD DISPLAY --- MP3 MODE
A1: Time.
A2: Song Time
A3: Total Number of Song Stored in Flash Memory
A4: MP3 playing symbol
A5: Flash Memory inserted symbol
A6: Volume of Song
MP3 Mode
: Play/Pause
+: Volume Up
-: Volume Down
: Previous/ Rewind
: Next/ Forward
Set up
Insert Flash Memory to USB port
button. The symbol “
Or SD card to SD Slot , and press
”
“
” (A4) pops up on the LCD screen, which indicates the
activation of MP3 Mode. Displayed in the middle of LCD screen is the duration of
current MP3 track. The figure shown in the right corner is the number of the MP3
track being played.
Press “
” button again to pause the MP3, and the display will return to Time
mode if no button is pressed for 30 seconds.
Sound Effects and Play mode setting
In MP3 mode, press “SET” button to enter the setting of sound effects. Press “+”/
“-” button to switch the setting. There are 5 different sound effects: Normal,
Classic, Bass, Live & Rock.
Press “SET” button again enter the setting of MP3 play mode. Different play
mode can be switched by pressing “+”/ “-”button. There are 4 play mode as
following: ALL, SHUFFLE, REPEAT ONE, REPEAT ALL. Press “SET” button
to confirm and exit the setting. It will return to MP3 operation mode if there’s no
button is pressed for 8 seconds.
Volume Adjustment.
Pressing “+” & “-” buttons to adjust the volume. (“+” :turn on volume, “-“:turn
down the volume). When either of those buttons is pressed, the volume indication
number shows in the right corner of LCD (A6). The volume range is 0-16.
Press “MODE” to return to Time mode.
If both USB Flash Memory and SD card were inserted, the clock will play back
MP3 tracks stored in USB Flash Memory firstly rather than SD Card.
The system recognizes only one kind of storage media at a time. Hold “
”
button for 3 seconds, and switch to play the MP3 tracks on the SD Card/ USB
Card.
Mini Speaker Function:
Connected unit with MP3, laptop, MD/CD… via. audio cable to Line In Jack (B6),
This clock then can be used as a mini louder speaker.
Sleep Operation:
Sleep mode lets you sleep to your MP3 or the radio.
In the MP3 operation mode or Radio operation mode, short press “ALARM”
button to enter sleep timer setting mode. When the sleep timer is activate,
“
sleep” symbol is appears on the LCD.
You can adjust the sleep timer from 10 minutes to 3 hours by pressing “+” button
or “-“button.
If no button is pressed for 8 seconds, the sleep timer deactivated, and the display
will return the previous mode (FM radio operation mode/ MP3 operation mode)
When setting sleep timer, the timer will not be activated if any other buttons
(except “+”/ “-”) been pressed.
SD Card Compatibility
Vendor
16
32
M
M
A-Date
Amazing
Apacer
Canon
Carol
ChoicOnly
DANE-ELE
C
HANA
IteMMORe
Kingmax
Kingston
Kolin
Lexar
MaxGold
MBRIDGE
NEXS
Pansonic
Philips
PLEOMAX
PNY
PQI
PRETEC
PREMIER
PSd
RiDATA
Sandisk
Silicon
Power
Toshiba
64
M
128
M
256
M
512
M
1
G
2
G
4
G
4G-SDH
C
Transcend
TwinMos
Ultra
WB
Note:
The speakers must be placed on a smooth and firm surface
Keep the system in a ventilate place and away from heat source or direct
sunlight.
Do not pour water, liquid or rubbish in the machine.