1
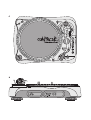
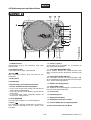
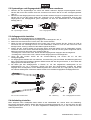
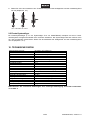
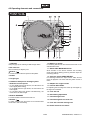
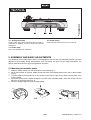
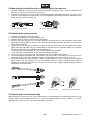
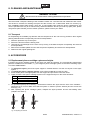
BEDIENUNGSANLEITUNG
USER MANUAL
DRT-1000
RECORDING TURNTABLE
Für weiteren Gebrauch aufbewahren!
Keep this manual for future needs!
© Copyright
Nachdruck verboten!
Reproduction prohibited!
Inhaltsverzeichnis/
Table of contents
1. EINFÜHRUNG ............................................................................................................................................... 4
2. SICHERHEITSHINWEISE............................................................................................................................. 4
3. BESTIMMUNGSGEMÄSSE VERWENDUNG .............................................................................................. 5
4. GERÄTEBESCHREIBUNG........................................................................................................................... 6
4.1 Features ................................................................................................................................................... 6
4.2 Bedienelemente und Anschlüsse............................................................................................................. 7
5. MONTAGE UND GRUNDEINSTELLUNGEN............................................................................................... 8
5.1 Plattenteller montieren ............................................................................................................................. 8
5.2 Systemträger und Gegengewicht für den Tonarm montieren.................................................................. 9
5.3 Auflagegewicht einstellen......................................................................................................................... 9
5.4 Antiskating einstellen ............................................................................................................................... 9
5.5 Nadelbeleuchtung montieren ................................................................................................................. 10
6. ANSCHLÜSSE ............................................................................................................................................ 10
7. BEDIENUNG ............................................................................................................................................... 10
7.1 Schallplatte abspielen ............................................................................................................................ 10
7.2 USB-Geräte und Speicherkarten abspielen........................................................................................... 11
7.3 Tonaufnahmen ....................................................................................................................................... 11
8. REINIGUNG UND WARTUNG.................................................................................................................... 12
8.1 Transport................................................................................................................................................ 12
9. ZUBEHÖR ................................................................................................................................................... 12
9.1 Tonabnehmersystem und Abtastnadel ersetzen ................................................................................... 12
9.2 Ersatz-Systemträger .............................................................................................................................. 13
10. TECHNISCHE DATEN .............................................................................................................................. 13
1. INTRODUCTION ......................................................................................................................................... 14
2. SAFETY INSTRUCTIONS .......................................................................................................................... 14
3. OPERATING DETERMINATIONS.............................................................................................................. 15
4. DESCRIPTION ............................................................................................................................................ 16
4.1 Features ................................................................................................................................................. 16
4.2 Operating elements and connections .................................................................................................... 17
5. ASSEMBLY AND BASIC ADJUSTMENTS ............................................................................................... 18
5.1 Mounting the turntable platter ................................................................................................................ 18
5.2 Mounting the headshell and the counterweight for the tone arm........................................................... 19
5.3 Adjusting the stylus pressure ................................................................................................................. 19
5.4 Adjusting the anti-skating facility............................................................................................................ 19
5.5 Mounting the target light......................................................................................................................... 20
6. CONNECTIONS .......................................................................................................................................... 20
7. OPERATION ............................................................................................................................................... 20
7.1 Playing a record ..................................................................................................................................... 20
7.2 Playing USB devices and memory cards............................................................................................... 21
7.3 Audio recordings .................................................................................................................................... 21
8. CLEANING AND MAINTENANCE ............................................................................................................. 22
8.1 Transport................................................................................................................................................ 22
9. ACCESSORIES........................................................................................................................................... 22
9.1 Replacement phono cartridge system and stylus .................................................................................. 22
9.2 Replacement headshell.......................................................................................................................... 23
10. TECHNICAL SPECIFICATIONS............................................................................................................... 23
Diese Bedienungsanleitung gilt für die Artikelnummer:
This user manual is valid for the article number:
10603062
10603062
Das neueste Update dieser Bedienungsanleitung finden Sie im Internet unter:
You can find the latest update of this user manual in the Internet under:
www.omnitronic.com
BEDIENUNGSANLEITUNG
Recording-Plattenspieler
Lesen Sie vor der ersten Inbetriebnahme zur eigenen Sicherheit diese Bedienungsanleitung sorgfältig durch!
Alle Personen, die mit der Aufstellung, Inbetriebnahme, Bedienung, Wartung und Instandhaltung dieses
Gerätes zu tun haben, müssen
- entsprechend qualifiziert sein
- diese Bedienungsanleitung genau beachten
- die Bedienungsanleitung als Teil des Produkts betrachten
- die Bedienungsanleitung während der Lebensdauer des Produkts behalten
- die Bedienungsanleitung an jeden nachfolgenden Besitzer oder Benutzer des Produkts weitergeben
- sich die letzte Version der Anleitung im Internet herunter laden
1. EINFÜHRUNG
Wir freuen uns, dass Sie sich für einen OMNITRONIC Plattenspieler entschieden haben. Wenn Sie
nachfolgende Hinweise beachten, sind wir sicher, dass Sie lange Zeit Freude an Ihrem Kauf haben werden.
Nehmen Sie das Gerät aus der Verpackung.
Bitte überprüfen Sie vor der ersten Inbetriebnahme, ob kein offensichtlicher Transportschaden vorliegt.
Sollten Sie Schäden an der Netzleitung oder am Gehäuse entdecken, nehmen Sie das Gerät nicht in Betrieb
und setzen sich bitte mit Ihrem Fachhändler in Verbindung.
2. SICHERHEITSHINWEISE
ACHTUNG!
Seien Sie besonders vorsichtig beim Umgang mit gefährlicher Netzspannung. Bei dieser Spannung können Sie einen lebensgefährlichen elektrischen Schlag erhalten!
Dieses Gerät hat das Werk in sicherheitstechnisch einwandfreiem Zustand verlassen. Um diesen Zustand zu
erhalten und einen gefahrlosen Betrieb sicherzustellen, muss der Anwender unbedingt die Sicherheitshinweise und die Warnvermerke beachten, die in dieser Gebrauchsanweisung enthalten sind.
Unbedingt lesen:
Bei Schäden, die durch Nichtbeachtung dieser Bedienungsanleitung verursacht werden, erlischt der
Garantieanspruch. Für daraus resultierende Folgeschäden übernimmt der Hersteller keine Haftung.
4/23
00048594.DOC, Version 1.0
Den Netzstecker immer als letztes einstecken. Vergewissern Sie sich, dass der Netzschalter auf „OFF“ steht,
wenn Sie das Gerät ans Netz anschließen.
Halten Sie das Gerät von Hitzequellen wie Heizkörpern oder Heizlüftern fern.
Das Gerät darf nicht in Betrieb genommen werden, nachdem es von einem kalten in einen warmen Raum
gebracht wurde. Das dabei entstehende Kondenswasser kann unter Umständen Ihr Gerät zerstören. Lassen
Sie das Gerät solange uneingeschaltet, bis es Zimmertemperatur erreicht hat!
Stellen Sie keine Flüssigkeitsbehälter, die leicht umfallen können, auf dem Gerät oder in dessen Nähe ab.
Falls doch einmal Flüssigkeit in das Geräteinnere gelangen sollte, sofort Netzstecker ziehen. Lassen Sie das
Gerät von einem qualifizierten Servicetechniker prüfen, bevor es erneut benutzt wird. Beschädigungen, die
durch Flüssigkeiten im Gerät hervorgerufen wurden, sind von der Garantie ausgeschlossen.
Der Aufbau entspricht der Schutzklasse II. Das Gerät ist schutzisoliert.
Lassen Sie die Netzleitung nicht mit anderen Kabeln in Kontakt kommen! Seien Sie vorsichtig beim Umgang
mit Netzleitungen und -anschlüssen. Fassen Sie diese Teile nie mit nassen Händen an!
Vergewissern Sie sich, dass die anzuschließende Netzspannung nicht höher ist als auf dem Spannungswahlschalter eingestellt.
Achten Sie darauf, dass die Netzleitung nicht gequetscht oder durch scharfe Kanten beschädigt werden
kann. Überprüfen Sie das Gerät und die Netzleitung in regelmäßigen Abständen auf Beschädigungen.
Gerät bei Nichtbenutzung und vor jeder Reinigung vom Netz trennen! Fassen Sie dazu den Netzstecker an
der Griffläche an und ziehen Sie niemals an der Netzleitung!
ACHTUNG: Endstufen immer zuletzt einschalten und zuerst ausschalten!
Beachten Sie bitte, dass Schäden, die durch manuelle Veränderungen an diesem Gerät verursacht werden,
nicht unter den Garantieanspruch fallen.
Kinder und Laien vom Gerät fern halten!
ACHTUNG: Zu hohe Lautstärken können das Gehör schädigen!
Im Geräteinneren befinden sich keine zu wartenden Teile. Eventuelle Servicearbeiten sind ausschließlich
dem autorisierten Fachhandel vorbehalten!
3. BESTIMMUNGSGEMÄSSE VERWENDUNG
Der DRT-1000 ist ein riemengetriebener Plattenspieler mit integriertem Phono-Vorverstärker. Er ist
speziell konzipiert für die hochwertige und komfortable Digitalisierung von analogen Vinyl-Schallplatten auf
externen Datenträgern. Zur Aufnahme der Musik im MP3-Format mit 128 kBit/s und 44,1 kHz Abtastrate
können USB-Geräte und SD(HC)-Speicherkarten verwendet werden. Der DRT-1000 kann auch zum
Abspielen von Datenträgern mit Titeln im MP3-Format eingesetzt werden.
Dieses Produkt ist für den Anschluss an 80 - 260 V AC, 50/60 Hz Wechselspannung zugelassen und wurde
ausschließlich zur Verwendung in Innenräumen konzipiert.
Vermeiden Sie Erschütterungen und jegliche Gewaltanwendung bei der Installierung oder Inbetriebnahme
des Gerätes.
Achten Sie bei der Wahl des Installationsortes darauf, dass das Gerät nicht zu großer Hitze, Feuchtigkeit
und Staub ausgesetzt wird. Vergewissern Sie sich, dass keine Kabel frei herumliegen. Sie gefährden Ihre
eigene und die Sicherheit Dritter!
Die Umgebungstemperatur muss zwischen -5° C und +45° C liegen. Halten Sie das Gerät von direkter
Sonneneinstrahlung (auch beim Transport in geschlossenen Wägen) und Heizkörpern fern.
5/23
00048594.DOC, Version 1.0
Die relative Luftfeuchte darf 50 % bei einer Umgebungstemperatur von 45° C nicht überschreiten.
Dieses Gerät darf nur in einer Höhenlage zwischen -20 und 2000 m über NN betrieben werden.
Nehmen Sie das Gerät erst in Betrieb, nachdem Sie sich mit seinen Funktionen vertraut gemacht haben.
Lassen Sie das Gerät nicht von Personen bedienen, die sich nicht mit dem Gerät auskennen. Wenn Geräte
nicht mehr korrekt funktionieren, ist das meist das Ergebnis von unsachgemäßer Bedienung!
Reinigen Sie das Gerät niemals mit Lösungsmitteln oder scharfen Reinigungsmitteln, sondern verwenden
Sie ein weiches und angefeuchtetes Tuch.
Soll das Gerät transportiert werden, verwenden Sie bitte die Originalverpackung, um Transportschäden zu
vermeiden.
Der Serienbarcode darf niemals vom Gerät entfernt werden, da ansonsten der Garantieanspruch erlischt.
Wird das Gerät anders verwendet als in dieser Bedienungsanleitung beschrieben, kann dies zu Schäden am
Produkt führen und der Garantieanspruch erlischt. Außerdem ist jede andere Verwendung mit Gefahren, wie
z. B. Kurzschluss, Brand, elektrischem Schlag, etc. verbunden.
4. GERÄTEBESCHREIBUNG
4.1 Features
Riemengetriebener Plattenspieler mit Aufnahmefunktion und Phono-Vorverstärker
• USB-Anschluss und SD-Steckplatz für die hochwertige und komfortable Digitalisierung von analogen VinylSchallplatten auf externen Datenträgern
• Aufnahmeformat: MP3 (44,1 kHz, 128 kBit/s)
• Aufnahmepegel einstellbar, mit Clip-LED
• Wiedergabefunktion für MP3-Dateien
• Integrierter Phono-Vorverstärker mit Line-Pegel-Ausgang
• Drei Geschwindigkeiten (33 1/3, 45 und 78 U/min)
• Schnellstart
• Großer Start/Pause-Taster
• Motor mit Rückwärtslauf abschaltbar
• LED-Nadelbeleuchtung (steckbar)
• Einstellbares Antiskating
• Schockabsorbierende Stellfüße
• Inkl. Tonabnehmersystem, Slipmat, Cinch-Kabel
• Lieferung ohne Abdeckhaube
6/23
00048594.DOC, Version 1.0
4.2 Bedienelemente und Anschlüsse
1 USB-Anschluss
USB-Anschluss (Typ A) zum Einstecken eines USBSpeichergeräts.
2 SD-Kartenschlitz
10 Tasten
und
Zur Titelwahl und zum schnellen Vor- und Rücklauf auf
dem angewählten Datenträger.
11 Taste REC MODE/REC STOP
Zum Einsetzen einer SD(HC)-Speicherkarte.
3 Taste
Zum Umschalten zwischen Start und Pause für den
Plattenteller.
Kurzes Drücken aktiviert den Aufnahmemodus (LED
blinkt) und langes Drücken beendet die Aufnahme (LED
aus).
12 Umschalter AUDIO SELECT
Zum Umschalten zwischen den Eingangsquellen USB,
SD und Schallplatte für die Wiedergabe. Die LEDs zeigen
Ihnen, welche Quelle angewählt ist.
4 Plattenteller
5 Nadellampe
13 Adapter für Single-Platten
6 Systemträger mit Tonabnehmersystem
14 Regler REC LEVEL
7 Tasten zur Wahl der Geschwindigkeit
• für 33O U/min die linke Taste drücken, die LED über der
Taste leuchtet (Grundeinstellung)
• für 45 U/min die rechte Taste drücken, die LED über der
Taste leuchtet
• für 78 U/min beide Tasten gleichzeitig drücken, die
LEDs über den Tasten leuchten
8 Taste REVERSE
Zum Einstellen des Aufnahmepegels. Leuchtet die ClipLED auf, ist das Signal übersteuert.
15 Tonarm-Lift
16 Antiskating-Rad
17 Gegengewicht-Skala
Zum Umschalten zwischen Vor- und Rückwärtslauf.
18 Gegengewicht für den Tonarm
9 Taste
19 Tonarm-Stütze mit Verriegelungshebel
Zum Umschalten zwischen Wiedergabe und Pause für
einen externen Datenträger und zum Starten einer
Aufnahme.
20 Ein-/Ausschalter für den Motor
7/23
00048594.DOC, Version 1.0
21 Analoger Line-Ausgang
23 Netzschalter
Analoger Audioausgang (Cinch, Links/Rechts) mit LinePegel zum Anschluss an Verstärker, Mischpulte bzw.
andere Geräte mit Line-Pegel-Eingängen.
Drücken Sie den Netzschalter, um das Gerät ein- und
auszuschalten.
22 Netzanschluss
Stecken Sie hier die beiliegende Netzleitung ein.
5. MONTAGE UND GRUNDEINSTELLUNGEN
Der Plattenteller, der Systemträger und das Gegengewicht für den Tonarm sind einzeln verpackt, damit sie
und der Plattenspieler beim Transport nicht beschädigt werden. Nach dem Auspacken lassen sich alle Teile
ganz einfach montieren. Die Verpackung sollte für eventuelle Transporte aufgehoben werden.
5.1 Plattenteller montieren
1. Legen Sie den Gummiantriebsriemen um die Unterseite des Plattentellers (Abb.1).
2. Stellen Sie den Plattenspieler auf einer ebenen, waagerechten Fläche auf und stecken Sie dann den
Plattenteller auf die Achse des Plattenspielers (Abb. 2).
3. Drehen Sie den Plattenteller von Hand, bis sich eines der Löcher im oberen rechten Drittel befindet und
die Antriebsachse des Motors zu sehen ist.
4. Der Gummiantriebsriemen ist durch die Plattentellerlöcher zu sehen. Fassen Sie den Antriebsriemen
und legen Sie ihn über die Antriebsachse (Abb. 3).
5. Legen Sie die beiliegende Slipmat auf den Plattenteller.
8/23
00048594.DOC, Version 1.0
5.2 Systemträger und Gegengewicht für den Tonarm montieren
1. Nehmen Sie den Systemträger aus einem der beiden seitlichen Styropor-Verpackungsteile heraus,
stecken Sie ihn auf das vordere Ende des Tonarmes und sichern Sie ihn mit der Verriegelungsmutter
(Abb. 4).
2. Nehmen Sie das Gegengewicht aus einem der beiden seitlichen Styropor-Verpackungsteile heraus und
stecken Sie es auf das hintere Ende des Tonarmes, bis es einrastet. Anschließend wird mit dem
Gegengewicht das Auflagegewicht genau eingestellt, mit dem die Abtastnadel auf der Schallplatte
aufliegt (Abb. 5).
Abb. 4 Systemträger montieren
Abb. 5 Gegengewicht montieren
5.3 Auflagegewicht einstellen
1.
2.
3.
4.
5.
6.
7.
8.
Entfernen Sie die Schutzkappe für die Abtastnadel.
Stellen Sie den Antiskating-Drehknopf entgegen dem Uhrzeigersinn auf „0“.
Stellen Sie den Hebel für den Tonarm-Lift in die vordere Position.
Öffnen Sie den Verriegelungshebel für den Tonarm nach rechts. Fassen Sie den Tonarm am Griff an
und führen Sie ihn vorsichtig bis kurz vor den Plattenteller, sodass er sich frei nach oben und unten
bewegen lässt. Achtung! Lassen Sie die Nadel nirgends anstoßen.
Führen Sie den Tonarm seitlich mit der linken Hand, damit die Nadel nicht am Plattenteller anstößt.
Verdrehen Sie mit der rechten Hand das Gegengewicht so, dass der Tonarm genau waagerecht stehen
bleibt und nicht nach oben oder unten schwingt (Abb. 6).
• Schwingt der Tonarm nach oben, drehen Sie das Gegengewicht entgegen dem Uhrzeigersinn.
• Schwingt der Tonarm nach unten, drehen Sie das Gegengewicht im Uhrzeigersinn.
Legen Sie den Tonarm zurück auf die Tonarm-Halterung und sichern Sie ihn mit dem
Verriegelungshebel.
Am Gegengewicht befindet sich ein drehbarer, schwarzer Ring mit einer Skala. Die Markierungslinie auf
dem Tonarm zeigt auf irgendeinen Wert der Skala. Drehen Sie den Ring auf Position „0“ ohne dabei das
Gegengewicht zu verdrehen (Abb. 7).
Die Skala gibt das Auflagegewicht in Gramm an. Für das mitgelieferte Abtastsystem ist ein
Auflagegewicht von 3,5 g erforderlich. Drehen Sie dazu das Gegengewicht (mitsamt der Skala)
entgegen dem Uhrzeigersinn, bis die Markierungslinie des Tonarms auf „3,5“ zeigt (Abb. 8). Wenn Sie
ein anderes Abtastsystem verwenden stellen Sie das vom Hersteller angegebene Auflagegewicht ein.
Abb. 6 Tonarm ausbalancieren
Abb. 7 Skalenring
Abb. 8 Auflagegewicht einstellen
5.4 Antiskating einstellen
Beim Abspielen einer Schallplatte treten Kräfte an der Abtastnadel auf, welche durch die AntiskatingEinrichtung aufgehoben werden. Stellen Sie dazu den Antiskating-Drehknopf von „0“ auf den Wert, der dem
Auflagegewicht gleich ist ein, d. h. bei dem mitgelieferten Abtastsystem auf „3,5“. Der Wert ist auf dem
Drehknopf abzulesen.
9/23
00048594.DOC, Version 1.0
5.5 Nadelbeleuchtung montieren
Nehmen Sie die Nadelbeleuchtung aus einem der beiden seitlichen Styropor-Verpackungsteile heraus und
stecken Sie sie in die dafür vorgesehene Cinch-Buchse (Abb. 9). Die Nadelbeleuchtung wird automatisch mit
Einschalten des Stroms aktiviert. Sie können die Lampe im Radius von 360° frei ausrichten.
Achtung! An diese Buchse dürfen niemals andere Stecker, z. B. Mixereingänge etc. angeschlossen werden!
Andernfalls Gefahr von irreparablen Schäden an Ihrem Equipment.
Abb. 9 Nadelbeleuchtung einstecken
6. ANSCHLÜSSE
Schalten Sie vor dem Anschließen oder Ändern bestehender Anschlüsse den Plattenspieler aus.
1. Verbinden Sie den analogen Audioausgang des Plattenspielers über das beiliegende Cinch-Kabel mit
den Line-Pegel-Eingangsbuchsen am Verstärker oder Mischpult. Achten Sie darauf, dass die
rechts/links Belegung (Steckerfarbe rot/weiß) an beiden Geräten übereinstimmt.
2. Verbinden Sie das beiliegende Netzkabel mit der entsprechenden Buchse am Plattenspieler und stecken
Sie den Netzstecker in eine Steckdose. Das Gerät Produkt ist für den Anschluss an 80 - 260 V, 50/60 Hz
Wechselspannung zugelassen.
Wenn das Gerät direkt an das örtliche Stromnetz angeschlossen wird, muss eine Trennvorrichtung mit
mindestens 3 mm Kontaktöffnung an jedem Pol in die festverlegte elektrische Installation eingebaut werden.
Das Gerät darf nur an eine Elektroinstallation angeschlossen werden, die den VDE-Bestimmungen
DIN VDE 0100 entspricht. Die Hausinstallation muss mit einem Fehlerstromschutzschalter (RCD) mit 30 mA
Bemessungsdifferenzstrom ausgestattet sein.
7. BEDIENUNG
7.1 Schallplatte abspielen
1. Entfernen Sie die Schutzkappe für die Abtastnadel.
2. Schalten Sie den Plattenspieler mit dem Netzschalter ein. Die Nadellampe leuchtet.
3. Drücken Sie die entsprechende Taste zur Wahl der Geschwindigkeit.
• für 33O U/min die linke Taste (Grundeinstellung)
• für 45 U/min die rechte Taste
• für 78 U/min beide Tasten gleichzeitig
Zur Anzeige der gewählten Geschwindigkeit leuchtet die jeweilige LED über den Tasten. Bei 78 U/min
leuchten beide LEDs.
4. Legen Sie die Schallplatte auf. Legen Sie bei Single-Platten den Adapter mit auf.
5. Öffnen Sie den Verriegelungshebel für den Tonarm nach rechts. Stellen Sie zum Anheben des Tonarms
den Hebel für den Tonarm-Lift in die hintere Position.
6. Fassen Sie den Tonarm am Griff an und positionieren Sie die Abtastnadel über den Anfang bzw. die
gewünschte Stelle auf der Schallplatte. Stellen Sie den Hebel für den Tonarm-Lift in die vordere Position.
Der Tonarm senkt sich langsam auf die Schallplatte.
. Der Plattenteller beginnt zu rotieren. Die Platte kann während des
7. Drücken Sie die Taste
Abspielens für eine Unterbrechung mit der Taste
an jeder Stelle gestoppt und wieder gestartet
werden.
8. Mit der Taste MOTOR OFF stoppen Sie den Motor (rote Kontroll-LED erlischt).
10/23
00048594.DOC, Version 1.0
9. Mit der Taste REVERSE können Sie die Drehrichtung umschalten. Drücken Sie dazu jeweils kurz die
Taste. Bei eingeschaltetem Rückwärtslauf leuchtet die rote Kontroll-LED.
10. Zum Beenden des Abspielens heben Sie den Tonarm mit dem Tonarm-Lift an und führen ihn per Hand
zurück auf den Tonarm-Halter. Stoppen Sie den Plattenteller mit der Taste
.
11. Sichern Sie nach dem Gebrauch des Plattenspielers den Tonarm mit dem Verriegelungshebel.
7.2 USB-Geräte und Speicherkarten abspielen
1. Stecken Sie USB-Geräte in den USB-Anschluss ein. Um eine Speicherkarte einzusetzen, schieben Sie
sie mit den Kontakten nach unten und der abgeschrägten Ecke nach rechts soweit in den Kartenschlitz,
bis sie einrastet. Um eine Speicherkarte auszugeben, drücken Sie diese leicht an woraufhin sie
herausspringt und abgezogen werden kann. ACHTUNG! Entfernen Sie niemals USB-Geräte oder
Speicherkarten im Wiedergabemodus, um Schäden oder Datenverlust zu vermeiden.
Hinweise zu Speicherkarten und USB-Geräten
• Das Gerät unterstützt SD- und SDHC-Speicherkarten.
• Das Gerät unterstützt USB-Massenspeichergeräte der Kategorie „Mass Storage Class" (MSC)
1.0, 1.1, 2.0, einschließlich tragbare Flash-Memory-Geräte und digitale Audioplayer. Externe
Festplattenlaufwerke, optische Speicher wie externe CD/DVD-Lauwerke und USB-Geräte, die an
einem USB-Verteiler angeschlossen sind, werden jedoch nicht erkannt.
• Bei Verwendung von bestimmten USB-Geräten ist u.U. keine einwandfreie Wiedergabe möglich.
• Wird ein Datenträger mit einer großen Anzahl von Ordnern und Dateien eingesetzt, kann der
Einlesevorgang längere Zeit beanspruchen.
2. Drücken Sie den Umschalter AUDIO SELECT, um von Schallplatte auf ein USB-Gerät oder eine
Speicherkarte umzuschalten. Mit dem ersten Tastendruck wird der USB-Anschluss angewählt, mit dem
nächsten der SD-Kartenschlitz und mit dem nächsten schalten Sie zurück auf Schallplatte. Die LEDs
zeigen Ihnen durch Leuchten, welche Quelle aktiviert ist. Beim Einlesevorgang von USB-Geräten und
Speicherkarten blinkt die entsprechende LED.
, um die Wiedergabe zu starten. Durch Drücken der Taste
wird die
3. Drücken Sie die Taste
Wiedergabe unterbrochen und durch erneutes Drücken wieder gestartet.
4. Mit den Tasten
und
wählen Sie Titel an und aktivieren den schnellen Vor- und Rücklauf. Mit jedem
Drücken der Taste
wird ein Titel vorgesprungen. Durch Drücken der Taste
wird an den Titelanfang
gesprungen und mit jedem weiteren Drücken ein Titel zurück. Für den schnellen Vorlauf halten Sie die
Taste
gedrückt, für den schnellen Rücklauf die Taste .
7.3 Tonaufnahmen
1. Schalten Sie mit dem Umschalter AUDIO SELECT auf Schallplatte (LED PHONO leuchtet).
2. Drücken Sie kurz die Taste REC MODE/REC STOP, um den Aufnahmemodus zu aktivieren (die
zugehörige LED blinkt). Ist für die Aufnahme ein USB-Gerät angeschlossen, blinkt die LED USB und
zeigt, dass das Gerät angewählt ist. Bei einer Speicherkarte blinkt die LED SD. Wenn sowohl ein USBGerät als auch eine Speicherkarte eingesetzt ist, wird automatisch das USB-Gerät als Aufnahmemedium
angewählt.
. Die Aufnahme wird gestartet. Auf dem Aufnahmemedium wird ein Ordner mit
3. Drücken Sie die Taste
der Aufnahme im MP3-Format mit 128 kBit/s und 44,1 kHz Abtastrate angelegt.
4. Stellen Sie mit dem Regler REC LEVEL den Aufnahmepegel ein. Die Übersteuerungsanzeige REC CLIP
sollte gar nicht bzw. bei Signalspitzen nur ganz kurz aufleuchten. Leuchtet sie permanent, muss der
Pegel entsprechend gesenkt werden.
5. Halten Sie die Taste REC MODE/REC STOP etwa drei Sekunden gedrückt, um die Aufnahme zu
beenden. Die LED der Taste REC MODE/REC STOP erlischt und die LED des Aufnahmemediums hört
auf zu blinken.
Tipp
Zum Bearbeiten der Aufnahmen an einem Computer sind verschiedene Programme als Freeware
im Internet erhältlich. Wir empfehlen Ihnen den leicht zu bedienenden Audioeditor Audacity
(http://audacity.sourceforge.net/).
6. Schalten Sie das Gerät nach dem Gebrauch mit dem Netzschalter aus.
11/23
00048594.DOC, Version 1.0
8. REINIGUNG UND WARTUNG
LEBENSGEFAHR!
Vor Wartungsarbeiten unbedingt allpolig vom Netz trennen!
Der Plattenspieler sollte regelmäßig von Verunreinigungen wie Staub usw. gereinigt werden. Verwenden Sie
zur Reinigung ein fusselfreies, angefeuchtetes Tuch. Auf keinen Fall Alkohol oder irgendwelche
Lösungsmittel zur Reinigung verwenden!
Verwenden Sie zum Entstauben der Abtastnadel und Schallplatten eine Carbonfaser-Plattenbürste (z.B.
Artikel 10608985 Carbonfaser-Plattenreinigungsbürste).
Im Geräteinneren befinden sich keine zu wartenden Teile. Wartungs- und Servicearbeiten sind ausschließlich dem autorisierten Fachhandel vorbehalten!
Sollten einmal Ersatzteile benötigt werden, verwenden Sie bitte nur Originalersatzteile.
Sollten Sie noch weitere Fragen haben, steht Ihnen Ihr Fachhändler jederzeit gerne zur Verfügung.
8.1 Transport
Soll der Plattenspieler transportiert werden, sichern Sie bitte alle Bauteile des Gerätes in der
Originalverpackung, um Transportschäden zu vermeiden.
1. Stecken Sie die Schutzkappe für die Abtastnadel auf.
2. Sichern Sie den Tonarm mit dem Verriegelungshebel.
3. Schrauben Sie das Gegengewicht für den Tonarm durch Drehen im Uhrzeigersinn ab verpacken Sie es
separat und transportgesichert.
4. Nehmen Sie den Plattenteller von der Achse und verpacken Sie ihn separat und transportgesichert.
5. Verwenden Sie bitte die Originalverpackung für Transporte.
9. ZUBEHÖR
9.1 Tonabnehmersystem und Abtastnadel ersetzen
Bei Bedarf kann das Tonabnehmersystem oder die Abtastnadel leicht ausgewechselt werden.
Entsprechende Ersatzteile sind im Fachhandel erhältlich, z. B. das Tonabnehmersystem S-15 und die dazu
passende Abtastnadel S-15 von OMNITRONIC.
1. Ziehen Sie zum Wechseln der Abtastnadel die Nadelhalterung nach vorne ab. Stecken Sie die neue
Nadel auf das Abtastsystem.
2. Schrauben Sie zum Wechseln des Tonabnehmersystems den Systemträger vom Tonarm ab.
3. Ziehen Sie das Tonabnehmersystem vom Träger ab und ziehen Sie die Anschlussdrähte ab.
4. Schrauben Sie das neue Tonabnehmersystem am Träger fest und stecken Sie die Drähte wie folgt auf:
weiß
blau
rot
grün
linker Kanal Pluspol
linker Kanal Minuspol
rechter Kanal Pluspol
rechter Kanal Minuspol
5. Für ein optimales Abtasten sollte der Überhang – der Abstand zwischen Nadel und der Achse des
Plattentellers – auf 15 mm eingestellt sein. Vergewissern Sie sich, dass das System mittig sitzt (korrekter
Azimut) und die Schrauben angezogen sind (Abb. 10).
12/23
00048594.DOC, Version 1.0
6. Stellen Sie nach dem Austausch des Tonabnehmersystems das Auflagewicht und den Antiskating-Wert
neu ein (Kapitel 5.3, 5.4).
Abb. 10 Einstellen des Azimut
9.2 Ersatz-Systemträger
Ein Ersatz-Systemträger (z. B. der Systemträger S-15 von OMNITRONIC) komplett mit einem Tonabnehmersystem ermöglicht bei Bedarf einen schnellen Austausch. Der Systemträger lässt sich einfach durch
Ab- und Anschrauben auswechseln. Stellen Sie anschließend das Auflagewicht und den Antiskating-Wert
neu ein (Kapitel 5.3, 5.4).
10. TECHNISCHE DATEN
Spannungsversorgung:
Gesamtanschlusswert:
Typ:
Antriebsart:
Motor:
Plattenteller:
Drehzahl:
Drehzahlübergang:
Startzeit:
Bremszeit:
Gleichlaufschwankungen:
Tonarm:
Antiskating-Bereich:
Auflagegewicht des Abtastsystems:
Passendes Abtastsystem:
Ausgänge:
Geeignete Datenträger:
Aufnahmeformat:
Maße (LxBxH):
Gewicht:
80 - 260 V AC, 50/60 Hz ~
8W
Manueller Plattenspieler
Riemenantrieb
Gleichstrommotor
Ø 330 mm, Alu-Druckguss
33 1/3 U/min, 45 U/min und 78 U/min
<1 s
<1 s
<1 s
<0,2 % WRMS
S-förmig mit Kardanaufhängung
0-4 g
3-4 g
6 - 10 g
Stereo-Cinch mit Line-Pegel
USB-Geräte und SD(HC)-Karten
MP3 mit 128 kBit/s und 44,1 kHz Abtastrate
485 x 370 x 140 mm
4 kg
Bitte beachten Sie: Technische Änderungen ohne vorherige Ankündigung und Irrtum vorbehalten.
11.08.2009 ©
13/23
00048594.DOC, Version 1.0
OPERATING INSTRUCTIONS
Recording Turntable
CAUTION!
Keep this device away from rain and moisture!
Unplug mains lead before opening the housing!
For your own safety, please read this user manual carefully before you initially start-up.
Every person involved with the installation, operation and maintenance of this device has to
- be qualified
- follow the instructions of this manual
- consider this manual to be part of the total product
- keep this manual for the entire service life of the product
- pass this manual on to every further owner or user of the product
- download the latest version of the user manual from the Internet
1. INTRODUCTION
Thank you for having chosen an OMNITRONIC turntable. If you follow the instructions given in this manual,
we can assure you that you will enjoy this device for many years.
Unpack your turntable.
Please make sure that there are no obvious transport damages. Should you notice any damages on the A/C
connection cable or on the casing, do not take the device into operation and immediately consult your local
dealer.
2. SAFETY INSTRUCTIONS
CAUTION!
Be careful with your operations. With a dangerous voltage you can suffer a dangerous
electric shock when touching the wires!
This device has left our premises in absolutely perfect condition. In order to maintain this condition and to
ensure a safe operation, it is absolutely necessary for the user to follow the safety instructions and warning
notes written in this user manual.
Important:
Damages caused by the disregard of this user manual are not subject to warranty. The dealer will
not accept liability for any resulting defects or problems.
14/23
00048594.DOC, Version 1.0
Always plug in the power plug least. Make sure that the power switch is set to OFF position before you
connect the device to the mains.
Keep away from heaters and other heating sources!
If the device has been exposed to drastic temperature fluctuation (e.g. after transportation), do not switch it
on immediately. The arising condensation water might damage your device. Leave the device switched off
until it has reached room temperature.
Never put any liquids on the device or close to it. Should any liquid enter the device nevertheless, disconnect
from mains immediately. Please let the device be checked by a qualified service technician before you
operate it again. Any damages caused by liquids having entered the device are not subject to warranty!
This device falls under protection-class II and features a protective insulation.
Never let the power cord come into contact with other cables! Handle the power cord and all connections
with the mains with particular caution!
Make sure that the power cord is never crimped or damaged by sharp edges. Check the device and the
power cord from time to time.
Always disconnect from the mains, when the device is not in use or before cleaning it. Only handle the power
cord by the plug. Never pull out the plug by tugging the power cord.
CAUTION: Turn the amplifier on last and off first!
Please note that damages caused by manual modifications on the device or unauthorized operation by
unqualified persons are not subject to warranty.
Keep away children and amateurs!
CAUTION: High volumes can cause hearing damage!
There are no serviceable parts inside the device. Maintenance and service operations are only to be carried
out by authorized dealers.
3. OPERATING DETERMINATIONS
The DRT-1000 is a belt drive turntable with built-in phono preamplifier and has been specially designed
for high-quality and convenient digitization of analog vinyl records to external data carriers. For audio
recordings in the MP3 format with 128 kbit/s and 44.1 kHz sampling rate, USB devices and SD(HC) memory
cards may be used. The DRT-1000 also serves for playing titles in the MP3 format from data carriers.
This product is allowed to be operated with an alternating current of 80 - 260 V AC, 50/60 Hz and was
designed for indoor use only.
Do not shake the device. Avoid brute force when installing or operating the device.
When choosing the installation spot, please make sure that the device is not exposed to extreme heat,
moisture or dust. There should not be any cables lying around. You endanger your own and the safety of
others!
The ambient temperature must always be between -5° C and +45° C.
The relative humidity must not exceed 50 % with an ambient temperature of 45° C.
This device must only be operated in an altitude between -20 and 2000 m over NN.
Operate the device only after having familiarized with its functions. Do not permit operation by persons not
qualified for operating the device. Most damages are the result of unprofessional operation!
15/23
00048594.DOC, Version 1.0
Never use solvents or aggressive detergents in order to clean the device! Rather use a soft and damp cloth.
Please use the original packaging if the device is to be transported.
Never remove the serial barcode from the device as this would make the guarantee void.
If this device will be operated in any way different to the one described in this manual, the product may suffer
damages and the guarantee becomes void. Furthermore, any other operation may lead to dangers like shortcircuit, burns, electric shock, etc.
4. DESCRIPTION
4.1 Features
Belt drive turntable with recording function and phono preamplifier
• USB port and SD card slot for high-quality and convenient digitization of analog vinyl records to external
data carriers
• Recording format: MP3 (44.1 kHz, 128 kbit/s)
• Recording level adjustable, with clip LED
• Playback of MP3 files
• Built-in phono preamplifier with line level outputs
• 3 speeds (33 1/3, 45 and 78 RPM)
• Quick start
• Large start/pause button
• Motor with reverse run can be switched off
• Plug-in LED target lamp
• Adjustable anti-skating
• Shock-absorbing feet
• Including pick-up system, slipmat, RCA cable
• Delivery without dust cover
16/23
00048594.DOC, Version 1.0
4.2 Operating elements and connections
1 USB port
10 Buttons
USB port (type A) for inserting a USB storage device.
and
For selecting titles and for fast forward and reverse on the
selected data carrier.
2 SD card slot
Slot for inserting an SD(HC) card.
11 Button REC MODE/REC STOP
3 Button
To switch between start and pause for the platter.
Short actuation of the button activates the recording
mode (LED will be flashing) and long actuation stops the
recording (LED off).
4 Platter
12 Selector switch AUDIO SELECT
5 Target light
For switching between the input sources USB, SD and
phono for playback. The LEDs will verify which source is
active.
6 Headshell with phono cartridge system
13 Adaptor for single records
7 Buttons to select speed
• for 33O RPM press the left button, the LED above the
button lights (basic setting)
• for 45 RPM press the right button, the LED above the
button lights
• for 78 RPM press both buttons simultaneously, the
LEDs above the buttons light
8 Button REVERSE
14 Control REC LEVEL
For adjusting the recording level. If the clip LED lights up,
the signal is overloaded.
15 Tone arm lift
16 Anti-skating adjustment
To switch between forward and reverse run.
17 Counterweight scale
9 Button
18 Counterweight for the tone arm
To switch between play and pause for an external data
carrier and to start a recording.
19 Tone arm rest with locking lever
20 On/off switch for the motor
17/23
00048594.DOC, Version 1.0
21 Analog line output
Analog audio output (RCA, left/right) with line level for
connecting an amplifier, a mixer or other units with line
level inputs.
23 Power switch
Press the power switch to turn the unit on and off.
22 Power input
Plug in the supplied power cable here.
5. ASSEMBLY AND BASIC ADJUSTMENTS
The headshell, the turntable platter and the counterweight for the tone arm are separately packed to prevent
damage to the turntable during transportation. After unpacking, the parts can be easily assembled. The
packing material should be kept for transportation purposes.
5.1 Mounting the turntable platter
1. Place the rubber driving belt over the bottom of the platter (Fig. 1).
2. Set up the turntable on a plane, stable ground and place the turntable platter on the axle of the turntable
(Fig. 2).
3. Turn the platter by hand until one of the cutouts is near the top right corner and the driving axle of the
motor is visible.
4. The rubber driving belt is visible through the cutouts of the turntable platter. Seize the driving belt and
place it over the driving axle (Fig. 3).
5. Place the supplied slipmat on the turntable platter.
18/23
00048594.DOC, Version 1.0
5.2 Mounting the headshell and the counterweight for the tone arm
1. Take the headshell out of one of the two lateral polystyrene wrappings, place it onto the front end of the
tone arm, and secure it with the locking nut (Fig. 4).
2. Take the counterweight out of one of the two lateral polystyrene wrappings and place it on the rear end
of the tone arm until it locks into the place. The counterweight is then used for precise adjustment of the
stylus pressure on the record (Fig. 5).
Fig. 4 Mounting the headshell
Fig. 5 Mounting the counterweight
5.3 Adjusting the stylus pressure
1.
2.
3.
4.
5.
6.
7.
8.
Pull down the protective cap of the stylus.
Turn the anti-skating knob counterclockwise to “0”.
Place the lever for the tone arm lift in the front position.
Open the tone arm locking lever to the right. Seize the handle of the tone arm and lead it carefully just
before the turntable platter so that it can be moved upwards and downwards. Attention! The stylus must
not hit against anything.
Lead the tone arm with the left hand to the side so that the stylus does not hit against the turntable
platter. With the right hand turn the counterweight so that the tone arm remains exactly in a horizontal
position and does not move upwards or downwards (Fig. 6).
• If the tone arm moves upwards, turn the counterweight counterclockwise.
• If the tone arm moves downwards, turn the counterweight clockwise.
Put the tone arm back onto the tone arm support and secure it with the locking lever.
The counterweight is provided with a black rotary ring with a scale. The marking line on the tone arm
points to a value on this scale. Without turning the counterweight, only turn the ring to “0” (Fig. 7).
The scale indicates the stylus pressure in grams. A stylus pressure of 3.5 g is required for the supplied
stylus system. For this purpose, turn the counterweight (with the scale) counterclockwise until the
marking line on the tone arm points to “3.5” (Fig. 8). For other stylus systems adjust the stylus pressure
indicated by the manufacturer.
Fig. 6 Tone arm balance
Fig. 7 Scale ring
Fig. 8 Stylus pressure adjustment
5.4 Adjusting the anti-skating facility
When playing a record, forces occur on the stylus which are compensated by the anti-skating facility. For this
purpose, adjust the anti-skating knob from “0” to the value which equals the stylus pressure, i.e. for the
supplied stylus system to “3.5”. The value is indicated on the knob.
19/23
00048594.DOC, Version 1.0
5.5 Mounting the target light
Take the target light out of one of the two lateral polystyrene wrappings and plug it into the corresponding
RCA jack (Fig. 9). The target light activates automatically when switching on the power. Adjust the light freely
in a range of 360°. Caution! Never connect any other plugs, e.g. mixer inputs etc. to this jack! Otherwise,
danger of heavy equipment damage.
Fig. 9 Connecting the target light
6. CONNECTIONS
Prior to connecting or changing existing connections switch off the turntable.
1. Connect the analog audio output of the turntable with the supplied RCA cable to the line level input jacks
at the amplifier or mixer. Make sure that the right/left occupation (plug color red/white) is the same at
both units.
2. Connect the supplied power supply cable to the corresponding input of the turntable and the mains plug
to a power outlet. The unit is allowed to be operated with an alternating current of 80 - 260 V, 50/60 Hz.
If the device will be directly connected with the local power supply network, a disconnection switch with a
minimum opening of 3 mm at every pole has to be included in the permanent electrical installation. The device
must only be connected with an electric installation carried out in compliance with the IEC standards. The
electric installation must be equipped with a Residual Current Device (RCD) with a maximum fault current of
30 mA.
7. OPERATION
7.1 Playing a record
1. Remove the protective cover of the stylus.
2. Switch on the turntable with the power switch. The target light lights up.
3. To select the speed, press the corresponding button:
• for 33O RPM the left button (basic setting)
• for 45 RPM the right button
• for 78 RPM both buttons simultaneously
To indicate the selected speed, the corresponding LED above the buttons lights up. For 78 RPM both
LEDs light up.
4. Put on the record. For single records, use the adaptor.
5. Open the locking lever for the tone arm to the right. To lift the tone arm, place the lever for the tone arm
lift to the rear position.
6. Seize the handle of the tone arm, and place the stylus above the beginning or the desired spot on the
record. Place the lever for the tone arm lift to the front position. The tone arm is slowly lowered onto the
record.
. The turntable platter starts to rotate. While playing, the record can be
7. Press the start/pause button
stopped at any place and be restarted with the button
.
8. To stop the motor press the button MOTOR OFF (red control LED extinguishes).
9. With the button REVERSE you can switch over the sense of rotation. For this purpose shortly press the
button. With the reverse run switched on, the red control LED lights up.
10. To stop the playing, lift the tone arm with the tone arm lift and put it back onto the tone arm support by
hand. Stop the turntable platter with the button
.
11. After use of the turntable, secure the tone arm with the locking lever.
20/23
00048594.DOC, Version 1.0
7.2 Playing USB devices and memory cards
1. Insert USB devices into the USB port. Insert a memory card with the contacts pointing downwards and
the notched corner to the right so far into the card slot until it is engaged. To eject a memory card,
slightly press it into the slot until it comes out and can be removed. CAUTION! Never attempt to remove
USB devices or memory cards in play mode. Otherwise damage or loss of data may occur.
Regarding memory cards and USB storage devices
• This unit supports SD and SDHC memory cards.
• This unit supports MSC (Mass Storage Class) USB storage devices 1.0, 1.1, 2.0 including
external portable flash memory devices and digital audio players. However, hard discs, optical
discs such as external CD/DVD drives, and USB devices connected to a USB hub will not be
recognized.
• Depending on the device used, proper playback may not be possible with all USB storage
devices.
• When inserting a data carrier with a large number of folders and files, some time may be required
to read in the contents.
2. Press the selector switch AUDIO SELECT to switch from the record to a USB device or a memory card.
The unit must be in pause mode. The first actuation of the button will select the USB port, the next
actuation will select the SD card slot and the next actuation will switch the unit back to the record. The
LEDs will light to verify which source is active. During the read-in of a USB device or memory card the
corresponding LED will be flashing.
to start playback. By pressing the button
playback can be interrupted and
3. Press the button
restarted by pressing the button again.
4. For selecting titles and for fast forward/reverse use the buttons
and . Each time the button
is
pressed, the unit will advance one title. By pressing the button , the unit will go to the beginning of the
title and with each further actuation, the unit will go back another title. For fast forward, keep the button
pressed, for fast reverse keep the button
pressed.
7.3 Audio recordings
1. Switch to phono with the selector switch AUDIO SELECT (LED PHONO lights).
2. Shortly actuate the button REC MODE/REC STOP to activate the recording mode (the corresponding
LED will be flashing). If a USB device is connected for the recording, the LED USB will be flashing to
indicate that the device is selected. For a memory card, the LED SD will be flashing. If both a USB and a
memory card is inserted, the USB device is automatically selected as memory medium.
. The recording starts. On the memory medium, a new folder will be created with the
3. Press the button
recording in the MP3 format with 128 kbit/s and 44.1 kHz sampling rate.
4. With the control REC LEVEL adjust the recording level. The overload indication REC CLIP should not
light up or only light up shortly during signal peaks. If it lights permanently, reduce the level
correspondingly.
5. To stop the recording, keep the button MODE/REC STOP pressed for about three seconds. The LED of
the button REC MODE/REC STOP extinguishes and the LED of the memory medium stops flashing.
Hint
For processing the recordings on a computer, different programs are available as freeware on the
internet. We recommend the easy-to-use audio editor Audacity (http://audacity.sourceforge.net/).
6. After use, switch off the unit with the power switch.
21/23
00048594.DOC, Version 1.0
8. CLEANING AND MAINTENANCE
DANGER TO LIFE!
Disconnect from mains before starting maintenance operation!
We recommend a frequent cleaning of the turntable. Please use a soft lint-free and moistened cloth. Never
use alcohol or solvents! For dusting the stylus and the records, use a carbon fiber brush for records (e.g.
item 10608985 carbon fibber brush). There are no serviceable parts inside the device. Maintenance and
service operations are only to be carried out by authorized dealers. Should you need any spare parts, please
use genuine parts. Should you have further questions, please contact your dealer.
8.1 Transport
For dispatching the turntable pay attention that all components of the unit are only packed in their original
packing material and/or are especially secured for transportation.
1. Place the protective cap on the stylus.
2. Secure the tone arm with the locking lever.
3. Unscrew the counterweight for the tone arm by turning it clockwise and pack it separately and secured
for transportation.
4. Remove the turntable platter from the axle and pack it separately and secured for transportation.
5. Please use the original packing box.
CH
9. ACCESSORIES
9.1 Replacement phono cartridge system and stylus
If required, the phono cartridge system or the stylus can easily be replaced. The corresponding replacement
parts are available from the retailer, e. g. the magnetic phono cartridge system S-15 and the matching stylus
S-15 from OMNITRONIC.
1. To change the stylus, pull off the stylus support in forward direction. Put the new stylus on the stylus
system.
2. To change the phono cartridge system, screw off the headshell from the tone arm.
3. Screw off the phono cartridge system from the support and pull off the connection wires.
4. Tightly screw the new phono cartridge system on the support and put on the wires as follows:
white left channel positive pole
blue
left channel negative pole
red
right channel positive pole
green right channel negative pole
5. For optimized pick-up the overhang – the distance between the stylus and the axle of the turntable –
should be set to 15 mm. Make sure that the system is centered (correct azimuth) and the screws are
fixed (Fig. 10).
6. After replacing the phono cartridge system, readjust the stylus pressure and the anti-skating value
(chapters 5.3 and 5.4).
Fig. 10 Adjusting the azimuth
22/23
00048594.DOC, Version 1.0
9.2 Replacement headshell
A replacement headshell (e. g. the headshell S-15 from OMNITRONIC) including a phono cartridge system
allows an immediate replacement, if required. The headshell can easily be replaced by unscrewing the
existing one and screwing on the new one. After the replacement readjust the stylus pressure and the antiskating value (chapters 5.3 and 5.4).
10. TECHNICAL SPECIFICATIONS
Power supply:
Power consumption:
Type:
Drive method:
Motor:
Platter:
Speed:
Change time between speeds:
Start time:
Stop time:
Wow and flutter:
Tone arm:
Anti-skating range:
Stylus pressure range:
Applicable cartridge weight:
Output connectors:
Available data carriers:
Recording format:
Dimensions:
Weight:
80 - 260 V AC, 50/60 Hz ~
8W
manual turntable
belt drive
DC motor
Ø 330 mm, aluminum diecast
33 1/3 RPM, 45 RPM, and 78 RPM
<1 sec
<1 sec
<1 sec
<0.2 % WRMS
S-shape with Cardan's suspension
0-4 g
3-4 g
6 - 10 g
stereo RCA with line level
USB devices and SD(HC) cards
MP3 with 128 kbit/s and 44.1 kHz sampling rate
485 x 370 x 140 mm
4 kg
Please note: Every information is subject to change without prior notice. 11.08.2009 ©
23/23
00048594.DOC, Version 1.0