1
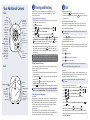
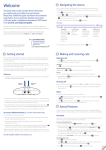
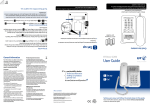
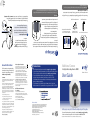
Please
turn
over
Important: Only use the mains power adaptor supplied in this box or your
product may not work.
Please refer to your original BT Digital Video Baby Monitor 1000 User guide if you
want to wall mount your Camera unit. This User guide can also be downloaded
from www.bt.com/producthelp
screws (x2) and wall plugs (x2)
Wall mounting bracket
1 mains power adaptor
(item code 064785)
1 Camera unit for the baby’s room
This Quick start guide to get your
new camera connected to your
BT Digital Video Baby Monitor 1000
Skip
Removing the batteries
If you ever need to remove the batteries,
unplug the power adaptor, then open the
battery compartment cover and use the
ribbon to gently pull them out.
1. Install 4 AA batteries (not supplied) into the battery
compartment as shown observing the polarity
markings inside. Then replace the battery
compartment cover.
The Camera unit can be powered up using the power adaptor provided or using
4 AA batteries (not supplied). Even if the power adaptor is used, we recommend
that you also install batteries to guarantee continual operation in the case of a
power cut.
or
2. Plug the power adaptor cable (item code
064785) into the socked marked
on
the side of the Baby unit and plug the
other end into the mains power and
switch on.
1 Setting up
Your BT Digital Video Baby Monitor 1000 Additional Camera
is guaranteed for a period of 12 months from the date
of purchase.
Subject to the terms listed below, the guarantee will provide
for the repair of, or at BT’s or its agent’s discretion the
option to replace the BT Digital Video Baby Monitor 1000
Additional Camera, or any component thereof, which is
identified as faulty or below standard, or as a result of inferior
workmanship or materials. Products over 28 days old from
the date of purchase may be replaced with a refurbished or
repaired product.
The conditions of this guarantee are:
• The guarantee shall only apply to defects that
occur within the 12 month guarantee period.
• Proof of purchase is required.
• The equipment is returned to BT or its agent as instructed.
This guarantee does not cover any faults or defects caused
by accidents, misuse, fair wear and tear, neglect, tampering
with the equipment, or any attempt at adjustment or repair
other than through approved agents.
This guarantee does not affect your statutory rights.
For further information within and outside the 12 month
guarantee, please refer to the full user guide at
www.bt.com/producthelp
The Waste of Electrical and Electronic Equipment (WEEE)
Directive (2002/96/EC) has been put in place to recycle
products using best available recovery and recycling
techniques to minimise the impact on the environment, treat
any hazardous substances and avoid the increasing landfill.
Product disposal instructions for residential users
When you have no further use for it, please remove any
batteries and dispose of them and the product as per your
local authority’s recycling processes. For more information
please contact your local authority or the retailer where the
product was purchased.
Check box contents
Guarantee
The symbol shown here and on the product means
that the product is classed as Electrical or Electronic
Equipment and should not be disposed with other household
or commercial waste at the end of its working life.
i d e o B a b y M o n it
The operating time for using AA batteries is
approximately 8 hours depending on light
conditions and feature usage. If you want to monitor
your baby for long periods we strongly recommend
you connect the power adaptor to the Camera unit.
The Camera unit can be wall mounted using the wall mounting
bracket supplied. For instructions, see your original BT Digital Video
Baby Monitor 1000 User guide or view online at www.bt.com/producthelp
For information on important safety
instructions, cleaning or further help,
please refer to the full user guide at
www.bt.com/producthelp
Product disposal instructions
BT
V
Warning
Do not mix old and new batteries. Only use the recommended type of 4 AA
batteries. Using other types could permanently damage the unit.
General information
Additional Camera
Find out more
• New Frequently Asked Questions available at www.bt.com/producthelp
• If you need more detailed instructions, the full BT Digital Video Baby Monitor
1000 user guide is available to download from www.bt.com/producthelp
• If you cannot find the answer to your problem in the full online
user guide, then please call the free Helpline on 0808 100 6554*.
Our dedicated advisors are more likely to be able to help you than the retailer
where you made your purchase.
• This document is also available in other formats, such as Large print,
Braille and Audio CD. If you would like a copy, please call 0808 100 6554*.
For Digital Video Baby Monitor 1000
User Guide
R&TTE Directive & Declaration
of Conformity
This product is intended for use within the UK.
This equipment complies with the essential requirements
for the Radio Equipment and Telecommunications Terminal
Equipment Directive (1999/5/EC).
For a copy of the Declaration of Conformity
please refer to www.bt.com/producthelp
Offices worldwide
The services described in this publication are subject to availability and may be
modified from time to time. Services and equipment are supplied subject to
British Telecommunications plc’s respective standard conditions of contract.
Nothing in this publication forms any part of a contract.
Setting up is easy. Just follow the simple steps in this guide.
© British Telecommunications plc 2011.
Registered Office: 81 Newgate Street, London EC1A 7AJ.
Registered in England No. 1800000.
Designed and produced by The Art & Design Partnership Ltd.
Printed in China / Issue 1 / ADP11-11
10%
If you need further assistance, please visit our website www.bt.com/producthelp
to view our advanced user guide or call our helpdesk on 0808 100 6554*
*Calls made from within the UK mainland network are free. Mobile and International call costs may vary.
Your Additional Camera
Front
Camera
Camera angle
adjustment tab
Infra red LEDs
Back-up light
for night vision.
Power on/off
Press and hold to
turn on or off.
Red light is on
when powered
by batteries.
Green light is on
when powered by
the power adaptor.
Orange light is on when
the Camera unit
is not paired to
the Parent unit.
Flashes red when
the battery is low.
Flashes red and green
alternately when
the Camera unit is in
pairing mode.
Pull to adjust the
camera angle.
Light sensor
Volume +/BT
Vide
o B ab y M on
ito
r
Press to increase or
decrease the volume.
Skip
Skip
Press to skip to the
next lullaby.
Microphone
You will need to pair your new Camera unit to your BT Digital Video 1000
Parent unit before you can use it. You can pair a maximum of four Camera
units to your Parent unit.
Switch the Camera unit on/off
1. Press and hold the
button until the light on the button turns on.
To pair the Camera unit to your Parent unit
1. Firstly, make sure the Camera and Parent units are turned on, by pressing and
holding the power buttons on each unit.
2. Press
3. Press
5. Press
on the Parent unit.
or
or
or
to highlight PAIR/UNPAIR CAM, then press
or
.
again to select Pair new CAM.
to choose a Camera unit slot, then press
.
6. When the display shows Please press both
and
keys on CAM side until
POWER indicator flashes Red and Green light, press and hold the
and
buttons for 5 seconds on the Camera unit. The light on the
button of
the Camera unit will flash red and green alternately.
7. When pairing has been successful, the screen will display the image from the
newly paired Camera unit. The light on the
button of the Camera unit
will turn red when it is powered by AA batteries or green when powered by the
power adaptor.
If pairing fails, the screen will display Pairing failed. Try the pairing procedure again.
If you pair a new Camera unit to an already occupied Camera unit slot it will
unpair the current Camera unit. Only one Camera unit can be paired at a time.
Testing the units before use
Antenna
Temperature sensor
Power socket
3 Go!
4. Press
Press to play and
stop lullabies.
Back
Speaker
To listen to lullabies
and parent’s voice
when Talk feature
is used from the
Parent unit.
2 Pairing and testing
Battery
compartment cover
Threaded socket
(6mm)
Used for the wall
mounting bracket
supplied or a tripod
(not supplied).
It is important that you test the units before use and at regular times thereafter,
especially if they have not been used for some time.
To test your units
1. Place the Parent and Camera units in the same room but make sure they are at
least 2 metres apart.
button on the Camera unit until the Power light on the
2. Press and hold the
button turns on.
3. Press and hold the
button on the Parent unit until the display shows
Waiting for linking and the Link light flashes.
4. Press the
button on the Parent unit to view the image from the Camera unit.
If no connection can be established, the Parent unit will display No link to CAM for
a few seconds, then Waiting for linking… The Link light will continue to flash.
2. To turn the Camera unit off, press and hold the
light will turn off.
button for 2 seconds. The
Adjust the Camera unit loudspeaker volume
You can adjust the loudspeaker volume from Level 1 to Level 5. The default
setting is Level 3. If you adjust the loudspeaker volume it will also adjust the
parent voice (Talk) playback volume.
When the maximum or minimum volume levels have been reached you will
hear an error tone.
or
button on the Camera unit at any time to increase or
1. Press the
decrease the loudspeaker volume.
Play lullabies from the Camera unit
The Camera unit has five lullabies that can be played to gently soothe your baby.
The total lullaby playback time is about 15 minutes and it starts from where you
stopped it last time.
To play lullabies
Press the
Press the
button to play.
Skip
Press the
button to skip to the next lullaby.
button to stop playback.
Lullaby playback will be paused if the Talk feature is being used from the
Parent unit, when finished lullaby playback will resume.
Night vision
To help you monitor your baby at night, the Camera unit automatically uses the
light from its infrared LEDs when it is turned on in a dark room. However, it only
transmits black and white images in this mode.
The LEDs on the Camera unit may glow red slightly in dark conditions,
this is normal.
To unpair a Camera unit from the Parent unit
1. Firstly, make sure both units are turned on, then press
on the Parent unit.
2. Press
or
to highlight PAIR/UNPAIR CAM, then press
Positioning and operating range
3. Press
or
to select Unpair CAM, then press
Positioning
We recommend you place the Camera unit between 1-2 metres away from your
baby for best performance. Make sure the unit and cable is out of reach of your
baby. Do not place the Parent and Camera units too close together as you will
hear a high-pitched noise, this is normal. The units are designed to be located
at a distance from one another, e.g. in separate rooms.
4. Press
or
Operating range
The operating range is up to 300 metres outdoors and 50 metres indoors.
The actual operating range may vary depending on the environmental conditions
and other interferences such as walls, doors and other obstructions.
then press
.
.
to select the Camera unit you want to unpair,
.
5. When the display shows, To unpair CAM # from the system, press
press the
or
key,
button.
6. When the display shows, Press
key to confirm, press
.
7. When unpairing has been successful, the screen will display the image from
the next paired Camera unit. If there is no paired Camera unit, the screen will
display NO CAM paired.