1
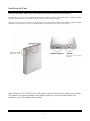
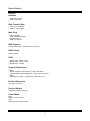
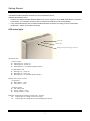
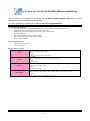
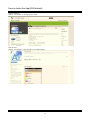
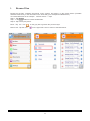
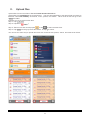
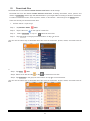
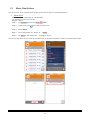
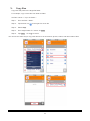
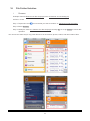
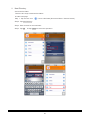
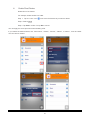
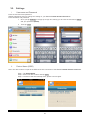
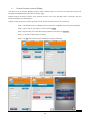
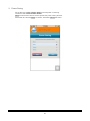
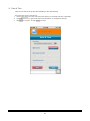
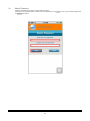
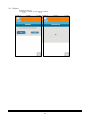
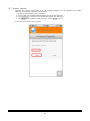
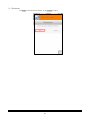
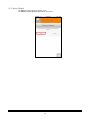
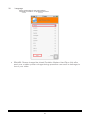
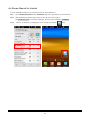
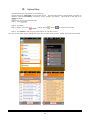
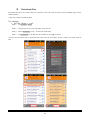
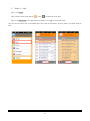
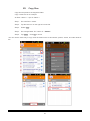
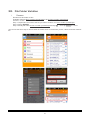
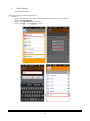
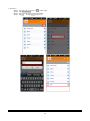
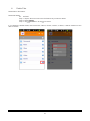
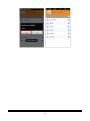
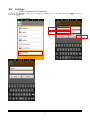
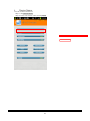
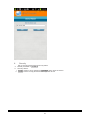
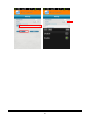
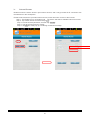
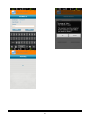
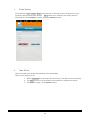
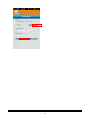
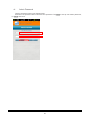
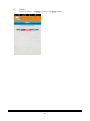
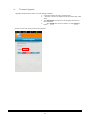
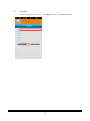
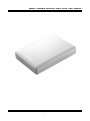
Maxell Portable Wireless Hard Drive User manual 1 Contents Product Overview..……………………………………………………………………………………………….….4 Identifying the Parts……………………………………………………………………………………………..…..5 Specifications ……………………………………………………………………………………………….…….…6 What’s in the Box…………………………………………………………………………………………….………8 Getting Started………………………………………………………………………………………………….……9 LED status lights…………………………………………………………………………..…………………………9 Air-Stream App for Maxell Portable Wireless Hard Drive……………………..…………..………………….…10 Air-Stream App Feature System Requirement Supported File Types How to obtain the App(IOS/Android) …………………………………………………………………………….11 Air-Stream Basic Operation (Air-Stream Wi-Fi Setting for iOS) ………………………………..…………. 12 Air-Stream for IOS ………………………………………………………………………………………………….13 I. Browse Files II. Upload III. Download IV. Move V. Copy Files VI. File folder Variation i. Rename ii. New Directory iii. Delete Files/Folders VII. Settings i. Username & Password ii. Device Name iii. Security Settings iv. Internet Access (Internet Bridge) v. Power Saving vi. Date & Time vii. Admin Password 2 viii. ix. x. xi. xii. Restart Firmware Upgrade Shutdown Factory Default Language Air-Stream Wi-Fi Setting for Android ………………………………………………………………………..…..33 Air-Stream Manual ……………………………………………………………………………………………......34 VIII. Browse Files IX. Upload Files X. Download Files XI. Move Files & Folders XII. Copy Files XIII. File folder Variation i. Rename ii. New Directory iii. Delete XIV. Settings i. Username & Password ii. Device Name iii. Security iv. Internet Access v. Power Saving vi. Date & Time vii. Admin Password viii. Restart ix. Firmware Upgrade x. Shutdown xi. Factory Default xii. Language Troubleshooting ……………………………………………………………………………………………….…60 Important Safety Instructions………………………………………………………………………..………….61 3 Product Overview Mobile Wireless Storage The Maxell Portable Wireless Hard Drive allows access to your personal videos, music, photos, data wirelessly and streaming it to your mobile devices such as iPad®/Tablet, Smartphones and more. By using its internal hard drive storage, there is no need to worry about running out of space on your mobile devices. At the same time, the Maxell Portable Wireless Hard Drive has a built in rechargeable battery. You can simply plug in to any USB port to charge and back up your files as a normal 2.5 inch hard drive. The Maxell Portable Wireless Hard Drive can also be accessed while the battery is charging. Just one click away, within a very short time, you can start to experience the power of mobile wireless life. 4 Identifying the Parts Power On/ Off Button: Switches On and Off the power of Maxell Portable Wireless Hard Drive. LED Indicators: You can see the Wireless Hard Drive status by looking at the LED Lights on the top (upright position), please refer to “LED status Lights” section for LED indicator signals. USB 3.0 Port: When you connect to your Notebook or PC via USB 3,0 Cable, the Maxell Portable Wireless Hard Drive can be used as a 2.5 inch portable HDD (make sure that you turn on the power) Note: Please use 5V 2A(EIAJ-2) AC adapter. Note: Always use 5V 2A (EIAJ-2) for DC power supply of this product, using wrong voltage AC adapter may cause damage to the product and may cause fire/smoke when over voltage is used. (AC adapter not included) 5 Specifications General Interface IEEE 802.11b/g/n USB 3.0 Micro-B Data Transfer Rate Wi-Fi up to 150Mbps USB 3.0 up to 5Gbps Main Chip Ralink RT5350 2.4G / WPA and WPA2 VIA Labs VL701 USB 3.0 / SATA II HDD Capacity 2.5" hard disk up to 1.5TB (SATA I or SATA II) HDD Format FAT32 / NTFS LEDs Power LED : White + Blue Battery LED : Green + Red Bridge LED : Orange System Requirement Wi-Fi iPad®, iPhone®, iPod touch® - iOS 5.0 and above Android tablets and smartphones - Android 2.3 and above USB Windows XP / Vista / 7 (x86 & x64) / Mac OS X 10.x Product Dimension 127 / 92.4 / 20.9 mm Product Weight 190g (W/O HDD & Packing) Power Mode Wi-Fi Battery / Self-Powered USB Bus-powered / Self-Powered 6 Battery Li-Polymer 2800mAh Temperature Operating: 0 ~ 40°C Storage: -10 °C ~ 60°C Humidity Operating: 65±20% RH non-condensing Storage: 65±20% RH non-condensing Package Contents USB 3.0 Micro-B 60cm Cable Quick Guide and Manual 2 year Warranty 7 What’s in the Box 1 Maxell Portable Wireless Hard Drive x 1 2 Quick Guide X 1 3 USB 3.0 Cable X1 8 Getting Started Prepare the HDD for your first use The Maxell Portable Wireless Hard Drive is pre-formatted as FAT32. Windows 8/7/Vista/XP users: Connect your Maxell Portable Wireless Hard Drive to your computer via the USB cable attached, press the on/off switch, your computer should be able to detect and install this product automatically. Copy video/audio/picture files to Maxell Portable Wireless Hard Drive according to the pre-set folders (Video files-> videos, picture files->Pictures) LED status lights Power LED Operation LED Bridging mode (Internet bridging mode) LED Operation LED: White (Wi-Fi mode) or Blue (USB HDD mode) In Wi-Fi mode: White light on : power on White light off : power off White blinking : In operation(data transfer)* In USB HDD mode: Blue light on : power on Blue light off : power off Blue blinking : In operation(data transfer)* Battery LED: Green or Red In operation: Red: battery < 30% Off: battery > 30% Charging mode Off : battery full Green: battery > 30% Orange: battery < 30% Bridging mode(Internet bridging mode) LED : Orange Orange light on: bridge connection ready Orange light off: bridge disconnected/bridging mode off 9 Air-Stream App for Maxell Portable Wireless Hard Drive The Air-Stream App is designed for and works with the Maxell Portable Wireless Hard Drive. You can download from iTunes App Store® or Google Play. For how to install the App, please refer to How to obtain the App(IOS/Android) Air-Stream App Features: Allows tablets and smartphones stream all the media files, documents wirelessly. Supports 5 devices streaming video at the same time. Supports 5 devices accessing documents, music and photos. File Management. Take and upload a photo to WiFi storage. Record and upload a video to WiFi storage. WiFi storage settings. System Requirement: Android 4.0 and above. iOS 5.0 and above. Supported File Types: Photo Video Music Document Android bmp / gif / jpg / jpeg / png iOS bmp / gif / jpg / jpeg / png / tiff Android avi* / divx* / mkv / mov* / mp4 / mpg* / mpeg* iOS mov / mp4 Android m4a / mp3 / wav / wma* iOS m4a / mp3 / wav Android doc* / docx* / htm / html / pdf* / ppt* / pptx* / rtf* / txt / xls* / xlsx* iOS doc / htm / html / pdf / ppt / rtf / txt / xls * Supported by open another app. (Android only, proper apps need to be installed). 10 How to obtain the App(IOS/Android) Android devices: Search “Air-Stream” in Google play market: IOS devices: Search “Air-Stream” in App store® or iTunes® website: 11 Air-Stream for IOS Connecting the device: Step 1: After installing the Air-Stream App, power on the device. Search for the wifi connection named “Max-Stream_xxx” (xxx is the last 4 digit of the MAC address of your device.) Tap MAX-Stream_XXX on the Wi-Fi Manager, and then enter password 12345678. Step 2: After successful connected to Maxell Portable Wireless Hard Drive, launch the Air-Stream App by tapping the icon. 12 I. Browse Files Browse all the files, including documents, music, photos, and videos, on the remote device (Portable Wireless Hard Drive), or the local files on the local side (your Smartphone/Tablet/device). To browse MP3 files as an example. All files> Music > *.mp3 Step 1. Tap All Files Step 2. Tap music folder to browse all MP3 files. Step 3. Tap a file to play music. Back: Tap the icon Main menu: Tap the icon on the grey bar to go back the previous layer. on the upper left corner to return to the Main Menu. 13 II. Upload files Upload files from the local files to Maxell Portable Wireless Hard Drive. Upload files from Local Files to the remote device. The App will upload files to the target folder according to filename extensions, including documents, music, photos, and videos. Other kinds of files will go to the Others file folder. Example on how to upload music files. Step 1. Tap Local Files. Step 2. Tap Music ( ) Step 3. Select music files and tap upload , or tap to select all music files. Step 4. Tap Upload on the grey bar at the bottom. Or tap X to cancel. You can use the same way to upload other files such as documents, photos, videos, and other kinds of files. 14 III. Download files Download files from the Maxell Portable Wireless Hard Drive to local storage. Download files from the Maxell Portable Wireless Hard Drive, including documents, music, photos, and videos, to Local Files, and the App will download files to your target folder according to filename extensions. For files not defined as music, such as photos, videos, or documents – these will go to the Others folder. There are two ways to download music files. 1. All Files >Music > mp3 songs Step 1. Tap All Files >Music Step 2. Tap the blue icon Step 3. Step 4. on the right of a music file Select Download, or tap to select all music files. Tap Download on the gray bar at the bottom. Or tap X to cancel. You can use the same way to download other files such as documents, photos, videos, and other kinds of files. 2. Step 1. Tap Music Step 2. Select music files and tap , or tap to select all music files. Step 3. Tap Download on the gray bar at the bottom. Or tap X to cancel the action. You can use the same way to download other files such as documents, photos, videos, and other kinds of files. 15 IV. Move files/folders You can move a file or a folder within the app, below are the steps on moving file/folders 1. Move a file: Move a file from a files folder to a target folder: For example: to move a music file: All Files > Music Step 1. Tap All Files and then tap Music Step 2. Tap the blue icon on the right of a music file. Step 3. Select Move Step 4. Go to target folder. Ex. /Music Step 5. tap Move on the bottom bar. / Others Or tap X to cancel. You can use the same way to move other folders such as documents, photos, videos, and other kinds of files. 16 2. Move a folder Move a file folder to another location. For example: To move a file folder named 01. favourite (Please see New Directory on how to add a new folder) All Files > 01.favorite All Files > Music > 01. Favorite Step 1. Tap All Files Step 2. Tap the blue icon Step 3. Select Move. Step 4. Tap Music folder Step 5. Tap Move on the bottom bar. Or tap X to cancel. on the right to the folder. You can use the same way to move other files such as documents, photos, videos, and other kinds of files. 17 V. Copy files Copy files and paste to the target file folder. For example, copy a music file from folder to folder. All Files > Music > *.mp3 Others > Step 1. Go to All Files > Music. Step 2. Tap the blue icon Step 3. Select Copy. Step 4. Go to target folder. Ex. / Music Others Step 5. Tap Paste. on the right of a music file. Or tap X to cancel. You can use the same way to copy other files such as documents, photos, videos, and other kinds of files. 18 VI. i. File Folder Variation Rename Example. Rename Rihanna-You Da One(mp3) to be 01.Rihanna-You Da One(mp3). All Files > music Step 1. Tap the blue icon next to the file you want to rename. ex. Rihanna-You Da One(mp3) Step 2. Select Rename. Step 3. Modify file name 01. Rihanna-You Da One(mp3) and tap OK. Or to tap Cancel to cancel this operation. You can use the same way to copy other files such as documents, photos, videos, and other kinds of files. 19 ii. New Directory Add a new file folder. There are two ways to add new file folders. In folder view page: Step 1. Tap the blue icon next to a file folder (Document/ Music / Photos/ Videos). Step 2. Tap New Directory. Step 3. Enter a name for the new folder. Step 4. Tap OK. Or tap Cancel to cancel this operation. 20 iii. Delete Files/Folders Delete files or file folders. For example, delete all files in a folder Step 1. Tap the blue icon next to the file folder that you want to delete. Step 2. Select Delete Step 3. Tap Yes to confirm. Or tap No to cancel. You can apply the same procedure when deleting a file. If you delete the default folders, like “Documents”, “Others”, “Photos”, “Videos”, or “Music”, it will be rebuilt once the device restarts. 21 VII. i. Settings Username and Password Enter the username and password Setting page allows users to change the setting on your Maxell Portable Wireless Hard Drive Enter username and password 1. Once you tap Settings, it will pop up a login box, asking you to enter the username (admin) and your password (admin). 2. Then tap Login. ii. Device Name (SSID) Note: The device name is equal to the SSID of the wifi connection of this Maxell Portable Wireless Hard Drive. Step 1. Tap Device Name. Step 2. Enter new device name and tap Apply. Step 3. The device will automatically reset, please connect again. 22 iii. Security Setting Set up security password and security status. Default password is 12345678. You can set your own password. Security: Enable means to enter password (Default: 12345678) when login the device. Disable means to disable password requirement when connect the device. i) ii) 23 iv. Internet Access (Internet Bridge) This device has an internet bridging function which enables users to connect to the Internet through their Smartphone/Tablet/device (using the Air-Stream App). Disable means the device doesn’t open Internet access, and it only provides Wi-Fi connection with the Notebook/Tablet or the Smartphone. Enable means the device provides Internet access, which lets users connect to the internet. Step 1. Tap Enable to turn on Bridge mode. It will search available internet access points(AP). Step 2. Tap on the AP you want to connect and tap Apply. Step 3. App will ask you to provide internet password, and then tap Connect. Step 4. It will ask for permission to restart. Step 5. Tap OK and it will pop up a restarting countdown message. 24 V. Power Saving Set up idle time (5 min/ 10 min/ 30min) to avoid power consuming. The device will shut down after idle time. None means that the device will not operate the power saving function. Select idle time and tap Apply to confirm; otherwise Cancel the action. 25 Vi. Date & Time Date & Time will show up after file uploading or file downloading. There are two ways to set this up: 1. Select Time Zone from the drop-down list and key in the date and time separately. 2. Tap Copy from PC to get information from Notebook or smartphone directly. 3. Tap Apply to confirm. Or tap Cancel to leave. 26 Vii. Admin Password Change password through the login Settings page. Enter the new password and confirm the new password. Tap Apply to set up new admin password, or Cancel and leave. 27 Viii Restart Restart the device. Tap Apply to restart, or tap Cancel to leave. 28 iX. Firmware Upgrade Upgrade the firmware when there is a new update available. You can upgrade the Portable Wireless Hard Drive by uploading new firmware. 1. Download the firmware file to a computer. 2. Connect with the Portable Wireless Hard Drive using that computer. 3. Tap Choose file to search for the upgrade firmware in the USB drive. 4. Tap Upload after the firmware file is chosen. Or tap Cancel to leave. Do not shut down power during upload. 29 X. Shutdown Tap Apply to shut down the device, or tap Cancel to leave. 30 Xi. Factory Default Tap Apply to reset settings to default value. The Maxell Portable Wireless Hard Drive will restart. 31 Xii. Language Select a language for the app interface. Tap Apply to confirm, or tap Cancel to leave. REMARK: Please charge the Maxell Portable Wireless Hard Drive fully after each use, sudden power outage during operation can result in damage/or loss of your data. 32 Air-Stream Manual for Android <Use an Android smartphone to connect remote Air-Stream Device> Step1:Go to Google play Store search Air-Stream App (iOS / App Store), and download it. Step2:After installing Air-Stream App, power on the device to link to Wi-Fi. Tap Wi-Stream_XXX on the Wi-Fi Manager, and then enter password 12345678. Step3. Launch Air-Stream by tapping the icon to login Air-Stream 33 App. VIII. Browse files Browse all files, including documents, music, photos, and videos, on the remote device, or the local files on the local side. To browse MP3 files as an example. All files> Music > *.mp3 Step 1. Tap All Files Step 2. Tap music folder to browse all MP3 files. Step 3. Tap a file to play music. Back: Tap the icon Main menu: Tap icon on on the gray bar to go back the former layer. the upper left corner to return to main menu. 34 IX. Upload files Upload files from the local files to remote device. Upload files from Local Files to the remote device. App will upload files to target folder according to filename extensions, including documents, music, photos, and videos. Other kinds of files will go to Others file folder. Example on how to upload music files. Step 1. Tap Local Files. Step 2. Tap Music Step 3. Select music files and tap upload , or tap to select all music files. Step 4. Tap Upload on the gray bar at the bottom. Or tap X to cancel. You can use the same way to upload other files such as documents, photos, videos, and other kinds of files. 35 X. Download files Download files from the remote device to local files. User can open the files by their installed apps in their Android device. There are 2 ways to download files. For example: 1. All Files >Music > *.mp3 Step 1. Tap All Files >Music Step 2. Tap the blue icon on the right side of a music file Step 3. Select Download, or tap Step 4. Tap Download on the gray bar at the bottom. Or tap X to cancel. to select all music files. You can use the same way to download other files such as documents, photos, videos, and other kinds of files. 36 2. Music > *.mp3 Step 1. Tap Music Step 2. Select music files and tap , or tap to select all music files. Step 3. Tap Download on the gray bar at the bottom. Or tap X to cancel the action. You can use the same way to download other files such as documents, photos, videos, and other kinds of files. 37 XI. Move files & folders Move a file Move a file from a files folder to a target folder: To move a music file as an example: All Files > Music Step 1. Tap All Files and then tap Music Step 2. Tap the blue icon on the right of a music file. Step 3. Select Move Step 4. Go to target folder. Ex. /Music Step 5. tap Move on the bottom bar. / Others Or tap X to cancel. You can use the same way to move other files such as documents, photos, videos, and other kinds of files. 38 Move a file folder Move a file folder to a target file folder. To move a file folder named 01. favorite as an example: (Please see introduction of New Directory to add a new folder) All Files > 01.favorite All Files > Music > 01. favorite Step 1. Tap All Files Step 2. Tap the blue icon on the right to the folder. Step 3. Select Move. Step 4. Tap Music folder Step 5. Tap Move on the bottom bar. Or tap X to cancel. You can use the same way to move other file folders such as documents, photos, videos, and other kinds of file 39 XII. Copy files. Copy files and paste to the target file folder. Copy a music file as an example. All Files > Music > *.mp3 Others > Step 1. Go to All Files > Music. Step 2. Tap the blue icon on the right of a music file. Step 3. Select Copy. Step 4. Go to target folder. Ex. / Music > Others / Step 5. Tap Paste. Or tap X to cancel. You can use the same way to copy other file folders such as documents, photos, videos, and other kinds of file 40 XIII. File Folder Variation i. Rename Rename for file folders or files. Example. Rename Don’t contain yourself.mp3 to be 01.Don’t contain yourself.mp3. All Files > music/ Step 1. Tap the blue icon next to the file you want to rename. ex. Don’t contain yourself.mp3 Step 2. Select Rename. Step 4. Modify file name 01.Don’t contain yourself.mp3 and tap OK. Or to tap Cancel to cancel. You can use the same way to rename other file folders such as documents, photos, videos, and other kinds of file 41 ii. New Directory Add a new file folder. There are two ways to add new file folders. 1. All Files > Step 1. Tap the blue icon next to a file folder (Document/ Music / Photos/ Videos). Step 2. Tap New Directory. Step 3. Enter a name for the new folder. Step 4. Tap OK. or tap Cancel to cancel. 42 2 .All Files > Step 1. Tap the gray icon on the upper right. Step 2. Tap New Directory. Step 3. Enter a new name for the new folder. Step 4. Tap OK. Or tap Cancel to give up. 43 iii. Delete Files Delete files or file folders. Delete file folders. Ex. All Files/ Step 1. Tap the blue icon next to the file folder that you want to delete. Step 2. Select Delete. Step 3. Tap Yes to confirm. Or tap No to cancel. If you delete the default folder, like Documents, Others, Photos, Videos, or Music, it will be rebuilt once the device restarts. 44 45 1. Delete files. Ex. All Files>Music/ Step 1. Tap the blue icon next to the file you want to delete. Step 2. Select Delete Step 3. Tap Yes to confirm. Or tap No to cancel. 46 XIV. Settings i. Enter Username & Password Once you tap Settings, it will pop up a login box, asking you to enter the username (admin) and your password (admin). Then tap Login. 47 ii. Device Name. You can rename the device. Step 1. Tap Device Name. Step 2. Enter new device name and tap Apply. 48 iii. Security a. b. i. ii. Set up security password and security status. Default password is 12345678. Security Status: Enable means to enter password (12345678) when login the device. Disable means to skip password when login the device. 49 50 iv. Internet Access Disable means the device doesn’t open Internet access, and it only provides Wi-Fi connection with the Notebook or the smartphone. Enable means the device provides Internet access, which lets users connect to the internet. Step 1. Tap Enable to turn on Bridge mode. The device will search available internet accesses. Step 2. Tap certain internet access and tap Apply. Step 3. Provide internet password, and then tap Connect. Step 4. The device will request to restart. Step 5. Tap OK and it will pop up a restarting countdown message. 51 52 v. Power Saving Set up idle time (5 min/ 10 min/ 30min) to avoid power consuming because of idling for too long. The device will shut down after idle time. None means not to operate power saving function. Select idle time and tap Apply to confirm; otherwise Cancel the action. vi. Date & Time Date & Time will show up after file uploading or file downloading. There are two ways to set up: 1. Select Time Zone from the drop-down list and key in the date and time separately. 2. Tap Copy from PC to get information from Notebook or smartphone directly. 3. Tap Apply to confirm. Or tap Cancel to leave. 53 54 vii. Admin Password Change password when login Settings page. Enter the new password and confirm the new password. Tap Apply to set up new admin password, or Cancel and leave. 55 viii. Restart Restart the device. Tap Apply to restart, or tap Cancel to leave. 56 ix. Firmware Upgrade. Upgrade firmware when there is a new update available. 1. Choose firmware file from computer and 2. Switch the device to Reader mode and insert the USB drive. 3. Tap Choose file to search for the upgrade firmware in the USB drive. 4. Tap Upload after a file is chosen. Or tap Cancel to leave. Please do not shut down power during upload. 57 x. Shutdown Tap Apply to shut down the device, or tap Cancel to leave. 58 xi. Factory Default Tap Apply to reset settings to default value. Then device will restart . 59 xii. Language Select a language for the device. Tap Apply to confirm, or tap Cancel to leave. 60 Troubleshooting To keep the warranty valid, never try to repair the system yourself. If you encounter problems when using this unit, check the following points before requesting for service. Warranty void if case is opened. Symptom No LED lights come on Likely Cause Battery is empty after the on/off button is pressed What to do • Charge with USB AC adapter or computer via USB cable. Green charging light will light up during charging. Power is not switched • Switch on power and on verify that power LED is on. (Middle white LED flashing) Portable Wireless HDD suddenly stops working I can see the Wifi connection but I cannot Triggered auto-off function • Press on/off button to turn on again (no operation left for too long) • See symptom above. Wifi password incorrect • connect from my mobile device Check Wifi password(Upper/lower case must be exactly the same) Wifi encryption not • Use different wireless compatible encryption method. Please refer to Security section for setting up wireless encryption. I have forgotten the Wifi Wrong Wifi network • Check and make sure the selected SSID is correct and connect again. - • password I have set up Please refer to Resetting the Maxell Portable Wireless Hard Drive section The Portable Wireless Not enough power in Hard Drive is not showing the Portable Wireless up on my PC/Notebook Hard Drive Please plug in the Maxell Portable Wireless Hard Drive into the root connector of your PC/Notebook USB port. Make sure the green charging light is on 61 before you turn on the Maxell Portable Wireless Hard Drive. Important Safety Instructions Warning! Do not use in a rainy or snowy place, by the waterside or in the bathroom. It may cause fire or electric shock. Caution! Do not keep in an excessively hot place such as radiators, heaters, stoves, or other apparatus (including amplifiers) that produce heat. The surface of the device or parts may get damaged, and may also cause fire. Do not keep especially in a closed car in summer, and in a place where sunlight directly falls or near a stove. This may cause leakage of battery fluid. Always use 5V 2A (EIAJ-2) for DC power supply of this product, using wrong voltage AC adapter may cause damage to the product and may cause fire/smoke when over voltage is used. (AC adapter not included) Disclaimer - MAXELL shall not be liable for any damages and/or loss of data during data transfer (or when power run out during operation.) - MAXELL shall not be liable for any damages and/or loss of data stored in products. - In no event shall MAXELL be liable under this statement for loss of profit, loss of anticipated savings, loss of data, or indirect, incidental or consequential losses or damages to the extent that those losses or damages can be disclaimed by law. - MAXELL under no circumstance will be responsible for the information or data stored in the MAXELL products claimed by warranty. - MAXELL recommends that customers back up all data periodically and before sending their products for warranty service. - MAXELL recommends that customers charge after every single time use. Maxell’s only obligation shall be to replace such quantity of the product proved to be defective in material or workmanship upon receipt. The user shall determine the suitability of the product for, intended use and assume all risk and liability in connection therewith. iPad, iPhone, iPod touch, iTunes are trademarks of Apple Inc.,registered in the U.S. and other countries. App Store is a service mark of Apple Inc. Google play is a trademark of Google Inc. Design and specifications are subject to change without notice. 62 63