1
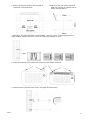
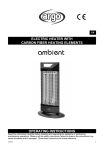
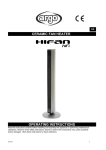
EN ELECTRIC CONVECTOR HEATER OPERATING INSTRUCTIONS Read the instructions carefully before installing and operating the appliance or performing maintenance operations. Observe all the safety instructions; failure to observe the instructions may cause accidents and/or damages. Store these instructions for future reference. V 06/13 7 GENERAL SAFETY INFORMATION Use this convector only as outlined in this manual. Any other use not recommended by the manufacturer may cause fire, electric shock or injury to people. Ensure that the mains power complies with the voltage specified on the convector data plate (220-240V~/50Hz). This product is not a toy. Children should be adequately supervised to ensure that they do not play with the appliance. This appliance is not suitable for use by people (including children) with reduced physical, sensory or mental abilities, or without the necessary experience and knowledge, unless they have been adequately supervised and instructed concerning use of the appliance by a person responsible for their safety. Do not restrict the air inlet and outlet grilles. The appliance heats up slightly when in use. In order to avoid burns, do not let bare skin touch hot surfaces. Ensure that all objects are at least 1 meter from the front and sides of the appliance. Disconnect the mains power when the appliance is not used or for cleaning operations. Avoid using the convector in dusty environments or in the presence of inflammable vapours (e.g. in workshops or garages) or paint vapours. Do not place anything on the appliance, use the appliance to dry clothing. Use the appliance in a well-ventilated area. Avoid placing fingers or foreign objects in the air inlet/outlet grilles, as this may lead to electric shock or fire and may damage the appliance. To avoid the risk of fire, do not block the grilles or tamper with them in any way while the convector operates. Do not use the appliance if the cord or plug are damaged. If the power supply cord is damaged, it must be replaced by the manufacturer, dealer or a similarly qualified person so as to avoid any safety risks. Do not operate the appliance if it has fallen from a height or has suffered damage in any way. Contact qualified technical personnel to examine the appliance or perform any electrical or mechanical repairs. The most common cause of overheating is the build-up of dust in the appliance. Remove dust deposits by unplugging the appliance and cleaning the air outlets and grilles with the aid of a vacuum cleaner. Do not use abrasive detergents for cleaning this appliance. Clean the appliance with the aid of a damp (not wet) cloth rinsed in hot soapy water. Always remove the plug from the mains socket before cleaning. To disconnect the convector, push the switch to OFF and remove the plug from the socket. Pull on the plug only. Avoid pulling on the cord when disconnecting the convector. Do not place any objects on the cord and do not bend it. It is not advisable to use extension cords, as these may overheat and cause the risk of fire. Do not use a single extension cord to operate multiple appliances. Do not immerse the cord, plug or any other element of the appliance in water or other liquids. Do not touch the plug with wet hands. Do not place the convector above or near another heat source. WARNING: AVOID COVERING THE CONVECTOR TO PREVENT IT FROM OVERHEATING. The symbol below signals the above warning: The convector may cause the risk of fire if, while in operation, is covered by or comes into contact with inflammable material including curtains, drapery, blankets, etc. KEEP THE CONVECTOR AWAY FROM THESE MATERIALS. Do not connect the appliance to the mains power before it has been properly assembled and positioned. Do not run the cord under carpets. Do not cover the cord with blankets, carpets or similar materials. Place the cord far away from busy areas or where it cannot be accidentally pulled-out. Do not position the convector below a socket outlet. Do not operate the appliance outdoors. WARNING: do not use the convector with a controller or any other external device that activates the appliance automatically, as there may be a risk of fire if the convector is covered or incorrectly positioned. Do not operate the convector in close proximity to bathtubs, showers, washbasins or pools. Upon initial start-up, the convector may emit a slight, harmless smell. This smell is a normal effect of the initial heating up of the internal heating elements, and should not recur later on. WARNING: DO NOT DEPEND ON THE ON/OFF BUTTON SWITCH AS THE SOLE MEANS OF DISCONNECTING POWER. WHEN SERVICING OR MOVING THE CONVECTOR, ALWAYS UNPLUG THE POWER CORD. A convector has hot and arcing or sparkling parts inside. It must not be used in potentially dangerous locations such as flammable, explosive, chemical-laden or wet atmosphere. Do not place the convector on soft surfaces, like a bed, where openings may become blocked. Always place the convector on a stable, flat, level surface when operating, to avoid the chance of the convector overturning. Locate the power cord so the convector or other objects are not resting on it. Always unplug the convector when not in use. In order to avoid accidents turn unit off if unattended. In the event of any problems (abnormal noise or a strange smell) switch off the appliance immediately, do not attempt to repair it and take it to your local after sales service. V 06/13 8 DESCRIPTION OF PARTS FRONT VIEW SIDE VIEW REAR VIEW A H D F E G A C B A. B. C. D. Air delivery/air intake grille Feet 24 hours timer Side handles E. F. G. H. Power level selector and switch Turbo switch (forced ventilation) Room thermostat Rear holes for wall mounting HOW TO INSTALL THE APPLIANCE The convector can be used underfloor, after assembling the feet, or alternatively it can be wall-mounted using the specific accessories supplied. A. Using as a portable appliance: how to assemble the feet supplied The convector is packed without feet. These must therefore be assembled before using the appliance. Assemble the feet as shown in the figure and put the convector in an upright position. Position the unit on a flat, stable surface. When you move the appliance, use its side handles. B. Wall-mounting: how to mount the convector onto the wall The convector packaging contains all the accessories necessary for wall-mounting. To wall-mount, proceed as follows. V 06/13 9 1. Observe the minimum distances from the walls as pointed out in the picture below. 2. Mark on the wall with a pencil the points where it is necessary to make the holes in order to insert the Fishers. 3. Drill holes in the wall and insert the 4 Fisher rawlplugs. Screw up 2 of the 4 screws supplied into the 2 upper rawlplugs, keep the head of the screws out of the Fisher rawlplugs for 8 mm. 4. Install the two spacers in the bottom of the convector as described in the picture. 5. Insert the hooks on the head of the screws, then tighten the screws firmly. V 06/13 10 6. Insert the rear holes for wall mounting of the convector into the hooks on the wall, then fix the spacers at the base of the convector. HOW TO USE THE CONVECTOR Connect the power cord to a suitable electric socket (220-240V~/50Hz). Select the desired temperature using the thermostat, turning this knob clockwise: MIN* corresponds to minimum temperature and MAX to maximum level. The convector will start operating only if the thermostat is above the minimum temperature. Then choose the power level desired through the power selector. The convector is off in the picture below. (BOTH BUTTONS ARE OFF). ECO MODE: PRESSING ONLY THE LEFT BUTTON, power and consumption are reduced to 750 W only, to save energy. COMFORT MODE: PRESSING ONLY THE RIGHT BUTTON, medium heating (1250 W). Room thermostat MIN* = (min temperature) MAX = (max temperature) If desired, you can also activate forced ventilation by pressing turbo button, located on the side of the unit, near the power selector. Forced ventilation can also be activated to distribute fresh air in summer, leaving the thermostat and heating elements off. SUPER MODE: PRESSING BOTH BUTTONS, Maximum heating (2000 W). Room temperature can be regulated by rotating the thermostat clockwise to increase or anticlockwise to decrease temperature. When the convector it switched on, we recommend to turn the thermostat knob to maximum temperature: then, when a pleasant room temperature is reached, turn the thermostat dial anticlockwise until the light of the power switch selected turns off. In this way the convector will keep room temperature constant. To switch the convector off completely position the power selector in OFF and then rotate the thermostat knob anticlockwise until you hear a click of total shutdown. Unplug the appliance if it will not be used for a certain period of time. V 06/13 11 TIMER The convector is equipped with a 24 hours timer, which counts 96 segments, each of which corresponds to 15 minutes and allows you to program the ignition and the operation of the convector during 24 hours. Red switch on - Timer ON: It allows you to program the convector on and off timing. Place the outer ring on the time you want the convector turn on: for example, to set the lighting at 7 p.m. (19.00) turn the outer ring clockwise until the arrow indicator corresponds to the number 19. Then set the time the heater is required to run by pulling the segments around the outer ring forward appropriate to the running period(s) required. Whereas every rider is 15 minutes, to 1 set 1 hour move out 4 riders between 19 and 20. When set, the heater will operate each day during the times programmed. Note, the heater must always be plugged into a power socket, the power selector must be in the on position and the thermostat must be suitably set to ensure the heater will come on. The unit will shut off after the set time. During the set, the operation the unit will still be governed also by the thermostat. NOTE , the convector will turn If you leave the red switch on on automatically every day at the same time, as long as power supplì is connected, the power selector is not on 0 and the thermostat is a medium position. Red switch on 0 OFF: The convector doesn’t work or stop working. Red switch on I ON: The convector works continuously, depending only on thermostat OVERHEATING SAFETY DEVICE In case of overheating the safety cut out protecting the heating element will automatically switch off the appliance. In this case the appliance stops working. If this happens: rotate the thermostat knob to maximum temperature (max); it the problem persists, switch off the convector; remove the causes of abnormal operation or overheating (i.e. obstacles in front of air inlet or air outlet grille, abnormal accumulations of dusts inside the appliance); let the convector cool down for 15/20 minutes; switch on again the convector and verify the correct operation. If the fault persists, contact an Authorized Service Center. MAINTENANCE AND STORAGE ALWAYS UNPLUG THE APPLIANCE BEFORE CLEANING OR MAINTENANCE. IMPORTANT: DO NOT SUBMERGE THE CONVECTOR IN WATER. Cleaning the outside surface of the appliance Turn the switch off and unplug the appliance before carrying out any maintenance work or moving it. Use a soft cloth to remove any dust from the convector. If the convector is excessively dirty, use a soft cloth moistened with water and a mild detergent at a temperature lower than 50°C. Let the convector dry completely before use. Do not use corrosive detergents or solvents such as petrol. Do not wash the appliance with water. Do not use oils, chemical substances or other items to clean that may damage the surface. Use a vacuum cleaner to remove dust from the air inlet/outlet grilles. STORAGE If the appliance is not used for prolonged periods, it must be stored together with this manual in its original packaging, in a cool and dry place. Information for correct disposal of the product in accordance with the European Directive 2002/96/EC At the end of its working life this equipment must not be disposed of as an household waste. It must be taken to special local community waste collection centres or to a dealer providing this service. Disposing of electrical and electronic equipment separately avoids possible negative effects on the environment and human health deriving from an inappropriate disposal and enables its components to be recovered and recycled to obtain significant savings in energy and resources. In order to underline the duty to dispose of this equipment separately, the product is marked with a crossed-out dustbin. V 06/13 www.argoclima.com 12