1
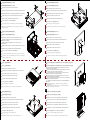
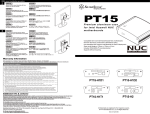
Warranty Information
This product has a limited 1 year warranty in North America and Australia.
For information on warranty periods in other regions, please contact your reseller or SilverStone authorized distributor.
Warranty terms & conditions
1. Product component defects or damages resulted from defective production is covered under warranty.
Defects or damages with the following conditions will be fixed or replaced under SilverStone Technology’s jurisdiction.
a) Usage in accordance with instructions provided in this manual, with no misuse, overuse, or other inappropriate actions.
b) Damage not caused by natural disaster (thunder, fire, earthquake, flood, salt, wind, insect, animals, etc…)
c) Product is not disassembled, modified, or fixed. Components not disassembled or replaced.
d) Warranty mark/stickers are not removed or broken.
Loss or damages resulted from conditions other than ones listed above are not covered under warranty.
2. Under warranty, SilverStone Technology’s maximum liability is limited to the current market value for the product (depreciated value, excluding
shipping, handling, and other fees). SilverStone Technology is not responsible for other damages or loss associated with the use of product.
3. Under warranty, SilverStone Technology is obligated to repair or replace its defective products. Under no circumstances will SilverStone
Technology be liable for damages in connection with the sale, purchase, or use including but not limited to loss of data, loss of business, loss of
profits, loss of use of the product or incidental or consequential damage whether or not foreseeable and whether or not based on breach of warranty,
contract or negligence, even if SilverStone Technology has been advised of the possibility of such damages.
PT13
4. Warranty covers only the original purchaser through authorized SilverStone distributors and resellers and is not transferable to a second hand
purchaser.
5. You must provide sales receipt or invoice with clear indication of purchase date to determine warranty eligibility.
6. If a problem develops during the warranty period, please contact your retailer/reseller/SilverStone authorized distributors or SilverStone
http://www.silverstonetek.com.
Please note that: (i) You must provide proof of original purchase of the product by a dated itemized receipt; (ii) You shall bear the cost of shipping
(or otherwise transporting) the product to SilverStone authorized distributors. SilverStone authorized distributors will bear the cost of shipping
(or otherwise transporting) the product back to you after completing the warranty service; (iii) Before you send the product, you must be issued a
Return Merchandise Authorization (“RMA”) number from SilverStone. Updated warranty information will be posted on SilverStone’s official website.
Please visit http://www.silverstonetek.com for the latest updates.
Ultra compact case for Thin Mini-ITX
Additional info & contacts
For North America ([email protected])
SilverStone Technology in North America may repair or replace defective product with refurbished product that is not new but has been functionally tested.
Replacement product will be warranted for remainder of the warranty period or thirty days, whichever is longer. All products should be sent
back to the place of purchase if it is within 30 days of purchase, after 30 days, customers need to initiate RMA procedure with SilverStone Technology
in USA by first downloading the “USA RMA form for end-users” form from the below link and follow its instructions.
http://silverstonetek.com/contactus.php
Thin Mini-ITX compatible
Super small at 1.4 liters
Include vertical stand holder
Meet VESA Mounting Interface Standard
Easy installation with flip-up top cover
For Australia only ([email protected])
Our goods come with guarantees that cannot be excluded under the Australian Consumer Law.
You are entitled to a replacement or refund for a major failure and for compensation for any other reasonably foreseeable loss or damage.
You are also entitled to have the goods repaired or replaced if the goods fail to be of acceptable quality and the failure does not amount to a major failure.
Please refer to above “Warranty terms & conditions” for further warranty details.
SilverStone Technology Co., Ltd. 12F No. 168 Jiankang Rd., Zhonghe Dist., New Taipei City 235 Taiwan R.O.C. + 886-2-8228-1238
(standard international call charges apply)
For Europe ([email protected])
For all other regions ([email protected])
1
將機殼後方的兩顆螺絲卸下並往上掀開上蓋。
将机箱后方的两颗螺丝卸下并往上掀开上盖。
Unscrew the two screws from the rear of the chassis and lift up the top cover.
Lösen Sie die beiden Schrauben von der Gehäuserückseite, nehmen Sie die
obere Abdeckung ab.
Quite los dos tornillos de la parte trasera del chasis y levante la
cubierta superior.
Dévissez les deux vis à l'arrière du châssis puis enlevez le
couvercle supérieur.
Svitare le due viti sulla parte posteriore del telaio e sollevare il
coperchio superiore.
ケース後部のネジ2本を緩めてトップカバーを上方に開きます。
섀시 후면에 있는 2 개의 나사를 푼 다음 상단 커버를 들어올립니다.
Отверните два винта на задней панели корпуса и поднимите верхнюю крышку.
2
將事先安裝好CPU散熱器的主機板放入機殼,並以四顆螺絲鎖固。
将事先安装好CPU散热器的主机板放入机箱,并以四颗螺丝锁固。
Install the motherboard together with the CPU cooler into the chassis
and secure with four screws.
Installieren Sie das Motherboard gemeinsam mit dem CPU-Kühler im
Gehäuse und befestigen Sie es mit vier Schrauben.
Instale la placa base junto con el disipador de la CPU en el chasis y
fíjelo con cuatro tornillos.
Installez la carte mère avec le refroidisseur de CPU dans le châssis et
fixez-les avec quatre vis.
2013
Installare la scheda madre insieme al dispersore di calore CPU nel telaio
e fissare usando quattro viti.
NO.G11218940
CPUクーラーを装備したマザーボードをケースに収め、ネジ4本で固定します。
메인보드를 CPU 쿨러와 함께 섀시에 설치한 다음 4개의 나사를 사용하여 고정합니다.
Установите в корпус системную плату с вентилятором охлаждения
процессора и закрепите четырьмя винтами.
3
7
依圖示將硬碟架以四顆螺絲鎖固於2.5吋硬碟。
將VESA固定架以四顆螺絲鎖固於機殼底部。
依图标将硬盘架以四颗螺丝锁固于2.5吋硬盘。
将VESA固定架以四颗螺丝锁固于机箱底部。
Install the 2.5” drive onto the drive tray with four screws.
Install VESA bracket onto the bottom of the case.
Installieren Sie das 2,5-Zoll-Laufwerk mit vier Schrauben im Laufwerkseinschub.
Installieren Sie die VESA-Halterung an der Unterseite des Gehäuses.
Instale el dispositivo de 2,5” en la bandeja para dispositivos con cuatro tornillos.
Instale el bracket VESA en la parte inferior de la carcasa.
Insérez le disque dur 2,5" dans le plateau de disque dur avec quatre vis.
Installez la console VESA sur le bas du boitier.
Installare l’unità 2,5" nel cassetto unità usando quattro viti.
Installare il supporto VESA sulla parte inferiore del case.
2.5”ドライブをドライブトレイにネジ4本で固定します。
VESAブラケットをケース底部に取り付けます。
4개의 나사를 사용하여 2.5" 드라이브를 드라이브 트레이에 설치합니다.
VESA 브래킷을 케이스의 바닥에 설치합니다.
Закрепите 2,5-дюймовый диск в отсеке для диска с помощью
четырех винтов.
Установите кронштейн VESA на нижней панели корпуса.
4
8
依圖示將2.5吋硬碟架以四顆螺絲鎖固於機殼。
將四顆VESA螺絲鎖固於螢幕後方VESA孔位。
依图标将2.5吋硬盘架以四颗螺丝锁固于机箱。
将四颗VESA螺丝锁固于屏幕后方VESA孔位。
Install the 2.5” drive tray into the chassis and secure with four screws.
Install four VESA screws on the back of the monitor.
Installieren und befestigen Sie den 2,5-Zoll-Laufwerkseinschub mit vier
Schrauben im Gehäuse.
Installieren Sie vier VESA-Schrauben an der Rückseite des Monitors.
Instale cuatro tornillos VESA en la parte posterior del monitor.
Instale la bandeja para dispositivos de 2,5” en el chasis y fíjelo con
cuatro tornillos.
Installez quatre vis VESA à l'arrière de l'écran.
Insérez le plateau de disque dur 2,5" dans le châssis et fixez-le avec quatre vis.
Installare quattro viti VESA sul retro del monitor.
Installare l’unità 2,5" nel cassetto unità e fissare usando quattro viti.
モニター背面にVESAネジ4本を取り付けます。
2.5”ドライブベイをケースに取り付け、ネジ4本で固定します。
모니터의 후면에 4개의 VESA 나사를 설치합니다.
2.5" 드라이브 트레이를 섀시에 설치하고 4개의 나사를 사용하여 고정합니다.
Установите четыре винта VESA на задней панели монитора.
Установите отсек для 2,5-дюймовых дисков в корпус и закрепите с
помощью четырех винтов.
5
9
往下關上上蓋並鎖回兩顆螺絲。
將已安裝VESA固定架的機殼,先對準螢幕VESA孔位推入,然後往下將機殼扣住,即可完成安裝。
往下关上上盖并锁回两颗螺丝。
将已安装VESA固定架的机箱,先对准屏幕VESA孔位推入,然后往下将机箱扣住,即可完成安装。
Close the top cover and secure the two screws.
Align VESA bracket on the assembled chassis with the screws on the monitor
from the top to complete installation.
Schließen Sie die obere Abdeckung, befestigen Sie sie mit zwei Schrauben.
Richten Sie zum Abschließen der Installation die VESA-Halterung am montierten
Gehäuse von oben mit den Schrauben am Monitor aus.
Cierre la cubierta superior y fíjela con cuatro tornillos.
Alinee el bracket VESA con el chasis montado con los tornillos en el monitor
desde la parte superior para completar la instalación.
Fermez le couvercle supérieur et fixez-le avec deux vis.
Alignez la console VESA avec le châssis assemblé avec les vis avec l'écran
depuis le dessus pour terminer l'installation.
Chiudere il coperchio superiore e stringere le due viti.
Allineare il supporto VESA sul telaio assemblato con le viti sul monitor dalla parte
superiore per completare l'installazione.
トップカバーを閉じてネジ2本で固定します。
ケースに取り付けたVESAブラケットを上部からモニターのネジと合わせて取り付けを
完了します。
상단 커버를 닫고 2개의 나사를 조입니다.
조립된 섀시의 VESA 브래킷을 위로부터 모니터의 나사에 맞춰 정렬하여
설치를 완료합니다.
Закройте верхнюю крышку и закрепите ее двумя винтами.
Совместите кронштейн VESA на корпусе с винтами на мониторе
сверху, чтобы завершить установку.
6
10
依圖示將橡膠墊黏貼於機殼底部。
如有需要,也可以將PT13依圖示安裝於直立腳座上。
依图示将橡胶垫黏贴于机箱底部。
如有需要,也可以将PT13依图示安装于直立脚座上。
Install rubber standoff onto the bottom of the case.
Alternatively, the PT13 can also be installed into the vertical stand holder.
Installieren Sie den Gummiabstandhaltet an der Unterseite des Gehäuses.
Alternativ kann das PT13 auch im vertikalen Ständer installiert werden.
Instale la base de goma en la parte inferior de la carcasa.
De modo alternativo, la PT13 se puede instalar en el soporte vertical.
Installez le bloqueur en caoutchouc sur le bas du boitier.
Alternativement, le PT13 peut aussi être installé dans le support vertical.
Installare il distanziatore di gomma sulla parte inferiore del case.
In alternativa, PT13 può anche essere installato usando il supporto verticale.
ケース底部にゴム製フットを取り付けます。
代わりにPT13を縦型スタンドホルダーに取り付けることも可能です。
고무 스탠드오프를 케이스의 바닥에 설치합니다.
또는 PT13을 수직 스탠드 홀더에 설치할 수도 있습니다.
Установите резиновые опоры на нижней панели корпуса.
PT13 можно также устанавливать на вертикальную подставку.