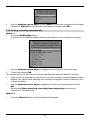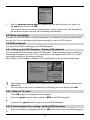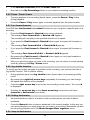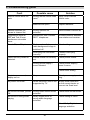
1
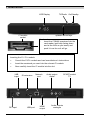
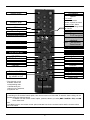
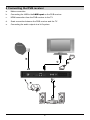
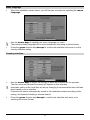
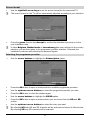
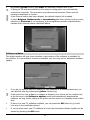
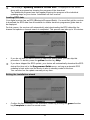
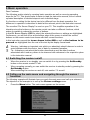
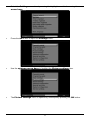
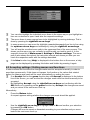
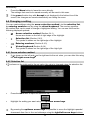
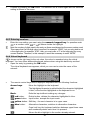
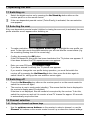
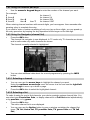
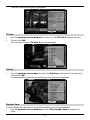
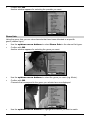
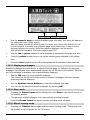
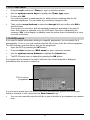
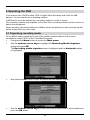
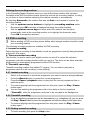
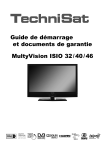
Quick start manual
TechniStar S2
International Edition
Digital HD Receiver
with CONAX card reader,
an interface for recording from CI/CI+ modules
plus DVR recording function via the USB interface.
DiSEqC 1.2
1 Illustrations
LED Display
TV/Radio On/Standby
CI module
socket
up/down arrow keys
Card reader:
>
Insert the CONAX smartcard into the
card reader (gold chip facing down
and at the front as you insert) and
push it in as far as it will go.
Inserting the CI / CI+ module:
>
Consult the CI/CI+ module and card manufacturer’s instructions.
>
Insert the smartcard you want into the relevant CI module.
>
Now carefully insert the CI module into the slot.
LNB
input
DC input
IR extension
USB port
Network
port
Audio output
digital
HDMI
output
2
Audio outputs
analogue
SCART socket
TV
Sound on/off
On/Standby
Numeric keys
in TV mode:
Select sound track/
subtitles, special functions
0/AV
in Radio mode: Select
stations by switching sound
sub-carriers
Option*
Recording
Left arrow key
Red Rewind
Green Stop,
DVR Navigator
Yellow Pause,
playback
Blue Fast forward,
Zoom/format
Right arrow key
Down arrow key
OK
Channel list On/Off
Multi-function keys
Up arrow key
SFI (EPG)
TV/Radio mode
Channel +
Info
Back
Volume +
Channel -
Volume Menu on/off
Teletext On/Off*
Freeze frame
jog shuttle on/off
Language selection*
PIP (picture in picture)
Sleep timer
* This function is only
available where the
corresponding data
is broadcast by the
channel on the selected
programme slot.
Remote control option:
by switching on the remote control option, two receivers and one TechniSat TV with the same coding can be
operated using this remote control.
>
To switch over the remote control option, press the button you want (SAT1, SAT2 or TV) and OK
at the same time.
Note:
to use this receiver, the remote control option selected here for the remote control and the remote control
code must match.
3
2 Please read this first
Before connecting and using the device, first check that everything has been supplied and
familiarise yourself with the safety instructions.
You should have received:
1 Digital receiver, 1 Power supply, 1 Remote control, 1 Quick start manual, 2 Batteries
(1.5V micro-cell), 1 HDMI cable.
2.1 Safety advice
For your own protection you should read the safety precautions carefully before using your
new receiver.
The manufacturer accepts no liability for damage caused by inappropriate handling, or by
non-compliance with the safety precautions.
Function-related discharge current may occur with electrical equipment. This is
acceptable and poses no risk, even if it is experienced as a slight tingling.
To prevent such discharge current, mains operated devices (receivers, TVs etc) must
always be installed or connected with the power switched off, i.e. all devices must be
disconnected from the mains.
-
Only operate the receiver in a temperate climate.
-
To ensure adequate ventilation, place the receiver on a flat, horizontal surface and
do not place any objects on top of it. There are ventilation slots here to allow heat to
be dissipated from the interior of the unit.
-
Do not place any burning objects, such as lit candles, on top of the receiver.
-
Do not expose the receiver to water droplets or water spray, and do not place
any objects filled with liquid, such as vases, on top of it. If water gets into the unit,
immediately disconnect the mains plug and inform the service department.
-
Do not operate any sources of heat near the TV which may also heat it up.
-
Do not obstruct the ventilation slots.
Do not open the receiver housing under any circumstances! You risk getting an
electric shock. Any necessary repairs to the receiver should only be carried out by
qualified service personnel.
4
In the following circumstances you should disconnect the device from the mains
power and consult an expert:
>
the power cable or mains plug is damaged
>
the device has been exposed to moisture or liquid has got into it
>
there are significant malfunctions
>
there is severe external damage.
2.2 Periods of non-use
During a storm or lengthy period of non-use (e.g. holiday), the receiver should be
disconnected from the mains and the antenna cable removed.
Before you disconnect the receiver from the mains, you should first switch it to standby
mode and wait until the time appears in the display or the red LED light is displayed.
2.3 Important notes on operation
Operation of the digital receiver is simplified through the use of so-called "On Screen
Displays" (OSD). This also means that the number of keys on the remote control unit is
reduced.
All functions are displayed on screen, and can be controlled by means of a few control
buttons.
Functions that are logically related are combined into a "MENU". The selected function will
be highlighted.
The red, yellow, blue and green function keys are indicated by coloured bars at the bottom
of the screen. In the various menus, these coloured bars represent different functions, which
can be implemented by pressing the appropriately coloured keys (multi-function keys) on the
remote control. The function keys are only active when a brief description is displayed in the
appropriate field.
The button identifications and terms that appear in the OSD menu are shown in bold type
in this operating manual.
Help: where available, press the blue function key in the menus to display help text; press
again to close the help window.
2.4 Disposal advice
The packaging material used for your receiver consists entirely of recyclable materials.
Please sort the components appropriately, and dispose of them in line with your local waste
disposal regulations.
5
At the end of its product life cycle, this receiver may not be disposed of with your regular
household waste. It must be taken to a recycling collection point for electrical and electronic
equipment.
This is indicated by the
symbol on the product, the operating manual or the packaging.
The materials used can be re-used in accordance with their labelling.
By ensuring that valuable raw materials in old equipment are re-used, you can make a
valuable contribution towards protecting our environment.
Please contact your local authority for the location of the nearest recycling point.
Please ensure that spent batteries from the remote control and electronic waste items are
not sent to your regular household refuse site, but are correctly disposed of (either in special
bins for problem waste, or at collection points at specialist dealers).
6
2.5 Important information on data security
Before handing your receiver over to your supplier for maintenance purposes, we
recommend that you remove all storage media or data carriers.
Restoring data is not part of maintenance or repair work. TechniSat accepts no responsibility
for the loss of, or damage to, data during repair work.
3 Remote control
3.1 Changing the battery
>
Open the cover on the battery compartment at the rear of the remote control by
pushing it in the direction of the arrow and then lifting it off.
>
Insert the supplied batteries, ensuring that the poles are the right way around (indicator
visible in battery compartment).
>
Close the battery compartment again.
3.2 Remote control code
By switching over the remote control option it is possible to use this remote control to
operate a TechniSat television and two TechniSat receivers using the same coding.
>
To switch over the remote control option, press the button you want (SAT1, SAT2 or
TV) and OK at the same time.
7
4 Connecting the DVB receiver
a.
Mains connection
b.
Connecting the LNB to the LNB input on the DVB receiver.
c.
HDMI connection from the DVB receiver to the TV.
d.
Scart connection between the DVB receiver and the TV.
e.
Connecting the audio outputs to a hi-fi system.
b
c
a
e
8
d
The following references (a b c etc.) relate to the illustration on the previous page.
4.1 Mains power connection
The digital receiver should only be connected to the power supply once you have finished
making all the connections to the various other components. This will prevent damage to the
digital receiver or other components.
a
Once you have made all the other connections in accordance with the following
sections, use the power supply to connect the receiver to a 230 V/50-60 Hz mains
power outlet.
4.2 External unit
b
Use a suitable co-axial cable to connect the LNB input on the digital receiver to your
external unit.
4.3 Connecting to a television set
c
Connect the receiver (HDMI output) and TV (HDMI input) using an HDMI cable.
If your TV is appropriately equipped it will automatically switch to the HDMI input when
the digital receiver is switched on.
Alternatively:
d
Connect the receiver (TV SCART socket) and the TV (SCART socket) via a
SCART cable.
If your TV is equipped appropriately, it will automatically switch to AV - and hence
satellite mode - when the digital receiver is switched on. It may be necessary to adjust
the signal type on your TV.
4.4 Hi-fi / surround amplifier
To achieve the best possible sound quality, you can connect your digital receiver to a hi-fi/
surround amplifier.
4.4.1 Digital
e
If your amplifier has an appropriate electrical or optical input, connect the AUDIO
OUT DIGITAL electrical socket to the electrical or optical input on your amplifier.
Depending on the signal provided by each broadcaster, sampling rates of 32, 44.1 and 48
kHz are available.
In addition, where broadcast, the Dolby Digital signal is also available on this output.
4.4.2 Analogue
e
Use a suitable cable to connect the cinch sockets (Audio R and Audio L) on the
digital receiver to an input on your hi-fi amplifier
(e.g. CD or AUX; note that the phono input is not suitable!).
9
4.5 USB port
The USB port is used for updating the operating software and transferring data. You can
also use the MPEG, MP3 or JPG playback functions to access MPEG, MP3 or JPG files
on the USB storage device. You can also insert a WLAN dongle, e.g. the TechniSat USB
WLAN Adapter (part no. 0000/3633) into the USB port to connect the receiver to your WLAN
network.
4.6 Network port (RJ45)
The USB port is used for updating the operating software and for viewing images / playing
music and films.
5 Initial installation
After you have read the safety instructions and attached the device you can then switch it
on.
Switching the device on
>
When the receiver is on standby, you can switch it on by pressing the On/Standby
button on the remote control/TV set.
On initial installation of the TV, the AutoInstall installation wizard starts automatically. The
installation wizard allows you to make the most important settings for your digital receiver in
the simplest way possible.
Each step of the installation explains which settings can be made.
>
In the installation wizard start window, you can cancel the initial installation by pressing
the red function button. The receiver then begins to run default pre-programming.
In the ensuing installation steps you can press the OK key to accept the preselected
settings and move on to the next step of the installation.
By pressing the Back key, you can go back to the previous installation step, so you
can correct any wrong entries at any time.
The initial installation process shown here serves merely as an example.
The exact process for the initial installation will depend on the settings you select. Therefore
please follow all instructions displayed on screen carefully.
10
Menu language
>
When the installation wizard starts, you will first see a window for selecting the menu
language.
>
Use the arrow keys to highlight the menu language you want.
The preferred audio language will be set automatically according to this selection.
>
Press the green function key Accept to confirm the selection and move on to the
country selection setting.
Country selection
>
Use the arrow keys to select the country in which the receiver will be operated.
The time zone and channel list sorting will depend on this selection.
Automatic setting of the local time as well as changing to summer/winter time will take
place based on your selection.
Channels will also be automatically sorted in the installation wizard according to this
setting, and likewise following a channel search.
>
Press the green function key Accept to confirm the selection and move on to
selecting the screen format.
11
Screen format
>
Use the right/left arrow keys to set the screen format for the connected TV.
The screen format on the TV will be automatically adjusted according to your selection.
>
Press the green function key Accept to confirm the selection and move on to the
next installation step.
If either Belgium, Netherlands or Luxembourg has been selected in the country
selection, you are then taken to the programme provider selection. Otherwise the
installation continues with selecting the antenna signals.
Selecting the programme provider
>
Use the arrow buttons to highlight the Subscription option.
>
Press the OK button to open a window with the available programme providers.
>
Use the up/down arrow buttons to select the programme provider you want.
>
Press the OK button to close the window again.
>
Use the arrow buttons to highlight the SD/HD option.
>
Press the OK button to open a window where you can select from the HD and SD
entries.
>
Use the up/down arrow buttons to select the entry you want.
By selecting HD both HD and SD channels will be scanned and stored in future scans.
By selecting SD only SD channels will be scanned.
12
>
Press the OK button to close the window again.
>
To accept the settings, use the arrow keys to highlight the Accept field.
>
Confirming with the OK button takes you to the next step of the installation.
Antenna configuration
In this step of the installation you can adapt your digital receiver setup to the configuration
of your antenna.
>
If you want to adopt the default antenna settings, press the green function key
Accept.
If you do this, proceed to the Channel search step.
>
If the configuration of your reception equipment does not conform to the default
setting, press the yellow function key Modify.
>
Now create the antenna settings according to your reception equipment then press the
red function key Back to return to the antenna configuration overview.
>
Press the green function key Accept to confirm the settings and move on to the
channel search.
Channel search
You can run a channel search to update the channel list.
>
Use the up/down arrow keys to highlight the All channels field if you wish to
scan for free-to-air as well as encrypted channels, or All unencrypted channels if
you only want to search for free-to-air channels.
13
>
By pressing green function key Start, an automatic channel scan is run.
In doing so, all selected satellites in the antenna configuration are automatically
scanned for channels. This procedure may take several minutes. Please note all
messages displayed on screen.
If the channel search has been skipped, the default channel list is loaded.
If either Belgium, Netherlands or Luxembourg has been selected in the country
selection, a Fastscan is run according to the programme provider's specifications
instead of the channel search described above.
Software updates
The digital receiver will now check whether a new version of the software is available for
the receiver. If a new software version is available, you can carry out an automatic software
update.
>
If you do not want to wait for a search for new software or a software download, you
can skip this step by pressing the yellow function key.
If the search for new software or updates is skipped, your device will run another test
at the time set in the Software update menu and automatically download the
software, as long as this setting is left active and the device is in standby mode at that
time.
>
If there is no new TV software available, you can press the OK button to go to the
next step in the installation wizard.
>
If, on the other hand, new TV software is found, the automatic software update can be
started by pressing the OK button.
14
The message "Updating software. Please wait.” is displayed on the screen
along with a progress bar showing the progress of the download.
Two additional progress bars then appear showing the progress of the individual
updating steps on your device. AutoInstall will then resume.
Loading EPG data
Your digital receiver has an EPG (Electronic Program Guide). You must first get the receiver
to download the EPG data from the satellite to enable electronic programme guide data to
be displayed.
For this reason, the receiver will automatically start downloading the EPG data after the
channel list update or channel search is completed. This process can take up to 30 minutes.
>
If you do not wish to wait for the EPG data to be downloaded, you can skip this
procedure. To do this, press the yellow function key Skip.
If you have skipped the EPG update, your device will automatically download the EPG
data at the time set in the Programme Guide menu, as long as automatic EPG
updating is kept active and the device is also in standby mode at this time.
You can also run the update manually at any time.
Exiting the installation wizard
>
Confirm the final message in the installation wizard by pressing the green function
key Complete to return to normal mode.
15
6 Basic operation
Dear Customer
The following section starts by covering basic operation as well as recurring operating
steps for the TV. This should make it easier to read the instruction manual, since it avoids
repeated description of identical steps at each individual stage.
If a function or setting for the device has to be different from the basic operation, the
difference in operation is described in detail at the relevant point in the instruction manual.
The so-called "On Screen Display" is used on your TV. This simplifies operation of the
television since the buttons on the remote control can take on different functions, which
makes it possible to reduce the number of buttons.
In this On Screen Display (OSD for short) the selected functions or settings are highlighted.
Furthermore, you will see a line at the bottom edge of the screen in which the various
buttons on the remote control are shown with their current functions.
In this instruction manual the terms shown in the OSD as well as the buttons to be
pressed are highlighted from the rest of the text by the display format used.
Warning - indicates an important note which you absolutely should observe in order to
avoid problems with the device, loss of data or unwanted operation.
Tip - indicates a note about the function described as well as other functions
associated with it and any others to be observed with reference to the respective place
in the instruction manual.
6.1 Switching the receiver on/off
>
>
When the receiver is on standby, you can switch it on by pressing the On/Standby
button on the remote control/TV set.
When operating normally you can switch the receiver to standby mode by pressing the
On/Standby button.
When switching the receiver on and off, note section 7.3 as well.
6.2 Calling up the main menu and navigating through the menus /
functions
The following example will illustrate how you reach the main menu and call up a submenu.
The objective of the example is to call up the Picture settings menu.
>
Press the Menu button. The main menu appears on the screen.
16
>
Select the Settings menu item by moving the highlight over this item using the
arrow keys.
>
Press the OK button to open the Settings menu.
>
Use the up/down arrow keys to highlight the Picture settings item.
>
The Picture settings menu is opened by subsequently pressing the OK button.
17
You can also highlight the individual menu items in the same way as you highlight an
item on a submenu to open it and alter the respective settings.
The menu items in some menus have to be highlighted by moving sideways. This is
done by pressing the right/left arrow keys.
In some menus you can move the highlight upwards/downwards from line to line using
the up/down arrow keys and sideways by using the right/left arrow keys
You will see the so-called menu path in the uppermost line of the menu screen. This
shows you the menu you are currently in and the path you took to reach it. In the
example shown this is Main menu > Settings > Picture settings. The menu
path is also shown throughout the instruction manual and shows you how you can
reach the respective menu with the settings described.
If the blue function key (Help) is displayed in the bottom line on the screen, a help
page can be displayed by pressing this button and hidden by pressing it again.
6.3 Accepting settings / Exiting menus and functions
In some menus and functions the changes made must be accepted manually in order to
save them permanently. If this does not happen, the function or the values that existed
before the change was made will be reset automatically on exiting the menu.
If an Accept field or the green function key with Accept is displayed in the bottom
line of the screen, you can see that the changes made must be saved manually to be
accepted.
>
By highlighting Accept using the right/left arrow keys and confirming with the
OK button or by pressing on the green function key Accept, the changes are saved
and you return to the next menu level up.
Alternatively:
>
Press the Return button.
A request appears asking whether the changes you made should be applied.
>
Use the right/left arrow keys to highlight Yes or No and confirm your selection
by pressing the OK button.
Changes will now be saved or discarded according to your selection and you move
back to the next menu level up.
18
Alternatively:
>
Press the Menu button to leave the menu directly.
The settings that need to be saved manually will be reset in this case.
If the green function key with Accept is not displayed in the bottom line of the
screen, the changes are saved automatically on exiting the menu.
6.4 Changing a setting
You can create settings using the arrow selection method, via the selection list,
by entering numbers and by using the virtual keyboard. The receiver specifies
the method that can be used to change a highlighted setting. You can see this from the
following displayed symbols:
Arrow selection method (Section 6.4.1)
Arrows are shown on the left or right edge of the highlight.
-
Selection list (Section 6.4.2)
The symbol is shown on the right edge of the highlight.
-
Entering numbers (Section 6.4.3)
-
Virtual keyboard (Section 6.4.4)
The symbol is shown on the right edge of the high light.
6.4.1 Arrow selection method
>
If is shown on the left and on the right next to the set value, you can alter this using
the left/right arrow keys.
6.4.2 Selection list
If
is shown on the right next to the set value, the value is changed using the selection list.
>
Press the OK button to open the selection list.
>
Highlight the setting you want using the up/down arrow keys.
By pressing the up/down arrow keys it is possible to move the highlight upwards/
downwards from line to line and sideways using the right/left arrow keys buttons.
19
>
Confirm by pressing the OK button. The selection list is closed again and the selected
setting is shown in the menu.
6.4.3 Entering numbers
>
Enter the new setting you want using the numeric keypad key if a question mark
or a number value
or
is shown inside the highlight.
Note the number of digits used in the entry as there must always be the same number used.
This means that if a five-digit value is required, for example “10600", but you only wish to set
a four-digit value, for example “9750“, then you must enter a “0” at the beginning for every
unused location. Therefore, in this example, it would be necessary to enter “09750”.
6.4.4 Virtual keyboard
If is shown on the right next to the set value, the value is amended using the virtual
keyboard. You have three different keyboard options when using this data entry method.
>
Open the entry by pressing the OK button.
The virtual keyboard now appears, which you can use to enter the name of the
network.
>
The remote control keys and/or displayed keyboard offer the following functions.
Arrow keys:
Move the highlight on the keyboard.
OK:
The highlighted character is added behind the character highlighted
in blue, or the function highlighted on the keyboard is run.
Back:
Exits the input without making any changes.
red button:
Delete button, deletes the character highlighted in blue.
green button: Input button, accepts the input made.
yellow button: Shift key - the next character is in upper case.
blue button:
Alternative characters, switches to alternative characters.
:
Caps lock key, the keyboard switches between upper/lower case
and numbers/symbols each time it is pressed.
:
Moves the blue highlight to the section already entered.
20
7 Operating the unit
7.1 Switching on
>
Switch the digital receiver on by pressing the On/Stand-by button either on the
receiver panel or on the remote control.
If the user-dependent parental control (TechniFamily) is activated, the user selection
now appears.
7.2 Selecting the user
If the user-dependent parental control (children's viewing time account) is activated, the user
profile selection screen appears after switching on.
>
To make a selection, use the up/down arrow keys to highlight the user profile you
want. To the right next to the profile selection you will now see the current status (e.g.
the remaining viewing time for the current day).
>
Confirm by pressing the OK button.
If the PIN request for this profile has been deactivated, the TV picture now appears. If
it has been activated, the PIN request screen now appears.
>
Enter your user PIN using the numeric keys.
If you have entered it correctly, the TV picture now appears.
>
If you want to change the user profile during operation, you must first switch the
receiver off by pressing the On/Stand-by button, then press the button again to
switch it back on, calling up the user selection screen again.
7.3 Switching off
>
Press the On/Stand-by key either on the receiver panel or on the remote control to
switch the receiver off again.
>
The receiver is now in ready mode (standby). This means that the time is displayed in
the receiver's display panel (if activated).
If the time is not displayed, this still needs to be acquired by the receiver. To do this,
switch the receiver on and set it to receive a local TV channel for approx. 30 seconds
to automatically acquire the time.
7.4 Channel selection
7.4.1 Using the channel up/down keys
>
Use the up/down arrow buttons on the receiver to select a channel, or use the
Channel +/- buttons on the remote control to scroll up or down the channel settings.
21
7.4.2 Using the numeric pad keys
>
Use the numeric keypad keys to enter the number of the channel you want.
For example:
1
for channel 1
1, then 4
for channel 14
2, then 3,
then 4
for channel 234
1, then 5,
then 6
then 7
for channel 1567
When entering channel numbers with several digits, you have approx. three seconds after
pressing a key to complete the entry.
If you wish to enter a number consisting of only one, two or three digits, you can speed up
the entry procedure by keeping the key depressed a little longer on the last digit.
7.4.3 Using the Navigator (channel list)
>
Press the OK button.
The channel list navigator is now displayed. In TV mode only TV channels are shown,
and in radio mode only radio channels are shown.
The channel currently selected is highlighted.
>
You can view additional data about the current programme by pressing the INFO
button.
7.4.3.1 Selecting a channel
>
You can now use the arrow keys to highlight the channel you want.
Using the up/down arrow keys move the cursor to a line and use the right/left
arrow keys to move up or down a page.
>
Press the OK button to select the highlighted channel.
7.4.3.2 Selecting a list
To make it easier for you to find channels, your device provides various channel lists. You
can select your Favourites lists, or display channels in a Full list sorted alphabetically,
or by provider, or by genre.
>
Press the OK button.
The active channel list is now displayed.
>
You can now use the Option button to open a window containing the channel list
types (TV list, Astra list, TV provider lists, TV genre lists and TV full
list).
22
The active channel list type is highlighted.
TV lists
>
>
Use the up/down arrow buttons to select e.g. the TV List 2 channel list type.
Confirm with OK.
The channels stored in TV List 2 are now displayed.
Full list
>
Use the up/down arrow keys to select the Full list in the channel list types and
confirm with OK.
An alphabetically sorted full list containing every channel is displayed.
Provider lists
You can display the channels from specific providers using the provider lists.
>
Use the up/down arrow buttons to select TV provider lists in channel list
types.
23
>
Confirm with OK.
Another window appears for selecting the provider you want.
Genre lists
Using the genre lists you can view channels that have been allocated to a specific
genre (channel type).
>
Use the up/down arrow buttons to select Genre lists in the channel list types.
>
Confirm with OK.
Another window appears for selecting the genre you want.
>
Use the up/down arrow buttons to select the genre you want (e.g. Music).
>
Confirm with OK.
Channels that correspond to the genre you selected are now displayed.
>
Use the up/down arrow buttons to highlight the channel you wish to watch.
24
>
Confirm by pressing OK.
7.4.4 Calling up blocked channels
If a programme is selected that is blocked by the parental control function, the message
Device PIN will be displayed on the screen.
>
Use the numeric keys to enter your PIN code.
The channel you want will be displayed.
or
>
Switch to a channel that is not blocked.
If global parental control is enabled, the device PIN code will be requested again when
the blocked channel is switched on. To make things easier for you, you only need
enter the PIN code once during each operating phase.
When doing so pay careful attention to the information and settings for global and
user-dependent parental control (TechniFamily).
7.4.5 Return to last channel selected
>
Press the Back button on the remote control to return to the last channel selected.
>
Press the button again to return to the channel you were previously watching.
7.4.6 TV/Radio switchover
>
You can use the TV/Radio button to switch between TV and radio mode.
The device switches to the last radio station listened to.
7.4.7 Infobox
An Info box appears on the screen for a set period every time you change channels.
This Info box displays the location and name of the selected channel, the title of the current
programme and the currently active channel list.
The progress bars are coloured yellow according to the amount of transmission time
already expired for the current programme. If the beginning of the progress bar is
coloured red, the transmission started too early; if the end of the progress bar is
coloured red, the current programme has post-roll time.
Additional programme properties are also displayed:
For example:
for teletext
for 16:9 broadcasts
for encrypted channels
for Dolby Digital broadcasts
for subtitles
for mono broadcasts
Also, where available from the provider, the EPG genre and the FSK (Voluntary Internal Film
Industry Monitoring) age restriction will be shown.
25
7.5 Receiving encrypted channels
Your receiver is equipped with an integrated CONAX encryption system (smartcard reader)
and a Common Interface for accepting a CI / CI+ module. This enables you to receive and
view encrypted channels. To do this, you must first either insert a CONAX Smartcard into
the integrated card reader, or insert a CI / CI+ module with a valid Smartcard into the slots
provided.
>
Insert the CONAX smartcard into the card slot in the integrated card reader. (goldcoloured chip facing down, and in the direction of insertion).
or
>
Insert a CI / CI+ module into the slot.
>
Insert the smartcard into the CI / CI+ module card slot. Ensure that the gold-coloured
chip on the smartcard is facing upwards, in the direction in which the card is inserted.
If you now select an encrypted channel, the digital receiver will automatically check the card
reader and the CI / CI+ slot and will display the channel in decoded form, assuming a valid
smartcard and an appropriate CI / CI+ module with a valid smartcard has been inserted.
7.6 Volume control
You have the option of adjusting the volume on your digital receiver. This facilitates operation
of the receiver, as it means you can access all the major functions on a single remote control,
and will only rarely have to resort to using the remote control for the TV. When you switch on
the digital receiver, sound will be reproduced at the volume level last set.
>
You can increase the volume for your digital receiver using the right arrow key on
the receiver or the Volume + button on the remote control, and reduce it using the
left arrow key on the receiver or the Volume - button.
Please note that the volume control and mute button also adjust or mute the digital
audio outputs (not with the bitstream setting).
7.6.1 Using mute
>
To switch the sound off (mute), press the Sound on/off button - press the key again
to switch the sound back on.
Throughout the time that the volume is switched to mute, the
the upper right of the screen.
symbol appears at
7.7 Selecting a different language / sound option
If a programme is broadcast in multiple languages or with multiple sound channels, this is
indicated in a message.
You can then set a different language or another audio channel as follows:
>
Press the Language selection button.
A list of the languages currently being broadcast is displayed on the screen.
26
>
Use the up/down arrow buttons to highlight the language you want and confirm
with OK.
You can now hear the programme in the selected language.
It is also possible to receive mono broadcasts with your digital receiver.
>
Using the right/left arrow keys you can choose between mono channel 1 ( ),
mono channel 2 ( ) and stereo ( ) when the sound selection has been called up
and the desired language highlighted.
7.8 Transponder information
>
Use the OK button to call up the Navigator.
>
Use the arrow keys to highlight the channel for which data you want to display dat .
>
By pressing the yellow function button (Status), the data for the installed
transponder is displayed.
7.9 Freeze frame
>
>
Press the Freeze frame key; the current TV picture will be displayed as a still
picture.
Press this key again to return to normal operation.
The sound will continue to be reproduced normally during freeze frame.
7.10 Teletext
7.10.1 Using your TV's teletext decoder
Where broadcast, teletext is provided via your TV's Scartsocket.
7.10.2 Using the internal teletext decoder
As an alternative, you can use the integrated TOP teletext decoder to display the
information. With TOP teletext, all text pages are separated into groups and blocks by
subject, making the teletext display clearer.
>
Switch on the channel from which you wish to view teletext data.
>
Switch the teletext on by pressing the Teletext button.
27
Teletext group
Teletext block
>
Use the numeric keys to enter the teletext page you want. Your entry will appear in
the upper left corner of the screen.
After you have entered the teletext page you want, your device will search for it. As
it is not possible to transfer every teletext page at the same time, it may be a few
seconds before your receiver finds the page and displays it on the screen.
With all teletext operators, the home page is page 100.
>
Use the red or green buttons to move forwards or backwards one page at a time.
>
Press the yellow function key to call up the teletext group indicated in the yellow
field.
>
Press the blue function key to call up the teletext block indicated in the blue field.
7.10.2.1 Displaying subpages
If teletext subpages are available for a selected teletext page, an indicator showing that
subpages have already been downloaded appears on the left next to the teletext. As soon
as a new subpage is available, this is automatically displayed.
>
Use the OK button to show a specific subpage.
The column on the left side of the screen is enabled. Subpages that have already
been acquired are displayed.
>
Use the up/down arrow buttons to select the subpage you want.
>
You can exit the display of specific subpages by pressing OK.
7.10.2.2 Stop mode
>
Pressing the Freeze frame button displays the word Stop in the top left corner of
the teletext window.
This prevents teletext subpages from automatically scrolling forwards.
>
Press the Freeze frame key again to switch the stop mode off again.
7.10.2.3 Mixed viewing mode
>
Pressing the Teletext button again enables mixed viewing mode. This means that
the teletext is superimposed on the TV picture.
28
7.10.2.4 Exiting teletext
>
Press the Back key to return to normal operating mode.
7.11 Subtitles
icon.
Where subtitles are broadcast, this will be indicated by the
If you have switched on the subtitles function, these will be displayed automatically,
provided that they are being broadcast in the language selected.
If subtitles are only being broadcast in other languages or via teletext, you can switch these
on manually as follows.
>
Press the Option button (possibly several times) until a selection table containing the
subtitle languages being broadcast appears in the Subtitles section.
>
Use the up/down arrow keys to highlight the language/teletext page you want.
>
Confirm with OK.
Subtitles will now be displayed.
Note that this function is only available when subtitles are actually being broadcast.
7.12 Picture zooming
You can use this function to display 4:3 programmes on a 16:9 TV in their original format
and in full screen. The same also applies to 16:9 broadcasts that are not tagged as such
when broadcast (no 16:9 icon in the Infobox). However, an important pre-requisite for this
zoom function is that the digital receiver is set to 16:9 mode and your TV supports 16:9
signalling via a Scart socket.
>
Now press the Option button.
Sound selection now appears on the screen.
>
Pressing the blue function key Zoom repeatedly displays the various zoom factors.
>
Press the Back button to exit sound selection.
>
Repeat this process to switch off the zoom.
The zoom function remains enabled until you switch it off again or switch the receiver to
standby mode.
7.13 Electronic Programme Guide (EPG, or SFI for SiehFern Info)
Your digital receiver has an electronic programme guide. This allows you to display channel
information relating to one or more channels on your screen.
You can very quickly obtain an overview of the programmes currently being broadcast, the
programmes for that day or those for subsequent days.
7.13.1 Calling up the Electronic Programme Guide
>
Press the SFI button to call up the electronic programme guide.
The electronic programme guide appears in the preset start category. The Overview
start category is selected in the factory settings.
29
7.13.2 EPG overview
4
1
2
5
3
6
1
1
Display time > gives the time of the programme to be displayed (Now, Next, More).
Display day > graphic representation of the weekday on the display.
2
Channel name with the corresponding channel within the active favourites list.
3
Progress bars or the start/stop time of the programme being shown.
4
The current date and the time.
5
Shows that there is further information available about the broadcast.
6
Programmes on the channel being shown.
>
By pressing the up/down arrow keys you can scroll through line by line and with
the right/left arrow keys you can move the cursor sideways.
You now have access to the EPG functions.
>
Press the yellow function key to go to the Next or More EPG table.
You can exit the electronic programme guide again by pressing the SFI button.
7.13.3 EPG timer programming
The EPG (electronic programme guide) enables you to programme timer events with great
ease.
Check the EPG timer programming for the set timer pre-roll time/post-roll times.
7.13.3.1 DVR timer
>
Press the Record button once to programme a DVR timer for a highlighted
programme.
>
Press the Record button again to delete the timer.
7.13.3.2 Channel-switching timer, VCR timer and alarm
>
Press the Option button once to programme a channel-switching timer for a
highlighted programme.
>
Press the Option button again to change the timer type to an alarm.
>
Press the Option button again to change the timer type to a VCR timer.
30
7.13.3.3 Timer menu
>
Press the red function key (Timer) to open a selection window.
>
Use the up/down arrow keys to highlight the Timer type option.
>
Confirm with OK.
For control purposes a mask appears for editing timers containing data for the
selected programme. You can make any necessary changes in this.
>
Then use the arrow buttons to select the Accept field and confirm with OK to
save the timer.
Your receiver is now set to start the selected programme according to the type of
timer. If the device is switched on by the DVR timer, this will be indicated by the
message “rEc” in the display. In standby mode the active timer is indicated by a clock
icon next to the time.
7.13.4 EPG search
If you want to obtain information relating to a specific programme, you can search for it
automatically. To do so, you just need to enter the title or part of the title of the programme.
The EPG will then scan the data to look for the programme.
>
Open the EPG by pressing the SFI button.
>
Press the blue function key (EPG menu) to open a selection window.
>
Use the up/down arrow buttons to highlight the Search item.
>
The EPG Search menu is opened by pressing the OK button.
If no search term is stored in the search selection, the virtual keyboard is displayed
immediately after the menu is called up.
Title of current
programme
If one or more search terms are stored, the menu automatically appears with the search
selection included. In this case select the New Search entry.
>
You can now manually enter the full title or part of the title of a programme as a search
term.
31
New search
Existing
search term
>
Now press the green function key (Accept) to search for programmes with exactly
this title (the EPG data is searched for programmes with this title and these are
displayed where available).
7.14 Timer recordings
You can use the DVR timer to record programmes to an attached recording medium while
you are out. Your receiver is equipped with video recorder timers and channel-switching
timers. In terms of their programming, these timer types differ only in name. You can
programme the timers manually as described in this chapter, or use the EPG function.
1. DVR timer
This function is used to switch your digital receiver on and off for the selected programme,
to record it to the storage medium while you are out.
If the receiver is switched on by the DVR timer, this is indicated by "rEc" in the display.
Some of the remote control functions (e.g. calling up the main menu) are unavailable.
2. Video recorder timer
If the video recorder timer is selected, your digital receiver will be switched on and off for the
selected programme, allowing you to record programmes to an external recording unit while
you are out (e.g. a video recorder). If the device is switched on by the video recorder timer,
this will be indicated by the message “rEc” in the display. Certain remote control functions
will be unavailable. Please note that the corresponding recorder must also be programmed.
3. Channel switching timer
If your receiver is in normal operating mode, it will switch to the programmed channel at the
set time.
In contrast to using the DVR or video recorder timer option, the device remains fully
functional and will not be switched off at the end of the programme.
4. Alarm
If your receiver is in standby mode, it is switched on when the programmed channel is
reached at the set time. In contrast to using the DVR or video recorder timer option, the
device remains fully functional and will not be switched off at the end of the programme.
7.14.1 Timer settings (pre-roll time/post-roll time)
With EPG timer programming, the receiver receives the data for the selected programme
automatically via the EPG data. This means that the start and end times for the programme
to be recorded are transferred to the exact minute.
32
However, it is often the case that the selected programme starts either earlier or later than
stated. If so, either the beginning or the end of the programme being recorded is missing.
To avoid this problem, you can enter a timer pre-roll time/post-roll in one minute increments. The
timer will now start earlier and finish later than in the EPG data by the pre-roll time/post-roll times
entered.
>
To access the timer overview, first call up the Main menu by pressing the Menu key.
>
Use the up/down arrow keys to highlight the Timer Organiser item and confirm
with OK.
>
Use the up/down arrow keys to highlight the Timer Settings item and confirm
by pressing OK again.
The Timer Settings submenu appears.
7.15 Selecting a function
>
>
>
Press the blue function key to open the navigation menu (NAV Menu).
Use the up/down arrow buttons to highlight the function you want to access.
TV
TV mode: playing TV programmes.
Radio
Radio mode: playing radio programmes.
Film/DVR
Film/DVR Navigator: access MPEG2 titles, VOB, TS or TS4 files stored
on a device connected to the USB port.
Music
Music navigator: access MP3 titles stored on a connected USB device
or a shared network drive.
Pictures
Pictures navigator: access JPG files stored on a connected USB device
or a shared network drive.
Confirm with OK to select the highlighted function.
33
8 Operating the DVR
Your receiver has a DVR function (DVR = Digital Video Recorder) and a slot for USB
devices. You can use this as a recording medium.
A USB device must be inserted as a recording medium in order to record.
The recording capacity thus depends on the size of the recording medium and the volume of
data in the programme.
When recording, the teletext data and subtitles (where broadcast) are also recorded as well
as the actual audio and video data.
8.1 Organising recording media
To be able to make recordings on one of the media mentioned above, this must be
formatted for either FAT32 or the TechniSat file system.
>
First press the Menu button to access the Main menu.
>
Use the up/down arrow keys to highlight the Recording Media Organiser
option and press OK.
The Recording media organiser menu is displayed and the Automatic option
is highlighted.
>
Now press the OK button to open a window with the inserted media.
>
Use the up/down arrow keys to select the medium that needs to be formatted and
press the OK button.
34
Defining the recording medium
In the Recording Media Organiser menu you can define which medium that has been
formatted in the DVR file system format should be used as the recording medium. In doing
so you have a choice between selecting the medium manually or automatically.
By selecting Automatic, the medium that was the first to be inserted is used as the
recording medium.
>
Use the up/down arrow buttons to highlight the recording medium option.
>
By pressing the OK a window is displayed showing the media available.
>
Use the up/down arrow keys to either select the medium that should be
permanently used as the recording medium or to highlight the Automatic entry.
>
Press OK to accept the selection.
8.2 DVR recording
Before starting a DVR recording, please define which storage medium should be used
as a recording medium.
The following recording modes are available for DVR recording:
1. Instant recording
Select this type of recording to immediately record the programme currently being broadcast
at the push of a button.
2. Timer-controlled recording
This function is used to switch your digital receiver on and off to record the selected
programme onto the recording medium while you are out. The timer can be either manually
programmed or automatically programmed via the EPG function.
3. Timeshift recording
Timeshift recording enables time-shifted TV viewing. You can start to play back a
programme while it is still recording (= time-shifting).
8.2.1 Instant recording
>
Switch to the channel on which the programme you want to record is being broadcast.
>
>
Press the Record button to record the current programme.
Press the Pause / playback button to play back the current programme from a
particular point.
>
To continue playing back the programme from this point, press the Play / Pause
button again.
You are now watching the programme with a time delay to the live broadcast
(Timeshift), while the programme continues to be recorded in the background.
8.2.2 Timeshift recording
>
If you are watching a programme and are interrupted by e.g. a telephone call, you can press
the Play / Pause button to pause the programme and start recording it at the same time.
>
To continue playing back the programme from this point, press the Play / Pause
button again.
8.2.3 Ending manual recording
>
To finish recording, first press the Stop button.
35
The following request appears.
>
Use the up/down arrow keys to select Store (to save the recording to the storage
medium) or Discard (to not save the recording) and confirm with OK.
8.2.4 Ending recording automatically
Option 1
>
Press the On/Standby button.
A request is now displayed asking what should happen to the recording in progress.
>
Use the up/down arrow keys to highlight the item with the action you want.
>
Confirm by pressing OK.
The receiver will record the channel until the specified time and then switch to standby.
>
If the receiver is switched on before the end of the recording, a request appears asking
whether you want to start watching the recording in progress, continue watching it live
or finish recording.
>
Use the up/down arrow keys to highlight the option you want and confirm with
OK.
By selecting Start watching recording from beginning the recording
continues in Timeshift mode.
Option 2
>
Press the Record button; the following window appears.
36
>
Use the up/down arrow keys to highlight the line with the action you want (e.g.
+1 hour) and confirm with OK.
The receiver will now record the programme(s) on the channel you have selected for
the set period of time and then stop recording automatically.
8.3 Timer recordings
You can use the DVR timer to record programmes to an attached recording medium while
you are out. You can programme the timers manually or use the EPG function.
8.4 DVR playback
You can access DVR recordings via the DVR Navigator.
8.4.1 Calling up the DVR Navigator / Starting DVR playback
You can access DVR recordings via the DVR Navigator. There are various ways to call this up.
Depending on whether you are in TV or radio mode, a list appears with all the TV or radio
recordings available on the storage medium.
After calling up the Navigator, playback of the highlighted recording starts straight away.
>
The programme information can be displayed and hidden by repeatedly pressing the
Info button.
You can start to play back a recording by highlighting it and confirming with OK.
8.4.1.1 When in TV mode
>
Press OK to open the programme list navigator.
>
or
>
Press the green function key to switch to DVR in the DVR Navigator.
Just press the green function key to open the DVR Navigator.
8.4.1.2 From playback of a running / existing DVR recording
>
or
While a recording is in progress, press the OK button first to open the DVR Navigator.
37
>
In the function selection select the Films / DVR item.
>
Now call up the My Recordings folder on your attached recording medium.
8.4.2 Pause / Freeze frame
>
To pause playback of a recording (freeze frame), press the Pause / Play button
during playback.
>
Press the Pause / Play button again to resume playback from the same location.
8.4.3 Fast forward/rewind
Your DVR has fast forward and rewind functions so you can get to a specific place in a
recording.
>
Press the Fast forward or Rewind button during playback.
The message Fast forward uu or Rewind ⊳⊳ appears.
The recording will now play in the specified direction at 4x speed.
>
If you press the Fast forward or Rewind button again, the speed will increase to
16x.
The message Fast forward uuu or Rewind⊳⊳⊳ appears.
>
If you press the Fast forward or Rewind button again, the speed will increase to
64x.
The message Fast forward uuuu or Rewind ⊳⊳⊳⊳ appears.
>
By pressing the Fast forward or Rewind button again you can jump forwards or
backwards in 10-minute increments.
>
When you get to the place you want in the recording, you can return to normal playing
mode by pressing the Play / Pause button.
8.4.4 Jog shuttle function
To quickly and accurately navigate to a position in the recording, your receiver also has a
'jog shuttle' function. This is used as follows:
>
During playback press the Jog shuttle button (freeze frame) to access jog shuttle
mode.
>
By pressing the right/left arrow keys (repeatedly if necessary) you can change
the speed and direction of the playback.
>
Press the right arrow key once to play the recording in slow motion. The icone Iu
is displayed.
>
Pressing the up arrow key or the down arrow key causes the next frame
forwards or backwards to be shown.
8.4.5 Setting bookmarks
>
As described above, skip to a location in the recording where you want to add a
bookmark.
>
Press the Record button to place a bookmark in the current location. In this way you
can set bookmarks in as many places as you want in a recording. Bookmarks can also
be set during playback and in the Music/images/films organiser menu.
8.4.6 Jump to bookmarks
38
During playback you have the option of navigating directly to locations in the recording
where you have set bookmarks.
>
Press the Option button to open a window displaying the available bookmarks.
The Current bookmark is also displayed. This indicates the current playback position
in the recording.
>
When you use the up/down arrow keys to highlight a bookmark, playback starts at
this point.
>
Press the OK button to close the window and return to normal playback mode.
8.4.7 Ending playback
>
Press the Stop button to end playback.
Playback will end and your receiver will return to normal mode. In doing so the
receiver "remembers" the place in the recording where playback ended. If you start
playing this recording again, it will automatically resume at the point where you
previously left off.
39
9 Troubleshooting guide
Fault
Remote control does not
work.
Possible cause
Solution
Wrong remote control code
used.
Apply correct remote
control code.
Batteries are spent.
Replace batteries.
Various channels not
shown in channel list.
Wrong channel list
selected.
Select another channel list.
Programmes such as
DSF and Tele 5 have
interference at certain
times.
Interference from cordless
DECT telephones.
Increase distance between
base station and receiver.
Sound OK, no TV picture.
Radio mode called up and
radio background image is
switched off.
Check setting.
Scart plug not connected
correctly.
Connect Scart plug
properly.
Picture format not correctly
set.
Check picture format.
Wrong picture display /
zoom selected.
Check picture display /
zoom in menu.
Picture not fully visible or
distorted.
Check zoom setting.
No picture, no sound,
display not on.
No power.
Check power supply and
plug.
No picture via HDMI.
HDMI resolution used is not
supported by TV.
Modify HDMI resolution
for the correct device or
connect via Scart lead.
No sound via HDMI, picture
OK.
Wrong HDMI sound format
selected.
Check HDMI sound format.
No sound or wrong audio
playing.
Dolby Digital active or
wrong audio language
selected.
Check setting in menu.
Check Dolby Digital /
language selection.
40
Fault
Cannot receive channels
that were previously being
received.
Possible cause
Solution
Antenna defective or not
correctly adjusted.
Check antenna.
Channel transferred to a
different transponder.
Perform a search/scan.
Channel no longer being
broadcast.
None.
Heavy rain or snow.
Remove snow from dish
antenna.
Antenna incorrectly
adjusted.
Adjust antenna.
Dish too small for your
location.
Use larger antenna.
Obstacle between dish and
satellite (e.g. a tree).
Mount dish with clear line of
sight.
Short circuit in LNB
connection.
Switch off receiver, resolve
short circuit, switch receiver
back on.
Faulty or missing cable
connection.
Check all cable connections
(see section 4).
Defective LNB.
Replace LNB.
Incorrect external unit
installed at receiver.
Modify setting.
Antenna incorrectly
adjusted.
Adjust antenna.
Antenna cannot be rotated.
Motor not compatible with
DiSEqC 1.2.
Use a suitable motor.
Time not displayed while in
standby mode.
Time not acquired.
Play a local TV channel for
approx. 30 sec.
Standby clock switched off.
Switch on standby clock.
Intermittent appearance
of square blocks in the
picture. Switches to freeze
frame intermittently, no
sound. Screen black at
certain times with the
message "no signal".
No picture, no sound,
display on.
41
Error
Receiver cannot be
operated, switched on or
switched off.
Possible cause
Defective data stream -->
receiver blocked.
Solution
Hold down the On/Stand-by
button on the receiver or
on the remote control for
approx. 5 seconds.
Disconnect mains plug for
approx. 5 seconds, then
reconnect receiver.
Perform Flash Reset:
Warning!
All personal settings will be
lost.
> Remove DC plug from
receiver.
> Press and hold the
Standby and up arrow
key at the same time.
> Reinsert DC plug in the
DC socket while holding
down the Standby and
up arrow buttons.
> Keep both buttons
pressed down for
approx. 5 sec. then
release. “SEt” appears
in the display.
USB device not recognised.
USB device formatted for
wrong file system.
42
Format USB device for
FAT32 file format.
TechniSat
Warranty
3
Years
How to get your three-year warranty
Step by step
1. Register your products within
n four
weeks of purchase - either by sending
nding in
your completed registration card
rd (see
reverse) or online at www.technisat.
chnisat.
com.
2. If, contrary to expectations, your
equipment should develop a problem,
in the first instance please contact your
dealer or our technical hotline on +49
(0) 3925 9220 1806 (normal charges will
apply for overseas calls).
Service
report
3. If the problem cannot be resolved by
calling our hotline, please complete
the Service Report in full (see reverse)
and briefly describe the fault with your
device.
Dealer
4. Send the faulty equipment to your
dealer, in the original packaging, along
with a proof of purchase (copy of invoice
or till receipt) and all accessories.
Once the fault has been repaired, the
Service Report will be returned to you
along with the repaired device with an
appropriate comment from our service
workshop.
Special note for TV customers:
5-year warranty after product
registration of TechniSat digital
televisions (3-year warranty + 2-year
warranty on parts except for the
screen, remote control, and housing
parts)
Permanent added value and breathtaking technology
www.technisat.com
Warranty
TechniSat
Guarantee certificate
3
Years
Warranty
Dear Customer,
You have purchased a high quality TechniSat product that has been put through multiple quality tests
and a stringent goods outwards check at every stage. Should you still encounter a problem with your
equipment, contrary to expectations, you can always take advantage of a two-year legal warranty claim.
This warranty claim can of course be exercised at any time without having registered the product.
However, from the seventh month after the date of purchase, under legal provision, the obligation is on
you to prove that the problem with the equipment already existed at the time of purchase. But TechniSat
is offering you another solution. By submitting a fully completed and signed TechniSat registration
card, your two-year legal warranty claim is converted into a three-year warranty. This releases you from
your legal obligation to prove that the item was faulty, for a period of three years from the purchase of
your equipment (based on the billing date). In the event of a claim under warranty, you will receive - at
TechniSat's discretion - a free repair of your equipment or an as-new equivalent replacement device.
To be sure of enjoying your warranty in full, make absolutely sure that only original TechniSat accessories
(such as cables, plugs etc) are used during installation.
Invalidation of the warranty claim
All warranty claims are invalidated if the equipment interior is accessed by anyone other than TechniSat
or if the equipment is modified (e.g. by hardware or software modifications). Service under warranty
shall also not apply in the event of damage caused by incorrect installation or improper use, or in the
event that manufacturer's numbers have been changed or rendered illegible, or mechanical damage has
been caused by accident or impact. The guarantee does not cover compensation or expenses, specifically
not loss of data, e.g. channel lists that have been set up or recordings on hard disks.
What to do in the event of damage
If you encounter a problem with your TechniSat equipment, despite the ultra-modern manufacturing
and constant quality checking, we would ask you to first contact your dealer or our technical hotline on
+49 (0) 3925 9220 1806 (normal charges will apply for overseas calls). If we cannot solve the problem
in this manner, we would ask you to contact your dealer or supplier.
Please make sure you complete and send off the registration card!
Or you can conveniently register online at www.technisat.com
Warranty
Note on
making a claim under warranty
The warranty can only be invoked if:
1. the fully completed registration card has been received by us no later than 4 weeks after purchase,
or you have registered the product online during this period.
2. you have first attempted to resolve the issue by contacting your dealer or our technical hotline on
+49 (0) 3925 9220 1806 (normal charges will apply for overseas calls).
3. you have filled out the Service Report in full, including a precise description of the problem.
4. the defective equipment is returned to the vendor, including any accessories (e.g. network cables,
remote control etc), but not smartcards and CI modules (that are not included with delivery),
in the original packaging, along with a proof of purchase (copy of invoice or till receipt) and the
completed Service Report. The Service Report will be returned to you along with the repaired
device with an appropriate comment from our service workshop.
How to register your product
1) Registration by post:
cut out the completed TechniSat registration
card along the dotted line, place in an
envelope with the appropriate postage
affixed and send to the following address
(see right):
2) Online registration:
Just complete the guarantee form you will
find online at the TechniSat website
(www.technisat.com) and your product will
be registered with TechniSat.
TechniSat Teledigital GmbH
- TechniSat Warranty Nordstrasse 4a
D-39418 Stassfurt
Germany
Service Report
Service Report in the event of a claim under warranty
The serial and item numbers are
located on the back of the box or
directly on the equipment.
Note
If, contrary to expectations, you encounter a problem with your equipment, despite the ultra-modern manufacturing and
constant quality checking, we would ask you to first contact our technical hotline on +49 (0) 3925 9220 1806 (normal
charges will apply for overseas calls). If we cannot solve the problem in this manner, we would ask you to contact your
dealer or supplier. If you do so, please complete the following Service Report beforehand.
Service Report
Serial No.:
Item
number:
Description of fault
City/
town:
Please briefly explain the problem with your equipment
Surname:
First name:
Street:
Post
code:
Telephone:
optional
Please note that a repair under warranty can only be carried out quickly and smoothly if this Service Report is completed
in full, and submitted with a proof of purchase (delivery note, invoice, till receipt etc), the defective equipment in the
original packaging, including all accessories (e.g. network cable, remote control) and a precise description of the problem.
The Service Report will be returned to you along with the repaired device with an appropriate comment from our service
workshop.
(please cut here)
✂
TechniSat registration card
3-year warranty
(for any questions)
City/
town:
Warranty
registration card
Year
3
to be completed by the dealer, where registration
is carried out in the dealership
This field must be completed so that service under
warranty can be provided!
TechniSat
Dealer No.:
By submitting a fully completed and signed TechniSat registration card, your two-year legal warranty claim is converted into
a three-year warranty. Hence you are released from your legal obligation to prove that the item was faulty, for a period of
three years from the purchase of your equipment (based on the billing date). In the event of a claim under warranty, you will
receive - at TechniSat's discretion - a free repair to your equipment or an as-new equivalent replacement device.
Surname:
First name:
Street:
Telephone:
Post
code:
optional
Email:
optional
Date of purchase:
Serial No.:
Purchased at:
Important: Tick to register
Yes, I want to convert my two-year legal warranty claim into a three-year warranty claim and thereby
consent to the use of my address by TechniSat for the purposes of sending information via post.
Yes, I want to receive communications via email as well (optional).
Date, Signature
Note
By signing here you declare your consent for TechniSat Digital GmbH to use your address for its own communications by post or email and give permission
to contact you. Your data will not be forwarded to third parties. You can rescind your consent at any time by writing to TechniSat Digital GmbH, TechniPark,
D-54550 Daun/ Vulkaneifel, Germany (for the attention of the Data Protection Officer) or by emailing [email protected]. The two-year legal warranty claim can only be converted into a three-year warranty claim by checking the first consent box and signing this registration card.
Your TV bears the CE symbol and complies with all requisite EU standards.
Subject to change for amendments and printing errors Version 06/12
Duplication and reproduction only with the publisher's approval
TechniSat and TechniStar S2 are registered trademarks of
TechniSat Digital GmbH Postfach 560
D-54541 Daun
Germany
www.technisat.com
Technical Hotline
+49 (0) 3925 9220 1806
Mon. - Fri. 8am - 6pm
(Normal charges will apply for overseas calls).
2233634000500