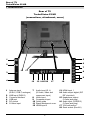
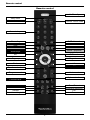
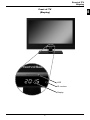
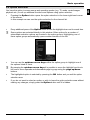
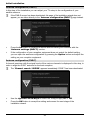
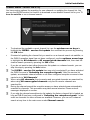
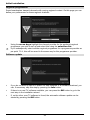
1
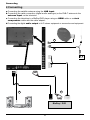
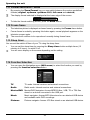
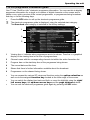
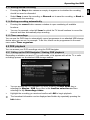
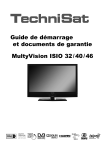
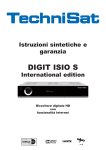
Quick start manual
and warranty documentation
TechniVision 22 / 26 / 32 HD
Rear of TV
TechniVision 22 HD
1 Illustrations
Rear of TV
TechniVision 22 HD
(connections, attachment, cover)
5
1
6
2
7
3
10
11
8
9
4
1
2
3
4
5
6
12
Antenna input
(DVB-C, DVB-T, analogue)
LNB Input (DVB-S)
Common Interface
USB port
DC socket
S-Video input
13 14 1516
7
17
Audio input (R, L)
(S-Video, Video and
component input)
8 Video input
9 Component input
10 Cable guide
11 Stand attachment cover
12 HDMI input 2
2
18
13 HDMI input 1
14 Audio output digital (S/P
DIF electrical)
15 Headphone output
(3.5mm jack plug)
16 Audio input (VGA/DVI)
(3.5mm jack plug)
17 VGA connection
18 Scart socket (EuroAV)
Rear of TV
TechniVision 26/32 HD
EN
Rear of TV
TechniVision 26/32 HD
(connections, cover)
1
2
3
4
5
6
9
10
11
7
8
12
1
2
3
4
5
6
USB port
Common Interface
LNB Input (DVB-S)
Antenna input
(DVB-C, DVB-T, analogue)
S-Video input
Audio input (R, L)
(S-Video, Video and
component input)
7
8
9
10
11
12
13
14
13 14 1516
17
Video input
Component input
Mains power switch
Mains power connection
Stand attachment cover
HDMI input 2
HDMI input 1
Audio output digital
(S/P DIF electrical)
3
18
15 Headphone output
(3.5mm jack plug)
16 Audio input (VGA/DVI)
(3.5mm jack plug)
17 VGA connection
18 Scart socket (EuroAV)
Remote control
Remote control
On/Standby
Sleep timer
Remote control code
Sound on/off
Numeric keys
Recording
TV/Radio mode
Stop
Rewind
Fast forward
Pause / playback
Arrow keys
SFI
DVR mode
Page up
Page down
Back
Info
OK
Function selection
Programme +/-
Volume +/Option selection
Function keys
Menu
Timer
Teletext
Freeze frame / Jogshuttle
Zoom/Format
Language selection
PaT
Genre
4
Front of TV
Display
EN
Front of TV
(Display)
LED
IR receiver
Display
5
Important instructions
2 Please read this first
Dear customer,
This quick start manual simply describes the most important connection options and the
basic operating steps required for you to quickly get started operating the TechniVision 22,
TechniVision 26 or TechniVision 32.
Please also definitely comply with the notes on safety provided under Point 2 of the
instruction manual, appropriate use, operation, power consumption in standby mode and
during operation as well as transport of and cleaning the television. You will also find
information provided in this section about disposal of the packaging and the television. The
manufacturer’s declaration is also provided in this section.
2.1 Intended use
>
Connection to mains power 230V/50Hz (TechniVision 26 / 32 HD and TechniVision 22
HD via mains power unit supplied) or to 12 V DC power (TechniVision 22 HD)
>
The TV set is intended only for the reception and playback of picture and sound signals.
>
The TV is only suitable for connection to audio and video devices, antenna units and
computers that meet DIN standards and have a CE mark.
Use is permitted in private and commercial situations in dry rooms and under supervision.
>
Any other use is expressly forbidden.
2.2 Manufacturer’s declaration
The TV meets the following requirements:
>
the EU directive 2006/95/EC (low voltage directive)
- EN 60065
>
the EU directive 2004/108/EU (EMC directive)
- EN 55013, EN 55020, EN 61000-3-2
and bears the CE mark.
2.3 Important instructions
Please observe the following instructions in order to avoid any safety risks, prevent damage
to the TV, and help contribute to environmental protection.
2.3.1 Safety
For your own protection you should read the safety notes carefully before using your new
TV. The manufacturer accepts no liability for damage caused by inappropriate handling, or
by non-compliance with the safety precautions.
Do not open the receiver housing under any circumstances!
Touching parts that conduct high voltages can be fatal!
6
Important instructions
Only operate the receiver in a temperate climate.
Do not switch on the TV immediately after delivery or transportation in cold weather;
wait until it reaches room temperature.
Do not expose the set to dripping or sprayed water. If water gets into the unit,
immediately remove the mains plug and advise the service department.
Do not place the TV on a narrow shelf or in small cabinets; ensure a minimum
ventilation gap of 10cm around the unit.
The set has ventilation slits to allow heat to escape from the inside of the set. Do not
cover the ventilation slits with objects such as newspapers, tablecloths etc.
Do not operate sources of heat near the TV that can additionally heat it up.
Do not place objects over the ventilation slits.
In thundery weather and when the set is not to be used for an extended period or
during absence you should remove the mains and antenna plugs from the set.
Overvoltage can damage the TV.
In the event of a noticeable defect on the set, if a smell is produced or if smoke comes
out, if there are severe malfunctions, if there is damage to the power cable or to the
casing and if liquids penetrate the set, pull the mains plug out immediately and contact
the service department.
In the event of a power failure the TV should be isolated from the mains power by
pulling out the plug or by switching the set off.
During long absences the TV should be switched off. This extends the lifetime of the
screen and saves energy.
2.3.2 Disposal
The packaging material used for your TV consists entirely of recyclable materials. Please
sort the components appropriately and dispose of them in line with your local waste disposal
regulations .
At the end of its useful life span, this receiver may not be disposed of with your regular
household waste. It must be taken to a recycling collection point for electrical and electronic
equipment.
This is indicated by the
symbol on the product, the operating manual or the packaging.
7
EN
Any necessary repairs to the receiver should only be carried out by qualified personnel.
Important instructions
The materials can be re-cycling in accordance with their labelling.
By ensuring that valuable raw materials are re-used you can make a valuable contribution
towards protecting our environment.
Please contact your local authority for the location of the nearest recycling point.
Please ensure that flat batteries removed from the remote control and electronic waste are
not sent to your regular household refuse site, but are correctly disposed of either in special
bins for problem waste, or at collection points in the retail trade.
2.3.3 Power consumption in Standby and during operation
The TV’s power consumption in standby and during operation depends on the settings you
select, the functions you use and the devices inserted/attached such as CI modules or USB
storage media.
Thus you can reduce power consumption during operation by e.g. only inserting/attaching CI
modules and USB storage media if they are actually going to be used. Power consumption
during operation is also influenced by the selected picture mode and backlighting setting
(Main menu > Settings > Picture Settings). The higher the backlighting is set, the
higher the power consumption too.
As the TV is not fully in standby mode during the automatic software download (Main
menu > Settings > Service Settings > Software Update) for the relevant period,
power consumption can be reduced by disabling this function. Power consumption is also
influenced by the standby clock and fast start functions.
8
Remote control
EN
3 Remote control
3.1 Changing the battery
>
Open the cover on the battery compartment at the rear of the remote control by
pushing it in the direction of the arrow and then lifting it off.
>
Insert the supplied batteries, ensuring that the poles are the right way around
(indicator visible in battery compartment).
>
Close the battery compartment again.
3.2 Remote control code
By switching over the remote control option it is possible to use this remote control to
operate a TechniSat television and two TechniSat receivers using the same coding.
>
Hold down the remote control code button to switch over the remote control option
and press the OK button as often as necessary until the LED for the desired remote
control option (TV, SAT1 or SAT2) flashes briefly.
The currently set remote control code will be displayed, as the appropriate LED
flashes, while pressing a button.
9
Connecting
4 Connecting
a Connecting the satellite antenna using the LNB input.
b Connecting the cable connection (digital and/or analogue) or the DVB-T antenna to the
antenna input on the television.
c Connecting the television to a BluRay/DVD player using an HDMI cable or a cinch
components cable with the cable adapter.
d Connecting the digital audio output to Hi-Fi stereo equipment or surround sound equipment.
a
b
TV/Radio
c
d
BluRay / DVD
10
Connecting
EN
The following references a b c d refer to the example connection on page 10.
4.1 Satellite antenna
a
Connect LNB input 1 on the TV to your external unit using a suitable coaxial cable.
4.2 Antenna/cable connection (analogue and digital)
b
Connect the antenna input for the LCD TV to either a terrestrial antenna or to the
connection socket for the cable or antenna connection.
Use the TechniSat DVB C/T Switch (Part No. 0000/3263) for simultaneous
reception of DBV-T signals and DVB-C plus analogue cable channels. This switch
automatically switches between DVB-T reception and reception of DVB-C and
analogue cable channels, thus preventing potentially conflicting frequency influences.
4.3 BluRay/DVD player
c
Connect your BluRay/DVD player using an HDMI connection cable
with an HDMI connection.
4.4 Surround sound/Hi-Fi amplifier
You can connect the LCD TV to a surround sound or Hi-Fi amplifier to obtain the best
possible sound quality.
d
If your amplifier has an appropriate electrical input (S/P-DIF), connect the Audio
output digital electrical to the input on your amplifier.
Depending on the broadcaster concerned, the stereo signal (PCM) and, where
broadcast, Dolby Digital signal (AC3) are available.
4.5 Mains power connection
>
TechniVision 22 HD
The TV should only be connected to the mains power supply using the adapter after
cable connections to the associated components have been fully set up. This will avoid
damage to the TV or other components.
Connect the mains adapter pin connector to the DC socket (see page 2 #5).
>
Then attach the mains cable to the adapter and connect it using a 230 V / 50 Hz plug.
TechniVision 26 / 32 HD
The TV should only be connected to the mains power supply using the adapter after
cable connections to the associated components have been fully set up. This will avoid
damage to the TV or other components.
>
To do this, attach the mains cable to the mains power connection (see page 3
#10) and connect it using a 230 V / 50 Hz plug.
11
Basic operation
5 Basic operation
Dear Customer,
the following section starts by covering basic operation as well as recurring operating
steps for the TV. This should make it easier to read the instruction manual, since it avoids
repeated description of identical steps at each individual stage.
The so-called "On Screen Display" is used on your television. This simplifies operation of
the television since the buttons on the remote control can take on different functions, which
makes it possible to reduce the number of buttons.
In this On Screen Display (OSD for short) the selected functions or settings are highlighted.
Furthermore, you will see a line at the lower edge of the screen in which the various buttons
on the remote control are shown with their current functions.
In this instruction manual the terms shown in the OSD as well as the buttons to be
pressed are highlighted from the rest of the text by the display format used.
Warning - indicates an important note which you absolutely should observe in order to
avoid problems with the television, loss of data or unwanted operation.
Tip - indicates a note about the function described as well as other functions
associated with it and any others to be observed with reference to the respective place
in the instruction manual.
5.1 Switching the television on/off
>
When the TV is on standby, you can switch it on by pressing the On/Standby button.
>
When operating normally you can switch the TV to standby mode by pressing the
On/Standby button.
When switching the TV on/off, also observe point 7.1 and points 7.1.1 - 7.1.4 as well
as the instructions given under these points.
12
Basic operation
The following example will illustrate how you reach the main menu and call up a submenu.
The objective of the example is to call up the Picture settings menu.
>
Press the Menu button. The main menu appears on the screen.
>
Select the Settings menu item by moving the highlight over this item using the
arrow keys.
>
Press the OK button to open the Settings menu.
13
EN
5.2 Calling up the main menu and navigating through the menus /functions
Basic operation
>
Use the up/down arrow keys to highlight the Picture settings item.
>
The Picture settings menu is opened by subsequently pressing the OK button.
You can also highlight the individual menu points in the same way as you highlight an
item on a submenu to open it and alter the respective settings.
The menu items in some menus have to be highlighted by moving sideways. This is
done by pressing the right/left arrow keys.
By pressing the up/down arrow keys it is possible to move the highlight from line to
line and to move upwards and downwards page by page using the page up/down
buttons.
You will see the so-called menu path in the uppermost line of the menu. This shows
you the menu you are currently in and the path you took to reach this menu. In the
example shown this is Main menu > Settings > Picture settings. The menu
path is also shown throughout the instruction manual and shows you how you can
reach the respective menu with the settings described.
If the blue function key with Help is displayed in the bottom line on the screen, a
Help page can be displayed by pressing this button and hidden by pressing it again.
14
Basic operation
In some menus and functions the changes made must be accepted manually in order to
save them permanently. If this does not happen, the values that existed before leaving the
menu or the function will be reset automatically.
If an Accept field or the green function key with Accept is displayed in the bottom
line of the screen, you can see that the changes made must be saved manually to
be accepted.
>
By highlighting Accept using the right/left arrow keys and confirming with the
OK button or by pressing on the green function key (Accept), the changes are
saved and you return to the next menu level up.
Alternatively:
>
Press the Back button.
A request appears asking whether the changes you made should be applied.
Use the right /left arrow keys to highlight Yes or No and confirm with the OK
button.
According to your selection the changes are now saved or rejected and you return to
the next menu level up.
Alternatively:
>
>
Press the Menu button to leave the menu directly.
The settings that need to be saved manually will be reset in this case.
If the green function key with Accept is not displayed in the bottom line of the
screen, the changes are saved automatically when leaving the menu.
5.4 Changing a setting
You can create settings using the arrow selection method, the selection list, by
entering numbers and by using the virtual keyboard. The television dictates the
method that can be used to alter a marked setting. You can see this from the following
displayed symbols:
-
Arrow selection method (Point 5.4.1)
Arrows are shown on the left or right edge of the marking.
-
Selection list (Point 5.4.2)
The symbol is shown on the right edge of the marking.
-
Entering numbers (Point 5.4.3)
-
Virtual keyboard (Point 5.4.4)
The symbol is shown on the right edge of the highlight.
15
EN
5.3 Accepting settings / Exiting menus and functions
Basic operation
5.4.1 Arrow selection method
>
If is shown on the left and on the right next to the set value, you can alter this using
the left/right arrow keys.
5.4.2 Selection list
If
is shown on the right next to the set value, the value is changed using the selection list.
>
Press the OK button to open the selection list.
>
Highlight the setting you want using the up/down arrow keys.
>
By pressing the up/down arrow keys it is possible to move the highlight from
line to line and to move upwards and downwards page by page using the page
up/down buttons.
Confirm by pressing on the OK button. The selection list is closed again and the
selected setting is shown in the menu.
16
Basic operation
Enter the new setting you want using the numeric keypad key if a question
or a number value
or
is shown inside the highlight.
mark
>
Note the number of digits used in the entry as there must always be the same number
used. This means that if a five-digit value is required, for example “10600", but you
only wish to set a four-digit value, for example “9750“, then you must enter a “0” at the
beginning for every unused location. Therefore, in this example, it would be necessary
to enter “09750”.
5.4.4 Virtual keyboard
If is shown on the right next to the set value, the value is amended using the virtual
keyboard. You have three different keyboard options when using this data entry method.
You can switch the keyboard layout between the so-called QWERTY keyboard and the
alphabetic keyboard; an SMS keyboard can also be used at any time.
The functionality of the QWERTY keyboard is identical to that of the alphabetic keyboard.
They only differ in the arrangement of the various letters, numbers, characters and symbols.
>
Press the OK button to open the virtual keyboard.
The keyboard now appears in the alphabetic format.
>
You can switch to the QWERTY keyboard and back to the alphabetic keyboard by
pressing the Option button.
You can now enter the term you want as follows.
Arrow keys:
Moves the highlight on the keys of the virtual keyboard.
OK:
The highlighted character is added to the end of the term, or
the highlighted function is executed.
/ Yellow function key: The keyboard switches between upper case/lower case.
:
/ Red function key:
Pressing/holding down deletes the character in front of the
orange highlight/the whole entry.
/ Green function key:
The entered term is accepted.
/ Blue function key:
The keyboard switches over to the alternative characters.
Moves the orange highlight within the term.
17
EN
5.4.3 Entering numbers
Basic operation
The SMS keyboard is operated using the numeric keypad key on both the alphabetic
and the QWERTY keyboard and can be used at any time. Therefore the coloured buttons
incorporate the functions described above.
>
Press one of the numeric pad keys 0 - 9 and select the various letters, numbers,
characters and symbols.
The first letter of the respective row of characters is highlighted after first pressing a
numeric keypad key.
>
The highlight then moves one field to the right for every additional press of the same
numeric keypad key.
Press as often as necessary to reach the desired character. This will be added to the
entered term after a short delay.
The various numeric pad keys are assigned the following displayed letters, numbers,
characters and symbols.
0:
1:
2:
3:
4:
5:
6:
7:
8:
9:
Once you have reached the field you want with the highlight, you can then begin
selecting the next character immediately since, in this case, the character is directly
added to the term.
If you wish to continue directly selecting a character from the same numeric
keypad key, you can add the previously highlighted character to the term by
pressing the right arrow key.
18
Basic operation
You have the option in some menus and operating modes (e.g. TV mode, music/images
playback etc.) to call up additional functions and options using option selection.
>
Pressing the Option button opens the option selection in the lower right-hand corner
of the screen.
In this example we can see the option selection for the channel list.
>
Every additional press of the Option button moves the highlight down one line each time.
Some options are selected directly in this window. Other options for a number of
subordinate selection options are located in the option groups. Highlighting one of
these option groups automatically opens another window on the left.
>
You can use the up/down arrow keys within the option group to highlight one of
the options listed in there.
By pressing the up/down arrow keys it is possible to move the highlight from line to
line and to move upwards and downwards page by page using the page up/down
buttons.
>
The highlighted option is selected by pressing the OK button and you exit the option
selection area.
>
If you do not want to select an option or wish to leave the option selection area without
making any changes, simply press the Option button until it is hidden.
19
EN
5.5 Option selection
Initial installation
6 Initial installation
On initial installation of the TV, the installation wizard starts AutoInstall automatically.
Using the installation wizard is the simplest way for you to create the most important
settings for your TV.
The initial installation process shown here serves merely as an example. The exact
process for the initial installation will depend on the settings you select. Therefore
please follow all instructions displayed on screen carefully.
Menu language
>
Use the up/down arrow keys to highlight the menu language you want and
confirm by pressing the OK button.
The preferred audio language will be set automatically according to this selection.
Country selection
>
Using the up/down arrow keys select the country in which the television will be
operated and confirm by pressing the OK button.
Automatic setting of the local time as well as changing to summer/winter time will take
place based on your selection.
Channels will also be automatically sorted in the installation wizard according to this
setting as well following a channel search.
20
Initial installation
EN
Display mode
>
Use the up/down arrow keys to select your preferred display mode and confirm by
pressing the OK button.
The values preset by the selected displayed mode can be adjusted as you want after
AutoInstall, in the main menu under Settings > Picture settings.
When selecting the intensive display mode, note the message(s) that appear and
confirm by pressing the OK button.
Selection of reception signals
>
Use the up/down arrow keys to select the available reception signals.
DVB-S
for digital satellite channels
DVB-C
for digital cable channels
DVB-T
for digital terrestrial channels;
Analogue CT for analogue terrestrial and cable channels.
>
Use the right/left arrow keys to indicate whether you wish to use the highlighted
reception signal (On) or not (Off).
>
Confirm by pressing the OK button.
21
Initial installation
Antenna configuration (DVB-S)
In this step of the installation you can adjust your TV setup to the configuration of your
satellite antenna.
If the DVB-S source has been deactivated, this page of the installation wizard does not
appear; you are taken directly to the “Antenna configuration (DVB-T)” page instead.
>
Press the OK button to accept the default antenna setting and continue with the
“Antenna settings (DVB-T)” section.
>
If the configuration of your reception equipment does not match the default setting,
you can open the antenna configuration by pressing the Option button and adjust the
setting on your reception equipment.
Antenna configuration (DVB-T)
A channel spectrum with the signal levels of the various channels is displayed in this step, in
order to align the DVB-T antenna for the best reception.
The “Channel search / ISIPRO” appears immediately if DVB-T has been deactivated.
>
Use the right/left arrow keys to switch the voltage supply on or off.
>
Press the OK button to accept the setting and access the next stage of the
installation wizard.
22
Initial installation
You have various options for searching for new channels or updating the channel list. You
can use the ISIPRO service list function to download a new satellite channel list for your TV
from the satellite or run a channel search.
>
To download the available current channel list, use the up/down arrow keys to
highlight the ISIPRO - service list update line and start the process by pressing
the OK button.
>
If instead of updating the channel list you want to run a channel search via satellite, or
the DVB-S reception signal has not been configured, use the up/down arrow keys
to highlight the All channels or All unencrypted channels field, then start the
channel search process by pressing the OK button.
>
If you do not want to start either the service list update or a channel search, you can
skip this step by pressing the Info button.
The ISIPRO - service list update item can only be selected if you have activated
the DVB-S source in "Selecting the reception signals”. After the service list
update, an automatic channel search on all other configured reception sources is then
carried out via “All Channels”.
When using All channels, free-to-receive and encrypted channels are searched for;
when using All unencrypted channels only free-to-receive channels are
searched for.
During the channel search the reception areas you have selected area automatically
scanned for channels. This procedure may take several minutes. Please note all
messages displayed on screen.
If you skip the channel search/service list update, the factory channel list is loaded, as
long as DVB-S has been configured in “Selecting the reception signals”. In this
event no channels for other sources are available. However, you can run a channel
search at any time in the main menu under Channel search.
23
EN
Channel search / ISIPRO DVB-S only
Initial installation
Regional programmes
Some broadcasters transmit channels with varying regional content. On this page you can
define your preferences for these regional channels.
>
Using the arrow keys highlight the channel provider for the preferred regional
programme you wish to set up and select this using the selection list.
If you subsequently select another regional programme for a programme provider as
per point 7.2.4, this will be saved in the same way for this programme provider.
Software update
>
If you do not want to wait for a search for new software or a software download, you
can, if necessary, skip this step by pressing the Info button.
>
If there is no new TV software available, you can press the OK button to go to the
next step in the installation wizard.
>
If, on the other, new TV software is found, the automatic software update can be
started by pressing the OK button.
24
Initial installation
Your TV has the SFI (SiehFernInfo) electronic programme guide. To enable the data for the
electronic programme guide to be displayed, it must first be downloaded.
To do this, your TV automatically starts downloading the SFI data as soon as any software
updating has been completed. This process can take up to 30 minutes.
>
If you do not want to wait for the SFI data to be downloaded, you can skip this process
by pressing the Info button.
If the SFI update has been skipped, your TV will download the SFI data automatically
at the set time, as long as the function remains activated and the TV is also
in standby mode at that moment. Additionally you can run the update manually at any
time, in the main menu under Settings > Programme guide.
Exiting the installation wizard
>
Confirm the final message from the installation assistant by pressing the OK button.
25
EN
Loading SFI data
Operating the unit
7 Operating the unit
7.1 Switching the TV on and off
7.1.1 Switching on using the mains power switch on the TV
(only with the TechniVision 26/32 HD)
>
Switch the TV on by pressing in the mains power switch (see page 3 #9).
The TV now performs an initialisation and cannot be operated during this time. This
process takes several seconds to complete.
7.1.2 Switching on from standby mode
>
Switch the TV on by pressing the On/Standby button or the Channel +/- keys or a
numeric key between 0 and 9 on the remote control.
The operating mode is displayed by the green LED, where this is activated in the main
menu under Settings > Basic settings.
If the user-dependent parental control (TechniFamily) is activated, the user selection
now appears as per point 7.1.3 in the quick start manual.
7.1.3 Switching off to standby mode
>
Switch the TV off by pressing the On/Standby button.
When switching off the TV, please note that a check takes place as to whether a new
operating software version or channel list is available. This process takes several
seconds to complete. The LCD panel is already switched off during the test.
The device switches completely into standby mode after completion of the test. The TV
is now in standby mode and can be completely switched off using the mains power
switch. The LED lights up red in standby mode or the time appears in the display,
where this is activated in the main menu under Settings > Basic settings.
7.1.4 Switching off using the mains power switch on the TV
(only with the TechniVision 26/32 HD)
>
The television is switched off completely by pressing the mains power switch.
If this is the case, neither automatic software and SFI data updates nor recording or
alarms will function.
The TV notes the last 'On' or 'Off' switching status entered using the remote control.
If the TV was switched off at the mains power switch during operation, it is switched
straight back to standby mode by pressing the mains power switch.
If a power failure took place during operation, you should switch off the television using
the mains power switch so that it is not switched on again unintentionally as soon as
the power is available again.
26
Operating the unit
7.2.1 Using the channel up/down buttons
>
You can switch between channels one at a time using the Channel +/- buttons on
the remote control or on the TV.
7.2.2 Using the numeric pad keys
>
Use the numeric keypad keys to enter the number of the channel you want.
For example:
1
for channel slot 1
1, then 4
for channel slot 14
2, then 3,
then 4
for channel slot 234
1, then 2,
then 4,
then 5
for channel slot 1245
When entering channel numbers with several digits, you have approx. three seconds
after pressing a key to complete the entry.
If you wish to enter a one, two or three-digit number, you can accelerate the switching
process by holding down the last digit for longer, or by pressing the OK button.
7.2.3 Using the channel list
>
Press the OK button.
The TV channel list appears in television mode and the radio channel list in radio
mode. The channel currently selected is highlighted.
>
You can view additional data about the current programme by pressing the Info button.
7.2.3.1 Selecting the channel
>
You can now highlight the channel you want using the up/down arrow keys, the
page up/down keys and the numeric keypad keys.
>
Exit the Navigator by the pressing the OK button; the highlighted channel is displayed
on the screen.
27
EN
7.2 Selecting a channel
Operating the unit
7.2.3.2 Selecting a list
To make it easier for you to find channels, your receiver provides various channel lists. You
can select your favourites lists or display the channels sorted alphabetically from the
list of all channels, the TV provider lists or according to genre.
>
Press the OK button to open the active channel list.
>
You can now use the option selection to select the channel list you want (TV list,
All Channels, TV provider lists and Tv genre lists).
>
Highlight the channel you want to watch as described under point 7.2.3.1 in the quick
start manual and confirm by pressing the OK button.
7.2.4 Selecting a regional programme
During the initial installation you selected your preferred regional programmes. If you
now pick one of these regional programmes, a note appears stating that further regional
programmes are available for selection.
>
Using the option selection you can select between the various regional
programmes under the Region item.
The selected regional programme is now stored as a preferred regional programme
from this programme provider.
7.2.5 Switching between TV/radio
>
You can use the TV/Radio button to switch between TV and radio mode.
The TV switches to the last radio channel listened to.
Alternatively you can also switch between TV and radio operation as described under
point 7.3 in the quick start manual.
To do this also note the setting for OSD Radio/Music in the main menu under
Settings > Special Functions > OSD.
28
Operating the unit
>
Press the AV button to open the AV sources selection window to select a device
connected to the HDMI inputs (HDMI 1/2), component input (YPbPr), Scart socket
(EuroAV), VGA port (VGA), video port (Video) or S-Video port (S-Video).
>
Select the source you want using the up/down arrow keys and confirm by
pressing the OK button to switch over to the selected input.
To do this also note points 7.2.1 and 7.2.3 in the quick start manual.
7.4 Channel/Source information
7.4.1 Infobox
An Infobox appears on the screen for the set period every time you change channels.
The channel slot and name as well as the source of the channel selected, the channel list in
which the channel is located and the title of the current programme with the start/end time
and the progress bar, as well as further channel information (e.g.
for teletext,
for 16:9
transmissions,
for subtitles,
for encrypted channels or
for Dolby Digital broadcasts)
are shown in this Info box.
The progress bars are coloured yellow according to the amount of transmission time
already expired for the current programme. If the beginning of the progress bar is coloured
red the transmission started too early and if the end of the progress bar is coloured red the
current programme has overrun.
The current time is shown in the upper right-hand corner of the screen.
7.4.2 Displaying the clock and channel information
This function allows you to see channel information about the channel being watched.
>
Pressing the Info button allows the information mentioned in point 7.4.1 of the
quick start manual to be displayed again for the set period.
29
EN
7.3 AV source
Operating the unit
7.5 Receiving encrypted channels
>
Insert a CI-/CI+- module with the upper side pointing to the rear in the slot.
>
Insert the smartcard into the CI / CI+ module card slot.
7.5.1 Smartcard PIN code
With encrypted channels, programmes that are not suitable for children can be pre-blocked
by means of a parental control code/symbol. To unblock the specific programme it is
necessary to enter the Smartcard PIN code stored on the Smartcard.
>
To release the programme use the numeric keypad keys to enter the 4-digit
Smartcard PIN code.
7.6 Volume control
After switching on the television sound is produced according to the power-on volume set
using the sound settings menu.
>
To adjust the volume of your TV, press Volume + to increase the volume, and
Volume - to decrease it.
7.6.1 Using mute
>
To switch the sound off (mute), press the Sound on/off button - press the key again
to switch the sound back on.
7.6.2 Headphone volume
>
While the sound is muted it is possible to operate the Volume + and Volume rocker keys to adjust the headphones volume.
7.7 Selecting a different language / sound option
For some channels you have the option of selecting a different sound option (Dolby Digital,
Stereo or Audio Channel 1 or Audio Channel 2) or another language.
>
Using option selection you can select the language/sound option you want via the
Audio option.
>
If is displayed in the highlight, you can press the Audio channel button to switch
between Stereo
, Audio channel 1
and Audio channel 2
playback.
30
Operating the unit
You can use the display mode selection option to switch between the preset display modes during
actual operation: natural (home use), intensive (presentation), movie (cinema) and
PC (graphic), as well as the fully customisable user-defined display mode.
>
You can select the display mode you want using option selection under the
Display mode menu item.
7.9 Subtitles
When switching to a programme being broadcast with subtitles, the subtitles symbol
appears in the Info box.
>
Using the option selection, under the Subtitles menu item, you can select
Subtitles when you want to display them.
7.10 Teletext
Your TV can display teletext information on channels that broadcast teletext data. This is
symbol in the Info box.
displayed by the
7.10.1 Switching teletext on/off
>
Press the Teletext button to switch on teletext for the currently selected channel
along with its overview page.
>
You can exit teletext by pressing the Teletext button again.
7.10.2 Page selection
>
Use the numeric keypad keys 0 to 9 to enter the 3-digit page number of the
teletext page you want.
>
Press the red, green, yellow or blue function keys to call up the teletext page
displayed in it.
31
EN
7.8 Display mode
Operating the unit
7.11 Format switchover / Zoom
>
By pressing the Zoom/Format key you can switch between the various predefined
formats (original, optimum, optimum 16:9, full zoom and stretch).
The display format selected is displayed at the lower edge of the screen.
>
To hide the format switching screen, press the Back button.
7.12 Freeze frame
>
The television picture is displayed as freeze frame by pressing the Freeze frame button.
>
Freeze frame is ended by pressing this button again; normal playback appears on the
television screen again.
The sound will continue to be reproduced normally during freeze frame.
7.13 Sleep timer
You can set the switch-off time of your TV using the sleep timer.
>
You can set the sleep timer by pressing the Sleep timer button multiple times (15
minutes to 2 hours), or switch it off.
You will see a display on the screen depending on the setting.
7.14 Function Selection
>
You can open the Navigation menu (NAV menu) to select the function you want by
pressing the function selection button.
TV
TV mode: Internal receiver and external connections.
Radio
Radio mode: Internal receiver and external connections.
Movies/DVR Movies/DVR Navigator: Access MPEG2 titles, VOB, TS or TS4 files
stored on a device connected to the USB port.
Music
Music navigator: Access MP3 titles stored on an attached USB device
and available radio DVR recordings.
Pictures
Pictures navigator: Access JPG files stored on an attached USB device.
32
Operating the unit
Your TV has "SiehFern Info" electronic programme information. You can use this to display
programme information for a single or a number of digital channels on the screen and to
obtain a very quick overview of the current programmes, or programmes being broadcast
that day, or on the following days.
>
Press the SFI button to call up the electronic programme guide.
The electronic programme guide is displayed, using the selected start category.
The Overview start category is selected in the factory settings.
4
1
5
2
6
3
1
Viewing time > indicates when programmes are to be shown. Time line > a graphical
display of the viewing time in the form of progress bars.
2
Channel name with the corresponding channel slot within the active favourites list.
3
Progress bars or the start/stop time of the programme being shown.
4
The current date and the time.
5
Shows that there is further information available about the broadcast.
6
Programmes on the channel being shown.
>
You can access the various SFI views and functions using the option selection as
well as via the assigned function key located at the lower edge of the screen.
>
You can switch the display time back and forth or move the highlight using the right/
left arrow keys, the up/down arrow keys and the page up/down buttons.
You can exit the electronic programme guide again by pressing the SFI button.
>
33
EN
7.15 SFI programme information guide
Operating the DVR
8 Operating the DVR
The DVR function (DVR=Digital Video Recorder) means you no longer have to use an
external recorder (e.g. video or DVD recorder) to record programmes, as you can use this
function to record them to an attached USB storage device.
The recording capacity thus depends on the volume of data in the broadcast material and
the size of the attached storage medium.
DVR recordings of channels from DVB-S, DVB-C and DVB-T sources can be made.
To do this be absolutely sure to observe the notes and settings under point 8 in the
quick start manual.
8.1 DVR recording
The following recording modes are available for DVR recording:
1. Instant recording
Select this type of recording to immediately record the programme currently being broadcast
at the push of a button.
2. Timer-controlled recording
This function is used to ensure that your television is switched on and off again for the
selected broadcast to make a recording, for example when you are out. You can do this by
programming the timer either manually or automatically, using the SFI.
3. Timeshift recording
Timeshift recording enables time-shifted TV viewing. You can start to play back a
programme while it is still recording (= time-shifting).
8.1.1 Instant recording
>
Switch on the channel/source you want to record and press the Record button to
record the current programme.
The programme will continue to be played on the screen while the recording is running.
>
Press the Pause / Playback button to play back the current programme from a
particular point.
>
To continue playing back the programme from this point, press the Pause /
Playback button again.
8.1.2 Timeshift recording
>
If you are watching a programme and are interrupted, for example, by a telephone call,
you can press the Pause / playback button to pause the programme and to start
recording it at the same time.
>
To continue playing back the programme from this point, press the Pause /
Playback button again.
You are now watching the programme with a time delay to the live broadcast
(Timeshift), while the programme continues to be recorded in the background.
34
Operating the DVR
>
Pressing the Stop button causes an enquiry to appear as to whether the recording
should be saved or discarded.
>
Select Save to save the recording, or Discard not to save the recording, or Back to
continue with the recording.
8.1.4 Ending recording automatically
>
Pressing the record button causes a window to open containing all available
functions.
>
You can, for example, select +1 hour for which the TV should continue to record the
channel and then automatically stop recording.
8.1.5 Timer recordings
You can use the DVR timer to automatically record programmes to an attached USB storage
device when you are out, for example. To do this, timers can be programmed in the main
menu under Timer organiser.
8.2 DVR playback
You can access your DVR recordings using the DVR Navigator.
8.2.1 Calling up the DVR Navigator / Starting DVR playback
Depending on whether you are in TV or radio mode, a list appears with all the TV or radio
recordings present on an attached USB storage medium.
>
You can access the DVR Navigator by either pressing the DVR mode key or
selecting the Movies / DVR menu item in the function selection and then
selecting the My Recordings folder.
>
Highlight the recording you want and confirm with OK to begin playback.
The broadcast information can be displayed and hidden by repeatedly pressing the
Info button.
35
EN
8.1.3 Ending manual recording
Operating the DVR
8.2.2 Pause/freeze frame
>
To pause playback of a recording (Freeze frame), press the Pause / Play button
during playback.
>
Press this button again to resume playback.
8.2.3 Fast forward/rewind
Your DVR has fast forward/rewind functions so you can get to a specific place in a recording.
>
Press the Fast forward or rewind button during playback. XX or WW appears in
the previously mentioned small Infobox. The recording is played back at 4x speed in
the selected direction.
>
If you press the Fast forward or Fast rewind button again, the speed will increase
to 16x and the message “XXX” or “WWW” appears.
>
If you press the Fast forward or Fast rewind button again, the speed will increase
to 64x and the message “XXXX” or “WWWW” appears.
>
Pressing the Fast forward or Fast rewind button again causes you to jump
forwards or backwards in 10 minute increments.
>
When you get to the place you want in the recording, you can return to normal playing
mode by pressing the Play / Pause button.
8.2.4 Jogshuttle function
To quickly and accurately navigate to a position in the recording, your receiver also has a 'jog
shuttle' function. This is used as follows:
>
During playback press the Jogshuttle button (freeze frame) to access jogshuttle mode.
Playback of the recording is halted (freeze frame) and “XII” is displayed in the Infobox.
8.2.5 Skipping to tags
During playback you have the option of navigating directly to locations in the recording where
you have set tags.
>
Using the option selection under the Tag menu item, select the tag to skip to the
location you want in the recording.
8.2.6 Ending playback
>
Press the Stop button to end playback.
Playback will end and your TV will return to TV mode. In doing so the television "notices"
the place in the recording where playback ended. If you start playing this recording back
again, it will automatically resume at the point where you previously left off.
36
EN
37
Guarantee
5
TechniSat
Guarantee
Years
Guarantee
Dear Customer,
You have purchased a high quality TechniSat product that has been put through multiple quality tests and a stringent
goods outwards check at every stage. Should you still encounter a problem with your equipment, contrary to
expectations, you can always take advantage of a two-year legal warranty claim. This warranty claim can of course
be exercised at any time without having registered the product. However, from the seventh month after the date
of purchase, under legal provision, the obligation is on you to prove that the problem with the equipment already
existed at the time of purchase. But TechniSat is offering you another solution. By submitting a fully completed and
signed TechniSat registration card, your two-year legal warranty claim is converted into a three-year guarantee.
You will then receive an additional two-year parts guarantee - excluding screen, remote control and housing parts.
This releases you from your legal obligation to prove that the item was faulty, for a period of five years from the
purchase of your equipment (based on the billing date). In the event of a claim under warranty, you will receive - at
TechniSat's discretion - a free repair to your equipment or an as-new equivalent replacement device. To be sure of
enjoying your guarantee in full, make absolutely sure that only original TechniSat accessories (such as cables, plugs
etc) are used during installation.
Invalidation of the warranty claim
All warranty claims are invalidated if the equipment interior is accessed by anyone other than TechniSat or if the
equipment is modified (e.g. by hardware or software modifications). Service under warranty shall also not apply in
the event of damage caused by incorrect installation or improper use, or in the event that manufacturer's numbers
have been changed or rendered illegible, or mechanical damage has been caused by accident or impact. The guarantee
does not cover compensation or expenses, specifically not loss of data, e.g. channel lists that have been set up or
recordings on hard disks.
What to do in the event of damage
If you encounter a problem with your TechniSat equipment despite the ultra-modern manufacturing and constant
quality checking, we would ask you to first contact your dealer or our technical service department on +49 (0)
180/5 00 59 07 (0.14 euro/min from German landlines, other tariffs apply for calls from abroad or from mobile
networks). If we cannot solve the problem in this manner, we would ask you to contact your dealer or supplier.
Please make sure you complete and send off the registration card!
Or you can conveniently register online at www.technisat.com/garantie
38
The sum of all advantages · www.technisat.com
EN
Guarantee
Guarantee information
The guarantee can only be invoked if:
1. the fully completed registration card has been received by us no later than 4 weeks after
purchase, or you have registered the product online during this period.
2. you have first attempted to resolve the issue by contacting your dealer or our technical service department
at +49 (0)180/5 00 59 07 (0.14 Euro/min from German landlines, other tariffs apply for calls from abroad or
from mobile networks).
3. you have filled out the Service Report in full, including a precise description of the problem.
4. the defective equipment is returned to the vendor, including any accessories (e.g. network cables, remote
control etc), but not smartcards and CI modules (that are not included with delivery), in the original
packaging, along with a proof of purchase (copy of invoice or till receipt) and the completed Service Report.
The Service Report will be returned to you along with the repaired device with an appropriate comment
from our service workshop.
How to register your product
1) Online registration:
Just complete the guarantee form you
will find online at the TechniSat website
(www.technisat.com/guarantee) and
your product will be registered with
TechniSat.
2) Registration by post:
cut out the completed TechniSat registration card
along the dotted line, place in an envelope with
the appropriate postage affixed and send to the
following address (see right):
39
TechniSat Teledigital AG
- TechniSat Guarantee Nordstrasse 4 a
D-39418 Stassfurt, Germany
Service Report
in the event of a claim under warranty
If you encounter a problem with your equipment despite the ultra-modern manufacturing and constant quality checking, we would
ask you to first contact your dealer or our technical service department +49 (0)180/5 00 59 07 (0.14 euro/min from German
landlines, other tariffs apply for calls from abroad or from mobile networks). If we cannot solve the problem in this manner,
we would ask you to contact your dealer or supplier. If you do so, please complete the following Service Report beforehand.
Service Report
Note
Serial No.:
These fields must be completed.
Item number:
The serial and item numbers are located on the
back of the box or directly on the equipment.
/
Surname:
First name:
Street:
Post code:
City/town:
Telephone:
optional
✂
TechniSat
(please cut here)
5
registration card
Guarantee
Years
5-year guarantee
By submitting a fully completed and signed TechniSat registration card, your two-year legal warranty claim is converted into a threeyear guarantee. You will then receive an additional two-year parts guarantee - excluding screen, remote control and housing parts.
Hence you are released from your legal obligation to prove that the item was faulty, for a period of five years from the purchase of
your equipment (based on the billing date). In the event of a claim under warranty, you will receive - at TechniSat's discretion - a free
repair to your equipment or an as-new equivalent replacement device.
Surname:
First name:
Street:
Post code:
City/town:
Telephone:
optional
(for any questions)
Email:
optional
TechniSat
Dealer No.:
Date of purchase:
to be completed by the dealer, where
registration is carried out in the dealership
40
EN
Service Report
in the event of a claim under warranty
Description of fault
Please briefly explain the problem with your equipment
Please note that a repair under guarantee can only be carried out quickly and smoothly if this Service Report is completed in full
and submitted with a proof of purchase (delivery note, invoice, till receipt etc), the defective equipment in the original packaging,
including all accessories (e.g. network cable, remote control) and a precise description of the problem. The Service Report will be
returned to you along with the repaired device with an appropriate comment from our service workshop.
✂
TechniSat
registration card
(please cut here)
This field must be completed so that
service under warranty can be provided!
The serial number is located on the back
of the box or directly on the equipment.
Serial No.:
Purchased at:
Important: Tick to register
Yes I want to convert my two-year legal warranty claim into a five-year guarantee (three-year guarantee plus two-year
parts guarantee - excluding screen, remote control and housing parts) and in doing so consent to the use of my address
for the purposes of TechniSat communications via post.
Yes, I want to receive communications via email as well (optional).
Date, Signature
Note
By signing here you declare your consent for TechniSat Digital GmbH to use your address for its own communications by post or
email and give permission to contact you. Your data will not be forwarded to third parties. You can rescind your consent at any time
by writing to TechniSat Digital GmbH, TechniPark, D-54550 Daun/ Vulkaneifel, Germany (for the attention of the Data Protection
Officer) or by emailing [email protected].
The two-year legal warranty claim can only be converted into a five-year guarantee (three-year guarantee plus two-year parts
guarantee - excluding screen, remote control and housing parts) by ticking the first consent box and signing the registration card.*
* The registration card must be received by TechniSat no later than four weeks after purchase of the equipment.
41
42
EN
43
Your receiver bears the CE symbol and complies with all requisite EU standards.
Subject to change for amendments and printing errors Version 04/11
Duplication and reproduction only with the publisher's approval
TechniVision 22 HD, TechniVision 26 HD, TechniVision 32 HD
and TechniSat are registered trademarks of
TechniSat Digital GmbH
PO Box 560
54541 Daun
www.technisat.com
Technical Hotline
Mon. - Fri. 8am - 7pm
+49 (0) 180/5 005907
(0.14 euros/min on the German line, telephone call charges
from abroad and from mobile phones will differ)
2239240000400