1
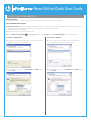
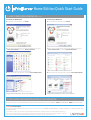
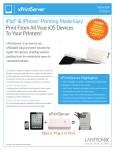
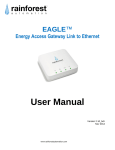
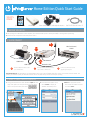
Home Edition Quick Start Guide
WHAT’S
inSidE
Home Edition Quick Start Guide
whAt’S
inSide
Home Edition Quick Start Guide
WhAt’S
inSide
Home Edition Quick Start Guide
WhAt’S
inSide
Quick Start guide
xprintServer
power adapter (5VdC) with regional adapters
rJ45 CAt5 ethernet Cable – 3'
1 BefOre
YOu
Begin
Before You
Begin
1 Ensure USB printer has been tested and functional before proceeding.
2 Internet
access
is requiredortomac
download
printer(from
drivers.
1. test printing
from
a Windows
computer
which the uSB printer is directly attached) is working before proceeding.
2. internet access is required to download printer drivers.
2 QuiCK COnneCt
3
Wireless Router/
Switch
1
USB Printer
2
USB Cable
1
Connect USB printer cable to USB
port of xPrintServer.
Network Cable
2
Connect network cable from wireless
router/switch to xPrintServer.
3
Power on the xPrintServer with
supplied power adapter.
3 hOW tO print frOm iOS deViCeS
1. using your ipad, iphone or other iOS device,
Open the web page, email, photo, etc. that you
wish to print and choose the icon to open the
native print menu:
2. from the printer Options menu,
choose Printer to display all available networked printers.
3. Select the appropriate printer.
then, select the number of copies
and choose Print.
Quick Start guide
xprintServer
power adapter (5VdC) with regional adapters
RJ45 CAt5 ethernet Cable – 3'
1 BefORe
YOu
Begin
Before You
Begin
1 Ensure USB printer has been tested and functional before proceeding.
2 Internet
access
is requiredortomac
download
printer(from
drivers.
1. test printing
from
a windows
computer
which the uSB printer is directly attached) is working before proceeding.
2. internet access is required to download printer drivers.
2 QuiCK COnneCt
3
Wireless Router/
Switch
1
USB Printer
2
USB Cable
1
Connect USB printer cable to USB
port of xPrintServer.
Network Cable
2
Connect network cable from wireless
router/switch to xPrintServer.
3
Power on the xPrintServer with
supplied power adapter.
Auto Set-Up Process: the xprintServer will automatically set-up your printers (uSB & network) as soon it is connected, as shown above. the
glowing “X” will blink quickly for about 30 seconds, then it will pulse slowly to show it’s ready for printing.
3 hOw tO pRint fROm iOS deViCeS
1. using your ipad, iphone or other iOS device,
Open the web page, email, photo, etc. that you
wish to print and choose the icon to open the
native print menu:
2. from the printer Options menu,
choose Printer to display all
available networked printers.
3. Select the appropriate printer.
then, select the number of copies
and choose Print.
Quick Start Guide
xPrintServer
Power adapter (5VdC) with regional adapters
rJ45 CAT5 Ethernet Cable – 3'
1 BEforE
YoU
BEGin
Before You
Begin
1 Ensure USB printer has been tested and functional before proceeding.
2 Internet
access
is requiredortomac
download
printer(from
drivers.
1. Test printing
from
a Windows
computer
which the USB printer is directly attached) is working before proceeding.
2. internet access is required to download printer drivers.
2 QUiCK ConnECT
3
Wireless Router/
Switch
1
USB Printer
2
USB Cable
1
Connect USB printer cable to USB
port of xPrintServer.
Network Cable
2
Connect network cable from wireless
router/switch to xPrintServer.
3
Power on the xPrintServer with
supplied power adapter.
Auto Set-Up Process: The xPrintServer will automatically set-up your printers (USB & network) as soon it is connected, as shown above. The
glowing “X” will blink quickly for about 30 seconds, then it will pulse slowly to show it’s ready for printing.
3 HoW To PrinT from ioS dEViCES
1. Using your iPad, iPhone or other ioS device, Open the web
page, email, photo, etc. that you wish to print and choose
the icon to open the native print menu:
2. from the Printer options menu,
choose Printer to display all
available networked printers.
3. Select the appropriate printer.
Then, select the number of copies
and choose Print.
Home Edition Quick Start Guide
4 HoW To PrinT from mAC oS
1. Go to System Preferences, Hardware and click on Print & Scan.
3. A list of printers appear. Select the printer you wish to add and
click on the Add button.
2. Click on the + button on the lower left corner
4. The printer is now added in your available list of printers and is
ready to print.
Home Edition Quick Start Guide
5 how to print from windows os
BEFORE YOU BEGIN
Ensure the USB printer is working and the printer drivers are installed on the computer before proceeding.
INSTALL BONJOUR PRINT SERVICES
1.Bonjour Print Services is an Apple application that allows discovery of printers connected to the xPrintServer from a Windows PC. Go to the
web address below to download and install Bonjour Print Services for Windows v2.0.2 or higher
http://support.apple.com/kb/DL999
2.Follow the prompts to install Bonjour Print Services
3.Find the Bonjour Printer Wizard
shortcut on your Desktop or in the Start/All programs menu and click to launch
Instructions for Windows XP
Instructions for Windows 7
4.The Bonjour Printer Wizard appears with a list of discovered printers.
Highlight the printer you wish to install.
4. The Bonjour Printer Wizard appears with a list of discovered
printers. Highlight the printer you wish to install.
5.Search and select your printer by manufacturer and model number
and click Next.
5. Search and select your printer by manufacturer and model number
and click Next.
Home Edition Quick Start Guide
5 how to print from windows os continued
Instructions for Windows XP
Instructions for Windows 7
6.To complete the installation, click Finish.
6. T o complete the installation, click Finish.
7.If you wish to configure the printer as the default printer go to:
Start, Control Panel and click on Printers and Faxes
7. If you wish to configure the printer as the default printer go to:
Start, Control Panel and click on Devices and Printers
8.Select the printer and right click and select Set as default printer
8. Select the printer and right click and select Set as default printer
Congratulations! Add printer setup is now complete.
Congratulations! Add printer setup is now complete.
6 For Custom Configuration & Product Documentation
Using a web browser log into the xPrintServer admin interface at xPrintServer.local with USER ID = admin and PASSWORD = PASS (both case sensitive)
Contact Technical Support
For technical support queries, visit http://www.lantronix.com/support or call (800) 422-7044 Monday – Friday from 6:00 a.m. – 5:00 p.m. Pacific Time,
excluding holidays.
© 2012 Lantronix, Inc. Lantronix, Inc. and Lantronix are registered trademarks, and xPrintServer is a trademark of Lantronix, Inc. All other trademarks are the property of
respective owners. Specifications subject to change without notice. iPad, iPhone, iPod, iPod classic, iPod nano, and iPod touch are trademarks of Apple, Inc., registered in
the U.S. and other countries. All other trademarks and trade names are the property of their respective holders. 900-627-R Rev A 06/12