Transcript
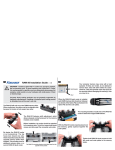
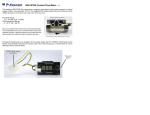
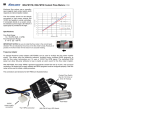
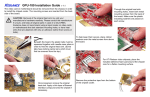
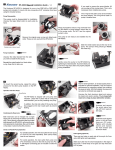
1
HD-55/57 Installation Guide
!
v 1.1
2
CAUTION - Koolance Hydra-Pak™ Coolers are puncture resistant,
but not puncture proof. To avoid rupturing your Hydra-Pak™ Cooler,
it is recommended to carefully cover any excessively sharp areas (for
example, solder points) on your hardware with small pieces of foam
or electrical tape.
There is a simple locking mechanism on the rear
side of the HD cooler to hold drives and the back
plate in place.
Upper drive unlocked
Rotate this latch horizontally in the appropriate direction
to remove a drive or the back plate individually.
Rotate this latch in a vertical position to lock both sides
of the cooling assembly (prior to case installation).
3rd-party liquid cooling products are not generally supported by
hardware manufacturers. Installing a Koolance liquid cooling product
is ultimately done at the user’s own risk.
Both drives locked
The HD-55 and HD-57 will cool one or two hard drives
simultaneously. Due to the nature of mounting this device,
it will not generally work with specialized hard drive trays.
Chassis with common side-mounted hard drive designs
(screws or rails) tend to be more compatible.
Install a hard drive by aligning the pegs with the
HD water block holes, pushing them down into
the cooler, and sliding the drive toward the cooler
nozzles.
Instead of screwing hard drives directly to the liquid
cooler, they are attached with pegs. These need
to be hand-tightened into each of the four bottom
screw holes on the hard drive. The pegs do not
need to be especially tight.
HD-55 Mounting Peg
HD-57 Mounting Peg
If you are using the HD cooler with one hard drive,
the back plate should remain on the rear side to
maintain contact pressure.
If you are cooling two drives with the HD cooler,
remove the back plate and mount the second
drive identically to the first (one will be installed
upside-down).
For the HD-55, rotate each
peg until the flatter portion is
facing toward the outside of
the hard drive. The HD-57 has
symmetrical pegs that do not
require any special alignment.
Single hard drive installed
1
HD-55/57 Installation Guide
!
v 1.1
CAUTION - Koolance Hydra-Pak™ Coolers are puncture resistant,
but not puncture proof. To avoid rupturing your Hydra-Pak™ Cooler,
it is recommended to carefully cover any excessively sharp areas (for
example, solder points) on your hardware with small pieces of foam
or electrical tape.
2
Dual hard drives installed
There is a simple locking mechanism on the rear
side of the HD cooler to hold drives and the back
plate in place.
Upper drive unlocked
Rotate this latch horizontally in the appropriate direction
to remove a drive or the back plate individually.
Rotate this latch in a vertical position to lock both sides
of the cooling assembly (prior to case installation).
3rd-party liquid cooling products are not generally supported by
hardware manufacturers. Installing a Koolance liquid cooling product
is ultimately done at the user’s own risk.
Both drives locked
The HD-55 and HD-57 will cool one or two hard drives
simultaneously. Due to the nature of mounting this device,
it will not generally work with specialized hard drive trays.
Chassis with common side-mounted hard drive designs
(screws or rails) tend to be more compatible.
Instead of screwing hard drives directly to the liquid
cooler, they are attached with pegs. These need
to be hand-tightened into each of the four bottom
screw holes on the hard drive. The pegs do not
need to be especially tight.
HD-55 Mounting Peg
HD-57 Mounting Peg
For the HD-55, rotate each
peg until the flatter portion is
facing toward the outside of
the hard drive. The HD-57 has
symmetrical pegs that do not
require any special alignment.
Install a hard drive by aligning the pegs with the
HD water block holes, pushing them down into
the cooler, and sliding the drive toward the cooler
nozzles.
If you are using the HD cooler with one hard drive,
the back plate should remain on the rear side to
maintain contact pressure.
If you are cooling two drives with the HD cooler,
remove the back plate and mount the second
drive identically to the first (one will be installed
upside-down).
Single hard drive installed
Dual hard drives installed