1
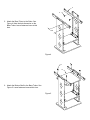
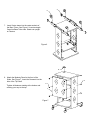
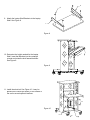
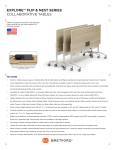
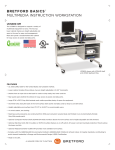
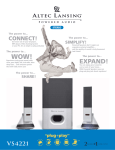
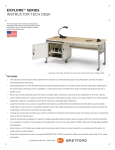
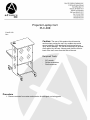
Projector Laptop Cart
PLC-38E
Form E-470
Rev.
Caution: The user of this product should exercise
caution when moving the cart. Any sudden stop could
cause instability of the stand and could cause serious
injury and/or damage. The cart should always be pushed,
never pulled, by the user. Always push from the front or
back of the cart, never from the side of the cart.
Required Tools:
-
3/8” wrench
Phillips screwdriver
Flat screwdriver
Procedure
1. Remove contents from carton and examine for damaged or missing parts.
2. The PLC-38E is a versatile cart with several assembly
options. This instruction sheet will guide you in
assembling the cart shown on the cover sheet. Determine
what your needs are and assemble according to your
plan. See Figure 1 for one assembly option.
Figure 1
3. It is easiest to assemble the cart upside down.
Lay the Top Shelf upside down and attach the
Sides. See Figure 2. The rectangles on the edges
of the Sides should face toward the large hole in
the Top Shelf. Leave fasteners loose at this time.
8
7
D
Figure 2
9
RECTANGLES
FACING HOLE
4. Pick a location for the Middle Shelf. Attach the
Middle Shelf Mounting Brackets to the Sides in
one of seven locations. See Figure 3. Attach
the Middle Shelf to the Mounting Brackets.
Note the hole dimensions on the underneath
side of the shelf. Leave fasteners loose at this
time.
C
3
Figure 3
4
D
11
5
F
5. Attach the Base Tubes to the Sides. See
Figure 4. Note the hole dimension on the
Base Tubes. Leave fasteners loose at this
time.
8.25
Figure 4
E
12
6. Attach the Bottom Shelf to the Base Tubes. See
Figure 5. Leave fasteners loose at this time.
Figure 5
6
A
7. Insert Caster stems into the caster sockets of
the Base Tubes. See Figure 6. Insert rectangle
Caps into Base Tube ends. Stand cart upright
on Casters.
Figure 6
B
8. Attach the Modesty Panel to the front of the
Sides. See Figure 7. Insert the Grommet into the
hole of the Top Shelf.
C
D
Tighten all fasteners starting at the bottom and
working your way to the top.
4
Figure 7
2
D
9. Attach the Laptop Shelf Brackets to the Laptop
Shelf. See Figure 8.
1
Figure 8
10. Determine the height needed for the Laptop
Shelf. Insert the Brackets into the rectangle
cutouts and rotate the shelf assemble down.
See Figure 9.
Figure 9
11. Install the electrical. See Figure 10. It may be
placed on the inside (as shown) or the outside of
the cart in several optional locations.
J
Figure 10
C
G