1
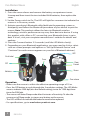
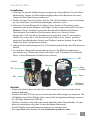
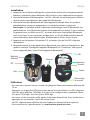
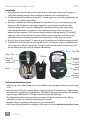
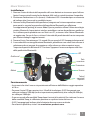
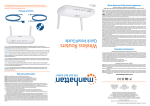
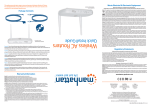
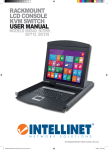
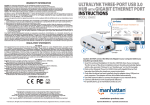
VIVA WIRELESS MOUSE
INSTRUCTIONS
MODEL 178235
manhattan-products.com
MAN-178235-UM-ML1-1212-01-0
Viva Wireless Mouse
English
Installation
1. Press the cover release and remove the battery compartment cover.
Unwrap and then insert the two included AAA batteries, then replace the
cover.
2. Set the Power switch to On. The LED will light for a moment to indicate the
mouse is in Discovery mode.
3. Activate your device’s Bluetooth utility (built into the operating system or
third-party) and follow the Bluetooth procedure of your device to pair the
mouse. Note: This product utilizes the latest in Bluetooth wireless
technology; wireless performance may vary from device to device. If using
this product with a Mac or PC, ensure that your Bluetooth driver is up to
date. If it isn’t, visit your computer manufacturer’s website for details and
updates.
4. Press the Connect button 2-3 seconds (until the LED blinks slowly).
5. Depending on your Bluetooth application, you may need to click or select
such on-screen prompts and options as “Set Up Bluetooth Device” and
“Continue” (once the mouse appears on your list of Bluetooth devices).
LED
Scroll wheel
Cover
DPI
Power
Connect
Batteries
Sensor
Cover release
Operation
• Make sure the mouse is within the effective operating range of 10 m.
•Press the DPI button to cycle through the 3 resolution settings. The LED blinks
once to indicate 1000 dpi (also the default setting); twice for 1500 dpi; three
times for 2000 dpi.
•The mouse will enter Sleep mode after 8 minutes of inactivity. To take the
mouse out of Sleep mode, just press any button on the mouse.
•The LED will flash to indicate the batteries need to be replaced.
•For specifications, go to manhattan-products.com.
2
ENGLISH
Viva Wireless Maus
Deutsch
Installation
1. Drücken Sie auf die Abdeckungsverriegelung und entfernen Sie die Akku abdeckung. Setzen Sie die beiden beiliegenden AAA-Batterien ein und
setzen Sie die Abdeckung wieder auf.
2. Stellen Sie den Power-Schalter auf On. Die LED leuchtet kurz auf und zeigt
an, dass die Maus nach bluetoothfähigen Geräten sucht.
3. Aktivieren Sie die Bluetooth-Funktion Ihres Geräts (in Betriebssystem
integriert oder durch Adapter) und folgen Sie den unten stehenden Schritten.
HInweis: Dieses Produkt verwendet die aktuellste Bluetooth Wireless
Technologie. Die kabellose Performance kann von Gerät zu Gerät
abweichen. Falls Sie dieses Produkt mit einem Mac oder PC verwenden,
stellen Sie sicher, dass sich der Bluetooth-Treiber Ihres Geräts auf dem
neuesten Stand befindet. Details und Treiber-Updates finden Sie auf der
Webseite Ihres Computerherstellers.
4. Halten Sie die Verbindungstaste 2-3 Sekunden gedrückt (bis die LED langsam
blinkt).
5. Je nach Ihrer Bluetooth-Anwendung müssen Sie Bildschirmoptionen
auswählen wie “Bluetooth-Gerät einrichten” und “Fortfahren” (sobald die
Maus in Ihrer Bluetooth-Geräteliste erscheint).
LED
Scrollrad
Abdeckung
Power
Verbinden
DPI
Sensor
Akku
Abdeckungsverriegelung
Betrieb
• Achten Sie darauf, dass sich die Maus nicht weiter als 10 m von Ihrem Gerät
entfernt befindet.
•Drücken Sie die DPI-Taste, um zwischen den drei Auflösungen zu wechseln. Die
LED blinkt einmal für 1000 dpi (dies ist auch die Standardeinstellung); zweimal
für 1500 dpi; dreimal für 2000 dpi.
•Die Maus schaltet nach 8 Minuten ohne Aktivität in den Sleep-Modus. Um die
Maus zu reaktivieren, drücken Sie eine beliebige Maustaste.
•Die LED blinkt, wenn die Batterie ausgetauscht werden muss.
•Die Spezifikationen finden Sie auf manhattan-products.com.
DEUTSCH
3
Ratón Inalámbrico Viva Español
Instalación
1. Presione el botón liberar tapa y retírela del compartimento de baterías.
Desenvuelva e inserte las 2 baterías AAA incluidas y coloque la tapa
nuevamente.
2. Fije el interruptor de energía a encendido. El LED encenderá por un
momento indicando que el ratón está en modo descubrimiento.
3. Active la utilidad Bluetooth en su dispositivo (incluido en el sistema o de un
tercero) y siga el procedimiento para emparejar su ratón vía Bluetooth.
Nota: Este producto utiliza lo último en tecnología Bluetooth: El desempeño
inalámbrico varía dependiendo el dispositivo. Si utiliza este producto con un
Mac o PC, procure tener los controladores actualizados. De no ser así visite
el sitio del fabricante para más detalles y actualizaciones.
4. Presione el botón “Conexión” de 2 a 3 segundos (hasta que el LED parpadee
lentamente).
5. Dependiendo de su aplicación Bluetooth, puede necesitar elegir en pantalla
las opciones como “Configurar un nuevo dispositivo Bluetooth” y “continuar”
una vez que el ratón aparezca en su lista de dispositivo Bluetooth).
Rueda de
desplazamiento
LED
Tapa
DPI
Encendido
Conexión
Sensor
Baterias
Liberar tapa
Modo de Operación
• Asegúrese de que el ratón está en el rango operativo de 10m.
•Presione el botón DPI para cambiar los ajustes entre las 3 resoluciones. El LED
parpadeará una vez para 1000dpi (ajuste por defecto), dos veces para 1500dpi
y tres veces para 2000dpi.
•El ratón entrará en modo reposo después de 8 minutos de inactividad, para
activarlo solo presione cualquier botón del ratón.
•El LED parpadeará para indicar que es necesario cambiar las baterías.
•Para más especificaciones, visite manhattan-products.com.
4
ESPAÑOL
Souris sans fil Viva Français.
Installation
1. Appuyez sur le déverrouillage du couvercle et enlevez le compartiment de
batterie. Insérez les deux batteries AAA incluses, puis replacez le couvercle.
2. Activez le bouton d’alimentation. La DEL s’allume un moment pour afficher
que la souris peut détecter des appareils Bluetooth.
3. Activez la fonction Bluetooth de votre appareil (intégré dans le système
d’exploitation ou par un adaptateur) et suivez les étapes ci-dessous.
Remarque: Ce produit utilise la dernière technologie sans fil Bluetooth ; les
performances sans fil peuvent varier d’un appareil à un autre. Si vous utilisez
ce produit avec un Mac ou un PC, assurez-vous que votre pilote Bluetooth
est à jour. Dans le cas contraire, rendez-vous sur le site Web du fabricant de
votre ordinateur pour obtenir plus d’informations et des mises à jour.
4. Appuyez sur le bouton Connecter 2-3 secondes (jusqu’à la DEL clignote
lentement).
5. Respectivement à votre application Bluetooth, vous devez sélectionner des
options comme “Configurez appareil Bluetooth” et “Continuer” (dès que la
souris apparaît dans votre liste d’appareils Bluetooth).
Molette de
défilement
DEL
Couvercle
Alimentation
Connecter
DPI
Capteur
Piles
Utilisation
Déverrouillage
du couvercle
• Assurez-vous que la souris est dans la plage de fonctionnement effective de
10 m.
•Appuyez sur le bouton DPI pour varier parmi trois résolutions. La DEL clignote
une fois pour afficher 1000 dpi (c’est aussi la configuration standard); deux
fois pour 1500 dpi; trois fois pour 2000 dpi.
•La souris entre le mode veille après 8 minutes d’inactivité. Pour la réactiver,
appuyez sur un bouton souris de votre choix.
•La DEL clignote pour afficher que les batteries doivent être remplacés.
•Vous trouvez les spécifications sur manhattan-products.com.
FRANÇAIS
5
Myszka bezprzewodowe Viva
Polski
Instalacja
1. Naciśnij przycisk zwalniający pokrywę komory na baterie i zdejmij ją. Rozpakuj, a
następnie włóż do komory dwie dołączone baterie AAA i załóż pokrywę.
2. Ustaw przełącznik zasilania w pozycji On. Dioda zapali się na chwilę sygnalizując, że
myszka jest w trybie wykrywania.
3. Aktywuj narzędzie do obsługi Bluetooth (wybudowane w system operacyjny lub
dołączone do urządzenia) i postępuj zgodnie z instrukcjami urządzenia, aby
nawiązać połączenie z myszką. Uwaga: Ten produkt wykorzystuje najnowszą
technologię Bluetooth; wydajność sieci bezprzewodowej może się różnić w
zależności od urządzeń. Jeśli używasz tego produktu z komputerem PC lub MAC,
upewnij się, że sterowniki do urządzenia Bluetooth są aktualne. Jeśli tak nie jest,
odwiedź stronę internetową producenta komputera i uaktualnij sterowniki.
4. Wciśnij i przytrzymaj przez 2-3 sekundy przycisk połączenia (aż dioda zamiga powoli).
5. W zależności od narzędzia do obsługi Bluetooth, konieczne może być zaznaczenie
lub wybranie na ekranie opcji typu „Dodaj urządzenie Bluetooth” oraz „Kontynuuj”
(aż myszka pojawi się na liście urządzeń Bluetooth).
Dioda LED
Rolka „Scroll”
Przełącznik
zmiany
rozdzielczości
Pokrywa
Przełącznik
zasilania
Przycisk
połączenia
Układ
optyczny
Baterie
Przycisk
zwalniający
pokrywę
Zalecenia eksploatacyjne
• Upewnij się, że myszka znajduje się w polu efektywnego zasięgu działania wynoszącego
10 m.
•Wciśnij przycisk DPI, aby wybrać jedną z trzech dostępnych rozdzielczości. Dioda mignie
jednokrotnie sygnalizując rozdzielczość 1000 dpi (ustawienie domyślne); dwukrotnie
sygnalizując rozdzielczość 1500 dpi oraz trzykrotnie dla 2000 dpi.
•Myszka przechodzi w tryb czuwania po ośmiu minutach nieaktywności. Aby ją
wzbudzić, po prostu wciśnij dowolny przycisk myszki.
•Migająca dioda sygnalizuje konieczność wymiany baterii.
• Pełną specyfikację produktu znajdziecie Państwo na stronie manhattan-products.com.
6
POLSKI
Mouse Wireless Viva Italiano
Installazione
1. Premere il tasto di rilascio del coperchio del vano batterie e rimuovere quest’ultimo.
Aprire il vano e quindi inserire le due batterie AAA incluse, quindi rimettere il coperchio.
2. Posizionare l’interruttore su On (acceso). L’indicatore LED si accenderà per un momento
ad indicare che il mouse è in modalità ricerca.
3. Attivare l’utility Bluetooth della periferica (integrata nel sistema operativo o come
terza parte) e seguire la procedura della periferica Bluetooth per effettuare
l’ accoppiamento (pairing) al mouse. Nota: Questo prodotto utilizza l’ultima tecnologia
wireless Bluetooth; le prestazioni wireless potrebbero variare da periferica a periferica.
Se si utilizza questo prodotto con un Mac o un PC, assicurarsi che il driver Bluetooth
sia aggiornato. Se non lo fosse, visitare il sito web del produttore del vostro computer
per ulteriori dettagli e aggiornamenti.
4. Premere il tasto Connettere per 2-3 secondi (fino a quando il LED lampeggia lentamente).
5. A seconda della vostra applicazione Bluetooth, potrebbe essere necessario cliccare o
selezionare alcuni prompt che appaiono sullo schermo o alcune opzioni come
“Imposta dispositivo Bluetooth” e “Continua” (appena il mouse compare nella lista
delle periferiche Bluetooth).
LED
Rotella scroll
DPI
Coperchio
Tasto
accensione
Connessione
Sensore
Batterie
Tasto di
sgancio del
coperchio
Funzionamento
• Assicurarsi che che il mouse sia posizionato all’interno dell’effettivo raggio operativo
di 10 m.
•Premere il tasto DPI per spostarsi tra i 3 livelli di risoluzione. Il LED lampeggia una
volta per indicare 1000 dpi (anche impostazione predefinita); due volte per 500 dpi;
tre volte per 2000 dpi.
•Il mouse accede alla modalità Sleep dopo 8 minuti di inattività. Per riattivare il mouse
dalla modalità Sleep, è sufficiente premere un qualsiasi tasto del mouse.
•Il LED lampeggia ad indicare che le batterie devono essere sostituite.
•Per ulteriori specifiche, visita il sito manhattan-products.com.
ITALIANO
7
WASTE ELECTRICAL & ELECTRONIC EQUIPMENT
Disposal of Electric and Electronic Equipment
(applicable in the European Union and other European countries with separate collection systems)
ENGLISH
This symbol on the product or its packaging indicates that this product shall not be treated as
household waste. Instead, it should be taken to an applicable collection point for the
recycling of electrical and electronic equipment. By ensuring this product is disposed
of correctly, you will help prevent potential negative consequences to the environment and human health, which could otherwise be caused by inappropriate
waste handling of this product. If your equipment contains easily removable batteries
or accumulators, dispose of these separately according to your local requirements.
The recycling of materials will help to conserve natural resources. For more detailed information
about recycling of this product, contact your local city office, your household waste disposal
service or the shop where you purchased this product. In countries outside of the EU: If you wish
to discard this product, contact your local authorities and ask for the correct manner of disposal.
DEUTSCH
Dieses auf dem Produkt oder der Verpackung angebrachte Symbol zeigt an, dass dieses Produkt nicht mit
dem Hausmüll entsorgt werden darf. In Übereinstimmung mit der Richtlinie 2002/96/EG des Europäischen
Parlaments und des Rates über Elektro- und Elektronik-Altgeräte (WEEE) darf dieses Elektrogerät nicht
im normalen Hausmüll oder dem Gelben Sack entsorgt werden. Wenn Sie dieses Produkt entsorgen
möchten, bringen Sie es bitte zur Verkaufsstelle zurück oder zum Recycling-Sammelpunkt Ihrer Gemeinde.
ESPAÑOL
Este símbolo en el producto o su embalaje indica que el producto no debe tratarse como residuo doméstico.
De conformidad con la Directiva 2002/96/CE de la UE sobre residuos de aparatos eléctricos y electrónicos
(RAEE), este producto eléctrico no puede desecharse con el resto de residuos no clasificados. Deshágase
de este producto devolviéndolo a su punto de venta o a un punto de recolección municipal para su reciclaje.
FRANÇAIS
Ce symbole sur Ie produit ou son emballage signifie que ce produit ne doit pas être traité comme un
déchet ménager. Conformément à la Directive 2002/96/EC sur les déchets d’équipements électriques
et électroniques (DEEE), ce produit électrique ne doit en aucun cas être mis au rebut sous forme de
déchet municipal non trié. Veuillez vous débarrasser de ce produit en Ie renvoyant à son point
de vente ou au point de ramassage local dans votre municipalité, à des fins de recyclage.
ITALIANO
Questo simbolo sui prodotto o sulla relativa confezione indica che il prodotto non va trattato come un rifiuto
domestico. In ottemperanza alla Direttiva UE 2002/96/EC sui rifiuti di apparecchiature elettriche ed
elettroniche (RAEE), questa prodotto elettrico non deve essere smaltito come rifiuto municipale misto. Si
prega di smaltire il prodotto riportandolo al punto vendita o al punto di raccolta municipale locale per un
opportuno riciclaggio.
POLSKI
Jeśli na produkcie lub jego opakowaniu umieszczono ten symbol, wówczas w czasie utylizacji nie wolno
wyrzucać tego produktu wraz z odpadami komunalnymi. Zgodnie z Dyrektywą Nr 2002/96/WE w sprawie
zużytego sprzętu elektrycznego i elektronicznego (WEEE), niniejszego produktu elektrycznego nie wolno
usuwać jako nie posortowanego odpadu komunalnego. Prosimy o usuniecie niniejszego produktu
poprzez jego zwrot do punktu zakupu lub oddanie do miejscowego komunalnego punktu zbiórki
odpadów przeznaczonych do recyklingu.
8
WARRANTY INFORMATION
ENGLISH: For warranty information, go to manhattan-products.com/warranty.
DEUTSCH: Garantieinformationen finden Sie unter manhattan-products.com/warranty.
ESPAÑOL: Si desea obtener información sobre la garantía, visite manhattan-products.com/warranty.
FRANÇAIS: Pour consulter les informations sur la garantie, visitez manhattan-products.com/warranty.
POLSKI: Informacje dotyczące gwarancji znajdują się na stronie manhattan-products.com/warranty.
ITALIANO: Per informazioni sulla garanzia, accedere a manhattan-products.com/warranty.
EN MÉXICO: Póliza de Garantía Manhattan — Datos del importador y responsable ante el consumidor
IC Intracom México, S.A.P.I. de C.V. • Av. Interceptor Poniente # 73, Col. Parque Industrial La Joya, Cuautitlan
Izcalli, Estado de México, C.P. 54730, México. • Tel. (55)1500-4500
La presente garantía cubre los siguientes productos contra cualquier defecto de fabricación en sus
materiales y mano de obra.
A. Garantizamos los productos de limpieza, aire comprimido y consumibles, por 60 dias a partir de la fecha
de entrega, o por el tiempo en que se agote totalmente su contenido por su propia función de uso,
lo que suceda primero.
B. Garantizamos los productos con partes móviles por 3 años.
C. Garantizamos los demás productos por 5 años (productos sin partes móviles), bajo las siguientes
condiciones:
1. Todos los productos a que se refiere esta garantía, ampara su cambio físico, sin ningún cargo para
el consumidor.
2. El comercializador no tiene talleres de servicio, debido a que los productos que se garantizan no
cuentan con reparaciones, ni refacciones, ya que su garantía es de cambio físico.
3. La garantía cubre exclusivamente aquellas partes, equipos o sub-ensambles que hayan sido instaladas
de fábrica y no incluye en ningún caso el equipo adicional o cualesquiera que hayan sido adicionados
al mismo por el usuario o distribuidor.
Para hacer efectiva esta garantía bastará con presentar el producto al distribuidor en el domicilio donde
fue adquirido o en el domicilio de IC Intracom México, S.A.P.I. de C.V., junto con los accesorios contenidos
en su empaque, acompañado de su póliza debidamente llenada y sellada por la casa vendedora
(indispensable el sello y fecha de compra) donde lo adquirió, o bien, la factura o ticket de compra
original donde se mencione claramente el modelo, número de serie (cuando aplique) y fecha de
adquisición. Esta garantía no es válida en los siguientes casos: Si el producto se hubiese utilizado en
condiciones distintas a las normales; si el producto no ha sido operado conforme a los instructivos de
uso; o si el producto ha sido alterado o tratado de ser reparado por el consumidor o terceras personas.
North & South America
IC Intracom Americas
550 Commerce Blvd.
Oldsmar, FL 34677
USA
Asia & Africa
IC Intracom Asia
Far Eastern Technology Center
7-F No. 125, Section 2, Da Tong Rd.
Shijr, Taipei
Taiwan, ROC
Europe
IC Intracom Europe
Löhbacher Str. 7
D-58553 Halver
Germany
Printed on recycled paper.
9
REGULATORY STATEMENTS
FCC Class B
This equipment has been tested and found to comply with the limits for a Class B digital device,
pursuant to Part 15 of Federal Communications Commission (FCC) Rules. These limits are designed
to provide reasonable protection against harmful interference in a residential installation. This
equipment generates, uses and can radiate radio frequency energy, and if not installed and used
in accordance with the instructions may cause harmful interference to radio communications.
However, there is no guarantee that interference will not occur in a particular installation. If this
equipment does cause harmful interference to radio or television reception, which can be determined
by turning the equipment off and on, the user is encouraged to try to correct the interference by one or
more of the following measures:
• Reorient or relocate the receiving antenna.
• Increase the separation between the equipment and the receiver.
• Connect the equipment to an outlet on a circuit different from the receiver.
• Consult the dealer or an experienced radio/TV technician for help.
CE / R&TTE
English: This device complies with the requirements of R&TTE Directive 1999/5/EC.
The Declaration of Conformity for this product is available at:
Deutsch: Dieses Gerät enspricht der Direktive R&TTE Direktive 1999/5/EC.
Die Konformitätserklärung für dieses Produkt finden Sie unter:
Español: Este dispositivo cumple con los requerimientos de la Directiva R&TTE 1999/5/EC.
La declaración de conformidad para este producto esta disponible en:
Français: Cet appareil satisfait aux exigences de la directive R&TTE 1999/5/CE.
La Déclaration de Conformité pour ce produit est disponible à l’adresset :
Polski: Urządzenie spełnia wymagania dyrektywy R&TTE 1999/5/EC.
Deklaracja zgodności dostępna jest na stronie internetowej producenta:
Italiano: Questo dispositivo è conforme alla Direttiva 1999/5/EC R&TTE.
La dichiarazione di conformità per questo prodotto è disponibile al:
manhattan-products.com
All trademarks and trade names are the property of their respective owners.
Alle Marken und Markennamen sind Eigentum Ihrer jeweiligen Inhaber.
Todas las marcas y nombres comerciales son propiedad de sus respectivos dueños.
Toutes les marques et noms commerciaux sont la propriété de leurs propriétaires respectifs.
Wszystkie znaki towarowe i nazwy handlowe należą do ich właścicieli.
Tutti i marchi registrati e le dominazioni commerciali sono di proprietà dei loro rispettivi proprietari.
© IC Intracom. All rights reserved.
Manhattan is a trademark of IC Intracom, registered in the U.S. and other countries.
10