Transcript
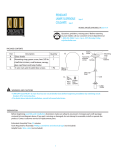
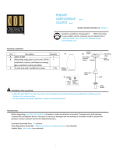
Kitchen Essentials by Checkolite
OVER 50lbs. CHAIN SUSPENDED FIXTURE INSTALLATION INSTRUCTION
Model # P1006-71
CEILING STRUCTURE MEMBER OR CROSS BRACE
ASSEMBLY INSTRUCTIONS
CAUTION: shut off main electrical supply from the main fuse box / circuit breaker.
We recommend that a qualified electrician install this fixture and that installation
meet all state & local electrical codes.
Steps:
1) Carefully remove all parts from package.Please verify that all parts are present
before discarding carton and packing materials.
2) Place fixture(1) on a smooth,flat surface.
3) Connect upper frame(2) and fixture(1) using nut(3), small nipple(4),
iron support arm(5).
4) Place shade(6) and metal ring(7) onto the cup(8), and lock it with socket ring(9).
5) Install bulb(10). (Use 2 x 50 watt type r-20 or less medium base).
6) Open up one end of "C" loop by turning the small threaded collar(11) and attach
the "C" loop to the top loop of the ceiling fixture. Make sure to close the collar
portion of the "C" loop once you have connected the chain and fixture base together.
CEILING WALL BOARD
SUPPLY WIRES
SUPPLY GROUND WIRE
CEILING JUNCTION BOX
HEX NUT
MOUNTING BAR
FIXTURE WIRES
MIN.1/4” DIAMETER
SCREWS (not supplied)
GROUND WIRE
MACHINE SCREWS
THREADED PIPE
Min. 60 Cº supply conductors
DECORATIVE KNOB
DECORATIVE KNOB
(11)SMALL THREADED
COLLAR
(2)UPPER FRAME
(3)NUT
(4)SMALL NIPPLE
(5)IRON SUPPORT ARM
(8)CUP
(1)FIXTURE
(7)METAL RING
(9)SOCKET RING
(6)SHADE
(10)BULB(NOT INCLUDED)
3. Fasten back two machine screws (supplied with
junction box) through slot at each end of mounting bar
and into junction box.
4. Fasten another hex nut onto bottom end of
threaded pipe.
CANOPY
“C”LOOP
2. To hang fixtures weighing over 50 lbs. (over 25
lbs. in Canada) the mounting bar must be
supported independently of the ceiling junction
box. Recommend minimum of two 1/4" diameter
screws or bolts (not supplied)(rated for 200 lbs. or greater)
which must have sufficient length to be installed through
the mounting bar, junction box, and securely into
the ceiling structure member or cross brace. This
installation must be able to support at least four
times the weight of the fixture. Check this fact
before starting assembly. If unsure please consult a
qualified technician.
IMPORTANT:
-TURN POWER AT MAIN FUSE OR CIRCUIT BREAKER
BOX BEFORE STARTING INSTALLATION.
-RECOMMEND THIS PRODUCT BE INSTALLED BY A
QUALIFIED ELECTRICIAN TO REDUCE RISK OF FIRE
AND ELECTRICAL SHOCK.
1. A. Screw about 1/2" of threaded pipe into center hole in
mounting bar. Note: The protruding side lips of mounting
bar must face threaded pipe. See diagram.
B. Attach mounting bar to ceiling junction box with two
machine screws (supplied with junction box) through slot
at each end of mounting bar.
C. At this point test install the canopy onto ceiling through
this threaded pipe and make certain 5/16" of threaded pipe
protrude below the canopy. If not, then adjust the threaded
pipe location by screwing up or down accordingly.
D. Once correct threaded pipe location has been adjusted,
remove canopy and mounting bar from junction box.
E. Lock threaded pipe into mounting bar by fastening a
hex nut from above. Note: Do not spin threaded pipe
during tightening.
5. Fixture wire connections:
Connect clear smooth side fixture wire to black supply
wire and clear ridged side fixture wire to white supply
wire.
Note: Make certain no loose conductors protrude
outside of wire connectors. And make certain all wires
are securely held together by wire connectors.
6. Ground wire connection:
Connect fixture ground wire to supply ground wire
with wire connector.
Important: Never connect ground wire to black or
white supply wires.
7. Once all wires are connected tuck, them carefully
into junction box. Then raise canopy against the ceiling
and lock into position by screwing decorative knob
onto the threaded pipe.
Checkolite International Inc.
142 Charles Street
Jersey City, NJ 07307
www.checkolite.com
1.800.265.9960
Printed in China
2