1
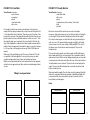
EI-5302
Grades 3+
Ages 8+
Welcome to the Microscopic World
Welcome to the hidden world of the microscope. Your new microscope is an
instrument with lenses for making very small objects appear much larger so
they can be studied. There are millions of tiny living plants and animals that
can be easily seen with your microscope.
In today’s technological world, every field of science utilizes microscopes.
Microscopes are used by biologists for studying microorganisms, by geologists
for studying rocks and minerals, by archaeologists for studying ancient
artifacts, and by astronomers for studying fallen meteorites.
Your microscope set contains the following parts:
1 – Die-cast Metal Microscope
1 – 10X Eyepiece
1 – 30X Eyepiece
1 – Camera Adapter
1 – Projection/Drawing Device
1 – Scalpel
1 – Spatula
1 – Tweezers
1 – Magnifying Glass
1 – Measuring Graduate
1 – Stirring Rod
1 – Pipette
1 – Test Tube with Cap
1 – Petri Dish
6 – Specimen Vials
5 – Prepared Slides
18 – Blank Slides
18 – Slide Labels
36 – Slide Covers
Storage and Carrying Case
Instruction and Activity Guide
1
What are all of these things for?
a) Microscope – The microscope holds samples of very small things on
clear slides. It shines a bright light through the small sample, and then
lenses make the sample look very big. Your microscope can make things
look 50 times, 150 times, 300 times, 450 times, or even 900 times larger
than the way you see them with your own eyes.
b) Eyepieces – The eyepieces are special magnifying lenses that work with
your microscope’s other eyepieces.
c) Camera Adapter – Photograph your findings using your point-and-shoot
camera and adapter.
d) Projection/Drawing Device – This device lets you project an image of the
slide you are examining either on a white wall, onto its own small viewing
screen, or onto a piece of white paper. You can share your discoveries
with friends or trace the image to create your own drawings.
e) Scalpel – A scalpel is a sharp blade used to cut very thin pieces of
material so you can look at them with your microscope.
n) Specimen Vials – These are little plastic bottles with tight-fitting lids. They
are used to carry your samples from where you collected them to where
you have your microscope set up.
o) Prepared Slides – These slides have samples on them that have been
prepared by professionals for you to examine.
p) Blank Slides – These are the clear slides that you will place prepared
samples on for examination under your microscope.
q) Slide Labels – These are little pieces of paper with sticky backs. You can
write on them and stick them on your slides to record information such as
when the sample was prepared.
r) Slide Covers – These are little squares made of thin, clear plastic. They
are used to cover very small samples on a slide. See the instructions in
this guide for making temporary and permanent slides.
s) Storage and Carrying Case – This heavy-duty case has been specifically
made to hold the components of your microscope set safely and securely.
f) Spatula - The spatula has a large flat blade, but it is not as sharp as the
scalpel. The spatula is used for scraping off bits of material for testing and
to mash and flatten soft samples.
g) Tweezers – The tweezers are used to pick up small samples and to
handle samples that you don’t want to touch with your hands – like slimy
mold!
h) Magnifying Glass – This is useful for taking a close look at a sample
before examining it under the high power magnification of your
microscope.
i) Measuring Graduate – This plastic cup is marked with measuring lines so
that you can accurately measure quantities of liquids in your experiments.
j) Stirring Rod – Use this rod to mix fluids until they are well blended. An
example is when you mix salt in with water.
k) Pipette – This is a plastic device that you can dip into a liquid to transfer a
drop or two to a slide for examination.
l) Test Tube with Cap – This thin, clear tube is used to hold liquid samples
when you want to see if anything is happening, such as when a sample
changes color.
m) Petri Dish – This round, flat dish with a clear cover is used to grow and
observe samples, such as molds.
2
3
Getting Acquainted with Your Microscope
Learning About Your Microscope
1.
Eyepiece – The eyepiece is where you look into the microscope. It is a small
magnifying lens that collects the image projected up by the three objective
lenses. Your microscope comes with two different eyepieces. The 10X eyepiece
makes an image look 10 times larger. The 30X eyepiece makes an image look 30
times larger.
2.
Viewer Screen – The observed image can be projected onto this screen so that
more than one person at a time can look at it.
3.
Viewer Head – The viewer head contains a mirror that will divert the viewed
image for projection.
4.
Focusing Knob – Turn these knobs very slowly to bring the image of your
sample into focus so you can see clearly.
5.
Body Tube – This is the main tube of the microscope. The image from the
sample travels up this tube to the eyepiece.
6.
Rotating Turret – The turret holds the three objective lenses. Turn the turret so
that each lens clicks into position.
7.
Objective Lenses – The objective lenses are the lenses closest to the objects
you are examining. Your microscope has three objective lenses, each with a
different magnifying power. The shortest lens has the lowest magnifying power
(5X). The longest lens has the highest magnifying power (30X). The third lens
has a magnifying power between the two (15X). The objective lenses work with
the eyepieces to give your microscope a range of magnifications. With the 10X
eyepiece in place, your microscope makes samples look 50 times (50X), 150
times (150X), and 300 times (300X) larger than they appear to your eyes. With
the 30X eyepiece in place, your microscope makes samples look 150 times
(150X), 450 times (450X), and 900 times (900X) larger than you can see them
with your own eyes.
8.
Arm – This curved piece is the “backbone” of the microscope and holds
everything together. You can tilt the arm backward to get a more comfortable
viewing position.
9.
Stage – The stage is the flat platform where your slides are held for studying.
1. Eyepiece
2. Viewer Screen
3. Viewer Head
5. Body Tube
4. Focusing Knob
6. Rotating Turret
7. Objective Lenses
9. Stage
8. Arm
10. Clips
11. Color Filter Unit
10. Clips – The two clips on the stage hold your slide in position so that it doesn’t
move around while you are looking at it.
11. Color Filter Unit – Attached to the underside of the stage, the color filters
enhance slide contrast and detail. Change the filters by turning the dial.
12. Mirror
12. Mirror – The mirror aims light from a bright source, like a sunlit window or a
table lamp, up through the slide you are studying so you can see the specimen
more clearly.
13. LED Illuminator
Lamp
14. Base
13. Illuminator Lamp – When there is not enough light available for the mirror
to do its job, turn the mirror over and the bright LED electric illuminator will light
your sample.
14. Base - The bottom of the base has a rubber cover to help prevent your
microscope from slipping on a smooth tabletop.
4
5
Microscope Safety Tips
Getting Started
Keep these safety tips in mind as you enjoy hours of fun projects and
experiments with your microscope.
• Read all instructions before use. Follow them and keep them for future
reference.
• Keep small children and animals away from any experiments or projects.
• When working with samples, keep your hands away from your mouth and
eyes. Eye protection is not included.
• Always wash your hands carefully after handling any samples and always
dispose of any samples in a safe manner.
• Handle the prepared slides carefully. They are made of glass.
• Store your microscope set out of reach of small children.
1) Insert two AA batteries into the base of the microscope, following the
instructions on page 21 of this guide.
2) Place the microscope on a flat surface near a bright light or, in the daytime,
a window. Locate the mirror and adjust the angle so that when you look into
the eyepiece you see a bright circle of light. Do not point the mirror
towards the sun as eye damage may result. If there is no bright light
available, or if the room lighting is poor, use the microscope’s electric
illuminator lamp. To turn on the illuminator lamp, flip the mirror over so that
the light bulb is aimed upward. The light will come on by itself. Look through
the eyepiece and adjust the angle of the light until you see a bright circle.
Taking Care of Your Microscope
•
•
•
•
Always handle the microscope with two hands—one hand around the arm
and another under the base.
Always remove and clean the slides from the microscope stage after
each use.
Place the microscope in a case, or cover it with a plastic bag after
each use.
Clean your microscope with a damp or dry cloth—do not immerse or spray
liquid or water on the microscope.
3) Once you can see a bright circle of light in the eyepiece, your microscope
is ready for use.
4) Choose one of the prepared sample slides from your set. Place it under
the two spring clips on top of the stage.
A Special Reminder About Lenses
The most important parts of your microscope are the lenses. Handle them
with care. If the lenses are dirty or dusty, you can clean them with a soft
cotton cloth or a special lens cleaning tissue. Do not wipe them with a
finger or a regular facial tissue. Avoid any direct contact between the
viewing lenses and the stage. When changing eyepieces, work carefully,
but quickly, to avoid introducing dust into your microscope. Always return
the lens cap to the eyepiece when finished.
We constantly improve and update our products. Sometimes, as a result of these
improvements, what is seen on the package or in the instructions may differ somewhat in
color or content from the product in the package.
6
5) Next, choose the magnifying power you want to use. Your microscope can
provide magnifying powers of 50X, 150X, 300X, 450X, and 900X.
Remember that the longer objective lenses used with the higher
magnification 30X eyepiece provide the higher powers. For optimal
viewing, start at the lowest power and work your way upward. Most
observing is done at low power.
7
6) To change the magnifying strength, turn the rotating lens turret until you
hear a click.
4. Gently place a temporary slide cover over the sample, being careful not to
allow any air bubbles in.
5. Remove any excess water or dye with a piece of paper towel by pressing
it down gently over the slide cover.
6. Now you can observe your slide.
7) Turn the focusing knob until the objective lens is almost touching the slide.
Don’t let the lens touch the slide as you may break the slide and damage
the lens. Now look through the eyepiece and slowly turn the focusing knob
back until you see the sample clearly. Try changing the color filter to
enhance your specimen's detail.
Making a Permanent Slide
8) To change the eyepiece, simply unscrew it from the body tube and replace
it with the other eyepiece.
1. Start with a clean slide and cover.
How to Make a Prepared Slide
3. Before placing the cover over your sample, add several drops of Gum
Media, Canada Balsam, or other commercially available mounting
adhesives. Or, use a piece of transparent tape.
Samples for examination should be very thin so that light can pass through
them. If the sample is too thick, it will appear dark in the microscope. Cloth
fibers, pollen, dust or salt crystals will be easy to see and make good
samples for you to observe.
2. Follow Steps 2 and 3 on page 8.
4. Place the cover gently over the sample and carefully squeeze out any
air bubbles.
5. Place your new slide in a safe place and let it dry for a day.
If the sample is very thin and clear, a drop of red or blue dye may make
details show more clearly. You can obtain dyes from a science supplies shop.
You can also try making a natural dye by putting a slice of beet root in a
blender and using the purple-red beet juice as a dye. Be sure to get an
adult’s permission first. Transfer a drop of the dye to your slide with the
pipette.
IMPORTANT NOTICE: Wash your hands before and after preparing slides
and after every project. Use warm water and soap. Also wash any of your
microscope kit equipment that you may have used. Make sure that an adult
knows what you are doing and is available to help you.
Be careful with dyes as they can stain clothing, furniture or carpets.
How to Use the Camera Adapter
Making a Temporary Slide
1. Wipe the slide clean.
2. Prepare a thin sample. You may have to slice it with a scalpel or a razor
blade. Be very careful. Check with an adult before using any sharp tools
for slicing specimens.
The camera adapter can help you photograph your findings using a pointand-shoot camera. To position the camera adapter, remove the microscope
eyepiece and place the camera adapter over the focusing tube. Place the
camera on the camera adapter base plate so that the camera lens is directly
over the hole in the base plate and shoot your photo.
3. Pick up your sample with the tweezers and put it on the center section
of the slide. Add one drop of water. If needed, you can now add a drop
of dye.
8
9
How to Use the Camera Adapter (cont.)
How to Use the Drawing Device
If your camera has a video display screen, you can preview the image for
positioning and focus sharpness. If your camera does not have this screen,
you may have to experiment with different focus positions and checking
the results.
You can observe the image on the unit’s projection screen, or you can project
an enlarged image onto a white surface.
Depending on your camera design, you may not need to make any
adjustment. Take your first pictures with the objective lenses almost touching
the slide. Measure the position of the focusing tube carefully and keep
records of each picture-taking focus position. When you find the best position
that gives a sharp picture, you may want to make a small mark on the
focusing tube so that the microscope can be set at the same position for the
next pictures you take. You best results will probably be at the 300X setting.
How to Use the Projection Device
1. Make sure that the plastic viewing screen is in place in the slot on the top
of the viewing hood.
2. Adjust the focus and illuminator lamp until you see a clear image on
the screen.
3. To see an enlarged image, remove the plastic viewing screen from its slot.
4. Make sure that the microscope is in the upright position.
5. Place a piece of white paper horizontally in front of the base of
the microscope.
6. Darken the room and adjust the angle of the viewer hood mirror until you
see the image projected on the white paper. Adjust the focus and
illuminator lamp position for the best result.
7. Trace the image projected on the piece of paper.
1. Twist the eyepiece counterclockwise and gently pull up to remove it. Insert
the viewer head over the focusing tube.
2. Face the viewer head towards a white wall or a piece of white paper.
3. Turn out the room lights and close any curtains. For best results, the room
should be dark.
4. Turn on the electric illuminator lamp and place a prepared slide on
the stage.
5. Try a distance of 3 to 4 feet (1 to 1.5 meters) from the wall or paper.
6. Adjust the illuminator lamp so that the image is as bright as possible.
7. Carefully adjust the focus until you see a sharp image. You may have to
readjust the illuminator lamp position.
8. You should now see a clear projected image. If you use a higher
magnification, you will have to refocus the microscope.
IMPORTANT SUGGESTIONS:
When you are using the drawing device or the projection device you
must be in a darkened room. You will see the brightest views in a very
dark room. Make sure that the batteries are fresh and that all lenses and
mirrors are clean. Before studying your slides in the dark, give your
eyes a few minutes to adjust.
When using the projection device, you may get some “light spill.”
This is unwanted light that comes directly from the illuminator lamp
or bounces off of a reflective surface. This unwanted light can
overpower the projected image. Try placing your hand in front of the
illuminator lamp to block this extra light.
10
11
FAQs – Frequently Asked Questions
PROJECT #1: Cloth Fibers
1) What can I see with my microscope?
You will need: microscope
scissors to cut small samples
scrap pieces of cloth of different types
clean, blank slides
You can see thousands of things that are difficult or impossible to see
with your eyes. You can see tiny plants and animals. You can observe plant
and animal cells. You can see the differences between different plants,
different papers, different fibers, and hairs from different people. You can
study crystals, rocks, and minerals. The uses for your microscope are
practically endless.
2) What is meant by power?
Power is a measure of the seeing ability of your microscope. It is really a
short way of saying “magnifying power.” Your microscope has five powers.
They are 50X (pronounced “50 times”), 150X, 300X, 450X, and 900X. This
means that your microscope can magnify the view of a sample so that it
appears 50 times, 150 times, 300 times, 450 times, or 900 times larger than
the way you see it with your own eyes.
3) I look through my microscope and all I see is darkness. Why?
This could be because the mirror is not positioned properly to aim light up
into your microscope. Another reason may be that the sample you are looking
at could be too thick for the light to shine through it.
4) All I can see is a partial circle of light. Why?
All types of cloth are made from long, thin strands called fibers. Some, like
wool, come from animals. Others, like cotton, come from plants. Still others
are made from chemical actions. Nylon and polyester are samples of manmade fibers.
Take small samples of various fibers, such as cotton, wool, and polyester.
Put one sample at a time between two clean, blank slides like a sandwich.
Put the slide sandwich under your microscope. Can you see the difference
between natural and man-made fibers?
Look at how tightly the strands are wound. Some are very tight and smooth.
Others are loose and spiky. The loose fibers can trap air. This trapped air can
help to keep you warm. Compare a wool fiber with a polyester fiber. Which
one do you think will keep you warmer?
Notes:
Type of
cloth fiber
Is it man
made or
natural?
Are the
fibers tightly
wound?
Are the
fibers loose
and spiky?
Will it keep
you warm?
To see your sample properly, you need to have light shining evenly up
through the slide. If you are using the mirror for light, try gently moving it
about while looking through the microscope until you see an evenly lit
full circle.
5) I have a very thin sample on my slide, but I can’t see any detail.
First, make sure that the image is in sharp focus by adjusting the focusing
knobs. If the problem still exists, add a drop of red or blue dye to the sample.
Dyes make hard-to-see objects like plant cells stand right out.
12
13
PROJECT #2: Animal Fur
PROJECT #3: Leaves
You will need: microscope
2 or more clean, blank slides
samples of different types of fur and hair
You will need: microscope
2 or more clean, blank slides
different types of leaves
An animal’s fur is similiar to the hair on your head. Like your hair, it protects
the skin underneath from cold, heat, and sunburn. Animals have different
kinds of fur. Some animals have fine, smooth fur. Others have stiff, bristly
hair. Some fur is short, and some fur is long. Long-haired animals can stay
warm even when it is very cold. Their fur traps and holds a layer of warm air
next to their skin. This is called insulation.
Plants breathe through their leaves! Most leaves have small holes in their
underneath side called stomata. Plants breathe in carbon dioxide from the
air and release oxygen. People and animals do the opposite. They breathe
in oxygen and breathe out carbon dioxide. In this way people and animals
help one another. The scientific name for a relationship like this is a
symbiotic relationship.
Study samples of fur from cats, dogs, and even your pet hamster. Check
paintbrushes you may have around the house. Some small paintbrushes have
hairs from squirrels. Other brushes may have bristles from pigs.
Collect leaves from different tree and plant types. The needles of pine, fir and
spruce trees are also leaves, but they look a little different.
Put several strands of animal hair or fur in between a slide sandwich like you
did with the cloth fibers and look at them under your microscope. If you look
closely at 450X or 900X magnification, you might see small rough lines going
around each hair. These are growth lines. If there is a large space between
these lines, the hair is fast-growing. A lot of small spaces between lines
indicate a slow-growing hair.
Pull out a single hair from your head. (Ouch!) Does it look like any of the
animal hairs?
If you gather your leaves in the spring and summer, they will be mainly green.
In the fall and winter they may be red or brown or orange—all except the
small fir, pine and spruce needles. They stay green all year round. The trees
from which these leaves come are called evergreens.
Look closely at your leaf samples at 300X magnification. Look for patterns of
lines running through the leaf. These are the veins of the leaf, and they carry
nutrients, or energy food, back and forth between the leaf and the main plant.
A plant’s leaves are like tiny food factories. Chlorophyll, a green chemical in
leaves, traps energy from sunlight. Plants use energy, water, and carbon
dioxide to make food in a process called photosynthesis.
Notes:
Notes:
Sample
#
#1
#2
#3
#4
#5
#6
14
Where is it
from?
Is the hair
smooth?
Would it keep
the animal
warm?
Can you see
growth rings?
Sample
#
What plant is
it from?
What color
is it?
Can you see
the veins?
Can you see
the stomata?
#1
#2
#3
#4
#5
#6
15
PROJECT #4: Dirt and Sand
PROJECT #5: Paper
You will need: microscope
several clean, blank slides
several slide covers
samples of dirt and sand from different places
specimen vials to hold the samples
pipette
water
You will need: microscope
2 clean, blank slides
writing paper, tissue paper, newspaper
paper towel
pen
water
Dirt can have small pieces from rocks in it. It can also have lots of organic
material. This is made up of decomposed plant and animal material. Dead
leaves and grass get broken down and eaten up by friendly bacteria and
small animals like earthworms. Dirt that has lots of organic material in it is
called loam, and it is very good for growing flowers and vegetables.
Sand can be made up of small grains of different rock types that have been
broken down from bigger pieces. There can also be tiny fragments of shells
from long-gone sea creatures. In some places the beach sand is black
because the fine particles have been worn down from pieces of coal!
Collect dirt and sand from around your house and from different beaches.
Bring small samples home from a vacation. Use the specimen vials in your
microscope kit to hold the samples. Place a very thin layer of each sample on
a slide. You will see many small types of particles. Then add one drop of
water and place a slide cover over the sample.
Paper can be made from many things. Most paper is made from trees.
Sometimes the paper maker adds finely chopped up cotton rags. Other types
of paper are made from paper that has been used before.
Paper can be thick or thin. It can be smooth or rough. It can be very strong or
very weak. Paper is used to write on, to make packages with, to clean up
spills, to blow your nose on, and even to make clothes with. Paper to write on
is smooth, while paper tissues are soft. Paper towels are thick, while
newspaper paper (called newsprint) is thin.
Get different types of paper and compare them. Try to write on them. Try to
clean up a few drops of spilled water with each type. Then place small pieces of
the different samples between two slides. Look at them through your
microscope. If you look at small pieces from a magazine or newspaper, you will
see that the pictures are printed with tiny dots of colored ink.
Notes:
Writing
Paper
Notes:
What do you see in your samples of dirt and sand? Which samples would
make good garden soil? Be sure to wash your hands when you are finished.
Newsprint
Paper
Towel
Facial
Tissues
Can you write on
it with a pencil?
Can you write on
it with a pen?
Material
Rock
Samples
Shell
Particles
Small Pieces
from Plants
Coal
Particles
Insect
Parts
16
Sample 1
Sample 2
Sample 3
Sample 4
How well does it
pick up spilled water?
How strong is it?
How smooth is it?
Through your microscope you should have noticed that tissues and paper
towel have soft, fuzzy fibers that have big air spaces between them. These
air spaces can also hold water, which is why these two samples did well
picking up the water spill. The writing paper did not have these air spaces
and did not pick up water very well. The newsprint did not work well either
because its fibers are also closely packed.
17
PROJECT #6: Pond Water
PROJECT #7: Friendly Bacteria
You will need: microscope
a pail or bucket
an empty jar
pipette
clean, blank slides
slide covers
You will need: microscope
clean, blank slides
slide covers
pipette
yogurt (must say “active cultures” on the label)
water
petri dish
Get a sample of water from a pond in a wooded area. It is best to get a
sample in the late spring or summer. Dip your pail or bucket in the pond to fill
it. Let it stand still for about a half-hour. Then dip your jar to the bottom of the
pail and try to get some of the sludge that has settled to the bottom. Use your
pipette to place a drop on a blank slide and place a slide cover over it. To do
this, stand the slide cover on end next to the drop. Gently let it fall onto the
drop. Push it lightly with a toothpick, but not hard enough to squash any little
animals. If water has squeezed out around the edges, you can touch a tissue
to it to clean it up. Look through your microscope. Start at 150X and work
upward.
What are all of the small things you see? Are some of them alive? You will
see small bits of dirt and vegetation. If you are lucky, you may see small
creatures moving around. Some of these are tiny baby insect larvae.
Others are very tiny animals that live in the water and feed on the vegetation
and on the insect eggs and larvae. Make careful notes and drawings of what
you see.
Things I saw in pond water:
Bacteria are very small life forms that you can only see through a
microscope. Some bacteria make us feel sick. Some bacteria are friendly. Do
you like yogurt? Did you know that friendly bacteria turn milk into yogurt?
Put a drop of natural yogurt on a slide. Mix it with a drop of water and put a
slide cover over it. The sample should be spread very thinly. Look through
your microscope. Scan the area carefully at 450X and 900X. Try to look at
the thinnest areas. You should see small round objects. These are the
friendly bacteria.
Place several drops of yogurt in a petri dish or sample vial. Mix it with several
drops of warm water. Do not cover your sample. Place it somewhere relatively
warm and out of reach. Wait for one day. Using your pipette, place a drop or two
of your sample on a slide and cover it with a slide cover. Look for more bacteria.
You will probably see more bacteria. They were in the air and landed on the
yogurt. There may be different shapes than you saw the day before. Draw
pictures of what you saw.
Wash your hands thoroughly. Place the slide cover in the garbage. Wash the
slide in hot, soapy water with several spoonfuls of liquid bleach added. Ask
your parents to help you because bleach can hurt you, and the bottle is
heavy. Wash your hands again.
Notes:
Friendly Bacteria
18
Other Bacteria
19
PROJECT #8: Crystals
More Microscope Investigations
You will need:
Always keep your eyes open to find other ways to use your microscope. Here
are two examples:
microscope
2 clean, blank slides
string
a drinking glass
very warm water (enough to almost fill the glass)
a spoon (to measure and stir with)
table salt
sugar
Take a piece of string about 3 inches (7.6 cm) long and tie it around the center
of an old pencil. Now take a small drinking glass and almost fill it with hot
water from the tap. Be careful not to burn yourself. Stir in a spoonful of salt
until it is well mixed and has all dissolved. Now add another spoonful and stir it
well. If all of the salt dissolves in the water, try to mix in a third spoonful.
Now place the pencil across the top of the glass so that the string is hanging
in the salt water. Place the glass somewhere safe where small children
cannot reach it. Do not move the glass around. Let it sit undisturbed for
a day and then examine the string. Leave it another day and examine the
string again.
You will see small white cubes growing on the string. These are salt crystals.
This crystal structure is salt’s basic shape.
Try the same experiment with a strong solution of sugar. Sugar also has a
crystal shape. Is it the same as a salt crystal? Can you tell them apart?
Look at some of the crystals you have grown under your microscope.
Sometimes the little cubes will join together in strange or beautiful shapes.
Salt Crystals
20
Toothbrushes—Compare the bristles of a new toothbrush to some from an
old, well-used one. Can you see why you should not use the same
toothbrush for a long time?
Printing—Compare printed material from different sources. Compare a
postage stamp with a piece of a newspaper or magazine picture. Can you
see the fine dots? How many different colors of dots are there? How can dots
of so few colors make all of the colors you see in a color magazine picture?
Battery Installation and Instructions
1. Loosen the screws in the bottom cover of the microscope and remove the cover.
2. Install 2 AA batteries following the diagram inside the compartment.
• Do not mix old and new batteries.
• Non-rechargeable batteries are not to be recharged.
• Do not use rechargeable batteries.
• Do not mix different types of batteries: alkaline, standard (carbon zinc), or
rechargeable batteries.
• Only batteries of the same or equivalent type are to be used.
• Remove exhausted batteries from the unit.
• The supply terminals are not to be short-circuited.
• To prevent corrosion and possible damage to the product, it is recommended
to remove the batteries from the microscope if it will not be used for more than
two weeks.
3. Replace the cover and tighten the screws. Do not over-tighten.
Sugar Crystals
21
Notes:
Developed in Southern California by Educational Insights.
© Educational Insights, Inc., Gardena, CA (U.S.A.). All rights reserved. Learning
Resources Ltd., King’s Lynn, Norfolk (U.K.). Please retain this information.
Made in China.
www.EducationalInsights.com
Fabriqué en Chine.
Made in China.
Hecho en China.
Informations à conserver.
Bitte bewahren Sie unsere
Adresse für spätere Nachfragen auf.
Conservar estos datos.
TM