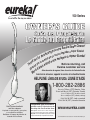
1
150 Series
O W NE R ’ S G U ID E
G uía de l P r o p iet a r io
L e G ui d e du P r o p r i ét a i r e
E u r ek a
w
e
n
r
ou
St e a m C l e an e r !
y
o r a va p o r E u r e k a !
g
d
a
n
i
i
p
s
m
i
rcha su nuevo l
u
p
va p e u r E u r e k a !
à
r
r
e
u
e
d
o
y
f
o
a
t
you la com pr votre net
k
n
té
r
Before returning, call
Tha ias po ir a che
Eureka customer service
ac
vo
¡Gr ci d'a Antes de enviar de regreso, Ilame al servico al cliente de Eureka
r
Me Avant de le retourner, appelez le service à la clientèle Eureka
HELPLINE LÍNEA DE AYUDA LIGNE D’AIDE
1-800-282-2886
8 a.m. to 7:30 p.m. (CST), Monday - Friday
10 a.m. to 6:30 p.m. (CST), Saturday - Sunday
8 a.m. a 7:30 p.m. (CST), de lunes a viernes
10 a.m. a 6:30 p.m. (CST), sábado y domingo
8 h à 19 h 30 (CST), lundi au vendredi
10 h à 18 h 30 (CST), samedi et dimanche
Promotional code: eurekaad13
Multi-surface handheld
and floor steamer
Special Offer – receive 15% off parts and accessories
when ordering online. Promotion excludes cleaners.
Limpiador a vapor portátil y para pisos,
para superficies múltiples
Oferta especial – descuento de 15% cuando compre partes y
accesorios por internet. La promoción no incluye a los limpiadores.
Offre spéciale – recevez 15 % de réduction sur les pièces et les accessoires
Nettoyeur à vapeur de plancher et
manuel multi-surfaces
www.eureka.com
lorsque vous commandez en ligne. La promotion exclut les nettoyeurs.
© 2011 Electrolux Home Care Products, Inc. Printed in China PN85013_rev1
Where to find important information
Keep this information
Write the model, type and serial number here:
Date of purchase (keep your receipt) _________________
Model number and type ____________________________
Serial number ____________________________________
Find these numbers on a label on the lower back side
of the steam cleaner. Refer to these numbers when
ordering parts and accessories or if service is needed.
Before you start your steam cleaner
Read these instructions for assembly and use. This Owner’s Guide provides
important instructions to prolong the life of your Eureka steam cleaner.
Inspection
Carefully unpack and inspect your new Eureka steam cleaner for shipping damage. Each unit is tested
and thoroughly inspected before shipping. For instructions regarding any shipping damage, call Eureka
Customer Service HELPLINE 1-800-282-2886 immediately.
Table of Contents
Important safeguards . . . . . . . . . . . . . . . . . . . . . . . . . . . . . . . . . . . . . . . . . . . . . . . . . . . . . . . . . . . . . .1-2
What’s in the carton . . . . . . . . . . . . . . . . . . . . . . . . . . . . . . . . . . . . . . . . . . . . . . . . . . . . . . . . . . . . . . . .3
How to identify parts of steam cleaner . . . . . . . . . . . . . . . . . . . . . . . . . . . . . . . . . . . . . . . . . . . . . . . . .4
Easy assembly . . . . . . . . . . . . . . . . . . . . . . . . . . . . . . . . . . . . . . . . . . . . . . . . . . . . . . . . . . . . . . . . . . . . .4
How to use floor steamer . . . . . . . . . . . . . . . . . . . . . . . . . . . . . . . . . . . . . . . . . . . . . . . . . . . . . . . . . . . .5
How to use handheld steamer . . . . . . . . . . . . . . . . . . . . . . . . . . . . . . . . . . . . . . . . . . . . . . . . . . . . . . . .6
Window squeegee, jet nozzle and brush
Problem solving . . . . . . . . . . . . . . . . . . . . . . . . . . . . . . . . . . . . . . . . . . . . . . . . . . . . . . . . . . . . . . . . . . . .7
Eureka limited warranty information . . . . . . . . . . . . . . . . . . . . . . . . . . . . . . . . . . . . . . . . . . . . . . . . . . .7
Spanish owner’s guide . . . . . . . . . . . . . . . . . . . . . . . . . . . . . . . . . . . . . . . . . . . . . . . . . . . . . . . . . . .8-15
French owner’s guide . . . . . . . . . . . . . . . . . . . . . . . . . . . . . . . . . . . . . . . . . . . . . . . . . . . . . . . . . . .16-23
Order forms and parts list . . . . . . . . . . . . . . . . . . . . . . . . . . . . . . . . . . . . . . . . . . . . . . . . . . . . . . . .24-25
! Follow caution information wherever you see this symbol.
Eureka Customer Service HELPLINE 1-800-282-2886
www.eureka.com
IMPORTANT SAFEGUARDS
When using an electrical appliance, basic precautions should always be followed, including the following:
READ ALL INSTRUCTIONS BEFORE USING THIS STEAM CLEANER
!
ENGLISH
WARNING
• Do not use outdoors.
• Do not leave steam cleaner when plugged in. Turn off the switch and unplug the electrical cord
when not in use and before servicing.
• Do not allow to be used as a toy. Close attention is necessary when used by or near children.
• Use only as described in this manual. Use only manufacturer's recommended accessories.
• Do not use with damaged cord or plug. If steam cleaner is not working as it should, has been
dropped, damaged, left outdoors, or dropped into water, return it to a service center before using.
• Do not pull or carry by cord. Do not use cord as a handle. Do not close a door on cord or pull cord
around sharp edges or corners. Do not run steam cleaner over cord. Keep cord away from heated
surfaces.
• Do not use extension cords or outlets with inadequate current carrying capacity.
• Turn off before unplugging.
• Do not unplug by pulling on cord. To unplug, grasp the plug, not the cord.
• Do not handle plug or steam cleaner with wet hands.
• Do not put any object into openings. Do not use with any opening blocked.
• Store your steam cleaner indoors in a cool, dry area.
• Keep your work area well lighted.
• Do not use without floor pad in place.
• Use extra care when cleaning stairs.
• Never direct steam towards people, animals or plants.
• Do not immerse the steam cleaner into water or other liquids. Always unplug the power cord from
the electrical socket when filling the steam cleaner.
• Never put the descaling, aromatic, alcoholic or detergent products into the steam cleaner, as this
may damage it or make it unsafe or use.
• Before filling with water, proceed as follows; (1) turn off the steam cleaner, (2) unplug the power
supply, (3) slowly lift up cap and wait 5 seconds before refilling.
• Do not leave steam cleaner unattended.
• Do not put hands or feet under steam cleaner.
SAVE THESE INSTRUCTIONS
GENERAL INFORMATION
The steam cleaner is designed as a complete change from old methods of manual floor cleaning.
This appliance is designed to obtain excellent floor cleaning and effective sanitation of these areas.
Eureka Customer Service HELPLINE 1-800-282-2886
www.eureka.com
1
Grounding instructions
This appliance must be grounded. If it should
malfunction or breakdown, grounding provides
a path of least resistance for electric current to
reduce the risk of electric shock.
This appliance is equipped with a cord having
an equipment grounding conductor and grounding
plug. The plug must be inserted into an
appropriate outlet that is properly installed and
grounded in accordance with all local codes and
ordinances.
! DANGER
Improper connection of the equipment-grounding
conductor can result in a risk of electric shock.
Check with a qualified electrician or service
person if you are in doubt as to whether the outlet
is properly grounded. Do not modify the plug
provided with the appliance – if it will not fit the
outlet, have a proper outlet installed by a
qualified electrician.
This appliance is for use on a nominal 120 volt
circuit and has a grounding plug that looks like
the plug illustrated in Figure A. A temporary
adapter which looks like the adapter illustrated in
Figure B may be used to connect this plug to a
two-pole receptacle, as shown, if a properly
grounded outlet is not available.
The temporary adapter should be used only until
a properly grounded outlet, Figure A, can be
installed by a qualified electrician. The green
colored rigid ear, lug, or the like extending from
the adapter must be connected to a permanent
ground such as a properly grounded outlet box
cover. Whenever the adapter is used, it must be
held in place by a metal screw.
NOTE: In Canada, the use of a temporary adapter is
not permitted by the Canadian Electrical Code.
Grounding blade
Fig. A
Adapter
Grounded
outlet box
Metal screw
Grounding tab
2 Eureka Customer Service HELPLINE 1-800-282-2886
Fig.
Fig.BB
www.eureka.com
What’s in the carton
REGISTR
ENGLISH
OWNER’S
GUIDE
ATION
Microfiber floor pad (blue)
Jet nozzle
Important safeguards
Cotton floor pad (white)
Window squeegee
Squeegee cover
Brush
Storage tray
Floor nozzle
SPECIAL FEATURES
Available on some models
Wire brush
Large scrubber brush
Steam cleaner
Dusting tool
and microfiber cover
Telescoping handle
Eureka Customer Service HELPLINE 1-800-282-2886
Wedge cleaning tool
and cover
Extension hose
www.eureka.com
3
How to identify parts of steam cleaner
Telescoping handle
Upper cord retainer
Telescoping handle latch
Power cord
Lower cord retainer
Handle release button
Water tank latch
Water tank cap
Push-button control switch
Water tank
Tool release button
Easy assembly
1) Align button on floor nozzle
with bottom of steamer. Push
to attach (Fig. 1).
2) Lift handle latch (Fig. 2) and
extend telescoping handle.
Close latch to lock handle.
Fig. 1
3) Push handle onto steamer
until release button snaps into
opening (Fig.3).
4) Lift handle latch and adjust
handle height to comfortable
position (Fig. 2).
5) Wrap power cord around
upper and lower cord
retainers (Fig. 4).
Fig. 2
4
Eureka Customer Service HELPLINE 1-800-282-2886
Fig. 3
Fig. 4
www.eureka.com
How to use floor steamer
!
ENGLISH
The Eureka steam cleaner is designed for use on hard-surface floors such as ceramic, stone, marble, vinyl,
linoleum, and sealed hardwood. Do not use on unsealed wood floors. If uncertain, test in an isolated area such
as a closet. NOTE: Heat and steam may remove the sheen on waxed floors or on some no-wax floors. Check
use and care instructions from flooring manufacturer.
• Be sure steamer is turned off and unplugged before filling water tank.
• Fill steamer with clear water only. Do not use chemicals, soap or detergent.
• Never use floor steamer without floor pad.
• Always direct steam away from yourself. Never direct steam toward people, animals or plants.
Using your steamer
1) Sweep or vacuum floor before using steamer.
2) Push up latch and remove water tank (Fig. 1).
3) Lift cap and fill tank with clean tap water. Do not
exceed maximum fill line (Fig. 2). In areas with
hard water, use distilled water for better
performance.
4) Put water tank back in place.
Fig. 1
Fig. 2
Fig. 3
Fig. 4
Fig. 5
Fig. 6
5) Place pad on floor with Velcro loop strips facing
up. Set floor nozzle onto pad (Fig. 3).
6) Plug in. Push button once for low steam; twice
for high steam. Push third time to turn off (Fig. 4).
7) Hold down floor nozzle and pull handle back to
comfortable angle (Fig. 5).
8) To refill steamer, turn off and unplug. Allow water
tank to cool before removing.
9) To remove pad, step on pad lip and lift off
steamer (Fig. 6).
The steamer can kill dust mites and some types of
bacteria when used properly. To disinfect a specific
area, position steamer over the area for minimum
of eight seconds. This allows the floor under the
steamer to reach approximately 170°F. Use this
procedure to disinfect floors in bathrooms, pet
sleeping quarters, etc.
!
Do not leave cleaner standing on the
floor. If you notice a whitish ‘halo,’
remove it with a few drops of vinegar.
Eureka Customer Service HELPLINE 1-800-282-2886
www.eureka.com
5
How to use handheld steamer
!
Be sure steamer is turned off and unplugged before attaching tools.
To use steamer in
handheld position:
1) Remove handle. Push handle release button
and pull handle off steamer (Fig. 1).
2) Remove floor nozzle. Push tool release button
and pull off floor nozzle (Fig. 2).
3) Attach tool. Align button with bottom of steamer.
Push to attach (Fig. 3).
4) Remove tool. Push release button and pull off
(Fig. 2).
Fig. 1
Fig. 2
Window Squeegee
• Use for windows and mirrors (Fig. 4).
• Use squeegee cover to scrub surfaces (Fig. 5).
!
Squeegee cover will be hot after use.
Turn steamer off and allow to cool
before removing cover.
Jet nozzle
• Align button with bottom of steamer.
Push to attach.
Fig. 3
Fig. 4
Fig. 5
Fig. 6
Fig. 7
Fig. 8
• Use around stove burners, faucets, toilet base –
anywhere you need a concentrated jet of steam
(Fig.6).
Brush
• Screw onto jet nozzle (Fig. 7).
• Use to scrub grout lines and other small places
(Fig. 8).
Caring for your steam cleaner
• Unplug and allow steamer to cool before storing.
• Always empty water tank after use.
• To store, attach handle and floor nozzle.
(see page 4, ‘easy assembly.’) Store steamer
upright in storage tray.
• Wash floor pad in warm water. Use only
liquid soap; do not use fabric softener.
Dry on low setting or dry flat.
6
Eureka Customer Service HELPLINE 1-800-282-2886
www.eureka.com
Problem solving
Cause
Solution
Steamer will not start.
Power plug
Push plug securely into outlet, try another outlet,
or check circuit breaker.
Control button in ‘off’ position
Push button once for low steam; twice for high steam.
No water in tank
Fill water tank. See page 5, Using your steamer.
Steamer will not
make steam.
No water in tank
Fill water tank. See page 5, Using your steamer.
Steamer leaves water
on floor.
Floor pad too wet
Change floor pad. If wood floor, dry the floor
before proceeding.
Steamer leaves whitish
halo on vinyl floor.
Steamer left standing in one
spot too long
Remove halo with a few drops of vinegar.
ENGLISH
Problem
The Eureka limited warranty
What this warranty covers
Your Eureka cleaner is warranted to be free from all defects in
material and workmanship in normal household use for a period
of one year. The warranty is granted only to the original purchaser
and members of his or her immediate household. The warranty is
subject to the following provisions:
What this warranty does not cover
• Parts of the cleaner that require replacement under normal use.
• Damages or malfunctions caused by negligence, abuse, or use
not in accordance the the Owner’s Guide.
• Defects or damages caused by unauthorized service
or the use of other than Genuine Eureka parts.
What Eureka will do
Eureka will, at its option, repair or replace a defective cleaner or
cleaner part that is covered by this warranty. As a matter of
warranty policy, Eureka will not refund the consumer’s
purchase price.
Warranty registration
Please fill out and return the warranty registration card
accompanying your cleaner.
Obtaining warranty service
To obtain warranty service you must return the cleaner or cleaner
part along with proof of purchase to any Eureka Authorized
Warranty Station. For the location of the nearest Eureka
Authorized Warranty Station or for service information visit
www.eureka.com, write or telephone toll free:
USA: 1-800-282-2886
Mexico: (55) 5343-4384
Canada: 1-800-282-2886
Electrolux Home Care
North America Service Division
P.O. Box 3900
Peoria, IL 61612
Electrolux Home Care
Electrolux Home Care
North America Service Division
5855 Terry Fox Way
Mississauga, Ontario L5V 3E4
If it is necessary to ship the cleaner outside your community to
obtain warranty repair, you must pay the shipping charges to the
Eureka Authorized Warranty Station. Return shipping charges will
be paid by the Warranty Station. When returning parts for repair,
please include the model, type, and serial number from the data
plate on the cleaner.
Further limitations and exclusions
Any warranty that may be implied in connection with your
purchase or use of the cleaner, including any warranty of
Merchantability or any warranty for Fitness For A Particular
Purpose is limited to the duration of this warranty. Some states do
not allow limitations on how long an implied warranty lasts, so the
above limitations may
not apply to you.
Your relief for the breach of this warranty is limited to the relief
expressly provided above. In no event shall the manufacturer be
liable for any consequential or incidental damages you may incur
in connection with your purchase or use of the cleaner.
Some states do not allow the exclusion or limitation of incidental
or consequential damages, so the above limitation or exclusion
may not apply to you.
This warranty gives you specific legal rights. You may also have
other rights, which may vary by state.
Eureka Customer Service HELPLINE 1-800-282-2886
www.eureka.com
7