1
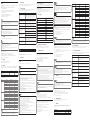
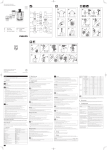
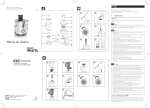
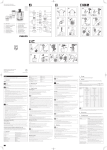
EN
Registre seu produto e obtenha suporte em
www.philips.com/welcome
Congratulations on your purchase, and welcome to Philips!
To fully benefit from the support that Philips offers, register your product at www.Philips.com/welcome.
RI1845
HR1846
HR1847
HR1848
1Important
Read this user manual carefully before you use this 4-in-1 juicer and save it for future reference.
o
b
p
n
q
m
r
c
l
s
k
j
d
i
e
melons, apples and grapes.
•• Use fresh fruit and vegetables; they contain more juice. Particularly suitable for processing in the juice extractor
are pineapples, beetroots, celery stalks, apples, cucumbers, carrots, spinach, melons, tomatoes, oranges and grapes.
•• You do not have to remove thin peels or skins. Only remove thick peels, e.g. those of oranges, pineapples and
Danger
uncooked beetroots. Also remove the white pith of citrus fruits because it has a bitter taste.
Don't immerse the motor unit of the juicer in water, any other fluid, nor rinse it under the tap. Use only a moist
cloth to clean.
Warning
•• When you prepare apple juice, remember that the thickness of the apple juice depends on the apple you are
using. The juicier the apple the thinner the juice. Choose an apple that produces the type of juice you prefer.
•• Apple juice turns brown very quickly. You can slow down this process by adding a few drops of lemon juice.
•• Fruits that contain starch, such as bananas, papayas, avocados, figs and mangoes are not suitable for processing in
the juice extractor. Use a food processor, blender or bar blender to process these fruits.
•• Check if the voltage indicated on the juicer corresponds to the local power voltage before you connect it.
•• Only connect the juicer to a grounded power outlet. Always make sure that the plug is inserted firmly into the power outlet.
•• Do not use the appliance if the plug, the power cord, or other components are damaged.
•• Assemble the juicer properly before plugging it into the power outlet.
•• Make sure that the damaged power cord is replaced by Philips, a service center authorized by Philips or similarly
•• Leaves and leafstalks of e.g. lettuce can also be processed in the juice extractor.
•• Drink the juice immediately after you have extracted it. If it is exposed to air for some time, the juice will lose its
taste and nutritional value.
•• You can get more juice output if you use softer force to push the fruit and vegetables down.
qualified persons in order to avoid a hazard.
t
•• Avoid touching the sharp blades, especially when you clean them and when the juicer is still connected to power outlet.
•• The appliance is not intended for use by persons (including children) with reduced physical, sensory, or mental
u
••
••
v
••
••
••
••
h
w
g
f
1 Clean and cut large ingredients into pieces that fit into the feeding tube.
2 Turn the control switch to the suggested speed.
3 Put your ingredients through the feeding tube.
4 Push the ingredients gently down with the pusher.
Tips
•• Remove stones from cherries, plums, peaches, etc. You do not have to remove cores or seeds from fruits like
Safety
a
EN User manual
PT-BR Manual do Usuário
Make sure the control switch is off. Then, connect to the power socket.
capabilities, or lack of experience and knowledge, unless they have been given supervision or instruction
concerning use of the appliance by a person responsible for their safety.
Children should be supervised to make sure that they do not play with the juicer.
Keep the power cord out of the reach of children. Do not let the power cord hang over the edge of the table
or worktop on which the juicer stands.
Do not plug in the juicer or press any of the buttons on the control panel with wet hands.
Never use the accessories to turn the juicer on and off.
Never let the juicer operate unattended.
Make sure the blade unit is securely fastened to the accessories before you assemble them onto the motor unit.
Caution
x
y
Notes
•• Do not exert too much pressure on the pusher, since this would affect the quality of the end result and it could
even cause the sieve to come to a halt.
•• Do not run the juicer continuously for more than 2 minutes. If you have not finished extracting juice, switch the
juicer off, and allow it to cool down to room temperature before you continue processing.
•• Do not reach into the sieve through the pulp outlet of the pulp collector.
Blending
The blender is intended for:
• Blending fluids, for examples dairy products, sauces, fruit juices, soups, mixed drinks, shakes;
• Mixing soft ingredients, for examples pancake batter or mayonnaise;
• Pureeing cooked ingredients, for example making baby food.
•• Never use any accessories or parts from other manufacturers or that Philips does not specifically recommend. If
Follow the assembling steps for blending. Remember to install the blender rubber ring before use.
••
••
••
••
••
••
••
••
••
••
••
••
••
••
Blending
••
you use such accessories or parts, your guarantee becomes invalid.
Do not remove accessories from the motor unit when the juicer is working.
Never reach into the jar or bowl with your fingers or an object while the juicer is running.
Do not exceed the quantities and processing times indicated in the recipe section.
Unplug the juicer immediately after use, e.g. before unscrewing the jar.
Avoid touching the sharp blades, especially when the juicer is still connected to power outlet.
If the blades get stuck, unplug the appliance before removing the ingredients that are blocking the blades by using a spatula.
Place the juicer on a stable, horizontal, and level surface.
Switch off and unplug the juicer from the power supply before you take out and insert any accessories from the main unit.
Always let the juicer cool down before you clean or move it.
Always clean the juicer after use. You can clean the juicer in dishwasher.
Always unplug the juicer if not used for a longer period.
This appliance is intended for household use only.
Make sure all parts are correctly mounted before you switch on the appliance.
Only use the appliance when both clamps are locked and unlock the clamps after you have switched off the
appliance.
Food coloring can discolor components. This is normal and has no impact on use.
1 Mount the the knife unit onto the jar. Fix it by turning it in the direction of the arrow.
2 Turn and lock the blender jar onto the motor unit until it locks into position, and you hear a click sound..
3 Clean and cut large ingredients into pieces, and put them in the blender jar.
4 Press the lid into place.
5 Place the measuring cup into the opening in the lid until it is firmly fixed.
6 Make sure the control switch is off. Then, connect to the power socket.
7 Turn the control switch to the suggested speed.
8 Once complete, switch off and unplug. Remove the blender jar from the motor unit.
9 Pour out the drink through the spout of the blender jar.
Notes
•• Dry ingredients must not be processed for more than 1 minute.
•• While the motor is running, ingredients (for examples: ice cubes and tomatoes) can be added into the blender
Electromagnetic fields (EMF)
through the opening in the lid.
This Philips appliance complies with all standards regarding electromagnetic fields (EMF). If handled properly and according
to the instructions in this user manual, the appliance is safe to use based on scientific evidence available today.
•• Make sure to position the sieve of the lid is in front of the spout of the jar for smooth liquid pouring.
•• To disassemble the blender, follow the instructions above in reverse order and direction.
•• Refer to the end of this user manual for the recommended quantities, speed settings, and processing time.
Built-in safety lock
This feature ensures that you can only switch on the appliance if the blender jar and lid, the mill beaker or the chopper
bowl and blade unit (specific types only) are assembled on the motor unit properly.
If the blender jar and lid, the mill beaker or the chopper bowl and blade unit are correctly assembled, the
built-in safety lock will be unlocked.
2Overview
a Measuring cup
n Chopper rubber ring (HR1847 and HR 1848 only)
b Blender jar lid
c Blender jar
o Chopper beaker (HR1847 and HR 1848 only)
p Pusher
d Blender rubber ring
q Feeding tube
e Blender blade unit
r Lid
f Central base
g Juice container
s Sieve
t Juice collector
h Juice container cover Spout
i Spout
u Locking clips
v Driving shaft
j Mill blade unit (HR1846, HR1847, and HR 1848 only)
w Pulp container
k Mill rubber ring (HR1846, HR1847, and HR 1848 only) x Switch
l Mill beaker (HR1846, HR1847, and HR 1848 only)
y Motor unit
m Chopper blade unit (HR1847 and HR 1848 only)
3
Before first use
1 Take out all the accessories.
2 Clean the parts of the juicer thoroughly before using the juicer for the first time (see chapter ‘Cleaning’).
3 Make sure all parts are completely dry before you start using the juicer.
4
e subject to change without notice
©2012 Koninklijke Philips Electronics N.V.
All rights reserved.
RI1845_HR1846_HR1847_HR1848_UM_PT-BR_V1.0_120607
314003530241
Using the juicer
Extracting Juice
The juicer can be used for preparing fresh fruit juices. Pulp, pips and skins will be separated.
Follow the assembling steps for extracting juice.
Cautions
•• Be careful not to exert too much pressure on the handle of the jar.
•• Never fill the jar with ingredients that have a temperature of over 60°C.
•• Never overfill the blender jar above the maximum level indication (1.0 liters) to avoid spillage.
•• Always insert the measuring cup into the lid before you start processing.
•• Do not run the blender for more than 3 minutes at a time. If you have not finished blending after 3 minutes,
switch the blender off and let it cool down to room temperature before you continue processing.
•• Never put your hand or any object in the jar while the blender is running.
•• Always set the control knob to 0 before you open the lid.
Grinding
The mill attachment can be used for grinding dry ingredients only.
Follow the assembling steps for grinding dry ingredients. Remember to install the mill rubber ring before use.
Put the ingredients in the beaker.
1
2
3
4
5
Screw the blade unit onto the beaker. Fix it by turning it in the direction of the arrow.
Turn the assembled mill upside down, place and lock it on the motor unit.
Turn the control switch to the suggested speed.
Once complete, switch off, unlock, and remove the mill from the motor unit.
Unscrew the blade unit from the beaker.
Notes
•• The mill is not suitable for chopping very hard ingredients like nutmeg and ice cubes.
•• Do not fill the beaker beyond the maximum indication. See the table for the advised quantities.
•• Never use the mill for more than 30 seconds without interruption.
8Environment
Chopping
The chopper attachment can be used for chopping ingredients such as nuts, meat, hard cheese, dried fruits, chocolate,
garlic, herbs, dry bread etc.
Follow the assembling steps for chopping. Remember to install the chopper rubber ring before use.
1
2
3
4
5
6
7
Put the ingredients in the beaker.
Do not throw away the appliance with normal household waste at the end of its life, but hand it in at an official
collection point for recycling. By doing this, you can help to preserve the environment.
9
Troubleshooting
If you encounter problems when using this juicer, check the following points before requesting service. If you cannot
solve the problem, contact the Philips Consumer Care Center in your country.
Screw the blade unit onto the beaker. Fix it by turning it in the direction of th©e arrow.
Turn the assembled chopper upside down, place and lock it on the motor unit.
Switch the chopper on.
Problem
Solution
When you have finished chopping, switch the chopper off.
The juicer does not work.
The juicer is equipped with a safety system. If the accessories are not
properly connected with the motor unit, the juicer does not work. Check
whether the accessories have been connected in the right way (see the
various sections). Turn off the juicer first!
Unlock and remove the assembled chopper from the motor unit.
Unscrew the blade unit from the beaker.
Tips
•• Cut large ingredients into pieces approximately 2 cm before processing.
•• If the ingredients are not evenly distributed, turn the appliance off. Open the lid and distribute the ingredients
evenly on the surface of the chopper. Turn the appliance on again.
Notes
•• The chopper is not suitable for chopping hard ingredients like coffee beans, dry beans, nutmeg and uncooked rice. Use the mill.
•• Do not use the chopper for mixing liquids. Use the blender.
•• The cutting edge of the blades are very sharp, avoid touching them.
•• Never exceed the maximum quantity. See the table for the advised quantities.
•• Never use the chopper for more than 30 seconds without interruption.
5Cleaning
It is easiest to clean the juicer, its parts and accessories immediately after use.
Notes
•• Unplug the juicer before you started cleaning it.
•• Wait until the juicer has cooled down sufficiently before cleaning it.
•• All detachable accessories can be cleaned in dishwasher.
•• Clean the motor unit with a moist cloth.
•• Do not use scouring pads, abrasive cleaning agents or aggressive liquids such as petrol, alcohol or acetone to
clean the appliance.
1 After you unplug the juicer, detach the used accessories and parts, and clean them in lukewarm, soapy water.
2 Rinse all accessories and parts under a tap.
3 To clean the blender jar, pour lukewarm water and some detergent into it.
4 Assemble the lid and the measuring cup, and then let the blender runs for a few seconds.
5 Detach the blender jar, knife unit, and remove the lid and measuring cup. Clean and rinse them as well.
6 For better cleaning, you can use the brush to clean.
6Storage
Recipes
Weight
Speed
Cucumbers/ Spinach/ Melons/ Tomatoes/ Oranges/
Lemon/ Grapes/ Berries
500g
1
Apples/ Carrots/ Pineapples/ Beetroots/ Celery/ Pear
500g
2
For blending, milling, and chopping
Features
Ingredients
Weight | Speed - 2
Time
Blending
Smoothies
Shakes & mixed drinks
1000ml
1000ml
60 sec.
60 sec.
Fruits & vegetables
1000ml
60 sec
Milling
Chopping
The motor unit gives an unpleasant
smell during the first few times of use.
This is normal for the first few applications. If the smelling continues, check
the quantity you are processing, the application time, or used speed.
The blender shows leakage.
Turn off the juicer. Release the knife unit by turning it anti-clockwise. Check whether
the rubber ring is properly assembled on the knife unit (rest on flat position).
The lid and/or measuring cup of the
blender show leakage.
Make sure the lid is attached properly, and the measuring cup fits well.
The sieve of the juicer makes contact
with the feeding tube or shows a high
vibration during processing.
Turn off the juicer. Check if the sieve is properly connected. The ribs on the
bottom of the sieve should fit properly on the motor coupling opening.
Check if the sieve is not damaged. Cracks, fissures, loose grater disc or any
other irregularity may cause malfunction.
The mill shows a high vibration,
produces a lot of noise or the blade
unit is out of alignment.
Check whether the knife is properly attached to the beaker.
The mill or chopper leaks.
Small amount of leakage is normal.
Make sure the rubber ring is assembled properly. The ring should rest
around all interface, in a flat position.
The chopper shows a high vibration,
produces a lot of noise or the knife
unit is out of alignment.
Check whether the rubber ring is assembled in a correct way.
Make sure the chopper has been properly attached to the motor unit. The
bayonets of the bowl should fit in the slots of the motor housing and "click".
Este aparelho Philips está em conformidade com todos os padrões relativos a campos eletromagnéticos (EMF). Se manuseado
adequadamente e de acordo com as instruções deste manual do usuário, a utilização do aparelho é segura, com base em evidências
científicas atualmente disponíveis.
•• Ingredientes que não contém líquidos não devem ser processados por mais de um minuto.
•• Quando o aparelho está em funcionamento, você pode adicionar alguns ingredientes, como cubos de gelo e tomates, pela
Trava de segurança interna
••
••
••
Esse recurso garante que o aparelho só seja ligado se o copo, a tampa, o copo do triturador ou do microprocessador e a unidade de
lâminas (apenas em alguns modelos específicos) estiverem encaixados corretamente no motor.
Se o copo, a tampa, o copo do triturador ou do microprocessador e as lâminas estiverem encaixados corretamente, a trava de
segurança interna será desativada.
2
Soups
500ml
60 sec
Batters
1000ml
60 sec
Sauces
1000ml
60 sec
Baby food
500ml
60 sec
Ice
6 pieces (approx. 38x30x23mm)
15 x 1sec.
Coffee
50g
30 sec.
Nuts
50-100g
30 sec
Cheese
50-100g
30 sec
Sesame seeds
50-100g
30 sec
Dry beans
50-100g
30 sec
Chili paste
50g
30 sec
Garlics
100g
5 x 1 sec.
Eggs
100g
5 x 1 sec.
Meat & fish
100g
5 sec.
Herbs
20g
5 x 1 sec.
Cheese
100g
3 x 5 sec.
Nuts
100g
2 x 10 sec.
Tip
•• For crushing ice in blender jar and chopping in chopper, it is suggested to use the pulse to have
a better result. That is to turn the appliance on and off to simulate the pulse effect.
Visão geral
Copo medidor
n
Anel de borracha do moedor (somente nos modelos
HR1847 e HR1848)
b
Tampa do copo
o
Copo do moedor (somente nos modelos HR1847 e
HR1848)
c
Jarra
p
Pilão
d
Anel de borracha do liquidificador
q
Bocal de alimentos
e
Unidade de lâminas do liquidificador
r
Tampa
f
Base central
s
Peneira
g
Recipiente para suco
t
Coletor de suco
h
Tampa do bico do recipiente para suco
u
Clipes de travamento
i
Bico
v
Ponto central do motor
j
Lâmina do triturador (somente nos modelos HR1846,
HR1847 e HR1848)
w
Coletor de polpa
k
Anel de borracha do triturador (somente nos modelos
HR1846, HR1847 e HR1848)
x
Botão
l
Copo do triturador (somente nos modelos
HR1846, HR1847 e HR1848)
y
Base
m
3
Unidade de lâminas do moedor (somente nos modelos HR1847 e HR1848)
Antes da primeira utilização
1 Remova todos os acessórios.
2 Limpe bem as peças do juicer antes de usá-lo pela primeira vez (consulte o capítulo “Limpeza”).
3 Verifique se todas as peças estão completamente secas antes de começar a usar o juicer.
PT-BR
Parabéns pela aquisição e seja bem-vindo à Philips!
Para aproveitar o suporte que a Philips oferece, registre seu produto em www.philips.com/welcome.
1Importante
4
Perigo
•• Não imerja o motor do juicer na água (ou em qualquer outro líquido) nem lave em água corrente. Para a limpeza, use
apenas um pano úmido.
Aviso
•• Antes de ligar o aparelho, verifique se a tensão indicada no juicer corresponde à tensão do local.
•• O juicer deve ser conectado somente a uma tomada aterrada. Sempre verifique se o plugue foi conectado corretamente
••
••
••
••
••
••
••
••
••
••
••
à tomada.
Não use o aparelho caso o plugue, o cabo de energia ou outros componentes estejam danificados.
Monte o juicer corretamente antes de conectá-lo à tomada.
Se o fio estiver danificado, deverá ser substituído pela Philips, por uma das assistências técnicas autorizadas ou por
técnicos igualmente qualificados a fim de evitar situações de risco.
Evite tocar nas lâminas afiadas, principalmente durante a limpeza e quando o juicer ainda estiver conectado à tomada de
energia.
O aparelho não deve ser usado por pessoas (inclusive crianças) com capacidades físicas, mentais ou sensoriais reduzidas
ou pouca experiência e conhecimento, a menos que sejam supervisionadas ou instruídas sobre o uso do aparelho por
uma pessoa responsável por sua segurança.
Crianças pequenas devem ser supervisionadas para que não brinquem com o juicer.
Mantenha o cabo de energia fora do alcance de crianças. Não deixe o cabo de energia pendurado no canto da mesa ou
na bancada em que o juicer fica.
Se você estiver com as mãos molhadas, não conecte o juicer nem pressione os botões do painel controle.
Nunca use os acessórios para ligar/desligar o juicer.
Nunca deixe o juicer funcionando sem supervisão.
Verifique se a unidade de lâminas está bem fixada nos acessórios antes de encaixá-los no motor.
Cuidado
•• Nunca use acessórios ou peças de outros fabricantes ou que não sejam especificamente recomendados pela Philips. Caso
contrário, a garantia será anulada.
•• Não remova os acessórios do motor enquanto o juicer estiver funcionando.
•• Não coloque a mão ou qualquer objeto dentro do copo/recipiente quando o juicer estiver funcionando.
•• Não exceda a quantidade nem o limite de tempo indicado na seção de receitas.
•• Desconecte o juicer logo após o uso (por exemplo, antes de desrosquear o copo).
•• Evite tocar nas lâminas afiadas, principalmente quando o juicer ainda estiver conectado à tomada.
•• Caso as lâminas fiquem obstruídas, desconecte o aparelho da tomada antes de remover com uma espátula os
ingredientes que estão obstruindo as lâminas.
•• Coloque o juicer em uma superfície estável, horizontal e nivelada.
•• Desligue e desconecte o juicer da tomada antes remover e inserir qualquer acessório na unidade principal.
•• Deixe o juicer esfriar antes de limpá-lo ou movê-lo.
•• Sempre limpe o juicer após o uso. Você pode colocar o juicer na lava-louças.
•• Desconecte o juicer da tomava após um longo período de inatividade.
•• Este aparelho destina-se somente a uso doméstico.
•• Antes de ligar o aparelho, verifique se todas as peças foram montadas corretamente.
•• Apenas use o aparelho quando as duas presilhas estiverem travadas. Elas só devem ser destravadas quando o aparelho
••
estiver desligado.
A coloração dos alimentos pode manchar os componentes. Isso é normal e não interfere no uso.
abertura da tampa.
Para extrair líquidos sem dificuldade, verifique se a peneira da tampa se encontra em frente ao bico do copo.
Para desmontar o liquidificador, siga as instruções acima na ordem e na direção inversas.
Consulte a última sessão deste manual do usuário para saber o tempo de processamento, os ajustes de velocidade e as
quantidades recomendadas.
Utilização do juicer
Extrair suco
Você pode usar o juicer para preparar sucos frescos, separar a polpa, a casca e as sementes.
Siga as etapas para extrair suco.
Verifique se o controle está desligado. Em seguida, conecte o aparelho à tomada.
1 Limpe e corte os alimentos grandes em pedaços para que caibam no bocal de alimentos.
2 Gire o controle até a velocidade indicada.
3 Coloque os ingredientes pelo bocal de alimentos.
4 Empurre levemente os alimentos com o pilão.
•• Cuidado para não exercer muita pressão no cabo do copo.
•• Nunca coloque no copo alimentos com temperatura superior a 60 °C.
•• Nunca encha o copo do liquidificador além da indicação máxima (1L), pois isso pode causar vazamento.
•• Coloque o copo medidor na tampa antes de começar a processar os alimentos.
•• Não use o liquidificador por mais de três minutos seguidos. Caso o processamento não seja concluído em até 3 minutos,
••
••
O moedor pode ser usado para moer apenas alimentos que não contêm líquido.
Siga as etapas para moer alimentos que não contém líquido. Não se esqueça de instalar o anel de borracha do moedor antes do uso.
Coloque os ingredientes dentro do copo.
1 Rosqueie a unidade de lâminas no copo. Gire a unidade de lâminas na direção da seta para fixá-la corretamente.
melões, maçãs e uvas.
beterraba, talos de aipo, maçã, pepino, cenoura, espinafre, melão, tomate, laranja e uva.
•• Não é necessário remover cascas ou peles. Remova apenas cascas grossas, como as de laranjas, abacaxis e beterrabas
••
••
••
••
••
cruas. Remova também a pele de frutas cítricas, pois elas têm um sabor amargo.
Ao preparar suco de maçã, lembre-se de que a consistência do suco depende do tipo de maçã. Quanto mais suculenta
for a maçã, menos consistente será o suco. Escolha uma maçã adequada para o tipo de suco que você deseja preparar.
O suco de maçã escurece rapidamente. É possível diminuir a velocidade do processamento adicionando algumas gotas
de suco de limão.
Não é recomendável processar frutas carnudas (como bananas, mamão papaia, abacate, figo e manga) no extrator de
suco. Use um processador de alimentos, liquidificador ou mixer para processar essas frutas.
Talos e folhas (alface, por exemplo) podem ser processados no extrator de sucos.
Beba o suco logo após extraí-lo. Quando exposto ao ar por algum tempo, o suco pode perder o sabor e o valor nutricional.
Se você não exercer muita força ao pressionar frutas, verduras e legumes, poderá obter ainda mais suco.
Lembretes
•• Não exerça muita força ao pressionar o pilão, pois isso pode interferir nos resultados e até interromper o funcionamento
da peneira.
•• Não use o juicer por mais de dois minutos seguidos. Caso você não tenha terminado de extrair o suco, desligue o juicer e
Liquidificar
O liquidificador é usado para:
Misturar líquidos, como laticínios, molhos, sucos de frutas, sopas, drinks e vitaminas;
Misturar ingredientes leves, como massa de panqueca ou maionese;
Fazer purê de alimentos cozidos, como papinhas para bebê, por exemplo.
•
•
•
Siga as etapas para misturar alimentos. Não se esqueça de instalar o anel de borracha do liquidificador antes do uso.
Misturar
1 Encaixe a unidade de lâminas no copo. Gire a unidade de lâminas na direção da seta para fixá-la corretamente.
2 Gire e trave o copo no motor até encaixá-lo corretamente (você ouvirá um “clique”).
3 Limpe e corte os alimentos grandes em pedaços para colocá-los no copo do liquidificador.
4 Encaixe a tampa em seu devido lugar.
5 Coloque o copo medidor na abertura da tampa e encaixe-o corretamente.
6 Verifique se o controle está desligado. Em seguida, conecte o aparelho à tomada.
7 Gire o controle até a velocidade indicada.
8 Em seguida, desligue e desconecte o aparelho da tomada. Remova o copo do motor.
9 Despeje a bebida pelo bico do copo.
1000ml
60 s.
Frutas e legumes
1000ml
60s
Sopas
500ml
60s
Massas
1000ml
60s
Molhos
1000ml
60s
Papinhas para bebê
500ml
60s
Gelo
6 pedaços (de aproximadamente
38 x 30 x 23mm)
15 x 1s
Café
50 g
30 s
Nozes
50 a 100g
30s
Queijo
50 a 100g
30s
Sementes de gergelim
50 a 100g
30s
Feijões secos
50 a 100g
30s
Molho de pimenta-malagueta
50 g
30s
Alho
100 g
5 x 1s
5 x 1s
Ovos
100 g
Carne e peixe
100 g
5s
Ervas
20 g
5 x 1s
Queijo
100 g
3 x 5s
Nozes
100 g
2 x 10s
Em seguida, desligue, destrave e remova o moedor do motor.
Desrosqueie a unidade de lâminas do copo.
Dica
•• Para obter os melhores resultados ao triturar gelo no copo e moer no moedor, recomenda-se usar a
função pulsar. Para isso, ligue e desligue o aparelho para simular o efeito da função pulsar.
Picar
O moedor pode ser usado para picar alimentos, como nozes, carne, queijos duros, frutas secas, chocolate, alho, ervas, pão
amanhecido etc.
Siga as etapas para picar alimentos. Não se esqueça de instalar o anel de borracha do moedor antes do uso.
Coloque os ingredientes dentro do copo.
Rosqueie a unidade de lâminas no copo. Gire a unidade de lâminas na direção da seta para encaixá-la corretamente.
Vire o moedor encaixado de ponta-cabeça e trave-o no motor.
8
Meio ambiente
Não descarte o aparelho com o lixo doméstico caso ele não esteja mais apresentando bons resultados. Leve-o até um posto de
coleta oficial para que possa ser reciclado. Ao fazer isso, você também ajuda a preservar o meio ambiente.
9
Solução de problemas
Caso haja algum problema durante o uso do juicer, verifique os seguintes pontos antes de solicitar assistência. Caso você continue
tendo problemas, entre em contato com a Central de Atendimento ao Cliente do seu país.
Ligue o moedor.
Ao terminar de moer os alimentos, desligue o moedor.
Destrave e remova o moedor do motor.
Desrosqueie a unidade de lâminas do copo.
Problema
Solução
O juicer não funciona.
O aparelho conta com um sistema de segurança. Se os acessórios não estiverem
encaixados corretamente no motor, o juicer não funcionará. Verifique se os
acessórios foram encaixados corretamente (consulte as diversas seções).
Primeiramente, desligue o juicer.
A unidade de lâminas, o motor está
obstruído.
Desligue o juicer e processe a quantidade menor.
Durante as primeiras vezes em que você
usar o aparelho, o motor produzirá um
cheiro desagradável.
Isso é normal. Caso ele continue produzindo esse cheiro, verifique a quantidade
que você está processando, o tempo de funcionamento e a velocidade usada.
Há vazamento no liquidificador.
Desligue o juicer. Remova a unidade de lâminas girando-a no sentido anti-horário.
Verifique se o anel de borracha foi encaixado corretamente na unidade de lâminas
(na posição plana).
Há vazamento na tampa e/ou no copo
medidor do liquidificador.
Verifique se a tampa e o copo medidor foram encaixados corretamente.
A peneira do juicer entra em contato
com o bocal de alimentos ou começa a
vibrar constantemente durante o preparo.
Desligue o juicer. Verifique se a peneira foi encaixada corretamente. As ranhuras
no fundo da peneira devem estar encaixadas corretamente na abertura de
acoplamento do motor.
Dicas
•• Corte os alimentos grandes em pedaços de aproximadamente 2cm antes de processá-los.
•• Caso os alimentos não sejam distribuídos por igual, ligue o aparelho. Abra a tampa e distribua os alimentos por igual na
superfície do moedor. Ligue o aparelho novamente.
Lembretes
•• O moedor não é adequado para moer alimentos duros, como grãos de café, feijões secos, noz-moscada e arroz cru. Use o moedor.
•• Não use o moedor para misturar líquidos. Use o liquidificador.
•• A ponta das lâminas são muito afiadas, evite tocar nelas.
•• Não exceda a quantidade máxima permitida. Consulte a tabela para ver as quantidades recomendadas.
•• Nunca use o moedor por mais de 30 segundos seguidos.
5
Verifique se a peneira não está danificada. Rachaduras, buracos, discos raladores
soltos ou qualquer outra irregularidade pode causar o mau funcionamento.
Limpeza
É mais fácil limpar o juicer, as peças e os acessórios logo após o uso.
Lembretes
•• Desconecte o juicer da tomada antes de começar a limpá-lo.
•• Espere até que o juicer tenha esfriado o suficiente para começar a limpá-lo.
•• Você pode colocar na lava-louças todos os acessórios removíveis.
•• Limpe a base com um pano úmido.
•• Não use palhas de aço, agentes de limpeza abrasivos ou líquidos corrosivos, como querosene, álcool ou acetona, para
limpar o aparelho.
deixe-o esfriar à temperatura ambiente antes de continuar o processamento.
•• Não toque na peneira localizada na saída de polpa do coletor.
60 s.
Vitaminas e drinks
Gire o controle até a velocidade indicada.
Lembretes
•• Remova as sementes de cerejas, ameixas, pêssegos etc. Não é necessário remover caroços ou sementes de frutas, como
•• Use frutas, verduras e legumes frescos, pois eles contêm mais suco. O extrator de suco é perfeito para processar abacaxi,
Hora
1000ml
Picar
Vire o moedor encaixado de ponta-cabeça e trave-o no motor.
•• O triturador não é adequado para triturar ingredientes muito duros como noz-moscada e cubos de gelo.
•• Não encha o copo além da indicação máxima. Consulte a tabela para ver as quantidades recomendadas.
•• Nunca use o moedor por mais de 30 segundos seguidos.
1
2
3
4
5
6
7
Peso | Velocidade - 2
Vitaminas
Moer
Moer
2
3
4
5
Ingredientes
Liquidificar
desligue o aparelho e deixe-o esfriar a uma temperatura ambiente antes de continuar o processamento.
Nunca coloque a mão ou qualquer objeto dentro do copo quando o liquidificador estiver funcionando.
Não se esqueça de mover o botão de controle até a posição 0 antes de abrir a tampa.
Dicas
••
Recursos
Avisos
a
Leia atentamente este manual antes de usar o juicer 4 em 1 e guarde-o para consultas futuras.
With 4-in-1 Juicer, you can experiment endlessly and try out all kind of recipes. You can make delicious juices, shakes,
soups, and sauces in no time at all. To give you an idea of the possibilities, you can go to www.kitchen.philips.com.
For Juicing
Ingredients
Turn off the juicer and process a smaller quantity.
Segurança
1 Keep it in dry places to avoid the sieve, blades get rusty.
2 Plug could be inserted into the main unit for storage.
7
The knife unit/ motor unit is blocked.
Para misturar, triturar, e moer
Lembretes
Campos eletromagnéticos (EMF)
1 Após desconectar o juicer da tomada, remova todas as peças e os acessórios usados e lave-os em água quente.
2 Em seguida, enxágue-os em água corrente.
3 Despeje água quente e um pouco de detergente dentro do copo para limpá-lo.
4 Encaixe a tampa e o copo medidor. Em seguida, deixe o liquidificador funcionando por alguns segundos.
5 Desencaixe o copo, a unidade de lâminas e remova a tampa e o copo medidor. Lave-os em seguida.
6 Use a escova para realizar uma limpeza mais eficaz.
6
Armazenamento
7
Receitas
1 Guarde o aparelho em locais secos para evitar que a peneira e as lâminas fiquem enferrujadas.
2 Você pode inserir o plugue no motor para armazená-lo.
Com o juicer 4 em 1, você tem inúmeras opções e pode experimentar todo tipo de receita. Você pode preparar molhos, sopas,
milkshakes e sucos deliciosos em instantes. Para saber quais são as possibilidades, acesse www.kitchen.philips.com.
Para preparar suco
Ingredientes
Peso
Velocidade
Pepino/espinafre/melão/tomate/laranja/limão/uva/frutas silvestres
500g
1
Maçã/cenoura/abacaxi/beterraba/aipo/pêra
500g
2
O moedor começa a vibrar
constantemente, emite muito barulho ou
a unidade de lâminas está desalinhada.
Verifique se a unidade de lâminas foi encaixada corretamente no copo.
Há vazamento no moedor ou no
miniprocessador.
É comum ocorrer um pouco de vazamento.
Verifique se o anel de borracha foi encaixado corretamente. O anel deve estar em
torno de toda a borda, em uma posição plana.
O moedor começa a vibrar
constantemente, emite muito barulho ou
a unidade de lâminas está desalinhada.
Verifique se o moedor foi encaixado corretamente no motor. As lâminas do copo
devem estar encaixadas nas ranhuras do motor (você ouvirá um "clique").
Verifique se o anel de borracha foi encaixado corretamente.