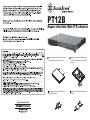
1
PT12B
Super slim thin Mini-ITX chassis
G11217540
1.
Loosen two screws from the rear of the
h
i then
th remove the
th top
t cover.
chassis
2.
Loosen four screws from the bottom
th chassis
h
i then
th remove the
th ODD
off the
bracket.
3.
Loosen three screws from the side to
remove ODD panel
4.
Install the ODD drive and secure with
screws
5.
Install the ODD bracket back into the
chassis and secure with screws.
6.
Loosen four screws from the bottom
of the chassis then remove the 2.5” SSD
hard drive bracket.
11.
Secure the CPU cooler with two screws.
7.
Install the 2.5” SSD hard drive and
secure with screws
8.
Install the 2.5” SSD hard drive bracket
back into the chassis and secure with
screws.
13.
Place the top cover back onto the case
and secure with screws.
9.
Install the I/O shield included with
your motherboard.
10.
Install the motherboard together with the
CPU cooler into the case and secure with
screws.
2.
Install the PT12’s VESA bracket onto
the VESA back plate on the monitor
from the top.
12.
Install the CPU fan into the case
and secure with two screws.
VESA Mounting
1. Secure the VESA back plate onto the
back of the monitor with four screws.
3.
Secure VESA mounting with two
screws. Installation complete