1
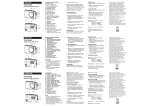
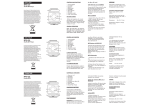
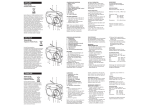
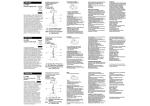
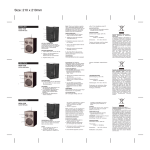
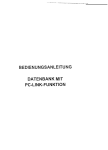
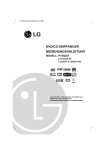
ENGLISH
LAC-2412
Digital LED Alarm Clock.
Your new Clock was manufactured
and assembled under strict
ROADSTAR quality control. Thank-you
for purchasing our product . Before
operating this unit, please read this
instruction manual carefully so that
you can operate the unit properly.
DEUTSCH
LAC-2412
LED-Digital-Uhr mit Alarm
Ihr neue Digital-Uhr wurde unter
Beachtung der strengen Roadstar
Qualitätsvorschriften gefertigt. Wir
danken Ihnen für den Kauf unseres
Produkts. Bitte lesen Sie diese
Bedienungs-anleitung vor der
Inbetrieb-nahme des Geräts durch.
FRANCAIS
LAC-2412
Horloge Digital LED avec Alarme
Votre nouvel horloge a été fabriqué et
monté en etant soumis a des
nombreaux tests Roadstar.
Avant de vous adonner a ces
activités, veuillez lire attentivement ce
manuel d'instructions afin d'être sûr
d'utiliser l'appareil comme il se doit.
CONTROLS AND FUNCTIONS
1. LED Display
2. Power Cord
3. MINUTES Button
4. HOURS button
5. CLOCK Button
6. ALARM Button
7. ALARM ON/OFF Selector
8. ALARM OFF
9. SNOOZE Button
10. Back-up Battery compartment
BACK-UP BATTERY
Maintains time and alarm memorized even
if a power failure should ocur.
1. Open battery cover on the bottom.
2. Insert and connect one 9V 006P
battery.
3. Replace battery cover.
Note: Check your battery regularly. Old or
discharged battery must be replaced to
avoid acid leaking that may damage your
unit. If the unit is not to be used for a long
time, remove the batteries from their
compartment.
(Battery is not included in the packing)
KONTROLLE UND FUNKTIONEN
1. LED-Anzeige
2. Netz-kable
3. MINUTEN-Taste
4. STUNDEN-Taste
5. ZEITEINSTELL-Taste
6. ALARM-Taste
7. ALARM EIN-/AUS-Wahlschalter
8. ALARM AUS-Taste
9. SCHLUMMER-Taste
10.BATTERIEFACH
STÜTZ-BATTERIE
1. Den Deckel des Batteriefachs in der
unteren Seite abnehmen.
2. Eine 9V Batterie einlegen.
3. Den Deckel des Batteriefachs wieder
anbringen.
Anmerkung: Die Batterie regelmässig
prüfen. Alte oder entladene Batterie
auswechseln, um eine Beschädigung des
Geräts durch auslaufende Batterie zu
vermeiden. Wenn das Gerät langere Zeit
nicht benutzt wird, die Batterie aus dem
Batteriefach herausnehmen.
(Batterie is nicht mitgeliefert).
STROMVERSORGUNG
Schliessen Sie das AC-Netzkabel an eine
230V AC-Netzsteckdose.
COMMANDES
1. Afficheur LED
2. Cable alimentation
3. Touche MINUTES
4. Touche HEURES
5. Touche HORAIRE
6. Touche d'ALARME
7. Sélecteur ALARME ON/OFF
8. Touche ALARME OFF
9. Touche SNOOZE
10.Compartiment Batterie
TIME SETTING (24 hours mode)
1. Press and keep pressed the CLOCK (5)
button
2. Press the HOUR button (4) to set hours.
3. Press the MIN. (3) button to set minutes.
4. Release the TIME (5) button.
ALARM SETTING
1. Press and keep pressed the ALARM
button (6)
2. Press the HOUR button (4) to set hours
for Alarm set-up.
3. Press the MIN. button (3) to set minutes
for Alarm set-up.
4. Release the CLOCK (5) button.
5. Move the OFF/ON selector (7) to
activate or disactivate the ALARM function.
SNOOZE FUNCTION
When the Alarm sounds, pressing the
SNOOZE button (9) will temporarily stop the
alarm sound for approx. 9 minutes. Then
the alarm will sound again.
SPECIFICATIONS
Power supply: AC 230V, 50 Hz
Backup battery: 1 x 9V 006P type
Snooze delay: 9 minutes
Dimensions 110 x 60 x 121 mm.
EINSTELLEN DER GENAUEN UHRZEIT
1. Drücken Sie die UHREINSTELL-TASTE (5)
und halten Sie sie gedrückt.
2. Drücken Sie die STUNDENTASTE (4), um
die Stunden forstschreiten zu lassen.
3. Drücken Sie die MINUTENTASTE (3), um
die Minuten forstschreiten zu lassen.
4. Lassen Sie die UHREINSTELLTASTE (5)
los.
EINSTELLEN DER WECKZEIT
1. Drücken Sie die ALARMEINSTELL-TASTE
(6) und halten Sie sie gedrückt.
2. Drücken Sie die STUNDENTASTE (4), um
die Stunden forstschreiten zu lassen.
2. Drücken Sie die MINUTENTASTE (3), um
die Minuten forstschreiten zu lassen.
4. Lassen Sie die UHREINSTELLTASTE (5)
los.
5. Stellen Sie die ALARM-Wahlschalter (7)
auf ON oder OFF für das Einschalten oder
Ausschalten der Alarm-Funktion.
SCHLUMMER-FUNKTION
Wenn der Wecker ertönt und Sie die
SCHLUMMERTASTE (9) drücken, stoppt der
Wecker zeitweilig für ca. 9 Minuten,
danach ertönt er wiede
PROGRAMMATION DE L'HORAIRE
1.Appuyer et tenir enfoncé la touche de
Réglage de l'HORAIRE (5).
2. Presser la touche de Réglage de l'HEURE
(4), pour faire avancer les heures.
3. Presser la touche de Réglage des
MINUTES (4), pour faire avancer les
minutes.
4. Relâcher la touche de réglage de
l'HORAIRE (5)
PROGRAMMATION DE L'HORAIRE DU
REVEIL
BATTERIE TAMPON
1.Appuyer et tenir enfoncé la touche de
Maintien en mémoire l'heure et l'alarme en
Réglage de l'ALARME (6).
cas de manque d'alimentation électrique.
2. Presser la touche de Réglage de l'HEURE
1. Ouvrir le logement des piles sur
(4), pour faire avancer les heures.
dessous de l’appareil
3. Presser la touche de Réglage des
2. Introduire une pile de 9V type 006P dans MINUTES (4), pour faire avancer les
le logement et la brancher au connecteur.
minutes.
3. Fermer le logement.
4. Relâcher la touche de réglage de
Note: Contrôlez votre pile régulièrement.
l'ALARME (5)
Une pile trop vieille ou déchargée devrait
5. Mettre le sélecteur de fonction de
être remplacée afin d'éviter un
l'Alarme (7) sur ON ou OFF, selon que l'on
endommagement résultant de fuites
désire activer ou désactiver la fonction
d'acide. Si l'appareil ne doit pas être utilisé ALARME.
pendant une longue période de temps,
FONCTION SNOOZE
enlevez les piles du logement.
Quand le réveil sonne, en appuyant sur la
(La batterie n'est pas fournie avec l'appareil) touche de SNOOZE (9), on l'arrête
Correct Disposal of ThisProduct(Waste
Electrical &Electronic Equipment)This
marking shown on the product orits
literature, indicates that it should notbe
disposed with other householdwastes at
the end of its working life. Toprevent
possible harm to theenvironment or
human health fromuncontrolled waste
disposal, pleaseseparate this from other
types ofwastes and recycle it
responsibly topromote the sustainable
reuse ofmaterial resources.Household
users should contact eitherthe retailer
where they purchased thisproduct, or
their local governmentoffice, for details
of where and howthey can take this item
forenvironmentally safe
recycling.Business users should contact
theirsupplier and check the terms
andconditions of the purchase
contract.This product should not be
mixed withother commercial wastes for
disposal.
Features and design could be subject to
variations without prior notice.
TECHNISCHE DATEN
Stromzufuhr
AC 230V, 50 Hz
Stutzbatterie: 1 x 9V Typ 006P
Schlummer-Verspätung: Ca. 9 Minuten
Abmessungen:110 x 60 x 121 mm.
Änderungen der technischen Daten und
des Designs sind ohne Vorankündigung
vorbehalten.
Korrekte Entsorgungdieses
Produkts(Elektromüll)Die Kennzeichnung auf
dem Produktbzw. auf der dazugehörigen
Literaturgibt an, dass es nach
seinerLebensdauer nicht zusammen mit
demnormalen HaushaltsmüIl entsorgtwerden
darf. Entsorgen Sie diesesGerat bitte getrennt
von anderenAbfallen, um der Umwelt bzw.
dermenschlichen Gesundheit nicht
durchunkontrollierte Müllbeseitigung zuschaden.
Recyceln Sie das Gerät, umdie nachhaltige
Wiederverwertung vonstofflichen Ressourcen
zu fördern.Private Nutzer sollten den Händler,
beidem das Produkt gekauft wurde, oderdie
zuständigen Behördenkontaktieren, um in
Erfahrung zubringen, wie sie das Gerät
aufumweltfreundliche Weise recycelnkönnen.
Gewerbliche Nutzer sollten sich anIhren
Lieferanten wenden und dieBedingungen des
Verkaufsvertragskonsultieren. Dieses Produkt
darf nichtzusammen mit anderem
Gewerbemüllentsorgt werden.
momentanément pendant environ 9
minutes, après quoi le réveil recommence
à sonner.
SPECIFICATIONS
Alimentation: CA 230V, 50 Hz
Batterie Tampon: 1 pile de 9V, type 006P
Délai Snooze: 9 minutes env.
Dimensions: 110 x 60 x 121 mm.
Les fonctions et le design de cet appareil
peuvent faire l'objet de modifications
sans préavis .
Comment éliminer ceproduit (déchetsd'équipements électriqueset
électroniques)Ce symbole sur le produit ou
sadocumentation indique qu'il ne doit pasêtre
éliminé en fin de vie avec lesautres déchets
ménagers. L'éliminationincontrôlée des déchets
pouvantporter préjudice a l'environnement ou
ala santé humaine, veuillez le séparerdes
autres types de déchets et lerecycler de façon
responsable. Vousfavoriserez ainsi la
réutilisation durabledes ressources
matérielles.Les particuliers sont invites
acontacter le distributeur leur ayantvendu le
produit ou a se renseignerauprès de leur mairie
pour savoir ou etcomment ils peuvent se
débarrasserde ce produit afin qu'il soit recyclé
enrespectant l'environnement.Les entreprises
sont invitées acontacter leurs fournisseurs et
aconsulter les conditions de leur contratde
vente. Ce produit ne doit pas êtreéliminé avec
les autres déchetscommerciaux.
CONTROLES Y FUNCIONES
1. Display LED
2. Cavo Alimentacion
3. Botón MINUTO
4. Botón HORA
5. Botón HORARIO
6. Botón ALARMA
7. Selector ALARMA ON/OFF
8. Botón ALARMA OFF
9. Botón SNOOZE
10. Compartimiento Batería
ESPAÑOL
PILA MEMORIA
Para mantener los ajustes del horario y del
alarma si la corriente eéctrica se
interumpe.
1. Quitese la tapa dei compartimiento de
pila
2. Introduzca una pila 9V, tipo 006P.
3. Pongase nuevamente la tapa.
Nota: Controlase periódicamente la pila.
Cambiase la pila que está vieja o
descargada para evitar daños provocados
por eventuales pérdidas de àcido. Si no
se usará el aparato por mucho tiempo
quítense la pila del compartimiento.
LAC-2412
Reloj digital LED con alarma.
El su nuevo reloj ha sido construido
según las normas estricta de control
de calidad Roadstar. Por favor leer el
manual antes de poner en
funcionamiento el equipo.
ALIMENTACION
Conectar el cable de alimentación CA (8) a
la toma de corriente CA doméstica.
COMANDI - FUNZIONI
1. Display LED
2. Cavo Alimentazione
3. TASTO MINUTI
4. TASTO ORE
5. TASTO ORARIO
6. TASTO ALLARME
7. Selettore ALLARME ON/OFF
8. Tasto ALLARME OFF
9. TASTO SNOOZE
10. Compartimento Batteria
ITALIANO
LAC-2412
Orologio digitale LED con allarme.
Il vostro nuovo orologio digitale è stato
prodotto ed assemblato sotto lo stretto
controllo di qualità Roadstar. Vi
ringraziamo di aver acquistato un
nostro prodotto. Prima di utilizzare
questo apparecchio, leggete attentamente questo manuale d’istruzioni.
BATTERIA TAMPONE
Per tenere in memoria l'orario e l'allarme
in caso di mancanza di elettricità.
1. Aprire il vano batterie sotto (10).
2. Inserire e collegare una batteria 9V
tipo 006P.
3. Richiudere il vano.
Nota: Controllate la batteria regolarmente. Una batteria vecchia o scarica deve
essere sostituita perché può perdere
materiale acido che danneggia
l'apparecchio. Se non intendete usare
l'apparecchio per un lungo periodo,
togliete la batteria dal suo vano.
(Batteria non fornita nella confezione)
LAC-2412
R
Relógio digital LED com alarma.
AUDIO VIDEO
Digital LED Alarm
Clock.
LAC-2412
Instruction manual
Bedienungsanleitung
Manuel d’instructions
Manual de instrucciones
Manuale d’istruzioni
Manual de instruções
FUNÇÃO DE COMANDOS
1. Display LED
2. Fio da corrente
3. Tecla MINUTOS
4. Tecla HORAS
5. Tecla HORARIO
6. Tecla ALARMA
7. Selector ALARMA ON/OFF
8. Tecla ALARME OFF
9. Tecla SNOOZ
10. Compartimento Pilha
PILHA MEMORIA
1. Abrir o compartimento da pilha (10),
localizado na parte de baixo do
aparelho
2. Introduzir uma pilha 006P 9V.
3. Fechar o compartimento da pilha
Nota: Deve verificar regularmente a pilha.
Caso estejam fracas, deverá substitui-la.
No caso de não utilizar o aparelho
durante um longo período de tempo,
deverá retirar a pilha (A pilha não
incluída).
AJUSTE DEL HORARIO (24 horas)
1. Mantener pulsado el botón AJUSTE
HORARIO (5).
2. Pulsar el botón HORA (4) para avanzar
la horas
3. Pulsar el botón MINUTOS (3) para
avanzar los minutos.
4. Soltar el botón AJUSTE HORARIO (5).
ESPECIFICACIONES
Alimentación: CA 230V, 50Hz
Batería: 1 pila 9V tipo 006P
Retardo Snooze: aprox. 9 minutos
Dimensiones: 120 x 50 x 97 mm
AJUSTE DEL HORARIO DEL ALARMA
1. Mantener pulsado el botón AJUSTE
ALARMA (6).
2. Pulsar el botón HORA (4) para avanzar
la horas
3. Pulsar el botón MINUTOS (3) para
avanzar los minutos.
4. Soltar el botón AJUSTE ALARMA (6).
5. Colocar el selector de Función ALARMA
(7) su ON para activar el Alarma y su OFF
para apagar.
Eliminación correcta deeste producto (materialelectrico y electrónico dedescarte)La
presencia de esta marca en elproducto o en el
materiál informativo quelo acompaña, indica
que al finalizar suvida útil no deberá eliminarse
junto conotros residuos domésticos. Para
evitarlos posibles daños al medio ambiente oa
la salud humane que representa laeliminación
incontrolada de residuos,separe este producto
de otros tipos deresiduos y reciclelo
correctamente parapromover la reutilización
sostenible derecursos materiales.Los usuarios
particulares puedencontactar con el
establecimiento dondeadquirieron el producto, o
con lasautoridades locales pertinentes,
parainformarse sobre cómo y dóndepueden
lIevario para que sea sometidoa un reciclaje
ecológico y seguro.Los usuarios comerciales
puedencontactar con su proveedor y
consultarlas condiciones del contrato de
compra.Este produco no debe
eliminarsemezclado con otros
residuoscomerciales.
FUNCION SNOOZE
Cuando el despertador sonará, pulsando
el botón SNOOZE (9) este se detendrá
momentaneamente por aproximadamente
9 minutos luego el despertador sonará
nuevamente.
ALIMENTAZIONE
Inserire il cavo di alimentazione in una
presa di corrente 230V, 50Hz.
IMPOSTAZIONE DELL'ORARIO (24h)
1. Premere e tener premuto il tasto
ORARIO (5).
2. Premere il tasto ORE (4) per regolare
le ore.
3. Premere il tasto MINUTI (3) per
regolare i minuti.
4. Rilasciare il tasto ORARIO (5).
IMPOSTAZIONE DELL'ORARIO
DELLA SVEGLIA (ALLARME)
1. Premere e tener premuto il tasto
ALLARME (6).
2. Premere il tasto ORE (4) per regolare
le ore.
3. Premere il tasto MINUTI (4) per
regolare i minuti.
4. Rilasciare il tasto ALLARME (6).
FUNZIONE SNOOZE
Quando la sveglia suonerà, premendo
SNOOZE (9), questa si fermerà
temporaneamente per circa 9 minuti e
poi la sveglia suonerà nuovamente.
ALIMENTAÇÃO
Conecte o fio na tomada AC da corrente
doméstica 230 V AC. 230V, 50Hz.
ACERTAR O RELÓGIO (modo24Horas)
1. Pressione o botão TIME (5) sem
largar
2. Pressione o botão HOUR (4) para
acertar a hora
3. Pressione o botão MINUTE (3)para
acertar os minutos.
4. Largue o botão TIME (5).
ACERTAR O ALARME
1. Pressione o botão ALARM (6) sem
largar.
2. Pressione o botão HOUR (4) para
programar a hora do despertador
3. Pressione o botão MINUTE (3) para
programar os minutos do
despertador
4. Largue o botão TIME (5).
5. Posicione o selector de Alarme ON/
OFF (7) no ON para activar a função
Alarme.
Las especificaciones estan sujetas a
cambios sin previo aviso.
DATI TECNICI
Alimentazione: CA 230V, 50 Hz
Batteria: 1 x 9V, tipo 006P
Ritardo Snooze: ca. 9 minuti
Dimensioni: 120 x 50 x 97 mm
Le caratteristiche ed il design possono
essere modificati senza preavviso.
Noi.
Roadstar Italia Spa
Viale Matteotti, 39
1-22012 Cernobbio
(Como)
Dichiariamo:
Che il modello orologio digitale LAC2412, della Roadstar è prodotto in
conformità al D.M. no. 548 datato
28/08/95 (G.U. no. 301 datata 28/
12/95) e, in particolare, è in
conformità alle prescrizioni
dell’articolo 2 comma 1.
FUNÇÃO SNOOZ
Quando tocar o despertador, pressione
o botão SNOOZ (9).
O despertador suspenderá
o toque por cerca de 9 minutos.
Após este tempo, começará
novamente a tocar.
ESPECIFICAÇÕES
Fonte de alimentação: 230V / 50 Hz CA
Pilha (para memoria): 006P 9V
Suspensão SNOOZ: 9 minutos
Dimenções: 120 x 50 x 97mm
As especificacões e o desenho
podem ser alterados sem pré-aviso.