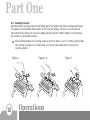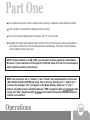
1
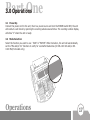
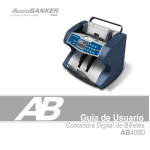
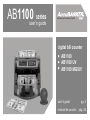
AB1100
series
user’s guide
because your money counts
digital bill counter
AB1100
AB1100 UV
AB1100 MG/UV
user’s guide
manual de usuario
pg. 2
pág. 32
WARNING
Before turning the power on, please make sure that there are no
objects obstructing the operation of the rollers and wheels. When
operating the models AB-1100 UV and AB-1100 MG/UV, please wait 5
minutes to allow the UV system reach its maximum detection
capability
AccuBANKER and its logo are registered trademarks or trademarks of Hilton Trading Corp. All Rights Reserved.
2
Contents
Table of Contents
GETTING STARTED:
BASIC INSTRUCTIONS FOR ALL MODELS
IMPORTANT SAFETY INSTRUCTIONS
OTHER SAFETY CONSIDERATIONS
BOX CONTENTS
CLEANING OF THE MACHINE
5
7
8
9
10
PART ONE:
1.0
1.1
2.0
3.0
GENERAL CONTROLS AND PARTS
SPECIFIC CONTROLS
FEATURES
2.1
Counting Mode
2.2
Preset Batching Function
2.3
ADD Function
2.4
MG and/or UV Detection Functions
2.5
Automatic Start
2.6
Emergency Stop Feature
2.7
Auxiliary Counting Screen
OPERATIONS
3.1
Power Up
3.2
Mode Selection
Table of Contents
11
13
15
15
15
15
15
15
16
16
17
17
17
3
Contents
PART ONE (Cont.)
3.3
3.4
3.5
3.6
3.7
3.8
3.9
3.10
Counting Function
UV Detection Function
“Double Detection” Function
“ADD” Function
“Batch” Function
Size Detection Function
Bill Density Detection Function
Emergency Stop Feature
18
20
21
22
22
23
23
24
PART TWO:
4.0
5.0
6.0
7.0
4
TROUBLESHOOTING OPERATIONAL PROBLEMS
4.1
Avoiding Problems
4.2
Jamming
4.3
When Counting Numbers Are Wrong
4.4
Additional Recommendation
MAINTENANCE OF THE MACHINE
5.1
Verifying the Adjustment of the Hopper Plate
5.2
Flipping the Rubber Tongue
ERROR MESSAGES AND THEIR MEANING
SPECIFICATIONS
Table of Contents
25
25
25
26
26
27
27
28
30
31
Getting Started
Basic Instructions for all Models
The AB-1100 Series is the vanguard of our evolution in bill counting technology. Its compact and
stylish design is as remarkable as its integrated electronics and multifunction capabilities. But the
AB-1100 Series is more than just looks and hi-tech electronics. It is ready to tackle the most
demanding tasks, from counting large amounts of cash, to batching custom bill quantities. The
power to dramatically reduce labor and counting losses is now at the reach of your hands.
The AB-1100 Series make an invaluable aid in banks, casinos, supermarkets, movie theaters, retail
locations and many other environments where moneys are used.
The model numbers and main features relevant to each type of machine, are given below:
Model AB-1100: sturdy, well equipped and utterly reliable, this machine counts at a rate of
1000 bills per minute, adds and creates batches. This is the base model in the 1100 Series,
and the most cost-effective choice when looking for bill counting equipment.
Model AB-1100 UV: In addition to the functions of the AB-1100, this machine has an integrated
counterfeit banknote detection device that works by means of UV Fluorescent Detection. The
unit alerts the user when a suspicious bill is detected.
Model AB-1100 MG/UV: In addition to the functions of AB-1100, this machine has two means
of counterfeit banknote detection which are: 1) Magnetic Detection and 2) UV Fluorescent
Detection. This is the most advanced unit in the AB-1100 Series.
Basic Instructions
5
Getting Started
This manual has been compiled to provide complete and clear instructions for operating the machine.
It is composed by two major parts:
Part One: Basic instructions for all models in the series.
Part Two: Instructions on how to handle operational problems, specifications, etc.
Before using the machine, read this manual thoroughly. Pay special attention to Part One, in order to
familiarize yourself with the functions and operations of the machine.
6
Basic Instructions
Getting Started
Important Safety Instructions
When using this bill counter, basic safety precautions should always be followed to reduce the risk of
fire, electric shock or injury to persons; including the following:
Warning
Caution
Do not use this product in areas where it may be exposed to
water or other liquids.
When unplugging the power plug, do not pull it by
the cord but rather grip the plug to pull it out. Not
following these instructions may result in electric
shock, fire or damage to the unit.
Unplug this product from the wall outlet before cleaning. Do
not use liquid or aerosol cleaners. Use a damp cloth for
cleaning.
Do not use the unit if the power cord is damaged or
if the plug socket contact is loose. Not following
these instructions may result in electric shock, fire
or other hazards.
To reduce the risk of electric shock, do not disassemble this
product. Take it to qualified service personnel when service or
repair work is required. Opening or removing covers -like the
rear cover plate- may expose you to dangerous voltages or
other risks. Incorrect re-assembly can cause electric shock
when the appliance is subsequently used.
Do not place heavy objects over the cord and do
not bend it excessively since it could get damaged.
Not following these instructions may result in
electric shock, fire or other hazards.
Only use the cable provided with the unit. The use of other
cables may result in electric shock, fire or cause serious
damage to the unit.
When not using the unit for a long period of time,
remove the power plug from the wall outlet.
Do not operate the unit in areas with high temperature or
high humidity since it may prevent it from working correctly.
Safety Instructions
7
Getting Started
Other Safety Considerations
Read and understand all of the instructions.
Follow all warnings and instructions marked on the
unit.
The slots and openings in the back or bottom of the
case, are provided for ventilation, to protect the unit
from overheating. These openings should never be
blocked or covered by placing the product on the bed,
sofa, rug, or similar surfaces. This product should
never be placed near or over a radiator or heat
register. This product should not be placed in a built-in
installation unless proper ventilation is provided.
This product should be operated only from the type of
power source indicated in the user’s guide. If you are
not sure of the type of power supply in your location,
consult your dealer or local power company.
This product is equipped with a three-wire grounding
type plug, a plug having a third (grounding) pin (110V
models, only). This plug will only fit into a grounding
type power outlet. This is a safety feature. If you are
unable to insert the plug into the outlet, contact your
electrician to replace the outlet. Do not try to defeat
the safety purpose of the grounding type plug.
8
Never push objects of any kind into the unit
through case slots, since they may touch
dangerous voltage points or shortcut parts,
resulting in a risk of fire or electric shock. Never
spill liquids of any kind on the product.
Unplug this product from the wall outlet and
refer servicing to qualified service personnel
under the following conditions:
!
!
!
!
!
!
When the power supply cord or plug is
damaged or frayed.
If liquid has been spilled into the unit.
If the unit has been exposed to rain or water.
If the unit does not operate normally by
following the operating instructions. Adjust
only those controls that are covered by the
operating instructions. Improper adjustment
of other controls may result in damage and
will often require extensive work by a
qualified technician to restore the product to
normal operation.
If the product has been dropped or the case
has been damaged.
If the product shows a noticeable change in
performance.
Safety Considerations
Getting Started
Box Contents
When opening the box, verify that all of the items described below are included. If any item is
damaged or missing, contact the dealer where the unit was purchased.
Bill Counter Unit
Auxiliary Counting
Screen
Box Contents
Power Cable
Other Items
Only use the cable provided
with the product. The use of
other cables may result in
electric shock, fire or cause
serious damage to the unit.
Cover, User’s Guide and
Warranty Card.
9
Getting Started
Cleaning of the Machine
WARNING: BEFORE DOING ANY CLEANING, TURN THE POWER SWITCH OFF AND DISCONNECT THE
POWER CORD FROM THE MACHINE. KEEP IN MIND THAT PROBLEMS OR DEFECTS THAT ARISE FROM
LACK OF PERIODIC MAINTENANCE ARE NOT COVERED BY THE WARRANTY
A) Cleaning the Optical Sensors
It is important to clean all the sensors in the unit to avoid any
paper particles or dust from sticking to the light-transmitter or
the light-receiver sensors. This should be done every day, if
possible. The glass surfaces of the detectors may also be wiped
with a soft cloth soaked with alcohol. The graphic on the right
shows the approximate position of the sensors.
SENSOR
B) Cleaning the Inner Side of the Machine Periodically
It is necessary to clean the inside of the machine once a month
or when needed. Unplug the machine and lift the top cover
(where the handle lays) to gain access to the interior.
C) Additional Recommendations
Avoid operating the machine in a dusty or dirty room. To guard
the machine from the elements, always keep it protected with
the supplied cover (when not in use).
SENSORS
SENSORS
10
Cleaning of the Machine
Part One
1.0 General Controls and Parts
Hopper Plate
Counting Guides
Hopper
Retractable Handle
Frontal Plastic Platform
Stacker
Optical Sensors
User Interface
Emergency Stop Button
Auxiliary Counting Screen
General Controls and Parts
11
Part One
Fastening Screws
Power Switch
Power Outlet
Bill Thickness Adjustment Screw
Rubber Tongue
Auxiliary Counting Screen Jack
12
General Controls and Parts
Part One
1.1 Specific Controls
AB1100
Preset Number Display (Batch display)
Counting Number Display (Counter)
Batch “+” Button (To add)
Batch “-” Button (To subtract)
Batch Button (Preset to 100, 50 and 20)
Restart Button (For manual restart)
ADD Button (Addition function)
“ADD” LED Indicator
AB1100 UV
“BATCH” LED Indicator
UV Button (Ultraviolet detection)
“UV” LED Indicator
Specific Controls
13
Part One
Preset Number Display (Batch display)
AB1100 MG/UV
Counting Number Display (Counter)
Batch “+” Button (To add)
Batch “-” Button (To subtract)
Batch Button (Preset 100, 50 and 20)
Restart Button (For manual restart)
ADD Button (Addition function)
“ADD” LED Indicator
“BATCH” LED Indicator
UV Button (Ultraviolet detection)
“UV” LED Indicator
MG Button (Magnetic detection)
“MG” LED Indicator
14
Specific Controls
Part One
2.0 Features
2.1 Counting Mode
Once turned on, the machine defaults to this mode, counting the bills placed in the hopper.
2.2 Preset Batching Function
Counts bills per batch up to the numbers preset with the “Batch” and “+” or “-” buttons. In the batch
preset mode, the machine is restarted by taking out the batched bills from the stacker. The unit will
batch all inserted bills in the preset batch amount.
2.3 ADD Function
Counts all bills placed in the hopper and will add to the total of all consecutive operations up to 9999
units. Removing the counted bills from the stacker will not reset the counting quantity displayed on
the screen.
2.4 MG and/or UV Detection Buttons (for AB-1100 UV and/or AB-1100 MG/UV, only)
Counts all bills and will detect counterfeit bills using different detection methods. The AB-1100 UV
employs UV fluorescence detection. The AB-1100 MG/UV employs both magnetic and UV detection
systems.
2.5 Automatic Start
The machine starts counting when bills are placed in the hopper.
Features
15
Part One
2.6 Emergency Stop Feature
The unit stops automatically when the resistance in the feeding friction rollers increases abnormally.
Moreover, a red octagonal button located on the upper left side of the unit stops all operations when
depressed.
2.7 Auxiliary Counting Screen
The AB-1100 Series is equipped with an auxiliary counting screen. This accessory will help the user
visualize the quantity of counted bills when the unit is placed out of his range of vision. It also serves
the purpose of allowing third parties to visualize the count. The screen is automatically activated by
plugging it to the unit (see figure 1).
Insert the plug
into the jack
16
Features
Part One
3.0 Operations
3.1 Power Up
Connect the power cord to the unit, then to a power source and turn the POWER switch ON; the unit
will conduct a self-check by spinning the counting wheels several times. The counting number display
will show “0” when the unit is ready.
3.2 Mode Selection
Select the function you want to use: “ADD” or “BATCH”. When turned on, the unit will automatically
set the “MG and/or UV” functions to verify for counterfeit banknotes (for AB-1100 UV and/or AB1100 MG/UV models only).
Operations
17
Part One
3.3 Counting Function
Once the bills are correctly placed in the hopper plate, the machine will start counting automatically.
The number of counted bills will be shown on the “Counter” display. Moreover, once the bills are
removed from the stacker, the “Counter” display will clear and the “Batch” display in turn will show
the number of counted bills instead.
Place the bills between the counting guides as shown in figure 1 and 1-b. Swiftly, push the bills
with a finger (see figure 2) to make them rest on top of the hopper plate, in the correct
counting position.
Figure 1
18
Figure 1-b
Operations
Figure 2
Part One
The machine will count until the hopper plate is empty or reaches a preset batching number.
The number of counted bills is displayed on the counter.
The next counting operation will start again- with “0” on the screen.
Loading the hopper with additional bills, without removing the previous notes accumulated on
the stacker, will start the next counting operation automatically. The newly counted quantity
will be added to the previous one.
NOTE: If your machine is an AB-1100, you may start counting operations immediately.
Moreover, if your machine is of the type UV or MG/UV, allow it to idle for five minutes to
attain optimal operation performance.
NOTE: the unit can be set to “include” or not “include” any suspicious bills in the count
(AB-1100 UV and AB-1100 MG/UV only). This is done by pressing the “-” button for 3
seconds. The message “Uxx” will appear in the Batch display. Using the “+” and “-”
buttons, the setting can be switched between “U00” (suspicious bills not included in the
count) and “U22” (suspicious bills included in the count). Press the RESTART button to
confirm your selection.
Operations
19
Part One
3.4 Ultraviolet Detection Function
(Available for the models AB-1100 UV and/or AB-1100 MG/UV, only)
Ultraviolet Fluorescence Detection Function or UV: The UV detection function is selected or
deselected by pressing the UV button in the function console. The UV function is able to check all
types of banknotes containing UV features.
Note: The ultraviolet function will work at its best five minutes after the machine has
been turned on.
Operation
By default, the UV function is automatically turned on when the unit is powered up. The counting
operation proceeds as normal. If the machine detects a counterfeit bill, it will stop counting. The unit
will emit triple beeping sound. Moreover, the batch display will show the message “A” and the UV
indicator will blink, alerting the user of the presence of a dubious bill. The problematic bill will be the
last one on the stacker. If the bills placed in the stacker including the dubious one are not removed
from the unit, the UV indicator will keep blinking and the triple beep alarm will cycle every 10
seconds.
To adjust the sensitivity of the UV function, press the UV button for 3 seconds. The batch number
display will show the current sensitivity level (increasing sensitivity from 0 to 10). Using the “+” or
“-” buttons, choose the desired sensitivity level. To set the desired sensitivity level, press RESTART.
20
Operations
Part One
3.5 “Double Detection” Function (available for the model AB-1100 MG/UV only)
The AB-1100 MG/UV incorporates the Magnetic Detection and Ultraviolet Fluorescence Functions. By
default, the MG and UV functions are automatically turned on when the unit is powered up. The
chances of detecting a counterfeit bill are multiplied when both MG and UV functions are on.
Magnetic Detection Function or MG: The MG detection function is selected or deselected by
pressing the MG button in the function console. The magnetic function is able to check all types
of banknotes containing magnetic features.
Operation
By default, the MG function is automatically turned on when the unit is powered up. The counting
operation proceeds as normal. If the machine detects a counterfeit bill, it will stop counting. The unit
will emit a triple beeping noise. Moreover, the batch display will show the signal “b” and the MG
indicator will blink, alerting the user of the presence of a dubious bill. The problematic bill will be the
last one on the stacker. If the bills placed in the stacker including the dubious one are not removed
from the unit, the MG indicator will keep blinking and the triple beep alarm will cycle every 10
seconds.
To adjust the sensitivity of the MG function, press the MG button for 3 seconds. The batch number
display will show the current sensitivity level (increasing sensitivity from 0 to 10). Using the “+” or
“-” buttons, choose the desired sensitivity level. To set the desired sensitivity level, press RESTART.
Ultraviolet Fluorescence Function or UV: For more information about his function, go to
section 3.4.
Operations
21
Part One
NOTE: The ultraviolet and magnetic detection systems integrated in the AB-1100
(models UV and MG/UV only,) are valuable instruments that help the user verify the
legitimacy of bills. However, the AB-1100 (models UV and MG/UV only,) like all other
counters with integrated detectors found in the market, cannot guarantee the
legitimacy of any bill analyzed by it due to the unpredictable techniques or advances
that counterfeiters may introduce.
3.6 “ADD” Function
Addition can be performed by pressing the “ADD” button (indicator must light up). In this case,
removing the counted bills from the stacker will not clear the quantity counted and shown on the
screen. The next bills placed in the hopper will be counted and added to the preceding quantity. The
total amount of added bills will be shown on the Counter screen. To clear the count, press the “ADD”
button (the indicator must be OFF).
If the machine stops during the addition operation due to an error message, remove the cause of the
error. Remove the bills from the stacker and from the feeding rolls, if any. The unit will resume
counting after the problem has been solved.
3.7 Size Detection Function
This feature will allow you to detect bills shorter than the first one counted by the unit. Press down
the “ADD” button for 3 sec to activate it. You will notice that the batch window will display “C00C10”. To deactivate this feature press the “-” button until “C00” appears on the screen. To activate it
press the “+” button in the range of 01 to 10.
22
Operations
Part One
3.8 Bill Density Detection Function
This feature will allow you to detect bills thinner or older than the first one that is counted by the unit.
To activate it, press down the “Batch” button for 3 sec. You will notice that the batch window will display
“C00-C10”. To deactivate this feature press the “-” button until “C00” appears on the screen. To activate it
press the “+” button in the range of 01 to 10.
3.9 “BATCH” Function
The preset batch function can be selected or deselected by pressing the “Batch” button. The batch number
is indicated on the “Batch” display. By default, when pressing the “BATCH” button, the batch number is set
to “100”. By pressing it again, the batch number can be changed (to 50 the first time and to 20 the second
time). Custom batching can be set in amounts between 1 and 999. The custom quantity can be set by
pressing the “+”or “-” buttons. Pressing the “+” or “-” buttons for more than 0.5 sec. will cause the set
number to increase or decrease, 5 units at a time, every 0.25 sec. Pressing the “+” or “-” buttons with
single and fast strokes will cause them to increase or decrease 1 by 1. To clear this function, press the
“BATCH” button until the indicator is OFF.
Once the hopper is loaded, the machine will start counting and will stop when the counted quantity reaches
the preset batch quantity (batch counting only).
To repeat the batch counting operation under the same preset batch quantity, just remove the counted bills
from the stacker. The unit will batch the next group of bills under the same settings.
If you wish to keep batching without removing the bills from the stacker, press the RESTART button.
If the counted number does not tally with the preset number, the counter will show the counted quantity
with a blinking number.
When counting with the detection modes MG and/or UV enabled (AB-1100 UV and/or AB-1100 MG/UV
models, only), the machine will stop automatically when detecting counterfeit currency. The counting
Operations
23
Part One
function can be resumed by removing the bills from the stacker. The number on the counter display
will include the dubious bill.
3.10 Emergency Stop Feature
The AB-1100 Series is equipped with an emergency
stop feature which protects the user in the event that
unintended objects (e.g. neckties, scarves, etc) reach
the feeding friction rollers. This fully automatic feature
works by means of a sensor that measures the
resistance on the feeding friction rollers. If the
resistance increases beyond the parameters of normal
bill counting, the counting operation is stopped.
In the event of an emergency, this feature can be
activated manually by depressing the red Emergency
Stop Button located on the upper left side of the
machine. The button has a red LED indicator that blinks
when the function is ON. Once ON, the unit will show
the message “EA7” on the batch number display. Once
the Emergency Stop feature is activated, all operations
will be canceled. The machine must be turned OFF; the
foreign objects removed, and turned back ON to
continue the bill counting operations.
24
Operations
Emergency Stop Button
Part Two
4.0 Troubleshooting Operational Problems
4.1 Avoiding Problems
Pre-select the bills you are going to count in the machine. Do not attempt to count bills:
With staples or metal clips
Torn or washed
Profusely stained
Covered with adhesive media (for AB-1100 UV and/or AB-1100 MG/UV models, only)
4.2
Jamming
Before you start operating the machine, make sure that there are no foreign elements (such as
silica bags) obstructing the moving parts of the unit.
To avoid jamming, load the bills as indicated in this manual. The bill facing you (in front) will go
in first.
If jamming occurs, make sure to turn the machine off. Carefully remove, with a wood piece or
a pencil, the bills stuck in the system. Look for any foreign materials -like paper clips, rubber
bands, etc. Remove them (if any).
Check for proper tightness of the bill thickness adjustment screw (#15) in the back of the unit.
Verify proper placement of the bills in the hopper.
Resume counting.
Troubleshooting
25
Part Two
4.3
When Counting Numbers are Wrong
Turn the bill thickness adjustment screw (#15) counter-clockwise to reduce friction, and vice
versa.
Adjust the rubber tongue position until the counting numbers are right.
Verify the adjustment of the hopper plate bracket. If loose, tighten it according to the
instruction found in the Cleaning and Maintenance of the Machine section
Remove the black rubber tongue. Flip it (one side may be worn out). Detailed instructions to
complete this procedure can be found in the Maintenance of the Machine section.
4.4 Additional Recommendation
The models AB-1100 UV and AB-1100 MG/UV should never be placed under intense light
sources. The sensibility of the UV sensors may be affected.
26
Troubleshooting
Part Two
5.0 Maintenance of the Machine
5.1 Verifying the Adjustment of the Hopper Plate
The hopper plate ensures proper feeding of the bills for counting. It is secured to the back of the unit
by means of two pivoting points and a magnetic lock. To verify that the Hopper Plate is properly
adjusted, press or lift the hopper plate and look for any displacement (see figure 1). If any
displacement occurs, press or lift the hopper plate until the magnetic lock holds the piece in place.
Figure 1
Maintenance
27
Part Two
5.2 Flipping the Rubber Tongue
When should the rubber tongue be flipped?
The rubber tongue should be flipped when the bill thickness adjustment screw does not solve the
problem of improper banknote feeding.
Procedure: press the hopper plate (metal plate) downward (see figure 1). While pressing the hopper
plate down, remove the rubber tongue located underneath the hopper plate (see figure 2).
Figure 1
28
Maintenance
Figure 2
Part Two
Flip the rubber tongue and place it back in its original position (see figures 3, A and B). Make sure
that the rubber tongue is 1/4" ahead of the tips of the metal plate that holds it down (see figure 4).
Once both sides of the rubber tongue have been used, contact your local service representative or
AccuBanker to get a new one.
A
Figure 3
B
Figure 4
Make sure that the
rubber tongue is
1/4” ahead of the
tips of the metal
plate that holds it
down
Make sure to flip
the rubber tongue
180 degrees
Maintenance
29
Part Two
6.0 Error Messages and their Meaning
Message Error
Solution
Suspicious bill detected by the UV
system (ultraviolet)
Problem in the UV system
Remove the suspicious bill from the stacker. Recount the bills
Lower the sensitivity of the UV detector. Recount the Bills
Suspicious bill detected by the MG
system (magnetic)
Problem in the MG system
Remove the suspicious bill from the stacker. Recount the bills
Lower the sensitivity of the MG detector. Recount the Bills
Chained bills (2 or more bills fed)
Bills jammed inside the unit
Verify that the hopper is not loose
Adjust if necessary
Problem with the left counting sensor
Clean the sensor
Problem with the right counting sensor
Clean the sensor
Problem with the stacker sensor
Clean the sensor
Problem or obstruction of the MG
system
Clean the system
Problem with the hopper sensor
Clean the sensor
Emergency stop function activated
Turn the machine OFF and then back ON
to resume bill counting
Bill size problems (half bill)
Remove the bill from the stacker. Recount all bills
80% of all the Operational Problems may be caused by dust and dirt inside the machine.
Keeping the machine clean may avoid malfunctions
30
Error Messages
Part Two
7.0 Specifications
Ambient Temperature: 32°F - 104°F (00 C - 400 C)
Ambient Humidity: 25% - 80%
Feeding System: Roller Friction System
Hopper Capacity: 100 old bills or 200 new bills
Stacker Capacity: 100 old bills or 200 new bills
Size of Countable Bills: 50mm X 100mm - 100mm X 185mm
Thickness of Countable Bills: 0.06mm - 0.12mm
Counting Number Display: Four Digits Green LED (large)
Batch Preset Number Display: Three Digits Red LED (small)
Power Source: Single Phase 110V ± 10% RMS, 60Hz. Also available in 220V ± 10% RMS,
50Hz
Power Consumption: < 40 Watts
Dimensions: 9 ½” x 11” x 7” (241 mm X 279 mm X 178 mm)
Weight: 13.6 lb (6.2 kg) (approx)
Counting Speed: 1,000 bills per minute
Specifications
31
PRECAUCIÓN
Verifique que no haya ningún objeto obstruyendo el libre movimiento de
los rodillos y ruedas receptoras de billetes antes de encender la
máquina. Encienda y espere 5 minutos antes de operar los modelos AB1000 UV y AB-1000 MG/UV, para que los sistemas ultravioleta y/o
magnético operen apropiadamente
AccuBANKER y su logo son marcas registradas de Hilton Trading Corp.
Todos los derechos reservados.
Contenido
Índice
INSTRUCCIONES BÁSICAS:
INSTRUCCIONES BÁSICAS PARA TODOS LOS MODELOS
INSTRUCCIONES IMPORTANTES DE SEGURIDAD
OTRAS CONSIDERACIONES DE SEGURIDAD
CONTENIDO DE LA CAJA
LIMPIEZA DE LA UNIDAD
35
37
38
39
40
PRIMERA SECCIÓN:
1.0
1.1
2.0
3.0
CONTROLES Y PARTES GENERALES
CONTROLES ESPECÍFICOS
CARACTERÍSTICAS
2.1
Modo de Conteo Regular
2.2
Función de Conteo de Agrupaciones Preseleccionadas (BATCH)
2.3
Función de Adición “ADD”
2.4
Funciones de Detección Magnética y Ultravioleta
2.5
Arranque Automático
2.6
Parada de Emergencia
2.7
Pantalla de Conteo Auxiliar
OPERACIONES
3.1
Encendido
3.2
Modos de Conteo
Índice
41
43
45
45
45
45
45
45
46
46
47
47
47
33
Contenido
PRIMERA SECCIÓN (CONT.)
3.3
3.4
3.5
3.6
3.7
3.8
3.9
3.10
Función de Conteo
Función de Detección Ultravioleta
Función de Detección Doble
Función de Adición “ADD”
Función de Detección de Tamaño
Función de Detección de Densidad
Función de Conteo de Agrupaciones Preseleccionadas (BATCH)
Parada de Emergencia
48
50
51
52
52
53
53
54
SEGUNDA SECCIÓN:
4.0
5.0
6.0
7.0
34
CORRECCIÓN DE PROBLEMAS DE OPERACIÓN
4.1
Prevención de Problemas
4.2
Atascamiento
4.3
Cuando el Conteo es Incorrecto
4.4
Recomendación Adicional
MANTENIMIENTO DE LA UNIDAD
Verificando el Ajuste de la Bandeja Alimentadora
5.1
Volteando la Lengüeta de Goma
5.2
MENSAJES DE ERROR Y SU SIGNIFICADO
ESPECIFICACIONES
Índice
55
55
55
56
56
57
57
58
60
61
Instrucciones Básicas
Instrucciones básicas para todos los Modelos
La Serie AB-1100 representa la vanguardia de nuestra evolución en tecnología de conteo de billetes.
Su diseño -compacto y elegante- es tan notable como su electrónica integrada y capacidades
multifunción. Sin embargo, las ventajas de la Serie AB-1100 van más allá de su apariencia y
avanzada tecnología. Estas unidades están listas para afrontar las tareas más exigentes, desde
contar grandes cantidades de billetes, hasta agrupar con precisión cantidades preseleccionadas. La
capacidad de reducir horas hombre y pérdidas debido a conteos incorrectos está ahora al alcance de
sus manos.
La Serie AB-1100 es una ayuda invaluable para labores de conteo en bancos, casinos,
supermercados, cines, establecimientos de venta al detalle, y cualquier otro negocio en el que se
requiera contar dinero.
Los modelos y características principales de cada variante son las siguientes:
Modelo AB-1100: resistente, duradera y confiable, es capaz de contar 1000 billetes por
minuto, sumar, y crear agrupaciones. Este es el modelo base de la Serie 1100, y la mejor
opción costo/inversión en contadoras de billetes.
Modelo AB-1100 UV: Basada en la AB-1100, esta máquina tiene una función adicional:
reconocer billetes falsos utilizando un sistema integrado de detección ultravioleta. La unidad
alerta al usuario cuando detecta un billete sospechoso.
Modelo AB-1100 MG/UV: Basada en la AB-1100 esta unidad ofrece dos sistemas de detección
de billetes falsos: 1) magnético y 2) ultravioleta. Este es el modelo más avanzado de la serie
AB-1100.
Instrucciones Básicas
35
Instrucciones Básicas
Este manual contiene instrucciones completas acerca de la operación de la máquina. Consiste de dos
secciones principales:
Primera Sección: Instrucciones básicas para todos los modelos de la serie.
Segunda Sección: Instrucciones para la solución a problemas de operación, etc.
Lea este manual y familiarícese con las instrucciones de la Primera Sección antes de operar la unidad.
36
Instrucciones Básicas
Instrucciones Básicas
Instrucciones Importantes de Seguridad
Al usar la contadora de billetes, tome estas precauciones de seguridad para evitar riesgos tales como
incendio, descarga eléctrica o daño a terceros.
Advertencia
No opere este producto en lugares donde puede estar
expuesto al agua o cualquier otro líquido. No opere este
equipo en lugares húmedos.
Antes de comenzar a limpiar la unidad, desenchúfela de la
toma de alimentación eléctrica. No utilice limpiadores líquidos
o en aerosol. Use únicamente un paño humedecido en agua.
Para reducir el riesgo de descarga eléctrica, no desmantele la
unidad. Cuando sea necesaria una reparación, llévela a un
centro autorizado de servicio. Abrir o quitar alguna tapa -como
la ubicada en la parte posterior- puede exponerlo a altos
voltajes u otros riesgos. El ensamblaje incorrecto puede causar
una descarga eléctrica cuando se vuelva a utilizar la unidad.
Utilice únicamente el cable que viene con la unidad. El uso de
otros cables puede resultar en descarga eléctrica, fuego o
daño irreparable a la unidad.
Precaución
Cuando desenchufe la unidad de la toma de
energía, no lo haga halando el enchufe por el
cable, sino por la clavija. No seguir estas
instrucciones puede resultar en riesgo de descarga
eléctrica, fuego o daño a la unidad.
No utilice esta unidad si el cable eléctrico está
dañado o el contacto en la clavija está suelto. No
seguir estas instrucciones puede resultar en
descarga eléctrica, fuego u otros peligros.
No coloque objetos pesados sobre el cable y no lo
doble excesivamente porque puede dañarlo. No
seguir estas instrucciones puede resultar en
descarga eléctrica, fuego u otros peligros.
Cuando no use la unidad por un tiempo
prolongado, desenchufe la clavija de la toma de
alimentación.
No operar esta unidad en áreas con altas temperaturas o
excesiva humedad ya que puede resultar en un mal
funcionamiento de la misma.
Instrucciones de Seguridad
37
Instrucciones Básicas
Otras Consideraciones de Seguridad
Lea y entienda todas las instrucciones.
Siga todas las precauciones e instrucciones señaladas
en la unidad.
Las aberturas y rejillas en la parte posterior y base de la
contadora sirven para ventilar la unidad. Estas entradas
no deben ser obstruidas o cubiertas colocando la
contadora sobre una cama, sofá, alfombra u otra
superficie similar. Este producto nunca deberá ser
colocado cerca o encima de una estufa o sistema de
calefacción. Este producto no deberá ser puesto en un
compartimiento que no tenga la ventilación apropiada.
Nunca inserte objetos de ningún tipo por las rejillas
o aberturas de la unidad ya que podrían tocar
partes energizadas resultando en descarga
eléctrica, fuego o daño a la unidad. Nunca derrame
líquidos de ningún tipo sobre la unidad.
Desenchufe la unidad de la toma de alimentación y
llévela a un centro autorizado de servicio en los
siguientes casos:
!
!
!
Este producto deberá ser operado utilizando el voltaje
correcto indicado en el manual de usuario. Si no está
seguro del tipo de voltaje, consulte al distribuidor o a su
compañía proveedora de electricidad.
Este producto está equipado con un cable eléctrico de
tres clavijas con conexión a tierra(solamente las
unidades que operan con 110V). Este enchufe encaja
únicamente en una toma de corriente triple con
conexión a tierra. Esta es una característica de
seguridad. Si usted no puede insertar el enchufe
correctamente, no lo fuerce, contacte a un electricista
para reemplazar la toma de corriente por una adecuada
al tipo de enchufe.
38
!
!
!
Cuando el cable eléctrico esté dañado o gastado.
Si algún líquido ha sido derramado sobre la
unidad.
Si el producto ha sido expuesto al agua u otros
líquidos.
Si el producto no funciona correctamente aun
siguiendo las instrucciones (ajuste solamente los
controles y partes mencionadas en este manual.
No trate de manipular otros aditamentos ya que
podría dañar la unidad, lo que requerirá de
técnicos calificados para restaurar el producto a
su condición original).
Si el producto ha sufrido una caída o golpe
fuerte.
Si el producto muestra algún cambio notorio en
su funcionamiento.
Otras Consideraciones
Instrucciones Básicas
Contenido de la Caja
Compruebe que todas las partes descritas en esta página estén presentes al abrir la caja. Si algún artículo falta o
está dañado, contacte al concesionario donde adquirió la unidad.
Contadora de Billetes
Pantalla de Conteo
Auxiliar
Contenido
Cable Eléctrico
Otros Artículos
Utilice únicamente el cable
que viene con la unidad. El
uso de otro tipo de cables
eléctricos puede resultar en
descarga eléctrica, fuego o
causar daño irreparable a la
unidad.
Funda protectora, Manual de
Usuario y Tarjeta de
Garantía.
39
Instrucciones Básicas
Limpieza de la Unidad
AVISO: ANTES DE LIMPIAR LA UNIDAD, PONGA EL INTERRUPTOR EN POSICIÓN “OFF” Y
DESCONECTE EL CABLE ELÉCTRICO. LA GARANTÍA DE LA MÁQUINA NO CUBRE LOS
DEFECTOS O PROBLEMAS OCASIONADOS POR FALTA DE MANTENIMIENTO PERIÓDICO
A) Limpieza de los sensores ópticos
Los sensores ópticos de la máquina son elementos muy
sensibles al polvo y partículas de papel que se adhieren a los
mismos. Es recomendable limpiarlos diariamente si es
posible. Las superficies de vidrio de los detectores pueden
limpiarse con un paño y un poco de alcohol. La gráfica
contigua muestra la posición aproximada de los sensores.
SENSOR
B) Limpieza Periódica del Interior de la Máquina
Para que la unidad opere eficientemente, es necesario limpiar
el interior una vez al mes, o cuando sea requerido.
Desenchufe la máquina y levante la cubierta superior (cerca
del asa) para ganar acceso al interior.
C) Recomendaciones Adicionales
La máquina no debe ser operada en un ambiente donde haya
polvo o suciedad. Proteja la máquina (cuando no sea usada)
con la funda protectora incluida en el empaque.
SENSORES
SENSORES
40
Limpieza de la Unidad
Primera Sección
1.0 Controles y Partes Generales
Bandeja de Alimentación
Guías de Conteo
Alimentador
Asa Retráctil
Plataforma Plástica Frontal
Bandeja Receptora
Sensores Ópticos
Panel de Control
Botón de Parada de
Emergencia
Pantalla de Conteo Auxiliar
Controles y Partes Generales
41
Primera Sección
Tornillos de Cierre de la Compuerta Trasera
Interruptor General
Toma de Alimentación
Tornillo para el Ajuste del Grosor de los Billetes
Lengüeta de Goma
Toma para el Cable de la Pantalla de Conteo
Auxiliar
42
Controles y Partes Generales
Primera Sección
1.1 Controles Específicos
AB1100
Pantalla de Conteo de Agrupaciones
Pantalla de Conteo de Billetes
Botón de Agrupación Libre (+ SUMA)
Botón de Agrupación Libre (- RESTA)
Control para Agrupación Preseleccionada
(Preajustado a 100, 50 y 20)
Reinicio Manual (RESTART)
Botón ADD (Función de Adición)
AB1100 UV
Indicador LED de función “ADD”
Indicador LED de función “BATCH”
Botón UV (Detección Ultravioleta)
Indicador LED de función “UV”
Controles Específicos
43
Primera Sección
Pantalla de Conteo de Agrupaciones
Pantalla de Conteo de Billetes
AB1100 MG/UV
Botón de Agrupación Libre (+ SUMA)
Botón de Agrupación Libre (- RESTA)
Control para Agrupación Preseleccionada
(Preajustado 100, 50 y 20)
Reinicio Manual (RESTART)
Botón ADD (Función de Adición)
Indicador LED de función “ADD”
Indicador LED de función “BATCH”
Botón UV (Detección Ultravioleta)
Indicador LED de función “UV”
Botón MG (Detección Magnética)
Indicador LED de función “MG”
44
Controles Específicos
Primera Sección
2.0 Características
2.1 Modo de Conteo Regular
Una vez encendida, la máquina cuenta los billetes colocados en el alimentador.
2.2 Función de Conteo de Agrupaciones Preseleccionadas (Batch)
La máquina cuenta todo los billetes en grupo hasta llegar a la cifra preseleccionada en el selector de
agrupaciones (Batch) la cual puede ser ajustada manualmente usando las teclas “+” y “-”. La
unidad continuará agrupando billetes en la bandeja receptora, en grupos con la cantidad de unidades
preseleccionada.
2.3 Función de Adición
La máquina cuenta todos los billetes colocados en el alimentador y suma todas las operaciones
consecutivas hasta alcanzar 9999. En este caso, el quitar los billetes contados de la bandeja
receptora no eliminará el número mostrado en el contador.
2.4 Funciones de detección MG y/o UV (sólo para los modelos AB-1100 UV y/o AB-1100
MG/UV)
La máquina cuenta todos los billetes colocados en el alimentador y detecta los billetes falsos usando
los sistemas de detección particulares a cada modelo: La AB-1100 UV emplea fluorescencia
ultravioleta. La AB-1100 MG/UV emplea detección magnética y fluorescencia ultravioleta.
2.5 Arranque Automático
La máquina inicia el conteo al colocar los billetes en el alimentador.
Características
45
Primera Sección
2.6 Parada de Emergencia
La unidad se detiene automáticamente cuando la resistencia en los rodillos de fricción se incrementa
anormalmente. Además, al apretar el botón octogonal rojo ubicado en la parte superior derecha de
la unidad, todas las operaciones de la unidad se detienen.
2.7 Pantalla de Conteo Auxiliar
La Serie AB-1100 viene equipada con una pantalla de conteo auxiliar que ayuda al usuario a
visualizar la cuenta cuando la unidad esté fuera de su campo de visión. Además, este accesorio sirve
para que otras personas puedan observar la cuenta. Se activa al enchufar el cable de la misma a la
unidad (ver figura 1).
Enchufe el conector del
cable en la toma
46
Características
Primera Sección
3.0 Operaciones
3.1 Encendido
Conecte el cable a la unidad y a una fuente de alimentación y encienda la máquina. La unidad se
auto analizará girando las ruedas alimentadoras varias veces. Cuando la pantalla muestre “0”, estará
lista para contar.
3.2 Modos de Conteo (Botones de Funciones)
Seleccione la función deseada presionando los botones “ADD” (añadir) o “BATCH” (agrupación). Al
encender la unidad, las funciones MG y/o UV (detección) para identificar billetes falsos se
encenderán automáticamente (funciones MG y/o UV disponibles sólo en los modelos AB-1100 UV y/o
AB-1100 MG/UV).
Operaciones
47
Primera Sección
3.3 Función de Conteo
Una vez que los billetes sean correctamente posicionados en la bandeja alimentadora, la máquina
empezará a contarlos automáticamente. El número de billetes contados aparecerá en la “Pantalla de
Conteo”. Una vez que estos sean retirados de la bandeja receptora, la “Pantalla de Conteo” mostrará
“0” y la cuenta pasará a mostrarse en la pantalla de conteo de agrupaciones.
Coloque el fajo de billetes entre las guías de conteo como se muestra en la figura 1.
Rápidamente, empuje los billetes con un dedo (ver figura 2) de manera que estos descansen
sobre la bandeja alimentadora, en la posición de conteo correcta.
Figura 1
48
Figura 1-b
Operaciones
Figura 2
Primera Sección
La unidad contará hasta que el alimentador esté vacío o alcance la cifra preseleccionada en la
función para agrupaciones (Batch).
La cantidad de unidades contadas aparecerá en la pantalla de conteo.
La siguiente operación empezará con “0” en la pantalla.
Si el alimentador se carga sin antes haber retirado de la bandeja receptora los billetes
previamente contados, la función de conteo se reiniciará automáticamente, añadiendo la
nueva cantidad a la cantidad anteriormente contada.
NOTA: Si su unidad es del tipo AB-1100, puede comenzar a contar inmediatamente
después de encenderla. Si su unidad es una AB-1100 UV o AB-1100 MG/UV, enciéndala
y espere 5 minutos antes de utilizarla para que los sensores funcionen a su máxima
potencia.
NOTA: la unidad puede ser calibrada para “incluir” o “no incluir” billetes de
características dudosas en la cuenta (AB-1100 UV y AB-1100 MG/UV solamente). Esto
se hace presionando el botón “-” por 3 segundos. La pantalla de agrupaciones
mostrará el mensaje “Uxx”. Usando los botones “+” y “-”, seleccione los modos
alternativos U00 (billetes dudosos no incluidos en la cuenta) o U22 (billetes dudosos
incluidos en la cuenta). Para hacer efectiva la selección, presione el botón RESTART.
Operaciones
49
Primera Sección
3.4 Función de Detección Ultravioleta
(Sólo disponible en los modelos AB-1100 UV y AB-1100 MG/UV)
Función de Detección por Fluorescencia Ultravioleta o UV: La función UV se activa o desactiva
presionando el botón UV en el panel de control. Es efectiva en todo tipo de billetes que tengan
características ultravioleta.
Nota: la función UV operará a su máxima capacidad 5 minutos después que la unidad
haya sido encendida.
Modo de operación
La función UV se activa automáticamente al encender la unidad. El conteo se efectúa normalmente.
Si la máquina detecta un billete falso, se detendrá y emitirá un triple sonido “beep”. Además, la
pantalla de agrupaciones mostrará el mensaje “A” y el indicador luminoso UV parpadeará, alertando
al usuario de la presencia de un billete de características dudosas. El billete sospechoso será el
último en la bandeja receptora. Si los billetes acumulados en la bandeja receptora incluyendo el
dudoso) no son retirados, el indicador luminoso UV continuará parpadeando y el triple sonido “beep”
se repetirá cada 10 segundos.
Para ajustar el nivel de sensibilidad de esta función, presione el botón correspondiente (UV) por 3
segundos. La pantalla del contador de agrupaciones mostrará el nivel de sensibilidad actual (los
niveles van en escala ascendente del 0 al 10). Seleccione el nivel deseado presionando los botones
“+” o “-”. Para hacer efectiva la selección, presione el botón RESTART.
50
Operaciones
Primera Sección
3.5 Función de Detección Doble (disponible sólo en el modelo AB-1100 MG/UV)
La AB-1100 MG/UV incorpora las funciones de Reacción Magnética y Fluorescencia Ultravioleta. Las
funciones MG y UV se activan automáticamente al encender la unidad. Las probabilidades de
detectar un billete falso se multiplican al usar ambos sistemas simultáneamente.
Función de Detección Magnética o MG: La función MG se activa o desactiva presionando el
botón MG en el panel de control. Es efectiva en todo tipo de billetes que tengan características
magnéticas.
Modo de operación
La función MG se activa automáticamente al encender la unidad. El conteo se efectúa normalmente.
Si la maquina detecta un billete falso, se detendrá y emitirá un triple sonido “beep”. Además, la
pantalla de agrupaciones mostrará el mensaje “b” y el indicador luminoso MG parpadeará, alertando
al usuario de la presencia de un billete de características dudosas. El billete sospechoso será el
último en la bandeja receptora. Si los billetes acumulados en la bandeja receptora incluyendo el
dudoso) no son retirados, el indicador luminoso MG continuará parpadeando y el triple sonido “beep”
se repetirá cada 10 segundos.
Para ajustar el nivel de sensibilidad de esta función, presione el botón correspondiente (MG) por 3
segundos. La pantalla del contador de agrupaciones mostrará el nivel de sensibilidad actual (los
niveles van en escala ascendente del 0 al 10). Seleccione el nivel deseado presionando los botones
“+” o “-”. Para hacer efectiva la selección, presione el botón RESTART.
Función de Detección por Fluorescencia Ultravioleta o UV: Para más información sobre
esta función, refiérase a la sección 3.4.
Operaciones
51
Primera Sección
NOTA: Los sistemas de detección ultravioleta y magnético integrados en la unidad
(modelos UV y MG/UV solamente) son instrumentos valiosos para detectar billetes
falsos. Sin embargo, al igual que cualquier otra contadora con detectores integrados, la
AB-1100 (modelos UV y MG/UV solamente) no garantiza la legitimidad de los billetes
analizados debido a los impredecibles avances en falsificación de dinero.
3.6 “ADD” Función de Suma
La unidad sumará al presionar el botón “ADD” (el indicador luminoso del botón se encenderá). En
este caso, el quitar los billetes contados de la bandeja receptora no eliminará el número del
contador. Cualquier billete contado subsecuentemente será sumado a la cantidad previa. El número
de billetes contados aparecerá en la “Pantalla de Conteo”. Para borrar la cuenta, presione el botón
“ADD” (el indicador se debe apagar).
Si la máquina se detiene durante el conteo y muestra un mensaje de error, elimine la causa del error.
Retire los billetes de la bandeja receptora y de los rodillos. La unidad continuará contando una vez
solucionado el problema.
3.7 Función de Detección de Tamaño
Esta función detecta billetes mas pequeños que el primero analizado por la unidad. Para activarlo,
presione el botón “Add” por 3 segundos. La pantalla de agrupaciones mostrará el mensaje “C00C10”. Para desactivar presione el botón “-” hasta que el mensaje “C00” aparezca en la pantalla. Para
activarlo, persione el botón “+” en el rango de 01 a 10.
52
Operaciones
Primera Sección
3.8 Función de Detección de Densidad
Esta función detecta billetes mas delgados o usados que el primero analizado por la unidad. Para
activarlo, presione el botón “Add” por 3 segundos. La pantalla de agrupaciones mostrará el mensaje
“C00-C10”. Para desactivar presione el botón “-” hasta que el mensaje “C00” aparezca en la pantalla.
Para activarlo, persione el botón “+” en el rango de 01 a 10.
3.9 Función de Conteo de Agrupaciones Preseleccionadas (Batch)
Esta función es activada o desactivada presionando el botón para agrupación (Batch). La cantidad a
contar por agrupación es mostrada en la pantalla de conteo de agrupaciones. Al presionar el botón
de agrupaciones, la cantidad que se mostrará automáticamente será “100”. Presionándolo de nuevo,
la cantidad cambiará (a 50 la primera vez y a 20 la segunda). Se pueden agrupar cantidades de
billetes preestablecidas entre 1 y 999. La cantidad a agrupar se puede cambiar presionando los
botones “+” o “-”. El presionar los botones “+” o “-” por más de 0.5 segundos hará que la cantidad
de la agrupación se incremente o disminuya de 5 en 5 cada 0.25 segundos. El presionar los botones
“+” o “-” rápidamente, hará que la cantidad de la agrupación se incremente o disminuya de 1 en 1.
Para desactivar esta función, presione el botón “BATCH” hasta que el indicador se apague.
Al colocar los billetes en el alimentador, la máquina empezará a contar y se detendrá cuando el
número contado alcance el número preseleccionado (para agrupaciones).
Para repetir el conteo de agrupaciones con la misma cantidad preseleccionada, retire los billetes
agrupados en la bandeja receptora. La siguiente agrupación tendrá la misma cantidad
preseleccionada.
Si desea continuar agrupando sin retirar los billetes de la bandeja receptora, presione el botón
RESTART.
Si la cantidad contada no concuerda con la cantidad seleccionada en la agrupación preseleccionada,
la pantalla mostrará -con un número parpadeante- la cantidad contada.
Operaciones
53
Primera Sección
Cuando la máquina esté contando bajo las funciones MG y/o UV (solo los modelos AB-1100 UV y AB1100 MG/UV), ésta se detendrá automáticamente al encontrar un billete falso. El conteo se reiniciará
al retirar los billetes de la bandeja receptora. El número en la pantalla de conteo incluirá el billete
dudoso.
3.10 Parada de Emergencia
La Serie AB-1100 está equipada con un botón de parada de
emergencia, el cual protege al usuario en caso que objetos
inadecuados (corbatas, pañuelos, etc.) lleguen a los rodillos de
fricción de la unidad. Esta función es completamente
automática y opera mediante un sensor que mide la resistencia
en los rodillos de fricción. Si esta se incrementa fuera de los
valores de conteo normales, se detienen.
En caso de emergencia, se puede detener la unidad
manualmente presionando el botón rojo de parada de
emergencia. Este se encuentra en la parte superior izquierda de
la unidad. El indicador luminoso (LED) integrado parpadeará
cuando la función esté encendida. En la pantalla de
agrupaciones (batch) aparecerá el mensaje “EA7”. Una vez que
el botón de parada de emergencia haya sido presionado, todas
las operaciones serán terminadas. La unidad deberá ser
apagada y los objetos inadecuados retirados. Presione el botón
ON para encenderla de nuevo y continuar contando.
54
Operaciones
Botón de Parada de Emergencia
Segunda Sección
4.0 Correción de Problemas de Operación
4.1 Prevención de Problemas
Seleccione los billetes que desee contar. Evite contar billetes con las siguientes características:
Con grapas o clips metálicos
Rotos o lavados
Profusamente manchados
Cubiertos con cinta adhesiva (sólo aplica a los modelos AB-1100 UV y AB-1100 MG/UV)
4.2
Atascamiento
Antes de usar la máquina, verifique que no haya objetos (como bolsas antihumedad)
obstruyendo las partes móviles de la misma.
Para evitar atascamientos, coloque los billetes como se indica en este manual. El billete
orientado hacia usted será el primero en ingresar al mecanismo de alimentación de la
máquina.
En caso de atascamiento, apague la unidad. Retire el billete atascado con la ayuda de
un palito o un lápiz. Verifique que no haya otros objetos -como clips o ligasobstruyendo el mecanismo de conteo.
Verifique que el tornillo de ajuste del grosor de los billetes (#15) en la parte posterior
de la unidad esté ajustado debidamente.
Verifique el posicionamiento correcto de los billetes en el alimentador.
Continúe contando.
Problemas de Operación
55
Segunda Sección
4.3
Cuando el Conteo es Incorrecto
Si el conteo es erróneo, regule el tornillo de ajuste del grosor de los billetes (#15) en el sentido
contrario a las manecillas del reloj para reducir la fricción, y viceversa.
Ajuste la posición de la lengüeta de goma del alimentador hacia adentro/afuera hasta que el
conteo sea exacto.
Verifique el ajuste del soporte de la bandeja alimentadora. Si está suelto, ajústelo siguiendo las
instrucciones de la sección de Mantenimiento de la Unidad.
Retire la lengüeta de de goma, voltéela y use el lado opuesto (puede ser que esté gastada de
un lado). La información acerca de este procedimiento se encuentra en la sección de
Mantenimiento de la Unidad
4.4
Recomendación Adicional
No coloque las unidades AB-1100UV y AB-1100MG/UV cerca de luces muy intensas. Estas
pueden interferir con el funcionamiento de los sensores UV.
56
Problemas de Operación
Segunda Sección
5.0 Mantenimiento de la Unidad
5.1 Verificando el Ajuste de la Bandeja Alimentadora
La bandeja alimentadora asegura el flujo correcto de billetes hacia el interior de la unidad. Está
sujeta a la parte posterior de la misma por dos pivotes y un seguro magnético. Para verificar que
esté ajustado apropiadamente, presione o levante la bandeja alimentadora mientras observa si es
que se desplaza o no (ver figura 1). Si hay desplazamiento, presione o levante la bandeja
alimentadora hasta que el seguro magnético la retenga en la posición debida.
Figura 1
Mantenimiento
57
Segunda Sección
5.2 Volteando la Lengüeta de Goma
¿Cuándo debe voltearse la lengüeta de goma?
La lengüeta de goma debe voltearse cuando haya un problema con la alimentación/conteo de los
billetes, y el tornillo de ajuste del grosor de los billetes no resuelva el problema.
Procedimiento: presione la base del alimentador (pieza metálica) (ver figura 1). Manteniendo la
pieza presionada, retire la lengüeta de goma que se encuentra en la parte inferior (ver figura 2).
Figura 1
58
Mantenimiento
Figura 2
Segunda Sección
Voltee la lengüeta y colóquela en su posición original (ver figura 3, A y B). Verifique que la lengüeta
de goma esté 1/4" por delante del extremo de la pieza metálica que la presiona (ver figura 4). Una
vez que ambos lados de la lengüeta hayan sido usados, contacte a su representante local de
mantenimiento o AccuBanker para obtener una nueva.
A
Figura 3
B
Figura 5
Verifique que la
lengüeta de goma
esté 1/4” más
adelante que el
extremo de la pieza
metálica que la sujeta
Gire la lengüeta de
goma 180 grados
Mantenimiento
59
Segunda Sección
6.0 Mensajes de Error y su Significado
Mensaje Error
Solución
Billete sospechoso detectado por el
sistema ultravioleta (UV)
Problema con el sistema UV
Retire el billete sospechoso de la bandeja receptora
Cuente todos los billetes
Reduzca la sensibilidad del detector UV
Billete sospechoso detectado por el
sistema magnético (MG)
Problema con el sistema MG
Retire el billete sospechoso de la bandeja receptora
Cuente todos los billetes
Reduzca la sensibilidad del detector MG
Billetes encadenados (2 o más)
Billetes atascados dentro de la unidad
Verifique que el alimentador no este suelto
Ajústelo si es necesario
Problema con el sensor de conteo izquierdo
Limpie el sensor
Problema con el sensor de conteo derecho
Limpie el sensor
Problema con el sensor de la bandeja receptora
Limpie el sensor
Problema u obstrucción del sistema MG
Limpie el sistema
Problema con el sensor del alimentador
Limpie el sensor
Parada de emergencia activada
Problema con el billete (billete roto)
Apague la unidad. Reenciéndala y continue las
operaciones de conteo
Retire el billete de la bandeja receptora.
Cuente todos los billetes
El 80% de los problemas de operación de la unidad son causados por la suciedad que obstruye los
sensores y piezas móviles. Mantener la máquina limpia puede ayudar a evitar estos problemas
60
Mensajes de Error
Segunda Sección
7.0 Especificaciones
Temperatura Ambiental: 32°F - 104°F (00C - 400C)
Humedad Ambiental: 25% - 80%
Sistema de Alimentación: Sistema de Rodillos de Fricción
Capacidad del Alimentador: 100 billetes viejos / 200 billetes nuevos
Capacidad de la Bandeja Receptora: 100 billetes viejos / 200 billetes nuevos
Tamaño del Billete: 50mm X 100mm / 100mm X 185mm
Grosor del Billete: 0.06mm - 0.12mm
Pantalla de Conteo de Billetes: Cuatro dígitos (LED Verde) (grande)
Pantalla de Conteo de Agrupaciones: Tres dígitos (LED Rojo) (pequeña)
Fuente de Alimentación: Monofásica 110V ± 10% RMS, 60Hz. Disponible en 220V ± 10%
RMS, 50Hz
Consumo de Electricidad: <40 Watts
Dimensiones: 9 ½” x 11” x 7” (241 mm X 279 mm X 178 mm)
Peso: 13.6 lb. (6.2 kg) aproximadamente
Velocidad de Conteo: 1000 billetes por minuto
Especificaciones
61