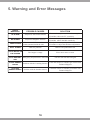
1
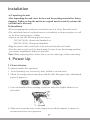
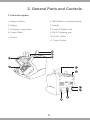
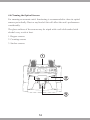
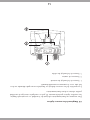
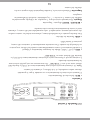
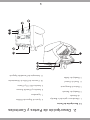
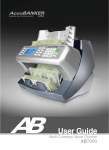
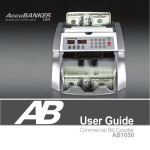
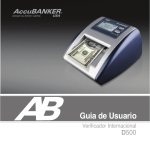
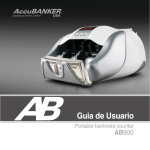
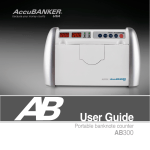
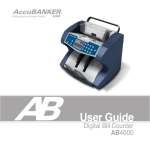
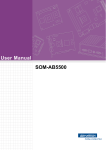
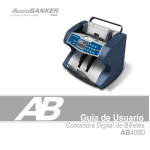
User Guide VALUE EXTENSION BILL COUNTER AB5500 Thank you for purchasing this AccuBANKER product. We recommend reading all information in the user guide to become familiar with this product. AccuBANKER and its logo are registered trademarks of Hilton Trading Corp. All Rights Reserved. 2 Table of Contents Introduction . . . . . . . . . . . . . . . . . . . . . . . . . . . . . . . . . . . . . . . . . . . . . . . . . . . . . 6 Box Contents . . . . . . . . . . . . . . . . . . . . . . . . . . . . . . . . . . . . . . . . . . . . . . . . . . . . 6 Installation . . . . . . . . . . . . . . . . . . . . . . . . . . . . . . . . . . . . . . . . . . . . . . . . . . . . . . 7 1. Power Up . . . . . . . . . . . . . . . . . . . . . . . . . . . . . . . . . . . . . . . . . . . . . . . . . . . . 7 1.1 Notes Selection. . . . . . . . . . . . . . . . . . . . . . . . . . . . . . . . . . . . . . . . . 7 1.2 Initializing Procedure. . . . . . . . . . . . . . . . . . . . . . . . . . . . . . . . . . . 8 1.3 Thickness Knob Adjusting Procedure . . . . . . . . . . . . . . . . . . . . . . . 8 2. General Parts and Controls. . . . . . . . . . . . . . . . . . . . . . . . . . . . . . . . . . . . . . 9 2.1 Parts Description. . . . . . . . . . . . . . . . . . . . . . . . . . . . . . . . . . . . . . . 9 2.2 Control Panel Description. . . . . . . . . . . . . . . . . . . . . . . . . . . . . . . 10 3. Basic Operation. . . . . . . . . . . . . . . . . . . . . . . . . . . . . . . . . . . . . . . . . . . . . . . 12 3.1 Power Up. . . . . . . . . . . . . . . . . . . . . . . . . . . . . . . . . . . . . . . . . . . . 12 3.2 Counting Mode . . . . . . . . . . . . . . . . . . . . . . . . . . . . . . . . . . . . . . 12 3.3 Functions Selection. . . . . . . . . . . . . . . . . . . . . . . . . . . . . . . . . . . . 12 3.4 Manual Value Extension function. . . . . . . . . . . . . . . . . . . . . . . . . 12 3.5 Report / Print function. . . . . . . . . . . . . . . . . . . . . . . . . . . . . . . . . . 12 4. Troubleshooting Operational Problems. . . . . . . . . . . . . . . . . . . . . . . . . . . 13 4.1 Avoiding Problems. . . . . . . . . . . . . . . . . . . . . . . . . . . . . . . . . . . . . 13 4.2 Removing Jammed Notes. . . . . . . . . . . . . . . . . . . . . . . . . . . . . . . . 13 4.3 Miscounting Errors. . . . . . . . . . . . . . . . . . . . . . . . . . . . . . . . . . . . . 13 4.4 Cleaning the optical sensors. . . . . . . . . . . . . . . . . . . . . . . . . . . . . . 14 4.5 UV Sensitivity Adjustment. . . . . . . . . . . . . . . . . . . . . . . . . . . . . . . 15 4.6 MG Sensitivity Adjustment. . . . . . . . . . . . . . . . . . . . . . . . . . . . . . . 15 5. Warning and Error Messages. . . . . . . . . . . . . . . . . . . . . . . . . . . . . . . . . . . . 18 7. Unit Specifications. . . . . . . . . . . . . . . . . . . . . . . . . . . . . . . . . . . . . . . . . . . . . 19 3 Important Safety Instructions ! Wa r n i n g Do not use this product in areas where it may be exposed to water or other liquids. Unplug this product from the wall outlet before cleaning. Do not use liquid or aerosol cleaners. Use a damp cloth for cleaning. To reduce the risk of electric shock, do not disassemble this product. Take it to qualified service personnel when service or repair work is required. Opening or removing covers may expose you to dangerous voltages or other risks. Incorrect re-assembly can cause electric shock when the appliance is subsequently used. Only use the cable provided with the unit. The use of other cables may result in electric shock, fire or cause serious damage to the unit. Do not operate the unit in areas with high temperature or high humidity since it may prevent it from working correctly. ! Caution When unplugging the power cord, do not pull it by the cord, but rather grip the plug to pull it out. Not following these instructions may result in electric shock, fire or damage to the unit. Do not use the unit if the power cord is damaged or if the plug socket contact is loose. Not following these instructions may result in electric shock, fire or other hazards. Do not place heavy objects over the cord and do not bend it excessivel since it could get damaged. Not following these instructions may result in electric shock, fire or other hazards. When not using the unit for a long period of time, remove the power plug from the wall outlet. 4 Other Safety Considerations • Read and understand all of the safety instructions. • Follow all warnings and instructions marked on the unit. • This product should never be placed near or over a radiator or heater register This product should not be placed in a built-in installation unless there is proper ventilation. • This product should be operated only from the type of power source indicated in this user’s guide. If you are not sure of the type of power supply in your lotion, consult your dealer or local power company. • Never push objects of any kind into the unit through the case slots or openings since they may touch dangerous voltage points or shortcut parts, resulting in a risk of fire or electric shock. • Never spill liquids of any kind on the product. • Unplug this product from the wall outlet and refer to servicing by qualified service personnel under the following conditions: -When the power supply cord or plug is damaged or frayed. -If liquid has been spilled into the unit. -If the unit has been exposed to rain or water. -If the unit does not operate normally while following the operating instructions, adjust only those controls that are covered by the operat ing instructions. Improper adjustment of other controls may result in damage and will often require extensive work by a qualified technician to restore the product to normal operation. -If the product has been dropped or the case has been damaged. -If the product shows a noticeable change in performance. 5 Introduction The AB5500 banknotes counter unit is the perfect solution for a fast, accurate and reliable banknote counting process. This machine is designed to meet the most demanding applications in today’s financial market. A simple and friendly user interface as well as its Value Extension function capability will help you to save time and money during your management accounting operations. This User Guide covers the Installation, Operation and Troubleshooting procedures of the AB5500. We recommend reading this guide thoroughly before operating the unit in order to become familiar with all its functions. Box Contents When opening the box, verify that all of the items described below are included. If any item is damaged or missing, contact the place where the unit was purchased. 1. Banknotes counter unit AB5500 2. Power Cord 3. User Guide and Warranty document 6 Installation A) Unpacking the unit After unpacking the unit, store the box and the packing material for future shipping. Failing to ship the unit in its original unit box and Styrofoam will void the unit’s warranty. B) Installation •Select an appropriate workspace and make sure it is clean, flat and leveled. •The unit should never be placed near or over radiator or heater registers as well as far from strong source of lights. •Operate on only the following power sources: 120 VAC/60 Hz, (American Standard) or 240 VAC/50 Hz, (European Standard) •Plug the power cable to the back of the unit and into the wall outlet. •Turn the unit on and verify its functioning. In case of any functioning problem; get contact immediately with your provider. Note: When replacing fuses, make sure to use the same type of fuse and rating. 1. Power Up 1.1 Notes Selection To ensure trouble-free operation: 1. Avoid counting wet, excessively dirty, folded or curved notes. 2. Check for foreign objects mixed up with the bills like paper clips, rubbebands, pieces of paper etc. $$ $$ $$ $$ $ 3. Fan each bundle before counting in case the notes are slightly adhesive on each other. 4. Make sure to put the notes on the hopper in an orderly manner to ensure on accurate and errors-free operation. 7 1.2 Initializing Procedure 1. After turning On, the unit will conduct a self-check procedure by spinning the rollers and showing the message “AccuBANKER-AB5500” on the LCD display while all the electronic components are tested. 2. If an error message appears on the display, proceed in accordance with the instruction given in the Section “Error Messages”. 1.3 Thickness Knob Adjustment Procedure 1.The Thickness Adjustment Knob is set at 0 as the standard setting from factory. 2.Having the right thickness adjustment knob positioning will ensure a smooth counting as well as a trouble-free unit’s operation. 3.Trial and error attempts are recommended before you make the final adjustment. a. for new (thinner) notes, adjust toward “-“ b. for used (thicker) notes, adjust toward “+” c. small adjustment toward “+” direction works best 8 2. General Parts and Controls 2.1 Parts Description 1. Hopper Guiders 6. Bill Thickness Adjustment knob 2. Hopper 7. Handle 3. Emergency stop button 8. External Display jack 4. Control Panel 9. RS-232 printing port 5. Stacker 10. Power Outlet 11. Power Switch 9 2.2 Control Panel Description Button Functions • DEN: Value Extension Function The user selects the specific denomination to count and at the end of the counting the display will show both data, the quantity of bills as well as the total amount of money involved in the counting. Note: In case the user needs to set up USD denominations, the MG function must be set up in “USD-MG”. Otherwise it will not allow you to set up in USD denominations. The same if the user wants to set up EURO denominations, the MG function must be set up in “EUR-MG”. Otherwise it will not allow you to set up EURO denominations. • MNL: Automatic or Manual starting mode. The unit begins counting automatically when banknotes are placed in the hopper. To control manually this action manually, press the MNL (manual) button. • ADD: Adding function On / Off. This function allow the unit to add up all the consecutive operations made with this function ON. • REPORT / PRINT Report: After pressing this button for 3 sec. the display will show the details of the counting. The +/- keys will help you to visualize the entire information. Both data, the Quantity (PCS) and Total Amount per denomination are shown, as well as the Grand Total amount involved in the counting. Print: With a single press on this button the unit will print a receipt with the details of the counting. 10 • MG $ / € : Magnetic Counterfeit Detection function. This function allows the unit to analyze the magnetic characteristics of each bill during the counting. The unit will stop counting if a bill is considered suspicious. The MG function could be set up in three different levels: a. USD-MG: for counting U.S. banknotes. b. EUR-MG: for counting Europe banknotes. c. MG-1 to MG-9: for other foreign currencies that use MG ink. Pressing the MG key for 3 sec. and using the +/- buttons, the user customizes the specific MG sensitivity required for any specific currency. Press RESTART to validate the selection. • UV : Ultraviolet Counterfeit Detection function. This function allow the unit to analyze the ultraviolet characteristics of each bill during the counting. The unit will stop counting if a bill is considered suspicious. The UV sensitivity also could be customized by pressing the UV key for 3 sec. and using the + / - buttons to reach the desired sensitivity setting. Press RESTART to validate the selection. • SPEED: Counting speed selection The AB5500 Series has 3 variable counting speeds Slow: 900 bills/min. Normal: 1200 bills/min. Fast: 1600 bills/min. • RESTART Used for resuming the counting in MNL mode as well as for clearing the current results before starting a new sequence of counting. Also used for clearing the Error Messages. • BATCH: Preset batch selection By pressing the BATCH button sequentially, the preset batch value will change among 10, 20, 25, 50, 100 or Off. In case the user needs a different quantity, use the + / - keys for customizing the preset values. • + / - : Scroll Up / Scroll Down buttons These keys are used to scroll up / down the detailing information shown on the display when the REPORT function is used. These keys are also used for customizing the batch quantity. 11 3. Basic Operation 3.1 Power Up Plug in the power cable and turn the unit ON. It will conduct a self-check by spinning the rollers while the unit tests all the electronic parts. As soon as the unit’s display shows “0”, the unit is ready to start counting. In case any error message comes out in the display, refer to the troubleshooting chapter. 3.2 Counting Mode Once the bills are correctly placed in the hopper, the unit will start counting automatically. The number of counted bills will be shown on the display. 3.3 Functions Selection Select the function you want to use by pressing the specific button on the keyboard: a) UV and MG functions are used to verify the authenticity of each note. Pressing them sequentially, the display will show you the available options for these functions. b) ADD and BATCH functions are used for addition and batch operations respectively. 3.4 Manual Value Extension function ( DEN ) This function allows the user to select the DENOMINATION of the notes to be counted in order to obtain the TOTAL AMOUNT of money counted. 3.5 REPORT/ PRINT function The unit will show on the display a breakdown list with the quantity of bills and the amount of money per denomination. This Report could be printed if required by the user. 12 4. Troubleshooting Operational Problems 4.1 Avoiding problems Pre-select the notes you are going to count in the unit. Don’t attempt to count bills: a. with staples, metal clips, rubber bands or any other object b. torn, washed or damaged c. profusely stained d. covered with any type of adhesive substance 4.2 Jamming 1. Before beginning operation, make sure there are no foreign objects in any of the mechanisms. 2. To avoid jamming ensure the notes are placed properly in the hopper. 3. In case a jamming event occurs, turn the unit Off immediately before proceeding to remove the jammed bill from the unit. 4. Now carefully proceed to remove the jammed note from the unit’s interior. 5. Look for any additional foreign object such as a piece of bill, paper clips, rubber band etc and remove them. 6. Evaluate the bill thickness adjustment mechanism in case it needs to be readjusted for improving the unit performance. 4.3 Miscounting errors In case the unit is not having an accurate count, proceed as follow: 1. Ensure that the banknotes are placed orderly in the hopper. 2. Check the counting sensors for dust or any other kind of malfunctioning source. 3. Evaluate the bill thickness adjustment mechanism in case it needs to be readjusted for improving the unit performance. 13 4.4 Cleaning the Optical Sensors For ensuring an accurate unit’s functioning is recommended to clean its optical sensors periodically. Dust or any kind of dirt will affect the unit’s performance considerably. The glass surfaces of the sensors may be wiped with a soft cloth soaked with alcohol every week at least. 1. Hopper sensors 2. Counting sensors 3. Stacker sensors 14 4.5 UV Sensitivity Adjustment The user is enable to adjust a specific setting for this function considering the specific UV sensitivity required for the counting or even disable it in case were required. 1. Keep pressing the “UV” key for 3 sec. 2. The display will show the current UV sensitivity level. 3. Pressing the “+” “-“ keys repeatedly you select the new setting level. 4. Press “RESTART” for confirming the new selection. Note: USD and EURO currencies have their own UV setting. 4.6 MG Sensitivity Adjustment The user is enable to adjust a specific setting for this function considering the specific MG sensitivity required for the counting or even disable it in case were required 1. Keep pressing the “MG” key for 3 sec. 2. The display will show the current MG sensitivity level. 3. Pressing the “+” “-“ keys repeatedly you select the new setting level. 4. Press “RESTART” for confirming the new selection. Note: USD and EURO currencies have their own MG setting. 15 5. Warning and Error Messages ERROR MESSAGES POSSIBLE CAUSES UV ALARM Suspicious Ultraviolet features MG ALARM Suspicious Magnetic features CHAIN ALARM a) Two or more bills were detected b) Bills jammed inside the unit SOLUTION a)Remove the suspicious bill and count again. b)Consider reduce the UV sensitivity a)Remove the suspicious bill and count again. b)Consider reduce the MG sensitivity a)Verify the fitness quality of the bills b)Consider re-adjust the thickness adjustment HALF ALARM Bill size problem Remove the problematic bill PLACE NOTES ON THE HOPPER The hopper is empty Place more notes to count EMERGENCY STOP RESTART UNIT Emergency stop function is activated Turn the unit Off and ON again COUNT SENSOR ERROR Problem with the Counting Sensors Clean the sensors or consider get contact with Technical Support STACKER SENSOR ERROR Problem with the Stacker Sensors Clean the sensor or consider get contact with Technical Support 16 6. Unit Specifications Variable Counting Speed: 900, 1200 and 1600 notes / min Feeding System: Roller Friction System (Front-loading) Hopper Capacity: 200 old bills or 300 new bills Stacker Capacity: 100 old bills or 200 new bills Banknote size range: 115mm x 50mm - 170mm x 85mm Display: High Resolution LCD Display Power Source: 100 - 240 VAC 60/50 Hz Power Consumption: < 25 Watts; 6 W (stand by) Weight: 11.60 lb (5.26 kg) Size (W x D x H): 10.5” x 9.7” x 9.5” (270mm x 248mm x 245mm) Interfaces: RS-232 – Printer Connexion External Display 17 D63 D64 D500 D580 AB410 AB610 18 AB300 AB1100 AB4000 AB5000 AS100 contact us 7104 NW 50th Street•Miami, FL 331366 | tel 305.594.0950 | ab.accubanker.com 19 6. Especificaciones Velocidad de Conteo: Variable, 900 – 1200 – 1600 billetes / min Sistema de Alimentación: por Rodillos Capacidad de la Bandeja de Entrada: 300 billetes Capacidad de la Bandeja de Salida: 200 billetes Dimensiones de los Billetes: 115mm x 50mm - 170mm x 85mm Display: Pantalla de LCD de alta resolución. Voltaje de Alimentación: 100-240 VAC, 50-60 Hz Consumo: < 25 Watt; 6 Watt (Reposo) Peso: 11.60 lbs / 5.26 Kg Dimensiones(WxDxH):10.5”x 9.7”x 9.5”(270mm x 248mm x240mm) Interfases: RS-232 – Conexión de Impresora Pantalla Externa 17 5. Mensajes y Codigos de Errores Limpie el sensor de la bandeja de salida o solicite Servicio Técnico Sensor del stacker sucio o desalineado STACKER SENSOR ERROR Limpie los sensores o solicite Servicio Técnico Sensor de conteo sucio o desalineado COUNT SENSOR ERROR Botón de Emergencia activado EMERGENCY STOP RESTART UNIT La bandeja de entrada está vacia PLACE NOTES ON THE HOPPER Retire el billete problemático Medio billete fue detectado HALF ALARM a)Retire el billete y continúe contando. b)Considerar reducir la sensibilidad UV a)Retire el billete y continúe contando. b)Considerar reducir la sensibilidad MG a)Revise el estado físico de los billetes b)Verifique el ajuste de espesor del billete a)2 o más billetes pasaron unidos b) Hay billetes atorados dentro CHAIN ALARM Billete sospechoso por MG MG ALARM Billete sospechoso por UV UV ALARM SOLUCION POSIBLE CAUSA Error / Mensaje Poner un fajo para contar Apague y Encienda la unidad 16 4.5 Ajuste de la Sensibilidad Ultravioleta El usuario puede ajustar a su conveniencia la sensibilidad Ultravioleta requerida para el conteo. 1. Mantenga presionada la tecla “UV” por 3 segundos. 2. La pantalla mostrará el nivel de sensibilidad UV actual. 3. Con las teclas “+” y “-“ usted selecciona la nueva sensibilidad UV que desee. 4. Presione “RESTART” para validar la selección. Nota: Los billetes de USD y EURO tienen sus niveles de sensibilidad predefinidos. 4.6 Ajuste de la Sensibilidad Magnética El usuario puede ajustar a su conveniencia la sensibilidad Magnética requerida para el conteo. 1. Mantenga presionada la tecla “MG” por 3 segundos. 2. La pantalla mostrará el nivel de sensibilidad MG actual. 3. Con las teclas “+” y “-“ usted selecciona la nueva sensibilidad MG que desee. 4. Presione “RESTART” para validar la selección. Nota: Los billetes de USD y EURO tienen sus niveles de sensibilidad predefinidos. 15 4.4 Limpieza de los sensores ópticos Para asegurar un funcionamiento eficiente de la unidad, se recomienda limpiar los sensores ópticos periódicamente. El polvo o cualquier otro tipo de suciedad podría afectar su buen funcionamiento. La superficie de los sensores deberá ser limpiada con un paño húmedo en alcohol una vez a la semana recomendablemente. 1. Sensor de la bandeja de entrada 2. Sensores de conteo 3. Sensor de la bandeja de salida 14 4. Solucion a Problemas Operacionales 4.1 Minimizando los errores Se recomienda preseleccionar los billetes que van a ser contados. Evite introducir billetes en la unidad en las siguientes condiciones: a. con presillas, ligas u otro tipo de objetos extraños b. que estén muy gastados, manchados o maltratados c. cubiertos con algún tipo de adhesivo 4.2 Atascamiento 1. Antes de comenzar el conteo asegurese de que no existe objetos extraños en el interior o partes móviles de la unidad. 2. Para evitar riesgos de atascamiento asegurese de que los billetes son bien posicionados en la bandeja de entrada. 3. En caso de que un billete se atasque, apague la unidad antes de proceder a extraer el billete del interior de la unidad. 4. Después de extraer el billete asegurese que no quedaron restos del mismo. 5. Revise el ajuste de espesor del billete en caso que necesite ser reajustado para mejorar el funcionamiento de la unidad. 4.3 Errores de Conteo En caso de que la unidad presente errores de conteo: 1. Asegurese de que los billetes son posicionados ordenadamente. 2. Verifique que no hay particulas de polvo u otro obstáculo que interfiera los sensores de conteo. 3. Verifique que el ajuste de espesor es el adecuado para los billetes que esta contando. 13 3. Funciones Operacionales 3.1 Encendido Conecte el cable de alimentación a la unidad y enciendala. La unidad comenzará con una secuencia de autochequeo a la donde comprueba todos sus mecanismos. Cuando la unidad finaliza esta rutina de comprobación, el numero “0” aparece en pantalla y la unidad queda lista para el conteo. Si algún mensaje de error aparece en la pantalla, refierase a la seccion de “Mensajes de Error”. 3.2 Modo Conteo Cuando los billetes son posicionados en la bandeja de entrada, la unidad comenzará el conteo inmediatamente. La cantidad total de billetes será mostrada en pantalla asi como el monto total si la denominación correspondiente fue seleccionada. 3.3 Seleccion de Funciones Seleccione la función deseada pulsando la tecla corespondiente: a) Las funciones de verificacion UV y MG analizan las caracteristicas de seguridad de los billetes mientras son contados. Presione secuencialmente las funciones, la unidad mostrará las opciones disponibles en cada caso. b) Adicion (ADD) y Agrupamiento (Batch) son funciones que permiten obtener un valor total de varios conteos consecutivos y permite la formación de grupos respectivamente. 3.4 Selección de Denominación. (DEN) Permite al usuario seleccionar la DENOMINACIÓN a contar y obtener asi el MONTO TOTAL asociado al número de billetes en el conteo. 3.5 Reporte/Impresion (Report/Print) La unidad muestra en pantalla los detalles del conteo, permitiendo al usuario ver cuantos billetes por denominación fueron contados, asi como el monto total. Este reporte de conteo puede ser impreso en caso de que se requiera. 12 • MG $ / €: Ajuste de la funcion de deteccion Magnetica Permite a la unidad evaluar las caracteristicas magnéticas de los billetes mientras son contados. El conteo se detendrá inmediatamente si algún billete es considerado sospechoso. La función MG consta de tres niveles de sensibilidad: a. USD-MG: para el conteo de billetes de USD. b. EUR-MG: para el conteo de billetes de EURO. c. MG-1 a MG-9: Ajuste selectivo de la sensibilidad MG para otras monedas Presionando la tecla MG por 3 seg. y usando las teclas +/-, el usuario ajusta un nivel especifico de sensibilidad requerido para una moneda específica. Presione RESTART para validar la selección. • UV: Ajuste de la función de detección Ultravioleta. Esta función permite analizar las caracteristicas ultravioletas de cada billete durante el conteo. El conteo se detendrá inmediatamente si algun billete es considerado sospechoso. La sensibilidad UV puede ser ajustada presionando la tecla UV por 3 seg. y usando las teclas +/- para alcanzar la sensibilidad deseada. Presione RESTART para validar la seleccion. SPEED: Selecciona la Velocidad de Conteo La serie AB5500 consta de 3 velocidades de conteo Lenta: 900 bills/min Normal: 1200 bills/min Rapida: 1600 bills/min • RESTART Usada para el comienzo del conteo en modo MNL (Manual) asi como para borrar del display los datos del conteo previo. Tambien usado para borrar los mensajes de error y para la confirmacion del ajuste de la sensibilidad de las funciones UV y MG. • BATCH: Función de Agrupamiento o Conteo por Lotes Preseleccionados. Presionando secuencialmente esta tecla, el valor de Agrupamiento ira cambiando entre los valores 10, 20, 25, 50, 100 o deshabilitado. Use las teclas +/- para declarar un valor distinto a los anteriores. • + / - : Ajuste de Agrupamiento / Visualización Mediante estas teclas el usuario puede personalizar un nuevo valor de Agrupamiento (Batch). Tambien le permite la visualizacion completa de toda la información de la pantalla en modo “Reporte”. 11 2.2 Panel de Control Controles • DEN: Selección de Denominación El usuario selecciona la denominacón a ser contada lo que le permitirá obtener ambos resultados, el # de billetes y el monto del conteo. Nota: Si el usuario necesita seleccionar denominaciones de USD, la función MG deberá estar en el nivel “USD-MG”. De otra manera no será posible seleccionar la denominación deseada. Lo mismo sucede si fuera necesario seleccionar denominaciones de EURO, la función MG deberá estar en “EUR-MG”. • MNL: (AUT / MNL) Modo de Arranque Automático o Manual. La unidad comienza el conteo automáticamente cuando los billetes son puestos en la bandeja de entrada. Para controlar manualmente el comienzo del conteo, presione el botón MNL. • ADD: Función de Adición. Esta función permite a la unidad adicionar y almacenar todos los conteos realizados consecutivamente, mostrando el valor acumulado total del conteo y el monto total si varias denominaciones fueron seleccionadas. • REPORT / PRINT: Reporte / Impresión Reporte: Presionando esta tecla por 3 segundos, en el display aparecerán los detalles del conteo. Las teclas + / - le permitirán vizualizar la información completa. Impresión: Pulsando esta tecla, la unidad imprimirá dicho reporte con los detalles del conteo. 10 2. Descripción de Partes y Controles 2.1 Descripción de Partes 1. Alineadores o guías de la Bandeja de Entrada 2. Bandeja de Entrada 3. Botón de Emergencia 4. Panel de Control 5. Bandeja de Salida 6. Ajuste de Espesor del Billete 7. Agarradera 8. Interfase p/ Pantalla Externa 9. Interfase RS-232 p/ Printer 10. Conector del Cable de Alimentación 11. Interruptor de Encendido/Apagado 9 1.2 Encendido y Auto-Chequeo 1. Al encender la unidad, esta mostrará el mensaje de iniciación “AccuBANKER AB 5500” al tiempo que todo el sistema es verificado. 2. Si algún mensaje de error aparece en el display, proceda como se refiere en la Sección “Mensajes de Error”. 1.3 Ajuste de Espesor del Billete 1. El Ajuste de Espesor del Billete viene ajustado de fábrica al valor “0”. 2. Un ajuste adecuado del espesor del billete que se está contando asegura un conteo uniforme de los billetes y evita riesgos de mal funcionamiento durante la operación de la unidad. 3. Intentos de comprobación previa son recomendados antes de decidir la posición final del ajuste. a. para billetes nuevos (delgados), se recomienda ajustar hacia el “-“ b. para billetes usados (gruesos), se recomienda ajustar hacia el “+” c. se obtienen mejores resultados al ajustar ligeramente orientado al “+” 8 Instalación A) Al recibir la unidad Después de extraer la unidad, guarde la caja original así como los protectores, en caso de que tenga que retornar la unidad. Si no procede como se recomienda y la unidad se daña durante la transportación, la garantía podría ser anulada. B) Instalación •Seleccione un lugar apropiado y asegúrese que está limpio, plano y nivelado. •La unidad no debe ubicarse cerca o encima de salidas de radiadores o calentadores, así como deberá estar alejada de fuertes fuentes de luz. •Los voltajes nominales de uso serán exclusivamente: 120 VAC/60 Hz, (Standard Americano) o 240 VAC/50 Hz, (Standard Europeo) •Conecte el cable de alimentación a la unidad y a la toma de corriente de pared. •Encender la unidad y verificar su adecuado funcionamiento. •En caso de algún problema, contactar inmediatamente con el proveedor. Nota: Si fuera necesario reemplazar fusibles, asegúrese de que sean de iguales catacterísticas a los originales 1. Puesta en Marcha 1.1 Clasificación de los billetes a contar Para asegurar el adecuado funcionamiento de la unidad: 1.Evitar contar billetes húmedos, excesivamente sucios, doblados o dañados 2.Evitar aquellos objetos que pudieran estar mezclados con los billetes como presillas y ligas. $$ $$ $$ $$ $ 3.Sacudir ligeramente los billetes en caso de ser nuevos porque usualmente se adhieren entre ellos. 4.Posicionar los billetes de forma ordenada en la bandeja de entrada para asegurar un funcionamiento libre de errores. 7 Introducción La unidad contadora de billetes AB5500 es la solución perfecta para lograr un conteo de su dinero rápido, confiable y efectivo. La unidad está diseñada para satisfacer las más disímiles exigencias de la rama financiera de hoy dia. Una interfase fácil de usar por el usuario, así como las novedosas prestaciones como la Selección de la Denominación a contar o la posibilidad de Visualización o Impresión de los detalles del conteo, le permitirán al usuario ahorrar tiempo y recursos en sus gestiones financieras. Esta Guía de Usuario le ayudará a familiarizarse con el funcionamiento de la unidad, para lograr un uso más eficiente de la misma. Le recomendamos leer cuidadosamente este material antes de comenzar su uso. Contenido del Empaque Al abrir la caja por primera vez verifique que todos los componentes descritos seguidamente están incluidos. Si alguno falta o esta dañado contacte el lugar donde esta unidad fue adquirida. 1. Unidad Contadora AB5500 2. Cable de Alimentación 3. Guia de Usuario y Documentos de Garantía 6 Medidas de Seguridad Adicionales •Lea cuidadosamente todas las instrucciones de seguridad. •Siga todos los consejos e instrucciones descritos en este manual •Esta unidad no debe ser ubicada en las cercanías de radiadores térmicos ni en lugares cerrados con escasa ventilación. •Asegurarse que la unidad será conectada a la línea de voltaje especificada en este manual. Si usted no esta seguro de la red de su local deberá consultar su dealer o su compañía local de energía. •No introduzca objetos de ningún tipo por las aberturas de la unidad, ya que pudieran hacer contacto con alguna parte del circuito electrónico provocando algún tipo de daño al mismo. •Tener cuidado de no derramar ningún tipo de líquido sobre la unidad •Desconecte y/o apague la unidad y llame al servicio técnico en cualquiera de los siguientes incidentes. -Si la unidad fue expuesta al agua o a la lluvia accidentalmente. -En el caso de que se haya derramado liquido sobre la unidad. -Cuando el cable de conexión esté dañado o gastado. -Si la unidad no opera normalmente a pesar de que se hayan seguido todas las instrucciones de ajuste recomendadas por el manual. Un ajuste inadecuado de otros controles pudiera producir otros daños mas complejos que tomarán mas tiempo resolver por el servicio técnico. - Si la unidad muestra evidentes cambios en su funcionamiento. - Si el equipo sufrió alguna caída o alguna de sus cubiertas esta dañada. 5 Importantes Medidas de Seguridad 4 Indice Introducción . . . . . . . . . . . . . . . . . . . . . . . . . . . . . . . . . . . . . . . . . . . . . . . . . . . . 6 Contenido del Empaque . . . . . . . . . . . . . . . . . . . . . . . . . . . . . . . . . . . . . . . . . . . . 6 Instalación . . . . . . . . . . . . . . . . . . . . . . . . . . . . . . . . . . . . . . . . . . . . . . . . . . . . . . 7 1. Puesta en Marcha. . . . . . . . . . . . . . . . . . . . . . . . . . . . . . . . . . . . . . . . . . . . . . 7 1.1 Clasificación de los Billetes a Contar. . . . . . . . . . . . . . . . . . . . . . . . 7 1.2 Encendido y Autochequeo. . . . . . . . . . . . . . . . . . . . . . . . . . . . . . . . 8 1.3 Ajuste de Espesor del Billete. . . . . . . . . . . . . . . . . . . . . . . . . . . . . . 8 2. Descripción de Partes y Controles. . . . . . . . . . . . . . . . . . . . . . . . . . . . . . . . 9 2.1 Descripción de Partes. . . . . . . . . . . . . . . . . . . . . . . . . . . . . . . . . . . . 9 2.2 Panel de Control. . . . . . . . . . . . . . . . . . . . . . . . . . . . . . . . . . . . . . . 10 3. Funciones Operacionales. . . . . . . . . . . . . . . . . . . . . . . . . . . . . . . . . . . . . . . .12 3.1 Encendido. . . . . . . . . . . . . . . . . . . . . . . . . . . . . . . . . . . . . . . . . . . . 12 3.2 Modo Conteo . . . . . . . . . . . . . . . . . . . . . . . . . . . . . . . . . . . . . . . . . 12 3.3 Seleccion de Funciones. . . . . . . . . . . . . . . . . . . . . . . . . . . . . . . . . .12 3.4 Seleccion de la Denominacion . . . . . . . . . . . . . . . . . . . . . . . . . . . . .12 3.5 Funcion de Reporte e Imprecion. . . . . . . . . . . . . . . . . . . . . . . . . . . .12 4. Solución a Problemas Operacionales. . . . . . . . . . . . . . . . . . . . . . . . . . . . . 13 4.1 Minimizando los errores. . . . . . . . . . . . . . . . . . . . . . . . . . . . . . . . . 13 4.2 Atascamiento. . . . . . . . . . . . . . . . . . . . . . . . . . . . . . . . . . . . . . . . . .13 4.3 Errores de Conteo. . . . . . . . . . . . . . . . . . . . . . . . . . . . . . . . . . . . . . 13 4.4 Limpieza de los sensores ópticos. . . . . . . . . . . . . . . . . . . . . . . . . . 14 4.5 Ajuste de la Sensibilidad Ultravioleta . . . . . . . . . . . . . . . . . . . . . . 15 4.6 Ajuste de la Sensibilidad Magnética. . . . . . . . . . . . . . . . . . . . . . . .15 5. Mensajes y Códigos de Error . . . . . . . . . . . . . . . . . . . . . . . . . . . . . . . . . . . 16 6. Especificaciones. . . . . . . . . . . . . . . . . . . . . . . . . . . . . . . . . . . . . . . . . . . . . . . .17 3 Gracias por adquirir este producto AccuBANKER Recomendamos leer cuidadosamente esta Guía de Usuario con el objetivo de que se familiarice con todas las prestaciones que le brinda este producto. AccuBANKER and its logo are registered trademarks of Hilton Trading Corp. All Rights Reserved. 2 Manual de Usuario Contadora de Billetes con Selección de Denominación AB5500