1
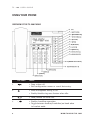
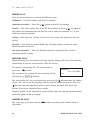
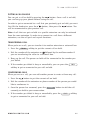
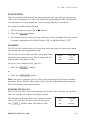
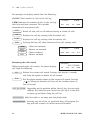
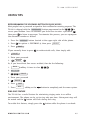
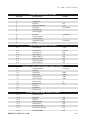
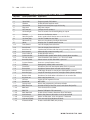
TS-200 cover_4c.qxd
11/2/2007
3:33 PM
Page 1
TALKSWITCH USER GUIDE
TALKSWITCH
TS-200 TELEPHONE
C T.T P 0 0 5 . 0 0 1 4 0 1
1545 CARLING AVENUE, SUITE 510
OTTAWA, ONTARIO, CANADA K1Z 8P9
www.talkswitch.com
ANSWERS WITH INTELLIGENCE
®
TalkSwitch is a division of Centrepoint Technologies Inc.
November 2007
CT.TP.005.001401
Information in this user guide is subject to change without notice and does not represent any commitment
on the part of TalkSwitch. No part of this user guide may be reproduced or transmitted in any form or by
any means, electronic or mechanical (including photocopying, recording, or information storage and
retrieval systems) or translated to another language, for any purpose other than the licensee’s personal use
and as specifically allowed in the licensing agreement, without the express written permission of TalkSwitch.
Reproduction, adaptation or translation without prior written permission is prohibited, except as allowed
under the copyright laws.
TalkSwitch. Copyright 2007. All Rights Reserved.
www.talkswitch.com
1545 CARLING AVENUE, SUITE 510
OTTAWA, ONTARIO, CANADA K1Z 8P9
1545, AVENUE CARLING, BUREAU 510
OTTAWA (ONTARIO) CANADA K1Z 8P9
www.talkswitch.com
TalkSwitch. Copyright 2007. Tous droits réservés.
Toute reproduction, adaptation ou traduction est interdite sans autorisation écrite préalable, sauf lorsque
le permet la législation relative aux droits d’auteur.
L’information contenue dans ce guide d’utilisateur est indiquée sous réserve de modifications et ne constitue
pas un engagement de la part de TalkSwitch. Il est interdit de reproduire ou de transmettre quelque
partie que ce soit de ce guide, de quelque manière que ce soit, électronique ou mécanique (y compris les
photocopies, l’enregistrement ou les systèmes de stockage ou de récupération d’information) ou de le
traduire dans une autre langue dans un but autre que l’utilisation personnelle du détenteur de licence,
comme le stipule le contrat de licence, sans avoir obtenu l’autorisation explicite écrite de TalkSwitch.
Novembre 2007
CT.TP.005.010491.CA
TalkSwitch est une division de Centrepoint Technologies Inc.
TS-200 cover_4c_EF-tumble.qxd
11/14/2007
4:47 PM
Page 2
Dear TS-200 owner,
Your TS-200 may be a new model that uses icons for special
function keys that are not reflected in this guide. Please take note
of the changes below:
Key Label
New Key Icon
RELEASE
MUT E
H O LD
SPEAKER
French language TalkSwitch documentation
For the TS-200 User Guide and Quick Reference Card in French,
please visit our website at www.talkswitch.com/ca/fr/soutien
TABLE OF CONTENTS
Installing your phone . . . . . . . . . . . . . . . . . . . . . . . . . . . . . . . . . . . . . . . . 1
Introduction . . . . . . . . . . . . . . . . . . . . . . . . . . . . . . . . . . . . . . . . . . . 1
Important safety instructions . . . . . . . . . . . . . . . . . . . . . . . . . . . . . . . 1
Part checklist . . . . . . . . . . . . . . . . . . . . . . . . . . . . . . . . . . . . . . . . . . 3
Installation . . . . . . . . . . . . . . . . . . . . . . . . . . . . . . . . . . . . . . . . . . . 3
Wall mounting . . . . . . . . . . . . . . . . . . . . . . . . . . . . . . . . . . . . . . . . . 3
Setting up your TS-200 phone . . . . . . . . . . . . . . . . . . . . . . . . . . . . . . . . . 4
Configure the line access mode . . . . . . . . . . . . . . . . . . . . . . . . . . . . . . 4
Set the language display . . . . . . . . . . . . . . . . . . . . . . . . . . . . . . . . . . 5
Headset operation (optional) . . . . . . . . . . . . . . . . . . . . . . . . . . . . . . . 6
Installing headsets with RJ22 connectors . . . . . . . . . . . . . . . . . . 6
Installing headsets with 2.5mm connectors . . . . . . . . . . . . . . . . . 7
Using headsets with the TS-200 . . . . . . . . . . . . . . . . . . . . . . . . . 7
Setting the date and time . . . . . . . . . . . . . . . . . . . . . . . . . . . . . . . . . 7
Using your phone . . . . . . . . . . . . . . . . . . . . . . . . . . . . . . . . . . . . . . . . . . . 8
Overview of the TS-200 phone . . . . . . . . . . . . . . . . . . . . . . . . . . . . . . 8
Making a call . . . . . . . . . . . . . . . . . . . . . . . . . . . . . . . . . . . . . . . . . 10
Receiving calls . . . . . . . . . . . . . . . . . . . . . . . . . . . . . . . . . . . . . . . . 10
Hanging up a call . . . . . . . . . . . . . . . . . . . . . . . . . . . . . . . . . . . . . . 10
Putting a call on hold . . . . . . . . . . . . . . . . . . . . . . . . . . . . . . . . . . . 11
Transferring a call . . . . . . . . . . . . . . . . . . . . . . . . . . . . . . . . . . . . . . 11
Conferencing calls . . . . . . . . . . . . . . . . . . . . . . . . . . . . . . . . . . . . . . 11
Parking a call . . . . . . . . . . . . . . . . . . . . . . . . . . . . . . . . . . . . . . . . . 12
Picking up a call . . . . . . . . . . . . . . . . . . . . . . . . . . . . . . . . . . . . . . . 12
Intercom and set paging . . . . . . . . . . . . . . . . . . . . . . . . . . . . . . . . . 12
Do not disturb . . . . . . . . . . . . . . . . . . . . . . . . . . . . . . . . . . . . . . . . 13
Voicemails . . . . . . . . . . . . . . . . . . . . . . . . . . . . . . . . . . . . . . . . . . . 13
Accessing the call log . . . . . . . . . . . . . . . . . . . . . . . . . . . . . . . . . . . 13
Using one-touch speed dials . . . . . . . . . . . . . . . . . . . . . . . . . . . . . . . 15
Using the phone book . . . . . . . . . . . . . . . . . . . . . . . . . . . . . . . . . . . 16
Useful tips . . . . . . . . . . . . . . . . . . . . . . . . . . . . . . . . . . . . . . . . . . . . . . . 17
Reprogramming the voicemail button for quick access . . . . . . . . . . . . . 17
Ring once feature . . . . . . . . . . . . . . . . . . . . . . . . . . . . . . . . . . . . . . 17
Advanced configuration . . . . . . . . . . . . . . . . . . . . . . . . . . . . . . . . . . . . . 18
Changing your phone back to factory default . . . . . . . . . . . . . . . . . . . 18
Navigating through the configuration menus . . . . . . . . . . . . . . . . . . . 18
Configuration menus function summary . . . . . . . . . . . . . . . . . . . . . . . 20
Maintenance of your phone . . . . . . . . . . . . . . . . . . . . . . . . . . . . . . . . . . 21
Troubleshooting guide . . . . . . . . . . . . . . . . . . . . . . . . . . . . . . . . . . . . . . 21
Blank screen . . . . . . . . . . . . . . . . . . . . . . . . . . . . . . . . . . . . . . . . . . 21
Phone doesn’t ring. . . . . . . . . . . . . . . . . . . . . . . . . . . . . . . . . . . . . . 21
No dial tone . . . . . . . . . . . . . . . . . . . . . . . . . . . . . . . . . . . . . . . . . . 21
No Caller ID . . . . . . . . . . . . . . . . . . . . . . . . . . . . . . . . . . . . . . . . . . 22
Handset doesn’t work. . . . . . . . . . . . . . . . . . . . . . . . . . . . . . . . . . . . 22
Headset doesn’t work . . . . . . . . . . . . . . . . . . . . . . . . . . . . . . . . . . . . 22
Problems dialing . . . . . . . . . . . . . . . . . . . . . . . . . . . . . . . . . . . . . . . 22
Message waiting count doesn’t work . . . . . . . . . . . . . . . . . . . . . . . . . 22
Can’t receive on-hook intercom calls . . . . . . . . . . . . . . . . . . . . . . . . . 22
Can’t receive set paging . . . . . . . . . . . . . . . . . . . . . . . . . . . . . . . . . . 22
Regulatory information . . . . . . . . . . . . . . . . . . . . . . . . . . . . . . . . . . . . . 23
Telephone repair and warranty service . . . . . . . . . . . . . . . . . . . . . . . . . . 23
TalkSwitch limited warranty . . . . . . . . . . . . . . . . . . . . . . . . . . . . . . . . . . 24
Legend:
= softkey
= feature button
= numeric key
TS-200 USER GUIDE
INSTALLING YOUR PHONE
INTRODUCTION
Congratulations on purchasing a TalkSwitch® TS-200 phone. This phone is
specifically designed to take full advantage of the features provided by the
TalkSwitch line of phone systems.
TS-200 Feature Overview
•
•
•
•
•
•
•
Business speaker phone
3-line LCD with softkeys
Headset jack
Data port
Desk or wall mountable
10 Speed dial buttons
99-entry phone book
•
•
•
•
•
•
TalkSwitch feature keys
Caller ID with call log
Message waiting count
Message waiting indicator
Hands-free intercom
Hands-free group paging
Please take the time to familiarize yourself with this User Guide.
IMPORTANT SAFETY INSTRUCTIONS
When using telephone equipment, basic safety precautions should always be
followed to reduce the risk of fire, electrical shock and injury, including
the following:
1. Read and understand all instructions in this User Guide.
2. Follow all warnings and follow all instructions marked on the product.
3. Unplug this product from the wall outlet before cleaning. Do not use liquid
or aerosol cleaners. Use a damp cloth for cleaning.
4. Telephones should not be used in a bathtub, shower or pool. Immersion of
the telephone in water could cause an electrical shock.
5. Slots and openings in the cabinet back or bottom are provided for ventilation,
to protect it from overheating. These openings must not be blocked or
covered. This product should never be placed near or over a radiator, heat
register or stove.
6. This product should be operated only with the power source provided.
W W W.T A L K S W I T C H . C O M
1
TS-200 USER GUIDE
7. Do not allow anything to rest on the telephone line cord or power cord. Do
not locate this product where its cords will be stepped on or interfered with.
8. Do not overload outlets and extension cords, as this can result in the risk of
fire or electric shock.
9. Never push objects of any kind into this product through the cabinet slots,
as you may touch dangerous voltage points or short out parts that could
result in fire or electrical shock.
10. Never spill liquid of any kind on the product.
11. To reduce the risk of electric shock, do not disassemble this product. Take it
to a qualified service technician when service or repair work is required.
Opening or removing covers may expose you to dangerous voltage or other
risks. Incorrect reassembly can cause electrical shock when the product is
subsequently used.
12. Never touch un-insulated telephone wires or terminals unless the telephone
line has been disconnected at the network interface.
13. Never install or modify telephone wiring during a lightning storm.
14. Never install telephone jacks in wet locations unless the jack is specifically
designed for wet locations.
15. Use caution when installing or modifying telephone lines.
16. Unplug the telephone from the wall outlet and refer servicing to qualified
service personnel under the following conditions:
•
•
•
•
The power cord is frayed or damaged.
If liquid has been spilled into the telephone.
If the telephone has been exposed to rain or water.
If the telephone does not operate properly by following the
operating instructions.
• If the telephone has been dropped or the enclosure damaged.
• If the telephone exhibits distinct changes in performance.
17. Avoid using a telephone during a thunderstorm. There may be a remote risk
of electrical shock from lightning.
18. Do not use the telephone to report a gas leak in the vicinity of the leak.
2
W W W.T A L K S W I T C H . C O M
TS-200 USER GUIDE
PART CHECKLIST
The following parts are included with your TS-200 phone:
•
•
•
•
TS-200 telephone
Plastic base
AC power adapter
6’ RJ11 phone cable
• Handset
• Coiled handset cord
• TS-200 User Guide
If any of these parts are missing, please contact your reseller.
INSTALLATION
1. Connect the power adapter to a
wall socket and to the phone
base. The power jack is located
on the underside of the phone.
Use only the power adapter
provided with your phone.
2. Connect the telephone line cord from the phone to the wall jack.
3. Plug the coiled cord into the handset, and then plug the other end of the
cord into the phone’s handset connector. The handset connector is on the
left side of the phone.
WALL MOUNTING
1. If you are not using a wall mounting
phone jack plate, remove the bracket
from the phone and use it as a
template to mark the placement of
the screw holes on the wall.
2. Place the bracket on the phone for
wall mounting (rotate 180° from
desk-mount position), and route
cords as shown in the diagram.
3. Push out the handset hook and reattach in opposite direction for the wall
mount position.
4. Replace handset and place the phone on the wall.
W W W.T A L K S W I T C H . C O M
3
TS-200 USER GUIDE
SETTING UP YOUR TS-200 PHONE
Before you can start using your TS-200 telephone, you will need to do the following:
1. Configure your line access mode.
2. Set the language display.
3. Enable headset operation if you’re using a headset.
4. Set the date and time.
CONFIGURE THE LINE ACCESS MODE
When you first power up the phone, the display will show DIRECT LINE? with
options YES and NO.
• If this extension is configured so that you don’t need to dial
external calls, then select YES.
• If you dial 9 before placing external calls, then select NO.
9
to place
Once set, the phone will automatically adjust redial, speed dial and Caller ID
dialing accordingly.
If the phone doesn’t display the DIRECT LINE? prompt, toggle the PBX/Standard
switch from PBX to Standard back to PBX. The switch is located on the right
side of the phone as shown in the picture. The phone will then prompt you for
direct line selection.
PBX Switch
NOTE: Ensure that the PBX/Standard switch is in the PBX position when you
are done.
4
W W W.T A L K S W I T C H . C O M
TS-200 USER GUIDE
SET THE LANGUAGE DISPLAY
The telephone’s display has three lines of text. The
first two lines display information, while the third
shows the functions of the 4 softkey buttons
located below the display.
09/16
05
11:03 AM
03
CALLS
MESSAGES
When the phone is idle, it displays the time and date as well as the number of
calls received and number of new messages in your voicemail inbox.
Your phone comes with the English display menus installed. If you want to
switch your display menus to French, you will need to do the following:
1. Press the OPTIONS button located at the upper right side of the phone.
2. Press * . ADVANCED CONFIG will appear on the display. Alternatively, you
can navigate to ADVANCED CONFIG option using the UP and DOWN softkeys.
3. Press the
SELECT
softkey located directly below the display.
4. Press 0. The DOWNLOAD prompt will appear on the screen. Alternatively, you
can navigate to the DOWNLOAD option using the UP and DOWN softkeys.
5. Press the SELECT
the screen.
softkey. The DOWNLOAD? prompt will appear on
6. Press the YES softkey to download the French version.
In order to come back to the English menu and permanently remove the French,
you will need to do the following:
1. Press the second softkey located directly below the display.
2. Power down and then power up the phone while holding this same softkey.
3. Answer YES to the ERASE ALL CODE? prompt that will appear on the display
(answering NO will bring you back to the French menus).
W W W.T A L K S W I T C H . C O M
5
TS-200 USER GUIDE
HEADSET OPERATION (OPTIONAL)
If you are using a headset, you will need to configure your telephone to operate
in headset mode. Configuring the TS-200 for headset mode allows you to place
calls using the headset without the need to lift the handset.
The TS-200 supports 2 types of headsets:
Headsets with RJ22 (handset) connectors
Headsets with 2.5mm connectors
Installing headsets with RJ22 connectors
Note: In order to use a headset with an RJ22 connector, you will need an external
controller/amplifier to switch between handset and headset.
1. Connect your headset to the phone.
• Disconnect the handset from the handset jack on the left of the phone.
• Plug your headset controller into the handset jack.
• Plug the handset into the headset controller.
2. Configure the phone for headset mode.
• Press the OPTIONS button.
• Press the
3
key for HEADSET
• Press the
SELECT
• Press the
CHNG
softkey to turn headset mode on.
• Press the
SAVE
softkey.
• Press and hold the
6
softkey.
button to exit the option menus.
W W W.T A L K S W I T C H . C O M
TS-200 USER GUIDE
Installing headsets with 2.5mm connectors
1. Plug your headset into the 2.5mm jack located on the right side of the phone.
2. The phone will automatically detect the headset and enable headset mode.
2.5 mm Headset Jack
Using headsets with the TS-200
Once headset mode is enabled, you can make and receive calls using the headset
without having to lift the handset.
The function of the
button changes once a headset is installed:
• Pressing the
button once places the phone off-hook for making or
receiving calls with the headset.
• Pressing the
button a second time engages the speakerphone
instead of the headset.
• Pressing the
button a third time disconnects the call.
• Pressing the
button at any time will also disconnect the call.
SETTING THE DATE AND TIME
Date and time is automatically set when the phone receives its first phone call.
It will use the time and date from Caller ID to synchronize itself with the
TalkSwitch date and time.
W W W.T A L K S W I T C H . C O M
7
TS-200 USER GUIDE
USING YOUR PHONE
OVERVIEW OF THE TS-200 PHONE
KEY LABEL
USAGE
1
• Drop active call.
• Exit configuration menus or cancel data entry.
2
• Mute microphone during a call.
• Enable/disable ring once feature when idle.
3
• Hold/unhold an active call.
4
• Enables handsfree operation.
• Toggle between headset/handsfree/on-hook when
in headset mode.
8
W W W.T A L K S W I T C H . C O M
TS-200 USER GUIDE
KEY LABEL
USAGE
5
OPTIONS
6
PHONEBOOK • Access the phone book.
• Access the configuration menu.
• Show Call Detail while in call log.
• Store the displayed phone number in the phone book.
7
VOICEMAIL
• Calls Voicemail.
8
FLASH
9
DND
10
PICKUP
11
CONF
12
REDIAL
13
VOLUME S • Increase ringer volume — when idle.
• Send a FLASH signal to the Extension line.
• Toggles do-not-disturb on and off.
• Answer a call at any ringing extension.
• Complete the conference — join with party on hold.
• Redial the last dialed number.
• Increase speaker or handset earpiece volume when on a call.
14
VOLUME T • Decrease ringer volume — when idle.
• Decrease speaker or handset earpiece volume when on a call.
15
SPEED DIAL
• 10 keys — dial a pre-programmed phone number or
feature code.
16
SOFTKEYS
• Provide access to various functions in
different circumstances.
SK1
MESSAGES
• Access Voicemail.
SK2
CALLS
• Access the call log to view received call information.
SK1
TRAN
• Initiate a transfer. Puts current call on hold and allows
the dialing of a new number.
SK2
CNCL
• Cancels a transfer and returns to the original call.
SK3
PARK
• Park active call — system responds with the park orbit.
SK4
UNPK
• Retrieves a parked call from the specified park orbit.
MWI
• Message waiting indicator lamp.
W W W.T A L K S W I T C H . C O M
9
TS-200 USER GUIDE
MAKING A CALL
Calls can be initiated in a number of different ways:
Traditional — Lift the handset and dial the number.
Handsfree or headset — Press the
button and dial the number.
Pre-dial — Dial the number first then lift the handset or press
. If required,
the phone will automatically add the line access code (for example “9”) if you
dialed an external number.
Call log — Dial from the call log. See the call log section for details on how to
do this.
Directory — Dial from the phone book. See the phone book section for more
details on how to do this.
One-touch speed dial — Press the desired one-touch speed dial key to call a
pre-programmed number.
RECEIVING CALLS
When receiving calls, your phone will ring and the display will show caller identity
information if you are subscribed to Caller ID service.
To answer an incoming call, lift the receiver or
press the
button.
You can mute the ringing for the incoming call by
pressing the MUTE softkey.
TalkSwitch
613-725-2980
MUTE
You can enable the ring once feature by pressing the
button when the phone
is idle. This will cause all incoming calls to ring the phone only once. Also, the
button light will now flash when a call is being received. This light also
flashes if you have turned off your ringer.
Ringing volume can be adjusted or turned off by using the volume control buttons
while the phone is idle or ringing.
HANGING UP A CALL
You can hang up by pressing the
the cradle.
10
button or putting the handset back in
W W W.T A L K S W I T C H . C O M
TS-200 USER GUIDE
PUTTING A CALL ON HOLD
You can put a call on hold by pressing the
button. Once a call is on hold,
you can hang up your phone without losing the call.
In order to get re-connected to a call that you previously put on hold, you must
first lift the handset or press the
button, then press the
button. You
will be reconnected to your previous call.
Note: A call that was put on hold at a specific extension can only be retrieved
from the same extension. In order to re-connect to a call from a different
extension, use the call park and unpark functions.
TRANSFERRING A CALL
When you’re on a call, you can transfer it to another extension or voicemail box.
1. Press the
TRAN
softkey to put the current call on hold.
2. Dial the number of the extension or * followed by the mailbox number if
you are transferring the caller to a voicemail box.
3. Hang up the call. The person on hold will be connected to the number you
just dialed.
4. If the number you dialed is busy or unavailable, you can press the
softkey to get re-connected to your call on hold.
CNCL
CONFERENCING CALLS
When you are on a call, you can add another person to create a three-way call.
1. Press the
button to put the current call on hold.
2. Dial the number of the extension or phone number of the person you would
like to conference in.
3. Once the person has answered, press the
currently on hold to your conversation.
CONF
button to add the call
4. If the number you dialed is busy or unavailable, press the
to get re-connected to your call on hold.
W W W.T A L K S W I T C H . C O M
CNCL
softkey
11
TS-200 USER GUIDE
PARKING A CALL
Parking a call puts the call on hold in one of ten park orbits, and allows the call
to be retrieved from any phone in the office.
1. Press the
PARK
softkey to park the current call.
2. The system will respond by confirming the call is parked and will announce
the park orbit. The orbit is between 500 and 509.
To retrieve a call that has been parked:
1. From any phone, lift the handset or press the
button.
2. Press the UNPARK softkey followed by the park orbit of the call.
3. You will be connected to call parked in the orbit specified.
PICKING UP A CALL
Pick up allows you to answer a call ringing at someone else’s extension.
When another extension is ringing:
1. Lift the handset or press the
2. Press the
PICKUP
button.
button.
3. You will be connected to the incoming call.
Note: Pick up works only for incoming external calls.
INTERCOM AND SET PAGING
The TS-200 supports On-hook intercom and Set Paging.
On-hook intercom: On-hook intercom calls are automatically answered in speaker
mode, enabling instant hands-free two-way communication. The telephone at
the target extension must also support intercom.
To place an on-hook intercom call, dial
*
8
4
+ extension.
Set Paging: Set paging calls are similar to on-hook intercom calls, but to a ring
group and are only one-way audio for announcements. All the phones in the ring
group automatically answered in speaker mode to receive the page. The phones
in the ring group must support set paging.
To place a set page call, dial
12
*
8
5
+ ring group number
W W W.T A L K S W I T C H . C O M
TS-200 USER GUIDE
DO NOT DISTURB
You can enable Do Not Disturb on your extension and you will not receive any
calls at that extension. All calls will follow the programmed Do Not Disturb call
cascade option for your extension, such as going directly to voicemail.
To enable or disable Do Not Disturb:
1. Lift the handset or press the
2. Press the
DND
button.
button.
3. The Do Not Disturb setting of your extension will be changed. You will receive
a system confirmation of Do Not Disturb “ON” or Do Not Disturb “OFF”.
VOICEMAILS
The TS-200 will indicate that you have new voice messages in your voice inbox
by flashing the message waiting lamp.
The TS-200 will also show you how many new voice
messages you currently have. This is shown on the
display when the phone is idle.
09/16
05
11:03 AM
03
CALLS
MESSAGES
To access your voicemail box, you can:
1. Press the MESSAGE softkey.
or
2. Press the VOICEMAIL button.
Note: You can re-program your TS-200 to also automatically dial your mailbox
password. Please refer to the section Useful Tips for information on reprogramming the message and voicemail keys.
ACCESSING THE CALL LOG
The TS-200 can store up to 99 incoming call records. Once 99 calls are reached,
new call records will replace the oldest records.
The idle phone display shows the number of news
calls in the call log. To access the call log, press
the CALLS softkey when the phone is idle.
W W W.T A L K S W I T C H . C O M
09/16
05
11:03 AM
03
CALLS
MESSAGES
13
TS-200 USER GUIDE
For example, the display would show the following:
12 CALLS: Total number of calls in the call log.
12 CALLS
5 NEW: Indicates the number of calls in the call log
that have not been reviewed. This includes
answered and unanswered calls.
RSET
FIND
UP
DOWN
Resets all new calls as old without having to review all calls.
UP
Displays the call log starting with the oldest call.
DOWN
Displays the call log starting with the newest call.
FIND
Pressing this key will allow selection of the call viewing order.
<NEW
NEW>
<OLD
OLD>
:
:
:
:
Oldest un-reviewed
Newest un-reviewed
Oldest reviewed
Newest reviewed
Reviewing the call records
While reviewing the call records, the phone display
will show the following:
12 CALLS
<NEW
NEW>
5 NEW
<OLD
OLD>
TalkSwitch
613-725-2980
DEL
DIAL
EXIT
DOWN
DEL
Deletes the current call record. Pressing this key for 2 seconds
will show the option to delete all call records.
DIAL
Dial the phone number shown in the current call record. Pressing
or lifting the handset will also call the number shown in
the call record.
EXIT/UP/DOWN
PHONEBOOK
SPEEDDIALKEY
14
RSET
5 NEW
Depending on the position within the call log, the two right
softkeys will allow the user to exit the call log if at the end,
or move up and down along the call list.
Adds the caller as an entry into the phone book.
Pressing any one of the 10 speed-dial keys will program the
key with the current call record name and number.
W W W.T A L K S W I T C H . C O M
TS-200 USER GUIDE
OPTIONS
Show additional information about the call. (The Options
button is the topmost feature key).
Record Number: 1 of 45
AN: Call was answered
1/45 AN
4 09/20
CB: “Called-back” from the call record
DEL
CB
LD
4:35 PM
DIAL
UP
DOWN
LD: Long Distance Call
4: is the Number of calls received from this caller.
UP/DOWN
Show the next call record for this caller.
USING ONE-TOUCH SPEED DIALS
The TS-200 has 10 programmable one-touch speed dial buttons. Pressing a speed
dial key will automatically dial the programmed phone number.
Speed dial keys can be programmed either by accessing the options menus or
while reviewing the call log.
Using the Options Configuration Menu:
1. Press OPTIONS
2. Press
3. Press
2
SELECT
4. Press the speed dial key that you want to program.
EDIT
5. Press
the value.
if the key was already programmed and you want to change
6. Enter the name using the numeric keypad and press
7. Enter the phone using the numeric keypad and press
SAVE
SAVE
.
.
Note about programming phone numbers:
• Do not program the outside line access code 9 as part of the number.
The phone automatically inserts it for numbers that are 7 digits or more.
• You can include pauses in the dialing of the number by pressing the
PAUSE softkey.
W W W.T A L K S W I T C H . C O M
15
TS-200 USER GUIDE
• You can include “Flash” in the dialing sequence by pressing the
FLASH softkey.
DIR
• Pressing
at beginning of a number will disable the automatic
dialing of the line access code 9.
• If your phone is configured for Direct Line Access, the phone will never
insert a line access code 9.
• These tips also apply to programming phone book entries.
While reviewing the call log:
• Pressing a speed dial key while viewing a call record will allow the user to
automatically save the caller’s name and number to the speed dial key.
USING THE PHONE BOOK
The TS-200 has a built-in phone book capable of storing 99 names and
phone numbers.
Phone book entries can be programmed either by accessing the options menus
or while reviewing the call log.
Using the options configuration menus:
1. Press OPTIONS .
2. Press
SELECT .
3. Enter the name using the numeric keypad and press
4. Enter the phone using the numeric keypad and press
SAVE
SAVE
.
.
While reviewing the Call Log:
1. Pressing the PHONEBOOK button while viewing a call record will allow the
user to automatically save the caller’s name and number to the phone book.
16
W W W.T A L K S W I T C H . C O M
TS-200 USER GUIDE
USEFUL TIPS
REPROGRAMMING THE VOICEMAIL BUTTON FOR QUICK ACCESS
Most people have a password assigned to their mailbox for security purposes. The
TS-200 is shipped with the VOICEMAIL button programmed to dial * * # to
access your mailbox. Once in voicemail you then have to enter a password, # ,
then press 1 to listen to messages. To automate this process, you can reprogram
the voicemail number as follows:
1. Press the OPTIONS button located at the upper right side of the phone.
2. Press
4
for option 4: VOICEMAIL #, then press
EDIT
3. Press
SELECT .
.
If you normally have to press
9
to make outside calls, then simply add:
PAUSE
1.
2. Enter your password.
3.
PAUSE
#
1
.
Or, if you have direct line access enabled, then do the following:
1.
BACK
2.
FLASH
3.
* *
softkey 3 times to clear
PAUSE
#
* *
#.
.
4. Enter your password
5. #
PAUSE
6. Press
SAVE
7. Press
REL
1
.
softkey or the
button to completely exit the menu system.
RING ONCE FEATURE
The TS-200 has a useful feature for minimizing ringing noise in an office
environment. The phone can be set to ring only one time. Subsequent rings will
be muted and the
button will flash during each ring.
To enable this feature, simply press the
W W W.T A L K S W I T C H . C O M
button while the phone is on-hook.
17
TS-200 USER GUIDE
ADVANCED CONFIGURATION
Pressing the OPTIONS button while the phone is idle provides access to numerous
programmable features and values for the telephone.
WARNING: Changing some of the values in the Options menus may cause your
phone to experience operational problems.
CHANGING YOUR PHONE BACK TO FACTORY DEFAULT
WARNING: Resetting your phone to factory default will cause all programming,
including the phone book to be erased.
You can return your phone back to factory defaults by following these steps:
1. OPTIONS
2.
3.
4.
*
SELECT
*
5.
SELECT
6.
YES
NAVIGATING THROUGH THE CONFIGURATION MENUS
You can use your numeric keypad to enter the number of the function you want
to navigate to. This eliminates the need to use the up/down key to scroll through
the menu choices. The key(s) required to navigate to each menu is shown in the
table.
Note: You will need to enter
SELECT
between the menu key codes.
For example, to navigate to the Factory Reset, you would enter OPTIONS
SELECT
18
*
*.
W W W.T A L K S W I T C H . C O M
TS-200 USER GUIDE
OPTIONS MENU DEFAULT SETTINGS
Key Code
1
2
3
4
5
6
7
8
9
0
*
#
Feature/Value
Phone book
Speed dial
Headset
Voicemail number
Ring tone
LCD contrast
LCD backlight
Features
Auto dial prefix
Set time/date
Advanced config
About
Setting
OFF
**#
Fast warble
Sub-menu
9
Sub-menu
-
FEATURES MENU DEFAULT SETTINGS
8-1
8-2
8-3
8-4
8-5
8-6
8-7
8-8
Time format
Date format
Auto time set
Auto answer
Store Caller ID
Quiet auto dial
Format numbers
Auto idle/hold
12hr.
mm-dd
ON
OFF
ON
OFF
ON
OFF
ADVANCED CONFIGURATION MENU DEFAULT SETTINGS
*-1
*-2
*-3
*-4
*-5
*-6
*-7
*-8
*-9
*-0
*-*-
System features
Softkeys
Flash time
Pause time
Auto dial time
Auto dial gap
Release time
Key time out
LCD test
Download
Factory reset
Sub-menu
600
2000
100
100
0
60
-
SYSTEM FEATURES MENU DEFAULT SETTINGS
*-1-1
*-1-2
*-1-3
*-1-4
*-1-5
*-1-6
*-1-7
*-1-8
W W W.T A L K S W I T C H . C O M
PBX direct line
PBX hold
PBX FSK
PBX download
Hold release
Disconnect clear
Light when off-hook
Extended DTMF
ON
ON
ON
ON
ON
ON
OFF
19
TS-200 USER GUIDE
CONFIGURATION MENUS FUNCTION SUMMARY
Key Code
1
2
3
4
5
6
7
8
9
0
*
#
8-1
8-2
8-3
8-4
8-5
8-6
8-7
8-8
*-1
*-2
*-3
*-4
*-5
*-6
*-7
*-8
*-9
*-0
*-**-1-1
*-1-2
*-1-3
*-1-4
*-1-5
*-1-6
*-1-7
*-1-8
20
Feature/Value Name
Phone book
Speed dial
Headset
Voicemail #
Ring tone
LCD contrast
LCD backlight
Features
Auto dial prefix
Set time/date
Advanced cfg.
About
Time format
Date format
Auto time set
Auto answer
Store Caller ID
Quiet auto-dial
Format numbers
Auto idle/hold
System features
Softkeys
Flash time
Pause time
Auto dial time
Auto dial gap
Release time
Key time out
LCD test
Download
Factory reset
PBX direct line
PBX hold
PBX FSK
PBX download
Hold release
Disconnect clear
Light w/off-hook
Extended DTMF
Explanation
Program entries in the phone book
Program speed dial buttons
Enable/disable headset mode
Program voicemail/messages dial string
Ring tone control
Change the LCD contrast
Time in seconds for LCD backlighting to stay on
Accesses the features menu
Access code to be dialed to access outside line
Set the TS-200 time and date
Accesses the advanced configuration menu
Displays the TS-200 firmware version
Sets the display format for time
Sets the display format for date
Synchronize the time and date using incoming Caller ID
Automatically answer incoming calls
Enable/disable call log
Enable/disable speaker when dialing stored phone numbers
Format numbers with dashes. ie: 1-613-725-2980
Phone returns to idle after hold is pressed
Accesses system features menu
Reprograms softkey labels and codes
Duration of the line interruption when Flash is pressed
Duration of pause when inserted in dial strings
DTMF digit duration for stored/pre-dialed phone numbers
Length of inter-digit pause for stored/pre-dialed phone numbers
Duration of on-hook when call released - 0= remain idle
Data entry key time-out
Lights all LCD segments for test
NOT USED
Resets the programming to factory defaults
Disables dialing of the line access code (auto-dial prefix)
Flash for hold or local hold
Receive TalkSwitch FSK commands
Enable direct Firmware download from TalkSwitch
Return the phone to idle when a call is put on hold
Return to idle when a line disconnect is detected
Turn message light ON when off-hook
Enables extended DTMF (A-D) dialing
W W W.T A L K S W I T C H . C O M
TS-200 USER GUIDE
MAINTENANCE OF YOUR PHONE
Treat your telephone with care for trouble-free performance. Avoid dropping the
handset or telephone. Dropping or damaging the phone will void the warranty.
Retain the original packaging in case you need to ship your phone back for repair.
Clean your telephone with a slightly damp cloth. Never use detergents, excess
water, aerosols or cleaning agents.
TROUBLESHOOTING GUIDE
If you have any problems with your telephone, determine first if the problem is
with your phone or with the phone line.
BLANK SCREEN
• Verify that your power adapter is properly connected.
PHONE DOESN’T RING
• Verify that the ringer is not turned off. Press the VOLUME S button
while the phone is idle to turn the ringer on.
• Verify that the line cord is properly connected and that dial tone is
present when going off-hook.
• Verify that the TalkSwitch unit is properly programmed for your
extension’s call handling.
• Verify that Do Not Disturb is disabled for your extension.
NO DIAL TONE
• Verify that the line cord is properly connected.
• Try with a different line cord.
• Test the telephone in a different jack. If it works, then the jack may be
defective or the TalkSwitch unit may be wired incorrectly.
W W W.T A L K S W I T C H . C O M
21
TS-200 USER GUIDE
NO CALLER ID
• Check Caller ID subscription. In order to receive Caller ID for external
calls, you must be subscribed to the Caller ID service from your
telephone service provider.
HANDSET DOESN’T WORK
• Verify that the coiled handset cord jack is fully inserted into the handset.
HEADSET DOESN’T WORK
• Verify that your phone is configured for headset operation.
PROBLEMS DIALING
• Verify that the switch on the right side of the phone is in the
PBX position.
• Ensure that your setting for direct line access on the phone matches the
setting on the TalkSwitch unit.
MESSAGE WAITING COUNT DOES NOT WORK
• Verify that your extension is programmed in TalkSwitch as a TS-200.
• Verify that the PBX/Standard switch on the side of the phone is in the
“PBX” position.
CAN’T RECEIVE ON-HOOK INTERCOM CALLS
• Verify that your extension is programmed in TalkSwitch as a TS-200.
CAN’T RECEIVE SET PAGING
• Verify that your extension is programmed in TalkSwitch as a TS-200.
22
W W W.T A L K S W I T C H . C O M
TS-200 USER GUIDE
REGULATORY INFORMATION
This equipment complies with TIA-968-A of FCC Rules. On the base unit of this
equipment is a label that contains, among other information, the FCC Registration
Number and Ringer Equivalence Number (REN) for this equipment. If requested,
this information must be given to the telephone company.
This equipment also complies with regulations RSS210 and CS-03 of Industry
Canada and Science Canada.
Operation is subject to the following two conditions: (1) this device may not
cause interference, and (2) this device must accept any interference, including
interference that may cause undesired operation of the device.
This CLASS B Digital apparatus meets all requirements of the Canadian interferencecausing equipment regulations.
This equipment is compatible with inductively coupled hearing aids.
Notice: This telephone is to be used only as an extension phone connected to a
TalkSwitch PBX.
If you experience trouble with this telephone equipment, please contact the
Technical Support department at the following address and phone number for
information on obtaining service or repairs:
TalkSwitch
1545 Carling Ave., Suite 510
Ottawa, Ontario K1Z 8P9
Canada
(866) 393-9960 – toll free in continental North America
(613) 725-2466
TELEPHONE REPAIR AND WARRANTY SERVICE
Do not attempt to repair this telephone yourself.
You can return your telephone to your reseller for repair or replacement in
accordance with our TALKSWITCH LIMITED WARRANTY. If shipped, make sure
you obtain a WRA number for authorization for repair under warranty.
W W W.T A L K S W I T C H . C O M
23
TS-200 USER GUIDE
TALKSWITCH LIMITED WARRANTY
TalkSwitch, a division of Centrepoint Technologies Inc. (“TalkSwitch”) warrants
to the original end-user customer (“Customer”) that each new TalkSwitch TS-200
telephone shall be substantially free from defects in materials and workmanship
under normal use for a period of one (1) year from the date of the original
purchase (proof of purchase required). The exclusive remedy and entire liability
under this warranty will be for repair or replacement on a like-for-like basis at
TalkSwitch’s option.
The above warranty shall not apply to product defects resulting from (a) improper
maintenance or installation; (b) misuse, neglect or accident; (c) damage from
moisture or corrosive environments; (d) use of the power adapter with supply
voltages other than that for which it is specified; (e) static discharges; (f) high
voltage surges; (g) electrostatic discharges; (h) operation outside the product’s
specification; or (i) failure to follow product instructions.
The warranty is void where (a) the serial number has been altered, removed or
effaced; or (b) the product has been used in an application, country, region,
locality, or connected to any network, other than those for which the product
was intended to operate.
TalkSwitch shall not have any obligation to repair or replace product until the
Customer returns defective product to TalkSwitch. Any replacement product may
be either new or like-new, and may contain remanufactured parts, equivalent to
new in performance.
EXCEPT FOR THE EXPRESS WARRANTIES SET FORTH ABOVE, AND TO THE EXTENT
PERMITTED BY APPLICABLE LAW, THE PRODUCTS IS SUPPLIED ON AN “AS IS”
BASIS AND THERE ARE NO WARRANTIES, REPRESENTATIONS OR CONDITIONS
WHETHER EXPRESSED OR IMPLIED, WRITTEN OR ORAL, ARISING BY STATUTE,
OPERATION OF LAW, COURSE OF DEALING, USAGE OF TRADE OR OTHERWISE, WITH
RESPECT TO THE PRODUCT. TALKSWITCH SPECIFICALLY DISCLAIMS ANY IMPLIED
WARRANTIES OR CONDITIONS OF MERCHANTABILITY, SATISFACTORY QUALITY,
DURABILITY, FITNESS FOR A PARTICULAR PURPOSE, AND NON-INFRINGEMENT.
In no event shall TalkSwitch be liable for any SPECIAL, INCIDENTAL, CONSEQUENTIAL,
indirect OR SIMILAR damages, including any lost profits, lost data, or other
incidental or consequential or punitive damages, whether based on contract, tort
24
W W W.T A L K S W I T C H . C O M
TS-200 USER GUIDE
(INCLUDING WITHOUT LIMITATION, NEGLIGENCE), or any other legal theory,
whether or not advised of the possibility of such damages, or whether such
damages are forseeable. In any event, the total aggregate liability of TalkSwitch
FOR DIRECT DAMAGES shall not exceed the purchase price of the product.
This warranty gives specific rights, and Customer may have other rights subject
to jurisdiction. To the extent any part of this limited warranty statement is
inconsistent with such local law, that part shall be deemed modified to be
consistent with such local law.
FOR PRODUCTS PURCHASED IN THE U.S. OR CANADA
1. Contact your reseller and obtain a Warranty Return Authorization (WRA)
number if required. If you bought the product directly from TalkSwitch, you
can obtain this number by contacting the Technical Support department at
TalkSwitch — call toll free in continental North America; (866) 393-9960,
otherwise call (613) 725-2466. Please have your model and serial number
available when you call.
2. Include a copy of your proof of purchase and a written explanation of the
problem; this will enable us to expedite your repair.
3. Attach the shipping label to the exterior of the package.
4. On the shipping label, be sure to include the WRA number obtained from
TalkSwitch or your reseller.
5. Ship the product (prepaid) to your reseller. If the product was purchased from
TalkSwitch, send the unit in its original or better protective packaging to:
TalkSwitch
1545 Carling Ave., Suite 510
Ottawa, Ontario
K1Z 8P9
Canada
If the product is being shipped from outside of Canada, the following statement
must be included on the package: ‘Canadian Goods Being Returned to Canada’.
Important: Failure to obtain a WRA number and include the information indicated
above will result in the package being refused.
W W W.T A L K S W I T C H . C O M
25
TS-200 USER GUIDE
FOR PRODUCTS PURCHASED OUTSIDE OF THE U.S. AND CANADA
To be eligible to obtain warranty service during the warranty period the Customer
must provide proof of the date of purchase, serial number, and obtain warranty
return instructions from the appropriate Authorized Warranty Centre. Authorized
Warranty Centres are listed in the User Guide and on www.talkswitch.com.
To obtain warranty service, the Customer is responsible for the cost of shipping
the product to the Authorized Warranty Centre in suitable packaging. Any
applicable duties or taxes for the return of repaired or replacement product are
the responsibility of the Customer. Replacement or repaired product is warranted
to be free from defects in material or workmanship for the remainder of the
limited warranty period of the originally purchased product.
26
W W W.T A L K S W I T C H . C O M