1
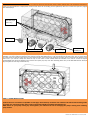
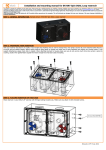
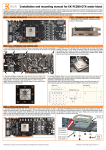
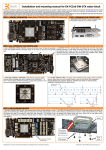
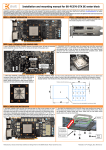
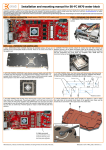
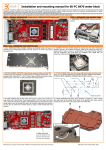
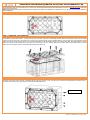
Installation and mounting manual for EK-BAY SPIN Reservoir CSQ
This product is intended for installation only by expert users. Please consult with a qualified technician for installation. Improper installation may result in damage to your equipment. EKWB d.o.o. assumes no liability
whatsoever, expressed or implied, for the use of these products, nor their installation. The following instructions are subject to change without notice. Please visit our web site at www.ekwaterblocks.com for updates.
The barb hose fittings require only a small amount of force to screw them in; otherwise the high flow fittings might break. These fittings do not need to be tightened with much force because the
liquid seal is made using o-rings.
EKWB recommends 24 hour leak testing for all EK products before powering on the computer. This will eliminate any damages that may occur because of the users improper installation or
products imperfections.
STEP 1: GENERAL INFORMATION. Sample picture of EK-BAY SPIN Reservoir CSQ
STEP 2: PREPARING YOUR RESERVOIR
Take your reservoir and place it on a flat and clean surface. In case you bought extra impellers and you wish to swap the original one then simply unscrew all
screws attaching (with enclosed Allen - hex key) the acrylic top to the base of the reservoir and replace impeller. Before closing reservoir make sure the impeller
is able to rotate around it's axis – the easiest way to check this is to blow air gently over the impeller’s blades in order to make sure it spins flawlessly without
making any kind of unusual grinding noises. If you encounter difficulties rotating the impeller please check impeller’s axis shaft. When attaching the acrylic top
back to the reservoir's base avoid using the excessive force since acrylic is prone to cracking. Make sure the rubber gasket is positioned inside it's channel.
Usually the sign of waterproof seal is when gasket flattens against the acrylic top.
STEP 3: MOUNTING THE RESERVOIR INSIDE YOUR COMPUTER CHASSIS:
This reservoir occupies two 5.25” drive bay expansion slots in your computer chassis. Free two slots in case they are already occupied with other
computer components such as optical- or hard disk drives. Place the reservoir in your 5.25" drive bay out with the front plate facing outwards. Secure
the reservoir to the drive bay cage using the enclosed M3x6 DIN7985 screws.
M3x6 DIN7985 screw
Revision 1.0. Released on 1st of June, 2012.
STEP 4: CONNECTING YOU RESERVOIR
You can use any G1/4 threaded ports marked as an outlet port except for the inlet port which is clearly marked (“IN”). We recommend using the 2nd
outlet port right beneath the J-shaped plastic extrusion which eases the air bleeding process significantly. Make sure unused outlet ports are plugged
with enclosed plugs.
Predrilled holes for
5mm LEDs (acrylic
version only)
EK G1/4 Plug
Outlet G1/4 threaded ports
EK PSC fitting
Inlet G1/4
threaded port
STEP 5: FILL RESERVOIR
Fill reservoir through G3/8 threaded fill port (marked with arrow) and make sure liquid is not spilled over your computer or any electrical devices nearby.
Preferably, your pump's height level should be lower than that of the EK-BAY SPIN Reservoir in order to flood and prime the water pump. Run your pump shortly
for couple of times to make sure water floods your tubes and other water cooling components. Repeat the procedure until you are done and pay attention to the
water level in your reservoir. Ideally there should be only so much water to make waterfall effect still noticeable in the reservoir. Lowest and highest
recommendable water levels are indicated on the reservoir's front panel (min, max). Once done with filling please close your EK-BAY SPIN Reservoir with G3/8
plug and tighten the seal using enclosed Allen key.
STEP 5: OTHER INSTRUCTIONS
Please note that EKWB holds no responsibility of any kind if assembly is not performed as per instructions. This applies also for all
products that are not listed as compatible on web page. Users must by all means also consider instructions that are being made
for proper use of pump and other water cooling components/liquids provided by manufacturer(s).
HINT: Never let your pump running dry. Prolonged dry use enhances the risk of damaging the pump’s bearing thus rendering
pump useless.
Revision 1.0. Released on 1st of June, 2012.