1
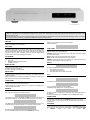
OPERATING MANUAL
CD-10 – CD-20 – CD-30
*
non contractual pictures
Dear Customer,
Thank you for purchasing one of the 3 Micromega CD players: CD-10, CD-20, CD-30. These players are mainly different by their audio characteristics. This manual is then
common for the 3 models.
This unit provides ease of use and sonics of the highest quality. Please pay close attention to this instruction manual, and read it fully before attempting to operate. It is designed
to ensure you maximise your pleasure of CD player and familiarise you with its many unique functions.
CHECKING
Check that the carton has no damage. Should you have any doubt about its condition,
please do not hesitate to contact your dealer.
If there is a disc, reading starts and its content is displayed.
Otherwise it indicates:
UNPACKING
Very carefully remove the unit from the box, taking care to preserve all the packing
material. It is good practice to put the carton and its contents into an outer plastic bag
and deposit it somewhere safe and dry. In the unlikely event that your unit needs to be
sent back to either your dealer or distributor, it must be sent in the original packing
material. Failure to observe this will invalidate your warranty.
ACCESSORIES
Upon opening the carton you should find the following:
•
Mains Lead.
•
Micromega system remote control handset
•
4 batteries 1V5 / AAA
FRONT PANEL
DISC: To stop play, to clear a program in stop. Display on/off (long pressure).
PLAY: To start play and to pause during play.
PREVIOUS: Selection of the previous track and reverse search during play .To replay
the current track during play.
NEXT: Selection of the next track and forward search during play.
MODE: CD-TEXT on/off and Digital output on/off (long pressure).
STANDBY: To switch the unit in and out of Standby mode. A blue LED located in the
middle of the panel illuminates when in Standby mode.
DISPLAY
MAINS VOLTAGE
Check that the mains voltage indicated on both the carton and the bottom of the unit
correspond to the local power supply.
If you are in any doubt, consult your dealer.
INSTALLATION
In order to obtain the maximum performance of CD player, it is important to follow the
installation instructions.
Wherever possible, we recommend that the CD player is installed in an audio rack or
other suitable furniture that provides sufficient ventilation.
CONNECTIONS
Having verified that the ON/OFF switch is on OFF position, connect the mains leads
provided to the rear of the unit and to the wall socket.
Connect the interconnect cable from the rear of your player to your amplifier input.
Connect the Digital out if required.
POWER UP
You may now turn on your CD player by switching the ON/OFF switch located at the
back of the unit. A message “CD” is written for a second.
At first start-up, or when both keys NEXT and PREV are pressed simultaneously and
when power is switched on, you can choose the displaying language of your player:
Press PLAY to select French or MODE to select English. There is 5 seconds to do so, if
not English language is selected by default. Then a welcoming message appears.
The standby LED lightens up indicating that the unit is in standby mode.
Press once the CD key of the remote control or the STANDBY key of the unit.
The display indicates:
•
On the left side track indication.
•
In the middle the status of the unit
•
On the right side the time in minutes and seconds.
PLAY
Open the tray and place a disc. When the tray is closed, the player reads the disc:
And it displays its contents:
If no disc is detected, the display indicates "NO DISC".
Press PLAY to begin reading the disc. The display indicates:
:
The display indicates on the left hand the current track, play mode and elapsed time on
the right hand.
If you wish to stop playing a disc, press DISC on the unit or STOP with the remote.
STANDBY MODE
To put the player in standby mode, press STANDBY on the unit or on the remote.
If the tray is open, it will close, then the LED illuminates showing the device is in
standby mode.
TRAY SPEED
You can select the speed of the tray by pressing PLAY and PREVIOUS while powering
up the player. The display shows then: SPEED MED. To change press NEXT, MODE
or
STANDBY.
Confirm
your
choice
by
pressing
DISC.
DISPLAY OFF
DIGITAL OUPUT
You can choose to minimize the display by pressing the key Display ▼ of the remote
or by a long pressure on the DISC key of the unit.
In that case CD PLAYER only displays one point on the screen:
You can activate the Digital output by executing a long pressure on the MODE key at
any moment. This is necessary if you wish to use a separate Digital to Analog converter
or if you wish to make a Digital recording. When activated, the display indicates:
When accessing another function, the display becomes full again for 5 seconds to show
the state of the unit.
To come back to normal displaying mode, press Display ▲on the remote or do a long
pressure of the DISC key.
If you want to disable the digital output, you can switch back to normal mode using the
same procedure:
TRACK SELECTION
Selecting a track can be done by pressing directly numeric key of the remote. You may
also access any track using of the NEXT or PREVIOUS keys of the device or remote
control.
PROGRAM
Programming tracks can only be done from the remote control handset.
You may program a maximum of 40 tracks of the same disc. Select the number of the
track that you desire to store by using direct access keys.
Store your choice by pressing the PROG key. The display indicates for instance:
The use or not of this output is stored in memory so you don’t need to set it up at each
start.
TIME INFORMATION (TIME)
Press the TIME key if you wish to know the remaining time of the playing track (REM
TIME). The display indicates:
The first two digits indicate that one track has been programmed and the last 4 ones
are the duration of the program.
Each time you select a track and store it (PROG key), the display will show the number
of stored tracks and the total time of this selection. Select all the tracks you wish to
program.
If the program is full (40 tracks already programmed), the display indicates:
Press the TIME key again during Play if you wish to know the elapsed time since the
beginning of the disc. (TOTAL TIME):
Press the PLAY key to start playing your selection.
When the selection has finished, press the DISC key of the player or the STOP key of
the handset again to clear the selection until P disappear from the display.
Press the TIME key again if you wish to return to default (TRACK TIME).
REPEAT
Press the SCAN key in either Stop or Play mode to start playing each track for 10
seconds.
The display indicates:
Press the REPEAT key before or during Play.
The display indicates that you are repeating the current track:
Press the REPEAT key again and the display indicates that you will be repeating the
whole disc:
Press the TIME key again if you wish to know the remaining time on the disc. (TOTAL
REM TIME):
SCAN MODE (SCAN)
If you find a track that you wish to play completely, press the PLAY key.
RANDOM MODE (RANDOM)
Press the RANDOM key before Play. The display indicates:
Press the REPEAT key to cancel the repeat mode.
SEARCH
A long pressure on the PREVIOUS key will allow you to search for a passage in reverse
direction whereas a long pressure on the NEXT key will allow you to search for a
passage in the forward direction.
The time that you continue to press the key determines the speed of the search.
In search mode the output volume is always reduced.
Press the DISC key of the unit or the STOP key of the handset twice to exit random
mode: once to stop, once to exit random mode.
A/B REPEAT
Press the A-B key while in play at the starting point of the passage that you wish to
repeat. The display indicates:
CD-TEXT
CD-TEXT mode allows to display CD-text information as long as the disc is featured as
such.
To activate CD-TEXT mode, press once on the MODE key. The display shows:
Press again the A-B key at the final point of the passage that you wish to repeat. The
display will then indicate:
You will play in loop the part from 2 seconds to 1 minute and 22 seconds.
Press the A-B key to cancel the A/B mode.
RS-232 CONTRÔL INTERFACE (OPTIONAL)
To come back to normal mode, press again on the MODE key. The display shows:
In stop mode, after reading the content of the disc, the unit will display the name of the
artist and the title of the album
Because the display has 10 characters only, if the content is larger than this number,
the display will scroll the text.
An optional DB9 female connector could be installed on the rear panel of CD player
allows controlling it via RS232 interface.
It accepts the following format:
Baud Rate
Data bits
Parity bit
Stop bits
Flow control
:
:
:
:
:
19200 Bauds
8
None
1
None
You will find complete instructions concerning this interface in the separate RS232 CD
manual.
TECHNICAL CHARACTERISTICS
CD-XX
Discs supported……………………………………………………………………………………..…… CD, CD-R, CD-RW
Audio characteristics
Bandwidth ( - 0.5dB )…………………………………………………………………………………….………… DC – 20Khz
Linearity at –90dB………………………………………………………………………………………….……………. < 0.5dB
Signal/Noise + THD…………………………………………………………………………………………….. < -96dB à1kHz
Crosstalk………………………………………………………………………………..…………………….… >100dB at 1kHz
D/A conversion type………………………………………………………………………………………………..………….. ∑∆
Oversampling (CD-10, CD-20)…………………………………………………………………………………..………… none
Oversampling (CD-30)…………………………………………………………………………………….…………. 132.3 kHz
Output impedance ……………………………………………………………………………………..………………….. 600 Ω
Output level ………………………………………………………………………………………………………… 2Vrms / 0dB
Power
Power consumption (Max) CD-10………………………………………………………………………………………... 20 W
Power consumption (Max) CD-20, CD-30……………………………………………………………………………….. 40 W
Dimensions : ( L x P x H mm)………………………………………………………………………………... 430 x 250 x 70
Weight CD-10……………………………………………………………………………………………….…….……….. 4.6 kg
CD-20, CD-30…………………………………………………………………………………………….…….…. 5.6 kg
WARRANTY
This warranty will start from the date of purchase of the Micromega product.
Statutory warranty regulations apply in the country where the Micromega product was purchased. In case of
complaints please contact the dealer who supplied your Micromega product.
WARNING: Warranty will be nulled if the unit is not shipped back in its original packing or if the serial
number has been modified or erased.
Warranty Certificate
Dealer's Stamp
Date of Purchase
Serial Number
AUDIS sarl. 13-15, rue du 8 mai 1945, ZA de la Haie Griselle, 94470 Boissy Saint Léger FRANCE
TEL: +33 (0)1 4382 8860 - FAX: +33 (0)1 4382 6129 - INTERNET: http://www.micromega-hifi.com