1
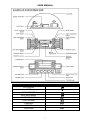
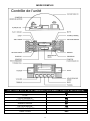
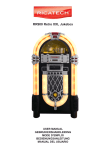
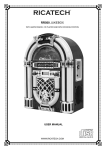
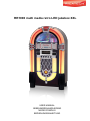
RR1000 multi media retro LED jukebox XXL USER MANUAL GEBRUIKERSHANDLEIDING MODE D‟EMPLOI BEDIENUNGSANLEITUNG The Lighting flash with an arrowhead symbol, within the equilateral triangle, is intended to alert the user to the presence of uninsulated “dangerous voltage” within the product’s enclosure that may be of sufficient magnitude to cause an electric shock. The exclamation point within the equilateral triangle is intended to alert the user to the presence of important operating and maintenance(servicing) instructions in this owner manual. WARNING: TO REDUCE THE RISK OF ELECTRIC SHOCK, DO NOT REMOVE COVER (OR BACK). NO USER-SERVICEABLE PARTS INSIDE. REFER SERVICING TO QUALIFIED SERVICE PERSONNEL. WARNING: TO PREVENT FIRE OR SHOCK HAZARD, DO NOT EXPOSE THIS APPLIANCE TO RAIN OR MOISTURE. Should any trouble occur, disconnect the AC power cord and refer servicing to a qualified technician. Do not place anything directly on the top of the unit. Damage to the unit can result. In case of malfunction due to electrostatic discharge the apparatus has to be reset by disconnecting it from mains supply. On Placement Do not use the unit in places which are extremely hot, cold, dusty, or humid. Place the unit on a flat and even surface. Do not restrict the air flow of the unit by placing it in a place with poor air flow, by covering it with a cloth. Do not place naked flame sources, such as lighted candles on the apparatus. Do not place objects filled with liquids, such as vases, on the apparatus. On AC Voltage Before use, check that the rated voltage of your unit matches your local voltage. On Safety When connecting or disconnecting the AC cord, grip the plug and not the cord itself. Pulling the cord may damage it and create a hazard. When you are not going to use the unit for a long period of time, disconnect the AC power cord. On Condensation When left in a heated room where it is warm and damp, water droplets or condensation may form inside the unit. When there is condensation inside the unit, the unit may not function normally. Let the unit stand for 1 to 2 hours before turning the power on, or gradually heat the room up and dry the unit before use. ATTENTION SHOULD BE DRAWN TO THE EVIRONMENTAL ASPECTS OF BATTERY DISPOSAL. LASER SAFETY THIS UNIT EMPLOYS A LASER. ONLY A QUALIFIED SERVICE PERSONNEL SHOULD OPEN COVER IN ATTEMPT TO SERVICE THIS DEVICE DUE TO POSSIBLE EYE INJURY. CAUTION: USE OF ANY CONTROLS, ADJUSTMENTS, OR PROCEDURES OTHER THAN THOSE SPECIFIED HEREIN MAY RESULT IN HAZARDOUS RADIATION EXPOSURE. CLASS 1 LASER PRODUCT APPAREIL A LASER DE CLASSE 1 CLASS 1 LASER PRODUCT PRODUCTO LASER DE CLASE 1 APPAREIL A LASER DE CLASSE 1 PRODUCTO LASER DE CLASE 1 CAUTION INVISIBLE LASER RADIATION WHEN OPEN AND INTERLOCKS DEFECTED. AVOID EXPOSURE TO BEAM 2 USER MANUAL REMOTE CONTROL FUNCTION (FOR CD PLAYER ONLY) PLAY/PAUSE STOP SKIP FORWARD SKIP BACKWARD FAST FORWARD FAST REWIND RANDOM RAN REPEAT REP PROGRAM PRG 3 TO PLAY A CD 1. Press the POWER switch and select MODE SELECTOR to CD. 2. Flip open the semi circle “CD DOOR”. 3. Turn the “RESET” pointer to “OFF” position and insert a disc onto the disc tray. **(Make sure the “RESET” pointer in “ON” position after disc loaded.) 4. Press the PLAY/PAUSE button to play the CD, press once again to temporarily stop disc play. 5. Press STOP to stop playing the CD. 6. Adjust listening level and sound effect with Volume,Treble and Bass knob 7. Press SKIP FORWARD to skip ahead to next track. Press SKIP BACKWARD to skip back to previous track. The track number will be displayed in readout. 8. During disc play mode, press the FAST FORWARD or FAST REWIND to search a particular point quickly. NOTE: If the disc is seriously scratched, or too dirty, disc play may not start. If an improperly centered disc is played, noise can be heard in the mechanism. The use of such discs should be avoided. PROGRAMMED DISC PLAY It is not possible to enter programs during disc play. Press the STOP button first, then enter a program. 1. Press the STOP button. 2. Press the PROGRAM button. Select a track number using SKIP FORWARD or SKIP BACKWARD button,press PROGRAM button again 3. Repeat step 2 until all the desired tracks are programmed in memory NOTE: To modify the program, press the STOP button and restart from step 2. -To clear the program, press the STOP or power is switched off REPEAT DISC PLAY 1. Press REPEAT button once to repeat disc play of one track. 2. Press REPEAT button twice to repeat all the track on the disc. 3. Select the desired track for disc play using SKIP FORWARD or SKIP BACKWARD button. 4. Press the PLAY/PAUSE button to play 5. Press STOP button to cancel repeat mode. RANDOM DISC PLAY 1. Press the RANDOM button to play CD in random order. 2. To cancel RANDOM, press STOP button MUTE DISC PLAY 1. Press MUTE button to muting the sound while playing disc. *The MUTE indicator on the CD control panel will be lighted up. 2. To resume press MUTE again and the MUTE indicator will goes off 4 RADIO OPERATION 1. Set the MODE selector to your desired band. 2. Adjust the sound with the VOLUME knob. 3. Tune to the desired radio station by using the TUNING knob. 4. To turn off the radio, press the POWER button. LIGHT OPERATION 1. Press the LIGHT button to turn on all the light. 2. To Turn off the light, press the LIGHT button again. NOTE: 1. (FOR “NEON LIGHTS” VERSION ONLY) Please note that Neon lights will not work while in AM / MW radio mode. This is due to interference caused by neon lighting and is a usual occurrence. 2. LIGHT MODE (IF EQUIPPED “BULB LIGHTS” VERSION ONLY) Switch the MODE selector at back cover to change light mode. 3. LIGHT MODE (IF EQUIPPED AT BACK COVER “LED LIGHTS” VERSION ONLY) The colors of the lights change overtime, switch to HOLD position to remain static to your favourite color. Switch to PLAY position to resume *IMPORTANT NOTE: (LED LIGHTS VERSION ONLY) The changing colors sequences of lights are controlled by IC, the lights maybe turned off when the light mode in HOLD position is normal. EXTERNAL SPEAKER CONNECTION (IF EQUIPPED) Connect each speaker wire to the speaker terminal at the back cover, switch the speaker switch to extenal. AUXILIARY CONNECTION “AUX IN” (IF EQUIPPED) 1. Connect your own device (i.e. MP3 player or IPOD) to the “AUX IN connection” (located at the back of cabinet) with stereo plug and detachable rack (packed separately). 2. Adjust the ON / OFF switch next to the jack to the „ON‟ position. 3. Rotate the mode selector to “CD-AUX”. 4. Adjust the sound with the VOLUME knob or the volume control of the device. 5. When change to another mode, the device will continue to play with no sound until the ON / OFF switch is adjusted to „OFF‟ position and switch off the device. IMPORTANT NOTE: 1. Adjust the ON / OFF switch to the „OFF‟ position when not in use. 2. The CD function will resume to normal only after the ON / OFF switch is adjusted to „OFF‟ position. 5 Warranty: Ricatech BV covers all products (Excl. accessories) with a 2 year warranty applying to all faults caused by a factory-error. External physical damage will not be covered by our warranty Warranty: No Warranty : Out of warranty repairs All hardware errors occurring within 2 years after purchase unless caused by points mentioned below. Faults caused by: *Dismountal by any other service center then ours. *Water and moisture damage *Drop and bump damage *Usage with non approved Ricatech accessories. *Short-circuit or over-voltage *Physical damage, loss or damage to accessories Please be so kind to contact us for out-of-warranty repairs. We will provide you with a quotation with the expected costs. Goods out of warranty cannot be returned to your reseller. CUSTOMER SUPPORT You can contact the Ricatech customer service when you have a question or a problem with your Ricatech product. You can contact us by telephone and email. Email For customer support by email, please sent a email to [email protected] Please make sure that you mention the model number and serial number of the product, mention your name & address and describe your question or problem clearly. Telephone For customer support by telephone, please dial +32 3 3265694. One of our service staff will be ready to serve you. For full procedure please visit the website of Ricatech at: www.ricatech.com 6 Het bliksem vormige symbool in de zwarte driehoek is bedoelt om gebruikers alert te maken op de aanwezigheid van gevaarliijke spanning in de binnenkant van het product dat mogelijk genoeg kracht bevat om een elektrische schok te veroorzaken Het uitroepteken in de zwarte driehoek is bedoelt om de gebruiker alert te maken op de aanwezigheid van belangrijke instructies in deze handleiding. WAARSCHUWING: OM DE KANS OP EEN ELEKTRISCHE SCHOK TE VERKLEINEN VERWIJDER NIET DE HOES (OF ACHTERKANT). GEEN GEBRUIKERS BENODIGDE ONDERDELEN BEVINDEN ZICH HIERBINNEN. VOOR SERVICE NEEM CONTACT OP MET SERVICE PERSONEEL. WAARSCHUWING:OM BRAND OF SCHOK GEVAAR TE VOORKOMEN MAG U HET APPARAAT NIET BLOOD STELLEN AAN REGEN OF VOCHT. Mochten er problemen ontstaan koppel de AC kabel dan los en verwijs voor verdere behandeling naar een gekwalificeerde technicus. Plaats niks direct op de bovenkant van het product. Schade aan het product kan hiervan het resultaat zijn. In het geval van defect door middel van een statische lading moet u het apparaat herinstellen door het los te koppelen van de hoofd voorziening. Over Plaatsen Gebruik het apparaat niet in plaatsen waar het extreem warm. koud, stoffig, bedompt is. Plaats het apparaat op een gelijke en platte oppervlakte. Blokkeer de lucht aanvoer niet door het product ergens te plaatsen waar de lucht toevoer slecht is, door het te bedekken met een doek. Plaats het apparaat niet naast open vuur zoals aangestoken kaarsen dicht bij het apparaat. Plaats het apparaat niet naast of op objecten gevuld met vloeistoffen zoals vazen. Over AC Voltage Voor gebruik controleer of de voltage van het product overeenkomt met uw locale voltage. Over Veiligheid Als u de AC kabel aan of af sluit pak dan de plug en niet de kabel zelf. Trekken aan de kabel kan schade veroorzaken wat vervolgens lijd naar risico op gevaar. Als u het apparaat voor een langere tijd niet gebruikt koppel de AC kabel dan los. Over Condensatie Als het apparaat in een verwarmde omgeving staat is het mogelijk dat er aan de binnenkant condensatie begint te vormen. Als er condensatie in het apparaat ontstaat bestaat er een kans dat deze niet naar behoren functioneert. Laat het apparaat 1 tot 2 uur rusten voordat u het gebruikt, verwarmd en droog het apparaat geleidelijk voordat u hem weer aanzet. AANDACHT VOOR HET EFFECT VAN BATTERIJ VERWERKING OP HET MILIEU. LASER VEILIGHEID DEZE UNIT HANTEERT DE LASER ALLEEN EEN GEKWALIFICEERDE SERVICE MEDEWERKER MAG DE KAP OPENEN IN VERBAND MET MODELIJKE OOG SCHADE. VOORZICHTIG: GEBRUIK VAN BESTURINGEN, AANPASSINGEN OF PROCEDURES ANDERS DAN GEMELD IN DEZE HANDLEIDING KAN RESULTEREN IN RISICOVOLLE RADIATE BLOOTSTELLING. CLASS 1 LASER PRODUCT APPAREIL A LASER DE CLASSE 1 PRODUCTO LASER DE CLASE 1 VOORZICHTIG ONZICHTBARE LASER RADIATIE WANNEER GEOPENED. VOORKOM BLOOTSTELLING AAN DE STRAAL. AVOID EXPOSURE TO BEAM 7 GEBRUIKERSHANDLEIDING REMOTE CONTROL FUNCTION (FOR CD PLAYER ONLY) PLAY/PAUSE (AFSPELEN/PAUZE) STOP (STOP) SKIP FORWARD (VOORUIT SPOELEN) SKIP BACKWARD (TERUG SPOELEN) FAST FORWARD (SNEL VOORUIT SPOELEN) FAST REWIND (SNEL TERUG SPOELEN) RANDOM (WILLEKEURIG) RAN REPEAT (HERHAAL) REP PROGRAM (PROGRAMMEREN) PRG 8 OM EEN CD AF TE SPELEN 1. Druk op de POWER knop and selecteer MODE SELECTOR en dan CD. 2. Kantel de halve cirkel “CD DOOR”. 3. Draai de “RESET” knop op “OFF” plaats en leg een cd platelade. **(Wees er zeker van dat de “RESET” knop “ON” aangeeft nadat de CD is ingevoerd.) 4. Druk op de PLAY/PAUSE knop om de CD af te spelen, druk er nogmaals op om de CD tijdelijk te pauzeren. 5. Druk op STOP om het afspelen van de CD te stoppen 6. Pas het luister level en geluid effect aan met de Volume,Treble en Bass knop 7. Druk op SKIP FORWARD om door te spoelen naar het volgende nummer. Druk op SKIP BACKWARD om terug te spoelen naar het vorige nummer. Het nummer van het lied wordt weergegeven in de readout. 8. Tijdens het afspelen druk op FAST FORWARD of FAST REWIND om snel naar een bepaald punt in het nummer te komen. NOTITIE: Als de CD te ernstig is beschadigt of vies is is het mogelijk dat hij niet afspeelt. Als er een onjuist gecentreerde cd wordt afgespeeld kan er geluid voortkomen uit het apparaat. Gebruik van zulke CD‟s is afgeraden. GEPROGRAMEERD AFSPELEN Het is niet mogelijk om een programma in te voeren tijdens het afspelen. Druk eerst op de STOP knop en voer daarna het gewenste programma in. 1. Druk op de STOP knop. 2. Druk op de PROGRAM knop. Selecteer een nummer door de knoppen SKIP FORWARD of SKIP BACKWARD te gebruiken,druk nogmaals op de PROGRAM knop. 3. Herhaal stap 2 tot dat alle gewenste nummers zijn geprogrammeerd in het geheugen. NOTITIE: Om het programma aan te passen druk op de STOP knop en begin weer opnieuw met stap 2. -Om het prorgramma te verwijderen druk op de STOP knop of schakel de stroom uit. HERHALEND AFSPELEN 1. Druk eenmaal op de REPEAT knop om een bepaald nummer te herhalen. 2. Druk twee keer op de REPEAT knop om alle nummers van de CD te herhalen. 3. Selecteer het gewenste nummer door de SKIP FORWARD of SKIP BACKWARD knop te gebruiken. 4. Druk op de PLAY/PAUSE om af te spelen. 5. Druk op de STOP knop om het herhalen te stoppen. WILLEKEURIGE AFSPELEN 1. Druk op de RANDOM knop om de CD in een willekeurige volgorde af te spelen. 2. Om het willekeurig afspelen te stoppen druk op de RANDOM knop. MUTE AFSPELEN 1. Druk op de MUTE knop om het geluid van de CD te dempen tijdens het afspelen. *De MUTE 9 indicator op het CD controle menu zal gaan oplichten. 2. Om te hervatten druk nogmaals op de MUTE knop en de MUTE indicator zal uit gaan. RADIO FUNCTIE 1. Zet de MODE selector naar uw gewenste band. 2. Pas het volume aan met de VOLUME knop. 3. Stel bij naar uw gewenste radio station met de TUNING knop. 4. Om de radio uit te schakelen druk op de POWER knop. LICHT FUNCTIE 1. Druk op de LIGHT knop om al het licht in te schakelen. 2. Om het licht uit te schakelen druk nogmaals op de LIGHT knop. NOTITIE: 1. (ALLEEN VOOR “NEON LIGHTS” VERSIES) Neon licht zal niet functioneren tijdens de AM / MW radio mode. Deze storing word veroorzaakt door neon lichten en is veel voorkomend. 2. LIGHT MODE (ALLEEN ALS HET GEINSTALLEERD IS. (ALLEEN DE“BULB LIGHTS” VERSIE) Wijzig de MODE selector op de achterkant om naar de licht mode te schakelen. 3. LIGHT MODE (ALS DEZE GEINSTALLEERD IS AAN DE ACHTERKANT(ALLEEN DE “LED LIGHTS” VERSIE) De kleuren van het licht veranderen met de tijd schakel over naar de HOLD positie om je favorite kleur te behouden. Schakel over naar PLAY om het afwisselen te hervatten. *BELANGRIJKE NOTITIE: (ALLEEN DE LED LIGHTS VERSIE) Het veranderen van de kleur volgorde word geregeld door de IC, de lichten kunnen uitgeschakled worden als de light mode in HOLD positie normaal is. EXTERNE SPEAKER VERBINDING(ALS DEZE GEINSTALLEERD IS) Sluit elke speaker aan kabel aan met de speaker aansluiting op de achterkant. Schakel de speaker knop over naar externe speaker. AUXILIARY CONNECTIE “AUX IN” (ALS DEZE GEINSTALLEERD IS) 1. Sluit uw eigen apparaat (i.e. MP3 player or IPOD) aan op de “AUX IN connectie” ( geplaatst aan de achterzijde van het apparaat.) aan met de stereo plug en de afkoppelbare stelling (apart verpakt ). 2. Schakelde ON / OFF schakelaar aan naast de jack naar de„ON‟ positie 3. Draai de mode selector naar “CD-AUX”. 4. Pas het geluid aan met de VOLUME knop of de volume knop van uw eigen apparaat. 5. Tijdens het overschakelen naar een ander menu zal het eigen apparaat blijven doorspelen zonder geluid tot dat de ON / OFF knop word aangepast naar de „OFF‟ positie en het apparaat word uitgeschakelt. BELANGRIJKE NOTITIE: 1. Schakel de ON / OFF knop naar de „OFF‟ positive als deze niet word gebruikt. 2. De CD functie zal alleen weer normaal terug schakelen als de ON / OFF knop is aangepast naar de „OFF‟ positie. 10 Garantie: Ricatech BVstaat garant voor alle producten (Excl. accessories) met een 2 jarige garantie periode die geldig is voor alle defecten veroorzaakt door fabrieksfouten. Externe schade valt niet onder de garantie. Garantie: Geen Garantie: Buiten garantie vallende reparaties Alle hardware fouten die voorkomen tijdens de 2 jarige periode na aankoopTenzij het word veroorzaakt door de volgende punten weergegeven hier beneden. Defecten veroorzaakt door: *Fouten door een andere service als die van Ricatech. *Water en vloeistof schade. *Val en stoot schade. *Gebruik van andere accessories die niet zijn goedgekeurd door Ricatech. *Kortsluiting of overspanning *Fysieke schade, verlies of schade aan de accessories Voor buiten garantie vallende reparaties kan u altijd contact met ons openemen.We zillen u een factuur geven van de verwachte kosten Producten die buiten de garantie vallen kunnen niet teruggebracht worden naar de winkel. KLANTENONDERSTEUNING Voor vragen of een probleem met uw Ricatech product kunt u telefonisch en per email contact opnemen met de Ricatech klantenservice. Email Voor klantenondersteuning per email kunt u een email sturen naar [email protected]. Vergeet niet het modelnummer, serienummer van het product en uw naam & adres te vermelden en beschrijf duidelijk uw vraag of probleem. Telefoon Bel voor telefonische klantenondersteuning naar +32 3 3265694. Onze servicemedewerkers staan klaar om u te helpen. Bezoek de website van Ricatech voor de volledige procedure: www.ricatech.com 11 La flèche en forme d’éclair, à l’intérieur d’un triangle équilatéral, est destinée à alerter l’utilisateur de la présence d’un voltage dangereux et non isolé à l’intérieur des produits, qui peut être d’une magnitude suffisante pour constituer un risque de choc électrique pour une personne y étant exposée. Le point d’exclamation, à l’intérieur d’un triangle équilatéral, est destiné à alerter l’utilisateur de la présence d’instructions d’utilisation et d’entretien importantes à l’intérieur du guide de l’utilisateur. WARNING: POUR REDUIRE LE RISQUE DE CHOC ELECTRIQUE, N’ENLEVEZ PAS L’ARMATURE (OU LA PARTIE ARRIERE). ELEMENTS NON-REPARABLES A L’INTERIEUR. POUR TOUTE REPARATION CONTACTEZ UN PROFESSIONNEL. WARNING: AFIN D’EVITER UN INCENDIE OU UN CHOC ELECTRIQUE, N’EXPOSEZ PAS CET APPAREIL A LA PLUIE OU L’HUMIDITE. Si un problème survient, débranchez le câble d’alimentation CA et contactez un professionnel qualifié. Ne posez rien directement sur l’appareil : cela pourrait l’endommager. En cas de malfonctionnement dû à une charge électrostatique, l’appareil doit être redémarré en le débranchant de la source d’alimentation principale. A propos de l’installation N‟utilisez pas cet appareil dans des lieux très chauds, froids, poussiéreux ou humides. Installez l‟appareil sur une surface plate et homogène. Ne gênez pas l‟aération de l‟appareil en l‟installant dans un lieu sans air, ou en le couvrant avec un vêtement. A propos de la sécurité Quand vous branchez ou débranchez le câble CA, tirez sur la prise et non sur le câble lui-même. Tirer sur le câble pourrait l‟endommager et créer un court-circuit. Quand vous vous préparez à ne pas utiliser l‟appareil pour une longue période, débranchez le câble CA. A propos du voltage en courant alternatif Avant toute utilisation, vérifiez que le voltage de votre appareil corresponde à celui de votre courant secteur. A propos de la condensation Quand l‟appareil est situé dans une pièce chaude et humide, des goutelettes ou de la condensation peuvent se former à l‟intérieur de l‟appareil. Quand de la condensation apparaît à l‟intérieur de l‟appareil, il peut ne pas fonctionner normalement. Laissez reposer l‟appareil 1 ou 2 heures avant de l‟allumer, ou réchauffez la pièce graduellement et séchez l‟appareil avant. Vérifiez que la ventilation n‟est pas obstruée par des objets tels que journaux, serviettes, rideaux, etc… Ne mettez pas des flammes à nu, comme des bougies, sur l‟appareil. Respectez les consignes environnementales liées à l‟utilisation des piles. Utilisez cet appareil dans des climats modérés (non tropicaux). N‟exposez pas l‟appareil à l‟eau ou aux éclaboussures. Ne mettez pas des objets remplis d‟eau, comme des vases, sur l‟appareil. SECURITE LASER CET APPAREIL UTILISE UN LASER. SEUL UN PROFESSIONNEL QUALIFIE DOIT LE DEMONTER ET LE REPARER AFIN D’EVITER UNE BLESSURE AUX YEUX QUI EST POSSIBLE. ATTENTION: TOUTE UTILISATION DE TOUT ELEMENT, AJUSTEMENT, OU DES INSTRUCTIONS QUI NE RESPECTE PAS LES CONSIGNES MENTIONNEES ICI PEUT CAUSER UNE EXPOSITION DANGEREUSE AUX RADIATIONS. CLASS 1 LASER PRODUCT APPAREIL A LASER DE CLASSE 1 PRODUCTO LASER DE CLASE 1 ATTENTION RADIATION LASER INVISIBLE UNE FOIS L’APPAREIL OUVERT EVITEZ L’EXPOSITION AU FAISCEAU LASER 12 MODE D’EMPLOI FONCTIONS DE LA TELECOMMANDE (SEULEMENT POUR LE LECTEUR CD) LECTURE/PAUSE STOP PISTE SUIVANTE PISTE PRECEDENTE AVANCE RAPIDE RETOUR RAPIDE LECTURE ALEATOIRE RAN REPETITION REP 13 PROGRAMME PRG POUR LIRE UN CD 1. Appuyez sur l‟interrupteur ALIMENATION et choisissez CD sur SELECTEUR MODE. 2. Ouvrez la PORTE CD en forme de demi-cercle. 3. Tournez le pointeur de REDEMARRAGE en position “OFF”Turn the “RESET” et insérez un disque sur la palette à disques. **(Vérifiez que le pointeur de REDEMARRAGE est sur “ON” après insertion du disque). 4. Appuyez sur le bouton LECTURE/PAUSE pour lire le CD ; appuyez une nouvelle fois pour arrêter temporairement la lecture. 5. Appuyez sur le bouton STOP pour arrêter la lecture du CD. 6. Ajustez le volume d‟écoute et les effets sonores avec les molettes Volume, Graves et Basses. 7. Appuyez sur PISTE SUIVANTE pour passer à la piste suivante. Appuyez sur PISTE PRECEDENTE pour revenir à la piste précédente. Le numéro de piste va s‟afficher sur l‟écran. 8. Pendant la lecture, appuyez sur AVANCE RAPIDE ou RETOUR RAPIDE pour rechercher un point particulier rapidement. NOTE: Si le disque est sérieusement endommagé, ou trop sale, la lecture peut ne pas être possible. Si le disque n‟est pas correctement inséré sur la palette de lecture, un bruit de frottement peut survenir. Recentrez le disque correctement. LECTURE DE DISQUE PROGRAMMEE Il n‟est pas possible de régler des programmes pendant la lecture de disques. Appuyez sur le bouton STOP d‟abord, puis réglez un programme. 1. Appuyez sur le bouton STOP. 2. Appuyez sur le bouton PROGRAMME. Choisissez un numéro de piste à l‟aide des boutons PISTE SUIVANTE et PISTE PRECEDENTE ; appuyez sur le bouton PROGRAMME de nouveau. 3. Répétez l‟étape 2 jusqu‟à ce que toutes les pistes désirées soient programmées dans la mémoire. NOTE: Pour modifier le programme, appuyez sur le bouton STOP et recommencez à partir de l‟étape 2. Pour effacer le programme, appuyez sur STOP ou éteignez l‟appareil. LECTURE DE DISQUE REPETEE 1. Appuyez sur le bouton REPETER une fois pour répéter la lecture d‟une piste. 2. Appuyez sur le bouton REPETER deux fois pour répéter toutes les pistes du disque. 3. Choisissez la piste désirée pour la lecture en utilisant les boutons PISTE SUIVANTE et PISTE PRECEDENTE. 4. Appuyez sur le bouton LECTURE/PAUSE pour lancer la lecture. 5. Appuyez sur le bouton STOP pour annuler le mode répétition. LECTURE ALEATOIRE 1. Appuyez sur le bouton LECTURE ALEATOIRE pour lire les pistes du CD dans n‟importe quel ordre. 2. Pour annuler la lecture alétoire, appuyez sur le bouton STOP. COUPER LE SON 1. Appuyez sur le bouton COUPER LE SON pour couper le son pendant la lecture. L‟indicateur COUPER LE SON apparaîtra sur l‟écran de contrôle CD. 2. Pour reprendre le son appuyez sur COUPER LE SON une nouvelle fois et l‟indicteur s‟éteindra. 14 UTILISATION DE LA RADIO 1. Tournez la molette SELECTEUR DE MODE jusqu‟au point désiré. 2. Ajustez le son avec la molette VOLUME. 3. Effectuez le réglage de la station de radio désirée avec la molette REGLAGE RADIO. 4. Pour éteindre la radio, appuyez sur l‟interrupteur d‟ALIMENTATION. UTILISATION DE LA LUMIERE 1. Appuyer sur le bouton LUMIERE pour allumer toutes les lumières. 2. Pour éteindre les lumières, appuyez sur le bouton LUMIERE une nouvelle fois. REMARQUES: 1. (POUR LA VERSION “LUMIERES NEON” SEULEMENT) Veuillez notez que les lumière néon ne fonctionneront pas en mode radio PO/GO. Cela est dû à l‟interférence dûe à la lumière néon, ce qui est normal. 2. MODE LUMIERE (AVEC LA VERSION “LUMIERES BULBE” SEULEMENT) Appuyez sur le SELECTEUR DE MODE derrière l‟appareil pour changer le mode lumières. 3. MODE LUMIERE (AVEC LA VERSION “LUMIERES LED” A L’ARRIERE SEULEMENT) Les couleurs des lumières changent au fur et à mesure ; passez en position HOLD (MAINTENIR) pour rester à vos couleurs favorites. Passez en position PLAY pour reprendre. * NOTE IMPORTANTE: (VERSION LUMIERES LED SEULEMENT) Le changement des séquences de couleurs est contrôlé par circuits intégrés ; les lumières peuvent s’éteindre quand le mode lumière est en position HOLD normal. CONNECTION A DES ENCEINTES EXTERNES SI EQUIPE) Branchez chaque enceinte au terminal enceinte derrière l‟appareil ; mettez l‟interrupteur enceintes en position “externe”. CONNECTION AUXILIAIRE “AUX IN” (SI EQUIPE) 1. Branchez votre source externe (par exemple lecteur mp3 ou iPod) sur la “connection AUX IN” (située au dos de votre appareil) avec un branchement stéréo et un rack détachable (fourni séparément) 2. Mettez l‟interrupteur ON/OFF à côté du jack en position “ON”. 3. Faites passer le sélecteur de mode en “CD-AUX”. 4. Ajustez le son avec la molette de VOLUME ou le contrôle volume de votre source externe. 5. Quand vous passez à un autre mode, la source externe continuera à lire sans son jusqu‟à ce que l‟interrupteur ON/OFF soit mis en position “OFF” et que la source externe soit éteinte. NOTE IMPORTANTE: 1. Mettez l‟interrupteur ON/OFF en position “OFF” quand vous ne l‟utilisez pas. 2. La fonction CD sera opérationnelle de façon normale après que l‟interrupteur ON/OFF ait été mis en position “OFF”. 15 Warranty: Ricatech BV covers all products (Excl. accessories) with a 2 year warranty applying to all faults caused by a factory-error. External physical damage will not be covered by our warranty Warranty: No Warranty : Out of warranty repairs All hardware errors occurring within 2 years after purchase unless caused by points mentioned below. Faults caused by: *Dismountal by any other service center then ours. *Water and moisture damage *Drop and bump damage *Usage with non approved Ricatech accessories. *Short-circuit or over-voltage *Physical damage, loss or damage to accessories Please be so kind to contact us for out-of-warranty repairs. We will provide you with a quotation with the expected costs. Goods out of warranty cannot be returned to your reseller. SUPPORT CLIENTÈLE Vous pouvez contacter le service client Ricatech si vous avez des questions ou si vous rencontrez un problème avec votre produit Ricatech. Vous pouvez nous contacter par téléphone et par e-mail. E-mail Pour un support clientèle par e-mail, veuillez envoyer votre e-mail à [email protected] N‟oubliez pas de mentionner le numéro du modèle et le numéro de série du produit, vos nom et adresse, et posez votre question ou décrivez clairement votre problème. Téléphone Pour un support clientèle par téléphone, veuillez composer le +32 3 3265694. L‟un de nos conseillers clientèle est là pour vous répondre. N‟hésitez pas à visiter le site web www.ricatech.com pour connaître toutes les procédures. 16 Das Dreieckszeichen mit Blitzsymbol verweist auf gefährliche Spannungen im Gerätegehäuse, die so hoch sein können, dass sie eine Gefahr von Stromschlägen bilden. Das Dreieckszeichen mit Ausrufungszeichen verweist auf wichtige Funktionsund Wartungshinweise (Reparatur) in der dem Gerät beigelegten Bedienungsanleitung. WARNUNG: ZUR VERMEIDUNG VON STROMSCHLAGGEFAHR, GERÄT NICHT ÖFFNEN! IM INNEREN DES GERÄTS SIND KEINE TEILE VORHANDEN DIE VOM BENUTZER GEWARTET WERDEN KÖNNEN. WENDEN SIE SICH AN AUSGEBILDETES WARTUNGSPERSONAL. WARNUNG: ZUR VERMEIDUNG VON FEUER- ODER STROMSCHLAGGEFAHR, SETZEN SIE DIESES GERÄT BITTE NIEMALS REGEN ODER STARKER FEUCHTIGKEIT AUS. Bei Problemen, ziehen Sie immer zuerst den Netzstecker aus der Steckdose und wenden Sie sich and ausgebildetes Wartungspersonal. Legen Sie nichts direkt auf das Gerät. Beschädigungen am Gerät können die Folge sein. Im Falle von Funktionsstörungen durch statische Elektrizität, muss das Gerät durch Herausziehen des Stecker neu initialisiert werden. Aufstellung Benutzen Sie das Gerät nicht unter besonders heißen, staubigen oder feuchten Umständen. Stellen Sie das Gerät auf eine flache, ebene Unterlage. Behindern Sie nicht die Luftzirkulation des Geräts, indem Sie es an Orte mit schlechter Belüftung stellen, oder Sie es mit einem Tuch bedecken. Sicherheit Wenn Sie das Gerät an den Strom anschließen oder den Stecker herausziehen, ziehen Sie immer am Stecker, niemals am Kabel. Am Netzkabel ziehen kann zu Beschädigungen und Gefahren führen. Wenn Sie das Gerät für längere Zeit nicht benutzen, ziehen Sie bitte den Stecker aus der Steckdose. Netzspannung Vor der Inbetriebnahme, überprüfen Sie bitte, ob die Netzspannung mit der Gerätespannung übereinstimmt. Kondensation Wassertropfen und Kondensation können sich innerhalb des Gerätes bilden, wenn das Gerät in einem warmen und feuchten Raum aufgestellt wird. Wenn sich innerhalb des Geräts Kondesation gebildet hat, kann es sein, dass das Gerät nicht richtig funktioniert. Lassen Sie das Gerät, bevor Sie es anschalten für ein oder zwei Stunden stehen oder erhöhen Sie die Raumtemperatur vor einer weiteren Benutzung langsam. Vergewissern Sie sich, dass keine der Öffnung durch Gegenstände wie z.B Zeitungen, Tischtücher, Vorhänge o.ä, abgedeckt ist. Gegenstände mit offenen Flammen, wie z.B. Kerzen, sollten niemals auf das Gerät gestellt werden. Achten Sie immer auf eine umweltgerechte Entsorgung leerer Batterien. Benutzen Sie das Gerät nur in moderaten Klimazonen (nicht für tropisches Klima geeignet). Setzen Sie das Gerät niemals Wassertropen oder -spritzern aus. Gegenstände die mit Flüssigkeiten gefüllt sind, wie z.B. Vasen sollten niemals auf das Gerät gestellt werden. LASERSICHERHEIT DIESES GERÄT VERWENDET EINEN LASER. NUR AUSGEBILDETES WARTUNGSPERSONAL SOLLTE DAS GERÄT ÖFFNEN, UM ZU VERMEIDEN DASS VERLETZUNGEN ENTSTEHEN. ACHTUNG:DIE VERWENDUNG VON FUNKTIONEN ODER EINSTELLUNGEN BZW. DIE DURCHFÜHRUNG VON NICHT IN DIESER BEDIENUNGSANLEITUNG BESCHRIEBENEN VORGÄNGEN, KANN ZUR AUSSETZUNG VON GEFÄHRLICHEN STRAHLUNGEN FÜHREN. CLASS 1 LASER PRODUCT APPAREIL A LASER DE CLASSE 1 PRODUCTO LASER DE CLASE 1 ACHTUNG UNSICHTBARE LASERSTRAHLUNG WIRD AUSGESETZT, WENN DAS GERÄT GEÖFFNET IST UND DIE SICHERHEITSVORRICHTUNGEN AUSSER KRAFT GESETZT SIND. VERMEIDEN SIE KONTAKT MIT DEM LASERSTRAHL. 17 BEDIENUNGSANLEITUNG FERNBEDIENUNG (NUR FÜR CD-PLAYER) Wiedergabe/Pause Stopp Vor Zurück Schnellvorlauf Schnellrücklauf Zufallswiedergabe RAN Wiederholung REP Programmwiedergabe PRG 18 WIEDERGABE EINER CD 1. Schalten Sie das Gerät ein und stellen Sie den MODE SELECTOR auf CD. 2. Öffnen Sie das halbkreisförmige CD-Ladefach. 3. Stellen Sie den RESET-Zeiger in die OFF-Position und legen Sie eine Disc in das Disc-Ladefach. **(Vergewissern Sie sich, dass der RESET-Zeiger in die ON-Position gestellt wird, nachdem Sie eine Disc eingelegt haben.) 4. Betätigen Sie PLAY/PAUSE zum Starten der Wiedergabe. Betätigen Sie die Taste erneut, um die Wiedergabe vorübergehend anzuhalten. 5. Betätigen Sie STOP zum Anhalten der Wiedergabe. 6. Stellen Sie Lautstärke, Treble und Bass nach Ihren Vorlieben ein. 7. Betätigen Sie , um zum nächsten Titel zu springen. Betätigen Sie , um zum vorigen Titel zu springen. Die aktuelle Titelnummer wird in der Anzeige angezeigt. 8. Während der Wiedergabe, betätigen Sie oder , um innerhalb eines Titels schnell einen bestimmten Abschnitt zu finden. HINWEIS: Wenn die Disc stark zerkratzt oder verschmutzt, kann es sein, dass die Wiedergabe nicht startet. Wenn die Disc nicht richtig zentriert ist, kann es zur Geräuschbildung kommen. Die Benutzung solcher Discs sollte auf jeden Fall vermieden werden. PROGRAMMWIEDERGABE Während der Wiedergabe ist es nicht möglich ein Programm zu erstellen. Betätigen Sie daher bitte zuerst die STOPP-Taste. 1. Betätigen Sie die STOPP-Taste. 2. Betätigen Sie die PRG-Taste. Wählen Sie eine Titelnummer mithilfe von oder und betätigen Sie die PRG-Taste erneut. 3. Wiederholen Sie Schritt 2 bis alle gewünschten Titel programmiert sind. HINWEIS: Zum Verändern des Programms, betätigen Sie die STOPP-Taste und führen Sie Schritt 2 erneut aus. - Betätigen Sie zum Löschen des Programms die STOPP-Taste erneut oder schalten Sie das Gerät aus. WIEDERHOLUNG 1. Betätigen Sie die REP-Taste zum Starten der Wiederholung eines Titels. 2. Betätigen Sie die REP-Taste erneut, um alle Titel einer Disc zu wiederholen. 3. Wählen Sie den gewünschten Titel zur Wiedergabe mithilfe von oder . 4. Betätigen Sie zum Starten der Wiedergabe. 5. Betätigen Sie die STOPP-Taste, um den Wiederholungsmodus zu deaktivieren. ZUFALLSWIEDERGABE 1. Betätigen Sie die RAN-Taste zur Wiedergabe der CD-Titel in zufälliger Reihenfolge. 2. Betätigen Sie die STOPP-Taste, um die Zufallswiedergabe zu stoppen. TON AUS 1. Betätigen Sie die MUTE-Taste während der Wiedergabe, um den Ton auszustellen. * Auf dem CD-Display wird die MUTE-Anzeige aktiviert. 2. Um den Ton wieder anzustelle, betätigen Sie die MUTE-Taste einfach erneut und die MUTE-Anzeige verschwindet. 19 RADIO 5. Stellen Sie den MODE SELECTOR auf das von Ihnen gewünschte Frequenzband. 6. Stellen Sie die Lautstärke mit dem Lautstärkeregler ein. 7. Suchen Sie mithilfe des Frequenzreglers den von Ihnen gewünschten Sender. 8. Benutzen Sie den An-/Ausschalter zum Ausschalten des Radios. LICHTEFFEKTE 3. Benutzen Sie die LIGHT-Taste zum Anschalten des Lichteffekts. 4. Zum Auschalten der Lichteffektfunktion, betätigen Sie die LIGHT-Taste bitte erneut. ANMERKUNG: 1. (BEI VERWENDUNG DER „NEON LIGHTS“-VERSION) Bedenken Sie bitte, dass die Neonlichter im Radiomodus nicht funktionieren. Dies dient dazu zu vermeiden, dass Interferenz von den Neonleuchten den Radiobetrieb beeinträchtigt. 2. LICHTMODUS (BEI VERWENDUNG DER „BULB LIGHTS“-VERSION) Benutzen Sie den MODE SELECTOR auf der Rückseite zum Verändern des Lichtmodus. 3. LICHTMODUS (BEI VERWENDUNG DER „LED LIGHTS“-VERSION) Die Farben des Lichts verändert sich standing. Stellen den Schalter auf die HOLD-Position, um die Farbe beizubehalten. Schalten Sie in die PLAY-Position zum Fortfahren der Wiedergabe. *WICHTIGER HINWEIS: (BEI VERWENDUNG DER LED LIGHTS-VERSION) Die Lichteffekte werden durch einen integrierten Schaltkreis geregelt. Zum Ausschalten der Lichteffekte stellen Sie den Lochtmodusschalter bitte in die Normalposition. ANSCHLUSS EXTERNER LAUTSPRECHER (OPTIONAL) Verbinden Sie sämtliche Lautsprecherkabel mit den Lautsprecheranschlüssen auf der Geräterückseite. Schalten Sie dann den Lautsprecherschalter auf „External“. ANSCHLUSS VON AUX-GERÄTEN (OPTIONAL) 6. Schließen Sie Ihr eigenes Gerät (z.B. ein MP3-Player oder iPod) mithilfe des Stereosteckers und dem Rackadapter (seperat verpackt) an den „AUX IN“-Anschluss auf der Geräterückseite. 7. Stellen Sie den AN-/AUSSCHALTER neben dem Anschluss auf ON. 8. Stellen Sie den MODE SELECTOR auf CD-AUX. 9. Stellen Sie die Lautstärke mit dem Lautstärkeregler an der Jukebox oder am externen Gerät ein. 10. Wenn Sie in einen anderen Modus wechseln, spielt das Gerät ohne Ton weiter, bis Sie den AN-/AUSSCHALTER auf OFF stellen und das Gerät ausschalten. WICHTIGER HINWEIS: 3. Stellen Sie den AN-/AUSSCHALTER auf OFF, wenn Sie den Anschluss nicht benutzen. 4. Wenn Sie den AN-/AUSSCHALTER auf OFF stellen, können Sie die CD-Funktion wie gewohnt weiter benutzen. 20 Warranty: Ricatech BV covers all products (Excl. accessories) with a 2 year warranty applying to all faults caused by a factory-error. External physical damage will not be covered by our warranty Warranty: No Warranty : Out of warranty repairs All hardware errors occurring within 2 years after purchase unless caused by points mentioned below. Faults caused by: *Dismountal by any other service center then ours. *Water and moisture damage *Drop and bump damage *Usage with non approved Ricatech accessories. *Short-circuit or over-voltage *Physical damage, loss or damage to accessories Please be so kind to contact us for out-of-warranty repairs. We will provide you with a quotation with the expected costs. Goods out of warranty cannot be returned to your reseller. KUNDENDIENST Sie können sich an den Ricatech-Kundendienst wenden, falls Sie eine Frage haben oder ein Problem mit Ihrem Ricatech-Produkt. Sie können uns per Telefon oder E-Mail erreichen. E-Mail Für den Kundendienst per E-Mail, senden Sie eine E-Mail an [email protected]. Bitte stellen Sie sicher, dass Sie darin die Gerätenummer und Seriennummer des Produktes sowie Ihren Namen und Ihre Adresse angeben und Ihre Frage oder Ihr Problem genau beschreiben. Telefon Für den Kundendienst per Telefon, wählen Sie bitte die +32 3 3265694. Einer unserer Mitarbeiter wird Ihnen gern behilflich sein. Für das genaue Vorgehen, wenden Sie sich bitte an unsere Website unter: www.ricatech.com 21