1
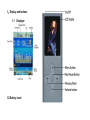
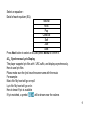
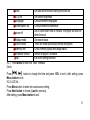
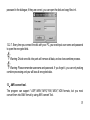
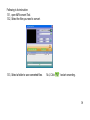
RC-1200 Series User Manual Introduction: We would like to congratulate you with the purchase of your Ricatech RC-1200 MP4 Player. To ensure you enjoy this player with all its option to its fullest, we advise you to read this manual carefully before using the device. While reading this manual, kindly connect the player to the provided adapter or USB port of your computer as it needs to be charged at least for 8 hours the first time. We wish you the best with using your MP4 player. Please be so kind to contact us if you have any questions or problems. The contact data can be found on the back of this booklet. With kind regards, Ricatech BV 1 1、Display and buttons 1.1 Displayer 1.2 Battery Level 2 „ ‟ indicates that the power of Battery is full. When power run out, Indicator will become blank, at this time you should charge for your player Please turn on the player before charge. Please turn off the player when not using it. Charge: There are 2 ways to charge the player (1) Charge by connecting to PC (2) Charge by the charger (if supplied) Note: Only charge by the charger supplied, the wrong charger may damage the player 1.3 Definition to the processing key Keys processing includes 3 actions: Press, Press and Hold, push Press: Press a key shortly Press and Hold: Press a key and hold it at least 1.2s Push: Push a key once 3 2、Basic Functions 2.1 Enter into master menus Turn on power and then you will enter into master menu. 2.2 Volume Adjust Press „VOL„ button shortly , then press „VOL+‟ or „VOL-‟ to increase or decrease volume. 2.3 Turn on 2.3.1 Push „power on/off‟ button right, then press „play‟ key for 4 seconds, you will enter into the master menu 2.4 Turn off 2.4.1 Press „play‟ button for 4 seconds to turn off the player. 2.4.2 when the power is too low,the player will turn off automatically . 2.4.3 Don‟t turn off the player directly by pushing power on/off switch. You should press and hold „play‟ key to turn off the player firstly, then push the „power on/off‟ button left to power off. 2.4.4 When not using the player, please make on/ff switch in the off position. It can save the power and lengthen the using time of battery. 3、Play & Stop On music mode, Press Play to play music. When music is playing, press Play button to pause; or press it long to turn off the player. 4 Start / Stop recording On recording mode, press „Play‟ button to stop. 4、Play music 4.1、Steps: Put earphone into earphone jack Turn power on to enter into master menus, press „MENU‟ button to enter into music mode ,and then press „play‟ button you will listen to wonderful music Select music: next music; Previous music. Volume adjusts: when the music is playing, press „VOL‟ to enter into volume mode and press button to decrease volume, button to increase volume. 4.2、Equalizer Mode In playing state Press MENU button to enter into submenu; Press Next button to choose Equalizer Mode; Press MENU button to enter into „Equalizer‟ submenu. 5 Select an equalizer:: Detail of each equalizer (EQ): Natural Rock Pop Classical Soft Jazz DBB Press Next button to select an EQ and press MENU to confirm it. 4.3、Synchronous Lyric Display The player supports lyric files with *.LRC suffix, and displays synchronously. How to use lyric files Please make sure the lyric have the same name with the music For example: Music file: My heart will go on.mp3 Lyric file: My heart will go on.lrc How to know if lyric is available If lyric matched, a symbol will be shown near the volume. 6 When marched lyric available: Press and hold MENU to enter into lyric interface; Press MENU return to music mode. 5、Voice Recording Each fold can save up to 99 voice recording files. 5.1, how to enter into it 5.1.1, Enter into main menu: 5.1.2, Press next button to choose Record mode 5.1.3, Press Menu button to enter into Record mode, screen will display as following: 5.1.4. Press Play button to start recording. 5.2, Select Record Type 5.2.1. in the interface of „Record „stop 5.2.2. Press Menu button shortly to enter into record submenu 5.2.3. Press „Next‟ button to select „Record type‟ submenu then presses „Menu‟ button to select it. Fine record wav file,fine quality Long REC Fine VOR act file, normal quality VOR file, (Recording controlled by voice, pause 7 Long VOR when mute) VOR file, (Recording controlled by voice, pause when mute) 5.2.4. Press Next button to choose appropriate type and press Menu button to select it 5.2.5. Press Play button to start recording. 5.3,Play recorded files Enter into main menu Press Next button to choose „voice‟ menu Press Menu button to enter into it Press Play button again to play the file. How to choose voice record files Previous: Select previous file Next: Select next file 6、FM radio 6.1. Enter into main menu; 6.2. Press next button to choose “FM Radio” menu 6.3. Press Menu button to enter into it 6.4. Automatic searching 8 Press and hold or button for two second, then the player will search forward or backward at the speed of 0.1 MHz/sec , when finding a station, it will stop automatically; if you want to stop searching, shortly press‟ 6.5. Manual micro adjusting or ‟button Shortly press button: 0.1MHz backward; shortly press 6.6. Save current channel: Press Mode to entry into FM submenu Press „Mode‟ button again to save the channel. 6.7. Listen to a saved channel: You can press Play button to listen to a saved channel. 6.8. Volume control Press „VOL‟ enter into volume button: 0.1MHz forward. : Increase volume; -: Decrease volume :20 channels can be saved each in “General Frequency” and “Japan Frequency” 7、Photo Browse This function is available for the pictures of JPEG, GIF, BMP format. 9 7, 1; on main menu, press Next/Prevision to choose „Photo Browse‟ menu 7, 2: Press Menu to enter into corresponding submenu。 7, 3; Press Next or Prevision button to choose the picture you want to review, then press Play button to play it 8、E-BOOK: can read text file 8.1. On main menu, press Next/Prevision to choose „E-BOOK‟ menu 8.2. Press Menu button to enter into corresponding submenu: 8.3.Press „Next‟ or „Prevision‟ to choose the document you want to read, then press Play to read it 9、System 9.1 You can set system performances here, options may vary in different firmware version Enter into main menu Press Next button to choose “system” Press Menu button to enter into it. 9.2 Options introduction: 10 clock LCD set Language ScreenSaver Sel Set date and time when saving recorded file Set screen brightness Choose different languages Choose different screensaver Set a count down time in minutes, the player will shut off power off when time out. Replay mode Set repeat status There are three option(Multi,normal,encrypted) Online mode Memory info Check memory space and usage status Firmware Version Version of player‟s firmware Exit Exit from Setting interface 9.2.1. Press Menu to enter into „clock‟ interface Clock: Press or button to change the time and press „VOL‟ to set it, after setting, press Menu button to exit. 9.2.2 LCD Set Press Menu button to enter into screensaver setting; Press Next button to choose (Last for previous) After setting, press Menu button to exit. 11 9.2.3 Language Setting Press Menu button to enter into language setting; Press Next for choosing (Last for previous) After setting, press Menu to exit. 9.2.4, power off Setting Please note: You can set time in seconds on „off time‟ mode, allow the player shut down automatically This function is unavailable if the time is 0. You can set time on „Sleep mode‟, allow the player is shut down automatically. It is designed for listening to music before sleeping. Note: Sleep mode valid only once after setting, you have to set again if you want to use it next time. 9.2.5,‟Replay mode‟ Please enter into „replay mode‟ menu Note: in “Manual replay” you should do it manually. In “Auto replay” the player can identify sentence automatically when on A-B repeat. (This function is designed for repeat sentences in language studies.) 9.2,6‟Memory info‟ You can check total memory space and the percentage of usage. 9.2, 7,‟Firmware version‟ You can find the player‟s firmware‟s version. 12 Tips: Press Play can exit current menu quickly. The function is valid on all other menus. 10、Movie On main menu, press Next/Prevision to choose „Movie‟ menu. And then press „plays‟ button you can watch the movie. If you want to change the volume, you should stop the movie, then press „VOL‟ button, then press : Increase volume; -: Decrease volume 11、How to install the CD driver. 11.1. Please insert the CD to the CD-ROM, open the CD, double-click “setup.exe”, and then proceed according to the instructions. 11.2. After the driver is set up successfully, by clicking the “start”ProgramMP3 Player Utilities 3.57, you can see five tools: AMV Convert Tool, AMV Player, MP3 Player Disk Tool, MP3 Player Update Tool & Sound Convert Tool. Among of them, MP3 Player Disk Tool is for setting encrypted drive, MP3 Player Update Tool is for updating the firmware/bios, and Sound Convert Tool is for converting the format of Audio file. 11.3. Using as USB flash drive As USB flash drive, it is USB2.0 interface. Compatible with Win98, Win98se, Win2000, Win Me & Win XP, and Mac OS 10.3 & above, and Linux Redhat 8.0 & above. For 13 Win98/Win98se, setting up the driver is required. When this device is connected with computer, by short pressing [MODE] to switch it to MP3 player mode. This device can recognize a maximum of 99 first grade folders set up by the user in the USB flash drive. 12. MP3 Player Disk Tool After install the utility from the CD, you can run MP3 Player Disk Tool to format the player and for the encryption function 12.1 Format: You can format the player either by this program or by Windows. 12.2. Partition and Encrypt You can divide USB disk into two parts by this tool, one is encrypted and the other is non-encrypted Note: Windows 2K should be installed SP4 to support this function Steps: 12.2.1. Connect the player with PC 12.2.2. Run MP3 Player Disk Tool 12.2.3. Select “partition and encryption” 12.2.4. Select a suitable space for encrypted disk and setup user name and password 12.2.5. Click “start” and finish the partition 12.2.6. You will see two disks. Click encrypted disk "RdiskDecrypt “and input user name and 14 password in the dialogue; if they are correct, you can open the disk and copy files in it. 12.2.7. Every time you connect the disk with your PC, you need input user name and password to open the encrypted disk. Warning: Divide one disk into parts will remove all data, and so does combine process. Warning: Please remember username and password. If you forget it, you can only making combine processing and you will loss all encrypted data. 13、AMV convert tool. The program can support *.ASF,*.WMV,*.MPG,*.RM,*.MOV,*.VOB formats, but you must convert them into AMV format by using AMV convert Tool. 15 Following is its instruction: 13.1, open AMV convert Tool. 13.2, Select the files you need to convert. 13.3, Select a folder to save converted files. 14.4, Click „ ‟ to start converting. 16 17 15、Technical Specifications Dimension 90*40*9mm Weight 43g Screen 262K,1.8‟TFT Memory 128M – 4GB Flash(optional) Power Supply Max 8 hours play Voice Recorder MP3、WMA、WMV、AMV Sample rate 8KHz Format WAV (32K bps), ACT (8K bps) Time 35hours (ACT, 128M Flash) Max. Output MP3 Bit rate (L) 10mW + (R)10mW (32Ohm) 8K bps – 320K bps WMA 、 WMV 、 AMV Bit rate 5K bps – 192K bps 18 FM Radio Supported Music Formats Operate Temperature 18 Languages Display Supported Systems Freq. Response 20Hz to 20KHz SNR 85dB Freq. Range 76MHz – 90MHz / 87MHz – 108MHz Max. Stored 20 + 20 Channels Max. Output (L) 10mW + (R)10mW (32Ohm) SNR 45dB MP3, WMA,ACT -5 to 40 degree Simple Chinese, English, Trad Chinese, French, German, Italian etc. Windows98/SE/ME/2K/XP、Mac OS 10、Linux 2.4.2 19 Frequently asked questions (FAQ) : No Sound Check the volume settings or try another headset. Not recognized on PC When using Windows 98, you need to install the drivers from the supplied CD-ROM. Bad FM reception The headset cable is used as an antenna, please check the cable condition. Files are being skipped Copyright protected files (Microsoft DRM) downloaded from paid services are not supported by this player. These files will be skipped. Files are played for only 10 Player is set to “Intro mode” please set the play mode to seconds. “Normal” (Chapter 12.1.1) Videofiles are not played. Only uncompressed files will be played. Files compressed with DIVX or XVID compression will be converted but will not be played by the player. Sound quality is bad. Check if the quality of your music is sufficient. The quality can vary from 64Kbps (average) to 320kbps (Good) 20 Warranty: Ricatech BV covers all products (Excl. Acessories) with a 2 year warranty applying to all faults caused by a factory-error. External physical damage will not be covered by our warranty Warranty: No Warranty : Out of warrranty repairs All hardware errors occurring within 2 years after purchase unless caused by points mentioned below. Faults caused by: *Dismountal by any other service center then ours. *Firmware upgrade *Water and moisture damage *Drop and bump damage *Usage with non approved Ricatech accessories. *Short-circuit or over-voltage by host computer (PC) *Physical damage, loss or damage to accessories Please be so kind to contact us for out-of-warranty repairs. We will provide you with a quotation with the expected costs. Goods out of warranty cannot be returned to your reseller. 21 Ricatech BV Tinstraat 103 2984AN Ridderkerk The Netherlands Technical Support Tel : 0031 (0) 180 446020 Fax : 0031 (0) 180446029 Email : [email protected] Telephone : 0031 (0) 180 446023 Email : [email protected] For technial support and price quotations please contact our helpdesk directly at : 22