1
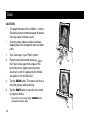
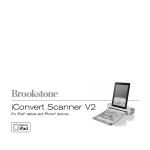
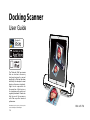
Docking Scanner
User Guide
Works with
Scanner App
The "Made for iPad" logo means
that an electronic accessory
has been designed to connect
specifically to iPad and has been
certified by the developer to meet
Apple performance standards.
Apple is not responsible for
the operation of this device or
its compliance with safety and
regulatory standards. Please note
that the use of this accessory
with iPad may affect wireless
performance.
All trademarks are the property of their respective
owners and all rights are acknowledged.
V1.4
Works with iPad
Safety and Precautions
•
•
•
•
•
•
•
•
•
•
•
•
•
Never store the unit in hot, or very cold, or humid or dusty places.
For an extended storage period, we recommend storing the unit in a cool and dry place.
To help keep the scanning area clean, store the unit in a proper case when not in use.
If the unit is left in extreme cold or hot conditions, allow to adjust to normal room temperatures before use.
Only use accessories included with the unit.
When left unused for a long period of time, the unit should be disconnected from the power supply.
Always handle the unit with care. Avoid dropping and strong impact.
Keep the lens and roller clean and free from scratches.
Do not scan sharp objects or hard abrasive surfaces.
Operate the unit on a level, well-grounded work surface, and free of excessive vibration.
Don’t open the unit. Risk of electric shock.
Use only a soft damp cloth to clean the exterior areas of the unit.
Do not leave the unit within the reach of children.
FCC notice:
This device complies with Part 15 of the FCC Rules. Operation is subject to the following two conditions: (1) this device
will not cause harmful interference, and (2) this device must accept any interference received, including interference
that may cause undesired operation.
Discarded electrical and electronic appliance are recyclable and should separate from the household waste. Please actively
support in conserving resources and protecting the environment by returning this appliance to the collection centers (if available).
2
Contents
Safety and Precautions .......................................................................................................................... 2
Contents ................................................................................................................................................... 3
Quick Start ............................................................................................................................................... 4
Unpack...................................................................................................................................................... 5
Scanner Parts ......................................................................................................................................... 6
Connect and Turn on ............................................................................................................................... 7
Dock the iPad ........................................................................................................................................... 8
Install and Access the i-Scan App ......................................................................................................... 9
App Launch Message on iOS 5.0 or later.......................................................................................................................... 9
Scan ........................................................................................................................................................ 10
Using the Photo Sleeve ................................................................................................................................................... 11
Calibrate ................................................................................................................................................. 12
Clean ....................................................................................................................................................... 13
Cleaning the Rollers ........................................................................................................................................................ 13
Cleaning the Lens............................................................................................................................................................ 13
Charge your iPad ................................................................................................................................... 14
Helpful Hints .......................................................................................................................................... 15
Specifications ........................................................................................................................................ 16
3
Quick Start
1
Connect to a power source.
2
Turn on the power.
3
Dock your iPad.
5
Insert a photo, tap 'Scan'.
6
Tap 'Save'. Done.
Apple USB charger
(not included)
4
Install and access the i-Scan app.
Application Not Installed
This accessory requires an
application you do not have
installed. Would you like to install it
from the App Store ?
No
4
Yes
No
Yes
Unpack
Make sure following items are included.
Scanner
USB Cable
Calibration Card
Cleaning Board
User
Guide
Cleaning Strip
Photo Sleeve
User Guide
5
Scanner Parts
Dock Connector
Feed Slot
Paper Guide
Power Button
Power LED
Paper Guide
Mini USB port
(for DC 5V power input)
6
Exit Slot
Stand
Connect and Turn on
1.
Connect the USB Cable to the scanner, and
connect the other end to the Apple USB
charger included with your iPad.
2.
Connect the Apple USB charger to a power
outlet.
3.
Long press the
the scanner.
Power button to turn on
Apple USB charger
(not included)
* The Power LED emits blue light.
In case of insufficient power supply, do not
connect the scanner to a computer or tablet
device for the power input.
7
Dock the iPad
Turn on your iPad. Hold your iPad and gently dock
it to the Dock Connector. Make sure it sits firmly in
place.
Please be cautious when you dock the iPad.
Do not lean the iPad forward as it and the
Dock Connector may be damaged.
Make sure the iPad battery has at least 20%
capacity remaining. For charging it, please
refer to the 'Charge your iPad' chapter.
The scanner will turn off automatically when
the iPad connected is in sleep mode. To resume the power, wake the iPad, then turn on
the scanner.
8
Install and Access the i-Scan App
When the i-Scan app is not installed, a message
'Application Not Installed' appears asking you to
download the free i-Scan app from the App Store.
Tap 'Yes' to continue.
Tap 'Install' and enter your Apple ID (iTunes
account) and password when prompted. The
i-Scan app icon will then be appeared on your iPad
screen.
Application Not Installed
This accessory requires an
application you do not have
installed. Would you like to install it
from the App Store ?
No
No
Yes
Yes
To access the i-Scan app, tap the app icon.
Make sure that your iPad is connected to the
Internet before downloading the i-Scan app.
Do not perform other activities on the iPad
while downloading the app.
i-Scan App icon
App Launch Message on iOS 5.0 or later
The scanner includes the ability to auto launch the
i-Scan app when the iPad touch is turned on and
docked. If the iPad is running on iOS 5.0 or later, a
message will pop up asking if you want to launch
the app, tap Allow.
9
Scan
CAUTIONS:
•
The paper thickness limit is 0.08mm ~ 0.6mm.
Exceeding the recommended paper thickness
limit may cause misfeed or jams.
•
Scanning sharp objects, abrasive surfaces
stapled paper can damage the lens and other
parts.
1.
Tap i-Scan app on your iPad to open it.
2.
Place the photo/document facing up, adjust
the Paper Guide against the edges of the
photo/document, slightly push the photo/
document in until it is gripped by the Rollers
and pulled it into the Feed Slot.
3.
Tap the SCAN button. The screen will show a
real-time preview while scanning.
4.
Tap the SAVE button to save the scan result
to the photo library.
* If you want to scan it again press CANCEL button
and repeat the above steps.
10
Scan (Continued)
Using the Photo Sleeve
Use the Photo Sleeve when photos are fragile or
small to avoid damage or jams, and get the best
result.
1.
Remove the plastic foil on the Sleeve, place
the photo inside the Sleeve, insert the tongue
into the hole at the open end.
2.
Insert the sealed end of the Sleeve facing up,
adjust the Paper Guide, then tap the SCAN
button.
11
Calibrate
If dark lines or stripes appeared on the scanned
image, please perform the calibration of your
scanner.
1.
Tap the iPad screen.
2.
Tap the
(Settings) at the top-right corner
of the app, tap the Calibrate.
3.
Remove the plastic foil on the Calibration
Card, insert it with the arrow mark facing
toward the shown direction to the Feed Slot.
4.
Tap the Calibrate button.
* When the calibration is finished, the Calibration Card
will be ejected, and the success message appears.
Tap the OK button.
To get the best scan quality, perform the
calibration periodically.
Make sure the Calibration Sheet is clean and
free of dust before use.
12
Calibration done.
OK
Clean
Dirt and dust can build up inside the scanner and
affect image quality, please clean your scanner
periodically to get the best result.
Cleaning done.
Cleaning the Rollers
1.
2.
3.
4.
OK
Tap the iPad screen.
Tap the
(Settings) at the top-right corner of
the app, tap the Clean.
Hold the Cleaning Board with the sponge
stopper strip facing down towards you.
Tap the Clean button, tap OK when the
success message appears, take out the Board.
Cleaning the Lens
1.
2.
3.
4.
Turn off the scanner, remove the iPad.
Hold the Cleaning Strip with the sponge grip
handle facing down.
Insert the thinner end into the Exit Slot at the
rear of the scanner.
Move the Strip from side to side few times,
then remove it.
OFF
13
Charge your iPad
1.
Before docking your iPad, turn off the power
of the scanner (the Power LED emits no
light).
2.
Dock your iPad to the scanner to start charging. The screen will indicate its charging status.
If your iPad is not charging, make sure the
power of the scanner is off, remove the iPad,
and dock it again.
Charge your iPad if the battery has less than
20% capacity remaining.
14
Apple USB charger
(not included)
OFF
Helpful Hints
No power.
•
Check if the USB cable is connected properly, and the scanner is turned on.
•
The scanner will turn off automatically when the iPad connected is in sleep mode. To resume the power, wake the
iPad, and then turn on the scanner.
The scanner does not response when iPad is docked.
Make sure the i-Scan app is installed and the iPad is docked correctly.
•
Check if the iPad is off or locked. Refer its own manual to unlock.
•
Cannot charge my iPad.
Make sure the iPad is docked firmly to the Dock Connector.
•
Refer to the 'Charge your iPad' chapter for the charging procedures.
•
The scan result is poor.
Calibrate and clean the scanner if the scan result is poor.
•
Do not use the Photo Sleeve if the photo is laminated.
•
Cannot feed the paper.
Make sure the photo/document is gripped and slightly pulled into the feed slot prior to scanning.
•
Remove the photo/document from the feed slot and insert it again.
•
Check if the paper thickness is exceeded the limit.
•
Cannot scan and save.
Charge your iPad if the battery has less than 20% power.
•
Close other running apps on iPad to release memory. Refer its own manual to close running apps.
•
15
Specifications
Scanner Type
Image Sensor
Light Source
Scan Size
Scan Thickness
Scan Resolution
Scan Speed
Ports
Power Source
Power Consumption
File Format
Dimensions
Weight
Operating Conditions
Minimum System
Requirements
16
Sheetfed Scanner
Color CIS
LED (R, G, B)
Up to Legal size 8.5" x 14" (216mm x 356 mm) (W x L)
0.08mm ~ 0.6mm
300 dpi
6 ppm (A4 color) at 300 dpi
USB mini-B ; Apple 30-pin dock connector
Input: 100-240V~0.45A 50/60Hz Output: 5.1V, 2.1A by Apple USB power
adapter (not included)
10.5W (Maximum) 5V, 2.1A
JPEG
308 x 111 x 72 mm ; 12.1" x 4.4" x 2.8" (W x D x H)
655g (1.44lbs)
5°C to 35°C (41°F to 95°F)
Humidity range 35% to 80% RH, Non-Condensing
iPad (3rd Generation), iPad 2, iPad with iOS 5.0 or later.
Minimum 30MB of free space in RAM on iPad for i-Scan app
An iTunes Store account (for i-Scan app download)
Internet access (for i-Scan app download)